Daz 3D is part of 
Connect
DAZ Productions, Inc.
7533 S Center View Ct #4664
West Jordan, UT 84084
Licensing Agreement | Terms of Service | Privacy Policy | EULA
© 2026 Daz Productions Inc. All Rights Reserved.
Comments
I hope the results are converging as you wish! After waiting hours for certain series of mine, I appreciate simple pre-viz tricks much more than I used to!
Her book is a favorite here too - highly recommended. It can still be found out there. Like you, Bryce and animation are a mix for me, but sometimes it's the tool I need to use to get surfaces I need.
Is there an equivalent tomb for Carrara that anyone knows about - just a great how-to book, even if a few releases old?
Use what works...
I think it's a cool concept, even if NASA is hiding it from us. I like Elysium (sp?) the movie, which had the man-made version as well. More!
--ms
UnifiedBrain, "but even I could construct a ringworld in Carrara which would rival yours"
All right, let's see it posted here.
I am very tempted to construct a sphincter world
just because it occurs to me it could cover a number of space memes
like brown holes
toxic emissions
a point of entry for a suggestively shaped space ship
donut moons
with the right transmaps, you could use the model to create... wait for it...
as...teroid belts that could circle ...
(yes, there's more...)
uranus...
butt i digress.
--ms
indeed, the roids around Uranus definitely might be worth exploring too, inspite of the dangers faced by navigating too close to the brown hole
.
Nice work Selina !!!
Classic music - I could even see little people being spun out into space off the outer surface
.
Great stuff Selina - thanks for the how - to - really appreciate you sharing your knowledge!
Thanks Selina.
I am not going to try to make the following look nice, only demonstrate how to do things.
Here is a yucky but illustrative look at how to implement some of what Selina mentioned. In particular, here is how to have complete control over the continents of the torus world, the ocean, and multiple layers of clouds. One way to do it is to create multiple vertex objects, each of which is a torus that fits inside the other. The torus with the narrowest width is the land, which will be edited with the displacement brush to create continents. The next widest torus will be the ocean, which will cover any land not displaced to be a continent. Use an even wider torus to hold a layer of replicated clouds (more for more layers of clouds).
Note - you can use the formula model to create the torus and use the parameter dials to adjust thickness. Saves steps but makes some folks dizzy.
Create a new Carrara scene and use the LARGE scene setting (makes using clouds easier).
Insert a vertex object. Construct an oval in the Z direction and reduce the number of points to 10. Reduce the size to 1/10 of default.
In same vertex object, construct a second oval and increase the number of points to 40. Leave at default size (so 10 times the first oval). Use the modeling menu to empty the second oval.
Select the smaller oval (should still be full) and use the construct sweep tool to create the torus. UVMap.
This will be the land torus.
Repeat using slightly larger initial ovals to get the ocean torus and the torus that will hold the cloud replicator (or however many cloud layers that you want).
You should now have at least three toruses that fit inside each other. That means that the clouds can be rotated around the land if desired (same with ocean).
Open the land torus in the vertex modeler. Select any polygon to enable the smooth function. Smooth and convert a few times to increase its mesh density. I repeated untl about 25,000 polygons. Just need enough polygons to give the displacement brush something to work with. Use the displacement brush to create the continents, or dig the Marianas trench in the ocean if desired). Hold the shift key while displacing to cause a depression instead of raising. Option - you could use a shader to control displacement rather than use the brush.
Insert a volumetric cloud. Reduce size to taste. Edit opacity, shape, etc. to taste.
Add more clouds if desire variety. Insert a surface replicator. Choose the cloud holder torus as the object on which stuff will be replicated. Choose the cloud or clouds as the objects to be replicated. Can use a shader to concentrate the clouds, create storm fronts, open spaces, etc.
Apply shaders to the land and to the ocean. Uncheck visibility for the cloud holder.
Formula modeler
Here is a formula for a torus. The parameters can change the diameter of the whole torus, or change the thickness.
Copy and paste to the formula box and hit parse.
d=1+p1;e=1+p2;
p=2*PI*(u-0.5);
q=2*PI*(v-0.5);
x=(d+e*cos(q))*cos(p);
y=(d+e*cos(q))*sin(p);
z=e*sin(q);
You can start in the formula modeler, adjust the thickness parameter, and then convert to a vertex object.
.
More than the specific formula, is the idea that you can do this at all in Carrara! That's kind of amazing!
That said, another approach would be to take the preformed primitives from Bryce or DS, or (?), and export them (with or without baked textures) such that Carrara can import them (obj, etc.) and continue from there.
I'd actually be curious how well that Bryce 'earth' with the existing maps, would translate/import from Bryce to Carrara.
Now that Bryce atmosphere would be a bit of a trick because of the distinctive Bryce animated 'swirling' effect: A year back, created a simple Bryce scene with just the sky, used a basic camera, zoomed to a good frequency for my scene, the used the sky-lab room to animate a 30 second Bryce sky atmosphere (using wind/direction in lab) (no objects, skydomes, etc, in the scene - just camera and Bryce sky), and recorded it as an image sequence and avi. I could then use either as an animated texture map in Carrara and DS (and probably poser?). Something like that could be used to get the 'swirling' atmosphere that we like from Bryce into Carrara and mapped onto the atmosphere shell of your Carrara 'Earth'.
To be honest, if I were as far along on this project as you are (@FlashGarcia) in Bryce, I'd probably just finish that part in Bryce, but in the spirit of flexibility/workflows/tool-diversity, it seemed worth mentioning the relaetd options, and may inspire the mixing of the strongest parts of our respective toolkits!
--ms
Thanks, Mindsong, I agree that the formula modeler is pretty amazing. Unfortunately, it gets even less love than the metaball modeler.
Bryce is great, and if FlashGarcia is happy/comfortable with Bryce, that is a good way to go.
Or, folks can take advantage of Bryce's additional terrain editing and texturing options and import the result to Carrara for additional modeling tools. Via Cripeman - https://www.youtube.com/watch?v=5b9c4CW2c18
But, if FlashGarcia would like to do something similar to what Selina has been doing, there are plenty of tools in Carrara to get the desired result. Folks could even use the 3DPaint tool to directly paint the continents if folks wanted to make them look cool and alien. The point is that if someone wants to have a fly through of various cloud layers to a torus planet with continents and oceans, the tools are there in Carrara.
EDIT: BTW, great job, Selina. I am not nearly as comfortable with getting shaders to look that excellent.
everyone needs to work with what they are comfortable with
Vue has utterly awesome volumetric clouds
probably the cream of the crop
but too many restrictions on the software unless willing to pay for many modules and difficulties using DAZ content in it for my liking
I don't dispute Bryce's awesomeness BTW and it is sad is being neglected
have said so myself many times
ditto on your vue clouds opinion - incredible. If you didn't have to buy the 'Xtreme' version for a cool grand+ to activate render passes, I'd probably actually use it.
--ms
nice job on that Selina... I especially like the clean/smooth camera motion work. (and also good music for a flyby). I still prefer @flash's cloud swirling style, but I bet a close variation could probably be accomplished in Carrara, esp. after seeing what you've got there.
--ms
love reading these threads and what you guys n gals do
awesome
I now must go out for coffee and scones
Carrara's spline modeler has a very good torus preset.
Thanks everyone for keeping this thread going.
The horribly hot weather here is finallly cooling down to normal levels now that summer is ending. I can't believe how time flys these days. The stores are already selling Halloween items!
I should have mentioned that a week ago I got as far as making three toruses in Carrara, each one smaller than the other, as I did in Bryce. One for the planet surface, one for the clouds, and one for a blueish tinged atmosphere. I fiddled with making the second two torues transparent, and I got it working but I still couldn't find a substitute for Bryce;s "random" option for the landscape. Also making the clouds look puffy/cumulus Bryce-like, and swirling, I haven't worked out yet.
I animated the grouped toruses, and that was easy with Carrara's superior animation controls. So far, I have managed to get about 80 to 90 percent of a Brycey look to my Carrara torus planet and maybe with the help of your ideas and approaches the last 20 percent can be accomplished.
Today I am going to try Diomede's method.
Hey Selina, the "big fuss" is that extra something that turns an image, or animation, into art, or at least of a quality style that can be called artistic. It's rather easy to get the basic scenes constructed but that extra "something", or the "big fuss" is what makes all the difference and gets images posted up in the CG Society Galleries. But, that "extra something" is not easy to do, is frustrating to accomplish, and doesn't always pan out. Also, who wants to admit about themselves that, "maybe I ain't good enough". But we should keep trying anyway until the h-bombs drop,
Try adding a 3d Aura to the bluish atmosphere torus. You will need a slight glow to do this. The aura can be found under the object's effects tab. Another possibility is to use Fake Freznel. It is one of the shader function plugins that DCG just made open source. In theory, it can make the receding "edges" of the atmosphere torus more bluish, and the parts of the torus closer to the camera more transparent. I have seen it done before, but have never tried it. It is something I am going to use for my challenge entry for a planet, and also I think some skin effects and clothing effects.

Below is an example of using the aura and glow for an atmosphere. First a low res animation, and then a still.
I would rephrase that to "Durn int!, it's *still* not up to my own standard". Then I go back to the forums and find generous help from the EPs, Selinas, Th3Digits, UBs (yes UB...), Andy, Philw, Dart (says' he's fine BTW, and hoping to rejoin us soon), head wax, diomede, 00seven, and the rest of the brilliant family in here who prove that it *can* be done, and share how, so we can be good enough, we just have to figure out where the puzzle pieces go (or more specifically, how that displacement map makes the ice-cream look 'right').
--ms
Today I followed Diomede's instructions for the vertex room tubes and got it working finally, but then I remembered that Bryce has a neat pop up window for adjusting both the inner and outer dimensions of a torus which is what I did, and then forgot, for my three grouped toruses. So, I will just import my toruses into Carrara as object files from Bryce with all the size dimensions done quick and easy. I didn't try the Formula method because my math/equations abilities are not up to it.
What I found very useful in Diomede's post is using the "displacement brush" on a Carrara torus. I had completely forgot about that tool. Thanks for that.
The cloud replicating idea is interesting and I will try that.
I'll give the Fake Freznel tool some test runs to see how it changes the look of my atmosphere torus.
Today, I also replicated Selina's parameter settings for the torus clouds, and ended up finding that as of today the Cellular setting seems to work the best for me in making cumulus clouds. I have attached 8 various settings with the last three, 7 through 10, looking the most cumulus.
Still learning heaps about both Carrara and Bryce, and in many cases still better than the newbies !!!!
PS _ Good to know about Dart - miss his waffles.
mindsong,
Thanks for the Bryce animated swirling clouda AVI idea. I am going to give that a try today.
I like the Brycian cloud motion enough to have pursued that. Play with the wind-direction/speed in the lab (maybe use none!), and assuming you'll be tiling when back in Carrara, consider different Bryce document sizes (e.g. 720x1280 or 1920x1080 or 3840x2160. etc.). Renders should be quick, and I don't think the Bryce anti-aliasing (slow) is needed if you're going to be mapping and viewing from the sort of distances in your scenes. I hope it works for you!
Note with AVIs, that some importing programs actually need a mapped alpha channel as well as the diffuse (same AVI, drives transparency), some use the pixel-level as transparency, and others are only clear/transparent when the pixel is black (0,0,0). I usually generate a sequence of PNGs from Bryce (PNGs honor alpha, TIFs should as well), so that I have alpha if needed, then convert/import them into my target(s) with what-ever mode the import needs (some video progs also get testy with import masks and alpha, etc.).
Someone in here can certainly help you get the animated shading set up in Carrara's shader room if you can describe your source materials clearly.
--ms
(edits to clarify)
So, here is the neat thing about Carrara. You can use image sequences as well. If the AVI's give you trouble, that is the way to go. Here is another neat trick. If you have a video (QT, AVI, or image sequence), and it has a valid alpha channel, you can open it in the color channel (use Texture Map), and Carrara will respect the alpha and you won't need anything in the alpha channel.
noted and saved in my 'book of all things Carrara' !!!
thanks for those details, EP!
cheers,
--ms
Not a torus world, but I do use torusi (toruses?) to build the ring around the world. This planet is made using the method I used in my previous scene, just refined a bit. I used three spheres. The surface sphere, the cloud sphere, and the atmosphere sphere. The cloud sphere does use an image map of earth's clouds, but playing with waves shader functions and fractal noise, I suspect I cou;d get a reasonable facimile. The atmosphere uses the Fake Freznel function from the Shader Ops plugin I mentioned a bit ago. I used it in the glow and alpha channels. I did exclude the atmosphere sphere from any scene lights as the alpha wasn't letting enough light in for some reason.
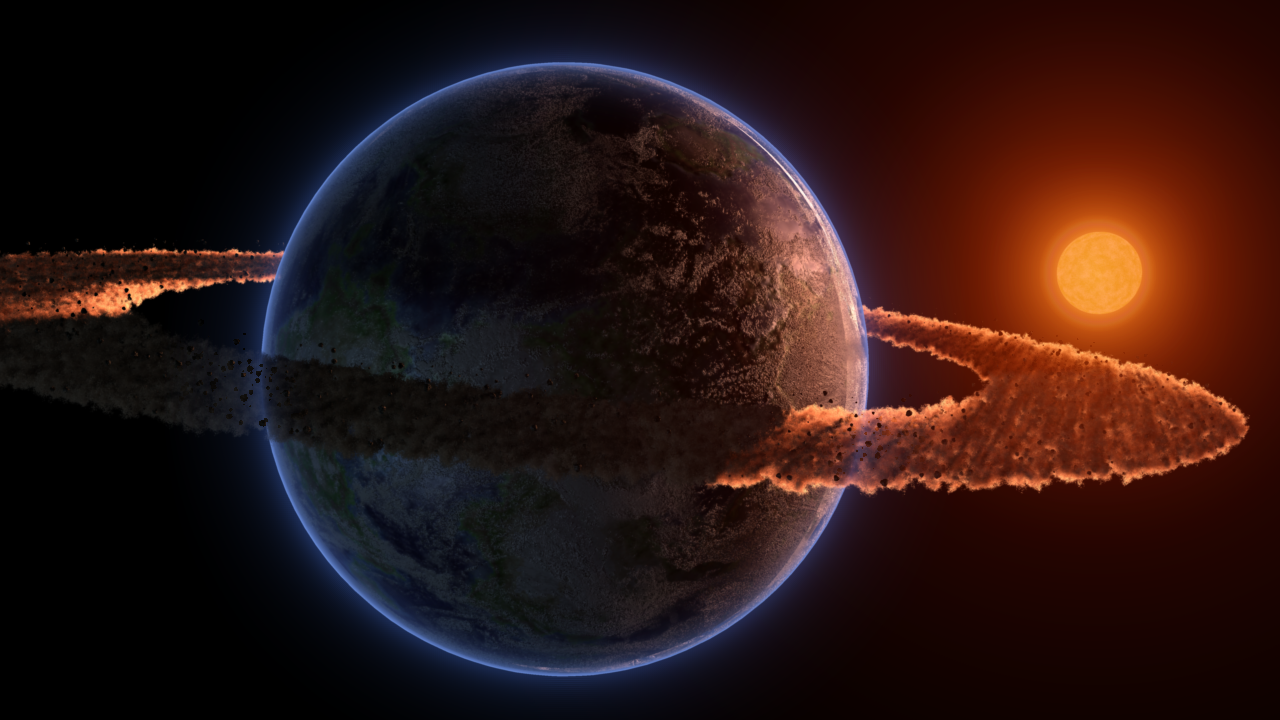
Im also used a 3D aura on the atmosphere sphere. Note that you only get the aura if the object has something in the glow channel.
A big factor in the quality of the render is also the lighting. The sun's actual placement was providing barely a sliver of light on the planet's rim. Artisitically, I wanted more of light effect, so I have another light off to the side providing it.