ratz43 WIP Images
 ForceX
Posts: 52
ForceX
Posts: 52
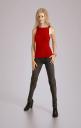
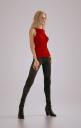
This is a G8 character that I've been sculpting in Zbrush for what feels like way too long.
Currently the model is using 49 custom JCM mostly for assisting with bending for the upper arm/shoulder and upper leg. The most difficult JCM that I have only partially tackled is, when the upper arm is forward and bent either in or out; the shoulder verts go through a rapid transition which will probably require a few keyed JCM to assist. That’s the hard way, the easy way will be to create a PCM for render time :)
The characters over all shape is vastly removed from the base G8 shape that just about all pieces of clothing are required to be re-sculpted in Zbrush to fit. This isn’t that big of a deal as most cloths require some type of touchup no matter which character they are attached too.
I'm curious if the image looks blown/washed out. I have two monitors both using sRGB color profile BenQ & Dell Ultrasharp. The BenQ the colors and details look great but the dell loses shadow details and looks too bright.
Comments, criticism, ideas, all welcome.
Rendered in Daz using the Octane plugin.
Daz 3D is part of 
Connect
DAZ Productions, Inc.
7533 S Center View Ct #4664
West Jordan, UT 84084
Licensing Agreement | Terms of Service | Privacy Policy | EULA
© 2026 Daz Productions Inc. All Rights Reserved.
Comments
Contrast looks ok in my monitor. The overall gloss level is maybe a bit high?
Thanks for the feedback. Gloss level was very high. Octane does not convert from 3dlight / Iray very well and the material it generated had the specularity at 100% for the shirt and pants. I need to take some time to make a proper cloth shader.
The following is a renderer comparison between Iray and Octane.
In this example both renderers were set to use a pure white environment background and a single emissive plane as a directional light source. Both were rendered @ 1000 samples.
The octane render is using the HDC 100 PlusCD Response. I have no idea what that equates into Iray terms. My understanding is these profiles simulate the way film process light. This accounts for the difference is the tonal feel of the image.
I go back and forth. Sometimes I like the waxy look that most of the Iray shaders tend to use, but mostly I prefer Octane it just has this quality that I like even though it is a bit of a pain to setup. That is until MDL support gets implemented.
Which do you prefer?
I think they both look pretty good but I have to say the Octane one looks more realistic as far as the textures go.
That was something that surprised me as well, epically looking at the shoes. In the Octane image I feel like I’m looking a pair of crocodile skin shoes. I’m not sure what type of material they look like to me in Iray. I wonder if that is something I can tweak out in the material setting to make it look more like the Octane version.
If this were an up-close image I can say I prefer the way teeth look using Iray materials vs the material I am currently using in Octane. The material I am using in Octane the teeth start to look like glazed porcelain up close. In Iray they have a SSS quality that I like but just haven’t been able to get with Octane (Yet).
Hmmm, if there are bump maps for the shoes you could try increasing the contrast and plugging the altered one into that slot and see if it brings out the texture better. You might play with the glossiness input as well.
On a regular monitor, it just looks like the same picture with Contrast and saturation tuned up.
I prefer the Octane (LEFT) Boots. As the iray boots look like they've lost detail in the darkness. It actually looks like the boots should be swapped between the two- to maintain consistency with the Levels.
I prefer Iray Jeans (Right) and from there on up, a mix of the two. Like, I'd take one render, sit it on top of the other (Photoshop layers) and adjust the opacity to blend the two images. Octane too glossy, Iray a little too washed and needs the LEVELS (Photoshop adjustment menu) worked on.
I thought I would try something I’ve never attempted before. A environmental night time scene. This required quite a bit of experimentation with the environment lighting, the primary light source, renderer Gama, & renderer exposure to try and pop the highlights while keeping that dark night time feel.
The houses in the background are just square planes set to be emissive to simulate the feel of houses in the background. No houses were constructed during the rendering of this image.
Motion blur, ground fog, stars & clouds were added in Photoshop. The actors looked funny just standing there with no sense of motion. So I created a few different layers with motion blur and blended them into the image. I hope it creates the correct effect. The fogs primary purpose ended up being to hide the crappy ground. No one needs to see that :) The stars and clouds, even though subtle, I think help to separate the actors in the foreground from the sky. The clouds were just generic difference clouds generated by PS with some motion & Gaussian blur.
What’s your experience with night time scenes? Let me and others know what your advice is for rendering when the lights go out!