How could I modify the height of the head of Genesis figures?

I'm using Genesis (G-G8) for the rough sketch for my illustration.
I have a question.
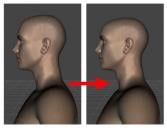
How could I modify the height of the head of G figures like the attached image?
In Poser, I use "Magnet" tool to slightly dent the head of Michael and Victoria.
How about in DAZStudio?
Any tools to do this in DS?
Since this is just for the rough draft process, I don't need to worry about hair or hats attach to the modified figures.
180107008_K.jpg
569 x 436 - 106K
Daz 3D is part of 
Connect
DAZ Productions, Inc.
7533 S Center View Ct #4664
West Jordan, UT 84084
Licensing Agreement | Terms of Service | Privacy Policy | EULA
© 2025 Daz Productions Inc. All Rights Reserved.
Comments
In the Scene pane, click the arrowhead next to your characters name (i.e. Genesis 8 Male) to expand it to show the bones of the character. Expand until you find the Head. Click on the Head bone to select your character's Head in the Scene pane. In the Parameters pane, click on the menu button (four stacked horizontal lines) and select Show Hidden Properties. Then in the Parameters pane select Y Scale and dial the value down. That will shorten the head like in your example.
(Instead of selecting the head in the Scene pane, you can use the Node Selection Tool and click on the character's head in the Viewport. That will select it in the Scene pane.)
Thank you very much for your reply, berbult.
Sorry, I think I was not explaining enough.
I would like to limit the area of deformation to the top half of the head like the red rectangular area in the attached image.
Changing the hidden Y Parameter in Parameters Pane dose affect somehow a bit bigger area. That also distorts the eyes and brows, too.
That's the issue I'd like to avoid.
What you are looking for is called a D-former in DAZ Studio. With your figure selected, go to the menu bar and Create > New D-Former. A popup dialogue will prompt you for a name. If it is only going to be used temporarily, I usually just use the default. Your choice. Click "OK", and nothing will seem to happen. Go to your Scene pane and expand the figure's node heirarchy if it isn't already, and you'll see two new entries for your D-former: one for Field, and one for Base. Selecting the one for Base will highlight all the vertices on your figure in the Viewport, and you'll see the default will have the central portion of the figure highlighted in red, with the remainder in yellow. That indicates the strength of the deformer field, which can be adjusted as required. The default deformer field is a sphere, as you can see, with the figure at the centre. If you expand the D-Former Base, you'll see the D-Former itself. Selecting this, then switching to your Parameters pane will allow you to use the sliders there to deform your figure. But you want one for just the top of the figure's head, so select the Field item back under the Scene tab, then back to the Parameters tab. Since you don't need the field to be that big, you can start by shrinking it down until it is somewhat larger than your figure's head, then translate it up so it is positioned roughly encompassing the head. By using the X, Y and Z scaling sliders and the translation sliders you can size and position your deformer to give you more or less what you are after.
Thanks, Barbult. This will be extremely useful for an unrelated problem I have!
Cheers,
Alex.
Thanks, Barbult. This will be extremely useful for an unrelated problem I have!
Cheers,
Alex.
Thank you very much, SixDs.
That's exactly the info I was looking for.
Since I didn't have time, sorry for taking so long to reply.
I really appreciate your help!
Seems like your problem is fixed, but if you wanted more detail in the head shape, you could use some head morphs. If you don't want to purchase male head morphs, look around for free ones, I think this package https://www.sharecg.com/v/88550/browse/21/DAZ-Studio/DieTrying-Morphs-for-G8-FFixed has a lot of them, including skull modification and making the figure look more neanderthal, though it's for female genesis 8. Not sure if there is one for males out there, but I've read that using female morphs for male figures is doable, not sure how though
i use this dformer but i cannot find how to adjust lenght of hair armani only rotate and resize