Lower Back Tattoo
 AdamThwaites
Posts: 779
AdamThwaites
Posts: 779
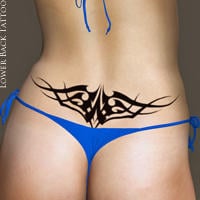
LOWER BACK TATTOO
http://www.most-digital-creations.com/freestuff.htm
PSD tattoo overlay for use with V4 texture maps
Have fun!
Cheers
Ad
LowerBackTattooThumb.jpg
200 x 200 - 60K
Daz 3D is part of 
Connect
DAZ Productions, Inc.
7533 S Center View Ct #4664
West Jordan, UT 84084
Licensing Agreement | Terms of Service | Privacy Policy | EULA
© 2026 Daz Productions Inc. All Rights Reserved.
Comments
Looks good, but how did you manage to both sides to line up evenly and avoid getting distortions along the spine (where the seam is)? I have a full back tattoo design I need to apply to an M4-based texture for one of my characters (made using Genesis), and have no idea how to do so.
Thank you for this great tattoo!
Adam, you are a wonder! Thanks for the tattoo and everything else you've given us over the years. I've been trying to find an overlay/template for tattoo placement and the only replies I've received were along the lines of "just play with it till it looks right." It'd be sooo much easier if there were a .png or .gif overlay showing where things should go. Sounds like a project that might be right up your field of expertise!
All I did for this was paint the tattoo onto V4 in ZBrush, simply black on white. Then I exported the torso texture and used GIMP to make the white area of the image transparent. Saved as a PSD and that was it.
It's a pretty good method for tattooing 3D models I think. Probably would work with colours too, but I haven't tried that yet
If you are having problems with making your texture maps line up then you can try a completely different approach. I just gave it a try and seems to work great: make the tattoo a Genesis Form Fitting piece of clothing with transparency.
I did the following to get a nice back tattoo:
1. Export generic Genesis figure into your favorite 3D modeling program. I prefer Anim8or over Hexagon.
2. Delete all parts of the figure that will not be getting a tattoo. In my case I only left the back.
3. Move the mesh a hair out so that the mesh will not sit on top of the skin (when applied to your figure)
4. Prepare your tattoo image by leaving (or adding) large white space borders to it so that when you do the UV mapping you don't get the image repeating)
5. Map the UV coordinates of the mesh with your tattoo image
6. Save as obj
7. Open your tattoo image and make it black and white. Then invert the colors (so that the background is black and the image is white).
8. This is your transparency file. Save this using a different file name.
7. Open Daz and add a Genesis based figure to the scene
8. Import the tattoo you made in steps 1 to 6
9. Use the transfer utility to make the tattoo fit your form (I use the "shirt - tight" setting)
10. Open the Surface/Material settings for the tattoo.
11. Set the Diffuse parameter to your tattoo image.
12. Set the Opacity Strength to your tattoo transparency file.
The transparency setting ensures that the portions of the tattoo mesh that are not being used by the tattoo are transparent. In effect this will create a invisible piece of clothing with only the tattoo visible. Now the same tattoo can be re-used with any genesis based character and the figure textures can change (e.g. skin color) without impacting the tattoo.
This method typically does not need trail and error to make seams line up because, typically, there are no seams.