How do I use layered image editor (LIE)
 Sfariah D
Posts: 25,704
Sfariah D
Posts: 25,704
I was wondering how to use LIE (or is it now MLIE?)
I am making this character with this outfit. I do not like the skirt and top being one color. I rather use the shaders and make a gold edge to it, but I do not know how.
Also remember I do not have internet at home right now and the library does have Daz Studio 4.5. I cannot return to the library till Monday.
I attached two renders with two different beards on the guy. One Blondies and actual unshaved beard.
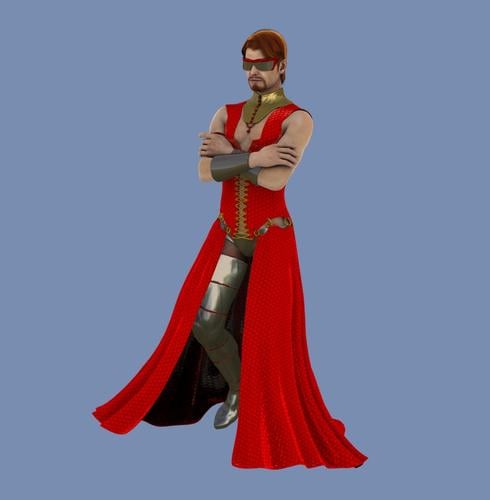
Testrender001.jpg
784 x 800 - 138K
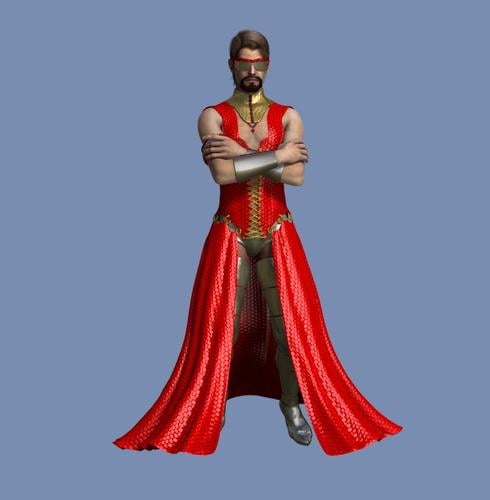
eroticman01.jpg
784 x 800 - 153K
Daz 3D is part of 
Connect
DAZ Productions, Inc.
224 S 200 W, Suite #250
Salt Lake City, UT 84101
Licensing Agreement | Terms of Service | Privacy Policy | EULA
© 2024 Daz Productions Inc. All Rights Reserved.
Comments
Super easy. It's very intuitive. However, it won't work for this if you're using tiled shaders. You'd have to make a separate material zone or work in Shader Mixer for that, or take the texture into an image editor and 'pretile' it there, saving it as a new image.
There are plenty of interesting options in the LIE, but I'll go with the basic workflow to accomplish this for now.
1: Be sure you have a base texture that looks good without tiling before you start. All images should ideally be made at the same size as the base texture. Make the gold edge texture that you want [if you want it to have a pattern, otherwise skip this step]. Then make a grayscale alpha for the gold edge. Paint the parts you want to be gold white, the parts that you want to look like the original texture black, and if you want you can blend between the two using shades of grey.
2: Go into the surfaces pane and select the surface [or surfaces] you want to change. Click the dropdown arrow next to Diffuse Color, then click Layered Image Editor.
3: The LIE will open. If you had the texture applied already, it'll be there as the first layer. If you didn't, click the + sign at the bottom of the empty Layers list, and click Add Layer. Select the new layer, choose Resource from the options, and load your base texture.
4: Click the + sign at the bottom of the Layers list, and choose Add Layer. Select that layer and load your gold texture from the Resource button [or, if you opted to just use a color, change the color to gold]. It'll cover the base layer, but we'll deal with that next.
5: Click the + sign at the bottom of the Layers list and choose Add Mask. This will add a sublayer to the gold layer for the mask. Making sure the mask layer is selected, load your alpha from the Resource button.
6: Click Accept. This should give you a nice gold edge around the trim. If tiling's on, that'll have to be removed. The LIE works with textures themselves, so modifications like this will be tiled along with the rest of the textures.
You could also do something like this just using an image editor to alter the texture, but something like this will be usable later if you want to make little adjustments within DS, change the trim color or base texture, etcetera, and a big advantage is you'll only need one alpha map and the assortment of textures you'd want to blend, rather than a new image for every combination of colors and textures.
thank you very much for that
I'm trying to find the LIE in DS 4.14. I followed the directions at the top. I can not seem to find it. Any ideas?
Screen shots of where I'm looking.
I have not moved up to 4.14 (or 4.15) yet, but I doubt that has changed. LIE has always been accessible from a popup menu with a left-click on the micro-thumbnail next to any image selector. Select your surface and go to the channel of interest, usually Base Color. Hovering shows a larger thumbnail, click once and near the top of the popup should be what you are looking for.
I have a stupid quiestion: How do I save a L.I.E Layer on a clothing? Do i have to save it as Material Preset or is there a way to only save the layer? I like to add different Logos to a t-shirt and i want them to be l.i.e. so you can load any logo you like (or none) and i want to save only the logo to be put on whatever diffuse for the shirt you have. So I like to only save the "added" layer, but not the underlaying diffusemap itselt. Thanks for your help. It must be easy, still I didn't found the option yet.
https://helpdaz.zendesk.com/hc/en-us/articles/207530233-How-to-Save-a-Custom-Preset-in-DAZ-Studio-
"Layered Image(s) Preset..."
It's near the bottom of the "Save as..." dropdown.
Hi Margrave. Geee am i Dum. I alwys thought that it is in alphabetical order and always wondered when people told about save as LIE Preset...
Thanks for pointing me to the right direction!