A freebie tutorial -- how to fit (almost) any clothing item for free (Update: Now fitting V4 heels)
(August 22: Fitting heels here)
(August 11: Youtube Video link here)
(Higher resolution images at the end of the post!)
I'm, again, procrastinating on other things, so I thought I'd post a tutorial on how to fit any clothing item onto any figure. The old version of this method involved exporting/importing OBJs, but that resulted in figures losing morphs, material presets not working, and a whole bunch of other issues... so here's updated one that's way easier and effective to use.
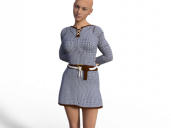
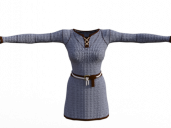
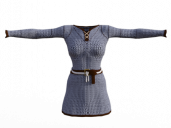
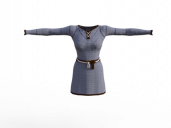
As a bit of a preamble, I thought I'd show one of the main problems with auto-fit. Here I have a tunic from the M2/V2 Tunic Pack that "technically" "fits" using the V3 auto-fit clone. However, like all dresses and long shirts, it experiences quite a bit of distortion near the hips -- also known as the dreaded V-tear problem. Futhermore, the polygon faces near the chest area are not uniform and produces an unacceptable result with repeating textures such as chainmail.


(Left: Original Tunic, Right: Autofitted Tunic with distortion)
For this tutorial, we'll be making use of the built-in Update Base Geometry tool.
Step one: Load your clothing item and your figure -- G3F in this example. Note the critical geometry, such as belts and such that would be mangled by smoothing modifiers.

Step two: Adjust the clothing in question using translation and scale. Note that you can even adjust the position and size of individal bones! For this example, the shoulders have been moved back along with an increase in their z-scale. Also note that the belt is no longer colliding with the figure.

Step three: Hide everything but the clothing item, and ensure that it is at Base Resolution. Perform an OBJ export (File/Export...) using whichever preset you wish.
Step four: Load a fresh copy of the clothing item. Select the clothing copy, then update its geometry through Edit/Figure/Geometry/Update Base Geometry. Select "Update Vertex Positions" then hit OK.
Step five: Select your exported OBJ and load it using the same preset as selected earlier. Your clothing item should update automatically with no issues.
Step six: Fit your clothing item to your figure, but select an Unsupported figure in the autofit screen. Choose the approrpiate projection template (Dress, full body, etc) and the clothing should now fit fairly well without any V-tearing.


(Left: Updated Geometry, Center: Fitted onto G3F with Smoothing Modifier, Right: Fitted onto G3F using V3 clone with distortion present)
If you need futher adjustments, you can always delete the copy and continue with the original clothing item. Alternatively, you can make continual adjustments and updates to the original clothing item itself -- just make sure to zero the item each time it is updated.
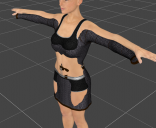
As a final example, here's A3 Mech Girl fitted onto G3F. Took me about 5 minutes to adjust the translation/scales to match the collarbone/chest/hips then let the smoothing modifier take care of the rest. Another neat trick is to export the smoothed clothing and update the base geometry again, but I'm sure most of you know that trick already :)


Daz 3D is part of 
Connect
DAZ Productions, Inc.
7533 S Center View Ct #4664
West Jordan, UT 84084
Licensing Agreement | Terms of Service | Privacy Policy | EULA
© 2026 Daz Productions Inc. All Rights Reserved.
Comments
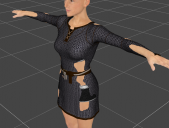
Here's a more severe example of V-tearing solved by this method, using the V4 Evening Star Dress:
thanks, I have trouble with this, even when G3 clothing on G3 character sometimes
appreciated! clearly described and certain to be used!
tnx,
--ms
videoTutorial?
I could make one if people are interested?
I am yes.
Thank You Mtl1, It is a great forum tutorial and it would make for a great Video tutorial so I would also be interested.
me too, there is a couple of steps I don't understand
Thank you for this. I have folders of old clothing items that need converting. Any chance you could put this on a PDF file?
Definitely! Let me finish this video first...
By the way, does anyone know how to set up a Youtube channel? o_o
Figured it out!
Thank you very much, for the tutorial.
With Auto-Fit I only have one figure, Genesis 2 Female, but the clothes are from Aiko3.
In your tutorial I see different figures, how to get the templates?
The other templates are commercial products developed by Valzheimer:
https://www.daz3d.com/wear-them-all-autofitting-clones-and-clothing-smoothers-for-genesis-3-female-s
https://www.daz3d.com/wear-them-all-autofit-clones-expansion-for-genesis-3-male-s-and-genesis-3-female-s
Thanks mtl1.
Thank you, mtl1! Very helpful =))
@mtl1
So essentially it's using bones and smooth to manually pre-fit a dress before feeding the auto-fit. I find the tutorial excellent, smart and easy and quick to the point. Probably one of the most useful tutorials around, if not the most useful at all.
Thank you so much indeed.
Nice ! Great tutorial video. Smart, simple, effective technique. Very helpful.
Thanks everyone :) Glad to know people like this technique. I'll try to do another video in the near future with footwear.
In the meantime, stay tuned for another tutorial soon...
I guess this method of updating the base geometry may also work to create standalone figures. For example when you combine different outfits and morphs and geografts to create a character. A standalone would have the benefit of being much lighter on the scene than the combination of different assets. And also to be independent of them in the library.
Going to check as soon as I have some time ..
Well updating the geometry doesn't work to get a standalone figure, because you can't get rid of unused morphs. But I had some success by exporting to obj and using the transfer utility to bring some life back to the imported obj. Basically you do as follows:
1) Create your character and export it to obj. Also export the morphs you need.
2) Load back the obj in Studio. Use the transfer utility to transfer the weight maps from the original character to the imported obj. Use morph loader pro to import back the morphs you exported.
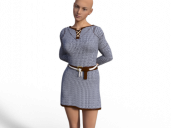
Below is a simple example that I did as a test. She's a cute elf created with G2F. She's a standalone and doesn't need G2F anymore. Note that it's a single figure including both the character and the dress. She can pose and she also has morphs.
It's up!
I'll upload another one tomorrow for boots...
Not to promote other sites (though I see deviantart, etc), but there is a handy tool to convert clothes without all the hard work that Coffee Art has done (THANK YOU VERY MUCH for vid AND sharing)
I did find this freebie on the renderhub website.
Yes, I got bored waiting for the 'gallery" to be returned to us (NOT LIKING MANY NEW DAZ3D SITE UPDATES - insert unhappy emoji) so I took a break to attempt to learn some new techniques.
But I digress, here is the tool i mentioned earlier.
https://www.renderhub.com/maxmaxs/clone-v4-for-genesis-8-females
Nice find, thank you :-)