Fibermesh Brows Creation
 3Diva
Posts: 12,047
3Diva
Posts: 12,047
in The Commons
I've been looking but can't seem to find a good tutorial on creating Fibermesh eyebrows in ZBrush. Does anyone know a good tutorial on how to create them?
Daz 3D is part of 
Connect
DAZ Productions, Inc.
7533 S Center View Ct #4664
West Jordan, UT 84084
Licensing Agreement | Terms of Service | Privacy Policy | EULA
© 2026 Daz Productions Inc. All Rights Reserved.
Comments
After several hours and 23 attempts, I finally got it. Whew, that was a major pain in the bottom.
So I guess that you will now be the one providing a tutorial? :-) :-) :-)
Nice work.
And I'm extra-impressed that you stuck with it through 22 "failures" before succeeding. (Thomas Edison would be proud,)
Please do post whatever useful information you have (or find) about "fibermesh hair" -- whether for the top of a head or the eyebrows only.
From what I can tell so far, fibermesh methods offer a much greater potential for achieving a real-world/photorealistic look in renders -- which is an important thing for the lines of business we're trying to create develop through the use of 3D modeling/rendering systems.
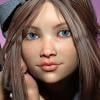
Would love to know the Character, Skin, and head-Hair used for this image -- and perhaps especially how you got the look in the Sclera of the eyes.
All of this seems quite photo-realistic, and that quality is something we're working hard to make "just second nature" to our work.
I remember a while back when I was messing with fiberhair in Zb and was just as frustrated. I got a good stach done for Dusk and then forgot to save the preset and every attempt after that to recreate it was a dud. I don't think I've ever tried eyebrows but have done a full beard, again fail. Couldn't get a nic tone mapping for the roots, mid and ends so it just looked like this flat piece of mud on Dusk's face after exported and made into a conformer in DAZ Studio. I do have that stach still and really love it, it makes him look like Freddie Mercury with a few of my home made face morphs applied to him. Oh well. I hope in a future release (as I don't think in this current release they made any) there are improvements made to how fiberhair is generated and those brushes, OMG! LOL I can set them to like .05 and some still make the generated hair go crazy! lol
Thank you, Will! :) The hair is Tears Hair with my own hair shader settings. The character is a morph I made in ZBrush that I'm submitting to Daz once I get her textures done (not the textures shown). The textures shown are Victoria 8's textures with her default settings except I bumped her SubD up to 3. The key to getting V8's default skin settings to look better is the lighting and render settings:
Be warned, while those settings make V8's skin look good (with Daz's default "Ruins" HDR) you'll have to adjust the settings for other character's skin (particularly the White Point). And those settings definitely increase render times.
Thank you, that's really nice of you to say! :) I'll try and come up with a step by step tutorial and post it when I'm done. :)
Oh gosh yes! It's the trying to move the hairs into place that creates the most frustration (once you get the steps down for the actual fibermesh creation). So many of my attempts I thought (yes, that looks good), only to get it into Daz and it looks crazy. lol Or the brushes move the mesh INTO the face and half the hairs disappear. It's really a pain in the tushy. lol I can see now why not many vendors create fibermesh brows for their characters and create baked-in 2D brows on the texture maps instead and try to get a more 3D look to the brows with normal maps, bump maps, or displacement maps. That's definitely an easier route.
Well much success for your upcoming submission to the DAZ Store.
Thank you! :) I hope they like her. I'd love to become a vendor. I'm having a lot of fun creating morphs. Textures, on the other hand, are a MAJOR pain. lol I'd almost rather create fibermesh eyebrows all day then create textures/skin maps. lol They are HARD.
Thanks bunches for the info.
I "get" that the LIGHTING on skin can have a HUGE impact on how the skin looks. Even the best skin textures can look lousy if the light applied to them is lousy.
I think I'm concluding from the Tone Mapping settings you show that you're mostly trying to use these settings to: 1] get the right "color balance" (White Point) of the light (regardless of, or in offset to) whatever lighting is used; and 2] trying to avoid "blowing out" the highlights (Burn Highlights) or "getting lost in the shadows" (Crush Blacks). -- either of which reduces the visibility of little details that convey "realism". Correct?
At first blush, this can seem like something that overall could be addressed in post-processing with a Photoshop-like tools. But in my limited experience so far with Daz Studio and Iray ... I'm finding that lighting that is "properly balanced" for the scene overalll can often be considerably "sub-optimal" (to put it charitably) for skin. Even that can be re-balanced "in post" in many cases -- especially if you use the Canvas and Alpha functions of Iray -- but doing that can be a time-consuming pain. Plus, why add any extra step of "post' if you can safely take care of an issue in the original render?
Is it your sense that adjusting the White Point is needed by the tint of the light from the HDRI you use in this case? Or is White Point adjustment something that likely needs to be done on a skin-by-skin basis to accommodate each skin's "pigmentation", translucence/sub-surface shading, etc.?
Do you increase SubDivision more for a general sense of "not blocky / too-angular"? Or is this maybe necessary to achieve a more realistic/detailed "contouring" (and perhaps a more distinct "defintion" of the contours there)?
And finally, as for adding Morphs ... I understand that you'd need to make some substantial changes to the base G8F geometry in order to have a "unique" character to offer for sale via the Daz3d Marketplace.
But have you also found that adding particular kinds of morphs beyond G8F's "out of the box" shape is necessary -- in order to add different or better-defined contours in the face and/or body specifically to achieve a realistic look?
I'm sure you have plenty to do. But if/when you can make the time to respond, it would be much appreciated.
You've probably figured out already that I tend to be pretty keen on understanding thoroughly and specifically WHY things are done, as much as (and often more than) the HOW they are done (although that sure can help, too).
Best ...
I'm guessing that the only changes in default settings you reference that could have any significant impact on Render Time is the increase in SubD Level?
Any thoughts that would confirm or refute this conclusion?
I could be wrong, but it doesn't seem like the Tone Mapping settings would have much/any effect on Render Time (although maybe changes in the Exposure Value could under certain circumstances).
I'm also assuming that the increase in Render Time you mention occurs only when comparing renders of your post-custom-morph geometries in both cases?
Good for you for sticking with it. Take care with the hair direction, however. The natural directional growth is up at the inner corners and the across and up toward the outer corner to across and downward at the arch break.
If I ever become good at modeling I will do toon style but more likely I will be too slow except to produce models for game specific characters I want to make.
@will.barger.arts
The SubD setting will impact the render time the most for closeups, as will the Hair. Just moving from full body or 3/4 to head and shoulders will noticeably impact render time without any other changes.
The tonemapping EV setting will primarily get the image to look the way you want but doesn't help render time much. Since Iray calculates faster with more light, too many people assume they can get more light by changing the tonemapping. Sadly this isn't more "photons", it's more like bumping ISO.
Whilke I haven't tried Divas' settings yet, I'm pretty sure the dominant impacts are white point, highlights, and blacks. I suspect your are correct that the adjusts may need to be made on a skin by skin / light by light basis. Then again that depends on what you WANT the skin to look like. I've seen too many renders where people have tweake many settings only to get to a point I thought was distinctly worse. It's still as subjective as any art.
Thanks, I know though. lol As you can see the top parts of the hairs pretty much follow that direction. However trying to get ALL the hair to follow that flow without it getting crazy and ugly is another mater. Knowing a thing and getting a program to do a thing is, sadly, worlds apart. lol I've not found any of the brushes in ZBrush that let me shape the brows without them getting crazy, even on low settings. If you have a brush suggestion or setting suggestion I'd love to hear it! :) I could use all the ZBrush advice and help I can get.
I'm really new to adjusting the render settings, so I can't answer all that, but I'll answer what I can. Victoria 8's skin looks kind of "flat" (IMO) with the default Iray render settings (even though, as you can see, she definitely has a lot of detailing in her skin). She also, to me, looks too orange (something I noticed that many of the Daz Original characters have an issue with - again, just my opinion). The White Point adjustment is to get rid of some of the "orange" in her skintone under the default settings. The Crush Blacks and Burn Highlights seems to bring out some of the detailing that her skin has, that doesn't show up very well under the default Iray settings.
Different skins look better with different settings. Sad, but true. Why Daz doesn't optimize their characters for viewing under the default Iray settings with the included "Ruins" HDR is something I don't understand. I'm sure they have a reason for it. I've seen some complaints about how V8's skin "lacks detail" and it doesn't at all. It just looks like it does under the default settings. Her skin actually has a lot of realism and detail. The characters definitely tend to look better with some adjustments though.
As for SubD - I know that the details included in the mesh sculpt tend to look better with a higher SubD. It also helps smooth out the edges for close ups.
As for morphing - I've had a lot of fun creating character morphs in ZBrush and haven't needed any other morphs. I've not even bought the face and body morphs yet for Genesis 8. I'm sure I will eventually, but for now if I want a specific morph I just bring her into ZBrush and do my best to make it happen. :) I've been able to create some pretty drastic morphs so far. I've got an Alien morph and some creature morphs that I'll be submitting to Daz.
I just tested it with a quick simple render. The first render was with the default settings, it rendered in 1 min and 35 seconds. With the second one, in which all I changed where the tone mapping settings, it increased the render time to 2 minutes and 47 seconds.
"I'm also assuming that the increase in Render Time you mention occurs only when comparing renders of your post-custom-morph geometries in both cases."
No, it increases for any character.
I think I managed that a while back with the stach.... I just set Groom Brush 01 to a super low setting to just move the hairs. At the default strength they not only move the hairs, they stretch them iirc. Which is NOT want you want, esp for eyebrows! lmao Now I've not tried this in 4R8 yet, perhaps there are some new tweaks to the brushes now.... nothing was mentioned before the release so probably not.
I`ve find out the groom brushes are almost useless for me, they always distort and stretch the fibers in horrible ways. When they work, they work, but I think they are too complicated.
What I do when I need hair to follow a certain direction is to rotate the figure (the camera view, not the mesh itself) and let gravity do it`s magic (you may need to touch the gravity slider each time you rotate the figure to reset it untill you find the desired direction) For instance, If I was doing eyebrows I would rotate the figure so it is lying on it`s side and then when I preview the fibermesh it will fall to that side as if it was growing in that direction. Don`t use gravity values too high or the hairs will have too much weight and make a straight line, try lower values until you find a number that produce a nice round shape.
If you want to get fancy, use 2 layers of hair, one at a normal thickness, and a second one thinner, longer, with less gravity and with less fibers, so hairs look more varied, better yet if you use a slightly lighter color for the thinner fibers when rendering, it will add more depth to the look.
Then you use the move brush at low settings to refine the movement. Good things the roots stay in place no matter what. Move Topological is also very usefull to manipulate individual hairs.
Finally: UV Map - Create - Fibers, to give the fibers a nice UV. Maybe not much needed in this case, but is a good practice to remember UV fibermesh before exporting.
Yeah, I'm having a heck of a time. It's obvious to me that ZBrush fibermesh was designed for longer hair or larger hair patches and not the precision tiny hairs that are eyebrows. It's a huge headache. :( I'm sure there must be a trick to it/easier way to do it, I just have to figure it out.
Thank you so much for the advice and tips! I definitely need it. I'll try your tips and see if I can make some better brows than what I've been able to make. Thank you! :)