DazStudio Iray Render Settings - Tone Mapping - Guide With Examples

IMPORTANT SETTINGS THAT PEOPLE OVERLOOK OR DON'T KNOW ABOUT!
Render Settings Tab -> Editor -> Tone Mapping
Shutter Speed : The lower this setting the brighter your scene will be.
F/Stop : The lower this setting the brighter your scene will be.
Film ISO : The higher this setting the brighter your scene will be.
These settings are meant to simulate how light is captured in a real life camera. Shutter speed is a fraction number (1/x of a second), so the larger "x" is the smaller the fraction. F/Stop is how narrow the apperature closes up on the Lens, F/1 is wide open letting lots of light in and F/16 is stopped down to a tiny opening letting hardly any light in. Film ISO is how sensitive the film is to light ISO 100 and 200 are good for outdoor daylight shooting, 400 is good all purpose film, 800 and 1600 are low light film good for indoors and night time shots.
On your camera you also have a F/Stop setting, that one is only used for calculating depth of field (DOF) and has no direct link to how bright your rendered scene will be.
Here are my findings from a controlled environment test.
Quadro K5000M 4GB, Memory usage during renders = 1454MB
Room x20ft z20ft y10ft (Iray -> Daz Uber -> "Rubber - Matte" Shader
Light 6Ft tall (4 inch emissive sphere 4500k temperature inside of a 14 inch frosted glass sphere)
Object Default Skin shader 8Ft from light
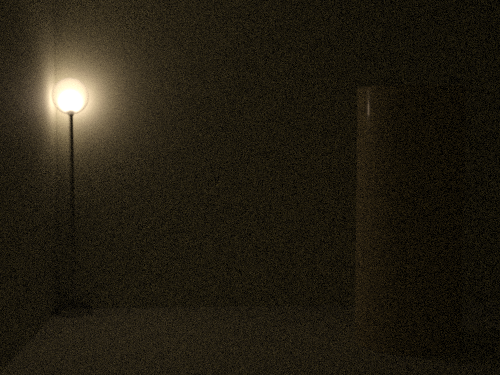
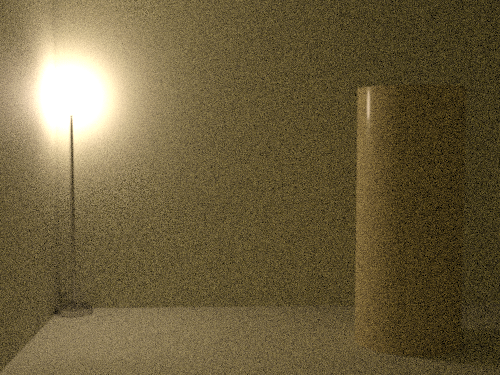
Render 1
100w Bulb @ 100% Luminous Efficacy
Shutter 1/128
F/Stop 8.0
ISO 100
Render Time to 2138 itterations : 6:55
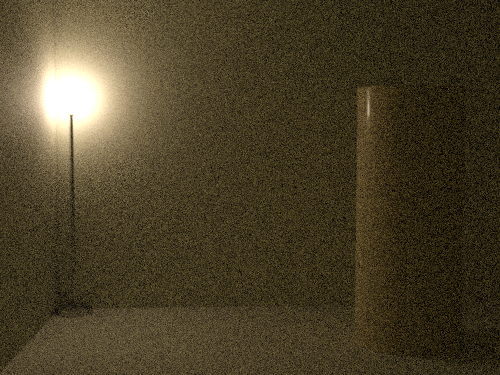
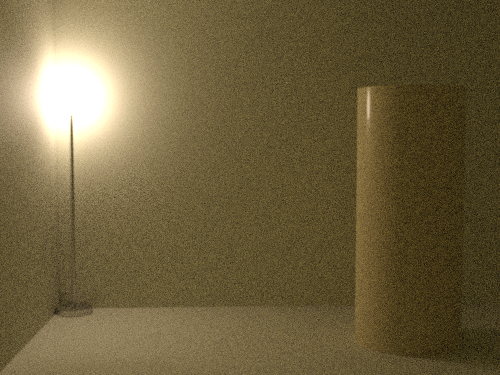
Render 2
100w Bulb @ 100% Luminous Efficacy
Shutter 1/60
F/Stop 4.0
ISO 200
Render Time to 2138 itterations : 6:52
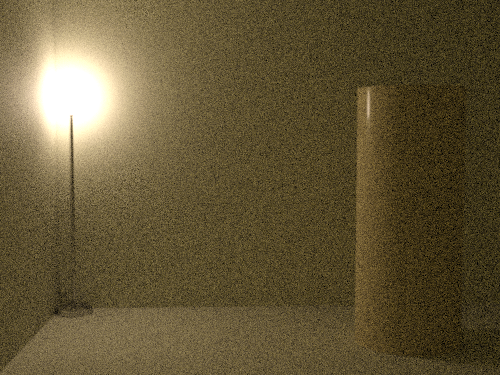
Render 3
100w Bulb @ 100% Luminous Efficacy
Shutter 1/30
F/Stop 2.0
ISO 400
Render Time to 2140 itterations : 6:53
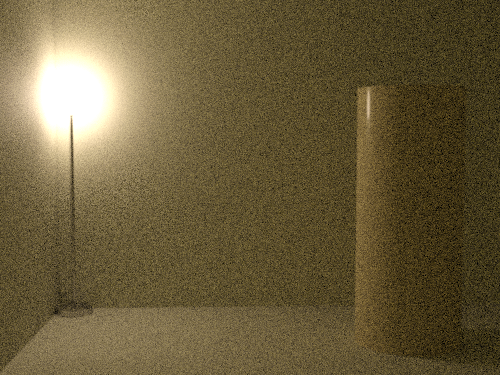
Render 4
100w Bulb @ 100% Luminous Efficacy
Shutter 1/30
F/Stop 2.0
ISO 1600
Render Time to 2140 itterations : 6:55
Convergence : 0.48%
This is the first of these renders with enough light getting to the canvas to generate Convergence numbers
Render 5
300w Bulb @ 100% Luminous Efficacy
Shutter 1/30
F/Stop 2.0
ISO 1600
Render Time to 2140 itterations : 6:54
Convergence : 0.65%
As you can see here, the more light that gets to the canvas the less passes it will take to reach 100% convergence. The end result being a better looking render in less time.
Render 6
1000w Bulb @ 100% Luminous Efficacy
Shutter 1/60
F/Stop 2.0
ISO 6400
Render Time to 1.58% Convergence : 16:01
Itterations : 5000
Convergence @ 2140 Itterations = 0.80% (Time = 6:53)
In this last render I have bumped the ISO up two settings, shortened the shutter a step, increased the light to 1000w and will let it go to 5000 Itterations.
The big takaway here is that more light getting to the canvas translates to higher convergence percent per itteration. The higher your convergence is at the end of a render, the less noise will reamain in your image.
The amount of light will not change the time that the GPU takes per itteration, but it will generate higher quality itterations in the same time.
Daz 3D is part of 
Connect
DAZ Productions, Inc.
7533 S Center View Ct #4664
West Jordan, UT 84084
Licensing Agreement | Terms of Service | Privacy Policy | EULA
© 2026 Daz Productions Inc. All Rights Reserved.
Comments
Hi,
Thanks for sharing your results. As a newbie, I have given up on simulating actual light source....the resource it takes is just ridiculous, same as your results. I just throw a wide piece of 2d plane as emission source, way faster convergence.
The point of this is to show the importance of setting the "tone mapping" settings. For example: if you set up a similar shot with a real camera and light bulb with those camera settings, you would probably come up with a photos that look alot like the ones in the renders.
Hi,
Appreciate your work. Yes, I understand the triangle of ISO/exposure/F-stop, but I just find it easier to leave the render setting alone and just mess with the light object parameter.
In D|S, only the EV value is meaningful. The f/stop, ISO speed, and shutter speed merely act to alter the EV in the predictable reciprocal fashion, and connect to the Iray tone mapper in the exact same way. So you might as well pick one tone mapping setting and ignore the others. It just confuses things otherwise. As you note, *unlike* a camera, altering these settings does not correlate to any physical change in the optics or film chemistry: DOF, image blur, or film grain, which is why you do them in a real camera.
In my view, it's better to not think of Iray as a still camera but as a motion picture camera used in a typical studio setting. There, the *lights* are adjusted to meet a specific exposure setting favored by the director of photography. He or she may want to always shoot at f/11 with a 135 degree shutter. Film (even digital) has a set ISO so you can predict its grain or noise. That leaves adjusting the placement, type, and brightness of the lamps to set the exposure. I never change the tone mapping settings more than one stop either direction. I just think it's better to adjust the lighting and use a consistent tone mapping setting.
Great examples but for camera tests a more step like testing would show more. Start with the base settings. Then open the aperture one whole stop while stopping down the shutter speed one whole stop (reciprocal amount) and see if there is any discernible difference in the image. On a real camera this would change the motion blur and depth of field.
When I get home I will run a few tests because I was under the impression that all the IRAY tone mapping did was lighten or darken the image like levels in Photoshop.
try doing the stepwise reciprocal value through 3 or 4 f/stops.
The tone mapping settings do not effect your depth of field in the render. Depth of Field is a seperate F/Stop setting in the cameras you place in the scene (Unfortunately from my testing. they do not acurately represent real F/Stop settings. You seem to need much higher F/Stops in your Daz Studio camera than you would in real life.)
As noted, there is no benefit to using reciprocal values in tone mapping, as these controls don't affect the camera. In Iray (under D|S) you have to do these in the Camera parameters. This is why I mentioned you might as well just change one tone mapping value (or EV) to alter the exposure.
Correct that D|S f/stops for DOF are arbitrary. There's no connection between those values and a real lens. I suppose now with the push toward photorealism they might fix this and use real-world values,, but then every existing scene would break. They already did that 2with 4.9 when they changed the units of measure for distant lights in Iray -- from cm^2 to m^2.
THIS!!!! THis has saved me so much time and heartache now!!!! I really wish Daz had bothered explaining this when they released Iray, because I tried for two weeks to understand why my lighting looked awful and finally walked away. Here I am, 3 years later and just now learning about this! Thank you! Now, my next question, what dictates how far light radiates from an emissive surface?
Just deal with the shutter speed and the ISO to get you perfect lighting. Place a few spotlights and a Linear light and play around with
the ISO and shutter and you will get the perfect light!
As a hobbiest photographer, I usually play with ISO and f-stop. It bugs me (just a little) that they arent' really the same as a physical camera. I understand that it is handy not having to worry about the effect a slow shutter has on motion blur or how the f-stop (in the tone mapping) doesn't change depth of field for focus. But I feel a little like I'm "cheating" when I use film speed / f-stop / shutter speed settings that would never really work for a physical camera.
Physics! Seriously, this is guided by the same science behind inverse square law, which (for the most part in Einstien's relativey) state that light is inversely proportional to the square of the distance from the source. So generally, if you double the distace the light is one fourth. There are afew exceptions -- laser or other highly collimated light doesn't behave this way, and distant light is too far away to have any meaningful impact in the relatively small space of the D|S stage.
For D|S, emissive surfaces (meshes), spotlights, and point lights behave this way. The distant light does not. It is considered a point light source at an infinite distance, and its rays are parallel. It doesn't matter how far awaay the light source is, its strength is the same anywhere on the D|S stage.
This is a great post
Addendum to my earlier post: Use a point light if you want to experiment with how Iray handles light drop off. A point source most directly demonsteates dropoff with inverse square law, as noted on this Wikipedia page
https://en.wikipedia.org/wiki/Inverse-square_law#Light_and_other_electromagnetic_radiation
In setting up a scene, use a point source if you want to show realistic falloff over distance -- ,maybe a character close to the camera and light, and another in the distance. If you use a spot light, which has controls for focusing the beam, the falloff characteristics may vary outside your expectations.