Dracorn's Tips n Stuff for Newbies and the Curious
Purpose of This Thread
Originally, Saphirewild asked me to show her some things I have learned, so I decided to put this thread under New Users so others can benefit as well.
I invite comments and additional tips, 'cause I don't know everything.
Please Note that many tips in this thread are designed for users with limited budgets who can't afford fancy computers or wiz-bang video cards, so these tutorials will focus on 3Delight. If you use Iray, there still may be things here that are of use to you. The tutorials will be titled with links on this first page.
Table of Contents
1. Categorizing.
How to use Categories to find your stuff. I will show you how to categorize whole packages and partial packages (useful for kit-bashing), as well as maintenance and some tips on how to find where things are installed. This includes the Poser folders as well for 3rd party content.
LINK: There is no link as this is the first tutorial immediately below.
2. 3Delight Do It Yourself Portrait Studio
3Delight Lighting tutorial specifically for portraits. PAGE 1 BELOW.
3. Dramatic Lighting Tutorial
3Delight lighting tutorial for dramatic lighting with strong shadows. Good for sunsets, low light scenes. Uses UberEnvironment 2.
Link: Dramatic Lighting Tutorial
4. Using Old Shoes on Genesis 8 that won't work with Autofit.
You can use Geometry Editor to auto-hide Vicki's feet that are sticking out.
Link: Fitting Old Shoes with Geometry Editor
5. Tutorial on Age of Armor's Advanced Lights for 3Delight
If you are a 3DL user, GET AoA's Advanced Lights Bundle for 3Delight. It's one of the best lighting sets you can get for this render engine. It renders faster than UberEnvironment 2 and has controls that allow you to choose which surfaces to light or not to light. This allows for possibilities not available in Iray. This tutorial is brief, but gives tips on specifics of the Advanced Lights.
https://www.daz3d.com/advanced-daz-studio-light-bundle-19
Link: Tutorial on AoA's Advanced Lights
[Return to this first page for links to more tutorials]
1. Categorizing Tutorial
When you have been using Daz Studio for a while, you collect quite a bit of stuff. It can be overwhelming and you can't find anything. Ever get frustrated trying to find textures that are named differently than your items? Ever look into Smart Content and can't see what set an item belongs to?
Everybody has their own methods of organizing. I will show you my methods as well as how to Categorize in Daz Studio.
NOTE: If you have accumulated lots of content, you will have to be very PATIENT. Categorizing everything is very tedious and you will have to take breaks. Once you have everything done, then you must apply the discipline to categorize as soon as you make a purchase/download.
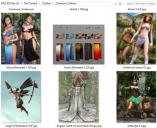
I will assume that most of us artists are visual people. I like to view my content pictorially. So I have created a folder called "My Content. When I purchase something, I will save screen prints of the promo pages - so I can see everything that's in it. I will look at these first before I choose something in Daz Studio.

As to how to break down your content into these folders, that's up to you. But make sure that these match what you categorize in Daz Studio. If you already have lots of stuff, you may want to write down a list of basic categories for yourself.
Daz Studio Categorizing - Two Methods
You can use two approaches.
1) Categorize the whole package, and all its add-ons/textures.
2) Categorize parts of a package. This is where it gets really useful for Kit-Bashing. You are outfitting your character and want to look for shoes. There are so many shoes that come with different packages - now you can have them all in one place, AND know which packages they came from so you can take advantage of all the texture packages too.
Finding the Best Source for the Category (Finding Stuff)
Product Library: This is the easiest place to go, but everything is dumped into one folder. Most PA's will break these down into sub-categories, especially if the package has 3Delight and Iray textures. It can be hard to find these things. Here's where you can find where the files are installed:
Daz Install Manager
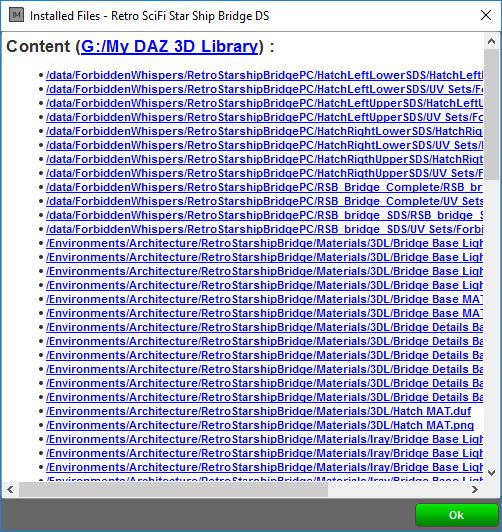
Open DIM, and click on the Installed tab.

Click on Show Installed Files.

See where it says /Environments/Architecture/RetroStarshipBridge? That's what you are looking for.

Daz 3D is part of 
Connect
DAZ Productions, Inc.
7533 S Center View Ct #4664
West Jordan, UT 84084
Licensing Agreement | Terms of Service | Privacy Policy | EULA
© 2026 Daz Productions Inc. All Rights Reserved.
Comments
Finding Content in Content Library / DAZ Studio Formats
Open Content Library, then DAZ Studio Formats. Open up My DAZ 3D Library.
Based on what you found in DIM, go down to Environments and open up Architecture.
Scroll down to the desired package. You can open it up to show the folders.
Finding Content in Content Library / Poser Files
You will find a lot of 3rd Party Content here. Poser content is often divided between folders, with the main geometry under Figures (sometimes Props), and the textures under Pose. Seems counter intuitive that it's not under materials, but that's how Poser Content shows up under Daz Studio.
Open up your 3rd Party Folder where you manually downloaded your files from. You can click through the various folders to find the main items.
Open Poser Formats, then My DAZ 3D Library. (Please ignore the fact that I have a duplicate here - I was trying to force it to my SSD which was my G drive instead of the default C drive).
Example: Dragon Corona Hair from Runtime DNA (purchased before the merger). Under Libraries, you will find Character and Pose. These correspond to the folders: Character = the Figures folder.
Found: AK DragonCorona folder under Figures and Pose.
Categorizing a Whole Package
Creating a New Category
Make sure you highlight the main folder. Right Click and choose Create a Category From, Selected Folder & Sub-Folders.
A list of your categories will open up. Click on the folder where you want the new category to be located and click Accept.
You can also create a category of your own. Right click on a main folder in your list of categories, and click on Create New Category, then name it and click OK.
Repeat these steps for Texture packages, and put those under the main package. Now you don't have to hunt for textures under a different name.
Categorizing a Partial Package (great for Kit-Bashing)
Here's where it can get very useful (provided you have a lot of patience). Let's say you want to categories all the shoes in one place, or candles, chairs, food, etc. Many packages have items that you would find useful but would never find otherwise.
Open Content Library and your desired package. This time, click on the icons you want to have in a separate category (only those icons). Hold the CTRL key to select multiple items - in this case, the plants from Garden Block.
Right click and choose Categorize.
This will open up a different list, with checkboxes next to each name. Use the twisties to open up these folders to the location you want to categories. Right click on the category you want to put them under, and Type the desired name. I personally like to know what package my items are coming from, so I use that name. That gives me more information than Smart Content.
Make sure you put a checkmark in the box where you want your categorized items to go.
The Category Folder
Open this up to find all of your categories.
A snapshot of my clothing categories. The underscore at the beginning of the name forces it to the top of the list.
My Sub-folder for Women's clothes (whole packages) are sub-divided under genres. I like to add an abbreviation for the figure that the clothes were made for. The ('WC' = women's clothes) after Fantasy is to differentiate it from the Men's Fantasy category ('MC' men's clothes).
NOTE: Smart Content Original Files will Now be Listed under Default
This is my Smart Content folder with all my categories. The original Daz categories are under the Default folder at the top of the list.
Category Maintenance
In your Category Folder, right click on any category you want to modify. Note that Delete will only delete the category, not the package.
Note the Confirm Delete lets you know it is a category you are deleting.
I have used Duplicate Category to place it in another location. Move Category To is useful if you put it in the wrong place.
For Partial Packages, to affect an individual item, right click on that item for its menu. Note that there is no Delete, just Remove Reference.
Here's a pic of my People Category, Women, where I have my characters sorted by figure type.
Hi Dracorn,
Great tips, will try to implement this. I always had issue with finding stuff and the search in daz is so terrible.
Thanks. It's very useful and lends itself easily to your own methods of organizing.
It's very annoying that daz by default dont search folder names, so you have stuff like "Woodland Elf dress", but the actual object files are "Corset", "Skirt" etc....but you can't search by "woodland".
Yeah, that bugs me too.
Unfortunately, Daz opening up Smart Content to all characters has had an unforeseen negative effect. I used to pick and choose eyes from the Eye folder, but now it throws all the eyes into one folder and doesn't separate by generation. So I pick an eye color for my character, but it doesn't work because it's for the wrong generation.
That means I will need to separate out the eyes by generation in a subfolder.
The hair I don't mind so much, because I have them separated by gender, but I renamed them to add the generation name, i.e., Dragonfly Hair G3F, Dragonfly Hair G2F and Dragonfly Hair V4. I don't have the patience to hover the mouse over every item to determine which generation it belongs to.
Thanks Dracorn for this amazing info and I have been trying to sort my content folder for past fewdays making some headway though!!!
You would not belive the amount of free stuff I have in there omg!!!
I've been spending lots of time categorizing eye colors. Now that D/S has opened up Smart Content to all generations, it doesn't separate out eyes by the figure. Been a little frustrating to click on an eye color to find it won't work because it's for a different figure.
Oh dang Dracorn that would be frusterating I an still sorting free clothing and props lol.
Here's a pic of my Eye categories. I went through each character, highlighted the eye icons, choose categorize, and put them into a folder by character. The larger eye sets I left as is, because it is easier to find them in their own folders.
I suppose I could sort them by color but I'm not sure I have that much patience. Eventually you'll go bonkers and have to leave it alone for a while. It's a big task when you have lots of stuff.
Hi,
How do you backup all the category created? For situation when you reinstall Daz.
Say, if you move the runtime around (different drives), will it be smart enough to auto locate the files?
Back up the CMS database - for Windows C:\Users\You\AppData\Roaming\DAZ 3D\cms. You can also export the user data as insurance - Content Library pane option menu (the lined button in the top corner or right-click the tab), Content DB Maintenance, check Export User Data; the reverse, importing user data , is also handled via the Content DB Maintenance dialogue.
A word to the wise. If you are going to use categories start sooner rather than later. I lost all of my categories once. Took me almost two months to put the whole thing back together. Literally every night and 6 hours or more on the weekends. it was worth every minute though. And I keep refining and adding categories as well. I never touch smart content though I load everything through dim and use the content library to find things as it sorts it out for me nice and neat (for instance, it would be, my daz library, people, generation 3 female, character, then it has subfolder under that for morphs, and materials and then subfolders under materials for Iray and 3Delight.) No guessing what goes where and its not all jumbled up like it is in Smart Content.
2. 3Delight Do It Yourself Portrait Studio
Here's a tutorial on creating a portrait studio for 3Delight, including the lighting setup. Once you get the basics created, you can reuse for other characters. This tutorial uses UberEnvironment 2 lighting along with UberArea mesh lights.
EDIT: For additional tutorials for UE2, please see MN-150374's post at the bottom of Page 1 for links to two tutorials.
Here's the result:
Download the Render Room.
This is a very nice soft, round corner room available on Share CG. It has the solid color look with no visible division between the wall and floor.
http://www.sharecg.com/v/61392/gallery/11/Poser/Soft-cornered-Render-Room-Morphing
Getting the Render Room Ready.
1. Load the render room in Daz Studio.
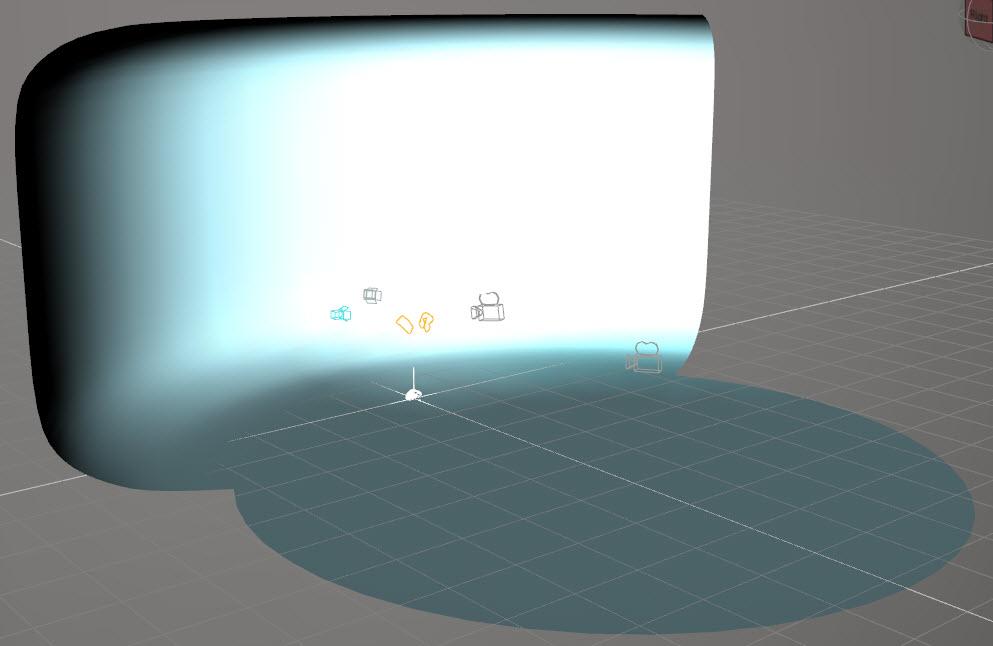
2. Using the Surface Selection Tool, select and turn off the opacity for all but the back wall and floor sections, so it has this shape:
3. Select the following sections in the Surface tab:
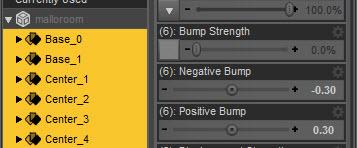
Base_0, Base_1, Center_1, Center_2, Center_3, and Center_4.
4. Set the Bump Strength to zero. This removes all texture so the floor melds into the wall.
5. Play around with the diffuse color to get some nice tones in light and dark shades. Save each one of these as a material preset. Here are the values for my sky blue: Red 162, Green 211, Blue 221.
Character and UE2.
6. Load your character and set up your camera.
7. You will find UE2 under:
Daz Studio Formats / My DAZ 3D Library / Light Presets / Omnifreaker / UberEnvironment2.
8. Load UberEnvironment2 Base. If your screen goes gray, don't worry. That means the skydome, which has no map, is too small. Open up your scene tab and click on UberEnvironment2 1. [See Edit below]
9. Open the parameters tab and enlarge the scale - I have it set to 200%. Make it larger if you want more room.
EDIT: AndyS was kind enough to add that you can simply hide the environment sphere. On the Scene tab, open up UberEnvironment2 and hide the EnvironmentSphere.
10. With UE2 still selected, choose Set HDR SoftBox from the UberEnvironment choices. Then choose Set Quality 3Hi. The soft box creates nice soft lighting for your portrait. Note that your progressive render will display grain, but this will go away as it renders. Also note that it will slow your render time, depending on your PC. I left the settings at default.
UberAreaLight
11. Load UberAreaLight Base.
12. Click on it in the scene tab and apply UberAreaLight Plane.
13. Move the plane up and angle it. This creates a lovely soft bounce light.
Spotlight 1
14. Create a spotlight for some directional lighting. Select it in the scene tab.

15. Click on the View Selection Menu and choose the Spotlight.
16. Position the light.
17. Adjust the settings. Add a color tint to the light, adjust the intensity. Leave the Shadow Type as None, or it will add some strange shadows.
Rim Light
18. Add another spotlight. Select it in the scene tab and rename it to Spotlight RIM. Click on it in the View Selection Menu. The rim light should be off to the side of the figure. If it is slightly behind, the effect is smaller, and becomes larger the more it is angled towards the front of the figure.
19. Play around with the intensity. Change the color. I chose a bright sky blue to match the background. Leave the Shadow Type set at None.
EDIT: ADDED SAMPLING
Removing Graininess in the Shadows
If the shadows are grainy, increase the sampling on the Render Tab. Up the Pixel Samples X and Y. You can also increase the Shadow Samples. Just do it as little as necessary, as this will also increase render time.
I am working on this tutorial and will show my results just as soon as it is done
Ok here is my go at this tutorial
Titled: Johnny On His Throne!
I like your Portrait Studio tutorial. I'm going to have to give that one a try. I still struggle a lot with lighting in 3Delight.
Hey, Saphirewild -
This is a fun render! So, spooky throne, guy with a friendly smile... is he a good guy or a bad guy?
I see that I forgot to include how to get rid of graininess in the shadowed areas. Let me add that.
Some of your rim light is showing up in his teeth and eyes, so turn down the intensity a little bit. There's a little too much blue - or maybe it's because his clothing is blue. If you change the color of his clothing to brown you will provide some nice contrast to the blue.
Let's play around with some shadows. Turn down the intensity of UE2 - when you reduce the ambient light, the shadows will deepen, which is a great effect for a spooky throne. Start with 50%, and keep reducing it. The more you turn it down the more the dramatic shadows will pop in. Also you will get more shadows under the throne. Also, the blue background is pretty happy for the spooky throne. You can darken it, and bring the color picker towards the bottom where it is a little more neutral.
I added an edit to the end of the tutorial, to include upping the samples in the render tab, to remove the graniness in shadows.
Here's what I mean about turning UE2 way down to bring in dramatic shadows. I was playing around with a crypt. The shadows are coming from a distant light, and the color from spotlights. UE2 Intensity is set at 0.5%, and its Intensity Scale is set to 20%. The Distant Light is set to 30%. The spotlights are all 100% but the colors are dark.
Just remember that UE2 Intensity set too high will wash everything out. Just use it as a fill light, or ambient light, to bring up the lighting, but most of your light will be coming from the distant and spot lights, linear point lights, etc. A scene like this is a good background start. The lighting will increase a little more when lighting a figure in the scene. This would lend itself well to a fire or glowing magic with a linear point light.
Here is the updated versions I have been working on and still can not get rid of the grainyness!!!
Even pumped it up to the set quality 4Hi and still grainy!!
I used candle light for UE2 and turned down the Intensity to 70% for the last one.
Edited to Add: I also changed back to the original textures of Johnny's clothing.
Hey, Sapphire: I made this comment on your thread but I wanted to include it here.
Another way to get rid of graininess is to go to the Sampling tab on the Render Settings and increase the Pixel Samples and Shadow Samples. I never had to max them out - usually just squaring the Pixel Samples is fine (i.e., if the default is 4, make it 12). Shadow Samples defaults at 64, so try doubling it. This usually worked for me as it was a good balance between clean renders and render time.
As far as color is concerned, I like your choices. You've got some very nice soft shadows here - it's lookin' good.
One more tip, see if you can tilt his right knee down a little for a more relaxed look. You might need to adjust the posing limits to do it.
Very good tutorial, Dracorn! Well done!
To get rid of the graininess with Uberenvironment, there are the UE2 Parameters Shading Rate and Occlusion Samples you could adjust too. You may take a look at the UE2 basic tutorial in Knittingmommy´s Laboratory.
For the curious, you can find a different approach of the three Point Light Setup with a LAMH Preset in Knittingmommy´s Laboratory.