How do I model a white collar?
 tdrd
Posts: 0
tdrd
Posts: 0
I've asked this question in a manner in another topic but it's never got looked at so I guess it's too old a topic now or I'm asking the wring questions..
I'm modelling a shirt with cuffs and collars and sleeves etc - well i've done the sleeves by extruding from the shirt body, however the collar is a little different.
I want the collar to be white where the shirt is chequered, so how do I model the collar so that it remains part of the shirt when parcelled together.
I've tried welding parts of two seperate objects together but the problem is that object them becomes one and the colours cannot be changed independantly. Besides - I've had several failures and crashes even when all the smoothings were collapsed and never managed to simply weld two seperate object edges together.
If I group a seperate collar to the main torso, will it stay grouped to the main section when the model moves or will it become detached?
(thinking about this I could try a test on the cuffs of the shirt I am doing to see couldn't I? :-) )
However I'm thinking of the opening up the front of the shirt also and that has to be a white button strip so you might be able to see why i'm worried.
The other thing I am concerned about is the squares on the shirt - will the checkered pattern look different on the body to the arms and can I set the arms for a different material because I want the stripes to do down the sleeves.
When I create the material - can I create some png somehow which has the pattern of the sleeves on it like the png's which appear somehow on the manekin in the background - having said that he does not look well!!!
So many questions I know - but please bear with me - it's my second modelling attempt at an item of cloting...
Daz 3D is part of 
Connect
DAZ Productions, Inc.
7533 S Center View Ct #4664
West Jordan, UT 84084
Licensing Agreement | Terms of Service | Privacy Policy | EULA
© 2026 Daz Productions Inc. All Rights Reserved.
Comments
Let me start by stating that I am not into this sort of thing, however where you are going wrong is to apply colour to the two separate objects before you weld them together. Once you do that, you loose both colours.
Having welded the collar to the body of the shirt, you then need to apply place holders so that when you UV it and unwrap it you will be able to apply what ever texture/colour/bump etc you require.
So the collar; change to face mode and one by one [holding the shift key] select all the relevant faces,. Open up the left hand material panel and down at the bottom in the Shading domain you should select new and name the resultant domain - collar. Then go to the material panel above and rename it Collar and change the colour to whatever colour you wish, say yellow. Beside the collar shading domain are two small boxes one with a + sign and, the outer one a blue ball; click the blue ball and the collar on your shirt will temporally disappear, that is until you click on it again.
Now after making your shirt body transparent using the icon on the lower tool bar, select all of the remaining mesh faces with the lasso tool, go to the shading domain panel and select new, rename it shirt body, ditto in the material panel above and change the colour to say medium red. Then go to the shading domain - collar and re click on the blue ball. Bingo, red shirt with yellow collar.
Now when you UV the final model you will have the material domains giving you separate islands together with the seams that you have added to enable you to unwrap.
Obviously if you need other areas to be either a different colour/material you need to select them like the collar, name them etc. You can do that before or even after you have selected the main body.
Hi Tdrd,
I would model it all in one piece. Don't worry about the materials until you have finished modelling the shirt.
Then you need to create new material groups for the separate areas. There is a really good tutorial at Geekatplay on how to do this...that is how I learnt to do it.
You will also need to do a basic uv map at least if you want to use a pattern on the shirt in DS.
If you get stuck following the tutorial either post here or pm me and I will try and help you.
Also just noticed what you asked about the size of the mesh on the sleeves compared to the body. It seems a very dense mesh on the body. You might be able to reduce it a bit...how many polys is it? I normally try and tidy the mesh as I go.
cheers
Pen
I do not know how to reduce the number of polys in a mesh once collapsed.
I wish I did as I think there's far too many.
There are currently 4064 polys on the shirt body.
RedSquare if they are still around would know I'm sure...
To reduce the poly count, select a tessellation (an edge) then loop it, check that all of that tessellation has been captured; then hit the back space key to dissolve it and click on the remove vert's option. Then select the next bar one and repeat. Alternatively, select one edge of a poly every other tessellation press the L key to loop them all, inspect, tidy up and dissolve the lot plus verts.
You may be able to save time by selection and then use the 1 x n tool to select alternating tessellations then loop and dissolve, but how successful that is will depend on how many tessellations are on the main body. Save the new version then repeat it all over again until after smoothing it still holds its shape and you are happier with the poly count.
EDIT: Ha! snap. :cheese: NB: Be careful NOT to remove a key tessellation that is essential for you to (a) create your seams and (b) retains the main structural template otherwise you will loose the shaping.
For a shirt for Genesis....you probably want the poly count to be somewhere in 3000 to 5000 range. For the simple matter of it 'fits' all the morphs with less distortion and odd stretching. I've been experimenting and a shirt with enough polys (about 3500) doesn't suffer from many of the problems lower poly count ones do, when morphng, especially into female shapes. Another key is 'uneven' distribution...having more polys in the chest area than the lower parts of the shirt.
BTW, your textures are flipped.
You can either reflip individual textures by clicking their box in the materials window or tell hexagon to always flip OBJ textures by checking the "Flip Textures" setting in "Preference editor" => "Import/Export" tab => "Wavefront Obj" button.
I think s/he means on Genesis. :)
Can anyone give tips on how to model the front lobes of a shirt collar - i'm struggling after hours here...
I might start by wrapping a rectangle around the guy's neck, make a gordon surface out of it, add thickness, and then add a level of smoothing.
OK since someone noticed the textures flipped on the genesis model - how do I fix the issue?
Not important but it makes him look a little healthier...
:-)
I mentioned 2 ways to fix it in the post I made where I first pointed it out. :)
(which is comment #7)
Thanks - Missed that post - sorry about that.
No problem! :)
I've already said Im creating a shirt collar.
I have attached a graphic of two shirts I sought off the web for some idea.
(I've removed faces and brand names for copyright and identity protection)
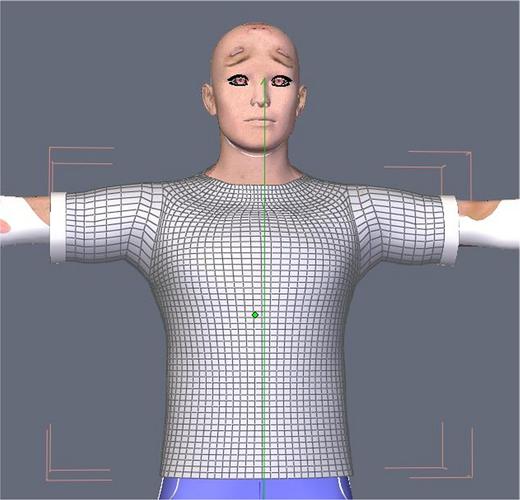
Below you will see the shirt as I have got it so far.
I created the collar by extruding the neck using smoothing level 2, but need to shape the outlines to the ones similar to the ones in the left sample. (The casual open necked appearance appeals to me.)
What I am having problems with (due to lack of experience) is keepind the depth of the collar whilst trying to move the points around.
I tried movinf individual points around but things got a bit spiky and I lost control.
Reverting back to a saved version (of which I have many) I have decided to ask you all if there is a technique I should follow when modelling the collar.
I can even make the Hexagon file available if anyone could show me how to start (not do it for me but show me - i'll never learn if people do it for me all the time.) Just drop me a PM if you want the hex file to help guide me as I think it could be a little complex given that i've only been hexing for about a month now.
ANY advice giving indications of where to start would be GREATLY WELCOME as i've tied myself and the shirt collar in knots over the last few hours getting nowhere fast. Once given invaluable pointers I'll be away...
Thank you in advance for ANY feedback. Terry
Roughly something like this?
Took a cylinder with 1 section, deleted the front vertical edge to make it open.
In symmetrical mode, pulled the wing tip bottom vert down and out and shaped the others to match.
Out of symmetrical mode - selected the top horizontal edge, extruded once inward and once down.
Level 2 smoothing.
Flattened slightly front-to-back.
You would need to cut in sufficient vertical edges to match where it will attach to the neck in order to weld.
Hope this helps a bit?
Thanks @Roygee: but I'm already committed to doing it as one piece for the shirt.
However you've got as far as I have, but it's the movement of the whole collar to where I want it is becoming the problem.
I've tried assigning different shading domains to the shirt and collar to have them different colours but it does not work - the whole shirt takes on the last set shading domain.
I need the shirt to have a white collar anyways and the shirt itself to be blue so can anyone please give me a step by step guide on setting different shading domains up correctly on the shirt given that it is all one piece. Someone said it was possible earlier in a discussion but I cannot apply it.
As you can see from the pic below - i'm in a mess!
Thanks
Shading Domains - got it!
Now I can hide the shirt body and still make a mess of the collar - more fun!
Thanks
Problems with shirt...
OK after two days I thought I was close but as you will see from the pictures below I have still got problems.
First look at the shirt collar in the Hexagon Picture - it looks fine no problems there...
Now look at the second picture when it is imported into Daz Studio...
The collar has gone all wrinkled and awful - why is this and how can I rectify it?
I attach another couple of poses and although I feel closer I still feel I need help.
Can anyone please advise or help in any way.
Thank you.
Flipped normals - which is why I suggested my method. You probably extruded up, then down? If so the collar is turned inside-out.
To fix, take it into Hex and with the shirt selected - it is all one mesh, right? - select Utilities->Orient normals. In the properties panel, select the big A, which should show you a whole bunch of red arrows - select unify normals - this should give you a single yellow arrow - if the arrow is pointing inwards, select the big A again. This should make the yellow arrow point outwards.
By the way, the bottom edge of the collar is penetrating the shirt - you'll want to lift that out.
Otherwise, good job:)
You can also flip the normals by tapping the space bar once the red arrows are displayed.
@Roygee: and @RedSquare: Thanks for the feedback.
Flipped Normals! Of course inside out all over again....
So easy to forget...
I did the above @Roygee: and believe me the red arrows are overtaking me - there's so many of them I cannot control them!
Okay - The reason I did not model the collar seperately is that I had an attempt and every time I tried to weld the surfaces together the program either crashed or the objects could not be selected together to make the edge weld. Following on the Peter Pan tutorial I decided to try that...
... still learning all the time - and getting greyer too!
Thank you again for the reminder...
Terry
UPDATE: UPDATE:
I flipped the normals and the colours are okay now but for some reason as you can see below the collar goes all ragged once posed other than normal.
Any tips there?
Stray/duplicate vertex or poly, not completely welded/two adjoining faces not actually sharing the common edge, not grouped properly, bones or weights not correct...any or any combination of those are the typical causes of that kind of distortion/breaking up.
I cannot see how there can be any of stray, duplicated or vertices sharing the same edge because it was made by extruding from the neck and upwards...
It's all been one piece from the start so there is no welding or bits removed at all.
See comment #20 to see what it looks like in Hexagon.
It looks smooth enough but it's not moving smoothly in a lot of poses.
There are no missing surfaces and I've checked that there are no missing links so what else can be the matter.
I can put the file on my website available for anyone else to take a look at it if they would - it's going to be free to share eventually anyway if I get it finished.
All feedback appreiciated.
Terry
What does the mesh for the collar look like in Hexagon if you turn off smoothing?
Sometimes a smoothed mesh can look fine, while the underlying unsmoothed mesh is all kinds of ugly. I like to add geometry to an unsmoothed mesh until its basic shape holds up after being smoothed.
Perhaps adding some extra geometry at the fold of the collar, rather than depending on the smoothing to do it, would help.
Without any smoothing the collar looks fine.
I did as you suggested and added more tessalations and geometry but the collar still went all ragged.
Am I allowed to post an address of where the file can be found on my website temporarily?
Terry
One of the things I've done, more often than I care to recall, is 'double extrude'...where you accidentally extrude twice but only move one of them...so you end up with 'double' vertices. And it will definitely cause all sorts of problems later, when it comes to rigging. Simply welding/removing doubles (what ever procedure your modelling app uses) will eliminate that...
No - NO double extrusion took place...
I have checked in another topic and I think I can put the file up as long as I am not selling anything.
So here goes... I've zipped it up and stored it on my webspace.
http://www.tdrd.karoo.net/test/
I am NOT asking for people to do this for me - NOT AT ALL - but if anyone can take a look and actually tell me whats wrong I would greatly appreciate it - Thanks
Have you applied a smoothing modifier in ds? That may fix it...it's worth playing with the settings in parameters also.
All the other things I can think of have already been suggested.