Long clothing collar distorts when the neck of the figure twists, please help
 Jonstark
Posts: 2,738
Jonstark
Posts: 2,738
So I took an M4 shirt and did some modeling changes in Carrara to make it fit on Genesis1, looks great, so I imported the obj of the shirt into Studio and used Transfer Utility to rig it onto Genesis1.
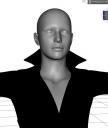
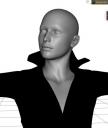
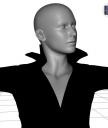
Everything works like a dream, except the for the very long collar that sticks up. When I twist Genesis1's neck, the autofollow doesn't seem to 'reach' all the way to the two tips of the collars, so all of the collar moves with the Genesis1 except the 2 collar tips, which seem stuck in place, and obviously this causes distortion and looks weird.
What's going on here, and what do I do to fix it? Looks like the collar is too large for the field/sphere/area of influence of the autofollow?
I'm pretty ignorant on Studio, so hopefully this is something simple that I'm overlooking.

Daz 3D is part of 
Connect
DAZ Productions, Inc.
7533 S Center View Ct #4664
West Jordan, UT 84084
Licensing Agreement | Terms of Service | Privacy Policy | EULA
© 2026 Daz Productions Inc. All Rights Reserved.
Comments
Its the bending not the morphs, so you're probably going to twiddle with weight maps, but fear not! Its easier than you think!
The easiest method is to go into the weight mapping mode (click the icon that has a paintbrush in front of a weight)
In the scene tab, select some part of the clothing item other than the root (the neck will probably be good for this one since you'll get some visual feedback on whats going on)
Right click on the figure in the viewport > geometry selection > select all, (it should highlight yellow)
Go to the tool tab (or open one if you don't currently) you should see some maps labled x-axis, scale, etc select the first one (you can probably ignore anything labled bulge)
Right click on the figure >weight editing > smooth selected: set smooth factor to 100%, smoothing iterations to something like 20, and uncheck restrict influence. repeat this for all the axis and the scale maps (since you've unchecked restrict influence you don't have to select other parts of the figure it will smooth them too)
This will clear up weight mapping issues about 90% of the time.
If issues are still being had, you'll have to manually edit the weight maps, which, honestly, isn't nearly as scary as it sounds The Daz documentation center actually has some good tutorials if you search for weight mapping
In case this is hideously explained heres some of the relevant wiki stuff, the first one in particular talks about the smoothing tool.
http://docs.daz3d.com/doku.php/public/software/dazstudio/4/userguide/creating_content/rigging/tutorials/weight_map_brush/start
http://docs.daz3d.com/doku.php/public/software/dazstudio/4/userguide/creating_content/rigging/tutorials/weight_mapping_a_figure/start
Thank you very much j cade. I followed the steps but still getting the same result, so I will have to investigate manually editing the weight maps, but thanks to your links and description I believe you've put me on the right path :)
Manual weight map edit in DS is quite intuitive. Could even be fun once you get into it...
Select Genesis Neck bone, grab the Weight tool.
Tool Setting pane, select the Brush icon with an S (for smooth), which should suffice for your purpose
Active the Symmetry across X axis
(Everything after this is my guestimate based on the pics shown)
click on the Y Rotation map, the main suspect, and smooth-paint away. You'll get instant visual feedback
do the same for the 2 Bulge maps under Y rotation if necessary
smooth the Z rotation map if it still wonky
Good luck...
Thank you Mythmaker, that seems to have worked (maybe using the 'smooth' brush was the missing link? not sure), now the collar follows the twisting of the neck, the collar tips move with the rest (well actually they don't when I'm twisting, but as soon as I let go they 'snap' to the right position), that's excellent help and solves my problem, thank you!
One follow up question out of curiosity, if you happen to know the answer: what if I didn't want the collar to move at all or at least very little, even when the Genesis neck twists? Like for example a very stiff piece of clothing. Is there a way to do that too?
y'know, too, loose sleeves wouldn't twist with arm or twist to a lesser degree, bend yeah, twist not so much
There's probably a faster way to do it but I would just manually erase the weight on the said maps. (If I right click to remove the maps sometimes it crashes DS so if you must erase the maps wholesale, do it from the Remove Selected at the bottom right)
To erase weight from the maps manually is easy, use the P brush while holding down Alt.
For your stiffen-the-collar purpose, perhaps some more smooth brush blurring will do, no need to erase all I reckon... Holding down shift and alt on S brush also add subtle effects, play around...
Oh these collars are just determined to fight me at every turn :) So thanks to the prior help I've now dealt with the collar tips not moving when the neck is twisted, all is well.
But then I discovered when I morph my Genesis from its default to a specific larger character (in this case, Kenji7) the autofit makes all the clothing get bigger and take the same shape as well (exactly as expected and working just fine) but the tips of the collars suddenly distort slightly as well (in reaction to the head resizing I think). This seems like an entirely different problem, but I have no idea how to solve it.
Does anyone have any ideas?