-
Rec 2020 turns Reds Black? Any fix?
I agree with Richard. As I understand it exr is in linear color space, that means all the possible physics values so an "unlimited" gamut. Think of it as the raw rendering buffer before color mapping. Then color mapping is the transfer function from the linear space to the output space, mostly srgb for normal monitors.
converted G3 to G2 male mophs not workingRichard Haseltine said:
You could apply the morph, set the resolution to base (Parameters pane>Mesh Resolutuion group), then export as OBJ and in the options dialogue pick the daz Studio preset and the option to export only the selected geometry. Then you could use Edit>Figure>Moprh Loader Pro (or Advanced), select the Daz Studio preset, and select the exported OBJ, and load it to get an SD version of the shape - which could be converted. However, this would lose all links to JCMs and so on - extra morphs that trigger when the main shape is applied and a particular bend or other shape is applied. You could figure out what was missing, manually set and export them, and load them as new morphs. You'd also have to redo and joint centre adjustments, and then use ERC Freeze to link those to the morph and the Property Hierarchy to reconnect the JCMs. With the original to act as an example that would be entirely possible, but a lot of work.
it is sounds like a lot of work but if i get what i want then it will be worth it, thanks.
IT WORKED! THE MORPH LOOKS GREAT THANK YOU SO MUCH FOR YOUR HELP!!!
Problem with Royal Eastern Dragon: Wings and LAMH Manetags_art said:
So, running into a couple of issues. I'm trying to do a cover for a book by a friend of mine, which requires a dragon with a mane and wings. The DAZ Dragon 3 and the Royal Eastern LAMH mane sounded like the perfect combo.
1) I can't load the LAMH mane on the DD3; it loads an entirely new Royal Eastern dragon figure.
Okay, so I'll just load that, says me. (See attachment DSRE LAMH Load. Please note the apparent missing files. I have a Mac with OS 10.13.6 installed - side note, does the general DS4.10 latest update work with OS 10.14.1? I've been holding off on updating, because I want to get this cover done!)
So, I've saved that figure (without doing any other changes, save the name in the scene), and reloaded it. (See attachment DSRE LAMH Saved.) No problem.
Then, I need to get the wings back on, and remove the tendrils. Due to previous experience, I just render the tendrils invisible, then delete the "Wingless Dragon" figure parented to the Royal Eastern Dragon, here named Candle. Save it, fine. Then to check it, I clear the scene (wait for DS to finish quitting on me, and bring it back up again), and reload the scene.
2) The mane hair is crazily all over the dragon figure (see DSRE LAMH Reload 2 - With Removed Wingless).
Problem. This is what I really need help with - how can I prevent this from happening, while still having both wings and mane?
Also, another issue I ran into (but didn't take screenshots for, because of the freezing going on); when I tried to apply any morphs/shaping to the Candle (aka Royal Eastern Dragon) figure, DS basically froze (with, you know, the colourful spinning Mac wheel), and then quit. I tried doing the body weight morph for the full figure the first time, and then I clicked on head to do the horn morphs (because Candle has heavy horns) the second time, and as soon as those things were done... bam. Frozen DS, spinning wheel, nothing to do but wait for it to quit unexpectedly.
Help, please!
(Thankfully, I do have the background scenery I can work on in the meantime, but I'd like to get the dragon issue fixed as soon as possible. Thanks!)
Do you have an account on your system named Admin? I can't tell you what support told me When I Put the in Ticket about this, hasn't been solved yet. Even if you set up your machine with Admin you get this, So you still get an error. You can apply textures after it loads.
Celebrity Look-a-Likes for 3D figures part 3Shinteo's Bianca Helen is now available for download. Apparently she is a Playboy model, so don't search at work...
https://www.patreon.com/posts/bianca-helen-for-63564084
Puredigital101 has a Greta Thunberg morph for G8F ...
https://sharecg.com/v/98863/gallery/5/3D-Model/Greta
They also have several other morphs that I don't recognise; does anyone see any resemblences in this group?
https://sharecg.com/pf/full_uploads.php?pf_user_name=puredigital101New! Novica & Forum Members Tips & Product Reviews Pt 14How do I look?
I actually didn't use anything from the Little Gentleman package (morphs for G2). I just autofit the original suit to G8M and applied a head morph and some Growing Up to G8M. The suit adjusted to Growing Up morphs with auto follow. It has some distortion, especially the buttons. The 3Delight materials were bad looking in Iray. I applied shaders. But, from a distance, it look surprisingly good for such and old product.
 AOBB's The Scandinavian for G8.1M head morph. No materials nor textures.
Fair warning - I am fixing all the head morphs I have uploaded so far starting with the Hollywood Glamour series. I'm fixing those weird teeth. I don't know how I could have missed that. So far I have done all the gents from the HG collection, the Astronaut and the Debutante. I have changed a little bit the shape of Debonair's head and made his eyelids thicker but it is still the same face. I also moved The Astronaut's jaw a little bit back and made his lips bigger, however all those changes are subtle.
I have also finished the G8.1F head morph of the lady whose render I posted before. I called her Serene. Here is a promo image of her (she looks much different than in the previous image even though I have only widened her jaw somewhat):
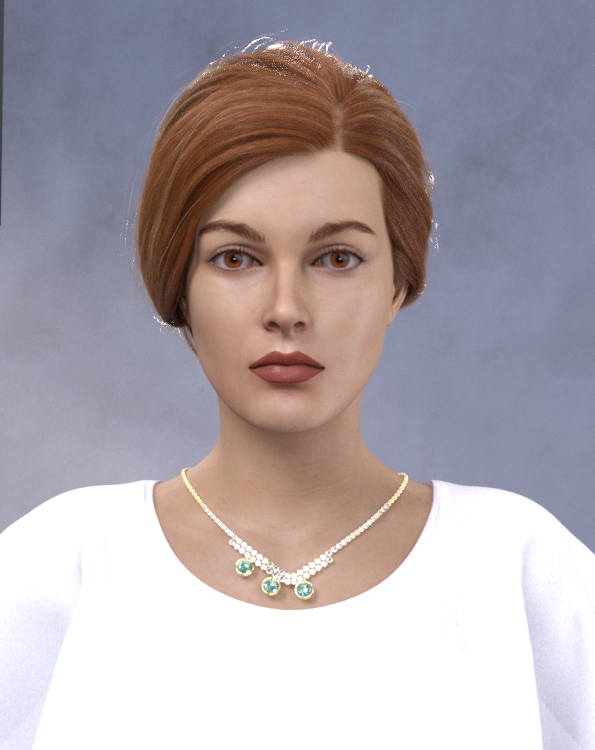
I'm lucky that the guest that is visiting us is very understanding plus I work mainly at night when she's sleeping...

Stay tuned and if you are reading this, please don't download the old morphs that came before The Scandinavian, because the upgraded versions will arrive all in one thread pretty soon (including the new lady)!
Cheers,
AOBB
converted G3 to G2 male mophs not workingYou could apply the morph, set the resolution to base (Parameters pane>Mesh Resolutuion group), then export as OBJ and in the options dialogue pick the daz Studio preset and the option to export only the selected geometry. Then you could use Edit>Figure>Moprh Loader Pro (or Advanced), select the Daz Studio preset, and select the exported OBJ, and load it to get an SD version of the shape - which could be converted. However, this would lose all links to JCMs and so on - extra morphs that trigger when the main shape is applied and a particular bend or other shape is applied. You could figure out what was missing, manually set and export them, and load them as new morphs. You'd also have to redo and joint centre adjustments, and then use ERC Freeze to link those to the morph and the Property Hierarchy to reconnect the JCMs. With the original to act as an example that would be entirely possible, but a lot of work.
converted G3 to G2 male mophs not workingRichard Haseltine said:
Please do not multi-post, I've left this one as a courtesy to those who replied even though it is not the first.
Please don't use whatever you used to compose the first post - it came in with light text on a dark ground.
Please do not post images of textures, nude figures.
-----------------------------
An HD morph, which is accessibly only for Daz PAs making content for the store, moves the virtual vertices created by the SubD process. Standard morphs move only the vertices of the base cage mesh to which SubD is applied to smooth out the final shape.
sorry about that i never posted in here so i got a little confused won't happen again, and thanks for answering!
after some reading I realise that these morphs cannot be converted but isnt there a way to maybe copy the shape of the body and face without the HD details i would have really like to use them in g2?
sorry about the 2 extra masseges it got duplicated for some reason
converted G3 to G2 male mophs not workingPlease do not multi-post, I've left this one as a courtesy to those who replied even though it is not the first.
Please don't use whatever you used to compose the first post - it came in with light text on a dark ground.
Please do not post images of textures, nude figures.
-----------------------------
An HD morph, which is accessibly only for Daz PAs making content for the store, moves the virtual vertices created by the SubD process. Standard morphs move only the vertices of the base cage mesh to which SubD is applied to smooth out the final shape.
Transfer a character morph to her fibermesh hairUse Autofit no Transfer Utility.
Transfer a character morph to her fibermesh hairHello,
could anybody, please, tell me how to transfer a character morph to her fibermesh hair?
More in details
from G8.1F to G8.1F head morph of a character.Automatic transfer utility is not providing the result I am hoping for.
Fibermesh done in Zbrush.
Thank you in advance!
AB
converted G3 to G2 male mophs not workingJust tried this myself; indeed, the morph sliders have no effect on the shape. When I use the 'full' LYFR Orc setting, the height of G2M changes (as it should) but again no change in shape...... so I'm afraid in this case it's just not possible to do...
converted G3 to G2 male mophs not workingHi,
I have problem with converted G3 male morph by genX.
I converted the orc male morph from LY Fantasy Races HD Faces and Bodies.
I converted a lot of other morphs and they worked great so I really don't get why these morph aren't working at all, in G3M it seems that the morph isn't using any other morph and it works but in G2M there is no change!
can someone please help me with this?!
thanks in advance.Moving DAZ Content off of C: Drive in 2020Phatmartino said:
This post was originally a question I had about finishing this process halfway through, and I was able to successfully get it done... So I thought I'd change this to lay out the exact steps I used for anyone else who might be looking to do this.
If you already have your Content on a new drive, you can scroll down to the Red Headings and skip straight to Pointing DIM and Daz to your new Content Folder.
Otherwise...
These are the steps to follow in the case that you're a Windows 10 user, don't use Daz Connect and have DIM set to Delete Downloads after Install.
Copying My DAZ 3D Library to a new Drive
There's really one folder that you need to worry about moving for sure, it's C:\Users\Public\Documents\My DAZ 3D Library. This is where your Daz Store bought (and 3rd party Manual Installs if you've done that to the default Data, People and Textures Folders) Content all resides.
I'll mention now, that when accessing this folder in any way using Windows Explorer interfaces of any kind, the above mentioned path is probably:
C:\Users\Public\Public Documents\My DAZ 3D Library
Some of the directions below require the actual physical path which is:
C:\Users\Public\Documents\My DAZ 3D Library.
Just keep this in mind when you have to browse to it in Windows Explorer.
I read when looking into this to use robocopy (which is a native feature in Windows 10) to copy your My DAZ 3D Library folder to another Drive, because it allows you to be sure ALL files are copied, where Windows Explorer is notorious for trying to decide what Hidden Files, or Files it thinks should be Hidden, or empty Folders might not be copied. I don't know for sure that it's absolutely necessary, but it worked perfectly for me.
1. At your Desktop, on the keyboard hit: "Windows Key + R" (R only capitalized so it's easy to see here)
2. In the little interface that opens, type: cmd then hit Enter or the [OK] Button
This opens your Command Prompt where you can feel like a computer enthusiast from the late 20th Century...
3. Here's the string you'll want to input:
robocopy "C:\Users\Public\Documents\My DAZ 3D Library" "D:\My DAZ 3D Library" /xo /e /v /a-:h
The above example can be copied and then pasted into the Command Prompt, assuming you're ok with the new location being D:\My DAZ 3D Library. If you want a different location on your D: Drive or another Drive, E:, G:, etc, just replace the D:\My DAZ 3D Library with your desired path, keeping in mind that the folder at the end of your Path MUST be My DAZ 3D Library. For example, I used G:\DAZ Transfer\My DAZ 3D Library.
If you do want to change that path, it may be easiest to create a new Text Document by right clicking on the Desktop, and pasting the robocopy string you copied from above into the Text Document, make your changes there, then copy the string again from your Text Document and paste that into your Command Prompt (this is because in the Command Prompt you can't edit the middle of a string, you have to backspace to where you want to make a change and re-type everything from there... easier to make changes in the Text Document and Copy/Paste into the Command Prompt, especially in case you were to make a mistake and need to fix it and try again).
You do not have to physically create the new destination My DAZ 3D Library Folder (or Folder Structure) on your D: or whatever Drive you choose before running the robocoy string. Whatever path is in the second set of quotes in the robocopy string will automatically be created when you run the string if it doesn't already exist. Alternatively, you can physically create the new Folder (or Folder Structure) on the new Drive before running the string, as long as you correctly put that path into the second set of quotes in your robocopy string. It might be best to do the first option, let the robocopy string create the new Folder(s), so that you don't inadvertantly end up with something like: D:\ ... \My DAZ 3D Library\My DAZ 3D Library.
4. Whether using the new location in the example robocopy string above or an altered string for a different new location, once you've pasted it into the Command Prompt, hit Enter.
Depending on the size of your Library, it may take a while to copy all that DAZ goodness. Consider watching a handful of episodes of something on Netflix or spending some time with your family.
Once it finishes, DO NOT erase that original C:\...\My Daz 3D Library yet... Keep it around until you've successfully finished the process and confirmed that everything is working with your new location after a few more steps.
Pointing DIM to your shiny new DAZ 3D My Library folder
1. Open DAZ Install Manager
2. Click the Settings Cog in the upper right corner of the window, and in the Dropdown Menu choose Advanced Settings...
3. There are 4 Tabs, choose the one labelled Installation.
4. In the bottom area of the window, there's a field with two column headers, Label and Path. In the field below them there should be one entry, your current default My DAZ 3D Library.
Right click in the open area of that field underneath the entry that's already there, and choose the one option, Add Content Path Shortcut...
5. In the window that opens, there are two fields to fill in...
Label : - This can be anything you want, it's probably for people who set up multiple paths to distinguish them from each other.
Path : - Click the Button [...] at the right end of this field to open a Windows Explorer style interface and browse to your NEW My DAZ 3D Library folder, wherever you ended up putting it.
In this Win Explorer Interface, you want to have your new My DAZ 3D Library folder highlighted either in the hierarchy (Left Column), or in the Right Browsing area, then click the [Select Folder] button at the bottom of the interface.
6. You're back at the Installation Tab now. Directly above the field you just added the Shortcut to, there's a Bar labelled Content Path Shortcuts:
Click that Bar and select the New Shortcut you just made in the last step.
7. Click the green [Accept] button.
At this point, you're set up to have DIM installations go to your new My DAZ 3D Library location. Yay!!
You could go back into the Settings Gog, Installation Tab, and in the bottom field headed Label: and Path:, you could Right Click on the original Default Shortcut (it's not there for me now to confirm exactly what it was called) and choose Remove, but it also doesn't matter if it sits there for the rest of time, so you should wait until you've completely finished the rest of the process and confirmed everything is working before removing it if that's your intent.
Confirm that DIM is set up to Install to your new My DAZ 3D Library folder
If there's anything sitting in the Ready to Download tab under Products (not Product Updates) in your DIM, it is an easy chance to test your work so far and confirm that a new Installation goes to your new My DAZ 3D Library.
1. Use DIM to install something that currently is not. Hopefully if you"re going through this process there's a good chance there's something you've un-installed or never installed because of it's size for you to use. If so, go ahead and Install it.
2. Maybe you're familiar with browsing your Content using the Content Library Tab in Daz, or going to actual Texture folder locations to do some editing, or installing things manually from Renderosity or Freebie sites... If so, use your knowledge to browse in Windows Explorer to your new My DAZ 3D Library, and search in any way you can for the product you just installed. Worst case scenario, while browsed to your new My DAZ 3D Library folder, you could use the Search feature to look for the product by name.
Hopefully you'll find it's been installed there... You can also browse to the same location in your original C:\Users\Public\Public Documents\My DAZ 3D Library and confirm that the newly installed product IS NOT there as well.
If both of the above are true, there's not much left to do!
Pointing DAZ to your shiny new DAZ 3D My Library folder
1. Open Daz Studio
2. Go to your Content Library Tab
If somehow it's not docked somewhere or something that you don't use regularly, in the Main Menu Bar select:
> Window > Panes (Tabs) > Content Library
3. In the Content Library Tab's Left Column / Folder Hierarchy (it can be easiest to look at if you collapse everything as far as possible by clicking any "Down-Pointing Arrows" so that they point to the Right), you're looking for 2 Folders:
> DAZ Studio Formats
> Poser Formats
4. Start by Right Clicking on > DAZ Studio Formats and selecting Add a Base Directory...
5. No matter where the Windows Explorer style interface that opens is currently pointing to, use it to browse to your new My DAZ 3D Library folder. This is the same as when we did it in DIM, you want your new My DAZ 3D Library folder to be highlighted either in the Left Column Folder Structure or in the right side browsing area, and hit the [Select Folder] button at the bottom of the interface.
6. Click the Right Pointing Arrow next to > DAZ Studio Formats to expand it, and you should now see 3 folders under it:
> My Library
> My DAZ 3D Library
> My DAZ 3D Library
The bottom > My DAZ 3D Library is the one you just added. You can confirm this if you like by right clicking on it and choosing Browse to Folder Location...
7. Right Click the MIDDLE (first of the two) > My DAZ 3D Library and select Remove Base Directory.
ALMOST DONE!!!
8. Now repeat the same exact process starting from Step 4 just above, this time Right Clicking on > Poser Formats (instead of > DAZ Studio Formats) selecting Add a Runtime Directory..., etc. Finish the rest of the Steps exactly the same way, only under > Poser Formats (instead of > DAZ Studio Formats) and dealing with Runtime Directory instead of Base Directory.
Now you should be fully migrated and set up to have your new My DAZ 3D Library used by both DAZ and DIM.
Deleting your original My DAZ 3D Library folder
Try using Daz Studio for a bit. Close it, re-open it and make sure everything is working properly, then when you feel comfortable doing so, you can travel over to your poor old C: Drive and delete your old My DAZ 3D Library folder.
1. In Windows Explorer, browse to:
C:\Users\Public\Public Documents\
2. With the folder My DAZ 3D Library selected in the Right Browsing area, on your keyboard hit Shift + Delete. This is a Keyboard Shortcut to bypass the Recycling Bin.
3. A window will pop up asking "Are you sure you want to permanently delete this file/folder?"... Click [Yes].
This may take at least a little time depending on the size of your Library, but once it's finished, so are you! Congrats!!
Hopefully this helps out anyone who might be in the same particular situation I was, feel free to ask any questions at all. If I can't answer them, there are several abolutely brilliant people who already responded to help me and will if needed for any questions that come up.
Hi there, amazing amazing guide, thank you so much.
I have followed the step you have mentioned accordingly. And everything seems to work fine.
However, when I try to install some new products by the DIM, it says "download failed" . And I'm wondering if you might help me sort out that lil issue.
With some products it works, with some others, it just doesn't and keeps saying "download failed".
Everything seems to be set accordingly, and the Daz Studio is also in accordance with your instructions.Please, let me know and thank you in advance.
How do I create more material zones? new: how to increase polygons ... Possible?It would probably be easier to use a map. You could divide the emsh in a modeller, then use the Transfer utility to rig that to match the original and transfer the morphs.
Diffeomorphic DAZ Importer version 1.6.0 released@plsgohots A more detailed and precise description would help. Anyway mhx has limits to transfer the animation back to daz studio since it uses a different structure than the daz rig and some retargeting is needed. To retarget by hand you can use any retargeting tool available for blender there are many.
Or you can animate with the simple-ik rig that uses the exact daz rig so no retageting is needed.
Ladies AND Laddies of Mousso appreciation threadLove this thread - always great to see how people render the awesome Mousso figures.
One thing I did find with her latest model MSO Eunji is that there is a Echo morph listed in the asset file instead of Eunji. Aslo when Eunji is loaded in the scane tab she is listed as MSO Mina (from the Sweet Chaoz bundle).
When I get a chance I will raise a tciket to Customer Service. Anyone else have the same issue.
David
Suggestions for Recreating An Alien Horror Scene?I'm trying to recreat a horror scene like in the Alien movie where the xenomorphs were bursting out of human bodies. Then suddenly I realized there is no such a morph to creat a realistically looking open wound/slash/cut on both g8f and g8m. Can anyone make some suggestions as for how to circumvent this situation? Geometry editing? Transparency/material manipulation? Thanks!
Secret Aztec Templelink because I keep having to look it up reading this thread
https://www.daz3d.com/secret-aztec-temple
a send to Hexagon and the smooth brush could probably reduce it too
I don't own it or I would create a thin lipped morph in Zbrush for you
AOBB's The Scandinavian for G8.1M head morph. No materials nor textures.@SapphireBlue - your image is just soooo cool. It could be in some great magazine! "Your" Scandinavian looks much better than "mine"! Wonderful job and great posing! Thank you and I'm honored that you made a special place in your gallery for your renderings using my morphs.
@Three_Wishes - Those A-ha guys were really good looking and the video for "Take On Me" was a real blast. Another of their songs that was popular and I loved was "Hunting High and Low".
@Kainjy - It would be great to turn this head morph into a product and make it easier to use. Thank you for the willingness to help! I really appreciate it !

I have created a new head morph that still requires some work and as I have a guest now for a longer while staying at my place I don't really have time to finish her. In the end though I'll upload her:
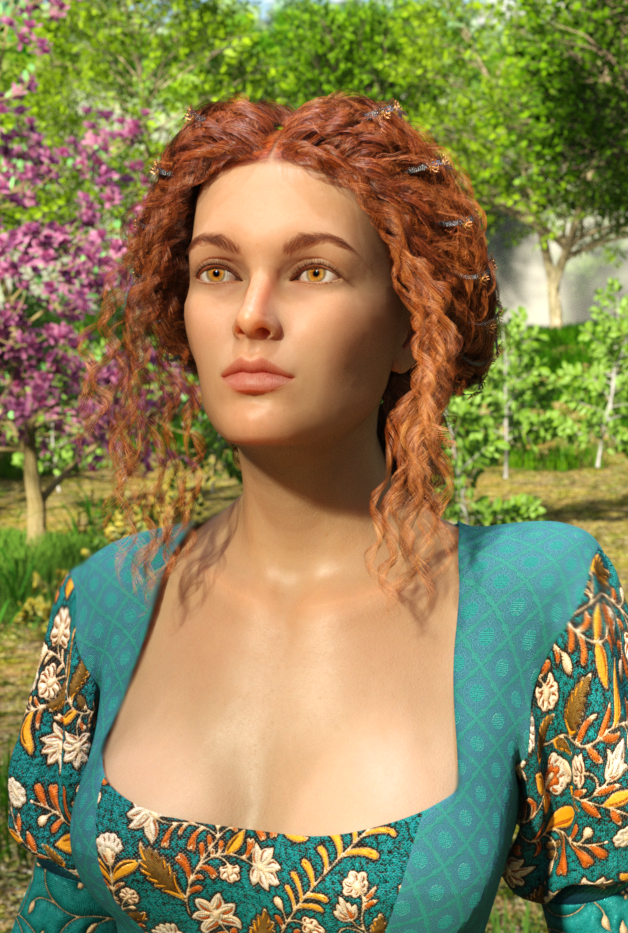
You will find another image with her here:
https://www.daz3d.com/gallery#gallery=newest&page=1&image=1215716
Thank you for all your appreciation. It's like having honey poured all over my heart.
AOBB
Daz 3D is part of

Connect
DAZ Productions, Inc.
7533 S Center View Ct #4664
West Jordan, UT 84084Licensing Agreement | Terms of Service | Privacy Policy | EULA
© 2026 Daz Productions Inc. All Rights Reserved.