-
[Released] LAMH2Iray Catalyzer: 1.8 update available [Commercial]
@Alessandro_AM, I am looking forward to this. But does it work with the clothing made here at the Daz store? In particular these items;
The NightQueen Wardrobe Collection for Genesis 3 Female
https://www.daz3d.com/the-nightqueen-wardrobe-collection-for-genesis-3-female-sSnow Angel for Genesis 3 Female
https://www.daz3d.com/snow-angel-for-genesis-3-femaleLord of Snow for Michael 4
https://www.daz3d.com/lord-of-snow-for-michael-4sorry no he said further up in his thread only his animals Alces alces, Bear Cubs, Beaver, Bison, Cervidae, Fox, Giant Anteater, Kangaroo, Koala, Raccoon, Easter Hemisphere Squirrels, Porcupine, Skunk, Tasmanian Devil, Thylacine, Warthog, Wolf2, Woolly Mammoth and the Real Fur for BC2. (so far) and not the spin off animals based on his like the Husky and German Shepard that uses his Wolf2. Probably work on all the upcoming ones he's working on though
[Released] LAMH2Iray Catalyzer: 1.8 update available [Commercial]@Alessandro_AM, I am looking forward to this. But does it work with the clothing made here at the Daz store? In particular these items;
The NightQueen Wardrobe Collection for Genesis 3 Female
https://www.daz3d.com/the-nightqueen-wardrobe-collection-for-genesis-3-female-sSnow Angel for Genesis 3 Female
https://www.daz3d.com/snow-angel-for-genesis-3-femaleLord of Snow for Michael 4
https://www.daz3d.com/lord-of-snow-for-michael-4Non-photorealistic Renders (NPR)This is an illustration for a detective story; the first half of the story featured that guy studying (I posted it a few months ago), so I had to kinda match the style and colors I used then. This is for print, so the strokes might look a little thick, but this is to keep them from washing out during the print process. Last time I used a finer line, and it reproduced okay... but I wanted a strong stroke this time. Here's hoping it works this time.
Any thoughts on these variations? (And these are just the top contenders, I've made several differentt variations, but can't decide what I like).
Before you pick your favorite, please click on the full-size image (in the list of attachments below) to see how the enlarged version looks. There's a LOT of detail in this.
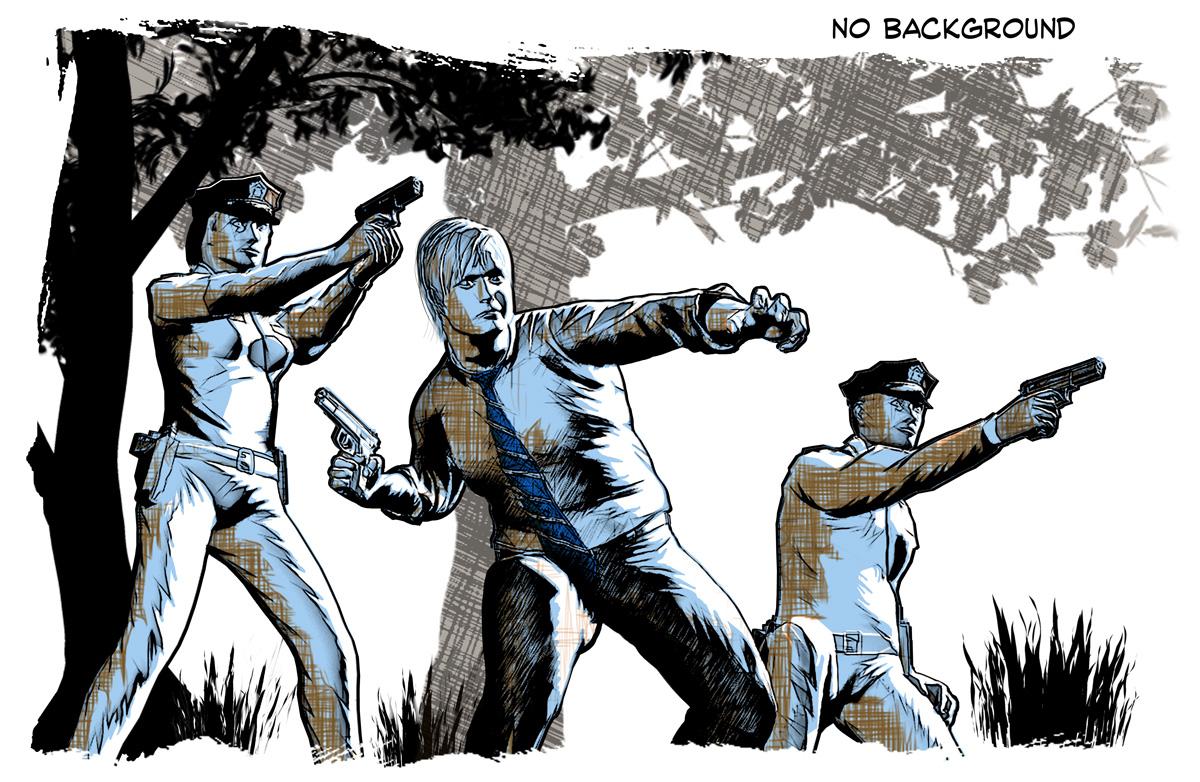

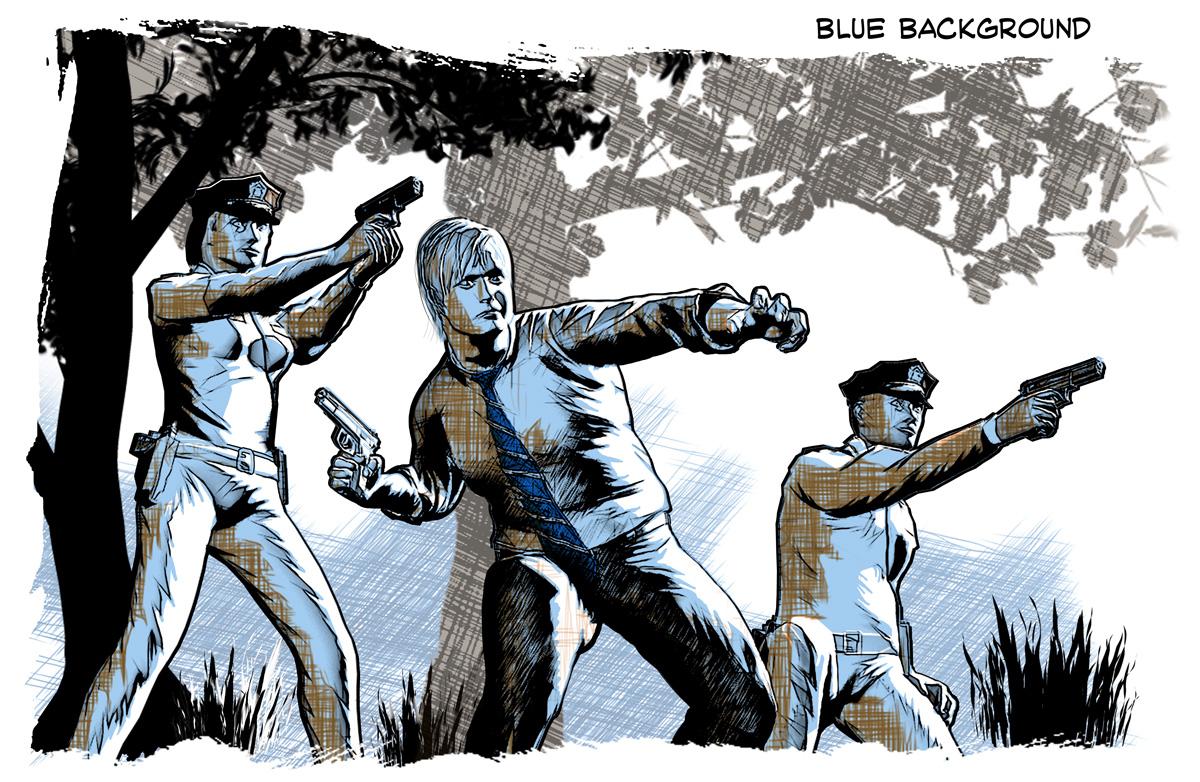
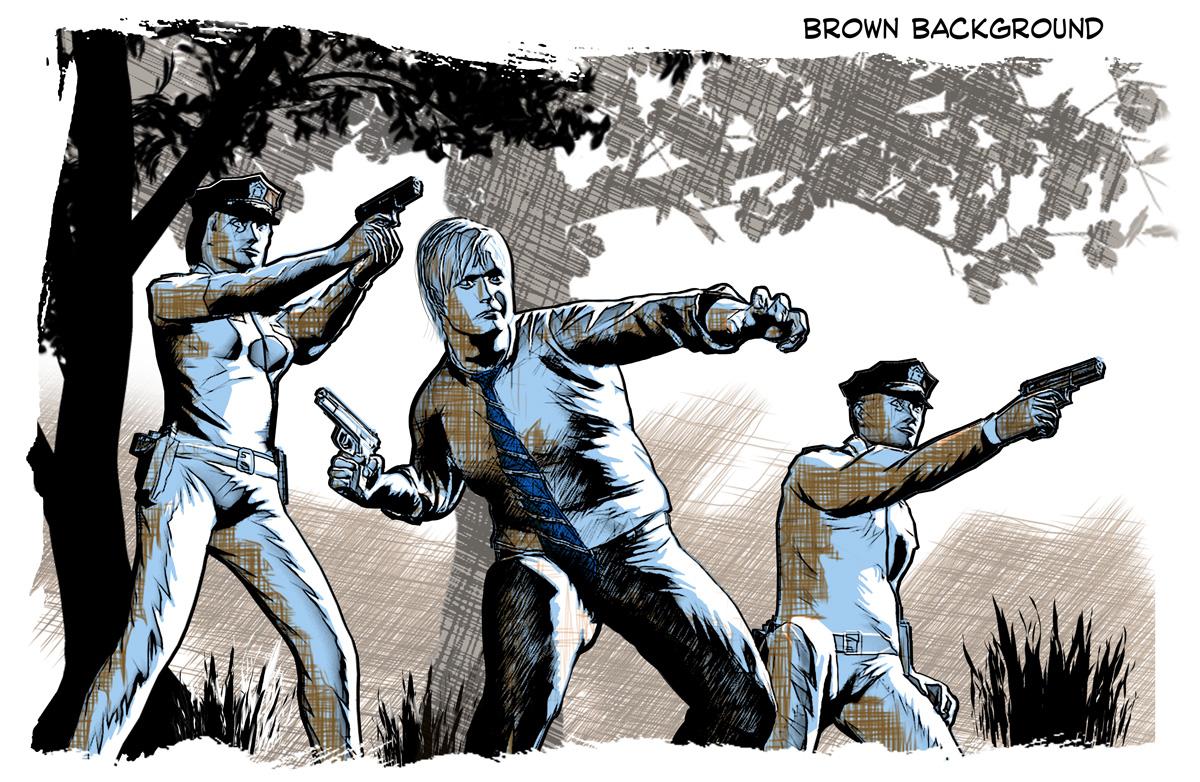
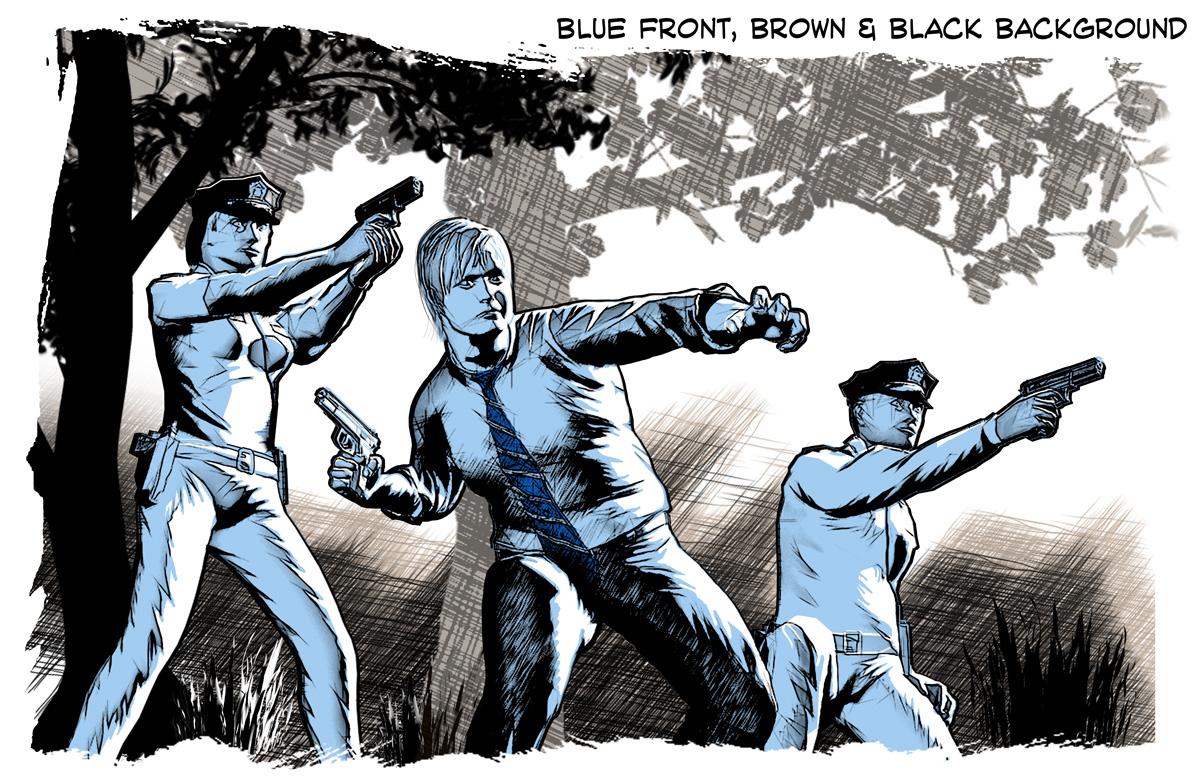
BTW: Created in Poser 11 Pro and Photoshop with Akvis Sketch. Central figure is Michael 4 (w/lots of morphs), other two figures are Predatron Lo-Rez Police.
All of them are great, but I will say the last one strikes me the most. I like the parrallels of the characters and the background.It sort of gives me a feeling that this scene is in the night time.
Toon Generations Clothing CompatabilityStrictly, without buying other products, any Generation 3 Male clothing fits to Toon Generations 2 Male and any Generation 3 Female clothing fits to Toon Generations 2 Female.
I have bought DAZ's Cross-Figure for Genesis 3 clothing product and that allows the Genesis 3 Males and the Genesis 3 Females to wear each others' clothing.
For them to wear Genesis 2 Male, Genesis 2 Female, Genesis, or even Victoria 4 or Michael 4 clothing you could buy the entire suite of a product like 'Wear Them All' (there are other products too that do that) or you can search the internet and find the tutorial on how to do that yourself (which is possible otherwise the product authors would not have been able to make their products). I chose to buy the Wear Them All (and several other products within reason) instead of manually converting all the clothing one generation at a time until I got to the newest generation. Look for SickleYield tutorials on how to do that if you like.
*Closed* RRRR A long time ago or Far far away Contesttag: luci45 #8
The SandwichA long time ago Beck brought his wife Vicky a sandwich and a glass of wine.
Used:
M4 Casual Wear
i13 Sandwiches
Beck for M4
Jonas Hair for Genesis 3 Male(s)
Dental Plan 2 HD for Genesis 2 Female(s) (LB)
Genesis Ranger Textures (LB)Also used:
Legacy UVs for Genesis 3: Michael 4
Victoria 6
Anjou Hair
Elijah 7
various morphs
Collective3d Portrait Vignettes Contemporary 5 How can I organize all of this mess?
Oh and by the way - this also helps with the "compatible items" question you raised. It helps to understand the chronology of figure development. David, Dusk, Dawn were some of the earliest; their stuff isn't compatible with anybody. Get rid of all of it is my advice. Then came Victoria 4 and Michael 4, then Genesis (with V5 and M5), Genesis 2 (with V6 and M6), Genesis 3 (with V7 and M7) and now Genesis... 8! With V8 and M8 so now all the same-generation numbers match. Or something.
So when you organize all your clothing by figure generation, you know where to look for compatible clothes. You can get a Wear-Them-All plugin that allows Genesis 3 Males, for example, to wear any previous generation's stuff (male or female if that floats your boat) back to M4. Others can tell you how to expand that list more, but that's all I need.
Likewise with poses. My 3D Library/People/Figure/Poses/Name of Pose Set (and) Vendor. No more lost poses, ever.
Non-photorealistic Renders (NPR)This is an illustration for a detective story; the first half of the story featured that guy studying (I posted it a few months ago), so I had to kinda match the style and colors I used then. This is for print, so the strokes might look a little thick, but this is to keep them from washing out during the print process. Last time I used a finer line, and it reproduced okay... but I wanted a strong stroke this time. Here's hoping it works this time.
Any thoughts on these variations? (And these are just the top contenders, I've made several differentt variations, but can't decide what I like).
Before you pick your favorite, please click on the full-size image (in the list of attachments below) to see how the enlarged version looks. There's a LOT of detail in this.
BTW: Created in Poser 11 Pro and Photoshop with Akvis Sketch. Central figure is Michael 4 (w/lots of morphs), other two figures are Predatron Lo-Rez Police.
Wow that's a hard one. I'm going to say the very last one.
Non-photorealistic Renders (NPR)This is an illustration for a detective story; the first half of the story featured that guy studying (I posted it a few months ago), so I had to kinda match the style and colors I used then. This is for print, so the strokes might look a little thick, but this is to keep them from washing out during the print process. Last time I used a finer line, and it reproduced okay... but I wanted a strong stroke this time. Here's hoping it works this time.
Any thoughts on these variations? (And these are just the top contenders, I've made several differentt variations, but can't decide what I like).
Before you pick your favorite, please click on the full-size image (in the list of attachments below) to see how the enlarged version looks. There's a LOT of detail in this.
BTW: Created in Poser 11 Pro and Photoshop with Akvis Sketch. Central figure is Michael 4 (w/lots of morphs), other two figures are Predatron Lo-Rez Police.
New content from Posemaster not showing upNot sure what you mean by 'Studio format folder'
I just created a subdirectory/folder within the current folder for each batch and had Posemaster save them there.
So if i was in a Michael 4/General poses folder, I would save to michael 4/General poses/convertedForGenesis.
Note - I just found one of those batches in MyLibrary/Presets/Poses/ConvertedForGenesis - they show up in Carrara's browser and DAZ's and all work! Can't recall if I manually dragged that folder in as a test - so will need to try again - but dragging whole folders is simple enough so this is a perfectly workable solution for getting usable .duf pose files for carrara.
Novica & Forum Members Tips & Product Reviews Pt 9Thank you for posting this, Novica! I am one of those people who have always struggled with GenX2. I did finally get it to work on an M4 about a year ago. A couple of months ago I needed to do another and ran into the same thing. Couldn't get it to work, didn't know what I was doing wrong, spent hours trying to find the solution. I'm bookmarking this and clipping it into my Evernote folder to refer back to!
I'm going to do a "may wanna try this" post for those who are getting back to GenX2 from a prolonged absence (me) and who need some refresher tips.
First, there's a lot of videos but here's one that really nails it, with perhaps a couple areas which you can tweak. So, let's start with my experiences last night and how I finally ended up tackling it. Feel free to provide your thoughts/ how you do it. Before you watch the video and get started, DO THIS:
1.) First make sure you have GenX2 installed. I did, but somehow when I went from studio 4.8 to 4.9, only GenX was installed. I KNOW I had GenX2 installed previously, because I discussed what I was doing on the GenX2 thread with Ralf, and in PMs- and posted my results in my threads! So whacky. How do you check? If you use DIM, just go type in Genesis Generation X2 and be sure it's installed.
2.) In the studio, go to Help>About Installed Plug Ins> and click on Genesis Generation X2. At the bottom, it will tell you the version number. 2.1.1.0 is the latest.
3.) I recommend this Black Sun Comics video: and start at 3:15 Here's some more helpful tips when watching that:
You find the GenX tool in Window (Panes/Tabs) then after you click on it, you can drag it wherever you want.4.) He doesn't change settings at the bottom. If you're going to do that, do it first so you don't forget. I changed Resolution to a lower number, which means sharper details. The official thread said not to get that ultra low (You can go to 0) and last time I used this, I had 30 and the results were very good. Default is 50, but the pdf mentions lowering it. What do you folks use? I also changed the limits to -20 and 20. I also compress the files, as per the discussion in the Commons.
5.) Note your generation 4 figures probably won't be in the dropdown for source, you can Load Source and track it down, or drag and drop. After you do it once, they will appear in the source choices.
For dragging over the first time for V4 and M4:
Content Library>Poser Formats>Daz>Figures> DAZ People then get the cr2 (base model)
Content Library>Poser Formats>Daz>Pose>DAZ's Victoria 4 (or Michael 4) >Morph Injections>INJ Morphs+++ (get the morphs you need. See Tip, next line.)TIP: Check all your characters BEFORE YOU START to see if they need addtional morphs, some of your muscular ones may need those. Just go to Product Library and the individual product pages, it's fast and easy. WHAT I DID: I loaded up the muscularity and the Morphs+++ because those two are common. If you're doing aged people or fantasy, you'll need the others, but I picked the two I think will be most commonly used, then I don't have to worry about it.
If loading the source and doing it from Load Files, in my studio it's Content>Runtime>Libraries for both of these, then:
Character>DAZ People>(Victoria 4, etc) for the base
Pose>(DAZ's Victoria 4,etc) >Morph Injections>INJ Morphs++ for the morphs.After you do these Generation 4 people once, they now appear in the Source dropdown list.
6.) Generally speaking- Select Edges if you are using a Generation 4 as the source. Use Smooth for the others. The explanation for this is in the official thread.
7.) Don't forget to use Select and choose Transfer On for all Non-Zero Values
8.) Doing complete vs head then body: after watching the video, I'm a firm believer in doing heads and bodies separately, due to getting a separate slider for the head and really maximizing morphs- you get sliders for each head and mixing morphs with other ones is SOOOOO easy. The way I named mine was to identify
a) character Tiffany (which would be the body one) OR TiffanyHead
b) where it came from REN (Renderosity)
c) what figure it came from V4
so the identifier would be Tiffany_REN_V4 for the body, or TiffanyHead_REN_V4 for just the head. The Name would be the same, without the underscores (_)Choose Actor for the body (in Region) and don't forget to choose HEAD for the head!
9.) To find the body- (Target, like Genesis 3 Female) > Actor > Generation X
10.) And in the Shaping pane, the head will be: Genesis 3 Female (whatever your target is) > Head > Generation X> VIctoria 4 (whatever your source was)
Hope this helps, you should breeze right along!This worked perfectly! I just moved my first V4 character to G3F. I do have a question though. Are there legacy UV's for V4 to Genesis 3F? I can't find them. I have one for m4 to G3 but can't find one for V4 to G3
Can Gen 2 or Gen 3 Poses be (all or mostly) used with V4 and V3 in Poser?DAZ's Victoria 4 and Michael 4 ( and their morph off shots) are generation 4 Poser legacy rigged figures, so generations 2 and 3 would pre-date generation 4 and also be Poser legacy rigged figures, not weight mapped. Genesis 1 and 2 are generation 5 and 6, use DAZ's TriAx weight mapping and can be used in Poser through DAZ's DSON Importer plug-in for Poser. Genesis 3 and Genesis 8, generation 7 and 8, use Dual Quaternion rigging that is not compatible with Poser at all.
The older generation: Victoria 2/3, Michael 2/3 and their children rendersFor my sister I call it
Becky's Angel
Freebies:
Angel: Character V2 Character Morphs by Kimber.
Angel: Clothing Free Sample SheetZ For Victoria 4 by jepegraphics.
Angel: Clothing Infinite Dimension Outfit by rross128.
Angel: Pose Female Figure Pose Pack #1 by Poser Nightmare.
Environment: Background Cloudy Skies Backgrounds-01-Part 6 Of 8 by pixlgirl.
Environment: Birds Flock 3D Model by Forester. Need PoseRay to convert to obj file. Mec4d shader Anotized surface
Environment: Plant Vase flowers N050317 by Andreo.
Shader: Clothing Pd-Daz Studio Soft Leather Shaders by Parrotdolphin.
Freebies Nolonger Available
DAZ:
Angel: Base Victoria 2.0 by DAZ 3D.
Environment: Lighting FWSA Soft Light Probes by Forbidden Whispers.
RuntimeDNA Freebies:
Angel: Wings Techno Seriph Wings by Eric VanDycke Traveler.
Clothing: Chains RDNA Industrial Age Chain 1 by Traveler.
Clothing: Star and weight Luna and Star Cage by Traveler.
Environment: Cross Gothic Cross by Traveler.
Paid Fors:
Angel: Hair Vayne Braid by AprilYSH.
Shader: Cross Mec4d PBS Shaders vol.2 for Iray by Mec4d.
Shader: Flock and Pedestal Mec4d PBS Shaders vol.1 for Iray by Mec4d. Confused About Skins
I just purchased "Legacy UVs for Genesis 3: Michael 4" so that I could use M4 skins on my G3 boys. However, upon reading the user guide, it looks like there's still more to do.
Apparently I need to change the M4 skins to .dufs. I have read a tutorial on this, and it went waaaay over my head
 . The user guide mentioned a "Michael 4 Skins Batch Converter". Cool, awesome, something else to buy (heavy sarcasm implied). The problem is, when I look that up, I only see "M4 Skins Batch Converter to Genesis 2 Male(s)". Well, my G2 skins don't work on G3, so how will that help me?
Could someone please help me figure out if I'm missing a step, or a product, or if I'm just going about this all the wrong way? I'm feeling rather silly right now with my G3 all geografted up with nothing to put on!
 Novica & Forum Members Tips & Product Reviews Pt 9
@jakiblue Thanks for recommending the Simple Details products. I use Generation 4 a lot, and these look really good, so I picked them up with the Rendo coupon that's good through the end of today. Here's the product on GypsyAngel's Jericho for M4. I used Anagenessis 2 on the skin and added a free bulge morph from Adam Thwaite's site. The pose is from M4 Comic Combat. The shoulders look very good here. I double checked to make sure the morph was working with his morphs, and it does work just fine. Will do a V4 with Simple Details soon too.
Click and zoom in for details. Not sure why it looks blurry when reduced, but I didn't get a lot of sleep last night so everything is blurry! LOL
 Is there a A gondolier outfit anywhere
I seem to remember one a very long time ago. Michael 4 or earlier. Haven't a clue where I saw it.
Novica & Forum Members Tips & Product Reviews Pt 9Thank you for posting this, Novica! I am one of those people who have always struggled with GenX2. I did finally get it to work on an M4 about a year ago. A couple of months ago I needed to do another and ran into the same thing. Couldn't get it to work, didn't know what I was doing wrong, spent hours trying to find the solution. I'm bookmarking this and clipping it into my Evernote folder to refer back to!
I'm going to do a "may wanna try this" post for those who are getting back to GenX2 from a prolonged absence (me) and who need some refresher tips.
First, there's a lot of videos but here's one that really nails it, with perhaps a couple areas which you can tweak. So, let's start with my experiences last night and how I finally ended up tackling it. Feel free to provide your thoughts/ how you do it. Before you watch the video and get started, DO THIS:
1.) First make sure you have GenX2 installed. I did, but somehow when I went from studio 4.8 to 4.9, only GenX was installed. I KNOW I had GenX2 installed previously, because I discussed what I was doing on the GenX2 thread with Ralf, and in PMs- and posted my results in my threads! So whacky. How do you check? If you use DIM, just go type in Genesis Generation X2 and be sure it's installed.
2.) In the studio, go to Help>About Installed Plug Ins> and click on Genesis Generation X2. At the bottom, it will tell you the version number. 2.1.1.0 is the latest.
3.) I recommend this Black Sun Comics video: and start at 3:15 Here's some more helpful tips when watching that:
You find the GenX tool in Window (Panes/Tabs) then after you click on it, you can drag it wherever you want.4.) He doesn't change settings at the bottom. If you're going to do that, do it first so you don't forget. I changed Resolution to a lower number, which means sharper details. The official thread said not to get that ultra low (You can go to 0) and last time I used this, I had 30 and the results were very good. Default is 50, but the pdf mentions lowering it. What do you folks use? I also changed the limits to -20 and 20. I also compress the files, as per the discussion in the Commons.
5.) Note your generation 4 figures probably won't be in the dropdown for source, you can Load Source and track it down, or drag and drop. After you do it once, they will appear in the source choices.
For dragging over the first time for V4 and M4:
Content Library>Poser Formats>Daz>Figures> DAZ People then get the cr2 (base model)
Content Library>Poser Formats>Daz>Pose>DAZ's Victoria 4 (or Michael 4) >Morph Injections>INJ Morphs+++ (get the morphs you need. See Tip, next line.)TIP: Check all your characters BEFORE YOU START to see if they need addtional morphs, some of your muscular ones may need those. Just go to Product Library and the individual product pages, it's fast and easy. WHAT I DID: I loaded up the muscularity and the Morphs+++ because those two are common. If you're doing aged people or fantasy, you'll need the others, but I picked the two I think will be most commonly used, then I don't have to worry about it.
If loading the source and doing it from Load Files, in my studio it's Content>Runtime>Libraries for both of these, then:
Character>DAZ People>(Victoria 4, etc) for the base
Pose>(DAZ's Victoria 4,etc) >Morph Injections>INJ Morphs++ for the morphs.After you do these Generation 4 people once, they now appear in the Source dropdown list.
6.) Generally speaking- Select Edges if you are using a Generation 4 as the source. Use Smooth for the others. The explanation for this is in the official thread.
7.) Don't forget to use Select and choose Transfer On for all Non-Zero Values
8.) Doing complete vs head then body: after watching the video, I'm a firm believer in doing heads and bodies separately, due to getting a separate slider for the head and really maximizing morphs- you get sliders for each head and mixing morphs with other ones is SOOOOO easy. The way I named mine was to identify
a) character Tiffany (which would be the body one) OR TiffanyHead
b) where it came from REN (Renderosity)
c) what figure it came from V4
so the identifier would be Tiffany_REN_V4 for the body, or TiffanyHead_REN_V4 for just the head. The Name would be the same, without the underscores (_)Choose Actor for the body (in Region) and don't forget to choose HEAD for the head!
9.) To find the body- (Target, like Genesis 3 Female) > Actor > Generation X
10.) And in the Shaping pane, the head will be: Genesis 3 Female (whatever your target is) > Head > Generation X> VIctoria 4 (whatever your source was)
Hope this helps, you should breeze right along!Quick Second Skin QuestionI'm trying to make some Superhero renders, and I've noticed that most freebie textures for them seem to be M4 "second skins". I assume that those are using the M4 skin maps? Anyway, does anyone know if those will work on G3M if I buy "Legacy UVs for Genesis 3: Michael 4"?
Sorry if I'm not making much sense, I've been using Daz for a while, but textures still absolutely confound me. I think I have a mental block about them

Yes they would work with that product. They maybe second skins with painted on clothing, but technically they are identical to any other M4 skin, and so can be placed on G3M using the legacy UV product.
Quick Second Skin QuestionI'm trying to make some Superhero renders, and I've noticed that most freebie textures for them seem to be M4 "second skins". I assume that those are using the M4 skin maps? Anyway, does anyone know if those will work on G3M if I buy "Legacy UVs for Genesis 3: Michael 4"?
Sorry if I'm not making much sense, I've been using Daz for a while, but textures still absolutely confound me. I think I have a mental block about them
Cyberpunk for M4 Question and more...Novica & Forum Members Tips & Product Reviews Pt 9TIPS ON USING GENX2
I'm going to do a "may wanna try this" post for those who are getting back to GenX2 from a prolonged absence (me) and who need some refresher tips. I also got tired of trying to remember WHERE to find WHAT.
But first, to mention a generation you will definitely want to transfer up:
The V4 to Genesis 3 is not sold here, it's over at Rendo. So if you're wondering how I am doing Victoria 4, head over there to find it (at least as of July 2017.) Cayman Studios is the vendor, and it's Legacy UVs for Genesis 3: V4.
There's a lot of videos but here's one that really nails it and moves right along, with perhaps a couple areas which you can tweak. So, using my frustrating experiences last night, before you watch the video and get started, DO THIS:
1.) First make sure you have GenX2 installed. I did, but somehow when I went from studio 4.8 to 4.9, only GenX was installed. I KNOW I had GenX2 installed previously, because I discussed what I was doing on the GenX2 thread with Ralf, and in PMs- and posted my results in my threads! So whacky. How do you check? If you use DIM, just go type in Genesis Generation X2 and be sure it's installed.
2.) In the studio, go to Help>About Installed Plug Ins> and click on Genesis Generation X2. At the bottom, it will tell you the version number. 2.1.1.0 is the latest.
3.) I recommend this Black Sun Comics video: and start at 3:15 Here's a helpful tip when watching that- where to find GenX-
You find the GenX tool in Window (Panes/Tabs) then after you click on it, you can drag it wherever you want.4.) He doesn't change settings at the bottom. If you're going to do that, do it first so you don't forget. I changed Resolution to a lower number, which means sharper details. The official thread said not to get that ultra low (You can go to 0) and last time I used this, I had 30 and the results were very good. Default is 50, but the pdf mentions lowering it. What do you folks use? I also changed the limits to -20 and 20. I also compress the files, as per the discussion in the Commons.
5.) Note your generation 4 figures probably won't be in the dropdown for source, you can Load Source and track it down, or drag and drop. After you do it once, they will appear in the source choices.
For dragging over the first time for V4 and M4:
Content Library>Poser Formats>Daz>Figures> DAZ People then get the cr2 (base model)
Content Library>Poser Formats>Daz>Pose>DAZ's Victoria 4 (or Michael 4) >Morph Injections>INJ Morphs+++ (get the morphs you need. See Tip, next line.)TIP: Check all your characters BEFORE YOU START to see if they need addtional morphs, some of your muscular ones may need those. Just go to Product Library and the individual product pages, it's fast and easy. WHAT I DID: I loaded up the muscularity and the Morphs+++ because those two are common. If you're doing aged people or fantasy, you'll need the others, but I picked the two I think will be most commonly used, then I don't have to worry about it.
If loading the source and doing it from Load Files, in my studio it's Content>Runtime>Libraries for both of these, then:
Character>DAZ People>(Victoria 4, etc) for the base
Pose>(DAZ's Victoria 4,etc) >Morph Injections>INJ Morphs++ for the morphs.After you do these Generation 4 people once, they now appear in the Source dropdown list.
6.) Generally speaking- Select Edges if you are using a Generation 4 as the source. Use Smooth for the others. The explanation for this is in the official thread.
7.) Don't forget to use Select and choose Transfer On for all Non-Zero Values
8.) Doing complete figures, vs head then body: after watching the video, I'm a firm believer in doing heads and bodies separately, due to getting a separate slider for the head and really maximizing morphs- you get sliders for each head and mixing morphs with other ones is SOOOOO easy.
The way I named mine was to identify:
a) character Tiffany (which would be the body one) OR TiffanyHead
b) where it came from REN (Renderosity)
c) what figure it came from V4
So the identifier would be Tiffany_REN_V4 for the body
OR TiffanyHead_REN_V4 for just the head. Then the Name would be the same, without the underscores (_)Choose Actor for the body (in Region) and don't forget to choose HEAD for the head!
So now you have your morphs. Load up your target figure (the figure you're putting this on, such as Genesis 3) and now to apply those morphs, using the Shaping pane. (First, remember to dial in your Source figure to 1.0. For example, Victoria 4. If you are putting that source onto the Genesis 3 Female target, you would select Genesis 3 in Scene. In Shaping, Genesis 3 Female > Actor > Generation X > Victoria 4 OR you can just type Victoria 4 in the search of the Shaping pane. )
9.) Make sure you have Genesis 3 or your target selected in the Scene. Then choose it in the Shaping pane. Your morphs will then be > Actor > Generation X
10.) And also in the Shaping pane, the head will be: Genesis 3 Female (whatever your target is) > Head > Generation X> VIctoria 4 (whatever your source was)
EDIT: This will also help you- Let's say you messed up and want to delete the morphs. I didn't try the morphs tab, I used (and this is when transferring a V4 onto a G3F)
Content > Data > Daz 3D (note the space) > Genesis 3 > Female > Morphs > D3D Gen X > Victoria 4
Hope this helps, you should breeze right along! Once you get the morphs, then you need to do the materials. See the next post, you don't just apply materials, you may have to convert to Iray, and you definitely need to apply the UV's. A Victoria 4 skin won't just plop onto G3F.Daz 3D is part of

Connect
DAZ Productions, Inc.
7533 S Center View Ct #4664
West Jordan, UT 84084Licensing Agreement | Terms of Service | Privacy Policy | EULA
© 2026 Daz Productions Inc. All Rights Reserved.