-
why is my daz so slow!!I think I have the same specs as you. More or less. If you mean 4gb ram. The only time mine is slow is when loading my runtime libraries. But it doesn't take 10 minutes. Loading Victoria 4 takes 2 minutes max. As it loads all morphs, shapes, parameters as well etc. That's because I set it up to load everything as I never know what I'm gonna do. So if I do that, I don't have to mess around with adding elite morphs or aiko morphs or anything. It's all loaded.
ya 4gb ram sorry bad typing. the driver could be the problem. i had to try to find one that even had open gl1.3 or greater once i loade windows 10. but the computer is a slim so the graphic card is bult onto the board. so getting a beter one my be out.
July 2016 New User 3D Art Contest “Portrait Rendering” – WIP ThreadThanks for all the incredible images in this thread! I learned a lot by studying them and the accompanying comments.
@barbult asked this question about my image a couple of pages ago:
I'm curious - what character and outfit is this? I don't recognize either one.
The character is Finley -- see her at: http://www.daz3d.com/fwsa-finley-hd-for-victoria-7-and-her-jewelry
The outfit is Victoria Iven -- see it at http://www.daz3d.com/victoria-iven-for-genesis-3-females
I put Victorian hair on the Finley shape, since the woman I'm trying to portray is described that way in the books. The outfit is perfect too; long skirts, full sleeves, and high necks are her go-to clothes. There's a variant availble for this which features a white coat and a red dress.
I've learned how to increase me render times to get rid of the noise that plagued my early efforts. Now if Windows would just stop updating twelve hours in, and the power would stay up, I'll be in business!
why is my daz so slow!!I think I have the same specs as you. More or less. If you mean 4gb ram. The only time mine is slow is when loading my runtime libraries. But it doesn't take 10 minutes. Loading Victoria 4 takes 2 minutes max. As it loads all morphs, shapes, parameters as well etc. That's because I set it up to load everything as I never know what I'm gonna do. So if I do that, I don't have to mess around with adding elite morphs or aiko morphs or anything. It's all loaded.Jim's ThingsHey guys, thanks for the feedback :)
Here's a new one. I started this gas mask months ago and always had trouble rigging it. Because I made it based on the V7 morph it turns out I needed to "reverse source shape from target". So after being up all night coming to grips with rigging more complex items I got a bit lazy when it came to render time.
 V4 clothing on G3F - tutorial
hey guys i'm sorry i might sound way off the subject but i already tried that but its seem a bit off so i wanted to get the v4 and i did but whenever i install it doesnt show i installed everything from victoria 4.2 pro bundle but i cant find it in my smart content nor the content library
any help would be greatly appreciated
That's very odd. I've installed the pro bundle and everything shows up for me. I'm not sure why it's not showing up for you. :( I wish I could help.
V4 clothing on G3F - tutorialI've been doing this for a while now. I didn't realize it was anything special. lol I just load G2F next to G3F. Load the clothes first to G2F then Fit To G3F. It definitely requires Victoria 4 for Genesis 2 Female. :)
Now if only I could do it for dude clothes. lol I suppose I need "Wear Them All" for that. :) I've been wanting that for a while but have waiting for it to go on sale.
Mid-Summer March Madness V4 discount not working properlyFeatured items for Victoria 4 ONLY $4 EACH**
OR $2.50 EACH WITH PURCHASE OF ANY MID-SUMMER MARCH MADNESS ITEM
Works only if you add two things ... grrrrrrrrrr
GenX2 Update / Genesis 3 Add-On [Commercial]How apt that IsaacNewton would codify the gravity of this situation for me, clarify my understanding, (and also use as an example the very V4 character I was attempting to convert to G3F). If not for his screenshots I might never have resized the GenX window so I could get a better view (especially since the first several times I attempted to drag and drop the character preset into GenX, nothing seemed to happen). Although I understand English very well, I am not fluent in Poserese, in which the GenX manual is written, or rather, encoded.
Turns out my initial problems were caused by GenX 2.0x in the Plugins folder keeping the newer version (2.1.0.0) from properly installing (and I would not have known about this if not for item 4 of Dimension3D's caveat checklist on page 3---about halfway down the page). After that, I still did not understand that the character morph would appear in the Parameters tab under Generation X after I had loaded Genesis 3 Female Base (because it was not explicitly stated as such). Nor was it mentioned that I would have to dial in the appropriate amount of the character and of Victoria 4 to get the desired results; (I found that .5 of Victoria 4 and 1.0 of the character got me closest to the original Tiffany V4 character).
Speaking of building characters, I find that Daz Studio and its lack of documentation (or easily accessible documentation) forces me to continually and consciously stay calm because the rising tide of frustration always beckons. Thanks to everyone who posted on this thread so I could glean enough to finally get my first character converted. I humbly request that anyone else who fights through the morass of jargon to get to the GenX promised land share their eureka insight(s) that cleared the way for them.
ZDG random Daz Studio discoveries and questions.Set the UV to Victoria 7 on the eyes for V7's mats, see if that helps, it might be >just< that much different from the default UVs.
ZDG random Daz Studio discoveries and questions.OK, Iray distraction over with, somewhat disappointingly, on to the Alt shader.
Saving a preliminary is not all that difficult, the eyes and makeup will be far more tedious.
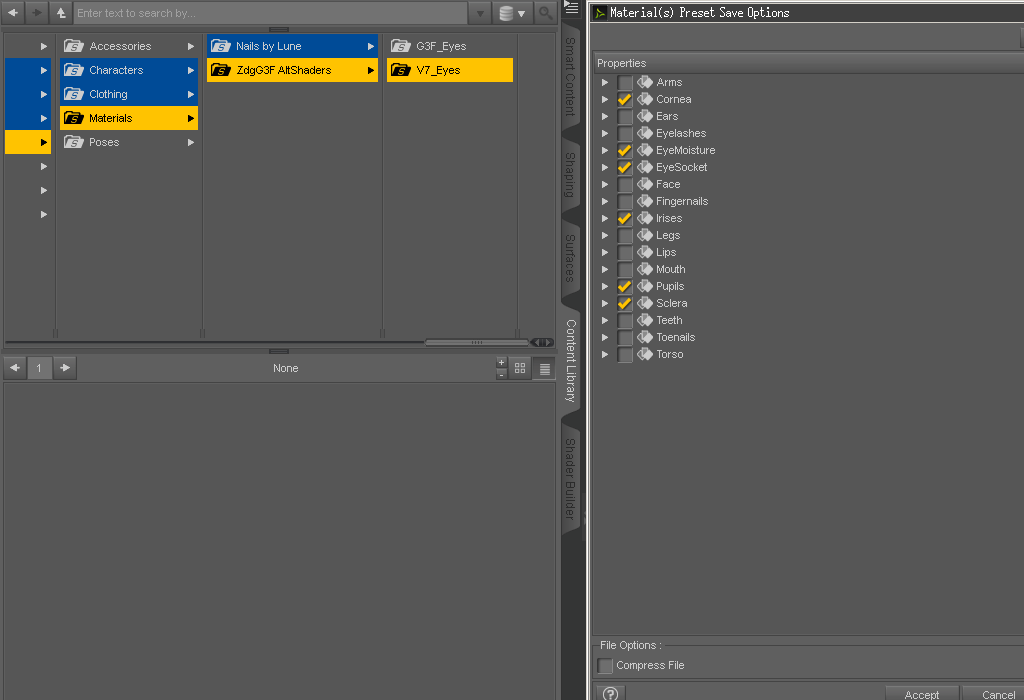
Eyes require swapping out the maps, and selecting the specific zones to save for the "Material Preset". Thankfully the zoning on G3F is a tad easier to work with then G2F when it comes to switching maps for some stuff, and it's fewer checkboxes to click threw in the Mat save selection window.
That checkbox for the Eye socket may have been a mistake I'll need to fix on G3F's alt shaders, tho I'm not sure yet. Some zones look better if they use the backing colors of the skin and others are better with no backing (like teeth and Irises). I'll need to look at that really quickly here. It's important for things like using V7's eyes on other figures that have drastically different skin settings (like FWSA Samira HD).
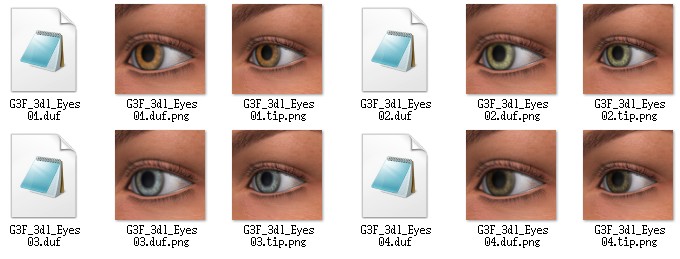
OK, before I load and re-save the G3F ones, I'll need to save all them cool icons and Thumbs I made. FYI, the icon is 91x91 pixels, and the 'tip' is 256x256 pixels. I'm still thinking about what corner is best for the '3DL' text overlay on the icons.
OK, that dealt with, I now have another oddity.
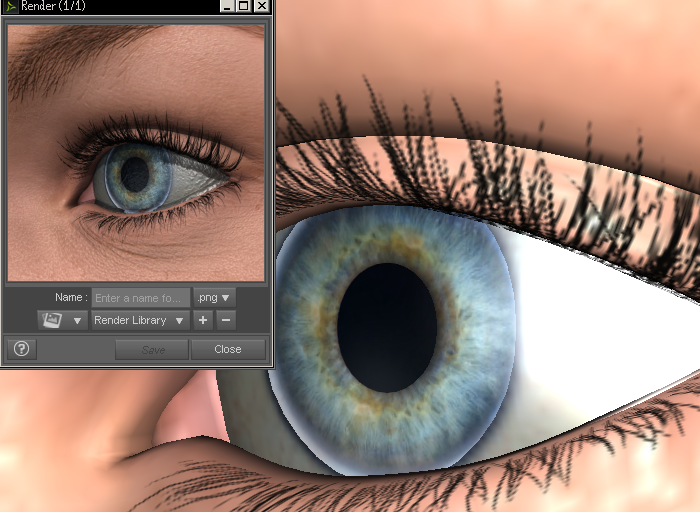
This is the same exact eye alt shader settings I've used the past few months on many figures with no problems at all. Yet for some reason V7's eye 02 and 03 maps have that odd glowing ring around the Irises. It is not there on maps 01 or 04 or any of the G3F maps. Hmmm.
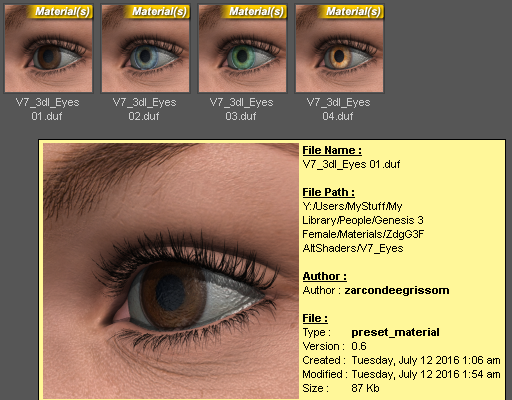
Getting there. TBC...
Getting Started.Lip colour, Nail colour, Eye colour, Skin tones and Hair colour are "Materials" and generally come with character and hair products, or as add-ons to individual products. For example:
- Your free Genesis 3 Starter Essentials comes with Armani Hair (male) and Toulouse Hair (female). Each of those include multiple hair color materials for that hair. Those hair color materials work only with the designated hair model. Each hair model you buy in the store will generally come with 4 or more colors for it.
- Each character that you buy usually comes with one skin material. They generally have several eye colors and some have nail colors. You have to look at the product description and promo images to see what is included. The skin from one character can be applied to a different character of the same gender and generation. For example, you can apply Eva 7's skin to Bethany 7. There are a few products that supply only nail colors or only makeup options, but they are few and far between.
- When you purchase a clothing item, it generally comes with 1-4 different color schemes. There is very often a separate product that you can purchase to add additional material choices. Be aware that the product with extra material cannot be used without the corresponding clothing model.
Now that we have discussed "Materials", it is time to differentiate between "Materials" and "Shader Presets". Materials apply only to the model they were designed for. Shaders can be applied to any surface of any model. Materials for a character my include a "face" with lips, eyebrows, cheeks, etc.. A shader preset is generally an overall color or texture that applies uniformly to the entire surface. Applying a shader preset to the face of Genesis 3 will make the face all one color or texture, instead of looking like a "face". Shader presets are useful on clothing to change the look. For example, apply a plaid shader preset to the sleeves of a blouse to change the look. OK, I know, its all very confusing. In time you will get better understanding of these things. For now, just be aware that there is a difference in how they are used, so when you shop, you are aware that they are different.
There is an excellent Iray hair shader preset product that I can recommend, based on personal experience. That is UHT2: Ultimate Color. Since it is a shader preset product, you can use it to change the hair color of any hair product. This means that you probably can buy fewer hair color add ons for the hair products you buy. It is driven by Daz Studio scripts to make it pretty easy to use once you've read the manual and watched some of the excellent video tutorials for it.
There is also an excellent set of Iray products made by V3Digitimes for changing the look of skin. I can recommend these from personal experience, too. There is one for each generation of characters. For Genesis 3 it is Iray Smart Converter and Advanced Skin Managers for Genesis 3. These do not change the texture of the skin, but just the color, translucency, bump, etc. This family of products can convert a non-Iray skin to Iray with stunning results, which is important for the older characters like Genesis 2, Genesis, and Victoria and Michael 4. You need to purchase the corresponding Iray skin converter for each of the generations that you want to use. V3Digitimes also sells products for tanned and wet skin, but I haven't tried those.
If you want to change the color of fingernails to a simple color, rather than pattern, you can do that easily and for free. Select your character in the Scene pane and then go to the Surfaces pane. Select the fingernails surface and change the base color. Or apply one of the car paint shaders that came free in the Daz Studio Default Resources for a shiny look.
Well, I apologize for overwhelming you with words!
Superheroes Rebooted - Ready to Rrrrrender?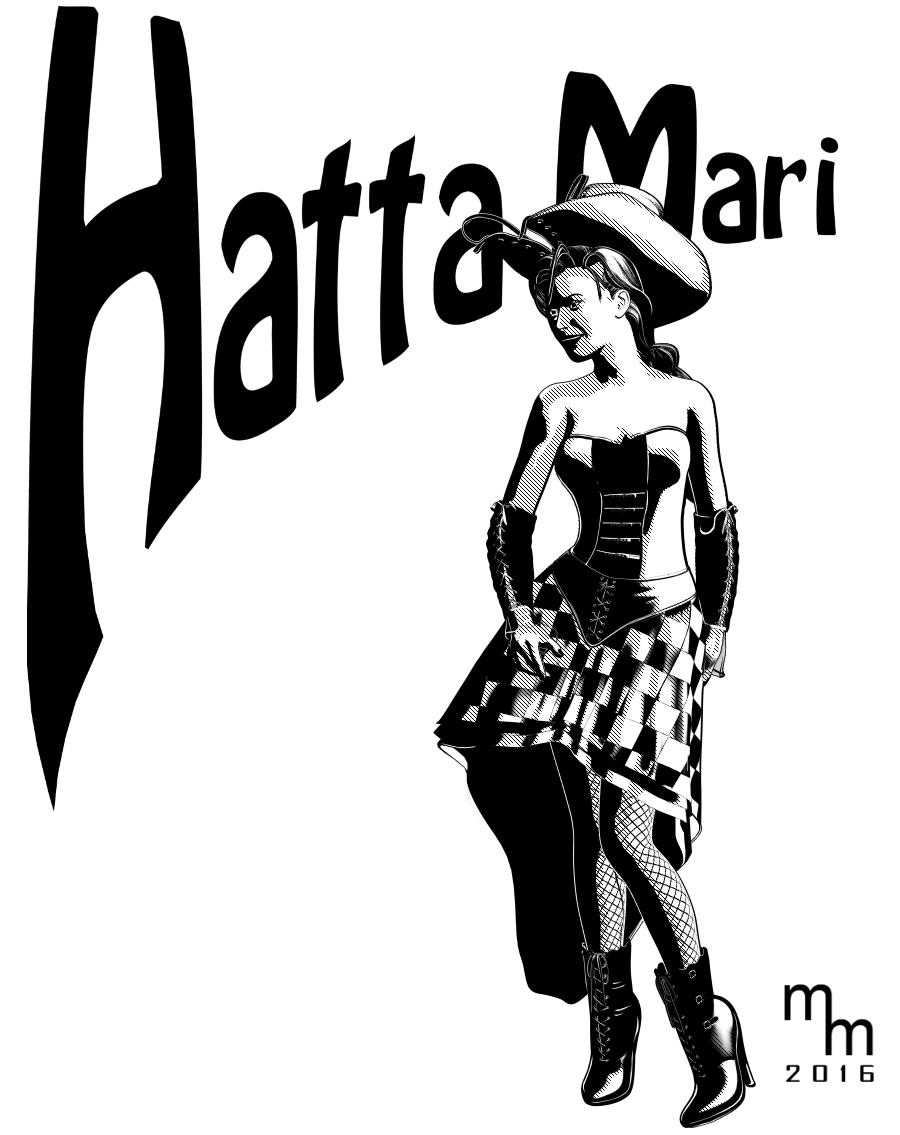
Another character study for a supervillain who will appear in my next project. She's a fun and sexy burglar with a thing for hats and Alice in Wonderland. This is Victoria 4 with some Girl 4 and Aiko 4 morphs thrown in. The textures on the skin have been simplified to just include her lips and eyebrows. The costume is Dark Rose with custom b&w textures applied for the stockings and the skirt. It was rendered in Poser 11 using the Comic Book Preview and I did touchup in Manga Studio 5. Logo was hastily created in Photoshop.
There's also another image of her in my Gallery: http://www.daz3d.com/gallery/#images/174901/
Getting Started.I'm newby myself, so take everything I'm about to say with a grain of salt. Two grains, Heck, the whole shaker.
But as a newcomer, I've had good results by first watching all the tutorials and then studying the store. I decided I'd start with Genesis 3 figures (the newest ones in the Genesis series). I got a Victoria 7, and then a Finley character for the Victoria.
Then I set about getting accessories and clothes for her, and learning to fit them, pose her, etc.
There is a learning curve. Pick a body, and then grab a single compatible outfit, plus accessories, and use those items to learn the basics. You can use a built-in body morph on the Genesis 3 Victoria to give her varying degrees of muscle build.
But the real trick, it seems to me, lies in lighting the scene, and aiming the camera. That's what I'm spending my time on now. There's a lot to learn, but it's fun to do.
Good luck with it! There are a lot of knowledgeable people around here to help.
I Bought Sickleyield Clothing Smoothers for G2FI don't own the product, but i did do a little digging. i found a post on deviantart by sy saying it's a dialed projection morph, which apprently means the morph is dialed from the characer and projects on to the clothing. Click on the character and search for the morphs listed on the product page (i.e Victoria 6 Smoother 01) and see if it pops up. If so, dial it in and see if the clothes are affected.
Star Trek Builders Unite 7: The Continuing MissionWork is progressing yet again on the TMP style Connie Engineering. I didn't bother modeling the corridors that I've added here in DAZ in Truespace because I new I'd just assemble them in Daz. The first floor is assembled and I'm kind of haphazardly assembling the second and third floors at the same time to make sure everything fits right since those are a kind of big open area. I put the small Connie in there so you can get an idea how this would orient inside the ship. The short corridors to the front of Engineering only connect to various turbolifts, but the corridor to the back would head to the cargo bay. When it's connected to the other sets I'm working on it'll just be a 90 degree Radial corridor turn. I am tempted to drop the torpedo bay somewhere off one of these corridors though instead of on the other side of the sets like I'd originally drawn up. I also threw in my usual Victoria 4 stand in so you could get an idea of scale. :)
V4 clothing on G3F - tutorialhey guys i'm sorry i might sound way off the subject but i already tried that but its seem a bit off so i wanted to get the v4 and i did but whenever i install it doesnt show i installed everything from victoria 4.2 pro bundle but i cant find it in my smart content nor the content library
any help would be greatly appreciated
Hypergenetic bioarmorWell, it would work with these onee:
http://www.daz3d.com/freak-ultra-bodysuit
http://www.daz3d.com/hiro-3-0-ultra-bodysuit (a favourite)
http://www.daz3d.com/stephanie-3-0-petite-ultra-catsuit
http://www.daz3d.com/victoria-3-0-ultra-catsuit
http://www.daz3d.com/aiko-3-0-ultra-catsuit
Which aren't too expensive, and allow you to use some other cool textures, like the Concord and Project Z series.
-- Walt Sterdan
From Russia for Rune 7Here are a few more. 1. Elena-Eva, 2. Svetlana-Victoria, 3. Anastasiya
Selbsthilfegruppe DAZ Studio - Beispiele, Fragen, Diskussion und sonstiges GequatscheHallo Miteinander,
Wahrscheinlich weiß das jeder nur ich wieder nicht.
Wenn ich ein Objekt, wie z,B. Pistole, Messer oder Axt einer Figur in einer der beiden Hände geben will und es dort kleben bleiben soll, wie stelle ich das an?
Vielen Dank für die Antworten.
Hi Commander,
relativ einfache Prozedur: wenn Du alles fertig positioniert hast, Rechtsklick auf den Gegenstand, der "kleben bleiben soll" (XYZ) und dann die Option "Change "XYZ" Parent..." linksklicken. In dem sich nun öffnenden Fenster den Körperteil der "Trägerfigur" auswählen, bei der der kleben bleiben soll. Im Fall von Waffen o. ä. Objekte wählt man da dann die linke oder rechte Hand, für Helme o. ä. Kopfbedeckungen den Kopf, usw. usw. (S. Bild "image_45"). Darauf achten, dass die Option "Parent in Place" angehakt ist.
Wenn man einen solchen Gegenstand öfter wiederverwenden will, empfiehlt es sich, das Ganze nach der vorangegangenen Prozedur als "Wearable(s) Preset..." abzuspeichern. Mit der Methode lässt sich z.B. die Pose der Hand mit einbinden, so dass man diese nicht jedesmal neu posieren muss/ein extra Pose Preset anwenden muss. Dann wird jedesmal, wenn man das Prop zuweist, auch die benötigte Griff-Pose automatisch angewendet.
Methode:
Im "Scene Tab" die "Tragerfigur" (G2F, G3F,etc.) auswählen, dann die Option "File", "Save As" und "Wearable(s) Preset..." anklicken, einen Dateinamen vergeben, und in dem nun aufploppenden Menü ausser bei dem gewünschten Gegenstand alle Haken entfernen. Dann auf den Reiter "Pose" klicken und einen Haken bei "Include Pose Settings in Preset" setzen.
In der darunterliegenden Node Liste auch erstmal alle Haken entfernen (sonst wird die komplette gegenwärtige Pose angewandt, und das wollen wir ja nicht, nur die Hand brauchen wir...) mittels linksklick auf den Figur Node (in diesem Beispiel Victoria 6). Dann wuseln wir uns durch die Node Liste, bis wir die Hand gefunden haben. Dort bei den Nodes "...Thumb 1", "...Carpal 1" und "...Carpal 2", "General" und "Pose Controls" einen Haken setzen, und dann auf "Accept" linksklicken. Schon hat man ein schickes WP mit eingebauter Pose. (S. Bild "image_48").
Die Hand an sich sollte man dabei nicht auswählen, da dann auch die Achsrotation der Hand ("Bend", "Twist", "Side-Side") mit in die Pose einfließt. Dadurch müsste man bei einer ansonst passenden finalen Pose wieder an der Handposition herumschrauben und diese wieder korrigieren. "Greifen" tun nur Daumen und Finger, nicht das ganze Patschehändchen...

Viel Spaß beim Ausprobieren.

P.S.: Falls die Frage aufkommt...
Das schicke "Glock 17" Prop in meinem Beispiel ist von FoRender.com, skaliert auf 87,3%. IMO wesentlich besser als das Renderosity Gegenstück (da vollständig texturiert) und mit schlappen $6.00 auch wesentlich günsticher. Unter "Free Products" findet man bei diesem Anbieter auch eine schicke, kostenlose HK USP inklusive Zubehör (Schalldämpfer, Lampe, Match-Aufsatz der Sport-Variante).
Help on render outputHello,
I have installed DAZ on another PC in the house and getting odd render results, even though the settings appear to be the same.
(I blocked out images incase I broke any forum rules) See pic 001, this is the image from the original PC (which is the texture I want). Its Victoria 7 with all default iRay settings. I do the same thing on the new PC, and I get whats in image 002, a washed out looking skin texture. I cant for the life of me figure it out. Any suggestions would be much appreciated. Thanks - J
Daz 3D is part of

Connect
DAZ Productions, Inc.
7533 S Center View Ct #4664
West Jordan, UT 84084Licensing Agreement | Terms of Service | Privacy Policy | EULA
© 2026 Daz Productions Inc. All Rights Reserved.