-
Anatomical Elements and Foreskin
zombietaggerung said:
nomad-ads_8ecd56922e said:
zombietaggerung said:
There's also THIS freebie on deviantart. It has some foreskin morphs for the default g8m gens.
Installed the morphs, loaded a couple different G8M figures... and can't find anything except the half-hidden morph. Looking in the actual dir paths in the zip file, I see a lot of morphs starting with the name MCM, but when I select the gens, I can't find anything in the morphs under Parameters tab with the that in the name, and there isn't a MediAsylum sub-group of morphs showing. It is clear I did install the morphs, because if I go into My DAZ 3D Library, I can find the actual files sitting in ...\data\DAZ 3D\Genesis 8\Male Genitalia\Morphs\MediAsylum\Advanced G8MGen but nothing is showing up in Daz Studio. Am I missing something? 0o
They show up for me under Advanced Control, with the gens selected:

This is just a small part of the list obviously.
Well, I guess they are ready to potty train if nothing else.
How to represent the collision of hard objects with the bodyhansolocambo said:
There's a lot in such an image to work on.
DAZ Solutions and limitations :
- Find clothes that are already dForce compatible. Or, if the wireframe is properly welded and not messy, add dForce Dynamic Surface to any cloth. Problem : for dForce to compute properly, colthes are usually optimized (wireframe not too dense). So you'll eventually get wrinkles but never as many as in your screenshot. Converting the cloth to SubD won't help as dForce computes the cloth at Base resolution. Subdivision is only visible post soft-body computation.
- You want a hand or any hard object to deform another. For that you can add a Smoothing Modifier to cloth AND to the genesis. And for both, define as collision item the hard object. The more your approach the hard object from your clothed Genesis, the more wireframe will be pushed in. Limitation : push modifier, like most things in DAZ, acts only on the Base resolution.
Blender, 3DS Max, Maya, etc. solution : you could do that in Blender, subdivide the cloth as much and simulate with the Cloth Modifier to get proper wrinkles. Your Genesis being subdivided, you'll be also able to deform the skin with more accuracy. You can then import back in DAZ the cloth and the Genesis. Copy paste textures from the original versions (as Material IDs will be the same). And render with Iray. Keep in mind that those two imported objects aren't the Genesis anymore (except of course if you decide to export it without subdivision to make a morph of the stomach) and it's not the original cloth anymore. Just 2 imported meshes without bones. But once Surfaces are copy pasted onto them, they'll look identical to the originals, with the extra wrinkles and little details you can add in another 3D app such as Blender.
Marvelous Designer : (The way I'd do it as I work this way for all my scenes with any kind of soft body deformations, pillows, skin, clothes, etc.)
- Make a custom morph for the stomach deformation.
- Export Genesis without SubD in final position + hard object a bit away from the body as obj.
- Then export Genesis with stomach deformed + hard object this time a bit inside the body : as mdd. Mdd format is a point cloud that'll enable you to play the animation (without bones) in Marvelous.
- Finally export your cloth as obj with SubD.
- Once in marvelous, import Genesis+hard object obj as Avatar. Import mdd of Genesis with stomach deformtion+hard object inside the body. Import the cloth as garment (it's subdivided and Marvelous triangulates anyway, so it won't be used as a morph anymore).
Now thanks to the .mdd you have an animation from final Pose to final Pose + stomach deformation of the Genesis and the movement of the hard object. You can now simulate the animation in Marvelous Designer and precisely shape the cloth as you want, push and pull it in real time to create those nice wrinkles. Once cloth garment looks good : export it as obj. Import that cloth back into DAZ. As it still have the Material ID information (UVs and surface) from the original, simply copy paste surfaces from original to imported cloth.
You now have in DAZ : the Genesis with your stomach deformation moprh. And a mesh simulated in marvelous Designer for the cloth.
In other words you can't really achieve a detailed image like this without knowing a bit more than the basics of DAZ. Like how to make your own custom morphs at least.The use of a third party app such as Blender, or in this case Marvelous Designer, would certainly raise the quality of the final effect.
Thankyou verymuch bro, I learned a lot from your comment !
New! Novica & Forum Members Tips & Product Reviews Pt 14barbult said:
She looks nice except for those rounded off teeth.
True. Is there a way to swap character's teeth? (Other than ghosting another character on top of another one LOL) EDIT: I found this thread. Is it possible since this character is for more than one type of gal there is a morph issue?
Wacky Modelling ~ In Carrara ~DanaTA said:
Do the legs and feet morph into the single "tail" when he goes airborne?
Dana
nope... that morph would be too hard to do... but I might be able to do an attachment for it.. hmmm

 Anatomical Elements and Foreskin
nomad-ads_8ecd56922e said:
zombietaggerung said:
There's also THIS freebie on deviantart. It has some foreskin morphs for the default g8m gens.
Installed the morphs, loaded a couple different G8M figures... and can't find anything except the half-hidden morph. Looking in the actual dir paths in the zip file, I see a lot of morphs starting with the name MCM, but when I select the gens, I can't find anything in the morphs under Parameters tab with the that in the name, and there isn't a MediAsylum sub-group of morphs showing. It is clear I did install the morphs, because if I go into My DAZ 3D Library, I can find the actual files sitting in ...\data\DAZ 3D\Genesis 8\Male Genitalia\Morphs\MediAsylum\Advanced G8MGen but nothing is showing up in Daz Studio. Am I missing something? 0o
They show up for me under Advanced Control, with the gens selected:
This is just a small part of the list obviously.
Anatomical Elements and Foreskinzombietaggerung said:
There's also THIS freebie on deviantart. It has some foreskin morphs for the default g8m gens.
Installed the morphs, loaded a couple different G8M figures... and can't find anything except the half-hidden morph. Looking in the actual dir paths in the zip file, I see a lot of morphs starting with the name MCM, but when I select the gens, I can't find anything in the morphs under Parameters tab with the that in the name, and there isn't a MediAsylum sub-group of morphs showing. It is clear I did install the morphs, because if I go into My DAZ 3D Library, I can find the actual files sitting in ...\data\DAZ 3D\Genesis 8\Male Genitalia\Morphs\MediAsylum\Advanced G8MGen but nothing is showing up in Daz Studio. Am I missing something? 0o
Are there morphs for G8F that can adjust the depth of the lines of belly muscle in a feminine way?I like the look of this on Isa for Rune 7 (for Genesis 3 Female) - I've converted it to Genesis 8 female with this: https://www.daz3d.com/character-converter-from-genesis-3-female-to-genesis-8-female
Edit: Scratch that - the HD morphs don't transfer over and there's no normal map so you lose the detail on the abs ... shame.
However, the Genesis 8 Body Morphs package has a 'Rectus Outer Detail' slider in the 'Waist' portion of the morphs that does the job.
Edit 2: Pic attached. Original Isa for Genesis 3 on the left, Converted Isa (Genesis 8 Female) with 'Rectus Outer Detail' dialled in on the right.
Are there any "smart" ways of making an asymmetric imported G8F model symmetric in Blender?Sorry... I have been very busy, and I was away camping in the mountains for a little while.
I'm back, and I have begun to work on a PDF tutorial for this. I finished part 1 of 3 parts, and will upload it here sometime next week when I am finished writing it.
For now, anyone wishing to follow the tut, you will need to download the free Blender addon 'Transfer Vertex Order' by bartoszstyperek -- You can find it here :
https://bartoszstyperek.gumroad.com/l/copy_verts_ids
I'll make a post outlining all three parts, but without the accompanying demonstration images that are included in the PDF.
AOBB's Babyface for G8.1F head morph based loosely on Jean Harlow. No materials nor textures.Her more extreme features are a little softer in your morph but it really does look like Harlow. I'll see what I can come up with for an image using the morph. I love the old Hollywood-style glamour photos.
Make hands independentRichard Haseltine said:
Right-click in the Viewport, but note that you can now skip a step and just delete selected.
Whata re you wanting to export for? Deleting chunks of mesh will make it impossible to use the result as a morph.
Nothing to do with morphs at all.
Exporting obj body sections of G8 can then be imported into the ios app Procreate. As mentioned Procreate now has a feature to import obj and USDZ files. This would allow you to draw and/or paint over 3d objects as long as they are UV mapped. Then export the results from Procreate with a new hand painted texture layer. Potentialy very powerful tool for something like tattooing with the abundance of brushes available in the app or can be downloaded along with utilizing the Apple pencil.
Someone doing 3d is laughing at the convenience of ($13.99 CAN) using this app. Just need to figure out how to export a transparent png with the contents.
The Procreate app on my 32gb 2019 ipad will not handle the full G8 obj. Exporting in smaller body sections is the only alternative.
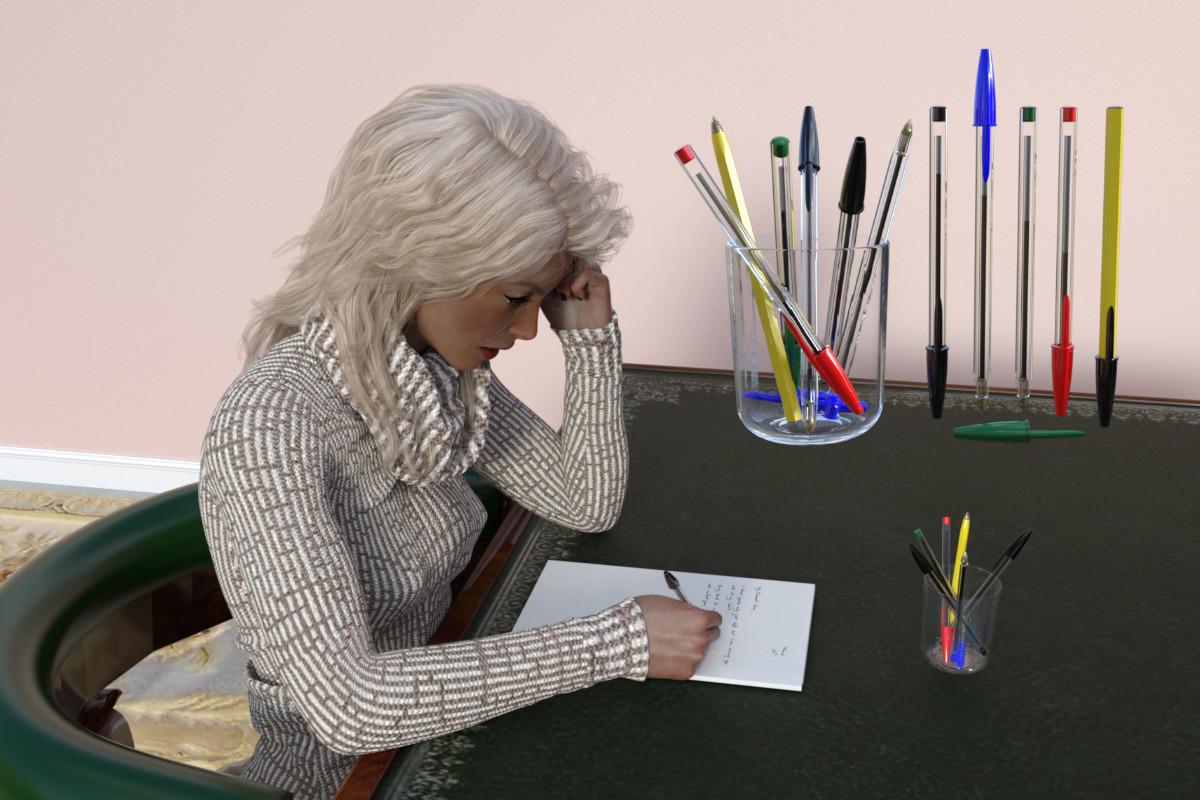
Disposable Ballpoint PensI feel like I'm going to a meeting of the AA, standing up and saying 'I have to confess that I have modelled up some disposable ballpoint pens.'. Just one fill, and then throw away; how wasteful. And how ubiquitous. As a confirmed fountain pen user, I never use these pens, and I actually had to borrow one off a colleague so I could check sizes, confirm manufacturing assumptions and relative dimensions - I've since returned it ;). They are a marvel of precision, high volume manufacturing, but on a personal level, I prefer the way a fountain pen can be re-used for more than a century (I have, and use, 4 fountain pens that are more than a century old) and mould its writing style to match your way of doing things.
Most households have a few of these pens. Many have a lot. So, please find attached a model of the pen and cap, four ink colours, a yellow body colour as well as clear. There are two wearable presets for G8F, in left and right hands. And, finally, there is the disposable pen equivalent of the Fountain Pen Tidy, a number of pens dropped randomly into a glass (my hazelnut chocolate spread glass - which is a required download for that scene subset, and this use is the reason why I started on the glass). This 'pen tidy' epitomises the sophistication of the disposable ballpoint pen.
The ink level has a lower morph, set in cm to a maximum of 9cm for when the pen is virtually empty.
Anyway, hope you like it.
Regards,
Richard.
Make hands independentRight-click in the Viewport, but note that you can now skip a step and just delete selected.
Whata re you wanting to export for? Deleting chunks of mesh will make it impossible to use the result as a morph.
Cartoonized is awesomeyangq001 said:
Hi, I wonder if there is a way to adjust the amount of cartoonization? I'd like to do about 50% of it but it's always either 0% or 100%. I wish there was a shape bar where I could select a value
@yangq001 Select your character in the Scene pane and then go to the Parameters pane. You will find the morph slider for the Cartoonized morph in the Actor/People section. It helps to locate it if you type cartoon into the filter bar at the top of the Parameters pane. There are also individual morph sliders for body and head parts under the Actor/Full Body section and Actor/Head section. Use "cartoon", not "cartoonized" for your filter string, because the individual body part morph names start with cartoon, not cartoonized.
 Gateway...
memcneil70 said:
As someone who joined the forums in late 2016 and read how many folks referred to lost posts from the previous forum, all I ask is that a priority is made to 'safely' and 'securly' transfer the current forums into the software when it is done.
Please.
Actually there have been two changes, the last of which did preserve the forums (bar some links not working, as I recall). It was the older move that didn't carry the old data across, though it remained aailable as an archive for some time.
[Released] Character Converter from Genesis 2 Female to Genesis 8 Female [Commercial]Norman_R said:
RiverSoftArt For me it looks like this. where is my mistake?

The head to the left is a common error where you had moved one of the figures before running the script. The converted morph works to push the head over to where you placed the figure. You need to delete BOTH the clone and all the morphs and run again. On first run, the script creates a clone (and never recreates it). You need to delete the clone so the script will regenerate it. It is located at C:/Users/USER NAME/AppData/Roaming/DAZ 3D/Studio4/CharacterConverterMorphs.
AOBB's Babyface for G8.1F head morph based loosely on Jean Harlow. No materials nor textures.After reading your comments about the trouble you were having getting the Jean Harlow morph right. I googled her and could see what you were talking about,
But after seeing your finished morph, she's absolutely beautiful, and very much like the images I googled. Well done! You certainly have a real gift for this.
Gateway...As someone who joined the forums in late 2016 and read how many folks referred to lost posts from the previous forum, all I ask is that a priority is made to 'safely' and 'securly' transfer the current forums into the software when it is done.
Please.
Adding Dual Quaternion support to UnrealEngine4 (Images inside)AlienRenders said:
Oh, and I'm thinking of doing a pull request to the official UE5 branch to get at least the math DQ changes added. They're just math functions and don't need to be maintained. I just have to find how they run their unit tests if they have any.
Anyways, the goal of that is that right now changing the math code affects everything. But if it's already in the official build, it would only be one or 2 dll's and some shaders that change to get DQS to work. I could maybe create a patch install for official releases. So you'd install the official release, then the patch and you have DQS. Problem there is forcing the shaders to rebuild but I think I can fix that too.
Also, the more stuff is in the official build, the likelier it is that they would include full DQS eventually.
Once I get the option to turn on/off DQS and fix the morph issues with it, I think I'll try a pull request on the main ue5 branch. The worst that can happen is they say no. If they say yes, then we're all set.
that would be amazing, we really need this fix because currently is really hard to work with daz characters in unreal with dq and the new ml deform looks abit bonk currently to be a really viable way.
How to represent the collision of hard objects with the bodyThere's a lot in such an image to work on.
DAZ Solutions and limitations :
- Find clothes that are already dForce compatible. Or, if the wireframe is properly welded and not messy, add dForce Dynamic Surface to any cloth. Problem : for dForce to compute properly, colthes are usually optimized (wireframe not too dense). So you'll eventually get wrinkles but never as many as in your screenshot. Converting the cloth to SubD won't help as dForce computes the cloth at Base resolution. Subdivision is only visible post soft-body computation.
- You want a hand or any hard object to deform another. For that you can add a Smoothing Modifier to cloth AND to the genesis. And for both, define as collision item the hard object. The more your approach the hard object from your clothed Genesis, the more wireframe will be pushed in. Limitation : push modifier, like most things in DAZ, acts only on the Base resolution.
Blender, 3DS Max, Maya, etc. solution : you could do that in Blender, subdivide the cloth as much and simulate with the Cloth Modifier to get proper wrinkles. Your Genesis being subdivided, you'll be also able to deform the skin with more accuracy. You can then import back in DAZ the cloth and the Genesis. Copy paste textures from the original versions (as Material IDs will be the same). And render with Iray. Keep in mind that those two imported objects aren't the Genesis anymore (except of course if you decide to export it without subdivision to make a morph of the stomach) and it's not the original cloth anymore. Just 2 imported meshes without bones. But once Surfaces are copy pasted onto them, they'll look identical to the originals, with the extra wrinkles and little details you can add in another 3D app such as Blender.
Marvelous Designer : (The way I'd do it as I work this way for all my scenes with any kind of soft body deformations, pillows, skin, clothes, etc.)
- Make a custom morph for the stomach deformation.
- Export Genesis without SubD in final position + hard object a bit away from the body as obj.
- Then export Genesis with stomach deformed + hard object this time a bit inside the body : as mdd. Mdd format is a point cloud that'll enable you to play the animation (without bones) in Marvelous.
- Finally export your cloth as obj with SubD.
- Once in marvelous, import Genesis+hard object obj as Avatar. Import mdd of Genesis with stomach deformtion+hard object inside the body. Import the cloth as garment (it's subdivided and Marvelous triangulates anyway, so it won't be used as a morph anymore).
Now thanks to the .mdd you have an animation from final Pose to final Pose + stomach deformation of the Genesis and the movement of the hard object. You can now simulate the animation in Marvelous Designer and precisely shape the cloth as you want, push and pull it in real time to create those nice wrinkles. Once cloth garment looks good : export it as obj. Import that cloth back into DAZ. As it still have the Material ID information (UVs and surface) from the original, simply copy paste surfaces from original to imported cloth.
You now have in DAZ : the Genesis with your stomach deformation moprh. And a mesh simulated in marvelous Designer for the cloth.
In other words you can't really achieve a detailed image like this without knowing a bit more than the basics of DAZ. Like how to make your own custom morphs at least.The use of a third party app such as Blender, or in this case Marvelous Designer, would certainly raise the quality of the final effect.
Strange arches on feetThat looks like a morph that si saved with a non-zero default value, so it is always applied, or if there is a pose applied it might be a JCM (to adjust the shape when posed) that is kicking in even when the figure shape it goes with is not applied. Do you see the arch deformation when the pose is zeroed? Does it go away, even if the figure is posed, when you zero the shape?
Daz 3D is part of

Connect
DAZ Productions, Inc.
7533 S Center View Ct #4664
West Jordan, UT 84084Licensing Agreement | Terms of Service | Privacy Policy | EULA
© 2026 Daz Productions Inc. All Rights Reserved.