-
Missing Victoria 4.2 morphs
Recap:
- Yes, I am using DIM. Forgot to mention that.
- Not using CMS. Couldn't get it running.
- Solved the PowerLoader. I have shortcuts on my desktop to for instance Victoria. Because I am always struggling to find stuff in DS. With double click, DS boots with Victoria instead of default Genesis. But in this way, PowerLoader does not start, so I never knew what you were talking about.
- With a regular boot and loading Victoria, I have the PL. So I can add the morphs. But it is for the loaded Victoria only and not the default. So this does not help me much in Carrara. But all the news morphs are working.
- Added the morph Injection folder to my Carrara browser. This gives me the option of injecting the morphs. But they do not work as mentioned before.
- Running the .bat file did not help.
- I also figured out there are two Victoria's 4.2. One Victoria 4.2 and one Victoria 4.2 QuickStart. The first one does not show up in my Carrara browser. Not sure if they are the same, because they are stored at different locations. So maybe installed the morphs on the wrong version.
- I am not so bad with animation, but solving these technical problems are not my favorite part. Maybe too impatient? I want to move on and do not want to stick with technical issues.
- And I really do not like DS. It is also so confusing, like runtime. A lot of the online documentation has no images. They all have loading errors. DS has tiny windows. But maybe it is me.
But there is good news for me and the ones who are helping me. It is solved with a new detour. I add the new morphs to my character in DS and export it as cr2 and import it into Carrara. Works perfect. Used this very good video:

For the ones who also need this.
Thanks and thanks.
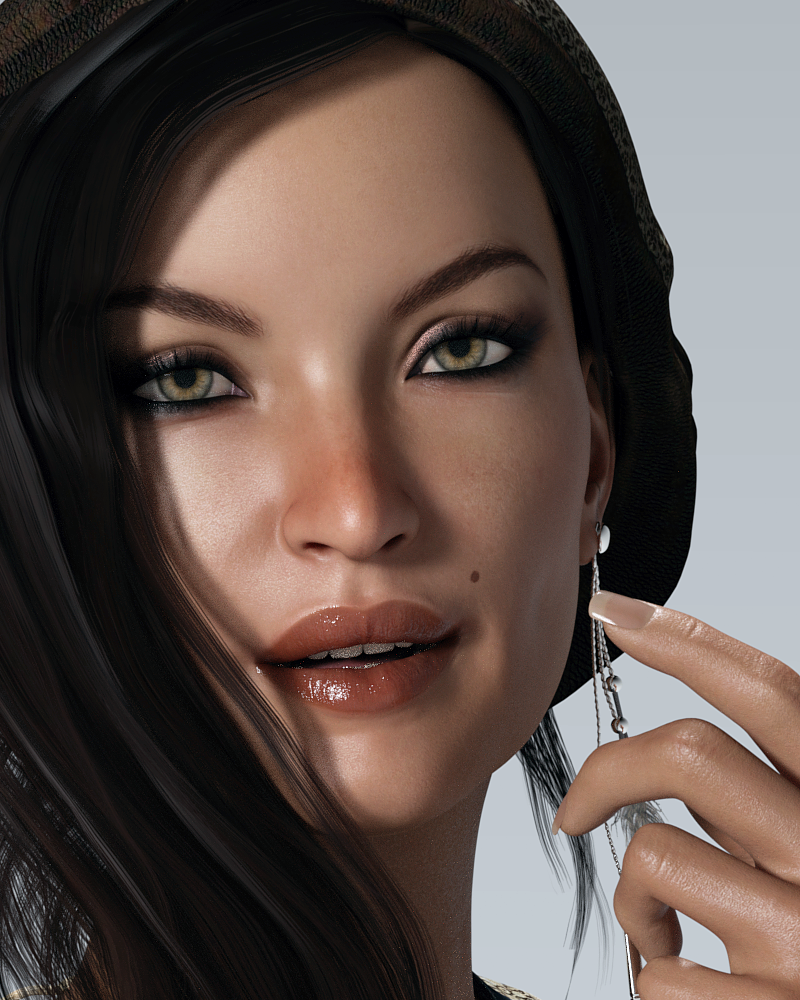
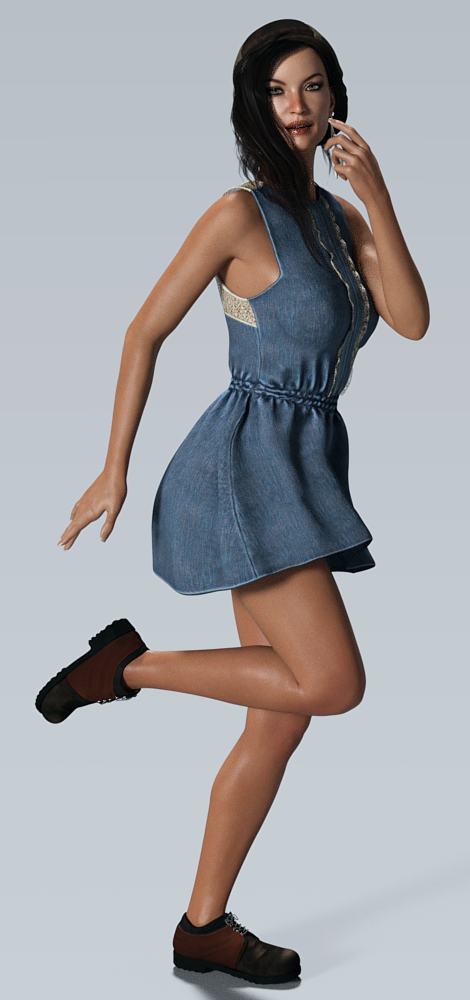
Novica & Forum Members Tips & Product Reviews Pt 8FWSA Monika HD For VIctoria 7 Street Artist for Genesis 3 Female(s)
In the featured stores, so thought I'd do this for you before getting some sleep. Click to enlarge. She seemed like a mature gal in the promos so I wanted to put her in something youthful just for fun.
 Knittingmommy's Laboratory
Knittingmommy, very nice comparison of your conversion results. Very good work. And yes, I know what you mean, doing those conversions is really time consuming.
As tools for a Batch Skin Conversion I can recommend these scripts by Draagonstorm:
http://www.daz3d.com/v4-skins-batch-converter-to-genesis-2-female-s
http://www.daz3d.com/m4-skins-batch-converter-to-genesis-2-male-s
As far as I can tell, the V4/M4 poser materials will be directly converted. No need for a .duf-conversion beforehand. At least I can not remember doing so. Everything worked fine and smoothly.
To get Genesis2 Skin Textures fitting Genesis1 there is also this batch script in addition: http://www.daz3d.com/batch-convert-genesis-2-to-genesis
Keep in mind, to get the scripts above work properly the following products are required:
http://www.daz3d.com/victoria-4-for-genesis-2-female
http://www.daz3d.com/michael-4-for-genesis-2-male
And the Genesis2 to Genesis Script requires:
http://www.daz3d.com/genesis-2-male-and-female-base-uvs-for-genesis
http://www.daz3d.com/victoria-6-and-michael-6-uvs-for-genesis
All together with GenX2 and the Add-Ons quiet an impressive list of products just to get the character conversions (morphs + textures) done. If you do not have all this already, you can put it on your wishlist for March Madness. Usually you get pretty good deals and bargains at March Madness. On occasion you may find some of the products even in FastGrab. Buying all at once is really off-putting, but I agree with Knittingmommy: Patient collectors end up happy sooner or later. :-)
There is a very detailed overview of possible conversion products for all the DAZ figures out there: http://www.daz3d.com/forums/discussion/64403/converting-to-g1-g2-g3/p1
They have added stuff since I was last playing around in G'mic. I like a lot of the little toys they have. This gives me an idea. I am goign to go play with one of my renders and post in my thread. :)
I am curious what you are up to. Will be monitoring your thread until there is something new. ;-)
Opps I got slightly sidetracked. :P I started to go back and do some more modeling and discovered a few new things and updates. Well, the rest is history. LOL
Take your time. Haste makes waste. :-)
Knittingmommy's LaboratoryIt looks like Angel transfers pretty well. That's such a lovely V4 character. I wish I had the GenX2 products she's definitely one of the ones I'd transfer, but sadly to get V4 to G3 you need to own three different GenX2 products. Ah well, I think Genesis 4/Victoria 8 will be coming out in 4 1/2 months or so, so I guess I'll hold on to my money and pray someone comes out with a product that can go directly from V4 to Genesis 4. lol :)
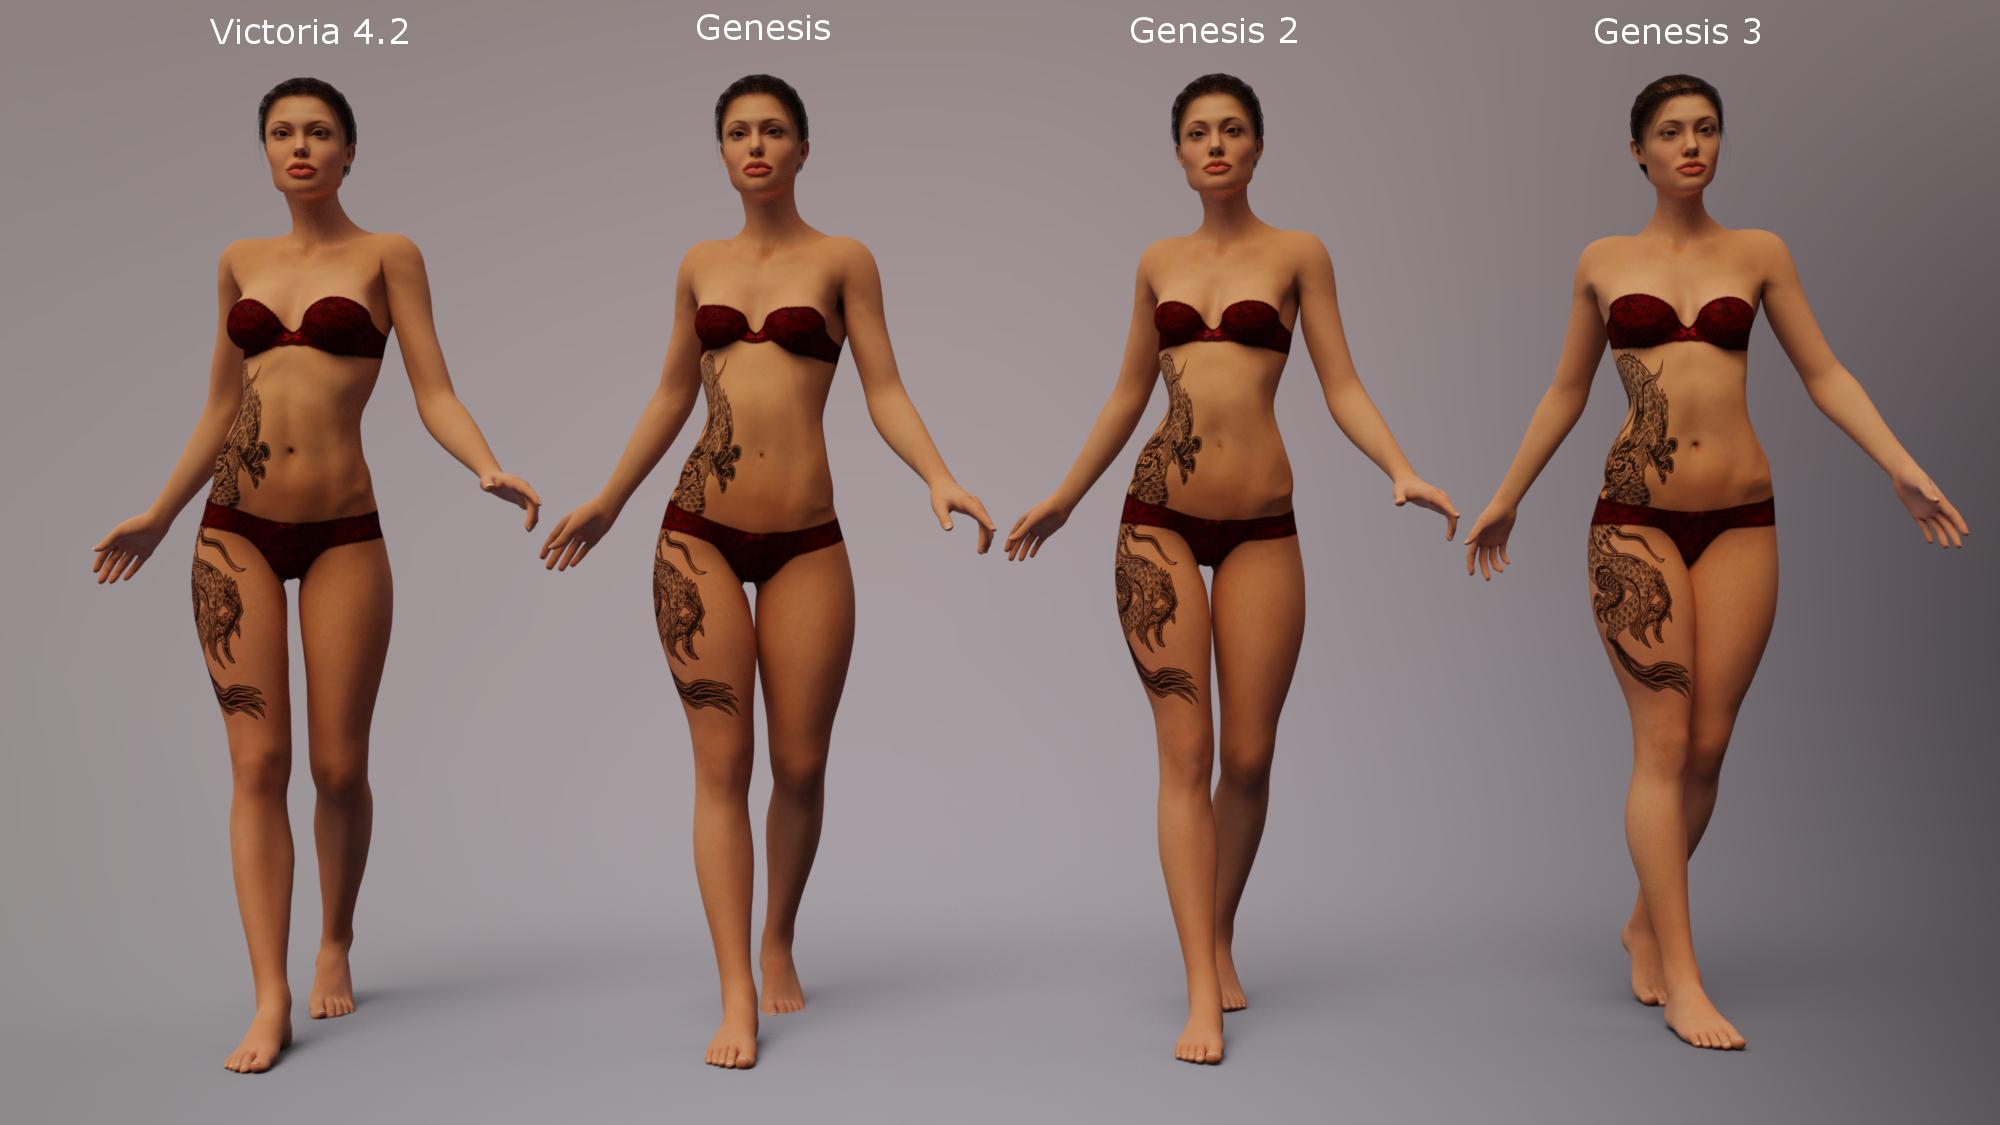
Knittingmommy's LaboratorySo, someone got hung up on transferring a morph over from V4 and posted a thread in the Commons here. They managed to figure out how to get it to work, but it made me remember that I still have a lot of characters that I want to move over through the generations. Of course, I can't do anything on a small scale so it turned into an all day project with food breaks and a few runs through the forums. I decided to start with the character that the person in the Commons was having problems with. Angel for V4. Here is what I did. I started out by loading up the morphs in GenX and I was going to just transfer it to Genesis since that was the figure giving problems to see if I had any of the same problems. I didn't so I'm not sure what was causing the issues the OP was having. Anyway, since I had the girl loaded up in GenX, I decided to move her up to G2F and G3F just to see what the differences were between generations if there were any.
Of course, once I had the morph for each character, I thought it would be cool to see them all together. That was an experience, I tell you. First I had to load the skin I wanted up on V4 and save it as a Material Preset so I could load it onto the other figures. Luckily, I have all of the required UVs to make sure everything looked good and the transfer went fairly smoothly until I got to 3F, that hussy! She just had to be different. It was the first time I had used the script by Cayman Studios available at Rendo and it took me a couple of times to get the proper sequence and appropriate geoshells highlighted in the appropriate tabs to get the V4 materials to look good on G3F. I managed, though. :)
Of course, then I had to fit the Assassin Outfit on all of the girls that came with the character! You see where I'm going with the all day project, yet? I finally gave up on the shoes so all of the girls are barefoot!
Oh, and did I mention? I took screenshots of every step of the way through the whole process. From morph transfer to fitting the skins and the clothing. I'll have that posted within a couple of days. I'm still adding in the text to explain all of the steps on each of the screenshots. It remains to be seen if I missed anything and have to go back and redo a screenshot here or there.
So, a couple of teaser renders to show you what I did today. These are raw renders straight out of DS with no touchups. I only took them into Gimp to add the labels for each of the girls so you know who is who to compare. The transfers were really close. I noticed some slight differences in the boob, the hip, and the jawline. The differences were extremely slight, though. I also noticed that the outfit fits just slightly different with autofit on the later generations. If I were doing it for a real render, I'd probably play the top a little bit to see if I could get it to look more like it does on V4. The autofit versions fit the top a little too well and there isn't that little hint of skin like there is on the V4 original version. The poses aren't exact, but close enough.
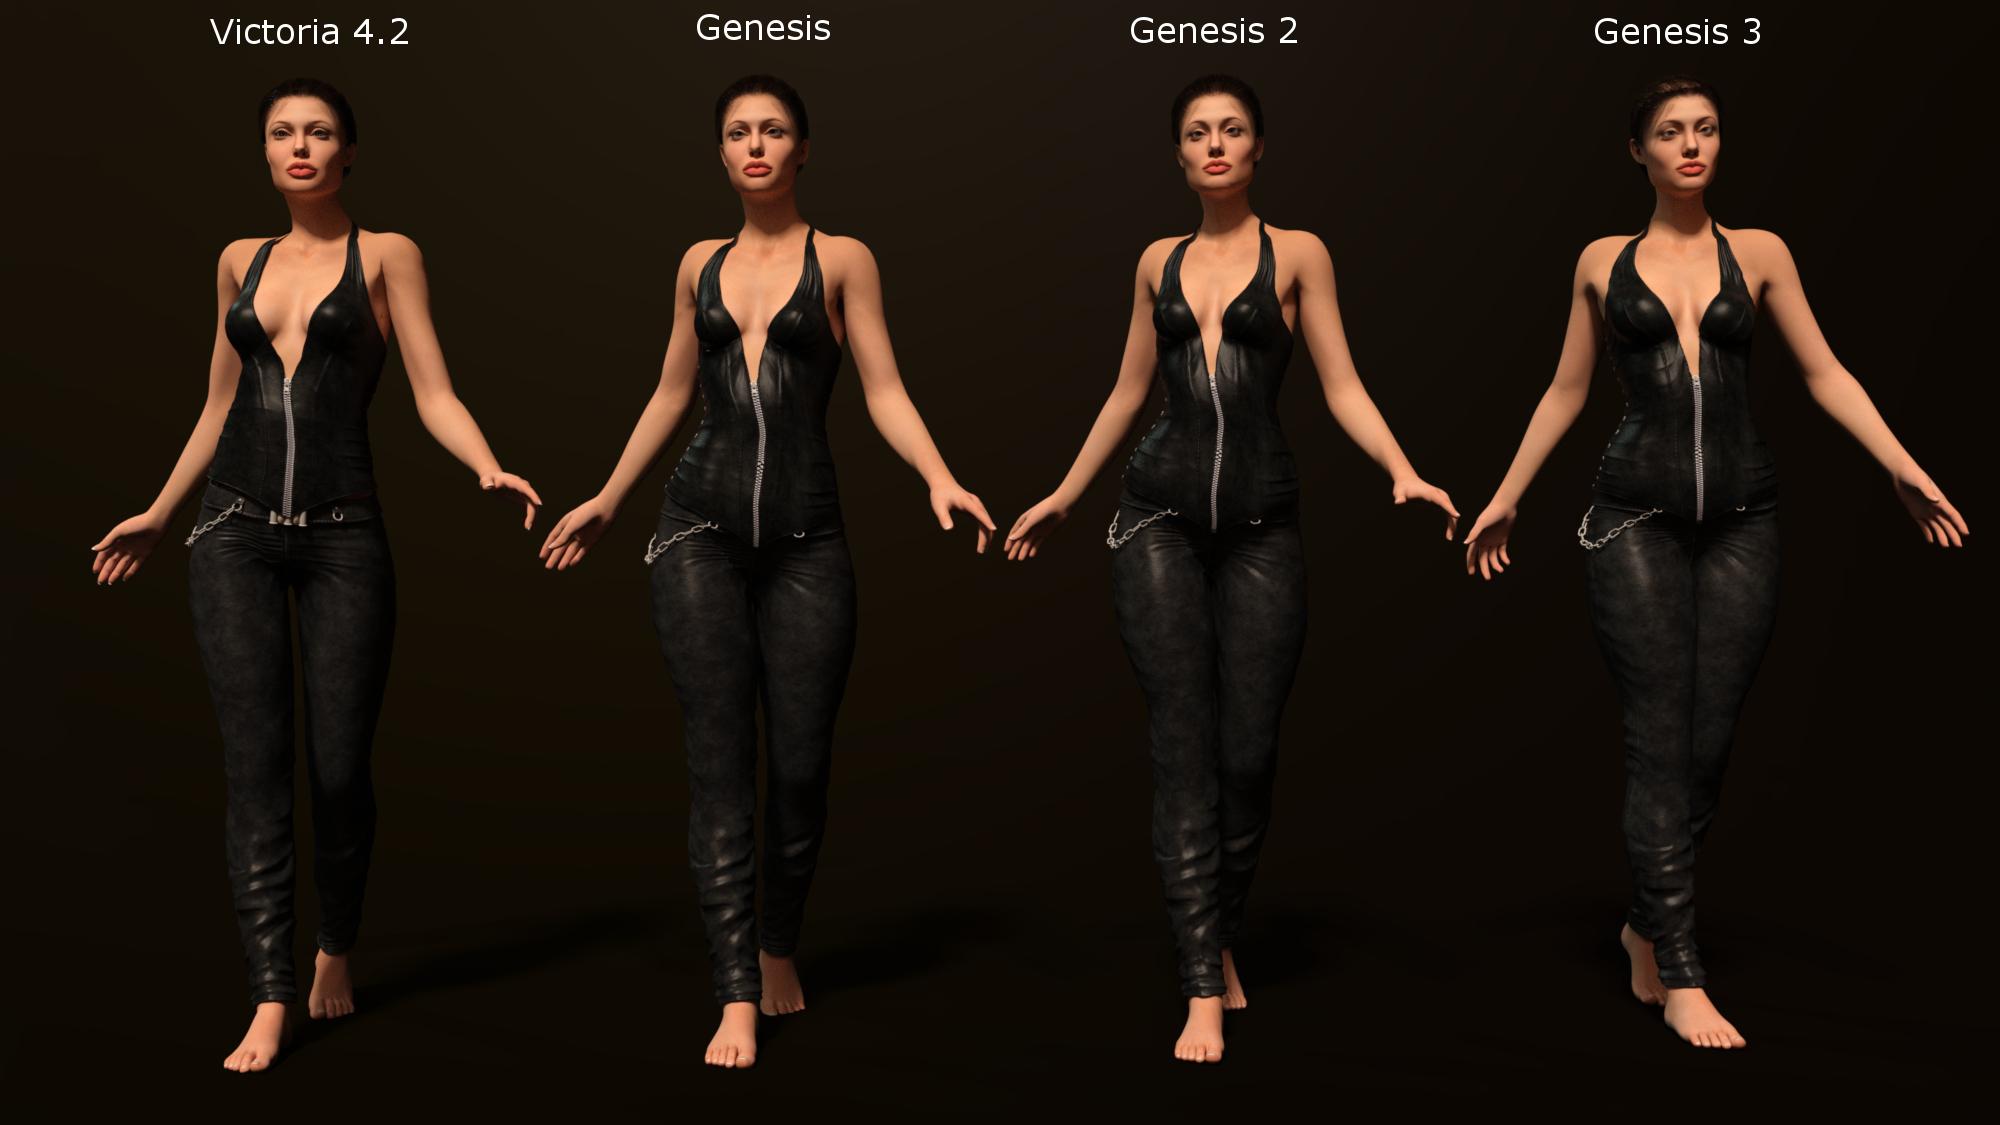
And, no, I don't plan to do this with every single character I transfer over. That would take forever!
edit: I just realized that Genesis' toes on the back foot are stuck in the floor! How dare she! ;)
Project EYEris - New DAZ Studio Shader and Preset Package *OUT NOW* [Commercial]@DigitalLiteDesign - thanks for the readme link. Site still doesn't work for me but I found the great pdf documentation. Seems just like what I'm looking for.
But, I still can't figure out if this will work for my Amy Elite, Victoria 4 character. Even if the morphs don't work, the eye reflections would be great (if this is possible).
If anyone has had success with V4 with this product, please let me know.
GEN X2 HelpI will copy what divamakeup said in the other thread. Basically apply your skin to V4, select V4, and then:
Select the character that has the textures you want to use. Then go to File >> Save As >> Material Preset (it's about half way down the "save as" list).
It will prompt you where to put the preset file, and this file will be a duf file.
I've tried that but they don't look the same as how Genesis looks exactly the same as the Victoria 4 character though. Why's that?
Are you using the product from renderosity, or the one sold here for V5?
In using the one from renderosity, Is there a difference? Also I wasn't able to find a legacy uv converter for Genesis 2 from v4
The legacy converter for Genesis 2 from V4 is sold here, and is even easier to use: http://www.daz3d.com/victoria-4-for-genesis-2-female
However the one from Renderosity should work for V4. One possible mistake you are making is are you ensuring that both G3F and all geografts are selecting before applying the V4 skin?
Also go into the surface tab and check that UV for the skin for G3F and all geografts is set to V4. That should be done automatically by the second script. Also do not mix up the scripts for the different Caymen Studio products
Yeah I do click the prepare G3 then apply v4 first before I click the material preset. It's the correct process right?
Yes. If the only thing wrong you are seeing is small differences in the morph, then you are likely doing everything correct.
Carrara?An article I wrote back before 8.5 came out
Carrara 8
The Best Choice for 3d Modeling, Rendering and Animation - Based the the idea that it treats Daz/Poser figures, props and poses like native content, it has an incredible assortment of tools for modeling, animating, and shading all under one roof with an incredibly comfortable interface.
See the Daz3d Carrara 8 Promo ReelTechnical Specifications and Features Comparison
See for yourself, a list of the named features of Carrara 8. Add your intuition and imagination and the sky is no longer a limit!Carrara has a vast collection of features built in to make our lives easier, no matter what we use it for. Some examples include (but are not limited to):
* Volumetric Primitives such as Fire, Fog, Clouds* along with the impressive Ocean Primitive
These powerful features are not to be underestimated. Simply drag one into your scene and you have an object that can give you a variety of effects. Each of them contains automatic animation controls and several options for changing their appearance and/or behaviors entirely.
Cripeman gives a quick look at a few of these in his Volumetrics & FX Tutorial.
*There are other clouds in addition to the Volumetric Clouds - Author clarification by request- Fire -
Drop in the Fire primitive and enter the model room to set all sorts of parameters to create the look you want. If your rendering a still image, your fire is done... render away! If your filming an animation, cruise the timeline and set the completion percentage how you'd like your fire to behave. You can animate any of the parameters as well. The Fire primitive can take you far beyond making fire, however, with a little imagination. Change the shape and color, how it looks and behaves and you can create things like animated wave caps for ship wakes or waves hitting the rocks or beach, Magical effects for your spell-casting characters, make eerie visual effects for the sky or haunting camera effects... and that's just the Fire primitive. There are many others!
Evil Producer did a great job with his Torch Fire demonstration and Fire Test
Cripeman helps you make a single flame for use on candles and such in his Playing with Fire tutorial.- Ocean -
Drop an Ocean Primitive into your scene and you have a beautiful representation of water with waves that can be set in motion to follow the wind. Great for stills and animations alike. Carrara Native Content also contains a variety of intensely excellent water shaders. If you have a model with a water plane, a river, or any sort of water at all, you can replace it with this to get it to animate - which really adds a new level of believability to your animation. Like the Fire, your imagination is allowed to take control, through away what others might say, and create something all your own - with really great controls for automated animations. TIP: For large bodies of water, making a super-large, high resolution Ocean can take up a LOT of resources. Instead, use the replicator to make as many seamless replicas as you need, and they all match up perfectly! I do this all the time!
Here, Cripeman tutors you on making Lake Michigan (I live right along Lake Michigan, but much further north) using the Ocean Primitive- Fog -
This one can really take an otherwise dull outdoors scene and make it look quite real. It has plenty of options to create a huge variety of fog appearances or blurry special effects. Like the others above, it contains automated animation controls saving you the time that you'd normally go through to get objects to go through these processes. Evil Producer prefers to use Volumetric Clouds wherever we would normally place fog - so there's that option as well. I use fog in nearly every outdoors scene I ever create. Even in Space. A little distant, colored fog and I have a nice nebula or distant galaxy. Unlike Volumetric Clouds, Fog has swirl and chaos functions. You can really get creative with fog for a multitude of still and animated effects.- Volumetric Clouds -
I've been telling you about versatility throughout my quick tour of the volumetric primitives. These beauties can't disappoint in that respect. With Volumetric Clouds in your scene, you have a lot of power. These primitives can interact with lights in your scene in different ways. For instance: If you place a few of these between a sunlight and your render camera, you can create rays! Set them to be affected only by your sunlight and, depending upon placement, you can create a really stormy effect. Place a check in the 'Use All Lights' box, and that same scene might just brighten up and turn into a cloudy, but beautiful day. Volumetric Clouds can be used in many ways. They can become a solid block of cotton-like haze; A soft patch of many shapes of puffs - all from a single instance - or add a bunch of them to really get people looking for different shapes as if they were seeing a real sky. Again, like everything else in Carrara, there's little to no limit on what an vivid imagination can do with these things.
Evil Producer, another Wisconsinite, lol shows them as real clouds in Dragon Flight
More real clouds in PhilW's Cloud Flight
Dimension Theory demonstrates them in motion in his Carrara Clouds Test and expands the users horizons with his Cloud Nine product sold here at Daz3d.
Take a closer look at the Volumetric Clouds Editor with Cripeman- Dynamic Hair -
Getting a bit off the beaten path, Carrara also has a very powerful Hair editor. Many people use this to grow field grass all over the ground. Grow it on small spheres to create yet another effect - like a weed top, or funky new type of planet. You can select between long-style hair or short fur. Cover animals, grow hair anywhere on any thing. It creates absolutely gorgeous hair for people, too!
Our own Holly Wetcircuit's Site has some cool tutorials on Hair and Fur, as well as a nice pile of other informative tutorials, links, and freebies.
Here Cripeman teaches how to create and edit hair stubble, with a good explanation of painting hair domains* Terrain Primitive, Shaders and Presets
Right out of the box, you can use one of many presets from the Native Content collection to get great results from a sample setup of the Terrain Primitive. Open it in the model room and you'll discover the vast and amazing flexibility that you have with this wonderful object. Change out the shape generator or add another one. Each of these generators have their own set of adjustments to tweak how they affect the terrain. Add a filter or blend in another generator and even try your hand at the advanced generators. Mix and match as much as you like to help make your own imagination come to life!
Enter the shader room and you'll be introduced to a shader that sets up the appearance of the various aspects of the Terrain primitive. It is fun and easy, yet infinitely diverse, to change any one or more of these appearances to create your own, custom terrain.
One of our incredible Daz3d Published Artists, Mec4d, made this as her first test in animating in Carrara: The Land of the Dragon - Carrara 8 Pro* Plant Primitive, Shaders and Presets
Like the Terrain Primitive, Carrara plants presets come with a complex shader applied that determines how the plant looks throughout its various aspects. These shaders are really powerful and easy to see, organize, and change in more ways that I could explain briefly here. The Primitive itself is set up within the model room, where you have complete control over the growing habits of your plant. Carrara 8 has made vast improvements enabling easier shaping and the addition of multiple leaf types on the same plant. Berries and Cones, etc., can now be an entirely separate model and added here. Very cool!
If you have the time, you should definitely check out Cripeman's Tree Tour tutorial.
* Particle Emitters, Physics, and Forces
In Carrara, the 3d space into which you create your scene is yours to control. Physics and flying particles behave however you direct your environment to behave - and it can be as simple as dropping an emitter into your work space and setting a few parameters. It can also become an incredibly complex system of flowing forces and spawning particles - like a flowing river, swift moving steam or fog, lava erupting from a volcano and flowing menacingly down the side onto the landscape below. Set objects in motion and let your physics settings control the result of the animation. Age of Armor had great fun smashing a GT 40 race car into a giant ball bearing! Dimension Theory can relax you into a trance with his dancing lights in Light as Substance!
While I'm providing links, here's a great Intro to Physics in Carrara by our very own super hero, Cripeman. I really like PhilW's Bullet Physics Test and Bruce Hoins, from Daz3d, made this excellent Introduction to the new Bullet Physics library integration for Carrara 8 Pro.* Powerful Shader Tools
I feel more at home with shaders in Carrara than with any other software I've ever tried. I will go into some good detail on this in articles to come in the near future. When you first bring in an object set up for use in Poser or Daz Studio, it is quite common that it will come in with shader settings that make it look plastic. This is only due to a difference in how Carrara handles shader properties. Although this means that you'll need to make some subtle changes in order to achieve adequate renders, you'll quickly learn to appreciate the power that you now have with your render quality by owning Carrara!
Cripeman has made a wonderful tutorial of tips for Displacement Mapping in the Carrara Shader Room and he ends up saving you a LOT of time with his insight. He has more tutorials that visit the shader room, but here are some that are more dedicated to the subject of shaders:
Natural ShadersMaking Windows Shader for a Distant Skyline
Terrain Shading
Thanks, Cripeman, for being so awesome and showing us glimpses of your knowledge of Carrara!
You can see my compiled index of his infamous teachings right here:
Cripeman's Video Tutorial Index* Poser and Daz Studio compatibility
One of the things that makes Carrara entirely unique from anything else on the market is the fact that it treats Poser style figures, props, poses and scenes, even scenes containing dynamic clothing simulations, as if they were native Carrara content. No other modeler on the market can do this so flawlessly! It was this functionality that I was looking for when I found Carrara. I needed to use Daz3d content - as my ambitions to animate were too heavy for me to try to model all of my assets myself. So I've taken on the attitude that I am the director, producer, and lead animator and that Daz3d and their Published Artists are my assets team. They work for cheap, too! Imagine how much it would cost me to have someone with Stonemason's talent and experience to build any one of his products in house. Now go look at how affordable it is for my project. Amazing, huh! I used Stefan as an example, but the same holds true for everyone at Daz3d. And if I should ever feel otherwise, there's no loss due to their unconditional 30 day money back guarantee! Sounds like a sales pitch, perhaps. But it isn't. If I had to build my entire collection of Daz3d products myself, I certainly wouldn't be where I am today.Some items might need a plugin to work, like aniMate's aniBlocks require the aniBlock Importer for Carrara, which has been an amazing feature for me - as all I ever do is animate - for the most part. aniMate has saved me a lot of time and, since I purchased all of their Martial Arts aniBlock sets, Rosie can fend off all of those Evil Orcs and other assorted nasties with ease, in style, and with the precision of a real black belt. Thanks GoFigure! If you're interested in such a thing, but don't already have a collection of aniBlocks, there are two bundles with the Importer to help build a quick collection at a great deal: aniBlock Importer Starter Bundle and aniBlock Importer Pro Bundle. Again, I apologize if this looks like a pitch. Just trying to help you you need a little direction.
Also, I mentioned above how flawlessly Carrara reads Poser files. There are some things that all Carrara artists have to get used to. One of the major ones is that many Poser figures, such as Victoria 4, load in with blue highlights. This is not a bug - as it makes her look great in Poser - her designated purpose softy (I often refer to software as softy, softies being the plural - just in case you see me talk that way later on! ;) ). It is quite easy to get used to changing the highlight color. Most people I've talked to just hit the little triangle at the bottom of the color box, which loads 'black' into that color box - which eliminates the highlight - and remove that 'plastic look' that you see in so many renders. Indigone has created a fantastic freebie shader kit for V4, but I've been using it for all of my characters as a base. The included tutorial taught me a lot about Carrara Shaders, and how to really get a great look on people within Carrara. There are two: V4 Skin Shader and Lights Kit and Endless Eye Kit for V4 for Carrara
* 3d Modeling
The fact that Carrara can model at all sets it apart from most every Poser-compatible softy on the market today. But Carrara has a great collection of tools for Spline modeling and Vertex modeling. This is huge, as it initially enabled me to make the morphs I've always wished I had on my existing Poser style figures' clothing and hair. Now I find myself constantly building stuff in there. Like everything else in Carrara, the modeling rooms have a very friendly interface taking much of the confusion of learning to model out of the equation. Starting with a specific initial shape at specific dimensions is super simple. Then you have a great assortment of user-friendly, yet sophisticated and professional tools to maneuver those vertices into your dream model. Dynamic extrusion rocks, as with all of the other functions and features. We'll get into that more later.
For now, if you'd like to see some basic modeling fun, with a pleasant mix of shading in the texture room, etc., check out this series on making a cityscape by Cripeman:
How to Model a Cityscape Pt 1Pete Gregorio has a wonderful online video tutorial that demonstrates some
wonderful features within Carrara's Vertex Modeler: Carrara 8 Gears Tutorial
* Superior Rendering through Global Illumination Features
You hear a lot of members discussing was to "Get around" using one of Carrara's very powerful rendering facilities, Global Illumination. So much, even, that you may go for years without ever trying it out. The fact is, if you own Carrara, you own some really powerful tools towards making some of the most spectacular renders anywhere. Before you dismiss the idea of using it, See what Cripeman has to say about it. He'll show you how it's really nothing to be afraid of. It's something to work into your work flow to produce nicer, smoother, more accurate shadows and reflections. For complex scenes that require a lot of placed lights, perhaps global illumination would add too much to the render times, so other methods should be looked at. But all I ask, is that you watch the tutorial and try it for yourself. You'll be glad you did.
One of our really great render artists, Koutsuko, can melt you into a pile of goo with some of her renders of Aiko, and she's almost (if not always) always using ambient occlusion, which is a feature of the global illumination rendering system.Work in Progress
This is something I intend to work on as I wait for long-term renders with the intention of creating a "Living Manual" for Carraraold versions...wow that's even further back than what I have. in 2004 I was still doing drawings by hand though it was getting more and more difficult.
I still have an XP system which 2.8 is on.
I'm originally a professional traditional pencil animator, so I'm still drawing by hand, even if not professionally any more; I discovered Poser 4 around 2001 and thought it was a nice hobby; not long after that I discovered the Poser community, and also the DAZ website, and later on the flame war around Poser 5 that caused DAZ Studio in the first place. (Victoria 3 could not be used in the initial version of Poser 5, as I remember.) I only use Poser/Studio for still pictures; I have animated in Maya a bit, but found the process much more mechanical than traditional animation.
By the way, I also still have ancient versions of Poser running; 4, 5, 6, 7, 10 Debut and 11. I don't have a fancy graphics card with lots of cuda-cores so I went the Poser/Reality-way, and stuck with Vicky and Mike 4...
...due to advancing bone and joint issues it just got too difficult to hold a brush, pencil. or pen very steady or for long without incurring a lot of stiffness and pain. That is a major part of what pushed me into 3D.
Figure + Hair dead horse me thinks...I like the way you think.
This is how I emptied my cart yesterday.
It's the Tanning Salon Sale.
I grabbed just the poses hoping to trigger some discounts further down the page, but nothing happened in my cart.

Then I saw the word BUNDLE was underlined so I clicked that and grabbed a bundle instead. I'm still learning.
I was torn between Summer or Carmilla (Do I REALLY need more women?) So I opened both to inspect their promo pics (you know, who's cuter, etc [just kidding, but no, not really].
Great, I already owned Summer so Carmilla is it! Then I saw buy TWO bundles and get all FOUR FOR FREE

Slapped all three in the cart on reflex.
- started rationalizing about all the ways those sets can be worth it down the road....
Then saw that Eva 7 was needed for two of the three and she was only slightly discounted. Add that up and...
Add her in and all the savings go away and I am buying two building sets that I really didn't want for more than I was interested in spending.
Carmilla is not so different than Victoria's several morphs in the library so no, I wasn't really, really missing out.
Cart emptied.
Not so good for the Artist(s) as their products get skipped over for no real reason that isn't avoidable.
Make those figures for Genesis 3, as you suggested, and I would have bought them AND the salon and detective set.
Missing Victoria 4.2 morphsUnder Daz's Victoria, I have 3 sub directories: General Poses, Magnetize Clothing and MATerials Sample-Res (all with content). So no Morph Injections. But I just added the Morph Injection folder as runtime. Now I have the 4 files as you described earlier (2x + and 2x -).
The morphs are now added by double clicking on the two + items. Parameters are added. But most do not respond or morph weird. Anything else required?
Aww... no. Don't do it like that. You're just asking for more issues.
Do it like I describe in the long post. Please. You'll save yourself a lot of headaches. If you want to use V4, you might as well set it up so you can use all of her instead of just Morphs ++
Please... go back and bring that whole runtime into your content tab. Please
Missing Victoria 4.2 morphsYup.
- Open V4 in Carrara
- Make sure Victoria 4 is sected in the instances tray
- in the browser, go to Poses > Daz3d's Victoria 4 > Morph Injections
- Double-click the morphs you wish to INJect into Vicky
I have 5 main directories in my Carrara Browser (Content runtime, My Library, content, libraries, My DAZ 3D Library). In the last one, I found a Morph Injection folder. But all folders from Victoria are completely empty. The structure is there, but no content. I have also Victoria in my other main categories (including poses), but not anything like UnifiedBrain.
It should be in your Content Runtime
If you're not seeing the files, try reinstalling it. I didn't answer right away because Steve K and Unified Brain had you covered in the first two replies.
So something's not right. One thing to know about runtime content is that we can NOT move the files around. It breaks the structure. Not sure if you did, not saying you did, just saying.
When we look at a Runtime structure, we begin with the Main folder, which I call the Runtime folder, even though it's not the one that's named "runtime". The main folder was originally named "Poser" and inside that folder was Poser.exe
If the older Daz3d Installers didn't see the Poser.exe file, it wouldn't install your content
Poser could only show x number of items in the runtime, showing alphabetically This was a large number, but not as large as our growing collections. So Poser was then made to be able to read multiple runtimes, which is why I call these main folders the Runtime folders. We can name these folders anything we want and we would make a blank text file and name it "Poser.exe" and place that in our Runtime folders so that Daz3d installers would work on them.
Anyways, I'm saying this because it can be easy to mess up a runtime folder if we're not aware of how they work.
The easiest way to understand them is to perfrom a manual download of a generation 4 style product.
Nowadays when we manually download a Poser format product (V4 and M4 and their family are Poser format) we begin with the main, doenloaded compressed folder beginning with "IMxxxx" x's are numbers.
Open that folder and we have two things: a folder named Content and a IM Manifest
The manifest file is simply something to tell Install Manager what needs to be done with this Content Folder against the database
The Content folder is a Runtime Folder by every sense of the word, as I explain it above. So in other words, to properly install it's contents to another Runtime folder, we open it and drag all of it's contents directly into the Runtime folder of our choosing - and click "Yes" to merge or overwrite as it copies.
===========================================
So we need you to recognise where your V4 stuff gets installed when you install it. Find that folder on your machine.
Make sure that "that" folder is in Carrara's Content Browser as a Runtime
If you have V4's Morphs ++ installed, you'll see them where Unified Brain is showing you they are.
Poser has categories and, along the way, folks have found a way to use Pose files to be used to INJect morphs onto a figure and a way to apply MATerial collections onto a figure, so those files have to be in the Pose structure of the runtime:
Runtime Folder > Runtime > Libraries > Poses
Daz3d was trying all manner of ways to further set their content apart from others - making them easier to find and use - easier to explain in the ReadMe's, a folder introduced to Runtime Folders by Daz3d
Generation 3 made a mess of the runtime putting "!" in front of their names, and there were a LOT of them
Generation 4 answered that mess by making folders like "Daz3d's Victoria 4" and putting all of the relavent files in that. Poses, MAT files, morph INJ files
Some products may have a slightly different order - or a new folder within that folder, but they did a really good job of organizing everything in there, so if you're not seeing the INJ files in your browser, there is one of two issues: Either the content is not installed correctly or the Runtime folder they're installed to is not 'mapped' to Carrara's Content tab yet.
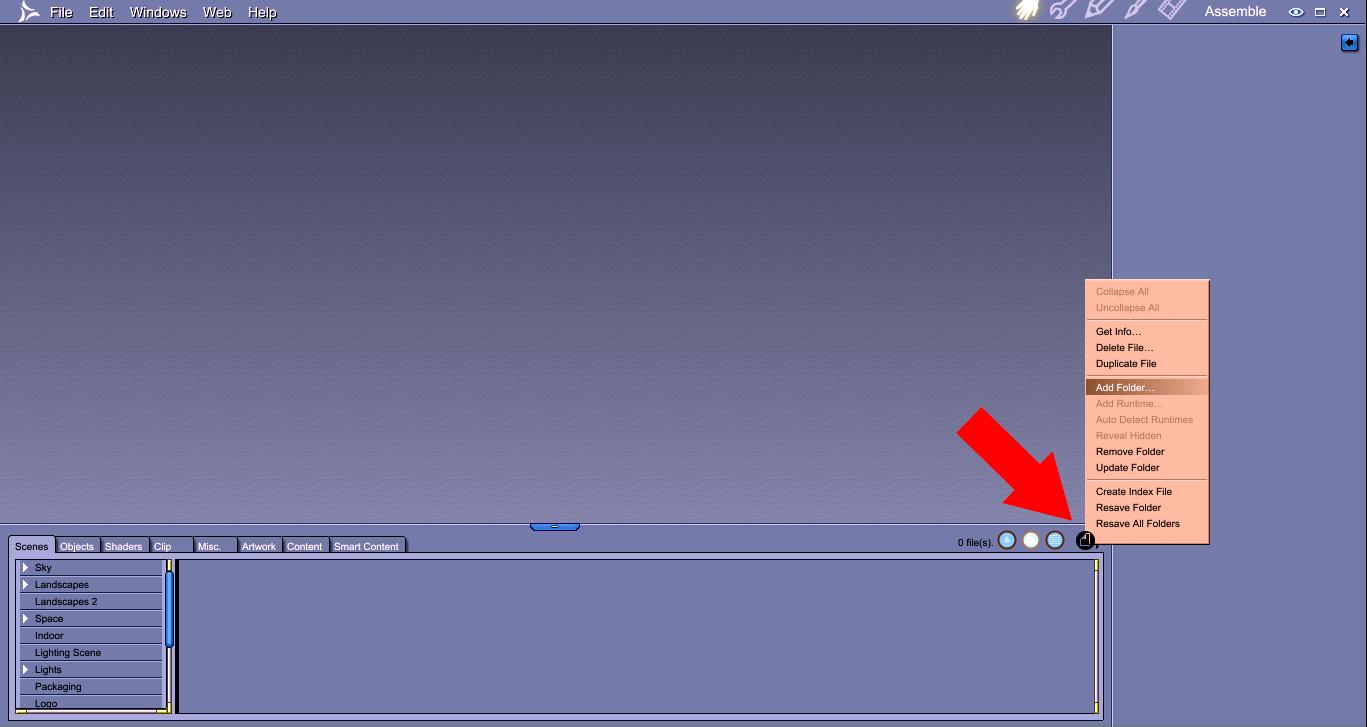
To check the latter, use the File/Folder menu in Carrara's browser. Find the Runtime Folder where you've installed your V4 content to. Now use the FIle/Folder menu in the Content tab and choose "Add Runtime" > browse to the Runtime folder (not the folder named "Runtime") and click Okay and, when asked, select "Runtime" instead of Content.
You'll find the files in that structures Pose category
 Help in Legacy UV for Genesis 3 Female
I've found the easiest way to do it is to first save the texture as a "material preset". Then from there it's a three step process. 1) Click the "prepare" button, 2) apply the desired texture via the "material preset", 3) click the "apply" button. The scripts do the work from there.
How do you save it as a material preset? And I can't find the material preset in the surface tab
Select the character that has the textures you want to use. Then go to File >> Save As >> Material Preset (it's about half way down the "save as" list).
You should then be able to find that material preset under your Content Library under My Library >> Presets >> Materials.
Oh so I stilvl have to download Victoria 4 then because I only have the metropolitan characters but I don't have Victoria 4.
You could apply it to the original Genesis figure - I'm pretty sure it comes with the V4 UV.
Yes, Genesis 1 has V4 and M4 UVs.
Can you use Genesis 2 and Genesis 3 clothes and hairs on Genesis 1?
Yeah, you need clones to do that though:
To wear G3F clothes on Genesis 1: http://www.daz3d.com/genesis-3-female-clone-for-genesis
To wear G3M clothes on Genesis 1: http://www.daz3d.com/genesis-3-male-clone-for-genesis
To wear G2F clothes on Genesis 1: http://www.daz3d.com/genesis-2-female-clone-for-genesis
To wear G2M clothes on Genesis 1: http://www.daz3d.com/genesis-2-male-clone-for-genesis
I've tried the material preset thing and was successful in transferring the skin textures however why doesnt it look the same? as the original victoira 4?
Are you still using the product for V5 UVs as you mentioned at the top of this post. If so that is not going to work with a V4 skin.
I've tried v4 too and they just don't look exactly the same, like even the morph has some small differences from the eyes and the nose. Can you kindly pose like comparisons from v4, g1, g2, and G3? If it's okay?
There will be some small differences in the morphs, a 100% fit when the figure is based on a different mesh would be near impossible.
I can not do V4 on G3F as I do not own that product (although I have a number of other Caymen converters). Below is a Gen X test conversion I did some time ago, it is Fransesca for V4,
G2F on the left, V4 in the center, Genesis on the right. The results are not identical, but in my opinion very similar.
Missing Victoria 4.2 morphsUnder Daz's Victoria, I have 3 sub directories: General Poses, Magnetize Clothing and MATerials Sample-Res (all with content). So no Morph Injections. But I just added the Morph Injection folder as runtime. Now I have the 4 files as you described earlier (2x + and 2x -).
The morphs are now added by double clicking on the two + items. Parameters are added. But most do not respond or morph weird. Anything else required?
GEN X2 HelpI will copy what divamakeup said in the other thread. Basically apply your skin to V4, select V4, and then:
Select the character that has the textures you want to use. Then go to File >> Save As >> Material Preset (it's about half way down the "save as" list).
It will prompt you where to put the preset file, and this file will be a duf file.
I've tried that but they don't look the same as how Genesis looks exactly the same as the Victoria 4 character though. Why's that?
Are you using the product from renderosity, or the one sold here for V5?
In using the one from renderosity, Is there a difference? Also I wasn't able to find a legacy uv converter for Genesis 2 from v4
The legacy converter for Genesis 2 from V4 is sold here, and is even easier to use: http://www.daz3d.com/victoria-4-for-genesis-2-female
However the one from Renderosity should work for V4. One possible mistake you are making is are you ensuring that both G3F and all geografts are selecting before applying the V4 skin?
Also go into the surface tab and check that UV for the skin for G3F and all geografts is set to V4. That should be done automatically by the second script. Also do not mix up the scripts for the different Caymen Studio products
Yeah I do click the prepare G3 then apply v4 first before I click the material preset. It's the correct process right?
GEN X2 HelpI will copy what divamakeup said in the other thread. Basically apply your skin to V4, select V4, and then:
Select the character that has the textures you want to use. Then go to File >> Save As >> Material Preset (it's about half way down the "save as" list).
It will prompt you where to put the preset file, and this file will be a duf file.
I've tried that but they don't look the same as how Genesis looks exactly the same as the Victoria 4 character though. Why's that?
Are you using the product from renderosity, or the one sold here for V5?
In using the one from renderosity, Is there a difference? Also I wasn't able to find a legacy uv converter for Genesis 2 from v4
The legacy converter for Genesis 2 from V4 is sold here, and is even easier to use: http://www.daz3d.com/victoria-4-for-genesis-2-female
However the one from Renderosity should work for V4. One possible mistake you are making is are you ensuring that both G3F and all geografts are selecting before applying the V4 skin?
Also go into the surface tab and check that UV for the skin for G3F and all geografts is set to V4. That should be done automatically by the second script. Also do not mix up the scripts for the different Caymen Studio products
Missing Victoria 4.2 morphsI'm guessing that the directory you want is "Content runtime," then click the little triangle next to Poses, then Daz's Victoria 4, and under that left-click directly on Morph Injections (and NOT the triangle next to it).
However, we keep describing the same thing, and you don't see it, so something else may be wrong.
Are you installing all content with the Daz Install Manager?
GEN X2 HelpI will copy what divamakeup said in the other thread. Basically apply your skin to V4, select V4, and then:
Select the character that has the textures you want to use. Then go to File >> Save As >> Material Preset (it's about half way down the "save as" list).
It will prompt you where to put the preset file, and this file will be a duf file.
I've tried that but they don't look the same as how Genesis looks exactly the same as the Victoria 4 character though. Why's that?
Are you using the product from renderosity, or the one sold here for V5?
In using the one from renderosity, Is there a difference? Also I wasn't able to find a legacy uv converter for Genesis 2 from v4
Help in Legacy UV for Genesis 3 FemaleI've found the easiest way to do it is to first save the texture as a "material preset". Then from there it's a three step process. 1) Click the "prepare" button, 2) apply the desired texture via the "material preset", 3) click the "apply" button. The scripts do the work from there.
How do you save it as a material preset? And I can't find the material preset in the surface tab
Select the character that has the textures you want to use. Then go to File >> Save As >> Material Preset (it's about half way down the "save as" list).
You should then be able to find that material preset under your Content Library under My Library >> Presets >> Materials.
Oh so I stilvl have to download Victoria 4 then because I only have the metropolitan characters but I don't have Victoria 4.
You could apply it to the original Genesis figure - I'm pretty sure it comes with the V4 UV.
Yes, Genesis 1 has V4 and M4 UVs.
Can you use Genesis 2 and Genesis 3 clothes and hairs on Genesis 1?
Yeah, you need clones to do that though:
To wear G3F clothes on Genesis 1: http://www.daz3d.com/genesis-3-female-clone-for-genesis
To wear G3M clothes on Genesis 1: http://www.daz3d.com/genesis-3-male-clone-for-genesis
To wear G2F clothes on Genesis 1: http://www.daz3d.com/genesis-2-female-clone-for-genesis
To wear G2M clothes on Genesis 1: http://www.daz3d.com/genesis-2-male-clone-for-genesis
I've tried the material preset thing and was successful in transferring the skin textures however why doesnt it look the same? as the original victoira 4?
Are you still using the product for V5 UVs as you mentioned at the top of this post. If so that is not going to work with a V4 skin.
I've tried v4 too and they just don't look exactly the same, like even the morph has some small differences from the eyes and the nose. Can you kindly pose like comparisons from v4, g1, g2, and G3? If it's okay?
Missing Victoria 4.2 morphsYup.
- Open V4 in Carrara
- Make sure Victoria 4 is sected in the instances tray
- in the browser, go to Poses > Daz3d's Victoria 4 > Morph Injections
- Double-click the morphs you wish to INJect into Vicky
I have 5 main directories in my Carrara Browser (Content runtime, My Library, content, libraries, My DAZ 3D Library). In the last one, I found a Morph Injection folder. But all folders from Victoria are completely empty. The structure is there, but no content. I have also Victoria in my other main categories (including poses), but not anything like UnifiedBrain.
Daz 3D is part of

Connect
DAZ Productions, Inc.
7533 S Center View Ct #4664
West Jordan, UT 84084Licensing Agreement | Terms of Service | Privacy Policy | EULA
© 2026 Daz Productions Inc. All Rights Reserved.