-
(solved) having problems creating morphs in blender to daz
weird, why didnt you just set reverse deformations to Yes like someone suggested earlier
(youre probably not importing your morph on top of the default base shape so you have to turn this option to Yes to reverse out the existing changes you already have on the base shape. Alternatively, load your morph onto the base shape with no other morphs applied.)
Genesis 9outrider42 said:
If you are using them as is, the normal maps that bluejaunte uses are too compressed. The compression artifacts will show in closer shots. I remove the normal maps he has entirely now, and either use a HD morph or another set of normals. I ran into the problem you probably are getting, and at first I didn't realize what the issue was. It is all compression. Thankfully the important dual lobe textures don't suffer this.
Some of his color textures have compression in them as well. This isn't as big a problem, but can be visible under the right circumstances. I retouched some of these textures in different ways to get rid of the 'blockiness' I saw.
Finally, the displacement map that he started using on feet is pretty compressed, too. I tried different things. I upscaled it and resized it, and I repainted it a bit all to try and get that compression blockiness out.
I know that sounds like a lot, and it kind of is, lol. But the textures he uses for dual lobe are fantastic, and I haven't seen anybody else quite match that. The bump maps are fairly good, they are not as compressed like the other textures. I have touched them up in spots at times. The inner hands and feet being the targets.
So for those skin presets, just ditch the original normals. You may not even need normals depending on your intention anyway.
If bluejaunte happens to be reading this, don't be disheartened, your characters are still great. But I would really love it if they used less compression on these certain textures. If you have a raw uncompressed version of any of your textures, I'd love to have them. I'd pay!
Texture compression is a problem I am finding with a lot of products, especially environments. I urge PAs to please use better quality textures. I am sure some people will still cry that a product is too big of a download or something, but in my opinion it is better to have that quality than not. Textures can easily be resized or compressed by users. But it is very hard to get detail back into a texture that is horribly compressed and/or low resolution. I am not saying we need 100MB TIF textures, just not overly compressed textures. There is no point in having a 4K texture if it is highly compressed.
Thanks to my earlier exchange with you, yesterday I tried using normals from another character I liked on my main bluejaunte skin, and my problem was solved. Those bumps seem a little suspect too, but I left them alone. bluejaunte has hacked making a Genesis figure look like a photographed human being, and I'd use his figures as-is if I didn't need for my main character to have zero associations. Feet aren't an issue for me, since my characters are usually shod. Thanks for the follow-up, as I'm now back in business.
(solved) having problems creating morphs in blender to dazfelis said:
I don't know what can have happended.
But maybe from your original mesh try to move just a single face, and then make a morph to see how that works.
And how does it look in blender?
I think it is a little messed up in blender kinda hard to tell but I'm going to try to start from the begining
(solved) having problems creating morphs in blender to dazPerttiA said:
If the character you exported to Blender, already had some morphs applied, then you must select "Reverse deformations" when importing the morph back to DS
Unless "Reverse deformations" is used, the morphs are applied to the base mesh, which means that any and all morphs that were active on the model exported to Blender, gets their effect applied twice as strong.
Idk it didnt work im gonna try starting over
Genesis 9xyer0 said:
outrider42 said:
The 8k normal maps are pretty cool, not going to lie. But I still think bluejaunte's method of achieving these details is better for more situations. If you have one of his characters, the dual lobe maps on several of them are 8k in size, and they accomplish the task of emulating human skin patterns. This way the normal maps can be used for larger details. The normal maps can be way too strong for this detail in some situations. Though bluejaunte does a similar thing sometimes by cranking the bump maps way too high. I find myself turning them down, sometimes less than half the value he defaults them to.
I don't have V9, but I would suggest swapping her base color textures with the free G9 textures Daz gave us. The first set is based off Victoria 8.1. Just the base and trans color, leave the rest, and see how she looks. I think that would be a good strategy with her, keep all the normal, bump, ect, but replace the color and trans maps with others.
That also works extremely well with bluejaunte characters, as I mentioned in a few threads. Keep all the dual lobe and other stuff, just swap the color maps. You might need to adjust the trans color and value a bit to taste, but this strategy works incredibly well for how easy it is, and can really make your older characters pop. Plus since G8 and G3 have the same UV, you can even try this with your favorite G3 skins.
I went as far as converting bluejaunte textures to G8M, since they never made one. So I can use those dual lobe textures on males as well. Nix looks awesome with them.
I have bluejaunte's characters, and they are my first choice---except for extreme close-ups where I want to see microtexture. My main character currently uses a bluejaunte skin, which makes her look real in full body and torso shots, but I'm not happy with the lack of detail in close-ups. I've been switching out maps on skins, trying to find what looks best, and changing diffuse or translucency or volume values to get colors Daz avoids, but I haven't tried plugging other diffuse maps into bluejaunte shaders. Thanks for the idea.
If you are using them as is, the normal maps that bluejaunte uses are too compressed. The compression artifacts will show in closer shots. I remove the normal maps he has entirely now, and either use a HD morph or another set of normals. I ran into the problem you probably are getting, and at first I didn't realize what the issue was. It is all compression. Thankfully the important dual lobe textures don't suffer this.
Some of his color textures have compression in them as well. This isn't as big a problem, but can be visible under the right circumstances. I retouched some of these textures in different ways to get rid of the 'blockiness' I saw.
Finally, the displacement map that he started using on feet is pretty compressed, too. I tried different things. I upscaled it and resized it, and I repainted it a bit all to try and get that compression blockiness out.
I know that sounds like a lot, and it kind of is, lol. But the textures he uses for dual lobe are fantastic, and I haven't seen anybody else quite match that. The bump maps are fairly good, they are not as compressed like the other textures. I have touched them up in spots at times. The inner hands and feet being the targets.
So for those skin presets, just ditch the original normals. You may not even need normals depending on your intention anyway.
If bluejaunte happens to be reading this, don't be disheartened, your characters are still great. But I would really love it if they used less compression on these certain textures. If you have a raw uncompressed version of any of your textures, I'd love to have them. I'd pay!
Texture compression is a problem I am finding with a lot of products, especially environments. I urge PAs to please use better quality textures. I am sure some people will still cry that a product is too big of a download or something, but in my opinion it is better to have that quality than not. Textures can easily be resized or compressed by users. But it is very hard to get detail back into a texture that is horribly compressed and/or low resolution. I am not saying we need 100MB TIF textures, just not overly compressed textures. There is no point in having a 4K texture if it is highly compressed.
(solved) having problems creating morphs in blender to dazfelis said:
I don't know what can have happended.
But maybe from your original mesh try to move just a single face, and then make a morph to see how that works.
And how does it look in blender?
it looks fine in blender and i tried not changing anything same problem
Genesis 9morrisonmp said:
I have been experimenting with Genesis 9 characters (Michael, Minerva, Victoria, and a couple others) and while the textures are good and the facial improvements are excellent... I still hate the bodies. Gen9 is weirdly doughy and roundy and the proportions just "feel" wrong. I have not been able to make a G9 character yet (and I bought several of the morph sets as well) that I actually like having in a scene. And to me, YMMV, they don't fit well in scenes with G8/G8.1 models because the entire approach to making them just feels so very different.
I'd love to see some new sculpts using the G9 innovations that are not so odd-bodied.
Sorry for the rant... but the G9s just feel super weird to me.
I agree. G9/V9 is a bit too pudgy and short for my taste and the arms seem too long and legs too short. Some characters seem to have the head too small for the body. I know I can change all that but if I want to use stock poses it's extra work to make them work with proportions I use. I already make most G8 characters taller with longer legs and G9 needs even a bigger stretch. The only advantage I see now are the eyes and quick load time because I have very few G9 characters. It is kind of fun creating more characters from scratch though with G9 because I often get lazy mixing several G8 characters together rather than work on individual morphs. G9 will take longer to morph/pose but I'll probably be more creative doing it.
Head gamesAllenArt said:
Let's see those custom G9 faces folks, now that the morph packages are out ;).
One of my favorite things (when my muse is away) is making faces on my 3D characters. Seems I'm always rolling a new one. I bet I'm not alone. So let's see those faces! :D
Here's mine (so far). Someone remind me to make an "Ears Rotate In and Out" morph. I was kinda surprised there wasn't one in the Essential morphs ;) BTW, the nose here is pretty much custom. All else are Daz morphs.

Edit: just had to rotate his ears back a bit. What do ya think? Out or in? LOL
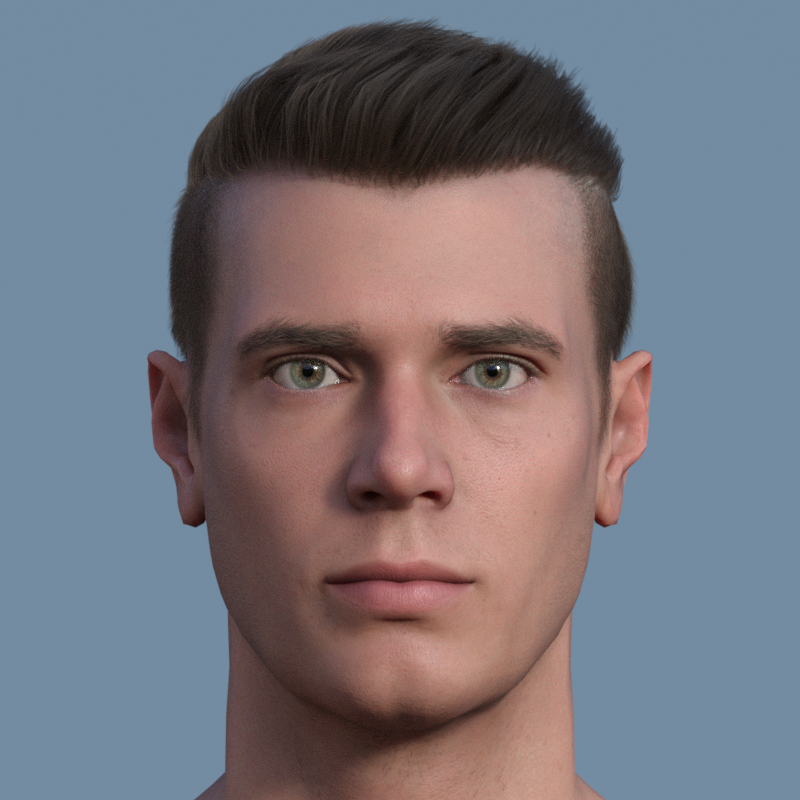
How did you get the ears to look like they do in the second image? Both faces are excellent!
Genesis 9I have been experimenting with Genesis 9 characters (Michael, Minerva, Victoria, and a couple others) and while the textures are good and the facial improvements are excellent... I still hate the bodies. Gen9 is weirdly doughy and roundy and the proportions just "feel" wrong. I have not been able to make a G9 character yet (and I bought several of the morph sets as well) that I actually like having in a scene. And to me, YMMV, they don't fit well in scenes with G8/G8.1 models because the entire approach to making them just feels so very different.
I'd love to see some new sculpts using the G9 innovations that are not so odd-bodied.
Sorry for the rant... but the G9s just feel super weird to me.
(solved) having problems creating morphs in blender to dazIf the character you exported to Blender, already had some morphs applied, then you must select "Reverse deformations" when importing the morph back to DS
Unless "Reverse deformations" is used, the morphs are applied to the base mesh, which means that any and all morphs that were active on the model exported to Blender, gets their effect applied twice as strong.
GenX2 Genesis Basic Child to G3M transfer arrives UPSIDE DOWN! :OI decided to redo the transfer again.
I am completely new with using the Genx2 stuff. Bought it and a bunch of it's add ons ages ago but never really got around to using it until now.
Anyway, to the best of my understanding, I go to the GenX tab/pane, select the Source button, select (for instance) Genesis from that, it loads all the relevant bits and bobs for that particular generation base character. You then load into the scene the (for instance) Genesis character you want to convert to a later Genesis generation, then click the Select button on the GenX pane and pick (for instance) .Get Values from Figure in Scene. but when I do that, I get an error telling me Some morphs were not found in the figure. If I instead, next try clicking Select and pick Transfer: On for All Non-Zero Values, it doesn't give any error. If I then uncollapse each of the items listed in the GenX pane, I notice that the only thing checkboxed on the left most column is 4 items under the (region) Actor section: each of the ones named Basic Child
In any event, I have Target set to Genesis 3 Male, and when I hit Transfer, it does a quick flurry of stuff in the window that pops up, and then the window disappaers. Now when I load the G3M base character, and in the Parameters for him go to the Actor on that and dial in Genesis and dial in Basic Child, the G3M takes on the right shape, but doesn't reduce down in scale ro match the original, I have to manually set him to Scale 54%, but he at least doessn't arrive upside down and undernerath the floor-plane this time around.
On the other hand, if I apply any kind of pose, he distorts. It's as if none of the JCMs transfered,
Incidentally, at the start of this, when I went to Source and loaded Genesis, I got the following output:
GenX - Loading figure: Genesis

Loading figure ...

C:/Users/David/Documents/DAZ 3D/Studio/My Library/data/DAZ 3D/Genesis/Base/Genesis.dsf

Loading morphs ...

Error reading morph file:

E:/Public Documents/My DAZ 3D Library/data/DAZ 3D/Genesis/Base/Morphs//askance/CloneDawn.dsf

Analyzing dependencies ...
Any idea what is going on here? This is really frustrating.
(solved) having problems creating morphs in blender to dazI don't know what can have happended.
But maybe from your original mesh try to move just a single face, and then make a morph to see how that works.
And how does it look in blender?
Baking Displacement: bloated meshMatt_Castle said:
Displacement can be funny about seams, particularly as different programs may interpret the maps in specifically linear or gamma colour spaces.
When I'm exporting displacements from Blender, I always use floating point EXR files, as the two programs agree very closely about how to interpret those (and once converted to 16-bit greyscale, the files aren't actually that large).
Yes, I'm using EXR. However, I found a solution.
I baked the displacement two times. One time with the HD morph and one time only the bash mesh with the same subdivision level.
Then I use both layers and do in Affinity Photo a Difference blend layer, which gives me the result I want.PrefoX said:
grey means no displacement, white positiv, black negative displacement
Not necessarily. For some reason I don't understand is the recommendation to use 32bit EXR displacement at a midlevel of 0:
This means black is no displacement. But I have no idea how negative displacement should work.(solved) having problems creating morphs in blender to dazI exported a g8f to obj then imported into blender. then when I made the changes I wanted I exported it back and used morph loader pro but when I put the morph to 100% I noticed the whole figure was changing for some reason I tried to export without sculting in blender and still had the same problem. the body gets slender, breasts lift up, and face changes. below is a picture at 0% and 100%
Genesis 9von Hobo said:
I wonder if any of these morph products will work on Genesis 9
Morphs for a figure won't work on a different figure.
File Attachments to posts not workingRichard Haseltine said:
This has just received a bit of attention and I was able to attach an image to my test post.
I was able to upload the two files as attachments to my post on that G8-G9 Pose Transfer thread. So, I would say it's working now... hope it stays working!
thanks,
/t
Buy Something That Doesn't Work in Carrara? Post your Questions and Workarounds here. (please)I have Daz Stduio 4.21 installed. Generally, it has not interfered with my use of Carrara. I am most likely to use the two together if I am using the Studio transfer utility, converting something to blended weight, or similar. I have had some problems in both Daz Studio and Carrara, but am reasonably confident those problems are not related to 4.21. Instead, my problems started when I had a hard drive die and I transferred my backup to a new drive with a new drive letter. Mostly little things like a texture map not being found on default load, and having to be loaded manually. Occasionally a more serious issue.
I was an early adopter of Genesis 9, but am back to Genesis 2 in Carrara (or my silly figures), and Genesis 8 in Studio - unless the situation calls for a Rawart monstrosity of some sort.
DAZ Log File?I keep getting errors when loading G8F about duplicate errors, and to check the log. For the life of me, I cannot seem to fing the log. WHere may i find the log, and which log file shall I be checkign for the morph collission?
Thanks,
-David
Baking Displacement: bloated meshHello,
Maybe one of you has a clue what's going on here.
I got zBrush a few days ago and want to bake in zBrush die HD morph of an expression to a displacement map.
But what ever I do, the height map also bloats the mesh additionally. Here in DAZ Studio: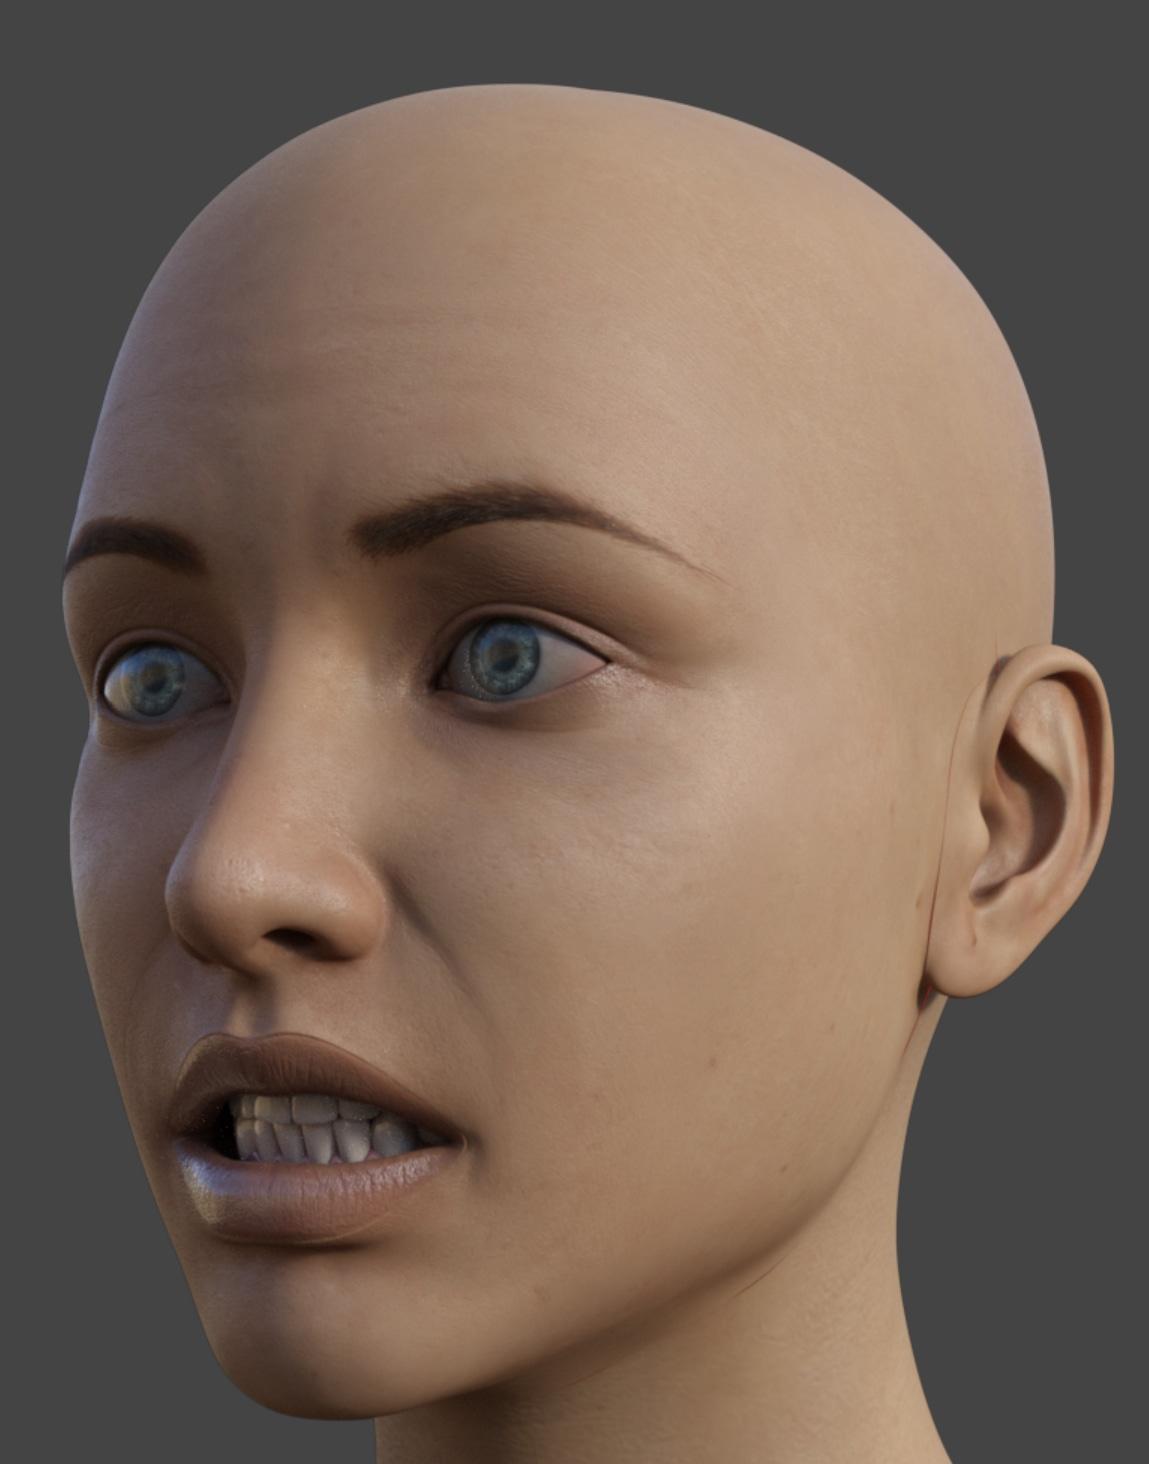
It's clearly visible that the displacement causes seams. The Displacement is only applied to the face. The seams are the result of the displacement maps adding height, in places it shouldn't.
Here the same map used in Blender: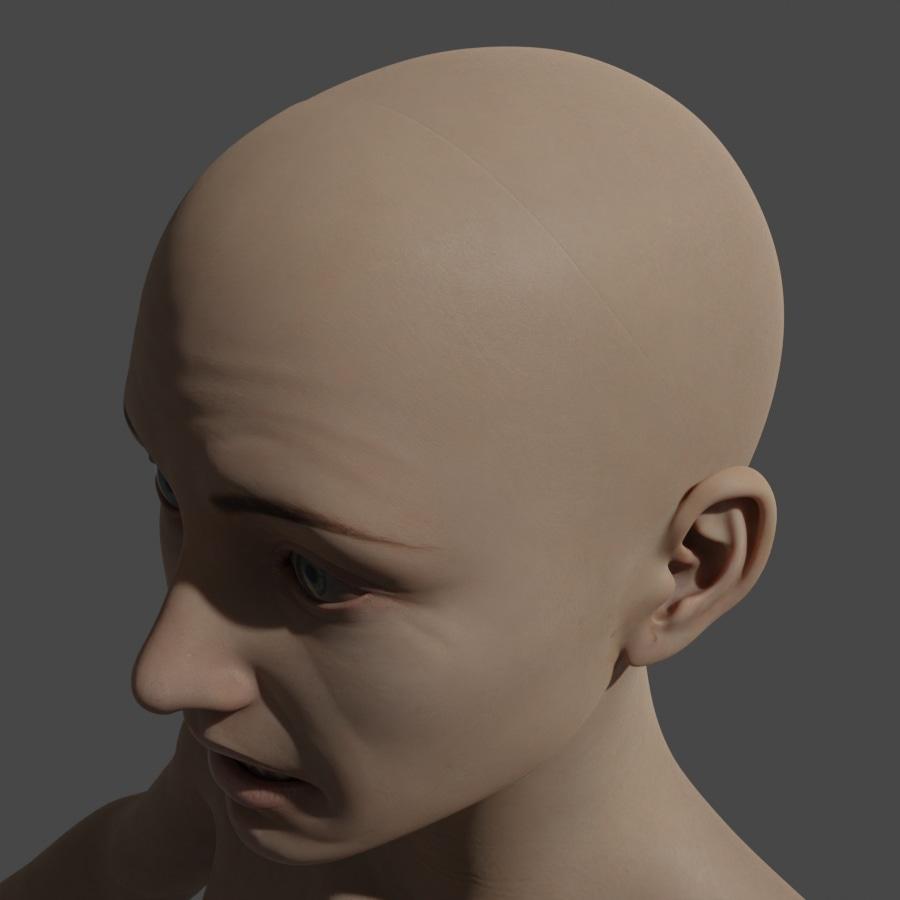
And just for comparison without any displacement: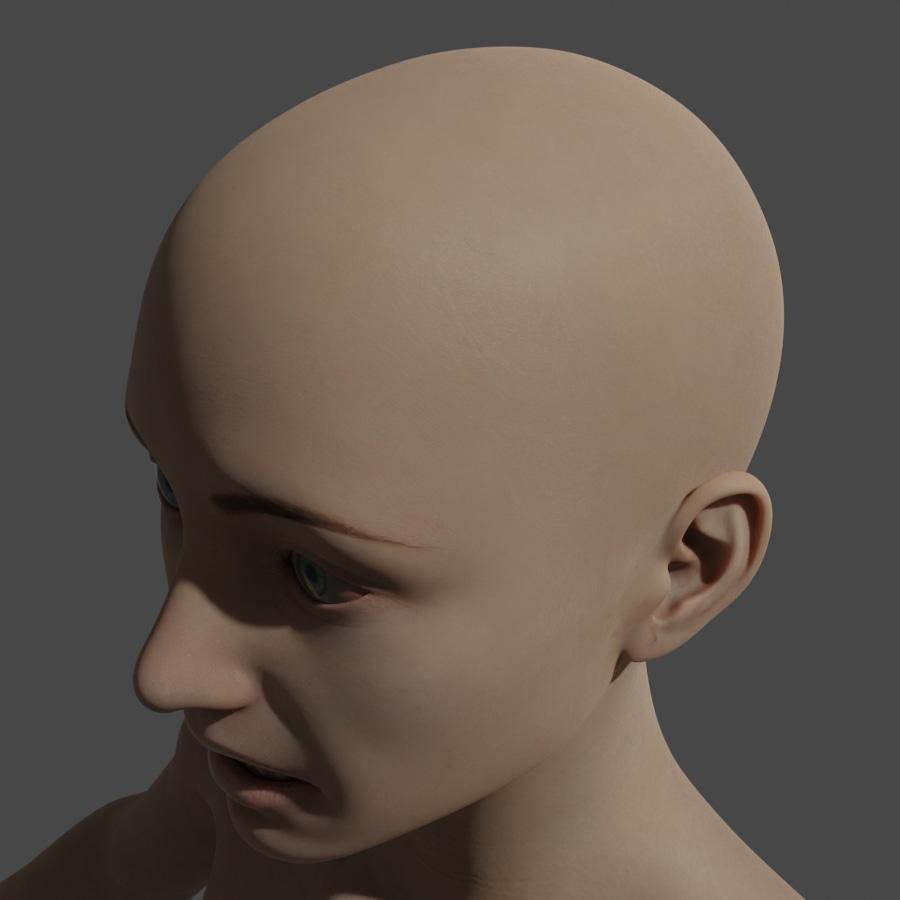
If I look on the map, it's clear why this happening. Even if there is no HD information, the mesh is overall grey instead of black on non affacted parts.
This is clearly obvious in the ears. They should be completely black, but they are gray. Even if I bake a mesh without any HD information I get a grey map which bloats than the mesh.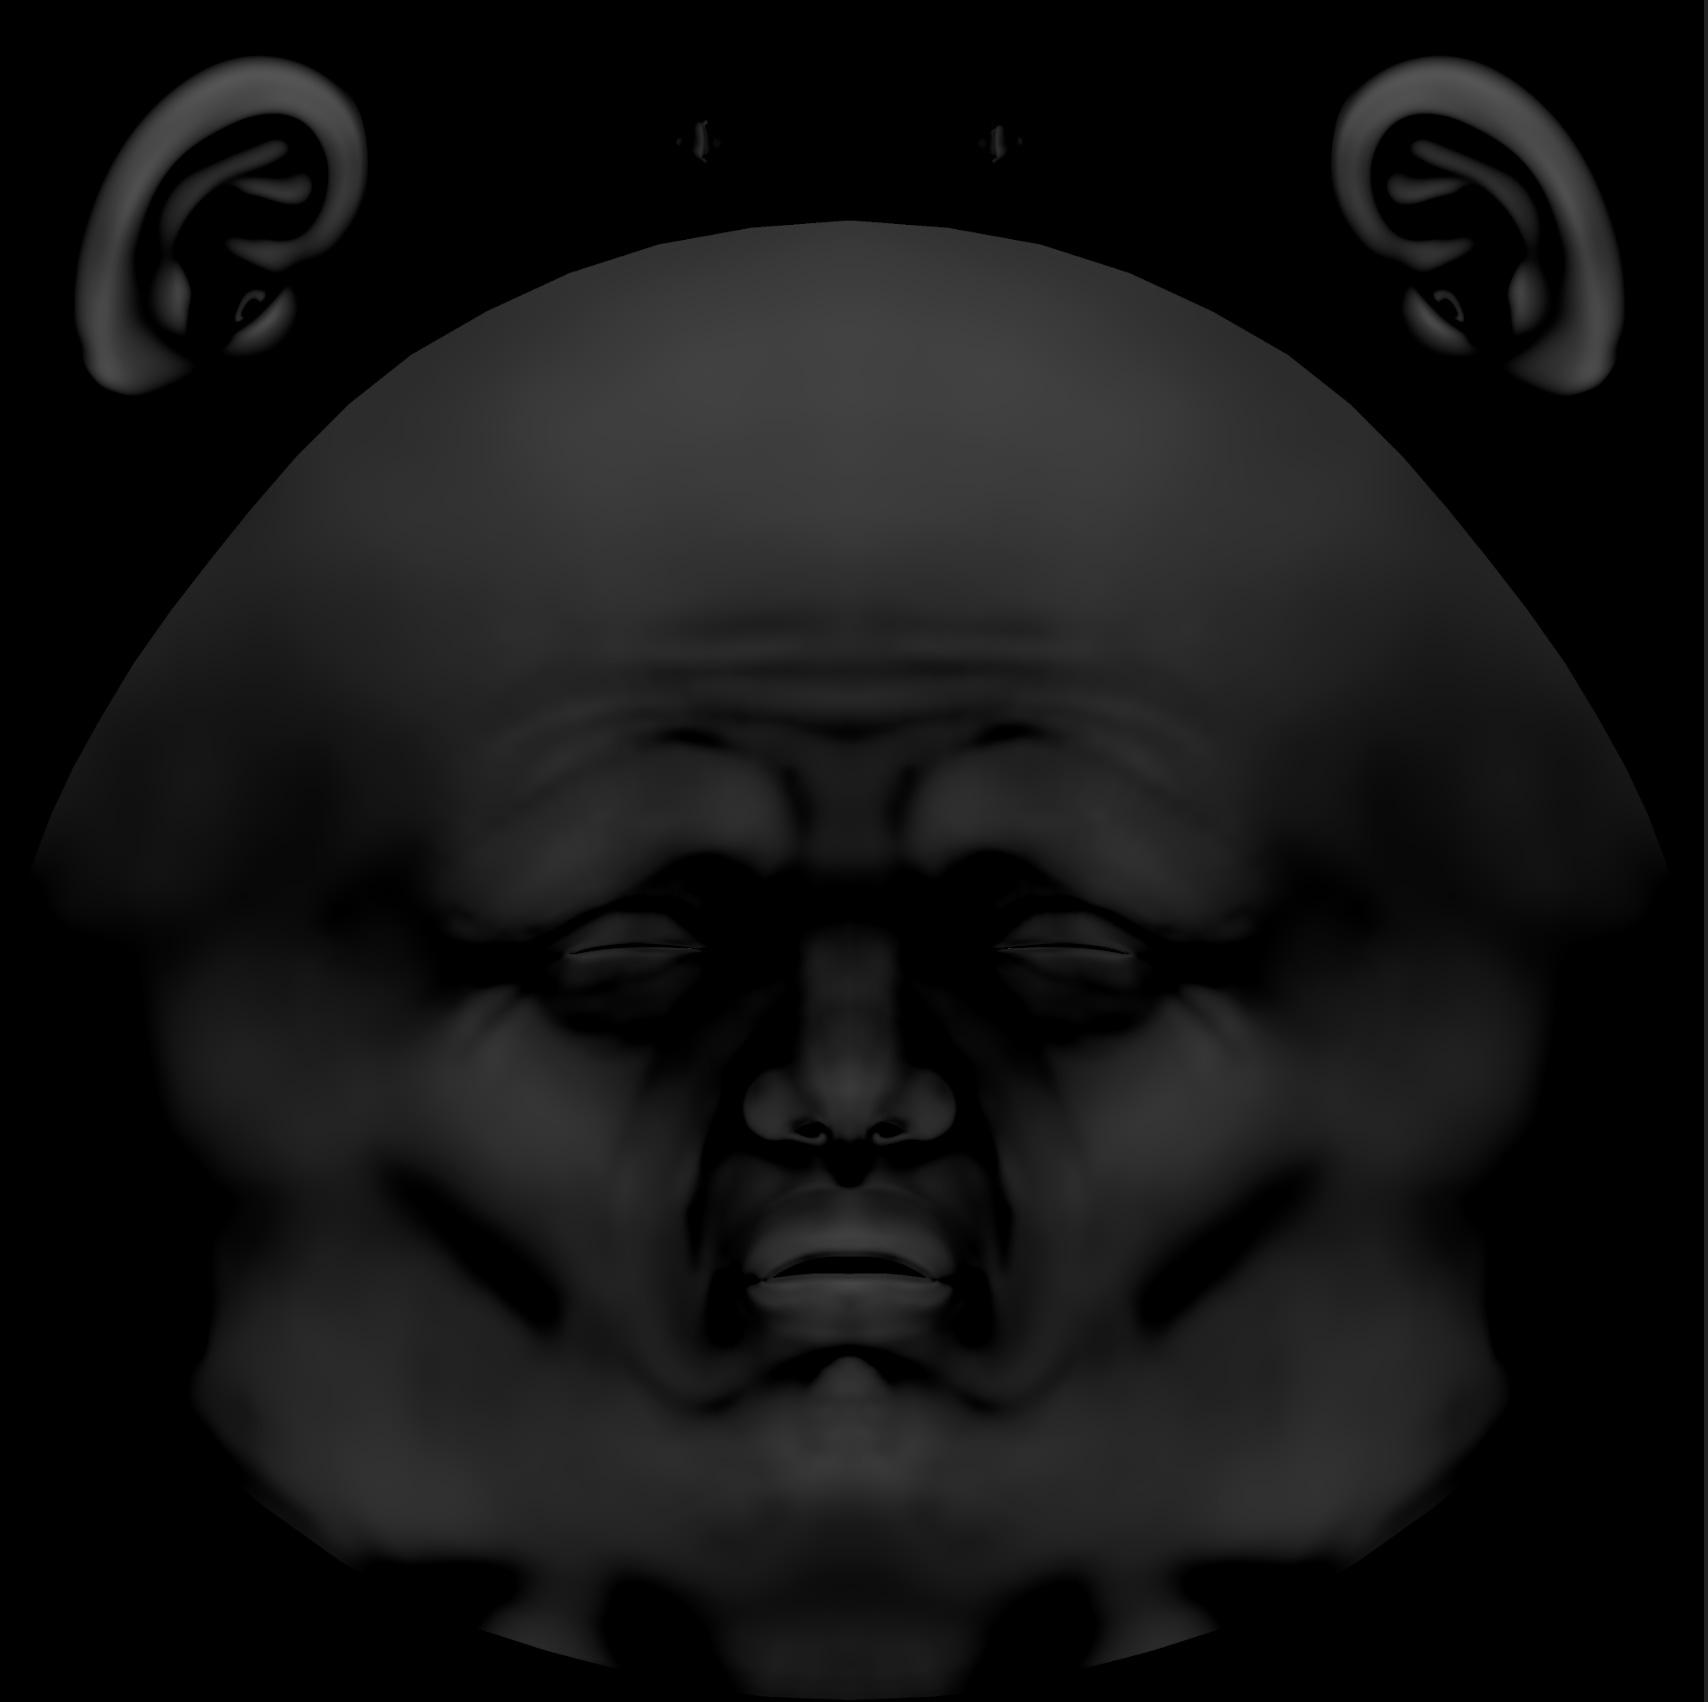
Here as a comparison the mesh without any HD information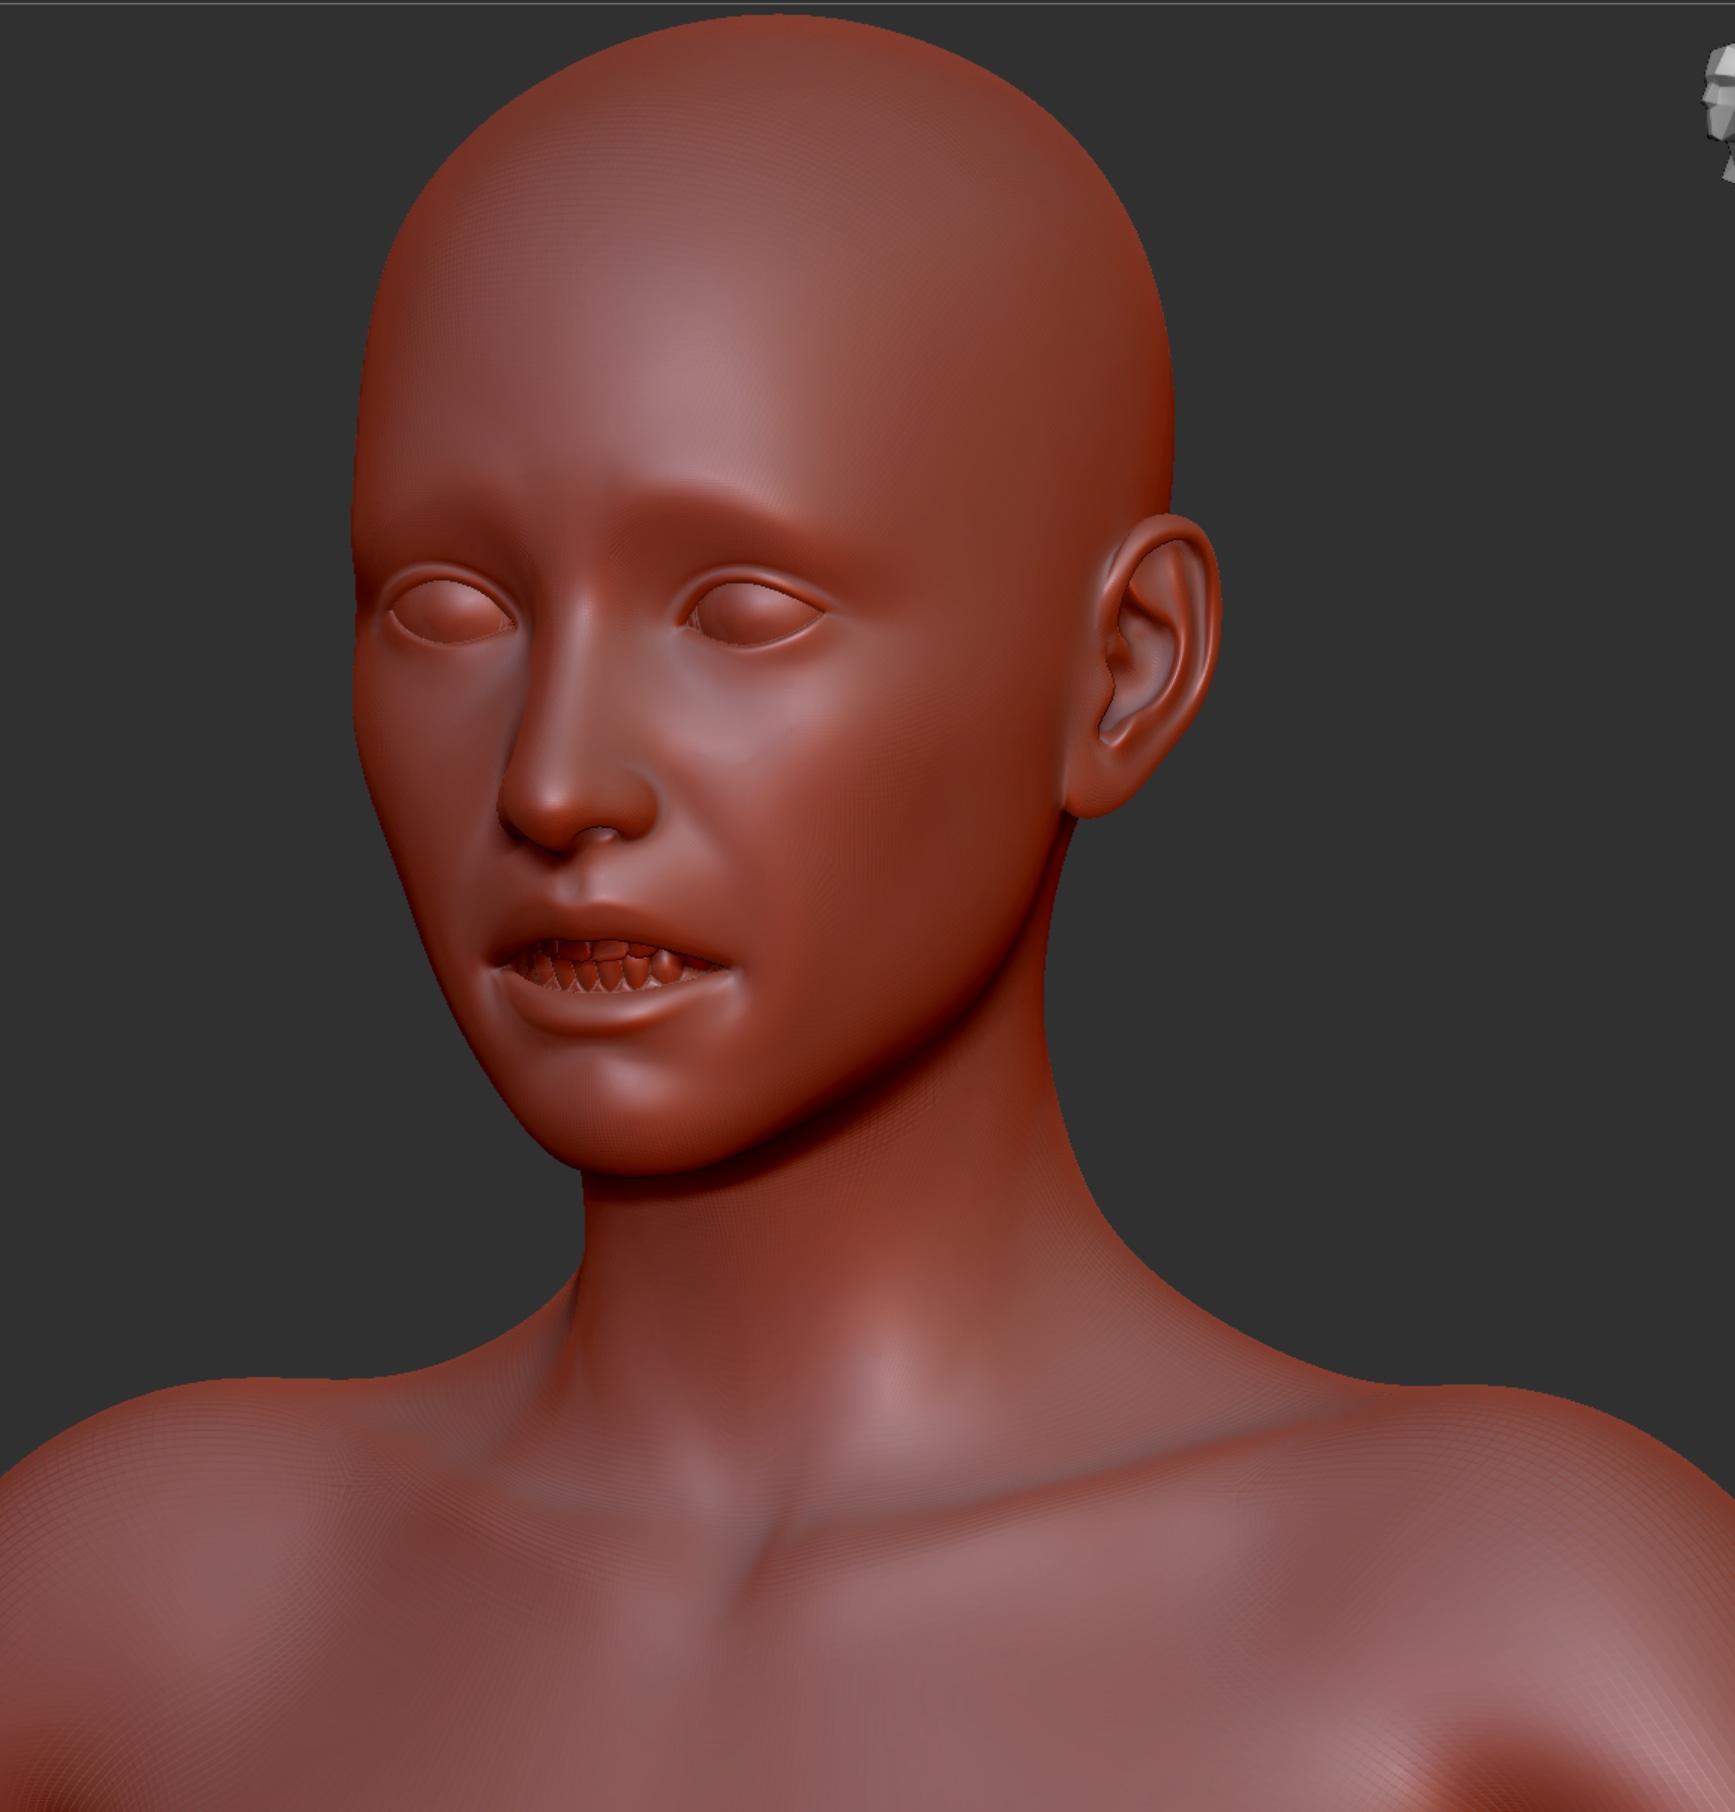
And here with (I managed to project a layer):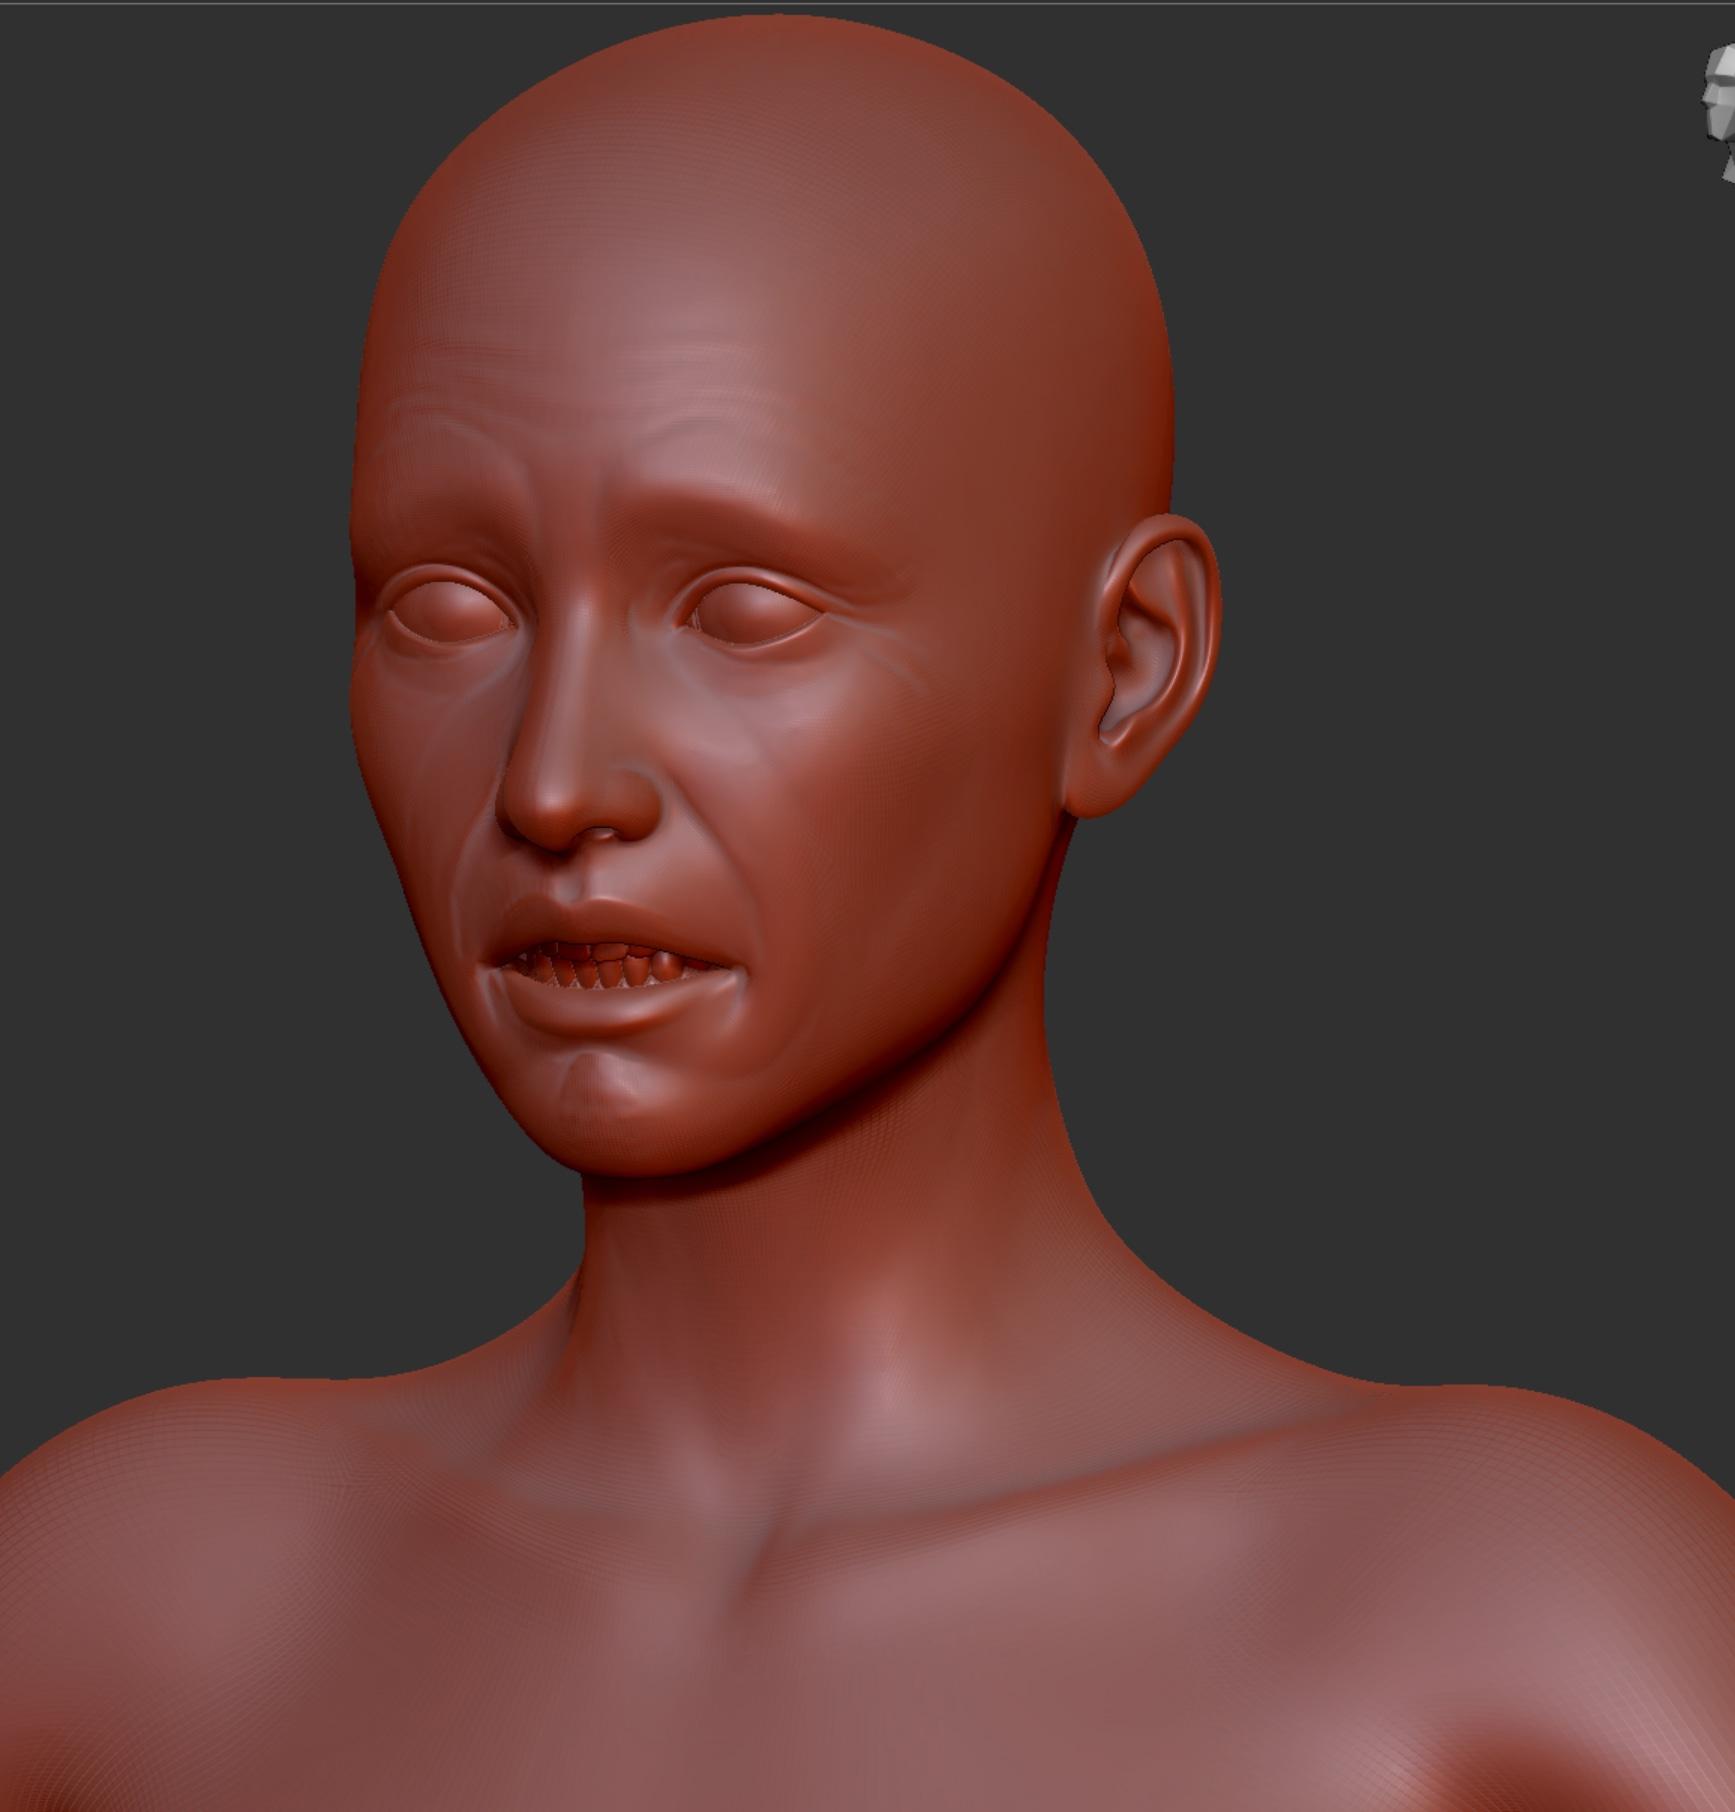
This seems to be a pretty basic problem in that it seems not to be possible to generate a displacement mesh that has only the diff between two meshes.
Any idea how I achieve this and why has a displacement map some kind of default grey?
I guess that be caused by thegeometry of the basemesh is too different from the subdivded mesh?
Genesis 9I wonder if any of these morph products will work on Genesis 9:
https://www.daz3d.com/cartoonized-for-genesis-8-female
https://www.daz3d.com/musculature-hd-morphs-bundle-for-genesis-8
https://www.daz3d.com/auto-muscle-enhancer-hd-for-genesis-8-males
https://www.daz3d.com/z-slender-model-shape-preset-and-poses-for-genesis-8-female
https://www.daz3d.com/z-strong-within-shape-and-pose-mega-set
I have a few other morphs, but the PAs have released G9 versions for those luckily.
Daz 3D is part of

Connect
DAZ Productions, Inc.
7533 S Center View Ct #4664
West Jordan, UT 84084Licensing Agreement | Terms of Service | Privacy Policy | EULA
© 2026 Daz Productions Inc. All Rights Reserved.