-
Loving Daz Studio!
WendyLuvsCatz said:
Ivy said:
Dartanbeck said:
I don't know if strand based hair was the culprit, but if it's falling off - or looks like it is, I have that feeling. Probably in the settings of the hair or a weight mapping issue or something.
I have the Dire Wolf bundle for Daz Dog 8, and I love how the strand-based hair turns out with that. Simulated quickly and looks fantastic, I think. RawArt's Snow Beast too.
I don't have the the Dire Wolf .. does the hair animate well. ?
yeah me either
it's often on sale but I prefer a real animal IE wolf or German Shepherd however I guess the fur can be used without the morph
if so maybe I should grab it (I have the German Shepherd)_
I've always been a big fan of Wolves.
I got a full bundle that included the animations, which are really quite useful. The first time I loaded the Dire Wolf I was just floored - and that's before I lifted the Dire Wolf slider, which was off when I loaded it - so it was a wolf, but not the Dire Wolf. Cranking that up made me pee in my pants!!!
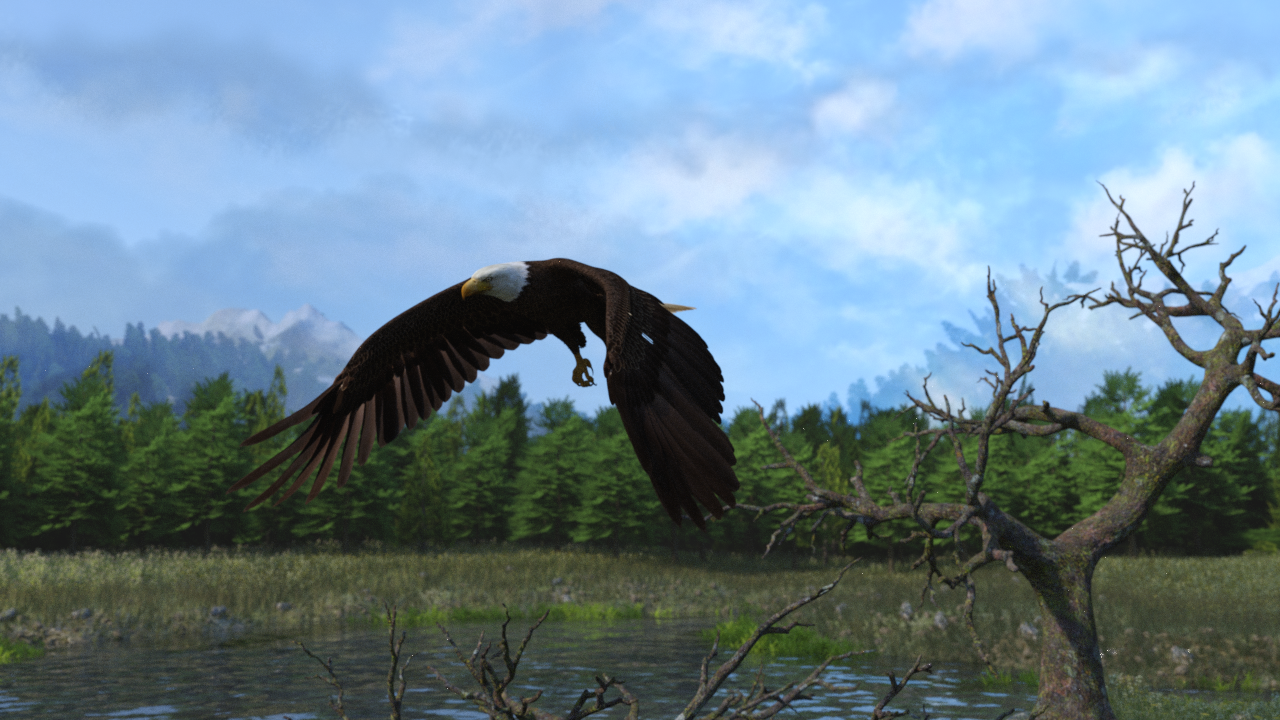
Another great find during that massive sale event was the DeepSea Eagle Bundle - Eagle, Environment and aniBlocks! Just freaking Awesome!!!
Frame 95
 Loving Daz Studio!
Ivy said:
Dartanbeck said:
I don't know if strand based hair was the culprit, but if it's falling off - or looks like it is, I have that feeling. Probably in the settings of the hair or a weight mapping issue or something.
I have the Dire Wolf bundle for Daz Dog 8, and I love how the strand-based hair turns out with that. Simulated quickly and looks fantastic, I think. RawArt's Snow Beast too.

I don't have the the Dire Wolf .. does the hair animate well. ?
yeah me either
it's often on sale but I prefer a real animal IE wolf or German Shepherd however I guess the fur can be used without the morph
if so maybe I should grab it (I have the German Shepherd)_
Encapsulation in Daz3D scenesI write code and scripts for my dayjob, so hopefully I have some skills that will transfer

Thank you for the link, I will take a look through and see if I can do what I want with it
Converting G3 Poses to G2! IT WORKS!I am currently working on a G8F to G1 pose transfer script. I have not done G3->G2. Can add it to the list if you want. It may be possible to use n_Alexandru's script either in the freebies here or Renderosity.
I have done a few transfer scripts, those being G1->V4, G1->G8F/M, G2F->V4, G2F->G8F, G3F->V4, G3M->M4, G8F->V3, G8F->V4, G8M->M4, G8->G9, M4->G3M, M4->G8M, V3->G3M, V4->G3F, V4->G8F.
Regards,
Richard
AOBB's freebie male head morph Yves G9. No materials nor textures.Very nice head morph!
[Released] Character Converter from Genesis 3 Female to Genesis 8 Female(Now Conv JCMs) [Commercial]Xagrim said:
I have tried to convert this with all possibilities options of the converter. Delete the morph folder.
FWSA Tchanun HD for Michael 7 and LI Tchanun Whiskers | Daz 3DI have managed that the G8 looksafter converting similiar to the original but if i save it, the morph is gone and it looks like a normal G8.
No idea what to do, try to save it as character preset, subscene, scene. Always the normal G8.
It sounds like the conversion works but the character preset loads a normal G8? There can be occasions where the Character Preset has an error but the morphs are created. Just dial in the morphs and then resave the preset.
How to continue with interupted dForce simulation?You'll have to create morphs for every frame not only frame X-10, otherwise dForce resets the simulation at the earlier frames. Do note this will create a huge save file as it saves the morph on each frame, but it should give you the results you want.
How to continue with interupted dForce simulation?cridgit said:
m_pohanka_6db953ed73 said:
Thank you for the avice. I do not have that product. I think it will not work nicely. As you mentioned, the information about energy and momentum needed to resume a simulation will be missing.
If I really wanted to do this and was desperately looking for a solution, here is what I would try:
After following the suggested steps above, if the animation appears to jump from frame X to frame X+1 because they were run as two different simulations, I would delete all keyframes from frame X-10 to frame X+10 and let the animation tween to create a smooth transition.
This sounds good. Like to create morph from the first simulation at frame X-10 and to create morph from the second simulation at frame X+10. Then to render from X-10 to X+10 and changing from morph 1 to morph 2.
Rigging TutorialsTry this once:
- Load the base figure that you'd like to fit the boots to. If you're looking to fit them to a specific character, still... only load the base figure for that character
- Load the boots
- In the scene, line up the boots how they should fit - scale and adjust if neccessary
- I normally model stuff to fit the base figure - you probably did to, so on to the next step
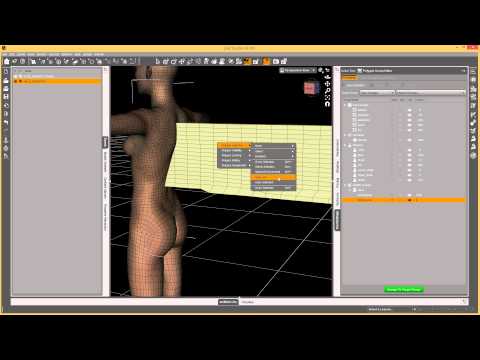
- Select a boot
- Edit > Object > Transfer Utility
- Source Field: Select the Figure
- Target Field: Boot L or Boot R (or both if the two of they're both one object)
- Click Options to open it up and check "Add Smoothing Modifier" if you want that. Probably not for boots?
- Click "Accept"
- Repeat for other Boot
- Save As > wearable preset > In the dialog, Deselect the figure - only check the boots *
- * If you need the feet to use a specific Shape morph to make them look right, you can activate "Shaping" and deselect the figure, then open up until you find the foot shape you need
- * If you need the feet to use a specific Pose to make them look right, you can activate "Pose" and deselect the figure, then open up until you find the foot pose you need
- Click Accept when you're done
- Delete the boots and load the new preset with the figure selected and test out various shaping morphs and such to see how well the Transfer Utility did.
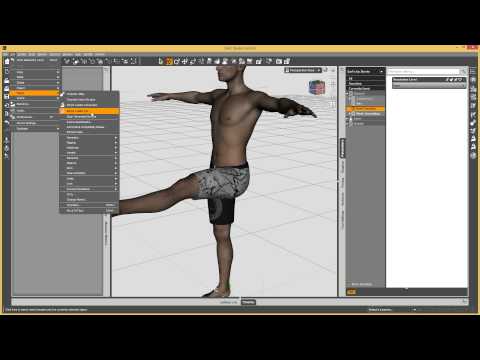
If you encounter issues with certain poses or shapes, see the videos below
Rigidity will help if the figures shaping morphs are doing funky things to the item
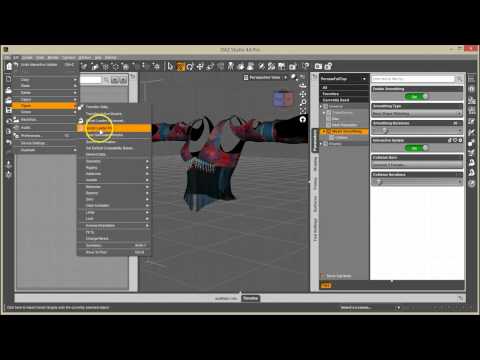
Smoothing - if you didn't add it in Transfer Utility but now you want to try it, here's how
If you decide that you need to add corrective morphs for certain situations
Hope this helps
HARDWARE: render timesDoes anyone out there have any knowledge on whether running the new 4090 in a PCI-E v3 slot/MB versus a newer MB with PCIE-4 has any bearing on actual RENDER times (or any of the PCI-E v4 cards in a lesser version PCI-E bus slot)? The PCI-E v4 slot is 4x faster throughput, but I'm wondering if that really doesn't have any bearing on render times since the rendering is on-board the GPU and should be affected by bus transfer speed to the CPU.
Anyone?
Question on how to report an issue with a product?So I ran into an issue where as soon as I loaded a figure with Iray active on the preview, or tried to render an in iray, Studio would do a hard crash instantly to desktop. This also happened when I loaded the base Gen8 figure, applied the morph and triggered once I applied the materials (skin).
After trying some of the more brutal fixes, uninstalling thousands of models, Studio, meticulously finding every bread crumb and purging those, and then reinstalling carefully after ensureing I was using updated NVidia drivers, etc., etc., I was still getting the same issue.
Eventually I stumbled across a thread pointing to .tif files being the issue. I converted the .tif files to .jpg, did an edit of all the .duf files to replace references to the .tif files to the new .jpg files, and behold, it works perfectly. So the issue wasn't Studio, be NVidia drivers, my install, etc., it was just that one figure, and more to the point, the materials for the skin on the figure.
At the end of the forum post it recommends reporting the product so that others don't have the same issues I just had and don't have to go through the huge timesink I did.
So: Question, how do I report a .tif file issue for a product?
The product in question was/is: Planetary Smuggler HD for Genesis 8 Male by GhostofMacbethWill the Animation side of DAZ ever get attention?his x said:
Ah, I see! I've spotted it before, but never looked into it. I have GraphMate too, but never took it out of the garage either. I always assumed they were just complex alternatives to PowerPose, still limited by the DAZ IK implementation, in the same way. DAZ IK is what I'm strugling with at the moment. Do you find the Graph Editor is more obedient that PowerPose?
I have a man smoking a cigarette. His hand is near his face. The butt is near his lips. I can't get it any closer. An hour's fiddling made no improvement. DAZ IK has a mind of its own. Turning it off only results in disabling the XYZ Transition tool. Can the Graph Editor overpower DAZ IK? or is it bound by the same restrictions?
This brings up some funny points about me.
I have never tried PowerPose or have any clue how it works. I'm only slightly experienced with Puppeteer - I just don't get a groove working with that - though I'm glad it's there. Some day....
IK is something that I never quite got to grips with either. In fact I tried using it to keep Rosie's hand on the steering wheel for me. Nope. Just didn't work.
So, here's how I solve your cigarette problem:
Hmmm... the hand isn't getting into position, eh? I'll try the morphforms (Arms Front-Back, etc.,) Hmmm... I'm not seeing anything that works. What I need is something that can rotate the arms a bit and bend the forearm more... yeah... that's it. Save the scene and start a new one.
- Open the base figure of the one I'm trying to animate
- Select one shoulder and use the Twist dial to twist it. If it goes higher in one direction than the other, I do that direction
- Without touching the base figure in any other way, I go to the Parameters tab > Pose
- Right-click in the tab and choose Edit Mode
- Click on the Arms portion of the Pose parameters -the one that has Arms Up-Down, etc., - just click on the word Arms
- Right-click > Add new property (typing from memory - I think that's it. I'll edit if not)
- Let's call this property "Arm Twist Left"
- Under Modifier we'll set that to Modifier > Pose
- The "Location" should show Pose/Arms. If not, Cancel and get in here again after clicking that word "Arms"
- It needs two names. The name of the dial and the label that displays in Studio *see below
- Give the slider some fancy colors and a picture if you want - or just leave the defaults
- If you want -1 through 1, uncheck where it will make it a pecentage, otherwise it will go -100% to 100% - doesn't matter. Just visual feedback
- You can also set limits and the default number for the base figure. For something like this, keep the default at 0
- Click Done
- Click on the new property you just made in the Pose > Arms category
- Now right-click it and select ERC Freeze
- If we didn't mess with the figure in any way other than twisting the arm, just accept whatever is there
- Done
- You'll have to set it back to 0 before making the next one. I just hold Alt and click the value twice (it takes two clicks most of the time - especially in Edit Mode)
Now repeat this process for any other joint controls you'd like to have to help edit animations and poses. Works like a charm, and making a whole bunch of these takes very little time - so take your time and just do it right the first time!
In your case, you'll want one that controls the bending of the elbow - but I went much further than that and made controls to bend and twist almost all joints of the figure - including the hands.
Speaking of hands, I made a bunch of hand controllers for their pose. I didn't do it this way yet, but we can load in the base figure, apply a hand pose from the library, and save that to a dial. We can also do this for the whole figure if we wanted to. But....
* Naming Conventions
Daz 3d prefers if Premier Artists use certain naming conventions when adding new properties. You can do what you want, but I happen to like the systems they have in place for this sort of thing.
In this case, we're making Pose controllers, so the name would begin with "pCTRL_" and immediately after the "_" we'd put in the name we want displayed, but with no spaces, like "pCTRL_ArmTwistL"
Now when we click out of that, the Label field will say "pCTRL_ArmTwistL", but I change it from that to "Arm Twist L". You may notice that some artists just leave the "pCTRL_ArmTwistL" sort of name. Doesn't look right to me.
Just know that, when making things for yourself, there really are no rules to follow. However, these conventions were created for Good reason - and that is, sometimes we don't like how something turned out and we want to get rid of it. With proper naming conventions, it's easy to go into your "My Daz 3d Library > data > DAZ3D > Genesis 8 > Female > Morphs > His X" folder and identify the difference between a pose control and a shape control or.... you get the point
Okay so to make this work on your saved figure (and any figure using this base), when you're done making dials for the day, go Save As > Figure/Prop Asset > Morph Asset
Create a new folder with your name or handle or whatever. Just make it unique and something you recognize.
Come up with a Name for your collection of dials. Every time you make a new one, you'll want to save them to the same "Product" name - or you'll end up with a mess and won't know where stuff is.
In the pop-up window, open the hierarchy of the figure to Pose > Arms (and any other locations you may have saved to) and select only the dials you've made this session.
Done.
Now, I said to save make the example under Pose > Arms as an example. Buit here's where some real power comes into this. We can make our own groups to contain our properties. Mine are as follows:
Majority of adjusters that bend or rotate any joint - I save these under Pose > Anim + (my name - make up your own!!!) LOL
That makes it easier to make a bunch of little tweaks without having to switch to different categories, but it can get cluttered - so you might want to keep things differently. I'm just telling you this as an example.
Pose > Hands > Anim + holds my hand posing dials. (I rotate the joints of the fingers to create a nice, natural pose and make a dial out of it - I also have one for each hand that closes in one direction, opens in the other)
Pose > Legs > Anim + holds my thigh twist, bend. Shin bend, etc., but I left Foot Bends in the main Anim + mentioned above
Pose Head > Anim + holds expressions that I've made
To create your custom group, in the "Location" (or is it called Address?) field, when making the New Property, Type the new name of your group. You only need to do this once, after which we select it to make a new property.
Example: To make my main Pose > Anim + group, I started by clicking on Pose, then immediately right-click to make the new property. By default, the Location field will be "Pose"
Click after Pose and type (without quotes, of course) "/His X
This first property will now reside there.
Now that you've made a new group, you can also place dials that you've made prior to this into that group by editing the properties of the group.
So if I wanted a His X in the Head category too, I'd start by clicking on Head (Pose > Head) right-click > create new property. etc., etc., etc.,
Questions? Just ask. I was typing from memory because Daz Studio is busy at the moment.
Can you switch a figure for another figure in a saved animation in DS?I'm not sure if transfer is the right word. Can the G9 be imported into the animation in the place & such that G8 is in? Will it need fulled repositioned or can I do it in a way to just need slight tweaks for fixing it.
Can you switch a figure for another figure in a saved animation in DS?So what are you wanting to transfer?
DIM product updates should solve problems not create someArgh. It was hidden by Turbo Loader, but now the update has turned it back on. Easy fix, though, if you don't want to wait.
Navigate to the morph file ("[yourLibrary]\data\DAZ 3D\Genesis 8\Female\Morphs\PoisenedLily\Latin Wedding Dress for Genesis 8 Female\LWD Shoe Pose.dsf")
Open it in a text editor. It's a small file, less than 3K. Replace the string "Lacey" with "LWD" (without the quotes) in 5 places. Not done yet. The scene modifier ID needs to be changed to distinguish it from the "LWD Shoe Pose" id that now sits at the beginning of the file where it replaced "Lacey Shoe Pose". So, add a "-1" on the end of the scene modifier id to make it look like this: "id" : "LWD Shoe Pose-1", ...
Save it and enjoy an error-free load.
[Solved] Rigged Heels from Blender and parenting in DAZOK. In fact, it's likely just they just bake joint rotation (joint mode, then left clic on figure, bake joint rotation) before the use of transfer utility. The zero pose is applied by itself when creating the product. There's nothing special, pose for heels still needs to be created and added to the product, there's no unexpected clipping. It's faster than the old way.
[Solved] Rigged Heels from Blender and parenting in DAZThere's nothing that's looks like a pre-morph for feet or hide feet. It really looks like someone managed to play with rigs and pose modes.
EDIT - Loaded them again.
The old way : rest pose is "no heel"
The alternative : rest pose is "with heel".
But I can't find anything that looks like a feet morph or a hide feet
Daz Studio Iray - Rendering Hardware Benchmarkingharrisoftware said:
Along with this, has anyone out there have any knowledge on whether running the 4090 in a PCI-E v3 slot/MB VS a newer MB with PCIE-4 has any bearing on actual RENDER times? The PCI-E v4 slot is 4x faster throughput, but I'm wondering if that really doesnt have any bearing on render times since the rendering is on-board the GPU and should be affected by bus transfer speed to the CPU.
Anyone?
You'd already posted this as a thread in the Commons, and been answered. Please don't double-post.
[Solved] Rigged Heels from Blender and parenting in DAZSome sets may use a foot morph to make the feet fit into the shoe, or simply hide the feet, rather than trying to get the shoes rigged to the default foot position and then take high-heel poses.
Genesis 9PixelSploiting said:
I literally bought HH Belle because the figure comes with working correctives. I can always dial the body morph for this character too 100% and then use other morph packages to customize if I don't need pinup character physique for this particular shot... But the thing with limb and ribcage bending as they should is great.
Yes. I'm trying to wait for a comprehensive bend corrective package to be delivered so I can keep my G9 morph count to a minimum. But who knows when or if that will be forthcoming.
Daz 3D is part of

Connect
DAZ Productions, Inc.
7533 S Center View Ct #4664
West Jordan, UT 84084Licensing Agreement | Terms of Service | Privacy Policy | EULA
© 2026 Daz Productions Inc. All Rights Reserved.