-
Looking for Advice/Opinions on a Product I'm Making
crosswind said:
Yeah, if you make the card enough polygons, technically you can further create bend morphs as you wish. But playing MTG is not like Hold'em or other "gambling card games", i.e. we don't really need to bend MTG cards haha ~~ esp. with the cards of R / MR.
Yeah, we definitely don't bend and fold them, but what about that authentic "magic curl" that you get with so many foils? Lol. That was actually the only reason I even wanted morph it in the first place. More realism. Haha
Indeed ! I usually had the foil partially bent near the seal before giving it a little yank ... But if making a foil prop in which you really don't need to literally place any cards there, making it a partial foil bend morph will just do, hoho ~
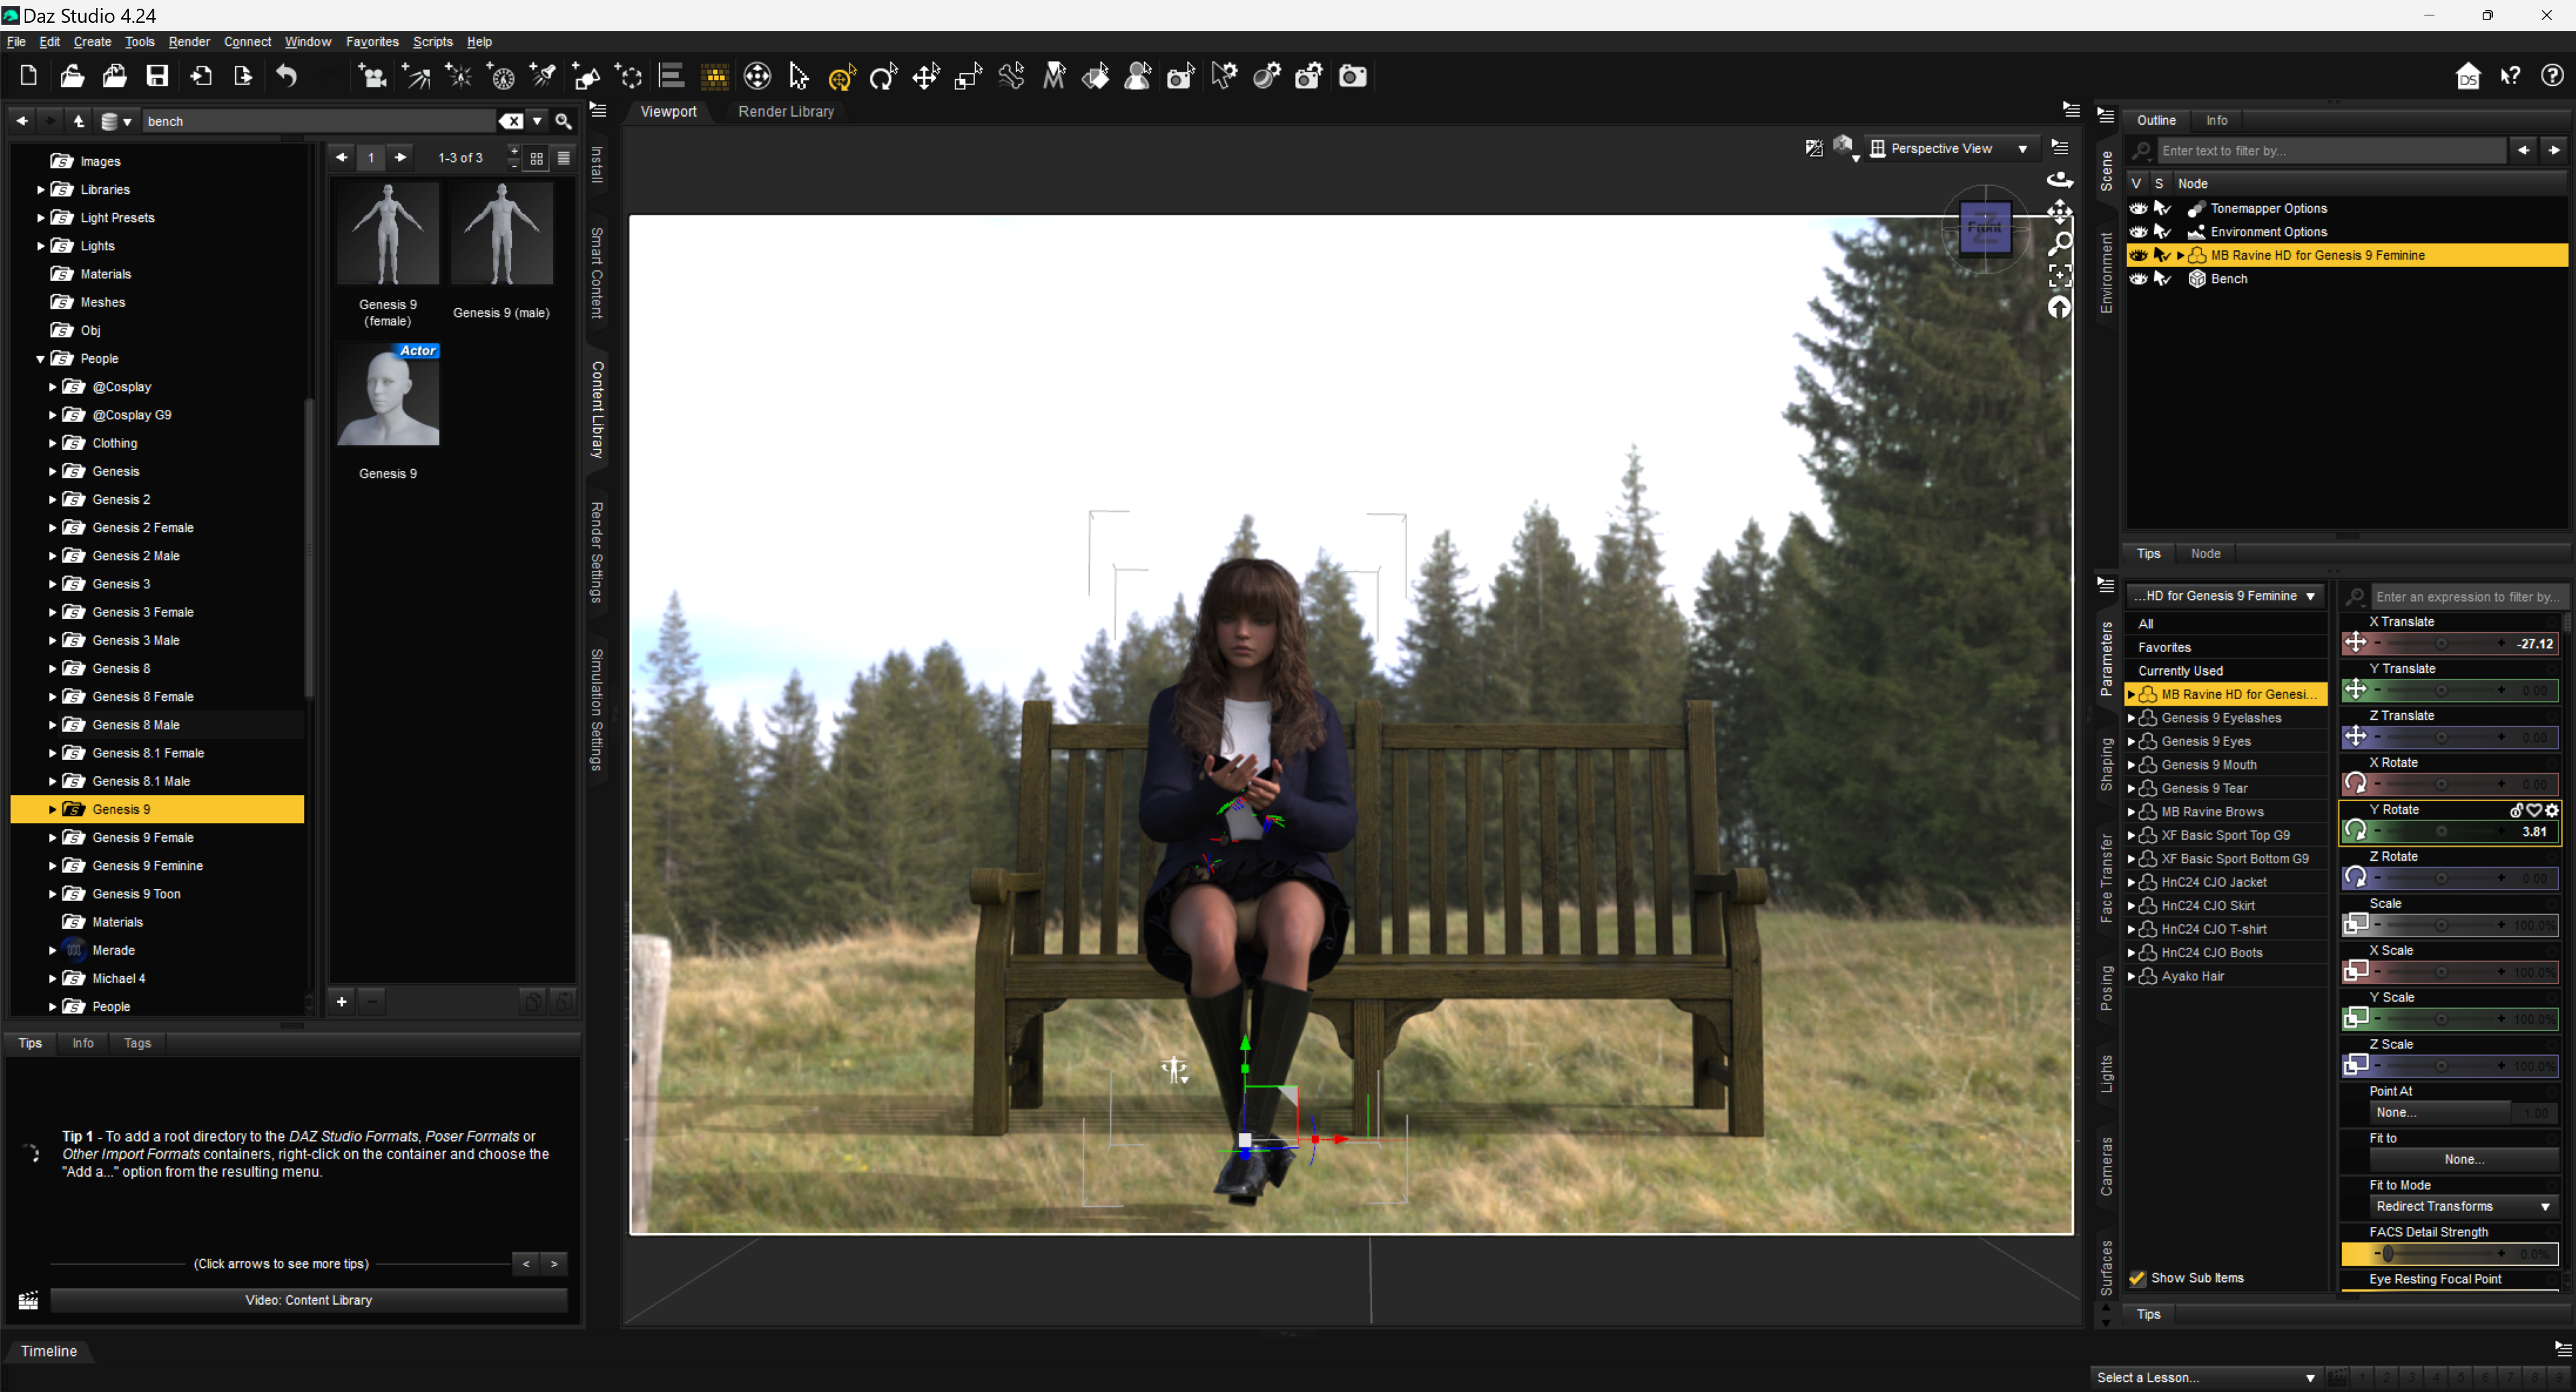
How to fit properly some clothing using Mesh GrabberHello, I have this problem.
I am trying to fit some ladies clothing in a seated position.
Not all clothing offers adjustments via Shaping Tab in Daz Studio.
I am using the current build 4.24 Windows 64-bit
Here are the items used as an example for this post, please note that not all of these items have been applied some Materials.
Genesis 9 Character “MB Ravine HD for Genesis 9 Feminine by Magic Brush”
Genesis 8 hair “Ayako Hair by goldtassel”
Clothing set “dForce HnC24 Casual Jacket Outfits by DAZkang”
The skirt gives me some headache trying to fit in the position.
The same happens with any other Genesis 9 figure.
Underneath is the “X-Fashion Basic Sport Lingerie by xtrart-3d” Yellow
The prop used is the “Premium Props - Park Bench by MindVision-GDS”
I have used “Z My Favorite Book by Zeddicuss” Genesis 8 Poses for F/M
Unfortunately, I didn’t added the book to the scene, as is cumbersome to get into the exact position when using a Genesis 9 character, even thought is a prop.
Added a HDRI from PolyHaven
I have Mesh Grabber Bundle, it comes with
Mesh Grabber for Daz Studio 4.5+ (Win64-bit)
Mesh Grabber Morph Edito for Daz Studio 4.5+ (Win64-bit)
Mesh Grabber Rotations AddOn for Daz Studio 4.5+ (Win64-bit)
Now I want to make use of it to try fixing the clothing issue.
However, I don’t know how to start with.
I am not a fan of searching useless videos, that will not get me where I need to do.
Just get me the know-how to get the things done.
I would really appreciate your input with some examples I can follow.
Thanks beforehand!
 Looking for Advice/Opinions on a Product I'm Making
Mattymanx said:
Static props would make more sense to me. You would only need to make one card and then 100 textures for it. Would be good if the center point of hte card, that point around which it will rotate, is at the center of the card. If the card has enought geometry, you could also make some bending morphs for ir
I ended up doing it a little differently so I didn't have to have 100 different textures. I created 4 different UVs for my card so I could put 4 images per texture. And I modeled the card with morphs in mind, cause I wanted to be able to put a little curl in the foil cards.
crosswind said:
Yeah, if you make the card enough polygons, technically you can further create bend morphs as you wish. But playing MTG is not like Hold'em or other "gambling card games", i.e. we don't really need to bend MTG cards haha ~~ esp. with the cards of R / MR.
Yeah, we definitely don't bend and fold them, but what about that authentic "magic curl" that you get with so many foils? Lol. That was actually the only reason I even wanted morph it in the first place. More realism. Haha
Why is there no "scale" option in parameters for this assetWell, if you change Scale on a rigged garment without fitting it on any Genesis figure, you may get unexpected result as Scaling is not proportional (screenshot 1). You might have to further tweak it cumbersomely.
Suggest you an alternative :
1) Re-rig the garment to G2F by using Transfer Utility + Full-body template, as the settings shown in (screenshot 2)
2) You'll find a new morph property FBMExpandAll on the garment. Dialing it may bring you better result (screenshot 3)Then dForce the garment as you wish ~
Looking for Advice/Opinions on a Product I'm MakingI used to be an MTG player many many years ago but now I mainly play MTGO ~~ Well, since you're not making game-ready assets but just assets for DS, then two cents from me:
- Make one card case like the black+red one shown in the above image. Rig it as a figure so that it can be opened.
- Make one card Prop. The card needs a thickness to certain extent. You'll not have to make two surfaces for it but just a good UV will do ~.Then to make a Deck, whatever for the case, library, graveyard or exile... etc., create Instance Nodes with a Card then form them as a Deck with Align plugin. That'll be a very easy process.
To make cards in hand, battlefield or wherever needed, two options:1) group of Card props; 2) a rigged figure with multiple cards and control the number of cards (actually shown or hidden...) by using Conditional Graft. (I personally prefer to this way 'cause that'll be interesting, as you can show / hide card(s) as well as make the cards have sort of different forms or "a bit messy form..." by translating / rotating them separately with morph properties... etc .etc.)
Finally, save them as Scene Sub-sets, Pose Presets, Mat Presets, etc... as needed. Suggest you make a PSD template as per the card UV layout so that the users can easily add MTG card images for the use of their own ~~
Edit: If you really want to make it as a freebie, you may go for the easier ways ~
 Mauro for G9 Hair?
lilweep said:
Well, for the record it is probably this one here https://www.3dscanstore.com/hair/realtime-hair-short-curly
It should be very easy to transfer this to your genesis figure of choice. Cant be bothered posting instructions though (maybe over DM if anyone insists).
Thanks for that find.
Mauro for G9 Hair?
Ohhh thank you for linking this.lilweep said:Well, for the record it is probably this one here https://www.3dscanstore.com/hair/realtime-hair-short-curly
It should be very easy to transfer this to your genesis figure of choice. Cant be bothered posting instructions though (maybe over DM if anyone insists).
How to make the Window glass surface transparentDouble-check that the proper figure has been selected before adding the clothing items. They should be "landing" where they belong. [assuming they were made correctly of course]
eta:
To pose a skirt for the sitting position, I do not have the grabber tools, I use dForce and the timeline, and of course Hexagon if required.
Clear the scene, load the figure and the skirt/dress, and of course the chair. One can add a dForce modifier to the skirt/dress if one doesn't already exist.
At "0" everything is in the default position. Except the chair, have that pulled back away from the figure so it can be slid into position at "30."
At "30" [at least, maybe a few more steps] the figure is posed to the sitting position on the chair.
Return to "0" and run the dForce simulation. Ideally as the figure goes to sit down, the garment drapes along with it. Might not be perfect but it's usually a good start.
Then I would send the lot over to Hexagon and fix any imperfections of the drape that are of concern for the image.
Then in D/S I would clear the drape from the garment, garment selected, then from Hexagon send the fixed drape back into D/S and make a morph. I would give it an appropriate name so I know what this morph is for. Then dial the morph to "0" and save the morph.Then clear the scene, load the scene you're working on, when the figure is sitting - select the garment and dial in the morph.
Render the still image.
n.b. If one can use Mesh Grabber on a draped garment, you can certainly use that then instead of Hexagon.
Mauro for G9 Hair?Well, for the record it is probably this one here https://www.3dscanstore.com/hair/realtime-hair-short-curly
It should be very easy to transfer this to your genesis figure of choice. Cant be bothered posting instructions though (maybe over DM if anyone insists).
Daz Studio 2026 Beta - version 6.25.2026.4408! (Updated February 18, 2026)Douglas said:
DoctorJellybean said:
Douglas said:
Hi all, two little things...
1) Is there a reason why under Shaping -> Actor there are big square icons with vertical sliders and not the orizontal ones ?
2) Under default keyboard shortcuts (View Control) the upper arrow icon is associated to CTRL+ATL+R or "reset camera"
that switches viewport into Front view. On the viewport window the up arrow icon resets the viewport.
May be useful add a separate keyboard shortcut for RESET viewport and change the reset camera icon into the shortcuts list ?Thanks to all developers !
Could you please show a screenshot of the first point. Which Style are you using?
I'm using Hollywood Blvd with darkside, midnight style ( if you mean Daz UI ).
Since the character vendors (at least in this Daz store...) usually provide big size thumbnail images for character's Head and Body morph, as default, DS sets big Card in Shaping pane for all the morphs of non PHM/PBM morphs under Actor path.
You can uncheck Preferences > "Show Property Cards" in the context menu of Shaping pane ~~ to make morph properties as "horizontal morph sliders" ~~
Create model of any face?dondraw said:
Daz doesnt include it in daz.
Well, the link i posted is a service that can generate morph from photo and has a plugin for Daz Studio, so not sure if it's relevant that "Daz doesnt include it in Daz Studio".
The other process I mentioned still answers your question, albeit was mainly just for context as I was not expecting you to follow through with it. In the year 2025, it has never been easier to scan a face or body and wrap to genesis figure so it's not as though it's impossible to go through the workflow I described on a small budget.
I have problems with forearmSorry, maybe I didn't really understand, but what I got out of this is, that you want the forearm look like in your top image, when it is in that position.
Reverse Deformation seems the correct methode to me, but you will need to use your morph target as a Joint controlled Parameter (JCM).
You use your fore arme bone twist as a master and connect it witj the freeze command in the right click Parameter tab to your correcting morph.
Now save your morph as a Morph asset.
Right click> show in Property hirarchy.
In Controllers 1st Stage you will find the twist bone.
Click and drag your character morph into the 2nd stage.
Now your custom morph dials in every time your forearm twists, but ONLY with this one character.
Hope that helped.Create model of any face?There's Face Transfer 1/2, FaceGen, and Headshop.
Face Transfer 2 claims to use AI, but not quite sure how that works technically.
Daz Studio 2026 Beta - version 6.25.2026.4408! (Updated February 18, 2026)barbult said:
Richard Haseltine said:
barbult said:
This was a shock and a disappointment. I created a scene in DS 4.24 and rendered it. Then I decided to try to render it in DS 6 Alpha, because of a comment from OSO3D about the adaptive displacement. I knew that at least one of my surfaces used displacement with subD. The DS6 Alpha render came out way wrong. I simplified the scene down to just the garage building. (This is the garage I have been using in my latest Jack and Richard story.) The garage originally used 3Delight materials. I selected all surfaces and converted to Iray Uber. Then later I applied a different Iray shader to the floor. That is the shader with displacement. I also hid many bones and surfaces that were not needed for my scenes. The DS6 rendered result looks like maps are applied to the wrong surfaces (garage door oval windows on the floor???) (brick wall flat white???) (floor displacement is entirely missing???).
The two renders and the scene are attached. The complete application version numbers are in the render file names.Which waws the other shader? If proeprty names differ, for example, that may wreck the transfer (though that should affect DS 4 too, unbless it is a DS 2025-specific step).
The prop I am using is from the Garage Hideout product and it is the prop named GH Garage. The shader I am applying to the surface garage_floor is from product Plaster and Concrete - Iray Shaders and the specific shader is PC Concrete 05.
I have those. They seem to apply correctly solo in DS 2025, but I will just try starting from DS 4.
The prop GH Garage has over 20 bones, but they are not hierarchical, they are all at the same level. Does that make it affected by the bug that has recently been fixed (but not yet available to users)? I am on Windows 10, not MacOS, if that makes a difference.
No, that is when the bones are in a cahin of Parent>Child, it isn't an issue with number of bones as long as the nesting isn't too deep.
Daz Studio 2026 Beta - version 6.25.2026.4408! (Updated February 18, 2026)Richard Haseltine said:
barbult said:
This was a shock and a disappointment. I created a scene in DS 4.24 and rendered it. Then I decided to try to render it in DS 6 Alpha, because of a comment from OSO3D about the adaptive displacement. I knew that at least one of my surfaces used displacement with subD. The DS6 Alpha render came out way wrong. I simplified the scene down to just the garage building. (This is the garage I have been using in my latest Jack and Richard story.) The garage originally used 3Delight materials. I selected all surfaces and converted to Iray Uber. Then later I applied a different Iray shader to the floor. That is the shader with displacement. I also hid many bones and surfaces that were not needed for my scenes. The DS6 rendered result looks like maps are applied to the wrong surfaces (garage door oval windows on the floor???) (brick wall flat white???) (floor displacement is entirely missing???).
The two renders and the scene are attached. The complete application version numbers are in the render file names.Which waws the other shader? If proeprty names differ, for example, that may wreck the transfer (though that should affect DS 4 too, unbless it is a DS 2025-specific step).
The prop I am using is from the Garage Hideout product and it is the prop named GH Garage. The shader I am applying to the surface garage_floor is from product Plaster and Concrete - Iray Shaders and the specific shader is PC Concrete 05.
The prop GH Garage has over 20 bones, but they are not hierarchical, they are all at the same level. Does that make it affected by the bug that has recently been fixed (but not yet available to users)? I am on Windows 10, not MacOS, if that makes a difference.
Victoria 4 loading issuedeeahr2169 said:
I am really grateful to you Richard, your knowledge and expertise is a real help. I am still struggling to get this issue with V4 sorted despite feeling closer to a solution thanks to you. Each step I take seems to involve more complications, for example running DzCreateExPFiles-v4 command gets blocked by Mac because of security issues. To date nothing I try has resolved this extra issue...Which leads me to ponder the question of why this is necessary. On starting with Poser content I loaded the V4 and M4 from my content library via the Daz website, so one would have thought all the content I obtained would be good to go. Indeed the M4 base and power loader once installled allows me to load M4 into DS with no issues whatsoever. As can be seen from this thread the case with V4 is that some part of the package fails to load properly if at all. Surely this cannot be correct. If one downloads content from Daz it should load without having to resort to trying to load parts of tht content package using Terminal. I am not exactly tech savvy, so this entire saga is a real effort for me and I am once again of the verge of giving up on thisPoser based content....
With the previous generation figures adding extra morphs (beyond a few for a character) required a whole new figure file, so it was not possible to mix morph sets without using an external editing tool on the figure files. Even where characters used the supplied morph slots they could end up competing for the same slot. The ExP system is an attempt to avoid these by allowing each expansion (character or morph set) to add its own sloys, but it does require that the list Poser/DS read be updated for each addition or removal. The batch/command file was how this was done initially for Poser, Daz Studio has the Power Loader tool which can do the building on loading so that the process is more configurable. Do you in fact have the Power Loader extensions installed (the base for the figure is the important one)? If you see a little scroll icon at top-left of the Victoria 4 thumbnail in DS but don't get the dialogue try holding down the cmd key while you double-click on the file to force it to show the UI.
Daz Studio 2026 Beta - version 6.25.2026.4408! (Updated February 18, 2026)barbult said:
This was a shock and a disappointment. I created a scene in DS 4.24 and rendered it. Then I decided to try to render it in DS 6 Alpha, because of a comment from OSO3D about the adaptive displacement. I knew that at least one of my surfaces used displacement with subD. The DS6 Alpha render came out way wrong. I simplified the scene down to just the garage building. (This is the garage I have been using in my latest Jack and Richard story.) The garage originally used 3Delight materials. I selected all surfaces and converted to Iray Uber. Then later I applied a different Iray shader to the floor. That is the shader with displacement. I also hid many bones and surfaces that were not needed for my scenes. The DS6 rendered result looks like maps are applied to the wrong surfaces (garage door oval windows on the floor???) (brick wall flat white???) (floor displacement is entirely missing???).
The two renders and the scene are attached. The complete application version numbers are in the render file names.Which waws the other shader? If proeprty names differ, for example, that may wreck the transfer (though that should affect DS 4 too, unbless it is a DS 2025-specific step).
Are there any products or addons that will let me auto-fit Genesis 8 clothing to Genesis 1 (V5)?crosswind said:
Spacewarper7 said:
Pardon my ignorance, but how do you make G8 clones? That's something I would love to do myself, as I still after all this time much prefer using Genesis (1) for my renders to any of its later generations because of its greater versaility (especially in ignoring the gender, which always struck me as pointless if not ridiculous - not for social reasons but simply for the lack of convenience in using them). That and because I don't like the older props I bought for Genesis and its predecessors now being largely useless on later models.
Here's the key steps to make a G8F clone on G1.
1. Load a G1 and G8F into the Scene, Show Hidden Properties... in Parameters pane. Dial Genesis Clone on G8F.
2. Tweak G1's pose to align with G8F AMAP. Export G1 to OBJ with Base Resolution.
3. Loade G1 OBJ. Rig it onto G8F. Zero Genesis Clone on G8F. Export G1 to OBJ again.
4. Import G1 OBJ as a Genesis 8 Female Clone morph by using Morph Loader Pro.
5. Modify the morph as a Clone in Parameter Settings. Save the morph as a Modifier Asset. Done ~Here's the video of the full process: https://mega.nz/file/iWhBGABD#Syp9KF9zePDMh7D0Fq1naeJ4qUN7sGrVsE_F_lp7HPo
Edit: I also attach the Pose Preset for the alignment... so that you don't have to tweak the pose on G1 yourself ~~ Load the Pose Preset in above step 2.
Then do almost the same if you want to make G8M clone or other Genesis generation clones. The key is to choose Daz official clone, and align the pose before rigging.
Thanks so much! I'll give this a try
Recommendations for premium vendors of clothes, hair and figuresFor characters, it depends on what you like. For pretty ladies, BlueJaunte and Mousso are among the best, Kooki99 is great for everyperson-type characters, and Spows does highly-detailed characters that are often of underrepresented demographics and occasionally verge into the grotesque. VirtualWorld makes very realistic characters as well as morph packs for certain types, like older men and East Asian women. If you're more interested in men, especially heavily tatted men, you might want to take a look at Darwins Mishap(s). I also highly recommend Redz Studio (also more male-focused), whose Small World morphs make the uncanny Caryn and Tobyn useable as babies, and makes some great hairs to boot.
the torso is deformed in Genesis 9lilweep said:
crosswind said:
In Parameters pane, right-click > Edit Mode. Select the morph property, right-click > ERC Freeze....
for this step, i would also suggest to quickly look through the list of what you are saving as subcomponents of your morph, because sometimes the list of subcomponents might contain things besides the rigging changes. E.g., you might be "ERC freezing" some irrelevant setting changes, depending on what you have been doing in your Scene prior.
Yes, case by case, if there's any other irrelevant partial morphs or rigging, etc. they need to be unchecked.
Daz 3D is part of

Connect
DAZ Productions, Inc.
7533 S Center View Ct #4664
West Jordan, UT 84084Licensing Agreement | Terms of Service | Privacy Policy | EULA
© 2026 Daz Productions Inc. All Rights Reserved.