-
A bunch of material presets not working anymore
RL_Media said:
Ahhhhhhhh damn, guess I will have to install that CMS crap then. Ugh.
I learned my lessons tryin to do anythin but clean installs of OS a while back lol. Never really works out well for me either, and always ended up having to clean install in the end, so might as well start with it. Same with drivers. No one drive for me, I don't really use any of those default folders like document and pictures. I have 6 hdd, keep all my stuff on those, install all the programs/games on a seperate SSD.
OK, Installed the CMS stuff, no dice. I even tried to load the character load in which does set up shaders properly, save a new material preset making sure all the maps are checked, and still loads lookin like that lol. Decided to install DS 4.15.0.30 to illiminate it being a beta issue, and it doesn't seem to be related to the beta. Back to stumped. Too tired to test more tonight, will pick it up tomorrow or saturday maybe. Or maybe I just set my computer on fire and go paint on a cave wall instead, stupid technology :PCMS is installed but is it running? You need to have a correct driver, the database that runs content running (CMS), a working database (i suspect that is where your problem is; the manual instal people always forget that both the user and the program have to know where files are and their relation to each other). Do you have any metadata?
DAZ Studio won't loadOK, then you have a high-risk option. You could renamed the contentCluster folder, then try restarting Daz Studio and see if it starts - if it does you know the issue, and you can reimport emtadata for products but - unless you'd exported it - you will lose metadata for your own files. If it still doesn't start then the issues iss oemthing else and you can try restoring the folder name, if the issue can be resolved by another route then you may still have the database.
[Released] Substance Painter Assistant [Commercial]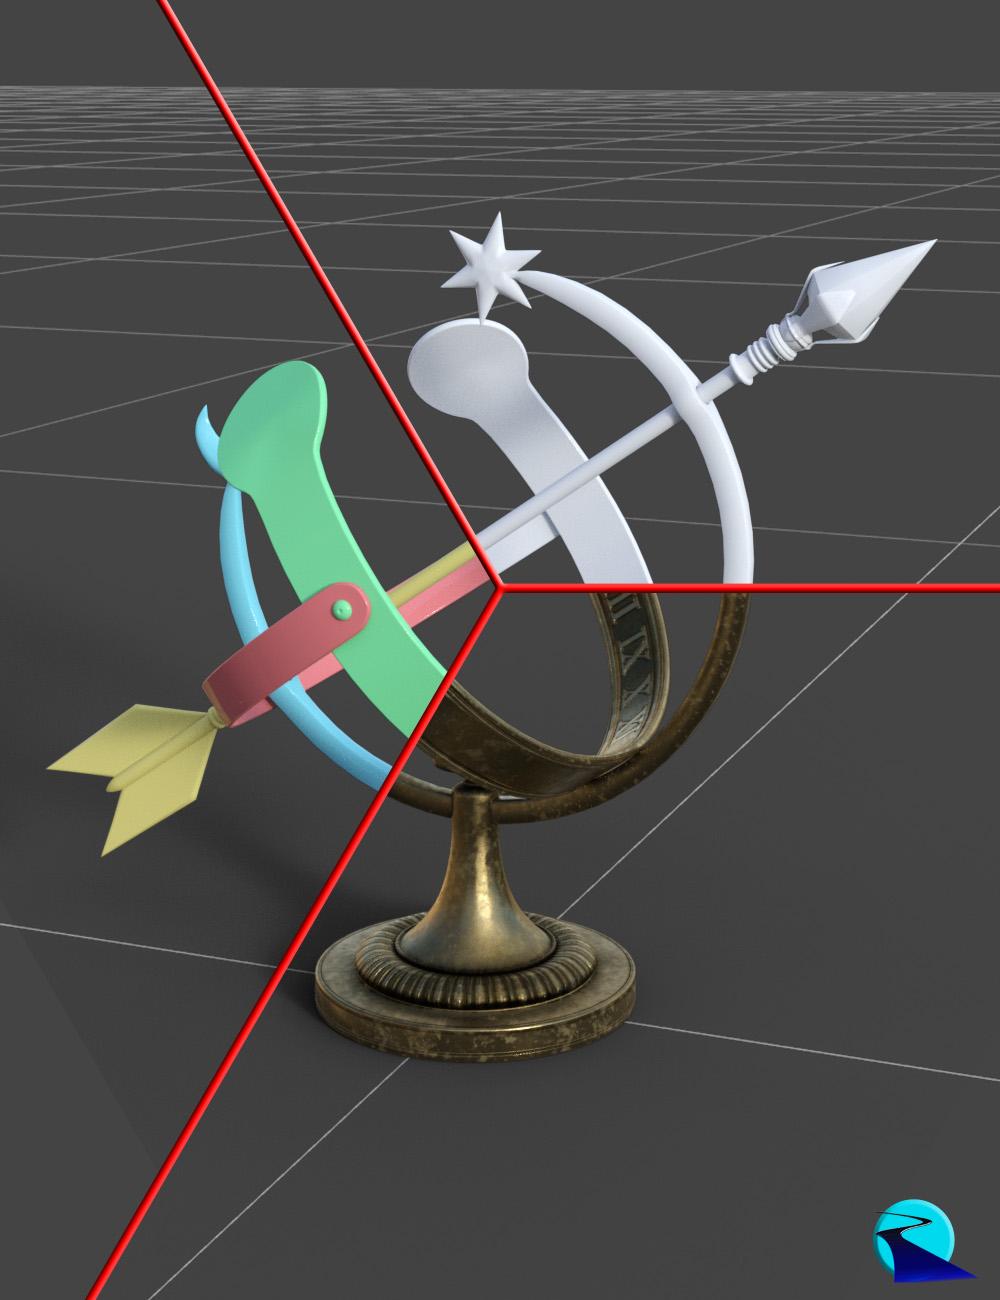 Substance Painter Assistant is a script product for Daz Studio designed to help automate the process of getting your Daz Studio 3D objects into Substance Painter for texturing and then get those textures back onto your Daz Studio 3D object. There are 2 scripts:
- Substance Painter Assistant: Exports Daz Studio objects for easy use in Substance Painter, including assigning easily distinguishable colors to every surface's base color (useful for ID maps in Substance Painter)
- Substance Painter Maps Import: Automates importing Substance Painter textures (or actually textures from any program) onto your untextured objects. By defining your texture file-naming scheme, Substance Painter Maps Import can automatically assign all of the files in a folder to the correct channels in your surfaces
Tutorial (by esha):
Note: Product is only meant for Iray
Diffeomorphic DAZ Importer version 1.6.0 releasedPadone said:
@Papabravio For simple-ik you have to bake with blender (pose > animation > bake action). I see for some reason it doesn't wotk with "only selected bones", dunno why. Other than that seems to work here.
steps:
- import g8f, merge rigs, make bones posable
- add custom shapes, add simple ik
- animate with ik
- bake with blender using the settings in the attached picture, don't use "only selected bones"
- save pose preset
Thanks, worked!
DForce item disappears during simulationNope. Don't have the thickener. Indeed interesting. I tend to do modifications with apps more dedicated to modeling ;)
In this test I did yesterday to fix the OP issue, I decided to delete the hoodie's inside because it was the fastest solution. The best solution to keep thickness while still being able to simulate with dForce would be (have been) to select the same part of the hoodie I show in the first screenshot (Blender), and separate it rather than delete it. Then re-weld that part but ONLY the vertices from the front side, not those to the rear.
I'm sure simulation would also work just fine while still keeping a better hood shape. The Thickener could also do the trick although I fear it's just an equivalent of Blender's solidify modifier or 3DS Max shell modifier, so it would create a too sharp looking thickness with stretched UVs (last pixel of the texture stretched along the thickness).
-----------------------------
For issues such as this one on a cloth I didn't do myself, personal best solution is :
I export the DAZ cloth as obj. Import that in Marvelous Designer as garment ticking the option "trace 2D patterns from UV Map".
This way, I end up with the fabric as a 2D garment. And I have perfect control over anything that needs to be added or changed. I prefer to make my own clothes, but in the rush of some freelance contracts, using already made clothes and recreating them for a proper DAZ dForce simulation is the fastest way to finish a contract quickly ;)
Diffeomorphic DAZ Importer version 1.6.0 released@Papabravio For simple-ik you have to bake with blender (pose > animation > bake action). I see for some reason it doesn't wotk with "only selected bones", dunno why. Other than that seems to work here.
steps:
- import g8f, merge rigs, make bones posable
- add custom shapes, add simple ik
- animate with ik
- bake with blender using the settings in the attached picture, don't use "only selected bones"
- save pose preset
How do I create more material zones? new: how to increase polygons ... Possible?@WillowRaven: From this:

to this:

...try the following (it is not difficult, i still am an absolute beginner with Hexagon!)
Before you start, please test if this method will work with your shirt:
A) Choose "wire shaded" as Draw Mode in the viewport. Then try to loopselect the collar to which you would like to add the second "line" as described in steps 12 to 15. If it works as described, your prop is suitable for this guide and you can continue. (Thanks to Richard Haseltine for spotting this weakness!)
1. Load your shirt and send it to Hexagon

2. Choose Display Mode "Flat Solid and Edges"

3. Leftclick on the shirt to select it which looks like so:

4. Press the "Select Edges" Button:

5. Select one edge in the collar zone where you want to add a second "line"

6. Press the RING Button:

7. Now it looks like this:
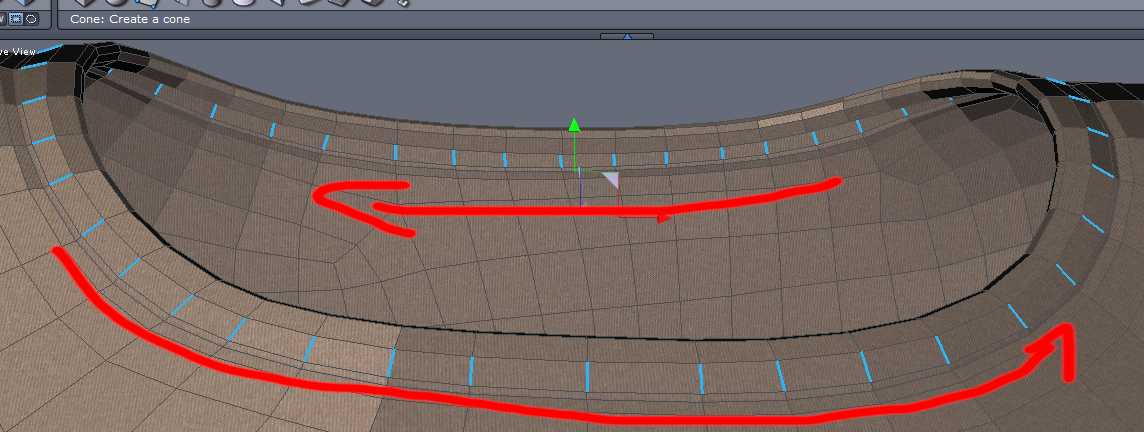
8. Now select Tools --> Lines --> Insert Points:

9. ... which creates the extra geometry. Now send it back to DAZ:

10. In DAZ STudio: Choose import as a prop:

11. If you haven't yet, delete the original shirt in the Scene Tab and select the "new" shirt. Choose "Wire Shaded" as Draw Mode in the Viewport
12. Now activate the Geometry Editor:

13. Select 2 adjacent faces in one of the lines:
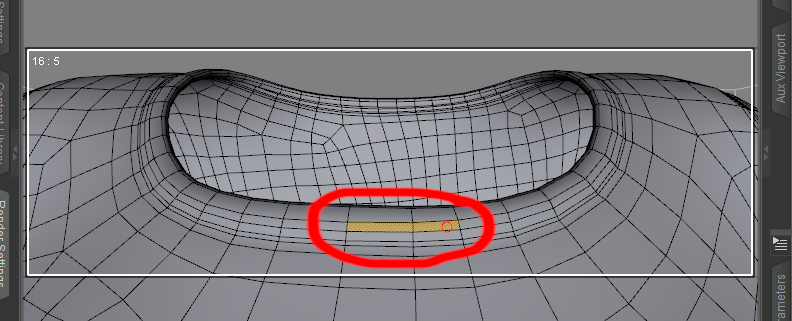
14. Rightclick and choose loop selection:

15. Your first line is selected:

16. Rightclick to choose create surface from selection and choose a name:

17. Repeat steps 13-16 for the second line, then you can already put shaders on the lines and rest of shirt.
18. Now convert the new shirt prop to subd:

19. Load the Genesis Figure the shirt was created for, select the new shirt prop and start the Transfer Utility:

20. Source is the genesis figure and target the new shirt prop:

21. Adapt SubD level and surface settings to your liking.Just to show the UV mapping wasn't destroyed:
 How do I Import Hair inside "Create/Edit New Strand Based Hair" Utility ?
Richard Haseltine said:
You can import the distribution maps, but not - if this is not strand-absed hair but rather dForce hair - the styling, as far as I know.
The one I tried was a dForce,gonna have to try a different one. Thanks!
How do I Import Hair inside "Create/Edit New Strand Based Hair" Utility ?You can import the distribution maps, but not - if this is not strand-absed hair but rather dForce hair - the styling, as far as I know.
How do I Import Hair inside "Create/Edit New Strand Based Hair" Utility ?Is it because I cant Import Actual Strands of Hair, only the textures?
How do I Import Hair inside "Create/Edit New Strand Based Hair" Utility ?I used the Strand baced hair utility before to put hair on a figure, but when it comes to trying to import a hair I have no idea what to do after I press the Import button.
As illustraded in an image below I have chosen a sculp of Ingrid Hair as an object onto which i wanted to import Ingreed hair so that i could style it in the way that I want.
So after i pressed Import button a directory opened up, from which i navigated to the Ingreed Hair folder with a bunch of different files, I chose one and some long message popped up, altered the way sculp looks in the display window but other than that nothing happenned.
If someone has ever used this function susessfully can you please tell me how to use it, what type of files to choose to import and so on, because I'm completely at a loss with this, could't find any tutorials on you tube, need to know what im doing wrong.
Thank you
The Kids 4 Complete and the DAZ to Maya BridgeI enlisted them to help me to create illustrations for a children's book. I was hoping that they would do the heavy lifting, but as it turns out, I probably will have to do a substantial part of the work. First problem is that I have to educate them on using DAZ. I am not an expert on DAZ and am struggling with it, so it is difficult to pass on my knowledge. I assumed that because they are familiar with Maya that it would be easy for them to come up to speed on DAZ Studio. My assumption is that if they buy the DAZ products that define the main characters in the book and install them on their system, they can then use the DAZ to Maya bridge to import the characters into Maya and then develop scenes that we can share and work interactively with. I am not sure if this will work as I do not fully understand what is required to pass files back and forth between programs. It may be the only thing that we can do is to share the main characters. The first milestone in the project is to define the main characters. Once that is done, I assume that they can develop scenes using Maya.
When they initially presented their view of the main characters in the book, I was disappointed. I already had sent them renders of the characters using DAZ products (Kids 4 and Lincoln), so I thought they could simply take my images and create their own versions in Maya. It did not work out that way.
I think that one problem is that using Kids 4 was not the best DAZ product to use if I want to bridge to Maya as it is not a Gen 8 product. The problem is that I created a character that exactly depicts my view of the main character using Kids 4. If the Kids 4 figure does not convert, we are back to square one. The second character was a Lincoln figure that may be ok because it is a Gen 8 product. The biggest problem is figuring out how to use the Kids 4 product with newer products that were developed for Gen 8.
UltraSceneryXT - large terrain/landscape generatorOso3D said:
I used heightmaps from World Creator without problems.
I just made sure to reduce them to 1024 8 bit png first.
What version of worldcreator are you using and what settings if you don't mind sharing. Also, here's an 8bit export and import with settings and the result.
UltraSceneryXT - large terrain/landscape generatorHowieFarkes said:
Richard Haseltine said:
Totte said:
As DAZ Studio does not support 16 bit greyscale images, only 8 bit, bandit is an issue.
Daz Studio itself imports 16 bit images - most displacement maps are 16 bit. Daz Studio has been able to import 16 bit images from the outset, as far as I can recall.
Daz Studio may be able to - but I haven’t yet found anything exposed in the SDK API that enables a plug-in to access this so I have to use the image and file loading capabilities of QT 4.8 - which does not support 16bit images
Hmm... but if i load one of the three png-pictures ultrascenery generates in a graficprogram
it shows me, that the pictures are in 24bit !!! The heightmap in 1024 resolution, the cavity and
flowmap in 2048 resolution.
UltraSceneryXT - large terrain/landscape generatorRichard Haseltine said:
Totte said:
As DAZ Studio does not support 16 bit greyscale images, only 8 bit, bandit is an issue.
Daz Studio itself imports 16 bit images - most displacement maps are 16 bit. Daz Studio has been able to import 16 bit images from the outset, as far as I can recall.
Daz Studio may be able to - but I haven’t yet found anything exposed in the SDK API that enables a plug-in to access this so I have to use the image and file loading capabilities of QT 4.8 - which does not support 16bit images
UltraSceneryXT - large terrain/landscape generator
Yeah. But the issue that I'm having is with USXT not Daz.Richard Haseltine said:Totte said:
As DAZ Studio does not support 16 bit greyscale images, only 8 bit, bandit is an issue.
Daz Studio itself imports 16 bit images - most displacement maps are 16 bit. Daz Studio has been able to import 16 bit images from the outset, as far as I can recall.
UltraSceneryXT - large terrain/landscape generatorTotte said:
As DAZ Studio does not support 16 bit greyscale images, only 8 bit, bandit is an issue.
Daz Studio itself imports 16 bit images - most displacement maps are 16 bit. Daz Studio has been able to import 16 bit images from the outset, as far as I can recall.
Eon VueHaven't used Vue (in my case Vue Infinite 2016) for quite a while now. Using Vue as the renderer? or Vue models into DS?
I mostly exported models from DS as .obj files (incl. textures). After import, it is usually necessary to modify/adjust the material settings in Vue. I don't recall exactly, but exporting from DS as .DAE files didn't work well with Vue.
For the reverse (and depending on the models), I did prefer exporting from Vue as .DAE for import in DS.
Importing VDB flamesHello. Is there a way to import VDB flames into Daz Studio? Thanks.
Geometry "disappearing"I'm creating a few jewelry pieces for the G8F. I've exported the G8F figure (Collada), imported it on Blender, created and positioned the pieces (one by one) on Blender around the G8f geometry. Then, I exported the object I created as Collada, opened Daz, imported the Collada and reexported as an OBJ file (I know I could export as an OBJ from Blender, but there are so many problems like scaling, positioning, etc, that this is simply easier to do). Finally, with the OBJ of the new object saved, I open a new scene, load a G8F, import the OBJ (it lands perfectly positioned), use the "bake joint rotations" on the G8F, use the Transfer Utility, and finally save my new object as a Support Asset (figure/prop asset).
I've already created a bracelet, a ring and two earrings, with one LEFT and one RIGHT version for each. Everything worked fine, and after saving them as "support assets" I could open a new scene, load a G8F and double click each of the DUF files to load them. They landed perfectly, had their textures applied, followed the G8F movements, and I was a very happy person.
But now, after testing everything (all was working), when I loaded one of the earrings (the left one for one of the two models I created) it was loaded as a "brick" (see the attached image please). I've opened the Geometry Editor, and there was NOTHING there (no geometry, surfaces, nothing)... After trying to load it again a few times, I deleted the DUF and repeated the process, exporting it again from Blender, doing everything I had done inside Daz and finally recreating the DUF. Once again it worked fine, but soon the OTHER model (that loaded PERFECTLY before) had the same problem out of nowhere (coincidence or not, in the same left ear).
And, after it happens ONCE with that specific DUF file, it will ALWAYS happen (I'm not able to load that specific object correctly again).
How can it happen? If Daz loaded the object once and it worked, how can it be loaded without any geometry later, using the SAME FILE? And what can I do to avoid it happening again? Now I'm afraid it can happen to any other object for no reason.
Thanks in advance for any help!
Daz 3D is part of

Connect
DAZ Productions, Inc.
7533 S Center View Ct #4664
West Jordan, UT 84084Licensing Agreement | Terms of Service | Privacy Policy | EULA
© 2026 Daz Productions Inc. All Rights Reserved.