-
Diffeomorphic DAZ Importer version 1.7.0 released
ThomasLarsson said:
Stable version 1.7.3 of the DAZ Importer and MHX Runtime system is a bugfix release. In particular, it fixes a bug that prevented older characters to be imported under Blender 4. This version can be downloaded from https://www.dropbox.com/scl/fi/3hdkujzb7yvgqsx226zpz/import_daz_mhx_rts_v1_7_3.zip?rlkey=oqugyrheyn2sma3zmxmxd2m3d.
-------------------------
Version 1.7.2 of the DAZ Importer and MHX Runtime system has been released. It can be downloaded from https://www.dropbox.com/scl/fi/avm8al0hvr9hcr3lr78xd/import_daz_mhx_rts_v1_7_2.zip?rlkey=ytanxu07xotsozcuhhv1pa7tb.
The main improvements in this release are:
- Support for Blender 4 (bone collections, principled shader version 2, hair curves).
- Major performance boost for morph loading.
- Improved support for older rigs with triax weights.
- Bugfixes.
This release has been tested with Blender 2.83, 3.6 and 4.0, but should run on intermediate Blender versions too.
----------------
Version 1.7.1 of the DAZ Importer and MHX Runtime system has been released. It can be downloaded from https://www.dropbox.com/s/7mj32wh3bnn4rwe/import_daz_mhx_rts_v1_7_1.zip.
This is primarily a bugfix release. A number of serious bugs were discovered right after the 1.7.0 release. Those have now been eliminated, so I recommend everybody to update to the new version. Safely Installing a New Version.
There are also a few new features. The most obvious one is that the user interface has been rearranged. The DAZ Importer now takes up two tabs in the User Interface (N-panel), DAZ Setup and DAZ Runtime. One or both of these tabs can be hidden.
Support for making pose presets has been improved.
The internal working of the MHX rig has been changed. However, there is a conversion tool for old MHX rigs, so they can still be used with the latest release.Original post:
Finally, version 1.7.0 of the DAZ Importer and MHX Runtime system has been released. It can be downloaded from https://www.dropbox.com/s/vpku2n8dhqmua37/import_daz_mhx_rts_v1_7_0.zip.
The plugins have been tested with Blender 2.83 and Blender 3.5 under Windows 7 and Windows 10, but should work with intermediate versions as well.
The most signicant new features in this release are:
- Support for Genesis 9 characters.
- Support for Blender 3.5, in particular the new mixing nodes.
There are also some other improvements and many bugfixes.
The documentation has moved to the Bitbucket wiki. It is not quite up-to-date, but I didn't want to postpone the release further. Here are links to the wikis:
I'm newbie and Thanks for your great free tool. amazing share. I tested with Genesis 8 and all MORPH import is ok. When I tested with animal (non-Genesis, dog, dragon ..etc) I can not import MORPH. What can I import dog's MORPH from DAZ to Blender?
Thanks!!
Face Transfer 2It's still crashing on me. Tried it on my work laptop and still crashes. Wish I could roll back to .07 but I don't think I have the zip anymore. So I'm stuck til the next update. I may just have to save the morph and then move the texture folder to somewhere permanent in the meantime.
Daz Studio Pro BETA - version 4.22.0.15! (*UPDATED*)Richard Haseltine said:
hedicarlos said:
Artini said:
Ynver said:
Since 4.22.0.10 everytime I try to save a generated Face Transfer Daz crash and shuts completely down. Anyone having the same issue? It does happen with both Face Transfer 1 & 2. But FT1 works fine on 4.16.
I have the same problem with 4.22.0.10,
so I reverted back to 4.22.0.7,
where Face Transfer 2 still works on my computer.
Same problem here.
Fixed (in a forthcoming update) according to the post above yours.
Oki, everything is awesome then ;)
Multiple Smoothing Modifiers? [RESOLVED]A simple way ~
With Collision Item set to Figure A, export sofa / bed to OBJ file and import as a "sitting morph for figure A" with Morph Loader Pro, dial it. Then set the Collision Item to Figure B. In this way, you can make multiple "morphs" on sofa / bed for multiple figures...rather than "merging figures".
Daz Studio Pro BETA - version 4.22.0.15! (*UPDATED*)hedicarlos said:
Artini said:
Ynver said:
Since 4.22.0.10 everytime I try to save a generated Face Transfer Daz crash and shuts completely down. Anyone having the same issue? It does happen with both Face Transfer 1 & 2. But FT1 works fine on 4.16.
I have the same problem with 4.22.0.10,
so I reverted back to 4.22.0.7,
where Face Transfer 2 still works on my computer.
Same problem here.
Fixed (in a forthcoming update) according to the post above yours.
Daz Studio Pro BETA - version 4.22.0.15! (*UPDATED*)Artini said:
Ynver said:
Since 4.22.0.10 everytime I try to save a generated Face Transfer Daz crash and shuts completely down. Anyone having the same issue? It does happen with both Face Transfer 1 & 2. But FT1 works fine on 4.16.
I have the same problem with 4.22.0.10,
so I reverted back to 4.22.0.7,
where Face Transfer 2 still works on my computer.
Same problem here.
Face Transfer 2Face Transfer 2 generates a face, but craches when trying to save.
Daz Studio Pro BETA - version 4.22.0.15! (*UPDATED*)Artini said:
Ynver said:
Since 4.22.0.10 everytime I try to save a generated Face Transfer Daz crash and shuts completely down. Anyone having the same issue? It does happen with both Face Transfer 1 & 2. But FT1 works fine on 4.16.
I have the same problem with 4.22.0.10,
so I reverted back to 4.22.0.7,
where Face Transfer 2 still works on my computer.
It has apparently been fixed.
Daz Studio Pro BETA - version 4.22.0.15! (*UPDATED*)Ynver said:
Since 4.22.0.10 everytime I try to save a generated Face Transfer Daz crash and shuts completely down. Anyone having the same issue? It does happen with both Face Transfer 1 & 2. But FT1 works fine on 4.16.
I have the same problem with 4.22.0.10,
so I reverted back to 4.22.0.7,
where Face Transfer 2 still works on my computer.
Face Transfer 2Artini said:
Richard Haseltine said:
Artini said:
Thanks, Richard, for great tips.
I have updated the Nvidia drivers in hope that it can help,
but still got Daz Studio beta crash if I attempt to save Face Transfer 2 characters.
Have uninstalled this new version and go back to 4.22.0.7.
and no error messages or other information?
Hi Richard,
I got 3 crash reports and also saved error messages from the log,
that I have to analyze.
I was too tired yesterday and only want to confirm
that the previous version of Daz Studio beta still works on my computer.
Is there any thread in Daz 3D forums, that I can post my findings
about the crash of Daz Studio beta?
https://www.daz3d.com/forums/discussion/601796/daz-studio-pro-beta-version-4-22-0-10-updated#latest
Prevent morphs from changing the skeleton (or Lock Skel)?if you're making custom meshed characters, you will face mesh deforming in unexpected ways when posing. requires lots of new jcm/ercs/morphs. adjust rig can only do so much.
if you want to to remove the skeleton changes, use notepad++ etc, and find entries in duf (may need to unzip it first) and delete them. don't del the morph deltas. have done for this many morphs after duplicating them. why? add a morph and seeing skelton move in some cases is not desireable.
just be aware it opens up a whole new world of possibilities, but even more work.
One very popular talented morph maker includes quite a few skeleton changes to prevent most users getting into issues as prewvious posters noted.
Face Transfer 2Richard Haseltine said:
Artini said:
Thanks, Richard, for great tips.
I have updated the Nvidia drivers in hope that it can help,
but still got Daz Studio beta crash if I attempt to save Face Transfer 2 characters.
Have uninstalled this new version and go back to 4.22.0.7.
and no error messages or other information?
Hi Richard,
I got 3 crash reports and also saved error messages from the log,
that I have to analyze.
I was too tired yesterday and only want to confirm
that the previous version of Daz Studio beta still works on my computer.
Is there any thread in Daz 3D forums, that I can post my findings
about the crash of Daz Studio beta?
No Face Transfer PaneLong time since this thread started and last had copmmen ts - I purchased Face Transfer for DAZ Studio today but didnt realize it was only for a windows machine. Anyone know if it will ever work on Mac? Thanks
Daz Studio Pro BETA - version 4.22.0.15! (*UPDATED*)Since 4.22.0.10 everytime I try to save a generated Face Transfer Daz crash and shuts completely down. Anyone having the same issue? It does happen with both Face Transfer 1 & 2. But FT1 works fine on 4.16.
Face Transfer 2GRFK DSGN Unlimited said:
Question: When you guys do the transfer, is it on the Genesis 9 main version (eyes, mouth, eyelashes, etc) or on the Developer Kit version? I was playing around with the developer kit version and added the eyes after a transfer. I wasn't planning on keeping the transfer so I zeroed everything out and used a different image. Turned out better. Not as much wonkiness as before. Maybe I'm missing something here?
Out of habit, I load the stock figure (not the Dev load one), select it and apply FT to it - that's what I've been doing all this time to use FT1 with G8.1 instead of G8. For this last one I posted earlier today, I just let FT2 create a figure. (On initial glance, it appears that the main difference is that FT2 politely puts clothes on the figure when it adds a figure itself.) All that said, I had never tried applying a FT shape to the dev figure so I gave that a try. It appears that you get the shape and textures on a figure with no eyes, mouth, etc. What wonkiness are you seeing?
Face Transfer 2Question: When you guys do the transfer, is it on the Genesis 9 main version (eyes, mouth, eyelashes, etc) or on the Developer Kit version? I was playing around with the developer kit version and added the eyes after a transfer. I wasn't planning on keeping the transfer so I zeroed everything out and used a different image. Turned out better. Not as much wonkiness as before. Maybe I'm missing something here?
Face Transfer 2Artini said:
Thanks, Richard, for great tips.
I have updated the Nvidia drivers in hope that it can help,
but still got Daz Studio beta crash if I attempt to save Face Transfer 2 characters.
Have uninstalled this new version and go back to 4.22.0.7.
and no error messages or other information?
G8F natal cleft "bridging" for some reasonPlease redo your screenshots with Smooth Shaded Drawstyle, or rendered in clay mode.
I am not sure what you mean by the reference to the same model a few months ago - is this a morph you crated and cannot now clear?
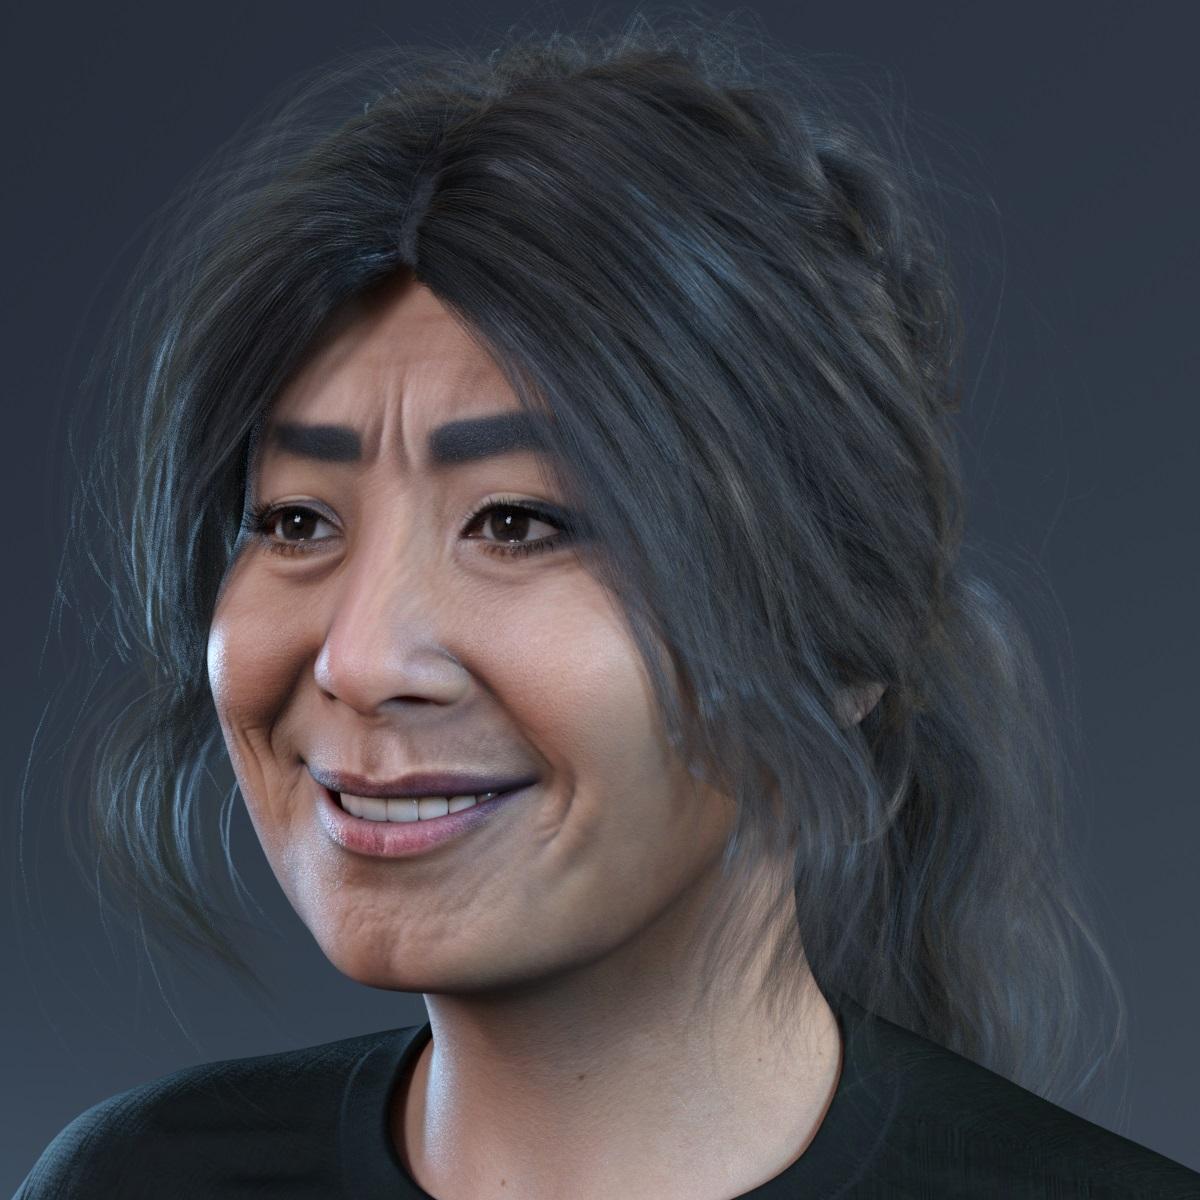
Face Transfer 2Ok, I am back. I am glad that I have saved the previous version of Daz Studio beta.
Below is a render of Genesis 9 character created with Face Transfer 2.
I really like this plugin and I would miss it a lot, if I could not use it on my computer.
 Face Transfer 2
Thanks, Richard, for great tips.
I have updated the Nvidia drivers in hope that it can help,
but still got Daz Studio beta crash if I attempt to save Face Transfer 2 characters.
Have uninstalled this new version and go back to 4.22.0.7.
Daz 3D is part of

Connect
DAZ Productions, Inc.
7533 S Center View Ct #4664
West Jordan, UT 84084Licensing Agreement | Terms of Service | Privacy Policy | EULA
© 2026 Daz Productions Inc. All Rights Reserved.