-
How to create a UV Set .duf file?
You need to load it as a new UV Set via the Surfaces pane oprtion menu - the lined/hamburger button in the top corner or right-click the tab - and then save it as an asset (File>Save As>Support Assets>UV Assets). It is vital that the vertex and polygon order have remained the same during import/export.
DAZ, MD, and Traditional Pattern Making - Graduation11/12 - New Video Posted - Collarless Shirt Complete Project
Collarless Casual Shirt - Complete ProjectYou can create this for V9 or M8 using the templates (slopers) Here:
ResourcesThe Free HDRI used in last section is here -> Studio HDR
Shaders used in final section: Mec4d PBS Shaders vol.2 for Iray. (If you don't have a basic cotton shader, there is a zip file in the resources above with textures)
Close to an hour - covers a lot of topics with chapters.
This simple garment (14 chapters!) in this image is using only what's covered in videos with a little postwork.
If you've never used Marvelous Designer before, but are familiar with 2D Vector tools like Illustrator you can probably jump right in with the free trail version and the template (sloper) starter files in resources if you have V9 or M8.
If this is your first video - you might want to check out this quick video that covers default settings that are useful -> Useful Settings
Link: Free Trial at bottom of page - you'll need to create login
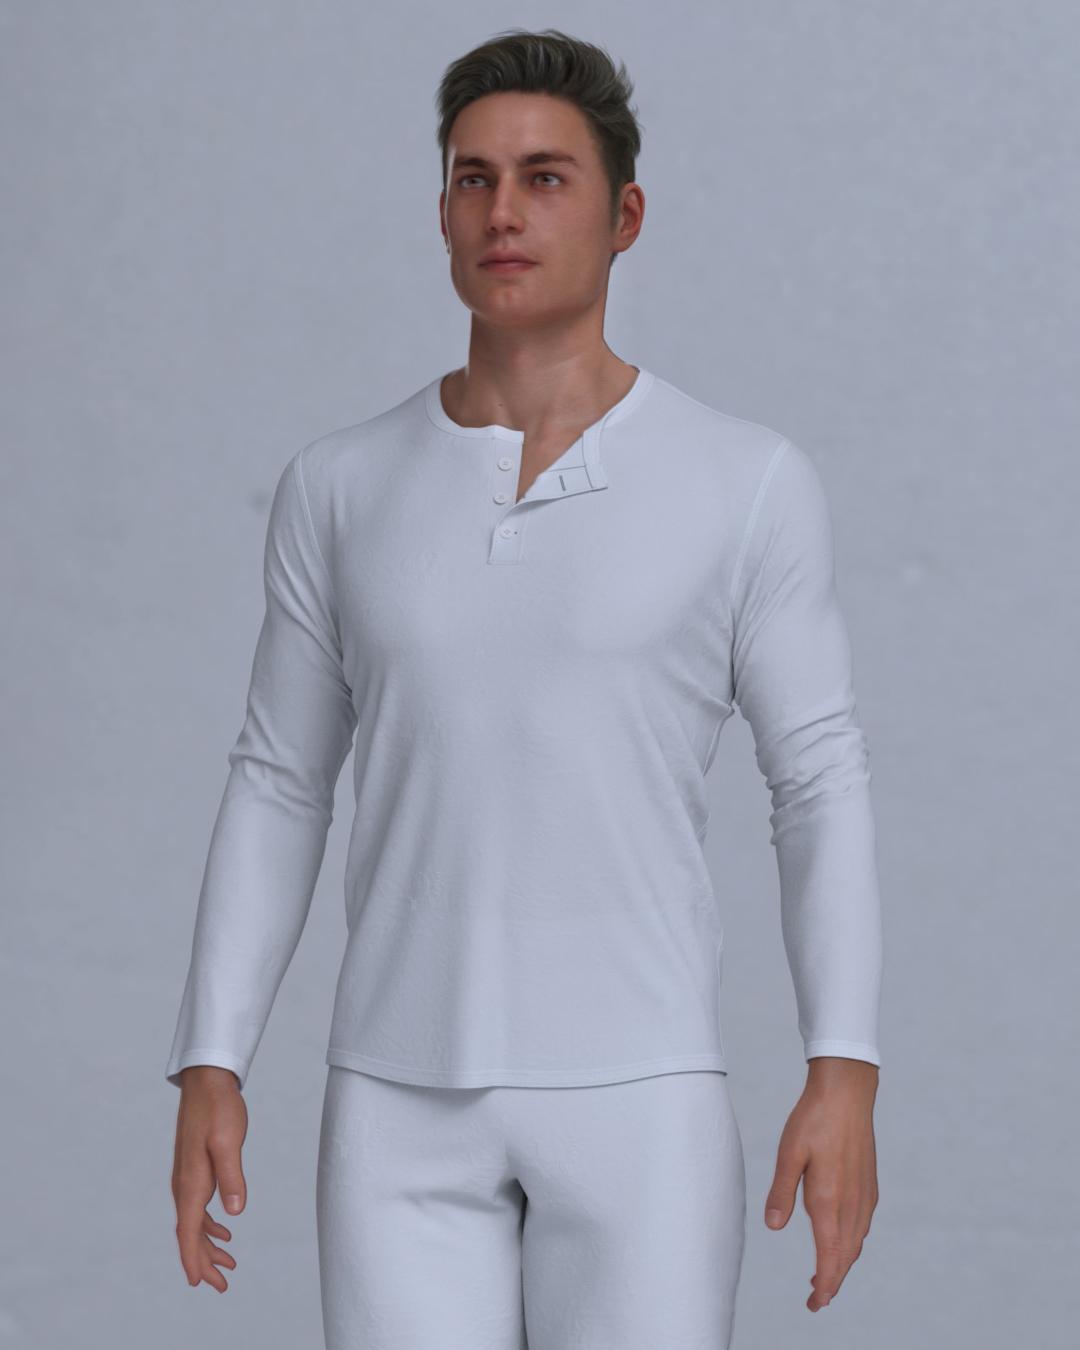
0:00 Export from DAZ
0:29 Import to Marvelous Designer
1:06 Project Overview
1:55 Move Dart on Women's Sloper
5:08 Shape Side
8:43 Shape Hemline
11:05 Shape Neckline
14:51 Shape Sleeve
17:41 Create Placket
22:05 Final Shaping
24:40 Adding Trim
29:08 Adding Seams for Realism
33:19 Stitching
36:27 Buttons
39:54 UV Setup
41:31 Creating Stitching Texture Map
43:01 Exporting Garment to DAZ
43:46 Simple texturing in DAZPC Transfer, Saved Files Under Smart ContentDid you remember to "Export User Data" on your old PC? That will create a file (or multiple files) in your Runtime/Support folder which you need to copy to the new PC and import into the content management system there.
ETA: To expand a little, the entries within the Local User "product" are stored in the CMS database as "User Data" when you save the scenes/presets/etc, so this is what you need to get copied across to your new PC.
If you still have access to Daz Studio on your old PC then my first sentence is the way to go:
On your old PC, from the Smart Content or Content Library tab hamburger menu, select "Content Database Maintenance" and you will a window with several options - checkmark "Export User Data" and Accept. This will place a file called UserData_1.dsx (and UserData_2, ... if you had a large amount of user data) in Runtime/Support library of your first Daz Content library.
Copy this file or files to your new PC into the corresponding Runtime/Support library on that PC then open Content Database Manager there. This time, checkmark "Re-import Metadata..." and Accept. On the window that opens, checkmark your copied Userdata file (or files) and uncheck everything else then click Accept. You should then see all your old scenes again.
DAZ, MD, and Traditional Pattern Making - Graduationbarbult said:
Stupido3D said:
barbult said:
I am interested in you you import Daz clothing into MD and drape it in MD, if you do that.
I have never simulated daz clothing per se, but I have simulated many other objs.
I attached an example of simulated obj garments. The bag in the image was not an obj, that was a MD garment.
Key findings
- any obj needs to be fully welded otherwise any unwelded pieces fly away or fall apart
- weft and warp will still work according to the UV layout of the obj, so you can still tweak the fit of the obj slightly
- it is best to position and resize against the avatar before bringing it into MD, and also subdivide it to the required mesh density
- for me, simulating an obj with the GPU acceleration simulation setting for too long will crash the program
- you can adjust the fabric properties of obj garments just as you would an MD garment file
- sometimes the UV will 'break' when you open an older MD file containing obj garments. I.e., MD will give you an error warning you that it forgot the UV. You can still proceed to export this to Daz and then reset the correct UV by clicking the 'load UV set' and choosing the obj file with the unadulterated UV.
Thanks for these tips! MD crashes often for me with GPU render, too.
I tried exporting a DS garment as OBJ and simulating it in MD. Then I exported it back out of MD and imported it into DS. But, back in DS, the imported OBJ did not have any of the textures of the original garment or any of the individual surfaces. So I'm still missing some understanding of how to handle this process. Hmmm. Maybe I am supposed to use the MD obj export as a morph source for the original garment instead. Any other suggestions?
That's a good point. The few times i've used 'obj garments' as we seem to be calling them, I've only used ones with simple UV (one UDIM tile) and only one material zone. So never encountered the issue.
In such cases where the garment has multiple surfaces, i guess we cannot easily maintain those Surfaces/Material Zones during the process so would have to do some workaround.Loading via Morph Loader Pro could be one solution, but only on the proviso that you maintained geometry during the process. What if you subdivided the mesh before going to MD (in order to get a more detailed simulation)? In that case, i suppose you wouldnt be able to load it as a morph on the original Daz garment. You would have to instead load the simulation as a morph onto the subdivided mesh.
UltraScenery - new territory [Commercial]Here is how i set up my depth maps.
As already said if i have no volumetrics in the scene I render to disk having set the canvases to Beauty ( needed otherwise youll not have a render but your not going to use this) Depth or Distance and any of the others you want. If you are using volumetrics, do your render then go back turn all of the smoke, fog, clouds or whatever else you have off in both your scene (vdbs etc) and your envirments tab in render settings. Then (and this is important) rename the image your about to render to disk something like image name-depth so and in canvases just select the depth/distnace etc and render away. You will not get a pretty pic for this as you didnt render a beauty layer but you will get the maps you need.
Render and import in to photoshop/ other image editor. The canvases will come in to (photoshop) overexposed so you need to knock that back down using an adjustment layer, then copy all layers and import in to your image alpha channel ( for photoshop this is what the lense blur filter uses to read the image and add blur) then go in to your fiters>Blut>LensBlur and you should be off and running. You can adjust the depth distance maps to make masks for mist and fog etc too buy using adjustments>exposture and tweaking the levels.
Ive attached some slides made as part of a tutorial i did which should help explain it.
Genesis 8 or 8.1 shapes on genesis 9?are your characters built from different morphs? if so, you will need to combine them into one morph before you can transfer it. as long as it's just one morph, you can transfer it using my steps.
you can combine morphs using Shape Splitter or by following these steps.
1. set character to base resolution (from parameters tab, scroll down a little bit and find "resolution level", set that to "base")
2. zero the pose on the character
3. export (file->export) with default options (and check "filter objects" by "selected roots")
4. load a new 8.1 figure.and select it
5. import your exported file as a morph:
edit->object->morph loader pro
click "choose morph files..." select your obj file, press ok
6. find and favorite that morph and transfer to g9
Cyberpunk universedaveso said:
xyer0 said:
Kitbash3D has Cyberpunk buildings galore, a high elven kit (Elysium) as well. If you buy upon release it's a good deal @ half off. Or you can wait for sales, which happen about thrice a year.
thery seem to be rather difficult to use unless you can use Blender or another 3D program.
@daveso If DS' fbx import still worked it would not be any more difficult than any other non-Daz asset. I use Poser to get them into Studio, and it works seamlessly.
DAZ, MD, and Traditional Pattern Making - GraduationStupido3D said:
barbult said:
I am interested in you you import Daz clothing into MD and drape it in MD, if you do that.
I have never simulated daz clothing per se, but I have simulated many other objs.
I attached an example of simulated obj garments. The bag in the image was not an obj, that was a MD garment.
Key findings
- any obj needs to be fully welded otherwise any unwelded pieces fly away or fall apart
- weft and warp will still work according to the UV layout of the obj, so you can still tweak the fit of the obj slightly
- it is best to position and resize against the avatar before bringing it into MD, and also subdivide it to the required mesh density
- for me, simulating an obj with the GPU acceleration simulation setting for too long will crash the program
- you can adjust the fabric properties of obj garments just as you would an MD garment file
- sometimes the UV will 'break' when you open an older MD file containing obj garments. I.e., MD will give you an error warning you that it forgot the UV. You can still proceed to export this to Daz and then reset the correct UV by clicking the 'load UV set' and choosing the obj file with the unadulterated UV.
Thanks for these tips! MD crashes often for me with GPU render, too.
I tried exporting a DS garment as OBJ and simulating it in MD. Then I exported it back out of MD and imported it into DS. But, back in DS, the imported OBJ did not have any of the textures of the original garment or any of the individual surfaces. So I'm still missing some understanding of how to handle this process. Hmmm. Maybe I am supposed to use the MD obj export as a morph source for the original garment instead. Any other suggestions?
UltraScenery - new territory [Commercial]Dave Savage said:
lou_harper said:
Sorry to dig up this old post but I have questions.From what I know of Canvases, you select certain object to be in one canvas. Like in a scene I would do foreground, middleground, and background each as a separate canvas. But with a complex environment like Ultrascenery, full of instances how do you pick what should be in a canvas?
From what I understand, you do a canvas of the whole scene only you change the type of canvas to "Depth" and then the further away from the camera objects are in the scene will render white and the closer will be black.
Though as it's creating an .exr file it will all just look completely white until you take it to the imaging editor.When you import the .exr file into Photoshop or other imaging editor, you need to convert the HDRI using "Equalise Histogram" and then set that layer to 'Screen' with your regular scene render layer underneath.
You can get really as complex as you need using layer masks to get maximum control, but this is just a simple way.
Hope this helps.
Interesting!
"...set that layer to 'Screen' with your regular scene render layer underneath." Does this mean that you render the scene twice–once with canvas and once normal, or am I misunderstanding?
UltraScenery - new territory [Commercial]Dave Savage said:
lou_harper said:
Sorry to dig up this old post but I have questions.From what I know of Canvases, you select certain object to be in one canvas. Like in a scene I would do foreground, middleground, and background each as a separate canvas. But with a complex environment like Ultrascenery, full of instances how do you pick what should be in a canvas?
From what I understand, you do a canvas of the whole scene only you change the type of canvas to "Depth" and then the further away from the camera objects are in the scene will render white and the closer will be black.
Though as it's creating an .exr file it will all just look completely white until you take it to the imaging editor.When you import the .exr file into Photoshop or other imaging editor, you need to convert the HDRI using "Equalise Histogram" and then set that layer to 'Screen' with your regular scene render layer underneath.
You can get really as complex as you need using layer masks to get maximum control, but this is just a simple way.
Hope this helps.
Another great tips - awesome and thanks for sharing.
Lisa’s Curious Botanicals: MushroomsRichard Haseltine said:
If it is from Hivewire or Renderosity (or if you got it from a Daz purchase but manually installed) then it won't show in database driven views unless you import the metadata. Daz Studio Formats or Poser Formats directly show the files on disc, check the location from the read me (or zip structure).
Using Content Package Assist and then installing through DIM helps with seeing it in the products section.
UltraScenery - new territory [Commercial]lou_harper said:
Sorry to dig up this old post but I have questions.From what I know of Canvases, you select certain object to be in one canvas. Like in a scene I would do foreground, middleground, and background each as a separate canvas. But with a complex environment like Ultrascenery, full of instances how do you pick what should be in a canvas?
From what I understand, you do a canvas of the whole scene only you change the type of canvas to "Depth" and then the further away from the camera objects are in the scene will render white and the closer will be black.
Though as it's creating an .exr file it will all just look completely white until you take it to the imaging editor.When you import the .exr file into Photoshop or other imaging editor, you need to convert the HDRI using "Equalise Histogram" and then set that layer to 'Screen' with your regular scene render layer underneath.
You can get really as complex as you need using layer masks to get maximum control, but this is just a simple way.
Hope this helps.
Lisa’s Curious Botanicals: MushroomsIf it is from Hivewire or Renderosity (or if you got it from a Daz purchase but manually installed) then it won't show in database driven views unless you import the metadata. Daz Studio Formats or Poser Formats directly show the files on disc, check the location from the read me (or zip structure).
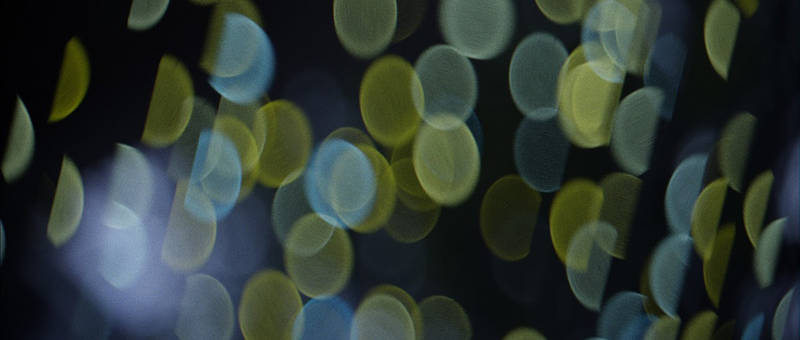
Anamorphic Process in Daz 3D IrayBelow is a copy/archive of the Deviant Art Journal I posted.
This is a detail write up on the experiments I've done and the methods with which you too can easily achieve the coveted (by select cinematography nerds like myself) "Anamorphic Bokeh" in Daz Iray.
TLDR instructions at end of the post.
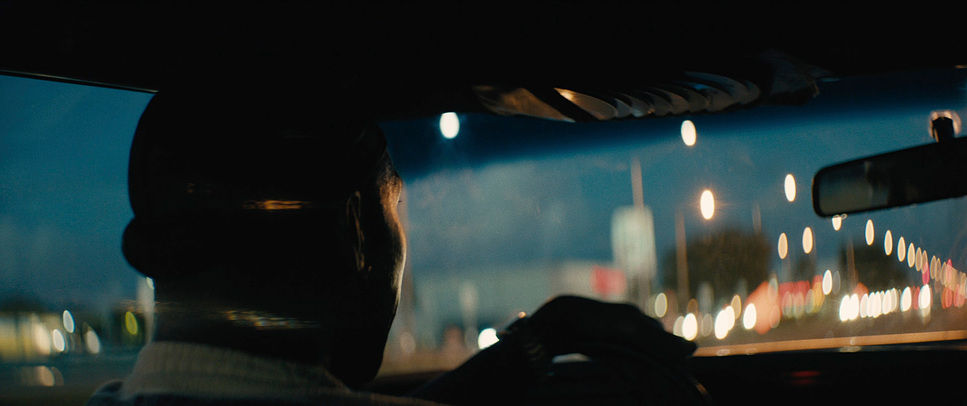
MOONLIGHT (2016)
Cinematography by James Laxton
Background
Ever since I started my Daz3D journey (roughly a year ago), I've been trying to find a way to achieve the "anamorphic look" with Daz Iray.
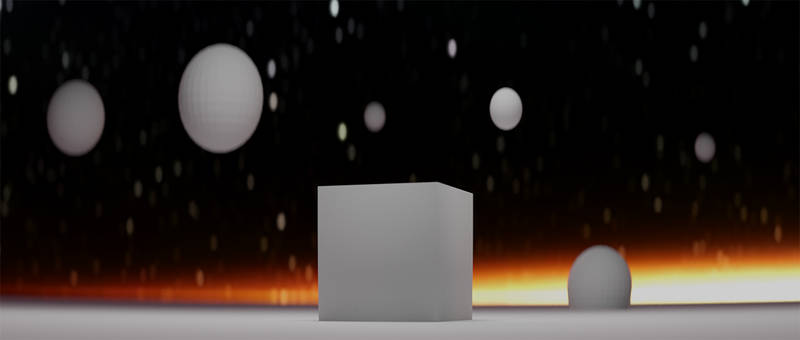
Blender Anamorphic Test
Since there are no render settings like the Aperture Ratio in Blender (other names/settings in other render engines), that can easily turn the bokeh into an oval shape, I first tried the post processing method - using a depth pass with a post process capable of producing anamorphic bokeh. In my case, I used a bokeh plugin in After effects, feeding the depth pass and adjusted the Aperture Ratio.
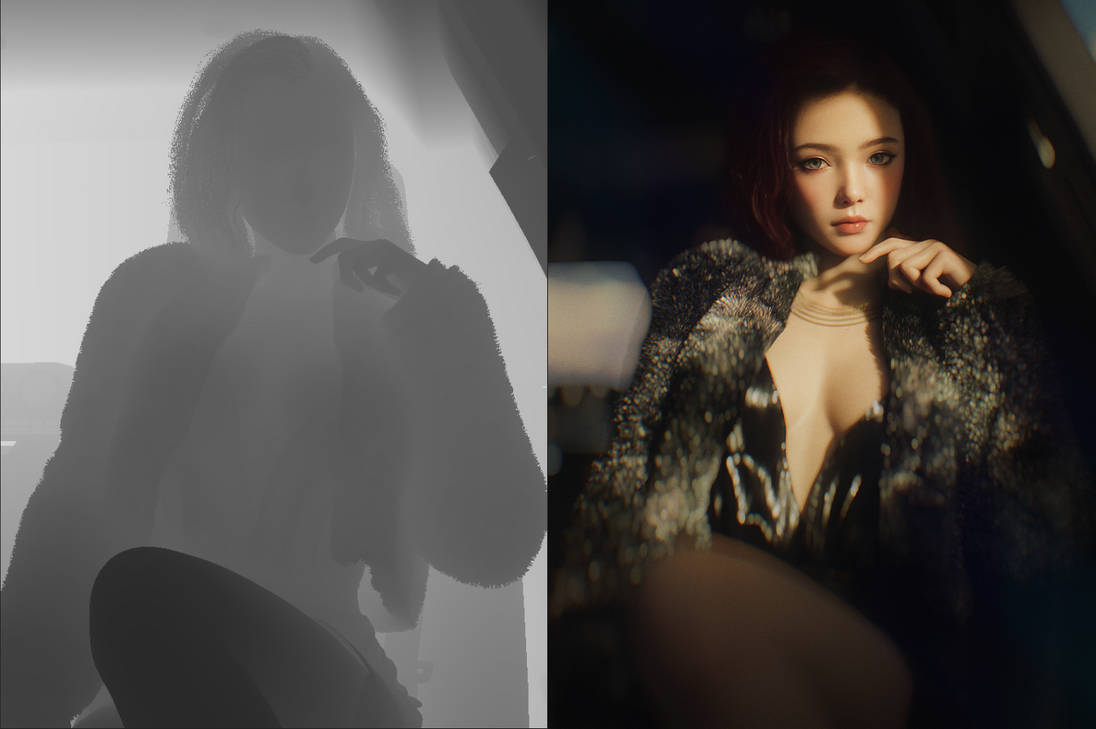
As can be seen here, while it can be somewhat workable, the effect is nowhere near the desired look. There are obvious ghosting around the subject edges, bokeh exposure needs constant babysitting and so on.
As far as I could tell, after a rather extensive set of testing of settings as well as different post-processing methods (photoshop, blender compositor, etc), the ghosting effect while minimizable to an extent, is not avoidable with the slew of options I had. (There are probably methods that doesn't have the ghosting problem, but I wasn't able to find one.)
* I've also tried Octane in Daz. But the plugin implementation was so half-assed and anti-user, I could not be bothered to give it a honest try. Where or not it has a bokeh setting I cannot remember. But hey, who needs Octane if it can be done in Iray, right?
Method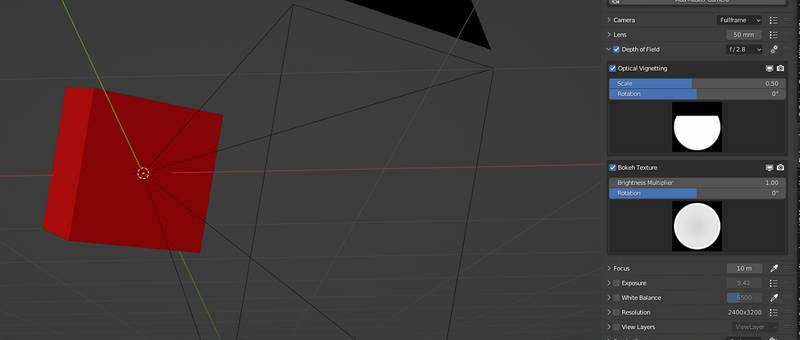
A while ago, by sheer accident/luck, I discovered the method by which the PHOTOGRAPHER 4 addon for Blender by chafouin uses for its bokeh effects - a physical obstruction in front of the camera to emulate the "failings" of a lens barrel in real life.
PHOTOGRAPHER 4 addon for Blender by chafouin
So, I employed the method in Daz Iray, and wouldn't you know it - IT WORKS.
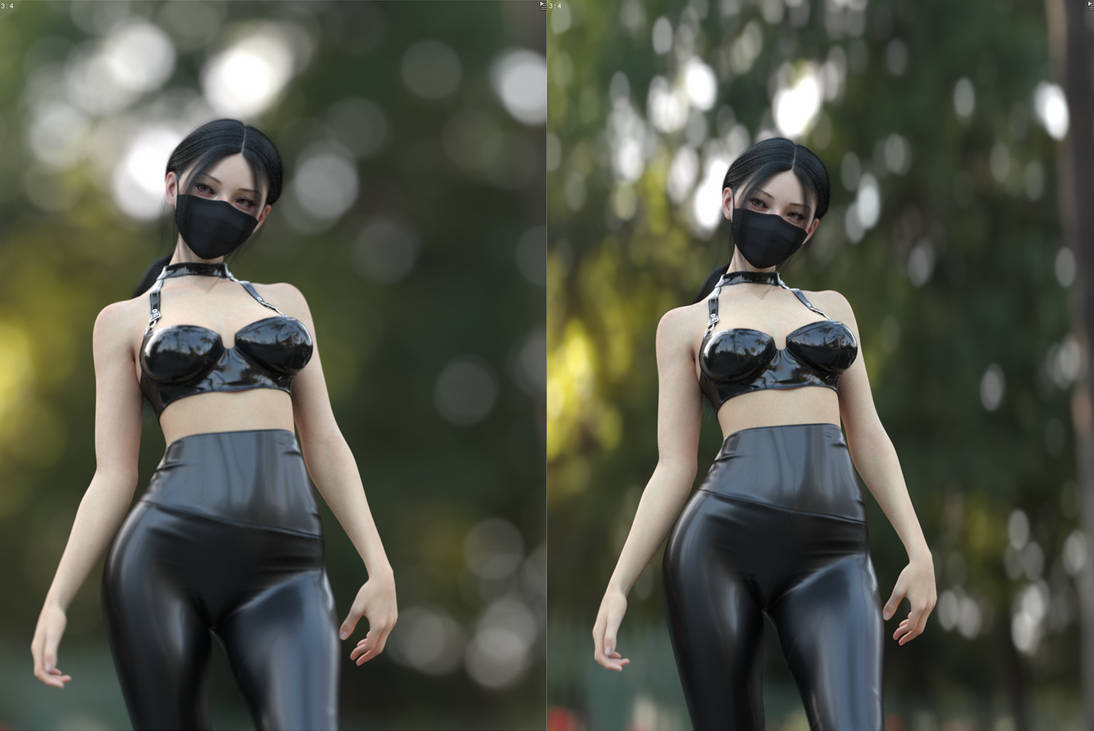
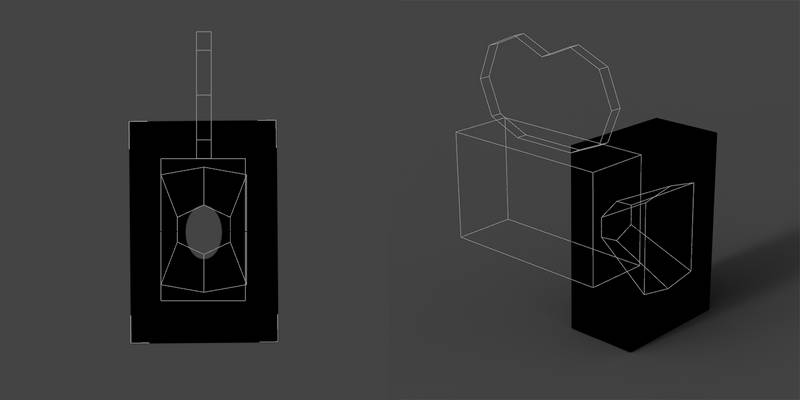
Basically, set up a completely black mesh that absorbs all light, cut an oval in the middle, put it in front of the camera as close as possible so that there's a black border in your camera view.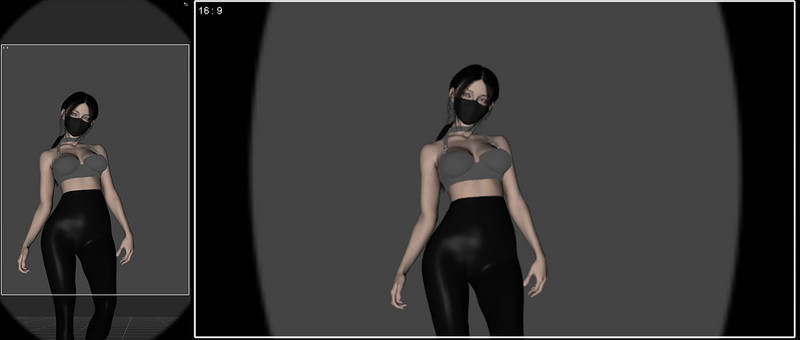
Then, you can either adjust the scale or translation of the mesh in relation to the camera, which will produce different looks and different strength of the Cat's Eye effect.
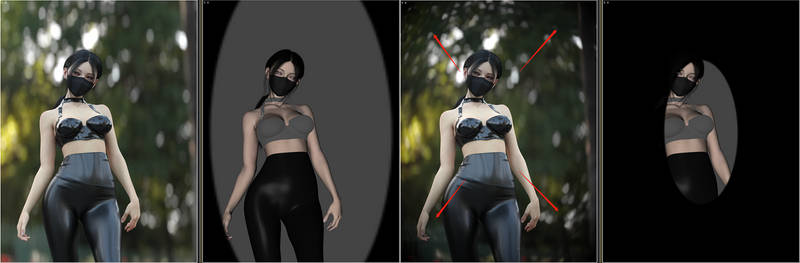
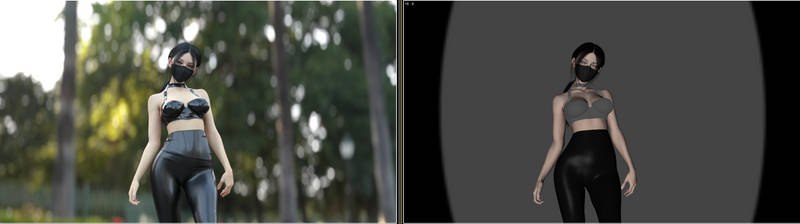
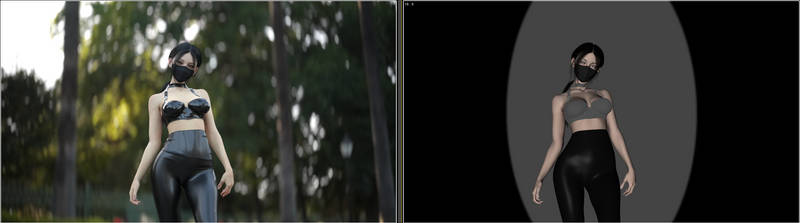
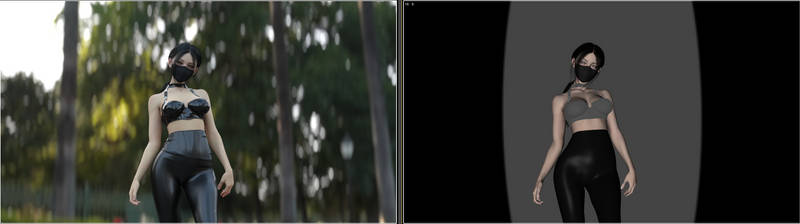
The more the camera is covered, the stronger the Cat's Eye effect. It also means less light is hitting the camera, but that can be easily compensated to taste in Render Settings > Tone Mapping > Exposure Value.
The bokeh will follow the shape of the cutout - more vertical cutout = more vertical bokeh. It also means:
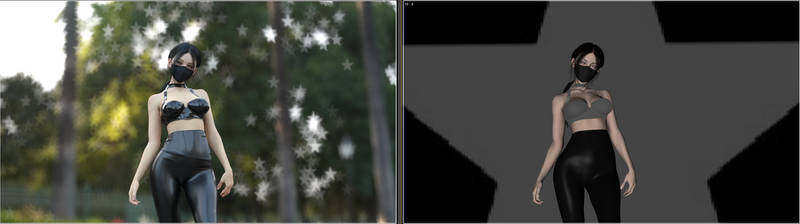
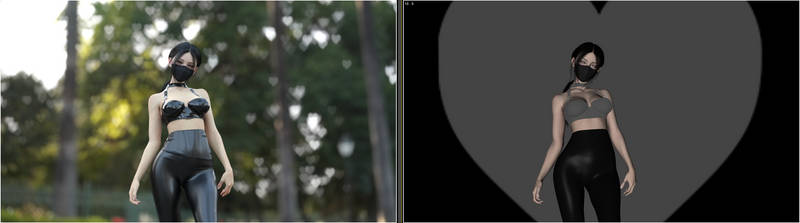
I don't think I'll ever use this effect but it works - and actual bokeh effect instead of faking through meshed objects in the background I've seen tutorials & products for, which I find to be even less useful.
Barrel Distortion
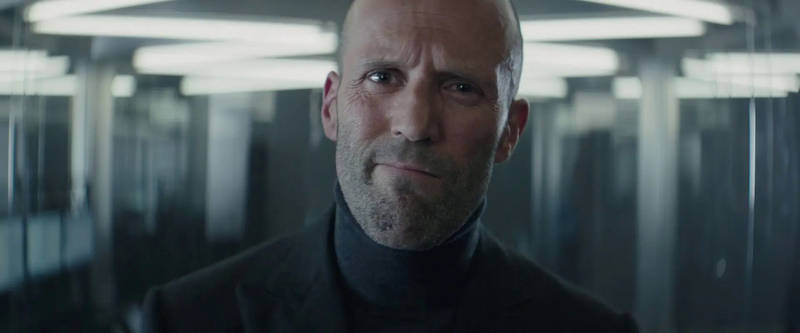
Hobbs and Shaw (2019)
Cinematography by Jonathan Sela
Another important part of the "Anamorphic Look" is the Barrel Distortion, where the image gets distorted along the edges.
This too can be achieved in engine, by using the variety of Lens Distortion in Lens settings on the Camera.
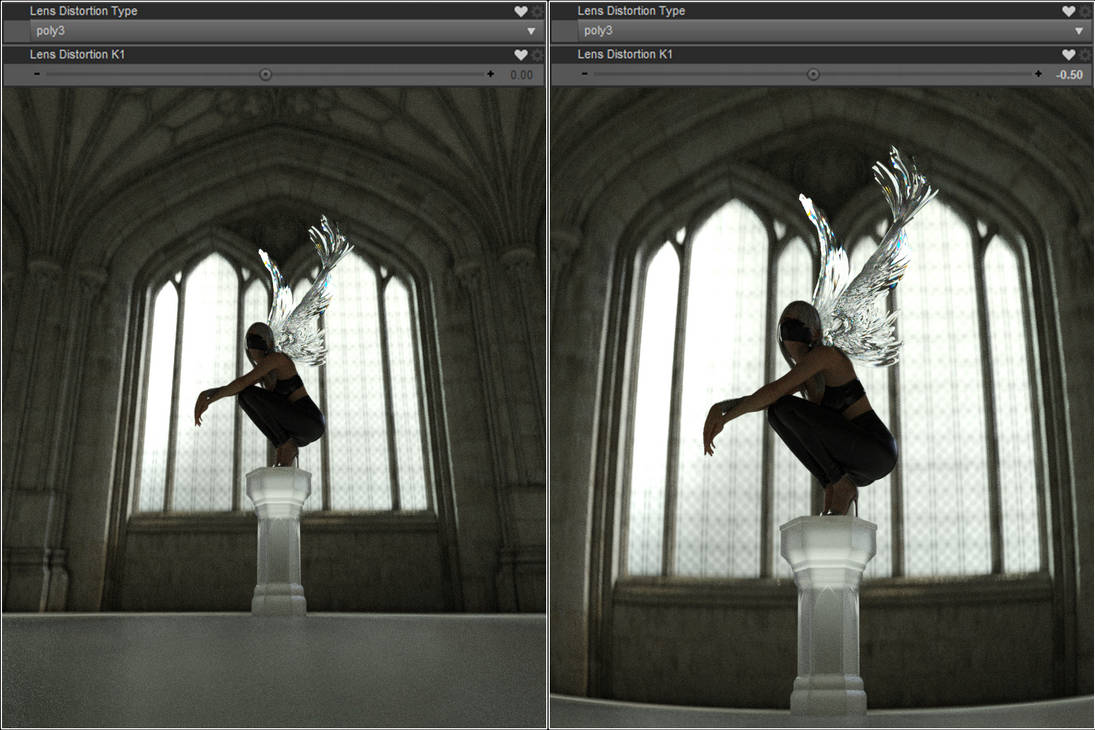
The various Distortion Types and Various Lens settings are poorly documented. You'd have to experiment with it yourself. But generally, I find adjusting in smaller increments of ± 0.1 to be more useful.
There are also different types of barrel distortion for Anamorphic which I won't go into here, but I believe they all can be achieved by using the inverted distortion or simply change to Positive/Negative Value.
Attached zip contains the mesh and textures I use for your convinence.
Usage:
- Import the OBJ (default settings should be fine).
- Plug in the desired texture into the Cutout Opacity of the OBJ.
- Make sure that the Glossy Layered Weight and Glossy Reflectivity is turned zero (so the mesh absorbs all light)
- Add a camera and zero it.
- Parent OBJ to the Camera.
- Adjust Translation + Scale for the vignette to taste.
- Camera F-stop (try 4, 8, 12) and focal length greatly influences the effect. If something doesn't seem to work or to your liking, try adjusting these first.
That's all. Hopefully this can prove helpful to any cinematographer nerds like me. Cheers~
Genesis 3 and 8 to 9 Pose Converter (Commercial)Zev0 said:
"It would be nice if the script didn't break if the pose being converted isn't in /People."
This tells me nothing. What exactly happens? Regardless it is an issue we addressed.
Changes coming in version 1.1
- H. Pose Preset issues fixed (figure disappearing, and wrong result after cancelling)
- If user selects a native G9 pose, a warning is given.
- Added Mirror pose option.
- If user selects multiple items, popup box appears showing all listed instead of an error message.
- Metadata now considered when suggesting whether pose is G3 or G8 (before it was only based on file path)
- Added new launch script from product root folder."
Awesome, when can we expect this update?
Genesis 3 and 8 to 9 Pose Converter (Commercial)"It would be nice if the script didn't break if the pose being converted isn't in /People."
This tells me nothing. What exactly happens? Regardless it is an issue we addressed.
Changes coming in version 1.1
- H. Pose Preset issues fixed (figure disappearing, and wrong result after cancelling)
- If user selects a native G9 pose, a warning is given.
- Added Mirror pose option.
- If user selects multiple items, popup box appears showing all listed instead of an error message.
- Metadata now considered when suggesting whether pose is G3 or G8 (before it was only based on file path)
- Added new launch script from product root folder."
Lisa’s Curious Botanicals: MushroomsWhat menu? Do you mean a content pane, if so which (and where) - only the Content Library under Daz Studuo Formats, Poser Formats, and Other Import Formats gives a direct view of files on disc.
Lisa’s Curious Botanicals: MushroomsI don't see it in my menu. I can only see it when I use import. Can someone help me install it,so I see it in my menu. It is a zip file.
Genesis 9 clothing questions & answersYou will get better results if you use the process in the 2nd post in this thread, the one in the video :) reverse source never really did it for me, which is why I worked out the swapping base shapes around method - to get a better fit. Its an extra step but you will get rid of the crunchy bit in the centre of the dress. You have to export the obj for the base figure and then import that to use with the transfer utility.
In the video you change the base shape from default to the masculine shape, then use create follower in dev tools to fit it to G9. You don't need the template for this bit, all you need is to be able to dial a morph up and down. Once you have the outfit fitted to G9 masculine - you can dial back down to base shape - and turn on smoothing if needed. Export an obj with the base shape.
Now you can import the obj that's shaped like the base and work from that.
https://www.daz3d.com/forums/discussion/comment/7776621/#Comment_7776621
If you get constant crashes with the templates (still tracking the bug down since its not consistent enough to pinpoint a cause for everyone) you can try the alternative method of going to Utilities on Genesis 9 and loading the template you want to use in the scene. Use that to transfer from instead of G9, and use replace source with target under general options on the transfer utility popup - so NOT the one where you choose which figure to
After using that method go to scene identification and rename the obj/node name before you save it
Adding Body Morphs, Custom Morphs and Auto-Follow to ClothesAutoFolow doesn't require any action - if a fitted item doesn't have a morph matching a morph on the base figure then it will try to project the morph into the fitted item, aiming to keep the same relation with the underlying surface. How well it works varies by outfit and morph.
As for the others, you need to reshape the clothing as required (to fit the target morph or to make the chnages required for the adjustment and export as OBJ, keeping the same vertex count and order as the original model (which can be tricky in marvellouse Designer if you are working from the original pattern as it will redo the conversion to geometry each time; you can reload the original exported OBJ and simulate that) and, in the case of morphs to match figure morphs, using the same name as the morph (you can get the name from the Parameter Settings dialogue in Daz Studio, click the gear icon on the slider). Once you have the OBJs import them using Morph loader Pro to create the morphs.
Daz 3D is part of

Connect
DAZ Productions, Inc.
7533 S Center View Ct #4664
West Jordan, UT 84084Licensing Agreement | Terms of Service | Privacy Policy | EULA
© 2026 Daz Productions Inc. All Rights Reserved.