-
Diomede's Notepad, Sketchpad, and Chilling Pad
Import Skirt OBJ to Daz Studio
- Open Daz Studio, load the G9 Development Figure, and Dial to Victoria 9 (don't change V9 proportion dial)
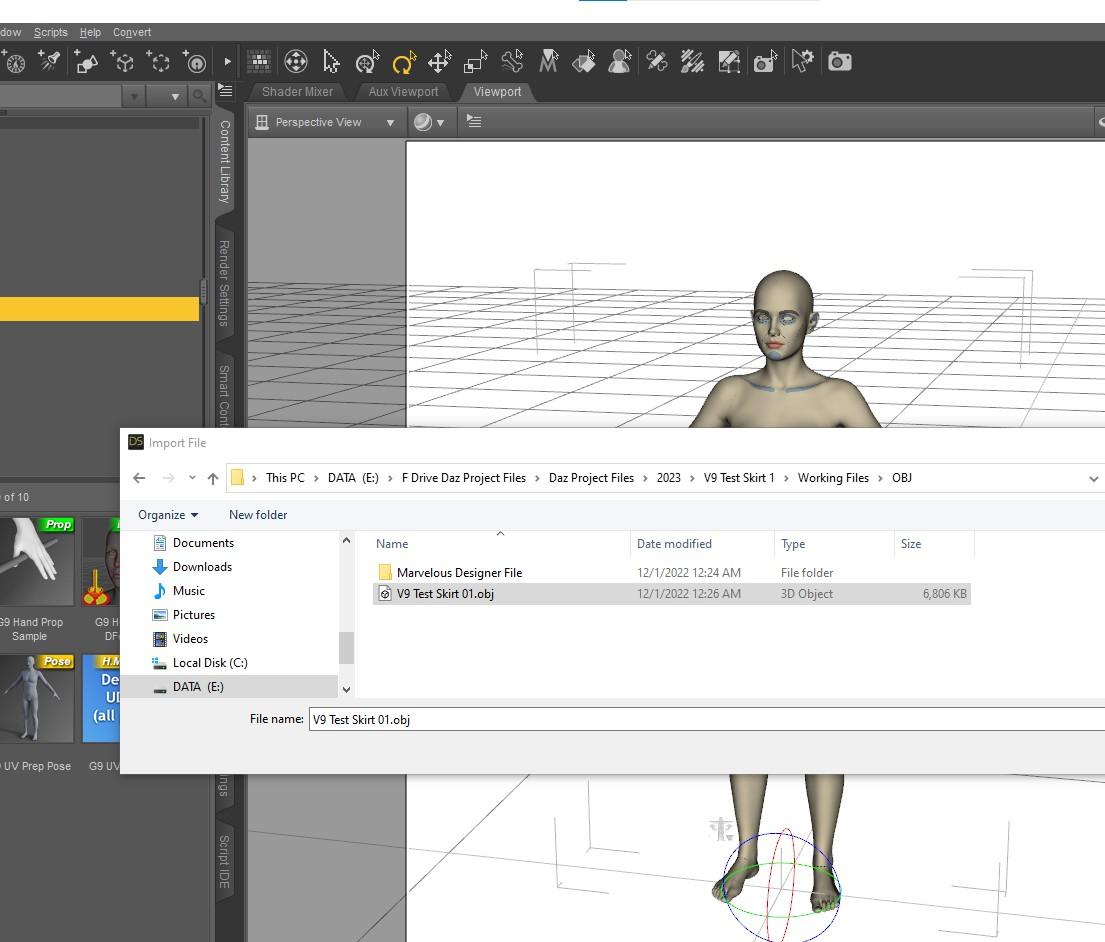
- Import the saved skirt OBJ exported from Marvelous Designer
- In import settings, make sure scale is Daz Studio (or consistent with whatever you used exporting from MD)
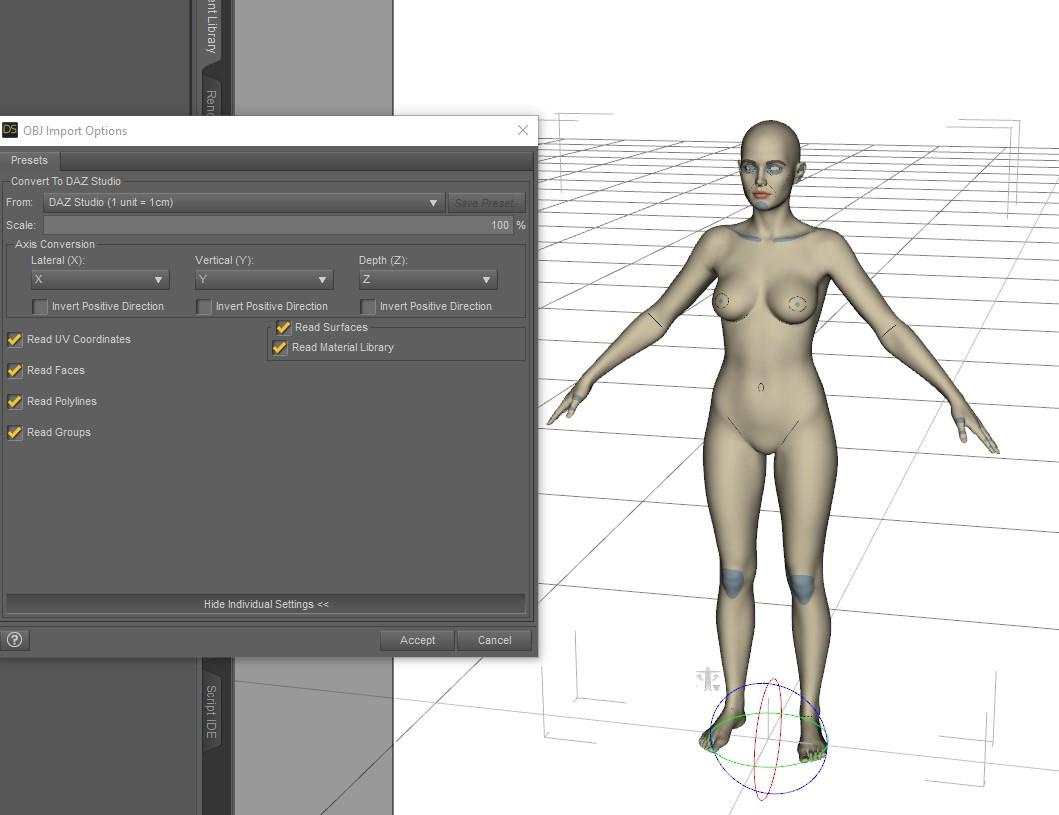
- Yay, my skirt OBJ loads to fit the G9 shape for Victoria 9 (not proportion changed)
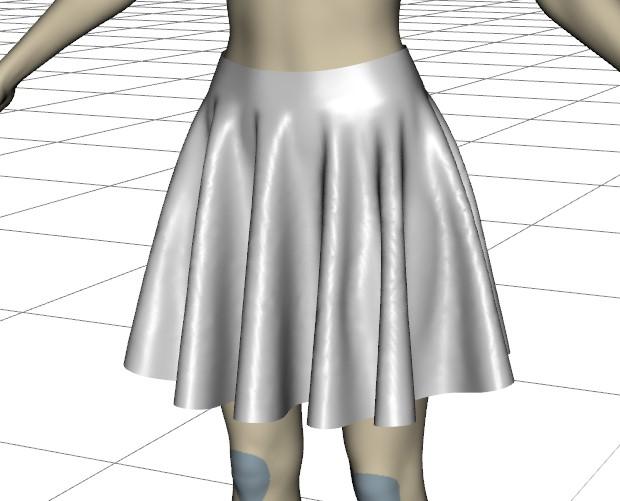 Possible Diffeomorphic issue to submit?
Now using the stable 1.6.2 version of diffeomorphic, OTT zola hair and G9 and the hair is still turning in to a million seperate meshes when i convert it. Also tried with a g9 hair (curly updo i think) and the same thing happens. I feel like ive tried every variation of settings but maybe im missing something.
Is anyone having the same issue and if not could you run me through your order of operation with hair and diffeomorphic. At the moment i am:
1. Easy import without checking "convert hair" as it never seemed to do work so ive always done it manualy.
2. Seperate the hair from the cap
3. Make sure human is the cap and hair is the hair
4. Click make hair and enter the settings ive always used, Sheet, Seperate loose parts, Resize hair to 40, Multi materials, children set to 6
used to work every time, now with G9 i get the 5863 meshes.
Any help would be much appericated.
FLUIDOS II for Daz Studio - update 2.2 [commercial]Thank you for the quick response and of course.
It doesn't seem the attach a file option is working for me, but I've uploaded it to mega.nz.
You can find it here: https://mega.nz/file/Q6RD1bRT#xxD2v7AlUDdwYLVLBwispXujAz2Du6ttchvym97f8Fk
It's a simple simulation of a standard cube being liqufied and dropped into the the domain (so basically a cookie-cutter test run to see if I could import a simple liquid simulation from Blender). Frame 15 (mega.nz link) is the one where it has just made contact with the bottom of the domain.
any news on the hd plugin?? :DUnifiedBrain said:
WendyLuvsCatz said:
there has been some great deals on G1&2 stuff lately too, I have almost given up on G3&8 now even with Misty's presets because the earlier figures are just so easy to animate and import BVH to using the Carrara plugin called DAZ studio too.
When I first started Carrara, I was not really focused on anything. Everything was new. Then I noticed that Generation 1-3 stuff was disappearing fast, so I focused on that for years. Now that I understand the HD plugin, and know how to use normal maps better, G2 is like a new door opening. A while back Diomede said that G2 was his main character set. I am coming around to that point of view. :)
Intersting, and nice work on that G2M character!
If you're intersted in trying more cool stuff, Genesis 1 has impressive capabilities - always has. For the Genesis line, it's definitely the most dated, when looking at characters available for sale. Genesis 3 and newer also gained Iray materials, which makes their promo shots that much more stunning.
But Genesis 1's magic will not be dying anytime soon. From the incredible Monstrosity series by Daz 3d to the wonderful Lycan by Midnight Stories, Abominable, Gorilla, all the men, women and children made for this fascinating any-gender figure - they all share the magic of, for the most part, being able to wear any of the clothing made for the entire line, but also your Generation 1 through 4 figures.
To the point:
Materialize is an amazing piece of software that allows us to quickly and easily create Normal maps from the bump maps.
I did some experimenting with it for Rosie 5. That was a while ago, but the results were really quite awesome.I noticed something particular to keep in mind, however:
When making Normal maps from Bump maps for a figure (or anything else with multiple map seams) it can help to begin by editing the edge of each map's island to extend out a bit further as to not create a Normal Map Ridge at the seams. Took me a while to figure out how I suddenly turned Rosie into a marionette!
This is a simple task if you want to 'get it done', but the more patient you are at enlarging the edge, the better the result will be.
Can't remember if you use Photoshop, Affinity Photo or what, but both of those two have what's called a cloning brush that works beautifully for doing this. Basically what I'm talking about is where the image portions of the skin maps meet white or other blank color. This isn't something we need to do for any of the other maps, just the bump (or whichever one you use to create the Normal map.
Here's Materialize
 Diffeomorphic DAZ Importer version 1.6.0 released
benniewoodell said:
I had the lagging happen all the time before, but now I import one version of the character with no clothes or hair, turn off the sub D in Blender, have nothing in the scene except basic cubes or whatever close that would resemble anything your character would interact with (like a table or something) and the lagging should stop for you. And then after I finish the animation, I append the armature into my scene file, go into the dope sheet, then the action editor and retarget my character to the animated rig and render. If this doesn't work, there's something else going on in your scene file that I don't know about. That lagging is super annoying. I just thought that's how things were in general because Daz can be that way too until I started taking animation courses and the rigs we're using in Maya are fast and stay that way, so then I started experimenting in Blender as I realized it didn't have to lag. Good luck!
Thank you for your response to the comment. It seems that I was able to solve the problem. After creating the animation, I did a test render in "Workbench" mode. I usually do something similar in daz as well. Because the viewport is not capable of showing a high frame rate. After the rendering is finished, the performance of the program drops a lot. I found a workaround. Save scene - Close blender - Reopen scene. All this takes 10 seconds. So it's not so bad.
I found another problem. If I'm trying to pin a character's hand to another character using the "child of" limiter. This works fine, as long as I don't go into pose mode of the character on which I have anchored the hand. After entering pose mode, blender freezes. I have tried another version of blender 3.0. The older version seems to work more stable. But I have not tested it for converting daz character to rigify
Translated with www.DeepL.com/Translator (free version)
Holiday Giveaways 2022!riuken1 said:
Nice render barbult and thanks AprilYSH. I just notice wen I filter by contex it no show in my assesories, againg thanks for this nice tiara.
Thanks for the compliment, riuken1. The tiaras are properly categorized, but they do not have any character compatibility set, so they never show up when filter by context is checked. You could submit a help request to ask Daz to update the metadata, or you could just set it yourself with the Content DB Editor in the Content Library pane. As far as I can tell, it is a prop parented to the character's head. It is not rigged to any particular character shape. I think you could parent it to any character and adjust the size to fit in the Parameters pane. Maybe that is why there is no particular character compatibility set in the Metadata.
FLUIDOS II for Daz Studio - update 2.2 [commercial]Writer25 said:
Alberto said:
Jovanni said:
Has anyone been able to import openvdb from blender to daz3d? :D
If you have vdb files of simulation of liquids, the vdbs are probably level sets, these can be transformed to meshes using remeshing in Fluidos II. But for smoke, fog, explosions, the current version (V2.1) cannot read these vdbs, but the plugin ABAS can do it (see https://youtu.be/FfGlaJyXXVo).
Hey there,
I've been trying out your plugin and I defintilty see potentional in this, since it works great when you make the fluid sims nativily in DAZStudio. However I'm running into an issue when I'm trying to import external .vdb liquid files from Blender.
When I've import them, I try to remesh them as described in the manual. I rename them as fluid00000x, set them in a bakefiles subfolder designated in the fluidos domain, and try running the remesh option in the simulator... Only this doesn't seem to work, as the simulator seems to go through them immediately, and doesn't convert the .vdb files into the required.ply.
Any idea what I'm doing wrong? The long-term plan is to use this plugin to render the externally made .vdb's in DAZstudio... so I hope that it can be resolved.
Greetz!
The vdb file must be of Level set type. Could you upload one of the vdb files so I could examine it?
FLUIDOS II for Daz Studio - update 2.2 [commercial]Alberto said:
Jovanni said:
Has anyone been able to import openvdb from blender to daz3d? :D
If you have vdb files of simulation of liquids, the vdbs are probably level sets, these can be transformed to meshes using remeshing in Fluidos II. But for smoke, fog, explosions, the current version (V2.1) cannot read these vdbs, but the plugin ABAS can do it (see https://youtu.be/FfGlaJyXXVo).
Hey there,
I've been trying out your plugin and I defintilty see potentional in this, since it works great when you make the fluid sims nativily in DAZStudio. However I'm running into an issue when I'm trying to import external .vdb liquid files from Blender.
When I've import them, I try to remesh them as described in the manual. I rename them as fluid00000x, set them in a bakefiles subfolder designated in the fluidos domain, and try running the remesh option in the simulator... Only this doesn't seem to work, as the simulator seems to go through them immediately, and doesn't convert the .vdb files into the required.ply.
Any idea what I'm doing wrong? The long-term plan is to use this plugin to render the externally made .vdb's in DAZstudio... so I hope that it can be resolved.
Greetz!
Update Meta Data Failure?It's the whole process that is being presented to new users that's essentially bound to create problems.
At DAZ site, they are given a link "Download Studio", which doesn't download DAZ Studio, but offers to install DAZ Central instead.
When the user has installed DAZ Central, downloaded and installed DAZ Studio and the assets that come with it and starts DAZ Studio the first time, the user is presented with a dialog asking for login credentials in a way that one thinks they should be given.
Having given the login credentials to DS and permission to go online, DAZ Connect within DS starts updating the metadata and 'bugging' the user that the content has not been installed (with DAZ Connect) and makes the user think it has to be installed again, which DAZ Connect does to an other location, taking twice the space on users C-drive (default location)
As any content installed with DAZ Connect takes priority over the installations made by other methods (DAZ Central/DIM/Manual installation), even when DAZ Connect installed content is corrupt, the user ends up with content that does not work and no way to figure out why...There is no warning or notice explaining that logging in to DAZ Studio, is only needed when one chooses to install content with DAZ Connect within DAZ Studio and if one does choose to do that, there is no point in using the other installation methods.
If one doesn't want to use DAZ Connect within DS to install content, one should set the Startup options in DS preferences as in the attached sample.
Add Collect Assets OptionThere arescripts which mayb help with organisation:
http://docs.daz3d.com/doku.php/public/software/dazstudio/4/referenceguide/scripting/api_reference/samples/metadata/list_products_used/start
http://docs.daz3d.com/doku.php/public/software/dazstudio/4/referenceguide/scripting/api_reference/samples/file_io/file_zip_extract_each/start
http://docs.daz3d.com/doku.php/public/software/dazstudio/4/referenceguide/scripting/api_reference/samples/remote_operation/extract_data_from_products_used/startsearch function not workingMacTire said:
So 3rd party assets cannot be searched?
The Content Library search goes by file names and will work on anything, the other content panes use the database and so require metadata - Daz content will (almost) always have that, soem third party content will have it though it will usually have to be imported, or you can add your own.
Diffeomorphic DAZ Importer version 1.6.0 releasedbenniewoodell said:
I had the lagging happen all the time before, but now I import one version of the character with no clothes or hair, turn off the sub D in Blender, have nothing in the scene except basic cubes or whatever close that would resemble anything your character would interact with (like a table or something) and the lagging should stop for you. And then after I finish the animation, I append the armature into my scene file, go into the dope sheet, then the action editor and retarget my character to the animated rig and render. If this doesn't work, there's something else going on in your scene file that I don't know about. That lagging is super annoying. I just thought that's how things were in general because Daz can be that way too until I started taking animation courses and the rigs we're using in Maya are fast and stay that way, so then I started experimenting in Blender as I realized it didn't have to lag. Good luck!
Great Advice
How to import BVH animation properlywolf359 said:
rilla said:
Doesn't Maya have the same retargeting capabilities as motionbuilder?
Debatable.
however the OP still needs to be able or willing to pay for a Maya subscription $1785 annually(nonsale price).
Just to create BVH files to import into Daz studio
I would be cheaper to pay the one time cost ofIclone 8/CC4 at $900 USD
or try to sort out that Cascaduere to Daz studio method Daz has show cased.
And there is always the option of just rendering his animation in unreal engine since that is where the retargeting seems to be working just fine.
There's still Maya Indie for less than $300/yr if the user lives in an eligible country, I believe.
Diffeomorphic DAZ Importer version 1.6.0 releasedI had the lagging happen all the time before, but now I import one version of the character with no clothes or hair, turn off the sub D in Blender, have nothing in the scene except basic cubes or whatever close that would resemble anything your character would interact with (like a table or something) and the lagging should stop for you. And then after I finish the animation, I append the armature into my scene file, go into the dope sheet, then the action editor and retarget my character to the animated rig and render. If this doesn't work, there's something else going on in your scene file that I don't know about. That lagging is super annoying. I just thought that's how things were in general because Daz can be that way too until I started taking animation courses and the rigs we're using in Maya are fast and stay that way, so then I started experimenting in Blender as I realized it didn't have to lag. Good luck!
How to import BVH animation properlyI used to think that DS just couldn't correctly read a simple BVH. While there may be some things with rotation order that it will sometimes incorrectly assume and produce nightmare fuel upon import, now that I've spent more time researching and trying different things, I now know what the real problem is: Orientation.
BVH as a format knows nothing about the Genesis framework. So it reckons angles from the un-oriented rest position. Daz Studio, of course, reckons angles from the oriented rest position. That's part of the reason why they deform so beautifyully. So the further you get from the hip bone, the errors stack. For example, change a G8's Left Thigh Bend. That's rotating around its local X axis. But notice that the leg does not rotate in a plane parallel to the YZ plane. It's angled outwards a bit. That's the Left Thigh Bend's orientation that the BVH file doesn't know about.
So DS is probably importing the BVH as best as it can, but there's only so much it can do, since whoever made you the BVH could not possibly have known about the bone orientations. It will never be perfect because BVH has no notion of orientation; rotations are always reckoned in the parent bone's space, precisely.
I think FBX does have a notion of orientation, I've seen the option in a Blender FBX addon, but although I've never tried, I don't think DS handles importing animations from FBX very well.
The tools @wolf359 and @WendyLuvzCatz are talking about, and the one I'm working on, know what bone orientation is, and do the math to correct for it.
PS - Well, actually, the other problem is that the BVH holds Euler Angles, and might not reckon the limits in the same way that Daz does, and again... nightmare fuel. A better, more modern solution is to use Quaternions, but a trip through the SDK forums show that there's a strong case saying that there's a bug in the way DS converts between the two, at least with Daz Script. *sigh*
How to render in 300dpi ?Both Tiff and PNG are lossless, any difference would be down to the export or import process (Tiff is somewhat variable, while PNG is well-specified)
How to import BVH animation properlyrilla said:
Doesn't Maya have the same retargeting capabilities as motionbuilder?
Debatable.
however the OP still needs to be able or willing to pay for a Maya subscription $1785 annually(nonsale price).
Just to create BVH files to import into Daz studioI would be cheaper to pay the one time cost ofIclone 8/CC4 at $900 USD
or try to sort out that Cascaduere to Daz studio method Daz has show cased.
And there is always the option of just rendering his animation in unreal engine since that is where the retargeting seems to be working just fine.
Daz Studio 4.21[.0.x] Pro, General Release!bishbosch said:
Is there up-to-date documentation for the new (and old) FBX export settings? The environment I'm trying to transfer to Unreal as an FBX is exploding, with parented things like windows and doors scattering, which wasn't happening before.
I can't export anything to Character Creator 4 anymore. I have tried all sorts of combiations in the new FBX dialog and CC4 still blows up on import.
How to Use Fisio: Experiments and Learnings5. Draping a Chain
Create a longer chain than in examples 2 and 3 and then free drape it as well as drape it around a cylinder and arm.
a. On the Fisio pane, set Scale to 0.25.
b. On the Fisio pane, click on the button Create Fisio Material node… and accept the recommended name. For this example we will be using the default material settings to start.
c. Create a torus that is Y-positive, 1 inch major diameter, 0.2 inch minor diameter, 64 segments, and 16 sides.
d. Make a copy of the torus by clicking on DS main menu and choosing Edit/Duplicate/Duplicate Node(s). Rotate the new torus 90 degrees and move it along Z-axis so the two tori are interleaved.
e. Hide everything in the scene except for the two tori. Using the DS main menu, select File/Export. Type in a name (like chain link) and check that wavefront object .obj appears in the drop down box below the name. In the next dialog box pick To: Daz Studio.
f. Using the DS main menu, select File/Import. Select the file you just created. In the next dialog box pick From: Daz Studio. You now have an object with the two tori linked so you can more easily create instances with UltraScatter Pro.
g. You can hide or delete the original two tori now that you have a copy.
h. On the Fisio pane, click on the button Create Fisio Material node… and accept the recommended name. For this example we will be using the default material settings.
i. On the Fisio pane, click on the button Assign Rigid Bodies… On the popup window click on Update Selections. Click on the chain link and then the Accept button.
j. There will now be a Fisio Rigid section in the Parameters pane. With the chain link selected, click on Collision Material and select Fisio Material. Scroll down and find the parameter Collision Shape Type and choose Mesh. Set Enable and Selectable to On and Fixed to Off.
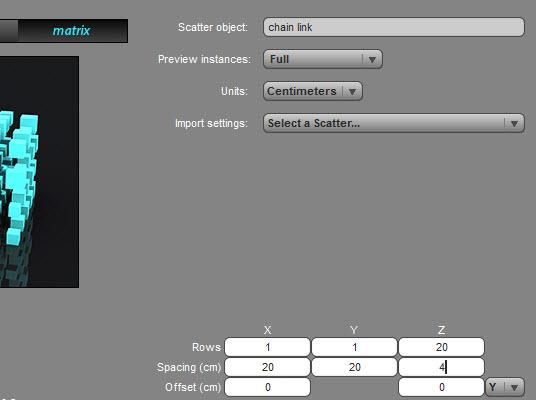
k. Next we will make copies of this link with UltraScatter Pro. Select the link, then run the USP script. Select matrix style and in the Rows area set X and Y to 1 and Z to 20. Set Z spacing to 4.
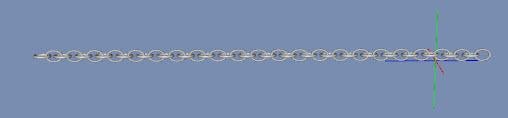
l. Select the Instances group and break it apart by selecting from the DS main menu Edit/Object/Instances/Break Instance Group.
m. Select the chain link object (not an instance) and then from the main menu choose Edit/Instances/Duplicate Node Hierarchies to create a copy. Move this to the right end of the chain and position it to be interleaved with the first object. Go to parameters and set Fisio Fixed to On. This link will hold the chain up so it doesn’t all just fall straight down.
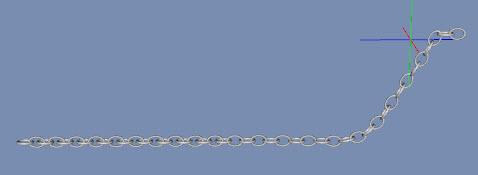
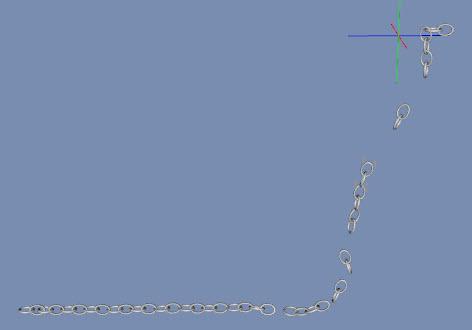
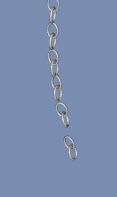
n. Run the Simulation. The chain will drape from the fixed link. It holds together until frame 15 when it begins to separate.
Frame 15:
Frame 24:
o. Change the Fisio Material parameters to Cohesion 20.
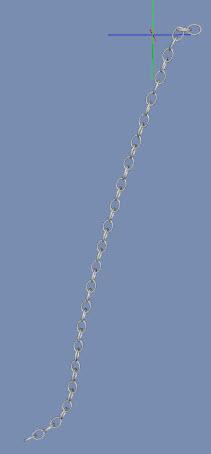
p. Run the Simulation. The chain will now drape until frame 34 before breaking.
Frame 32: Frame 34:
q. Create a new X-positive cylinder, 2 feet long, 6 inches in diameter, 24 segments, and 16 sides. Position it just under the chain at about half its length.
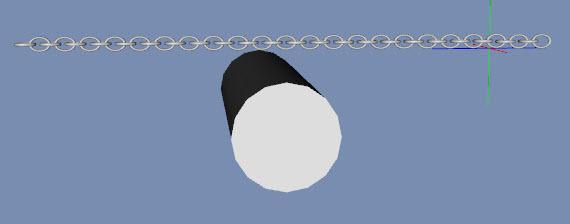
r. On the Fisio pane, click on the button Assign Rigid Bodies… On the popup window click on Update Selections. Click on the new cylinder and then the Accept button. Then in the Parameters pane click on Collision Material and select Fisio Material. Scroll down and find the parameter Collision Shape Type and choose Mesh. Set Enable, Fixed, and Selectable to On.
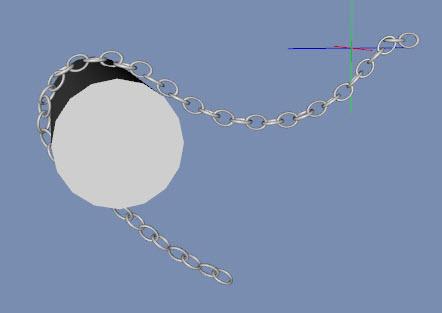
s. Run the Simulation. The chain will drape around the cylinder and not break (simulation was run to 46 frames, image shows frame 30).
t. Load a figure (I used G3M) and position it so its left arm is located where the cylinder is. Hide the cylinder. Repeat step r but for the figure this time.
u. Run the Simulation. It will be similar to step s. You’ll notice it doesn’t fit tightly around the arm but projects forward and looks as if the cylinder is still there. It is, even though it is hidden.
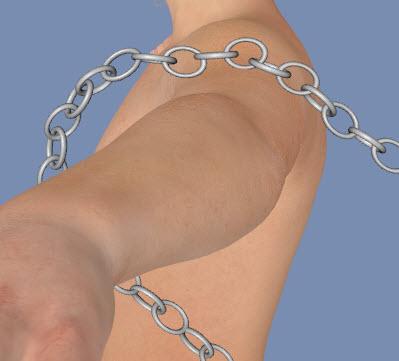
v. Select the cylinder and turn the Fisio parameter Enable to Off. Rerun the Simulation. Now it wraps around the arm.
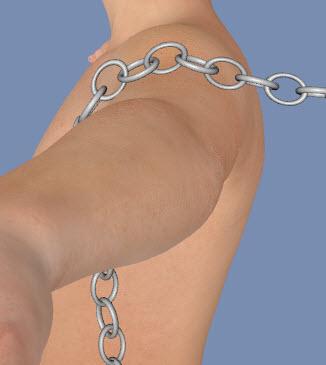
Frame 30: Frame 40:
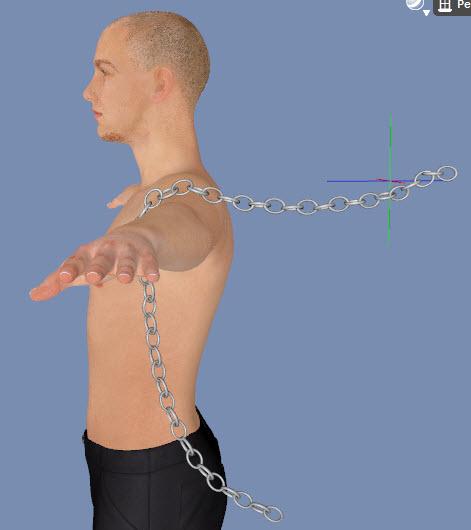
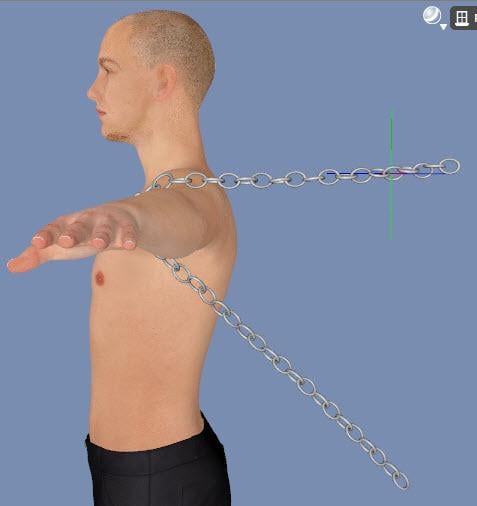
Key Learnings: (1) Use a small amount of cohesion to keep the chain links together. (2) If you have multiple Fisio Rigid Bodies in a scene but are only use one in a simulation, hiding the item does not remove it from a simulation as it does for dForce. You need to change Fisio Enable to Off.
Diffeomorphic 1.6.2 and Gen 9 HDadamb2011 said:
Hi All,
Thanks for the comments.
In the end I updated the plugin to 1.7, saved out my route paths throught the plugin ( so now I only have my E: drive which is correct) and also selected keep base meshes in the import, just to be sure.
Cheers
AHas Diffeomorphic 1.7 been released already?
Daz 3D is part of

Connect
DAZ Productions, Inc.
7533 S Center View Ct #4664
West Jordan, UT 84084Licensing Agreement | Terms of Service | Privacy Policy | EULA
© 2026 Daz Productions Inc. All Rights Reserved.