-
Experimenting with ML Deformer in UE5.1
There is no need of manually fiddling with jcms/drivers etc., because you only need to export the body mesh with jcms+drivers once and whenever you import any "fixed" animation or pose for the corresponding character into UE from blender/daz, UE handles all the drivers automatically.
I've tried to use the UE Metahuman skin material once, but the procedural micro normals caused bad seams at the edges of the uv maps, so MetaHuman Materials are just good for the Face, but not for full characters.
Can Geoshells be officially edited (Geometry editor, MeshGrabber) independent of its parent object?delete polygons on the shell
Select the shell > Paramters Tab > Shell > Visibility.
There you can set parts of the shell On of Off. That's how you hide parts. No deleting them.
reloading the scene the shell is as expected, it follows the parent. The Meshgrabber indents stayed, though.
As explained by Richard, Shells have the exact same geometry as the object they were made from. The push modifier (offset) or MeshGrabber do NOT modify the geometry, they just move things around like a morph. Same amount of polygons, same vertices order, same rigging to bones. So yes of course, it still follows the original object's bones, and modifications to the Shell's geometry (movements) is taken into account.
this way one could create rather cool effects.
If you want total control over a shell... don't use a shell.
- Create a Geoshell. Export it as obj (or send it to ZBrush, etc).
- Edit this shell object (a pure copy of Genesis) with any 3D app. Let's say you want a tattoo on the arm : delete all shell's polygons but the ones on the part of the arm you need. Export that object as obj.
- Import the obj into Daz and use the Transfer Utility to fit it to Genesis like you'd do for socks, etc. You now have only a small portion of a "shell", which is a basic 3D object, fitted to the arm. But because it was made from a shell : it has the exact same shape as the arm (with the offset of the orginial shell) and the exact same UVs. Which makes it easy to texture it with anything you want.
- Such an object has most of the advantages of a shell : it moves with Genesis, adapts to morphs, accepts any shader and materials, still has UVs from the original arm, etc... without some eventual inconvenients of a shell.
Daz Studio InsallationI mainly install content through Connect, but currently I have one main content directory for not-my-own content (store and freebies), oen for my own files, and one as a test location for things like freebies and stores without DIM support (so I can more easily track down the fiels when adding metadata, or fixing errors, then I move them across to the main content directory; that dosn't break the database entries as those are relative to the content directory without a record of which content directory it is)
Has anyone tried to render DAZ3D models in Lumion?We can't tell you that, but it will certainly play a role. A fast SSD and a fast GPU with at least 10 GB graphics memory and more should be standard.
We have also noticed that different DAZ models take different amounts of time to import. But all this is quite fast. We don't want to advertise Lumion, but its strengths are the workflow. It's all very simple and well thought out. It's fun like a game.When they have been working with us for 6 months, they don't want anything else.
https://lumion.com/blog/faster-3d-rendering-with-6-workflow-boosting-features-in-lumion-10.html
 MDBridge for Daz3D
Hi and thank you for creating this tool. For some time I've been exporting figures from Daz as OBJ avatars into MD. For animation I use the MDD cache from Daz into MD and then I export/import the garments as OBJ files back into Daz. I'm assuming your tool is a superior workflow and I would like to understand its advantages over the import/export method I've been using. THANKS
DAZ, MD, and Traditional Pattern Making - Graduation@lilweep - great insights as always. I'm still struggling with how to deal with FBMs that don't play well with others - but I have a few ideas on the way and your possible solution is an interesting one. I'm working on a similar script to import JCMs no matter which software you use to create them. Very similar to the create shapes morphs script, only the JCM pose needs to be loaded for reverse deforms. I'm using the createMorph function in the included code library that also clamps the morph to 0 and 1. I'm going to add hiddenTrueFalse and color fields to both the JSON and function to control the parm display as well.
This is the function definition so far:
function createMorph(oNode, fullPathFileName, morphName, reverseDeformationsTrueFalse, propertyGroup)and here's a single JSON example entry that 'drives' each morph for now. It could be modified for whatever morph you want to import, as long as the figure on the keyframe matches the deformation you're bringing in.
"ShapeName": "Minerva9",
"MorphName": "Minerva9_body_bs_Body",
"MorphPath": "Actor/Full Body/People/Feminine",
"KeyFrame": 210Thanks again all so much for your insights and sharing your experience. I'm learning so much.
DAZ, MD, and Traditional Pattern Making - Graduationbarbult said:
This looks interesting. I saw my name in there! I wonder how well the final morphs mix together. I've had some problems with that in the past when using MD draping to generate FBMs. Each one looks good, but when I mix FBMs. they become somewhat of a mess sometimes. It may well have been a lack of skill on my part.
I look forward to your first release as a new PA.
This is also what I worry about too. I think this method that bohemian has put forth should work well for very low poly and tight garments where interference from the other FBM morphs when mixing would be minimal.
for higher poly shapes and looser fits, i can imagine that the particular folds or drape from a given body could interfere in unwanted ways, and this would probably be an inherent problem. I kind of ran into this problem when i experimented with making pJCMs in marvelous designer (which perhaps is an easier problem for making non interferencing morphs than the FBM problem since pJCM only affects one area where FBM affects the whole garment).
Im just spitballing, but I guess you could do this method as a first pass, and then maybe try to further tweak the FBMs to adhere to a standard drape with less risk of incompatibility when mixing. This would be a hybrid approach of getting a physical sim from MD and then shifting it toward a perhaps less-than-ideal shape but something still better than the autogenerated FBM.
I would also wonder how you could survey every combination of FBMs when doing QA checks to make sure they all mix well.
I guess the beauty of the approach bohemian proposed is its simplicity and once you start tweaking and doing further adjustments then it becomes as annoying and complicated as the manual way. That said, i think the bulk import of FBMs is very clever and will help stay organised. I didnt watch the video or dl the script yet, but did it include pJCMs?
DAZ, MD, and Traditional Pattern Making - GraduationAs I consider becoming a content creator for DAZ I was feeling overwhelmed by all the morphs and files that are needed so I decided to try my hand at scripting the process. This video will be mainly of interest to others who are currently content creators or considering it like me.
In this thread I learned a great deal about exchanging animations between (thanks all for your contributions) and am now using the Sagan Alembic Exporter, info linked below.
Even if you don't use Marvelous Designer to create your shape morphs, the chapters on using a JSON file to drive your import process may be of interest. The scripts linked below are not encoded and you can adapt them to your pipeline and workflow.
Core Workflow
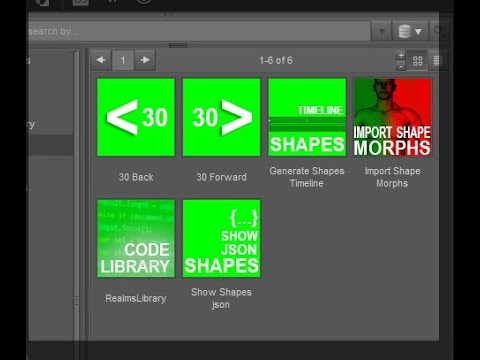
- Generate Timeline from JSON file of shapes you want to create morphs for
- Export Genesis9 figure shapes animation using Sagan Alembic
- Use your software of choice to create your morphs on your garment / product
- Use same JSON file import the morphs
The import process script imports the morphs using reverse deformations, clamps to 0 - 1 values and colors the property display to aqua so you can find them.
I look forward to any insights you all have on improving and simplifying this process. Thanks.
Links:
Sagan A Daz to Blender Alembic Exporter
DAZ Scripts Used in these videos
 Has anyone tried to render DAZ3D models in Lumion?
Well, after make some test, I give up on lumion currently.
For one reason. I tried to import two genesis with cloths, hair, etc at once. It tooks a long time to get it in.
No matter how fast the render is, if the import process also takes time, the time cost would be just the same.
This is somthing I'm afraid of since the beginning.Anw @wendy I haven't tried your hypotesis.
My solution for now to cut the time cost is to reduce the iray render quality and use denoiser.
Content can't be foundRichard Haseltine said:
Older products may not have complete metadata. One thing you can try is to load the figure (Aiko 3 here) then drag the items you ant to associate with her from the Content Library pane to a category container in Smart Content.
That worked. Thank you very much.
categories content in smart content still appears in "lost and found"Thank you for your advice.To be honest I have not understood everything.
Regarding
I organize my content to remove it from "lost and found" in smart content.
But some keep coming back to "lost and found". In this example files are categorized to "lost and found" _plus_ to other categories.
I did not encounter this issue since.
Following your advice I have Edit> Preferences> Content = Is "Show Hidden Vendor Categorizations" => UNCHECKED
Regarding the fact many products are in L&F folder, I have started to categorize them and most of them are old content without categorization.
I am working with DIM
and my product have meta data as seen in the screenshot above
It has metadata, and I checked all its items, none is in Lost and Found, but the product is present in Lost and Found
Typically those products have a folder in "content library > categories > Lost&Found" .
When I make sure the "content library > categories > Lost&Found > product folder" is empty (categorize then refresh).
When I delete that "content library > categories > Lost&Found > product folder" then the product disapears from "smart content > Lost&Found".
Databases, Content, Smart content tabes_b199eb1e said:
NorthOf45 said:
I assume you installed with DIM or Central, and not Connect. Connect is another method to install content, in a different location. If you use DIM or Central, you do not need Connect to use Smart Content, so you do not need to log in to DAZ from Studio. The "Install" icon is Connect's way of telling you it wants to nstall, but don't do it. You will have a second, overriding installation of the content, and possible conflicts. Much has been discussed about this subject, and the general rule is that if you use DIM/Central, do not use Connect, do not log in to DAZ from Studio. You can set this in your Preferences (F2). If the Product thumbnails are in colour, nothing is wrong.
Is that the 'automatically login with remembered credentials' checkbox?
Yes.
BTW, re-import metadata can be done at any time, but for the whole library, hopefully just once. You can re-import metadata from DIM for one or more selected products in the Installed tab.
Databases, Content, Smart content tabOkay, found it: You have to choose the smart content tab, then open the content database maintenance dialog, check re-import metadata and click accept.
Export and import dForce dreadlocks hair from DAZ to BlenderI agree with Donald, if you animate in daz studio with dforce and want to export the exact same animation to blender then go for alembic with sagan. As for diffeomorphic that's to export and animate in blender, though it can import some animation from daz.
Content can't be foundOlder products may not have complete metadata. One thing you can try is to load the figure (Aiko 3 here) then drag the items you ant to associate with her from the Content Library pane to a category container in Smart Content.
Rotating bones after creating new figureThe widgets for moving the end points ar emeant to stay oriented to world space, as far as I know, since manipulating them will - among other things - determine the bone's orientation. One option might be to simply spawn a morph for each translation; since morphs are linear they are perfectly suited to this, unlike rotation and scale. That is, move the mesh using the Translate or Universal tool, with the model otherwise zeroed and the coordinate system set to local, export as OBJ, and import as a morph target (Edit>Figure>Morph Loader Pro, taking care to use the same preset for both export and import). Hide the native transaltion sliders and place the morph sliders in their slot (or just use them from the figure node).
Diffeomorphic DAZ Importer version 1.6.0 releasedPadone said:
I didn't have any issue importing your test animation on a G3F, works fine here. Be sure to update the plugin and clean install.
p.s. You have to insert the last frame by hand because the plugin defaults to 250, if this is what you miss.
Thanks, I'll try to remove the plugin completely and reinstall it in Blender. I was under thr impression that I was running clean but I must have missed something.
btw, I have set the last frame by hand, as shown in my previously uploaded images.
So fingers crossed. I'll procede to remove and reinstall Daz Import, and if I were a praying man, I guess I could do that as well.
AIUTO...CHI CONOSCE L’ITALIANO? PARTE TREDICIImago said:
Ruthven said:
arrivo a casa coi neuroni bolliti dal preparare buste paga)Ok, ora mi spiego meglio.

Nella lista "Lost & Found" tutti i prodotti hanno un metadata di base, se li strascini all'interno di una voce differente, tipo "Wardrobe", acquisiranno i metadata di quella sezione, apparendo in quella lista.
In genere la vecchia "cartella" dentro Lost & Found sparisce e rimane solo quella della nuova destinazione. In questo caso dvi modificare manualmente quella voce rimanente nel tab Content e suando il Content DB Manager. Per raggiungere la cartella giusta senza dover bollire il cervello ulteriormente, fai click destro sulla cartella vuota dentro lo Smart Content e clicca su "Show Category" e correggi o cancella le voci vuote.
Per una maggiore gestione puoi anche andare ad aggiungere dei Tag ai prodotti appena spostati, lo puoi fare direttamente dallo Smart Content dal tab Tags che appare di fianco a quello del negozio Content (la finestralla in fondo allo spazio dello Smart Content, se non la vedi clicca sulle tre lineette strette strette giù in fondo.
Ricorda che la vecchia categorizzazione viene perduta con questo metodo per cui ti consiglio di aggiungere ai tag il nome della categorizzazione precedente, giusto per sicurezza. Tuttavia le liste "Product" non vengono alterate per cui puoi ancora ricercare per prodotto se necessario.
Ah, dimenticavo: Puoi anche spostare l'intera categoria in un altra dal tab Content con "click destro-> Move category to" e mettendola in una di tua scelta.
Ti ringrazio.
Ah, non so se avete notato, il cambio col dollaro è tornato a nostro favore. Per chi usa Paypal, che sul cambio applica commissioni alte (come ha fatto notare Imago tempo fa), si può scegliere in fase di pagamento ("vedi opzioni per le valute") di pagare in dollari e le commissioni di cambio le applica la società delle carta di credito. Finora sono risultate più basse di quelle di Paypal, infatti sto ancora usando quest'opzione.
Importing hand poses to Blender (DAZ to Blender bridge) – scaleHi,
I've posed and keyframed a Gen 8 character in Daz, and now I need to import it to Blender. The figure is mostly animated with translations and rotations, but I have some necessary hand poses set on.
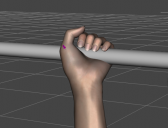
Whenever I tried importing it to Blender with DTB, the hand poses were not executed properly. From what I've found in other discussions, there are plenty of issues with the official Bridge and already came across the Diffeomorphic script, but as a Mac user, it's not an option for me. FBX results are terrifying, so I'm not going to even post them lol
I think scaling might be an issue, but I'm not sure. I've tried many settings, and here are the results for "Export Morphs" checked:
(morph sliders set on 0)
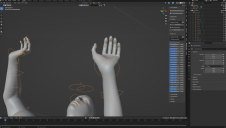
(adjusted morph sliders value)
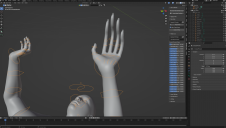
Now, "Export Morphs" unchecked:
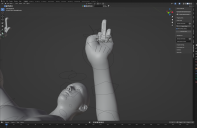
As you can guess, I'm not exactly happy with the results. Is there any way to fix it?
Export and import dForce dreadlocks hair from DAZ to BlenderHi there,
I have been spending days trying to export a Genisis 8.1 figure with a simple walking animation (from Mixamo) and Mehrloc Hair dreadlocks (https://www.daz3d.com/mehrloc-hair-for-genesis-8-and-81) from DAZ to Blender.
In Daz the hair is simulated and animates nicely, reacting to the walking animation. Now I am trying to get this to Blender

I tried the Daz To Blender bridge, the Diffeomorphic DAZ Importer and exporing/importing fbx files.
The only way I am able get the figure with the animation and hair from DAZ to Blender is by experting exporing/importing an fbx file.
However the physics on the hair do not work in Blender.

Is there a way to transport the hair animation to Blender?
Preferably also with the Beads in the hear which also animiate incorrectly (you can see them floating arround in the gif above) but I've been spending so much time on this I'm willing to just remove them from the figure.
Thanks!
Daz 3D is part of

Connect
DAZ Productions, Inc.
7533 S Center View Ct #4664
West Jordan, UT 84084Licensing Agreement | Terms of Service | Privacy Policy | EULA
© 2026 Daz Productions Inc. All Rights Reserved.