-
Ok, So this is Gen 9
Sickleyield has a tutorial on her deviant art here - https://www.deviantart.com/sickleyield/journal/Tutorial-Transferring-Character-Morphs-G1G2G3G8-409437916
I haven't used that one, mine is more like the instructions Redz put out years back. Basically this.
Load G3 and reduce its resolution to base with no subdivision.
Export it as an obj then clear the scene.
Load G8 (I used the Dev model here), then import your G3 .obj
Transfer utility using G8 as source and G3 .obj as target. Accept default Transfer Utility options.
Hide G8 and all its subpieces so only the G3 .obj is visible in the scene.
Save this as your scene, you can reuse it over and over.
To do the actual transfers now all you have to do is load your 'G8 to G3' scene. Load your morph and export to .obj. Since G3 is the only thing visible in the scene it should be the only thing that gets exported.
Load a G3, launch morphloader pro and select the exported morph (all my morphloader morphs I import to the same property group so I know where to find them later). In the parameters tab find your morph and set it to 100% Some extreme morphs may need to be smoothed out in something like Zbrush. But I've only had to do that once and it was pretty simple to smooth out some leg bumps. If that happens you can do whatever tweeks you need to in another app and reimport it again.
With your newly morphed G3 selected, make sure from the top menu to do Edit/Figure/Rigging/Adjust Rigging to Shape. Then go to your Parameters tab menu, go into edit mode. In the parameters find the morph again, right click on it and select ERC Freeze. (If you don't do these steps your morphed character can have wacky results later when you pose or use attachments).
You can then save the imported morph as a morph asset to be used over and over. I have had to tweek the irises and pupils a couple of times, but that's pretty easy to do in the sliders.
Enjoy and be sure to think happy thoughs about Sickleyield and Redz for their awesome hacks.
I've used this morphing V4, G1, G8 to G3 with pretty positive results. I have played around a bit with G9 and this doesn't work at all. Unless you want to see what G9 would look like after going though a pulp mill.
Animated BackgroundIs there any way to import an animated background for example a crowd in a theatre or arena cheering. I want to save resources. In Poser, I noticed you can import a .avi onto a plain one-sided square! Is this possible in DAZ Studio 4.21? If not is there any script or third-party content available that would do the job? Cheers
Item placement and description@MasonicArtist - I agree with you fully. Don't forget that if you search in the Smart Library, searching under the Files tab may produce results not found using the Products tab. Also remember that when you find what you are searching for, you can add categories to content files - even if you cannot delete the vendor's categories from a product - and you can add/change metadata and tags that can make finding content easier.
Daz Studio Pro BETA - version 4.22.0.15! (*UPDATED*)Pickle Renderer said:
I suggest round-tripping base character to Blender, doing your animation there, and then bringing it back into Daz if you want to stick with that for set dressing, lighting and rendering. Diffeomorphic for import/export and Blender's animation tools are powerful and definitely worth learning, though it will be frustrating at first.
Why should I do so much work going back and forth between softwares and relearning the same thing when it would be enough to fix the bugs in DAZ Studio? They are bugs not options that I could not like. They are malfunctions in the core code they wrote, not an add-on from third parties that could be ditched.
I can do nice animations in DAZ Studio 4.12.0.86 where the animation tools still works half decently. The devs put a lot of bugs in the code and now, in DAZ Studio 4.21, those tools are affected by colossal bugs and make a simple walkcycle is a torture. You can't filter sliders on the graph pane and GraphMate. You can't create a proper dot in puppeteer. You can't move the keyframes in the timeline. You can't frame distant props in the scene. You can't save your custom actions in the menus.
These issues are there since the relase just after 4.12.0.86 and for this reson I'm still stuck with version 4.12.0.86 that obviously lacks of a lot of new features I would like to try.
I spent a lot of money for assets for DAZ Studio and I want to use them in DAZ Studio not in another software, even if the transportation is super easy.
Said this, I wish an happy new year to everybody and their beloved ones!
Cannot Export/Import OBJ for Clothing Morph - "Geometry Does Not Match"Hi lioncrud! After a failed morph load, the Morph Loader should place a message at the end of the Log file like this: Vertex Count mismatch 1106:1202 (Base:Morph). The first of these numbers is the number of vertices that the Morph Loader expects from the morph file. The second is the number of vertices the morph actually gives to the Loader. Import your item into Blender, select all the vertices, find out their total number and compare it with what the Morph Loader expects. If this number is higher, then something else was exported from the Daz Studio.
Bug? Loading Casey G9 (scene or preset) with dForce Pitt Bull Hair puts the hair 30cm over his headCatherine3678ab said:
If you are referring to: https://www.daz3d.com/dforce-pitt-bull-hair-for-genesis-3-8-and-81-males, no that's not a bug. It's made for G3,8 and 8.1.
My understanding of G9 is that you can use the G8 items like hair. When I load it, it brings up an import window, I choose the correct original format, and it works fine.
It is only when saving then re-loading it in a scene that it doesn't work. Which kind of defeats the purpose of having the proclaimed backwards compatibility. So since it does work when you initially load it, but not when you load a scene, I'm pretty sure it's a bug.
Cannot Export/Import OBJ for Clothing Morph - "Geometry Does Not Match"Hi Dazzers,
So this item here is giving me a bit of a headache: https://www.daz3d.com/dforce-cgi-selene-outfit-for-genesis-8-and-81-females
I'm very accustomed to making clothing morphs in other programs (Blender) and re-importing to Daz3D. However this item, even when I export OBJ without loading into another program and try to load directly back onto item using Morph Loader Pro, does not match geometry. Trying to figure out why.
A few things I've already tried:
- Made sure I was exporting base mesh, no sub divides or higher resolutions
- The item has some sort of attachment, I tried exporting with and without it (simlar as you would do removing eyelashes from a base Genesis 8 character)
- Made sure exported file was set to DAZ scale.
- As noted, I tried exporting the file then directly trying to load it into Daz3d without any 3rd party program being involved. geometry doesn't match out of the gate, so I know it's not a 3rd party program (I use Blender)...something wonky going on with the export or thte import (Morph Loader Pro).
[Solved] How to rig and save new clothes for GF9 AND Victoria 9?felis said:
Are you modelling towards G9 base or G9 female base?
If not G9 base you must use reverse source shape from target.
Hi felis,
I use the G9 female base for modelling and followed your suggestions from above. You mentioned that this simple way works well for you.
The only explanation I have at the moment as to why it doesn't work for me is: there must be a step that is so obvious that it is not mentioned or I do something (based on my experience with GF8) that is not recommended while dealing with GF9.
Here is a step-by-step explanation of how I implement your suggestion:
1) import the garment object made for G9 female base
2) Select Edit -> Object -> Transfer Utility ...
3) Select "Genesis 9" as source and set "Current" as Source Item Shape
4) Select the object as target and "Default" as Target Item Shape
5) Select "Bodysuit Loose Template" as Projektion Template
6) Under "Options" mark "reverse source shape from target", select "Fit to Source figure", "Parent to Source figure" and "Add Smoothing Modifier"
7) Put the Content Type to "Follower" and accept
8) Save the garment object as "Support Asset" -> "Figure / Prop Asset" with "Set Compatibilty Base" set to "Genesis 9" and "Set Compatible" with set to "Genesis 9 / Base" (thats the save preset for me)
And after all I get that botched garment from my Screenshots when I load it for Victoria 9
Happy New Year to you! I think this will be my last entry this year
 Diffeomorphic DAZ Importer version 1.6.0 released
You need to import the jcms, check jcms in easy import.
Daz Studio Pro BETA - version 4.22.0.15! (*UPDATED*)Totally agree animation need more attention.
But will also agree that DAZ has it hands full with implementing G9 (and all its features) and speed regressions and Ghost-lights, etc. etc.I completely agree, although I have to say looking at the Blender codebase, the probability you'll get anything as good as that in the animation department is very close to zero. For that reason I suggest round-tripping base character to Blender, doing your animation there, and then bringing it back into Daz if you want to stick with that for set dressing, lighting and rendering. Diffeomorphic for import/export and Blender's animation tools are powerful and definitely worth learning, though it will be frustrating at first.
I would tell the story about how I switched from Fireworks to Inkscape for design at work (the former went out of support so tech support had to uninstall it). The older you get and the longer you were using the former, the more learning the latter hurts!
Anyone figured out how to use Geo-Grafting Navel and Nipples for Genesis 9?fjb507 said:
Padone said:
The HD morph has two components, a base mesh morph and a HD sculpting over that. The base mesh morph will follow the uv map, the HD sculpting will not, in that you can sculpt any feature anywhere, that's what HD sculpting is for.
I don't see that it's essentially different. If I, as a non-PA, make a base level morph I'm free to flatten out the existing nipples and make new ones elsewhere provided I'm prepared to make the appropriate changes to the UVs/textures. I'd just have to live with the compatibility issues. Now, since with Genesis 9 there is no base level nipple detail I suppose it would be possible to accidentally put the nipples in the wrong place but that would be immediately obvious once the textures are loaded. So if a PA moves some detail at any level it will be because they had a good reason to do so (probably because they’re making something so non-standard that compatibility isn’t an issue). But in most cases they will just follow the template and put them in the default position. I just can’t see any reason to try repositioning common details like nipples or crease lines in the HD morph when it’s just as easy and more logical and compatible to do it in the base morph.
What tends to get lost in the discussion is that the easiest way to make sure that the nipples and navel don't get displaced too much by any changes made by the HD morph is to do the shaping at the subdivision level you will be making the HD and then go back to base resolution before sending the base morph back to DAZ Studio, since you need that before you try to import the higher subdivision.
[Solved] How to rig and save new clothes for GF9 AND Victoria 9?Here is my suggestion, which works for me:
- Load G9 Dev Load or G9 Base
- Import your OBJ
- Run the Transfer Utility and select the appropriate template that best fits the OBJ you have imported (probably loose bodysuit or loose long dress in your jumper example) and apply smoothing modifier. (I made a screenshot for you, but the forum is so broken it won't upload at this time.)
- The garment will now be be rigged and fit to G9 and parented to G9. Select that rigged parented garment in the Scene pane.
- Save as Figure/Prop Asset.
Daz Studio will use Auto Follow (not to be confused with Auto Fit) to make the garment fit unique character shapes like Victoria 9. This will be fairly successful for shapes that are not too extreme, like Victoria 9. It it doesn't fit perfectly, your recourse is to create your own custom morph for the garment to fit that particular character shape.
[Solved] How to rig and save new clothes for GF9 AND Victoria 9?Hi Pushee-Ri,
The problem is the auto-generated shape for Victoria9 on your clothing. As you know, when you load your clothing and then change the character's shape (say to Victoria 9), DS automatically generates the Victoria 9 shape for the clothing. Often, this autogenerated shape has issues (such as those described by you). To get around this problem, you need to 'fix' the shape in an external modelling program and then use Morph Manager to import and overwrite the Victoria 9 morph with your corrected version. What is super important is that you must use the exact name of the morph/shape that your are trying to replace. In this case, it would be "Victoria9_body_bs_Body" (without the parentheses). You will often have to do this 'fix' for many of the other shaping morphs that are dramatically different (i.e. Large Breasts, Voluptous, etc...) from the base shape if you want your clothing to look good on other characters.
If you own zBrush, this fix is pretty easy to do. Basically,
(1) load Genesis 9 base,(2) load your clothing,
(3) make sure both are set to base resolution.
(4) Change the shape of Genesis 9 base (to Victoria 9), so that the clothing also changes.
(5) "Send to zbrush" with deformation box checked (send both the figure and clothing at base resolution).
(6) in zbrush select the clothing (subtool) and make your corrections using a combination of the standard brush and smoothing brush. Note: I like to use the masking tool, so that I can have precise control over the regions that I change.
(7) GoZ back to Daz Studio where you will want to overwrite the original "Victoria9_body_bs_Body" shape in the clothing. Some of the tutorials you have watched should have the exact boxes to change on the import (Sorry, I am not in front of my Daz computer so I can't give you the specific details).
Note:
Once back in Daz Studio, I like to export out the corrected shape as an obj file (at base resolution). I do this step in case something goes wrong, or I want to make some additional small tweaks/corrections.
Make sure that no other morphs are active when you go to zbrush, otherwise these changes will be incorporated into that shape/morph and result in unexpected problems (i.e., weird shapes).
[Solved] How to rig and save new clothes for GF9 AND Victoria 9?felis said:
Well, it might not be the right way, but for G9 clothing I just use transfer rigging right after import.
A) If the clothing is modelled to G9 base I just use transfer right away.
B) If the clothing is modelled to a shape, e.g. G9 female base, then in transfer rigging I use current, and in options tick 'Reverse Source Shape from Target'.
And then when saved, saved as a follower.
Thank you felis, I'm just working on an other project and will try it tomorrow (it's 16.30 here in germany ;-)
[Solved] How to rig and save new clothes for GF9 AND Victoria 9?Well, it might not be the right way, but for G9 clothing I just use transfer rigging right after import.
A) If the clothing is modelled to G9 base I just use transfer right away.
B) If the clothing is modelled to a shape, e.g. G9 female base, then in transfer rigging I use current, and in options tick 'Reverse Source Shape from Target'.
And then when saved, saved as a follower.
Diffeomorphic DAZ Importer version 1.6.0 released@Matteroyal1 The instructions are in test0.7z, there's no video that I know of. You really want to go the hard way here, again consider to avoid G9 and HD morphs, also because they are not friendly to animations your figure will be heavy this way so it will only fit for posing, not for animation.
@3WC No that means you can retarget your manual rigify rig to the daz rig with bone constraints or any retargeting tool.
@superegophobia The standard morphs are for the genesis figures, for other figures you can import custom morphs.
Smart Content is an amiss mess!ShelLuser said:
Happy to hear that it got resolved, smart contents can be tricky to get started with IMO but once you get your fingers behind all the basics...
The best part about this pane, in my opinion of course, is that you can customize just about everything about it. For example... I often start working with the Genesis base figures, either to apply specific presets and morphs or maybe start something in ZBrush with the Genesis as base... etc. So I got a Figures => Genesis category which only contains all the Genesis base figures.
I seriously prefer 'smart' over the content library pane (which I also heavily use) when it comes to sorting out my projects because it's all non-destructive. I can easily cateorize my projects under "WIP", "Shared", or specific categories which I use to group renders which are somewhat related to each other. Couldn't be easier!
Thanks. I have resisted extending my "Smart Content" categories metadata until I got my SSD storage settled for many years but once I do that I will extend Smart Content in a way that is helpful to me.
I am now nearly done filling up a 2TB Sata III SSD with DAZ 3D Store content (nearly 8000 products according to DIM) and have decided I will this year do one of these things: upgrade to a 4TB 3.1 USB SSD or 2 2TB 3.1 USB SSDs and split the DAZ Install Manager data (the downloaded zips basically) on one SSD with the DAZ Content Library on the other SSD. Either way, the cost is about the same: $300. The 4TB 3.1 USB SSD is Sandisk while the 2 2TB 3.1 USB SSDs are Samsungs. I would get a 4TB 3.1 USB SSD instead but Samsung doesn't make that size. After I get that done this year, that basically remedies my storage needs for a very, very long time because I don't see my needing or wanting to buy another 8000 products from the DAZ 3D Store although a fair amount of those are "freebies" and the same product but in different formats, eg DAZ, Poser, Carrara, Bryce, and so on. I think they'd have to complete come up with a significantly faster (4X or more) and more much more compact external storage technique that was as cheap to get me to upgrade storage again. After that, I'll be set up to script weekly clean installs of Windows 11, which will be an interesting learning exercise.
Experimenting with ML Deformer in UE5.1mrpdean_7efbae9610 said:
Krys Kryngle said:
Yes, so glad to see someone else experimenting with this. I'll share what I've found out, although I've taken a break from trying it (now I may have to start again).
First question is are you going from DAZ straight to unreal? If so, how did you get the alembic file exported?
I'm using Unreal to Blender with diffeomorphic. I went through the pain of putting all the joint limits in the Maya trainer and generated the 50,000 frame animation. I imported the skeletal animation into blender and got it to work fine. If anyone needs it for experimentation I'd be glad to share. It's just an FBX skeletal animation without the mesh so I don't think I'll be breaking any copyrights or anything. I can also save someone some time with the presets for Maya if anyone needs it. No sense typing in all those values if you don't have to.
I triangulated both meshes, the fbx and alembic, prior to exporting from Blender. This helped with one issue I was having. I think blender triangulates the alembic but not the fbx, or vice versa, so adding the traingulate modifier, applying it, and re-associating the shape keys helps. I have instructions on that if anyone wants.
I was able to get it working with a character at base resolution. I can't find a copy of my settings in Unreal but I remember bumping up most of the settings. I would really appreciate a copy of your settings to see what you used. I'll run another test and upload mine.
The biggest problem I ran into was bumping up the character resolution to sub 1 which is somewhere around 65,000 verts. I kept getting the results shown in the attached image. I tried many different settings but couldn't get anything to work. It would not let me increase the 'num morph targets per bone' without throwing an error after simulation (ran out of memory or something). If anyone was able to get this working, please, please, pleasefg post your settings in Unreal. I can't get this part working. So close...
I use a very different workflow. I originally started with Maya but soon switched to using Houdini, where I'm attempting to build a tool to automate things as much as possible. Here is a high level overview of my workflow.
In Daz Studio:
- I'm using the Daz to Maya plugin (just the Daz side of it) to export a subd 1 FBX of my character.
- I also use the Daz to Maya plugin to export an FBX of my training animation, which I made in Daz by just keyframing my character into various poses, around 500 frames in total at the moment. I'm slowly adding more poses to it, although I've not found much benefit in adding more poses to the training animation. Doesn't seem to improve the end result based on my initial experiments.
- Finally, on the Daz Studio part, I'm using the Sagan Alembic Exporter to export the same training animation as an alembic cache.
- One important thing with my workflow is that frame 0 of the training animation is unposed. This is because frame 0 of the Alembic cache gets used as the final character mesh at the end of this process.
At this stage I had the skinned subd1 character in FBX format, the training animation in FBX format, and the alembic cache of the same training animation. Theoretically this is all that's needed to use the ML Deformer but of course it was never going to be that simple.
The first problem I ran into inside UE and setting up the ML Deformer training was this error:
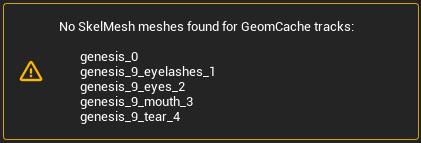
This led me down a path of trying to understand the internals of Alembic files as for some reason, UE was renaming the the tracks in the Alembic cache exported from Daz which meant that the tracks nolonger matched the parts of my character mesh. At least I think that's what was happening as I could find no information about this error.
The second problem I ran into was that the vertex order in the Alembic cache was different to that of my character mesh.
Also, UE was importing the Alembic cache at 24fps whereas it was importing the training animation FBX at 30fps, so I was getting a wanring about that as well.
To solve all of these things I decided to use Houdini:
- I import the character FBX, the alembic cache and the training animation into Houdini.
- I grab the geometry from first frame from the Alembic cache and this becomes my character mesh, which means that the vertex order matches.
- I fix up the paths/tracks of the Alembic cache, which solves the first error above.
- I rebind this new mesh to the skeleton and transfer the joint weights and materials across.
- I ensure that houdini is set up to export both the FBX animation and the alembic cache at 30fps.
- I also strip all of the properties/attributes from the alembic cache before exporting everthing (the character FBX, the training animation FBX and the Alembic cache) back out.
- All of this now happens automatically in Houdini. I don't need to do any manual work now that it's set up.
The new assets, exported out of Houdini now work perfectly for me in the ML Deformer setup.
I do a few others things in Houdini as well, not necessary for the ML Deformer to work, such as optimising the materials down to 10, packing the 4x4k head, body, arm and leg textures down to a single 8k texture, fixing up the eyes to work with the Metahuman eye material setup, renaming materials etc. I'm keen to continue building on my Houdini setup to work with Genesis 9 figures, alter the skeleton to better match the UE5 skeleton, handle clothing better anda few other things.
I did run into a similar problem you are having. At least it looked visually similar. I'm assuming that the vertex orders match between your character mesh and the alembic cache? For me the issue was due to some attributes/properties that were in the Alembic cache file exported out of Daz, which I now strip out in Houdini. I'll try to reproduce the problem again and see if I can work out what the exact cause was.
I tend to just run with the default settings in UE now as bumping things up didn't seem to make much difference to the quality of the end result. I haven't had any memory warnings though so it's possible that you're running out of GPU memory?
I'm in the process of updating my workflow for Genesis 9 so it's a bit broken at the moment but once I get it runnign again I'll do some more experiments and get back to you.
I'm close to releasing Sagan v3. It's a long story, but it'll preserve the vertex/face indices as they exist in DS, hopefully solving that problem.
It's also much faster.
Importing a suit from Blender. Need help with transfer utility.However it is that you manage to get the .obj [or .fbx] to land precisely on the figure is the way to import it. If different from one of the existing presets, can save it out as a new preset in that dialog box.
If you have to rearrange the .obj [or .fbx] to fit properly, then HIDE the figure [and anything else in the scene except the clothing], export out the clothing using the DAZ preset. Delete the clothing from the scene, make the figure visible again, import back in that clothing .obj using the DAZ preset ... and it should now be landing exactly where you want it on the figure. Run the transfer utility and make it into a clothing file. Color as you please and save it. Delete it from the scene, reload the new save {this makes sure it's there and working} and make mat presets, etc. Also any pJCMs etc. {and remember to save those too}.
Importing a suit from Blender. Need help with transfer utility.josemulia said:
I'm still seeing 0 image, even from my last post. I even turned of my adblocker (since last week) just to make sure. I'm using Microsoft Edge on Windows 10. See the screenshot attached. You probably can see some images because you have more user rights in the forum. There's definitely something wrong with the import preset because it messed up. Did it get tested before released? Please investigate, or point me to a forum section where I can file a bug.
I do not see an attachment on this post. The Company is well aware of the forum bugs.
Sometimes, if one goes to 'edit' their post and do 'something' [even just add a space] to trigger the option to 'save' the post, then maybe the attachments reappear.
Daz 3D is part of

Connect
DAZ Productions, Inc.
7533 S Center View Ct #4664
West Jordan, UT 84084Licensing Agreement | Terms of Service | Privacy Policy | EULA
© 2026 Daz Productions Inc. All Rights Reserved.