-
The "Complaints 'R' Us, complaint thread"
I cannot sleep. I woke up and now I cannot fall back asleep. Even though it is early I opened my birthday presents from Daddy. He said to open them up on my birthday. He did not say that it had to be actual daytime, or not that I can remember. I got a book called Lady Midnight, a pack of colored pencils, a coloring book, and a dragon blank book. I can show pictures of that later but it is still early and my roommate is sleeping.
...congratulations on completing your latest round trip about our central stellar primary.

 April 2018 - Daz 3D New User Challenge - Open Render Challenge
TLDR
@daybird - Your insights are very good. I wanted to say something about how I struggle with lighting dark-skinned figures like that dragon of cathan's, but since I had nothing to offer suggestion-wise I didn't mention it (a weakness of mine I will need to overcome if I'm going to include more variety in my subjects). I like the details you've added. Now, like the guy with the mug, I find myself laughing a little bit when I think about this scene. The skin looks much better in this light, but I agree--it is a shame to lose the highlights in her hair. I wonder if you could add more gloss/reflection in the shader for the hair to return that look you're after under a less harsh lighting? Or perhaps you could consider doing two renders and then a little post-work magic? I know that sometimes when I can't get the lighting I'm after that has helped. Not sure how the two would look together though. You know, I hadn't said this before, but one of the things I like about this is that you actually see in your head what that left hand is doing. Or at least that's the illusion for me. I imagine her grabbing a handful of hair. And you didn't need to put it in frame. I'm thinking maybe the central figure in the background needs better lighting because it's hard for me to see his head/expression. I like the guy's gut hanging out on the right. The assorted responses are good. You can really tell their reactions. Now, please forgive me for the long-winded response to your brief questions.
I like your second entry even more than the first. I'm courious how you put the mushroom in that background picture, or is that melting ice in the right corner a prop?
I like the camera angle and the DoF ( Did you use a focal distance below 22?) and how you light up the mushroom and the little feary. ( Emissive? )
Thank you for your kind comments and interest. First, let me include a cropped shot of my viewport from the camera with headlamp on (note: I've made a new version of this, because I forgot to set the render frame proportions and wanted more light on the fairy. Plus, I moved the camera a bit closer. Hopefully it's an improvement.)
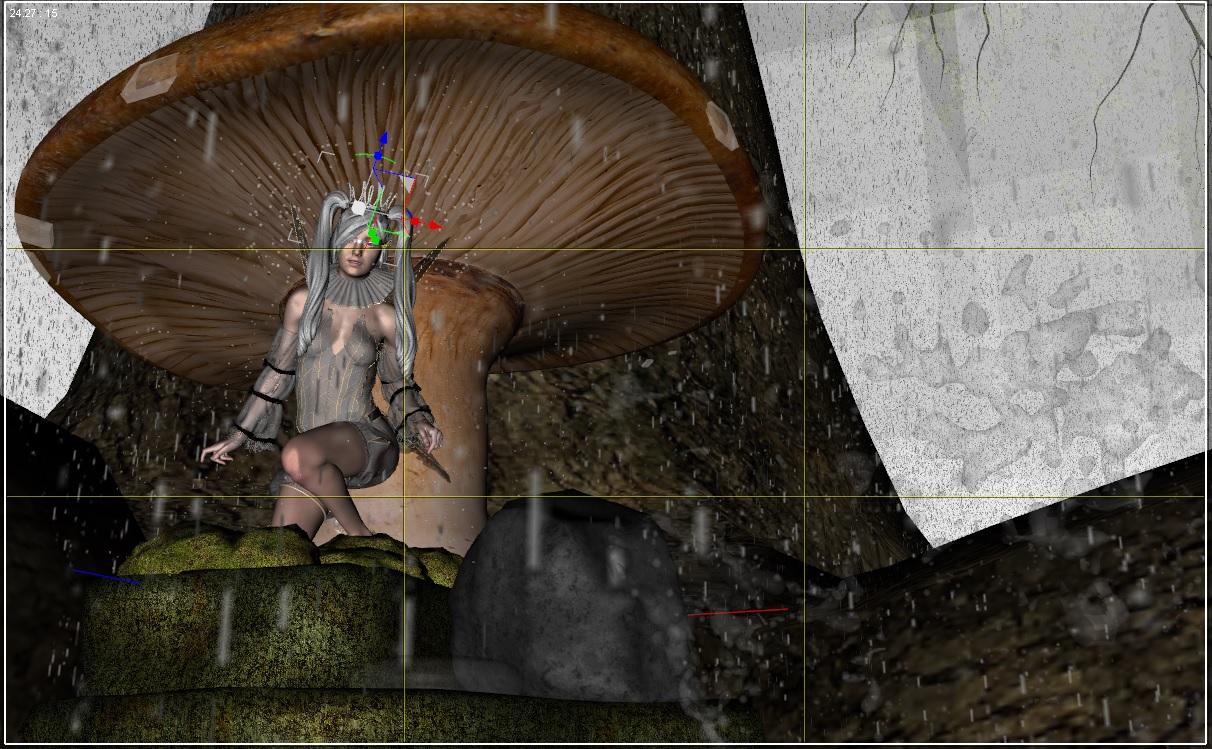
I did this just to show what I've got going on in this scene. There is only one tree and only 3 unique light sources if you count the HDR of the sky. The way I achieved the look in the version posted above was to use Ultrascatter instancing (though you don't need that to do something similar, it just takes more work). To create the background, I created a large plane, moved it directly behind the tree, y - positive, and covered it with instances of the tree to fill in sky with detail. I placed my star prop light that I made for the temple image a couple of months ago in the scene, applied a low-level emissive shader to it and hid it under the rocks just to get it out of the way. I then ultrascattered 2-3% sized instances of that star over the surface of a cylinder and hid it from render. I then duplicated the node instance hierarchy of that cylinder and instancing group 2 times. Each of those I reduced the x and z scale from the one before and rotated 45 degrees to give a variety of little lights. This did not give me enough lighting on her, so I mader her a torus halo and instanced the same lights over its surface (again with Ultrascatter). In the end, I warmed her up by making a primitive plane, about her size, stood it facing her, applied emissive shading (temp 2000, lumens 100). I then pushed it's cutout opacity to nearly zero (something like .000001, which some say it doesn't need to go that low, but at only .001 I swear I saw fireflies in a render from the hidden object). This gives you light from a surface while hiding that surface from the render. In this new version, I added one more primitive near her face with a brighter lumen level to attempt to bring out her features more. Maybe it's better. Maybe not.
As for the "ice," well, that's kind of a trick of the eye. I've used 3 strategies to create the weather in this image. The rain system by Kindred Arts generated the rainfall with very little overhead. I chose a light rain to make it like the change in seasons - somewhere between ice melting off and misty rain. I just had to make sure the grid-based props didn't cut through the mushroom. I then added a couple of splashes from Out of Touch's 3d Water set. (Who knew they did something besides hair and hot clothes?) One of those is that "ice" melting in the foreground, helped along by a touch of bloom (just a touch) and DoF. The other strategy I used was not as expertly done. I modeled drops in Anim8or, then applied a water shader from SickleYield, and used Ultrascatter to spread over just the cap of the mushroom. I've debated redoing it. The smooth "stone" in front of the fairy is actually the original droplet used for instancing, but it is colored by the rocks around it so I went with it. I like that it's an illusion, too.
As for focal length, I did not touch it. I used the auto-framing feature built into the viewport. So in this case, I set an object in the center of the shot, about the same distance from the camera as the thing I'm wanting in focus, select that object (in this case a hidden sphere primitive), then click the little framing tool (I forget its name) in the corner of the viewport (looks like a focus target with a plus inside a square). That sets the focal distance automatically, which was all I needed to achieve this look. So in camera settings, Depth of Field is on and Focal Distance is set for me (in this case at 408.54). The only warning I would offer is that when you click that autoframe button, it moves the camera. If I then use undo it moves the camera back, but I think it keeps the focal distance (I could be wrong). I may have just lucked into it. I'm the first to admit I'm taking stabs in the dark. I figure I'd share all this so that if someone is trying something maybe it'll give them missing pieces of the puzzle for what they are trying to do. Thanks for humoring me.
Photo-real characters. A different approach.Nice work Serene -- a few minor suggestions:
- If not already, recommend a single light source, a Spotlight, mirror the camera transforms for the light and aim at character slightly above nose level. Also your lighting used in the image is a bit overexposed on the central face giving it a slightly artificial look. Can you try moving the light source further away, also I would use Light Geometry of Disc and set both dimensions to 50. Lastly, I'd love to see a render against a white or near-white background vice grey...grey while neutral, is pretty uncommon in real life so again it reduces your overall realism of this particular image. Ok lastly again, the facial features still seem very symmetric..overly a bit.. so perhaps raise an eyebrow a tad, skew the nose a tad...
Anyhow, your pic is great...just curious these make it even more so!
Jeff
Today YET another female figure (group) - WHEN is Lee 8 coming?I'm sad to say that Lee 8 fell casualty to DAZ's ongoing predilection for overstuffing the Lee and Mei-Lin bundles with overly Asia-centric ethnicy-type content. Apparently the DAZ designers did too good a job with Lee's stuff this time around and all the contents of his bundles were declared to be unauthorized imports and they, along with a distressed looking Lee 8, were sent to China when he failed to be able to provide documentation proving legal residence in the state of Utah.
Mei Lin, on the other hand, had just enough time to hook up with the first unattached male Gen 8 character she could get to agree to a marriage of convenience in order to stay in the country. The delay on her products is because it now all has to be re-branded to reflect her new married name, Mei-Ollie.there's some truth in the first sentence.. as if every single Asian person was walking around either as a ninja or a samurai, possibly wearing a rice hat. just as if like i dunno, every central european ran around in lederhosen or folkloric costume ~
as to the rest.. well why don't we swim some more in a sea of cliché. i'm not quite sure if i should frown or laugh...
omg.. Mei-Ollie, the ugliest anime schoolgirl ever. XDSubway CarHeh-- Love the Budd RDC's in your last pic.. We used to run them up here as passenger service on branch lines.... Now the subway car in question - wrong trucks - those are freight car roller bearing trucks, not light rial traction motor trucks... and those couplers aren't going to couple anything... Here we have light rail - and it runs on one central street downtown,m that is closed to car traffic.. Outside of downtown its on a separate right of way...
...my fave in San Francisco is Market Street Railroad. Riding the old streetcars and streamlined PCC cars brings back memories. There are also several streetcars they've acquired from other nations as well.
April 2018 - Daz 3D New User Challenge - Open Render Challenge@Tynkere - the hair used in my previous version is Paige Hair by PhilW. More than one product uses the name Paige. I mean this one. https://www.daz3d.com/paige-hair-for-genesis-8-femalesHere is my next step. Prop emissive tests. As per Daybird's and BeeMKay's instructions (thanks again), I've applied a flecked grayscale map to 4 toruses and inserted them in the color, emissive, and opacity cutout channels of the surfaces tab. All other lights are turned off. The only light right now comes from the 4 toruses, and those lights are set very low. Once again, I've got a placeholder G8F. She is wearing the Andromeda SciFi outfit.
Heh. Looks like I just missed hair-doo being on sale. Added to wishlist-- always another sale... : )
Added pentacle in background? Don't remember that-- good excuse to watch movie again. Am learning a lot from you in just how to be organized and plan a scene.

Here's the second version of my image. I have made the back wall darker and managed to lighten the man's right arm and get rid of the light in the mirror. There is no longer much of a shadow on the floor so I could try to change the lighting to improve this.
As others have said, looks good in toning down wall & moving spot.
Speaking of moving... Here's a suggestion for what it's worth.
How much room do you have to the left of your set? (to the viewers left or behind the dancers) If moved entire set to the right a little, you might be able to get all of the couple to show in the mirror. Just a thought.

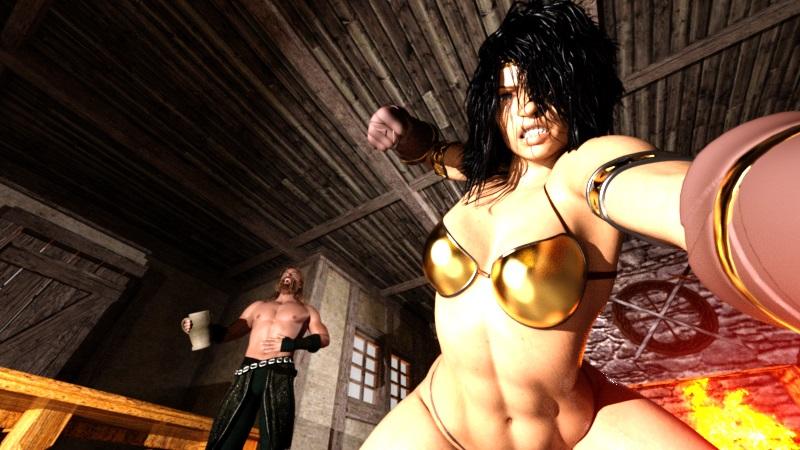
Don't flirt with an Amazon...
You really have a knack for different camera angles. Mine are always pretty tame.
Like how forearm is out of the picture, and fist... Seems aimed right at the viewer!
"Never flirt with an Amazon... Unless wearing a helmet." ; )
And here my WiP with the lighting. I'm using the SunSky only here. And pose the sun manually instead of using the time dials.I didn't know what the time dial was, so just blundered into tweaking on x, y, and z. : 0 !
Looks good. Only suggestion I might make is blank area to viewers left. Have you considered changing aspect ratio to crop a bit? Just a suggestion.
As for soldering irons, use one myself in restoring vintage tape decks, receivers, and amps from 70's. Lots of fun. Just don't make a mistake I did once. Had been using it, found defective part, tossed iron aside and went looking for replacement. Iron landed on lead to a probe on my scope. Tektronics is proud of their products. That little lesson cost me. Now I make sure scope related stuff safely tucked away. : )
Here's where I am currently:
Red Gold Blue: The Purification of Old Town
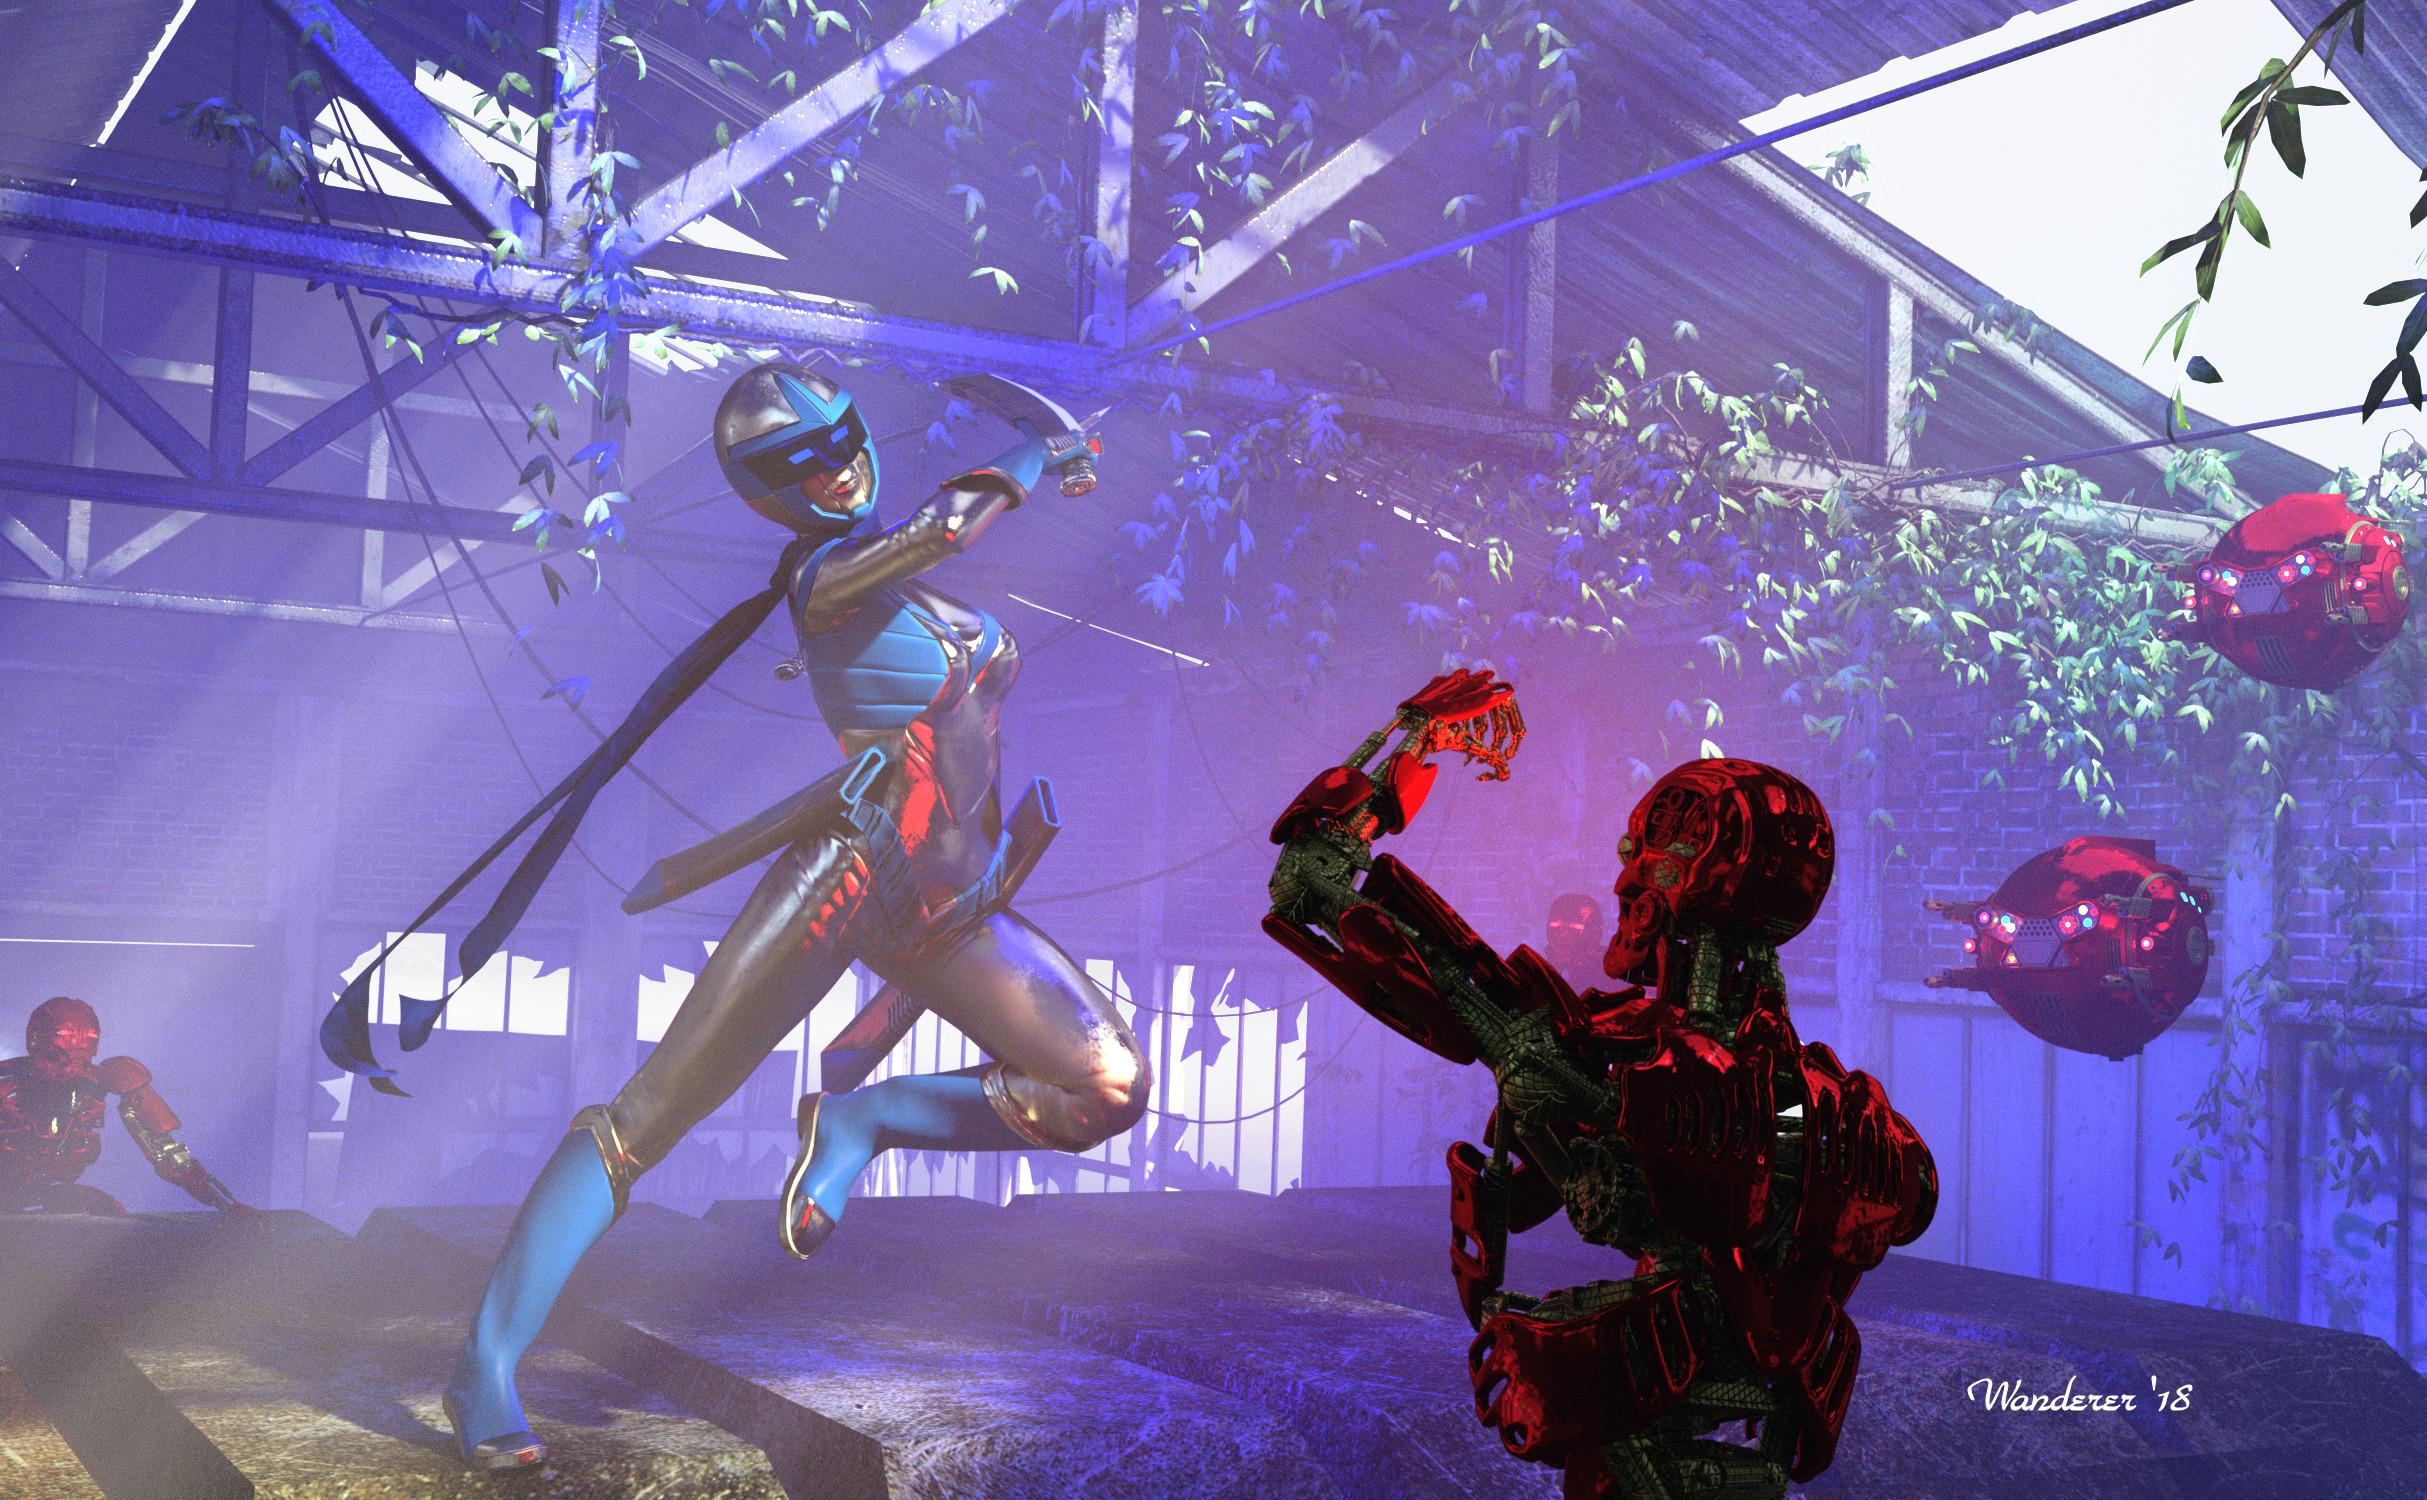
I'm not going for complete photorealism with this. I dialed back the blue a bit with the daylight, kept the red light in the foreground, but made sure the light highlighted the central figure. I tried to restore the clouds in the upper right, but the atmospheric effect made it either or (either the clouds or the lightshafts). I could force them anyway, but I'm not certain I want to go there. I may try to do some postwork, but for now, this is what I've got done.
Can definately see more, but not sure. Ask three people get six opinions. Kind of liked the earlier version that was darker, but that's just me.
Just curious, but what was the spiral thing from an earlier version? It's a guide for movement or how the eye scans an image? I learned composition back in the Pliestocene, so just a grid, or subdivide into triangles. As said, just curious how it helps? Any tool that helps you is a good one I guess. : )
I hope that's everyone
Meanwhile...
Putting the *.obj file into the water much easier than I had feared. The set has several, so interested to see what everyone thinks about it. Without ripples in water, project going no where.
Also... The more I look at the render, the more I am bothered by Vicky's feet. This started out with her wearing the shoes, but they looked too large. Tried posing Vikcy from scratch and (hopefully) successful, but feet flat on ladder rung still looked too long. (Vicky just has big feet?) So from a different angle, tried posing with her standing 'tip-toe.'
Now... Is it my imagination, or from the front, does it look like she's not putting any weight on the ladder and kind of floating?

Thanks for reading
--Bruce
Great reference image from Chohole. If in doubt test the pose yourself ( if you can ) or find a reference image.
The toes look off to me. They need to be flatter with the ball of the foot on the ladder ( as Chohole as already said ). Also, the character's right foot is intersecting with the step of the ladder.
[Released] Aeridian Aerial Landing Pads & Platform (Scifi & Futuristic)My second scifi set in the Aeridian series is now live in the store. Here's the blurb:
"Soar above the clouds with your own personal AI-controlled aerial landing pad. Perfect for small vehicles and jetpack-equipped protagonists, or to populate the background of your sci-fi skylines.
Includes both aerial and terrestrial versions of the landing pad, along with a host of modular components, light props, and detailing for you to customize it as you see fit. The aerial platform has articulated wings, and both versions have hideable components and rotating beacons. Pre-made stacks of the terrestrial version let you quickly set up a double, triple, or quadruple high tower. Also included are hologram advertising props if you prefer to use the landing platforms in an oppressive dystopian future city."
Aeridian Aerial Landing Pads & Platforms


-------------
Bit of trivia about this project. Initially it was going to be a futuristic jetpack, but I had this idea for the main promo -- I really wanted the girl with the jetpack on a flying platform. Started working on the platform, and before I knew it, the set had grown to be a viable product in its own right. Worked out for the best, because someone else released a new jetpack shortly before this went live.
Not coincidently, it fits neatly into the central shaft of the Aeridian Throne Room set. :)


As with most of my sets, there's also a lot of component parts included. This is kind of becoming my signature, I suppose. I love kitbashing stuff myself, so making sure there's enough extra bits for others to do the same is becoming an important aspect of my products now.

Anyway, I hope you enjoy this set as much as I enjoyed creating it!
April 2018 - Daz 3D New User Challenge - Open Render Challenge@Tynkere - the hair used in my previous version is Paige Hair by PhilW. More than one product uses the name Paige. I mean this one. https://www.daz3d.com/paige-hair-for-genesis-8-femalesHere is my next step. Prop emissive tests. As per Daybird's and BeeMKay's instructions (thanks again), I've applied a flecked grayscale map to 4 toruses and inserted them in the color, emissive, and opacity cutout channels of the surfaces tab. All other lights are turned off. The only light right now comes from the 4 toruses, and those lights are set very low. Once again, I've got a placeholder G8F. She is wearing the Andromeda SciFi outfit.
Heh. Looks like I just missed hair-doo being on sale. Added to wishlist-- always another sale... : )
Added pentacle in background? Don't remember that-- good excuse to watch movie again. Am learning a lot from you in just how to be organized and plan a scene.
Here's the second version of my image. I have made the back wall darker and managed to lighten the man's right arm and get rid of the light in the mirror. There is no longer much of a shadow on the floor so I could try to change the lighting to improve this.
As others have said, looks good in toning down wall & moving spot.
Speaking of moving... Here's a suggestion for what it's worth.
How much room do you have to the left of your set? (to the viewers left or behind the dancers) If moved entire set to the right a little, you might be able to get all of the couple to show in the mirror. Just a thought.
Don't flirt with an Amazon...
You really have a knack for different camera angles. Mine are always pretty tame.
Like how forearm is out of the picture, and fist... Seems aimed right at the viewer!
"Never flirt with an Amazon... Unless wearing a helmet." ; )
And here my WiP with the lighting. I'm using the SunSky only here. And pose the sun manually instead of using the time dials.I didn't know what the time dial was, so just blundered into tweaking on x, y, and z. : 0 !
Looks good. Only suggestion I might make is blank area to viewers left. Have you considered changing aspect ratio to crop a bit? Just a suggestion.
As for soldering irons, use one myself in restoring vintage tape decks, receivers, and amps from 70's. Lots of fun. Just don't make a mistake I did once. Had been using it, found defective part, tossed iron aside and went looking for replacement. Iron landed on lead to a probe on my scope. Tektronics is proud of their products. That little lesson cost me. Now I make sure scope related stuff safely tucked away. : )
Here's where I am currently:
Red Gold Blue: The Purification of Old Town
I'm not going for complete photorealism with this. I dialed back the blue a bit with the daylight, kept the red light in the foreground, but made sure the light highlighted the central figure. I tried to restore the clouds in the upper right, but the atmospheric effect made it either or (either the clouds or the lightshafts). I could force them anyway, but I'm not certain I want to go there. I may try to do some postwork, but for now, this is what I've got done.
Can definately see more, but not sure. Ask three people get six opinions. Kind of liked the earlier version that was darker, but that's just me.
Just curious, but what was the spiral thing from an earlier version? It's a guide for movement or how the eye scans an image? I learned composition back in the Pliestocene, so just a grid, or subdivide into triangles. As said, just curious how it helps? Any tool that helps you is a good one I guess. : )
I hope that's everyone
Meanwhile...
Putting the *.obj file into the water much easier than I had feared. The set has several, so interested to see what everyone thinks about it. Without ripples in water, project going no where.
Also... The more I look at the render, the more I am bothered by Vicky's feet. This started out with her wearing the shoes, but they looked too large. Tried posing Vikcy from scratch and (hopefully) successful, but feet flat on ladder rung still looked too long. (Vicky just has big feet?) So from a different angle, tried posing with her standing 'tip-toe.'
Now... Is it my imagination, or from the front, does it look like she's not putting any weight on the ladder and kind of floating?
Thanks for reading
--Bruce
---
Edit: weeding out old imgur files. PM missing links.[Released] Now-Crowd Billboards - Droids [Commercial]FYI. It appears that the 30% discount is not working (4/9/18 - 7:24pm central time). Waiting for fix before purchasing.
Waiting on this too to combo with a couple of other items for better discounts!
Whoops! I hope it cleared up.
April 2018 - Daz 3D New User Challenge - Open Render ChallengeHere's where I am currently:
Red Gold Blue: The Purification of Old Town
I'm not going for complete photorealism with this. I dialed back the blue a bit with the daylight, kept the red light in the foreground, but made sure the light highlighted the central figure. I tried to restore the clouds in the upper right, but the atmospheric effect made it either or (either the clouds or the lightshafts). I could force them anyway, but I'm not certain I want to go there. I may try to do some postwork, but for now, this is what I've got done.
If I had to choose between God Rays and clouds the God Rays win.
RiverSoft Art First Anniversary Contest SUBMISSION THREAD1. Image: Are You There?
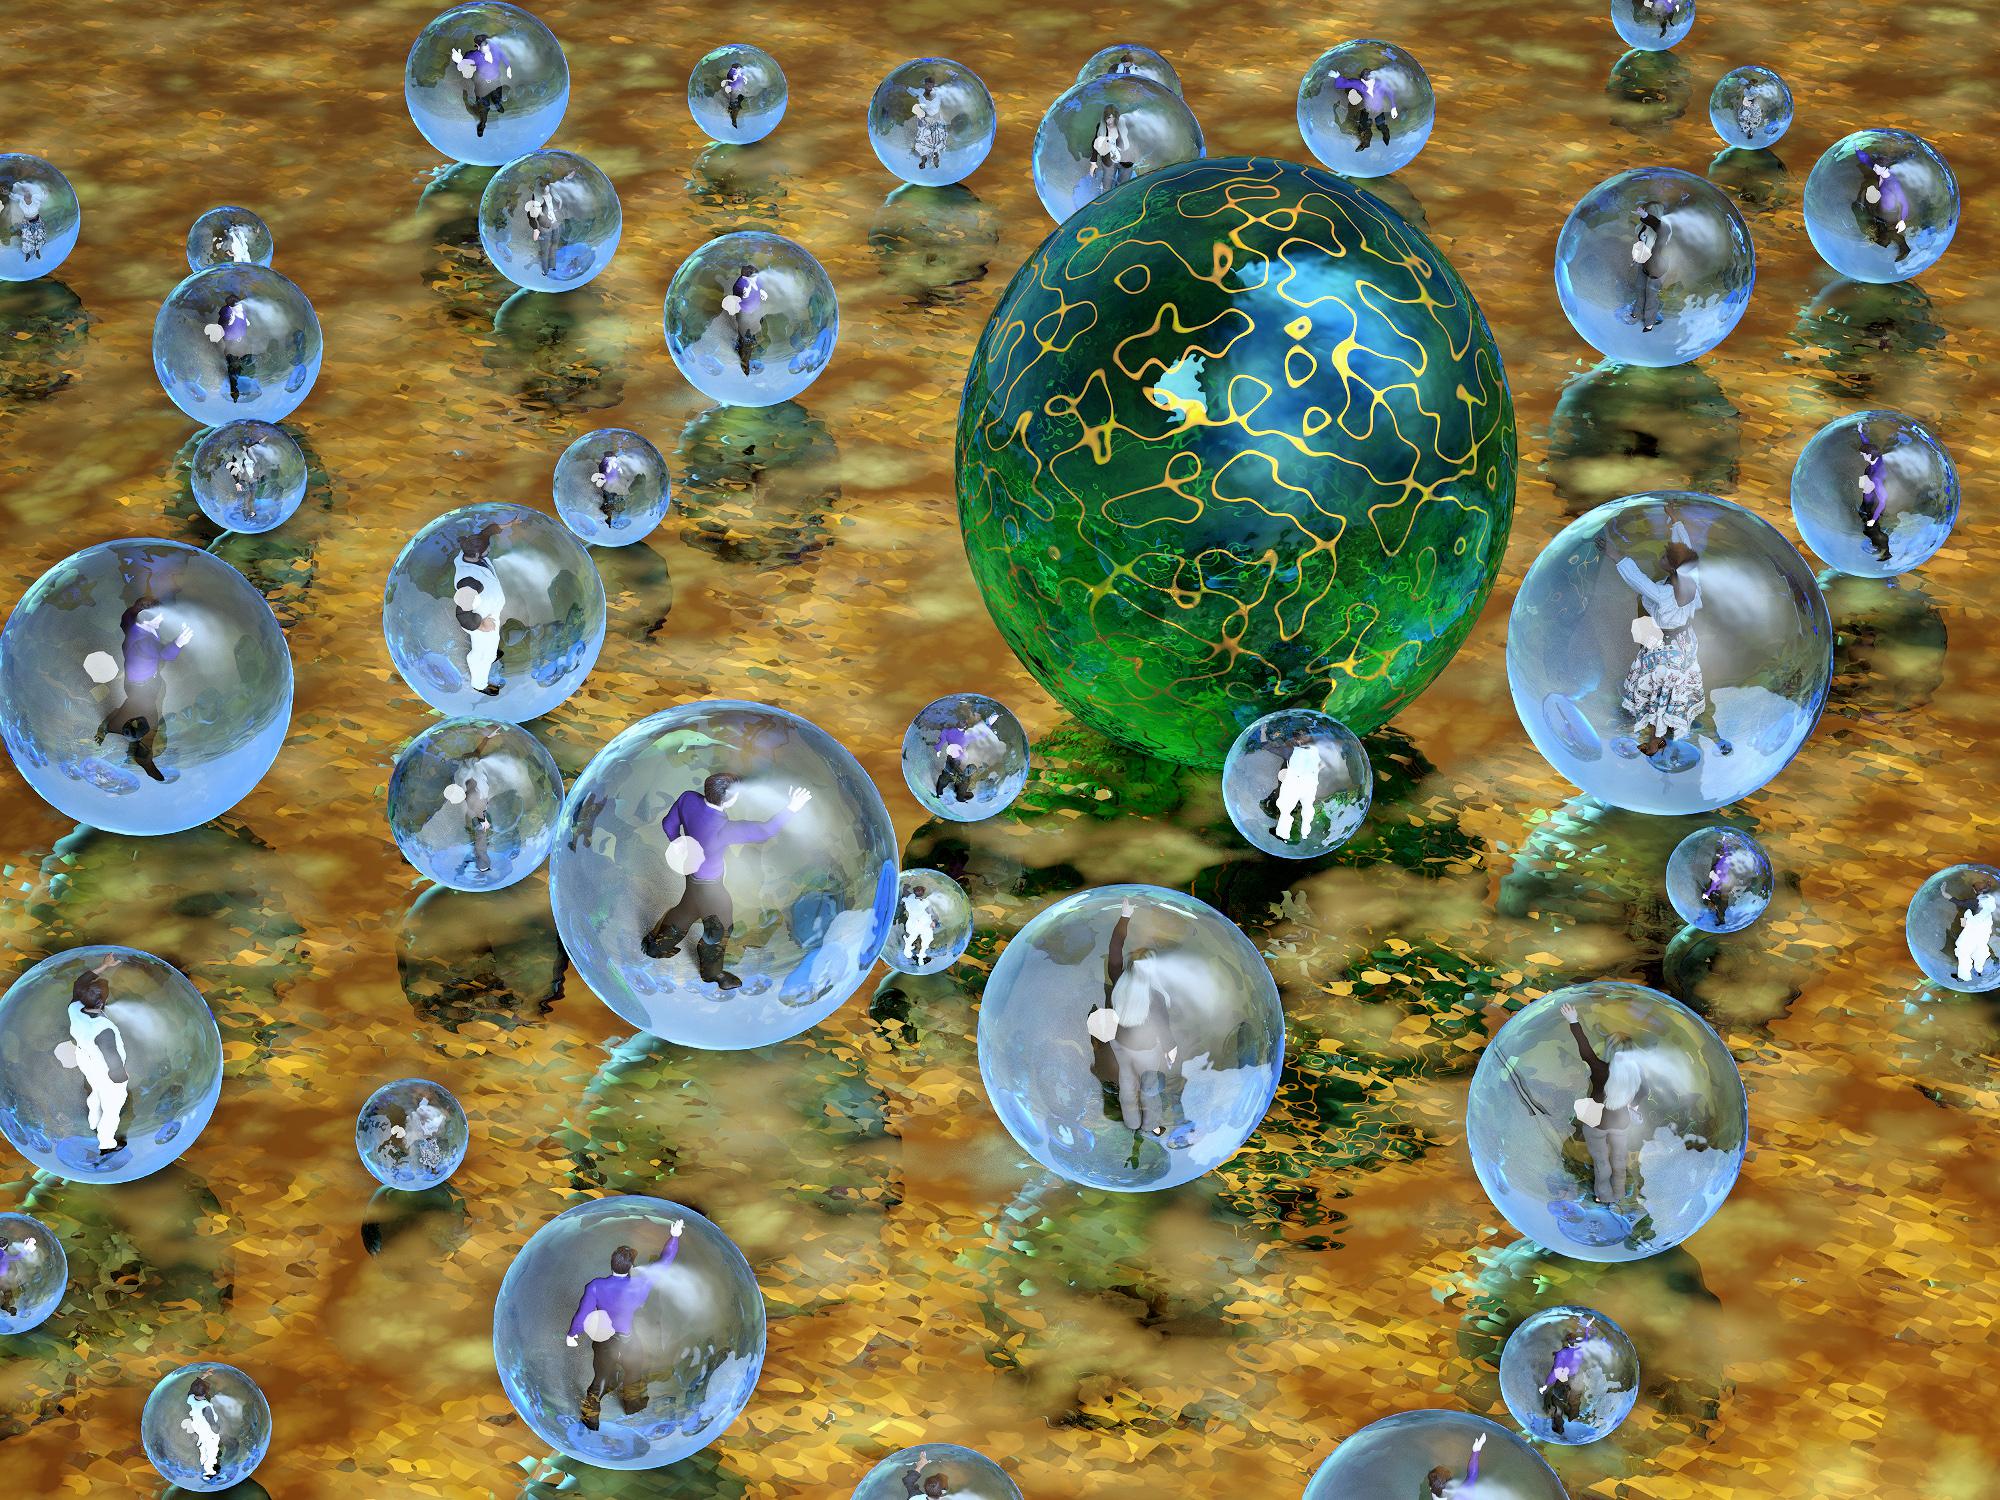
2. I used Now-Crowd Billboards - Modern City Life and Look At Me Pose Control
3. Description
- The idea behind this image is isolated humanity trying to attract the attention of the center of its universe. There was no way my computer was going to handle more than a few characters in an image like this. Billboards to the rescue!
- I selected two "hailing" billboards from the Modern City Life set, put them inside primitive spheres, and scattered them with UltraScatter. I wanted to change the orientation of each billboard to face the central orb. I used Instances to Objects to turn my sphere/billboard instances into objects, so I could manipulate them individually.
- I was hoping I could use the Look at That feature of Look At Me Pose Control to orient the billboards, but billboards are not figures with heads and eyes, so that didn't pan out. No problem, the Now-Crowd Change Billboard Angle Script let me orient each billboard much faster than I expected. The Live Preview made it easy to determine what angle I wanted to use for each one. Then I followed up with the Now-Crowd Orient Billboard Script to adjust all the billboards to the final render camera angle. I used the time and sanity saving feature of Now-Crowd Orient Billboard Script to select all the billboards in my scene without me having to go through the scene hierarchy and select all of them manually.
- I decided I had two much human repetition with just two billboards, so that inspired me to make a couple billboards of my own with a "hailing" pose. I used female characters for my billboards. I decided to make one of my billboard women look up. Look at Me Pose Control facilitated that nicely, because it can move the head, the eyes, and the eye lids in a coordinated way. I just positioned a camera at an angle looking down on the character, and used Look at Camera.
- The way the Now-Crowd billboards are created made it easy to substitute my own rendered billboard image and mask into the surfaces pane to change out the billboard. (I didn't even have to go as far as making true billboard props for my billboard images.) Being able to substitute the billboard diffuse and opacity images at the last minute turned out to be very useful, because I certainly didn't want to start over back at the UltraScatter phase of creating this image! All I had to do was look at the name of the image in the diffuse channel and see what horizontal and vertical angles were used. Then I just dragged and dropped my own billboard image with the same angles into the diffuse surface channel. Then I did the same for the mask in the opacity channel.
4. I am not a PA
[Released] Now-Crowd Billboards - Droids [Commercial]FYI. It appears that the 30% discount is not working (4/9/18 - 7:24pm central time). Waiting for fix before purchasing.
Waiting on this too to combo with a couple of other items for better discounts!
[Released] Now-Crowd Billboards - Droids [Commercial]FYI. It appears that the 30% discount is not working (4/9/18 - 7:24pm central time). Waiting for fix before purchasing.
April 2018 - Daz 3D New User Challenge - Open Render ChallengeHere's where I am currently:
Red Gold Blue: The Purification of Old Town
I'm not going for complete photorealism with this. I dialed back the blue a bit with the daylight, kept the red light in the foreground, but made sure the light highlighted the central figure. I tried to restore the clouds in the upper right, but the atmospheric effect made it either or (either the clouds or the lightshafts). I could force them anyway, but I'm not certain I want to go there. I may try to do some postwork, but for now, this is what I've got done.
I'm really jealous man.
This God Rays and the atmospheric is something I cant do with my old system. I quit such renders always after 17-20h, because they have only reached 6-7% until then.
The light, pose and colors looking great and I think the need no just a little adjustment. I think the Woman should be the main figure, but the dark contrast from the robot right of her, pulls my eyes to him. So she needs more light or he less contrast I think.
I also think you use the Golden Spiral and to be consequent you could try to arrange the scarf on the line of her.
Not sure about this idea...maybe that look unnatural but you could try it in a fast 3DL test render.April 2018 - Daz 3D New User Challenge - Open Render ChallengeHere's where I am currently:
Red Gold Blue: The Purification of Old Town
I'm not going for complete photorealism with this. I dialed back the blue a bit with the daylight, kept the red light in the foreground, but made sure the light highlighted the central figure. I tried to restore the clouds in the upper right, but the atmospheric effect made it either or (either the clouds or the lightshafts). I could force them anyway, but I'm not certain I want to go there. I may try to do some postwork, but for now, this is what I've got done.
Looking for ... 1930's art deco buildingYou know some people are gonna' tease you about the "year". Just a friendly "heads up".
As for 1930s type buildings, CyberTenko offers one, probably the most iconic aprat from the Empire State building and the Chrysler Building. The central tower from Fritz Lang's "Metropolis". However, beyond it being a recognized "entertainment property" recreation, the structure seems insanely huge for a newspaper headquarters, well, at least in my admittedly biased opinion. You, on the other hand, may consider it perfect.
Sorry, I won't link it as D*Z will no doubt "zap" the shortcut to a competing store. But you should be able to find it easily enough.
Sincerely,
Bill
April 2018 - Daz 3D New User Challenge - Open Render Challenge@Shinji - I like it a lot better. Looking pretty good.
@Diomede - Thanks for the advice. I might come back and take it. Here is my next iteration - which pretty much ended up the opposite of what you suggested. However, I like it so I'm going to keep it even if I move on from this version to something better. For that reason, I stuck my name on it. I'm not sure what I like about it, but I do like it. I like your references a lot. That's really cool stuff. Please tell me if you think I still need to switch to more character central lighting.
Now, does anyone else (besides me) like it? If my instincts are not shared by others, I don't mind changing it because it is so early. Please give feedback if you don't mind. I'd still like to improve.

I did modify her pose a bit.
I am going to disagree with Wanderer. I like the red lighting but find the overall blue hue a bit much and I miss the clouds you had in the roof opening. Maybe something between your first image and this one?
“Still New” releases not responding to discountsHi,
I was hoping that this would be fixed by 1 p.m. Central. Some of the MM items recognize the additional 10% if you own Ollie 8 Pro but the more recent MM items do not. I've attached an example. Maybe they are still working on it...
Trish
 April 2018 - Daz 3D New User Challenge - Open Render Challenge
@Shinji - I like it a lot better. Looking pretty good.
@Diomede - Thanks for the advice. I might come back and take it. Here is my next iteration - which pretty much ended up the opposite of what you suggested. However, I like it so I'm going to keep it even if I move on from this version to something better. For that reason, I stuck my name on it. I'm not sure what I like about it, but I do like it. I like your references a lot. That's really cool stuff. Please tell me if you think I still need to switch to more character central lighting.
Now, does anyone else (besides me) like it? If my instincts are not shared by others, I don't mind changing it because it is so early. Please give feedback if you don't mind. I'd still like to improve.
I did modify her pose a bit.
Noob Question: Items Appearing As Big Grey Blocks?It would be a great service to encourage new users of DAZ if there were a script available that would load unzipped content into the DAZ My Library (not the plain "My Library") so that the ugly grey blocks don't appear subsequently in renders. It is very discouraging to decide to buy a product where the confusing dsf / duf files are not placed in the correct folders and all one can render is those blocks, or white plastic skin.
I would like to stress It is NOT CLEAR how to transfer folders successfully all the time from the uncompressed zip file to the My DAZ Library folder. I have watched ALL the video tutorials on this subject on Youtube. There is an assumption that all Vendors make the same folder hierarchy, but it sadly isn't so.
The zip file must be uncompressed. This may be assumed to be understood, but I think there is room for confusion. In my old Windows 7, the Windows folks in their wisdom took away the ability to unzip folders with a native program so I had to find one to accomplish that task. Windows 10 restored that ability.
First of all where is that folder I must transfer to? I found mine in User's "Public Documents" in Windows 10, but I have no idea why there is even a Public Documents folder since I don't share on a cloud, etc. So there's that. Has to be the User folder, not the one you think is on your hard drive. This is never made clear in the tutorials. Then the User folder is some weird abbreviation. I made a shortcut so I don't have to remember what the heck it is called and keep the shortcut on the desktop. I extract the zip file to my desktop. It makes a folder, or folders, and those are what I will work with to transfer to My DAZ Library.
Next, what exactly is in the zip file? I am amazed at how many levels of folders one must drill down through, to get to the Vendor folder, because that is what should be transferred to DAZ MY Library. Sometimes, more often than not, because there are redundant folders called Runtime, and sometimes 4 times deep, that the Runtime gets put in a different place in the User Name/DAZ My Library. When that happens, you can't tell where the heck the folders actually ended up without a lot of searching. You will know this by the pop-up message "can't find this or that texture file"
I have begun to search down to the vendor name folder in the unzipped folder, and copy that from the unzip to the Library, because that is how the Library works, through the Vendor name in the main or central Runtime folder that will list by Vendors, not products. So you have to know the Vendor name and whatever the heck abbreviation they may have used. This is one of the biggest stumbling blocks.
The best advice I got was from this forum. Basically: The files that are labeled with the extension ".dsf" MUST BE in the Data folder, or the ugly grey blocks render. I have most success doing that myself directly. Then I just load the textures manually into my Surfaces panel since the Vendors will often have 2 or more texture files that maddeningly are not consistent, (arms in one file, torso in another), so jump around from one to the other until I've found and loaded the textures I want. Then I save all my hard work as a preset, so I don't have to do it again.
That's about the simplest explanation that helped me. A script that would just put the darn dsf files into the MAIN DATA Runtime folder would make it easier. I don't know how to write a script, but maybe someone will take pity and write one for newbies and less experience file wranglers. That would remove the ugly grey blocks.
Daz 3D is part of

Connect
DAZ Productions, Inc.
7533 S Center View Ct #4664
West Jordan, UT 84084Licensing Agreement | Terms of Service | Privacy Policy | EULA
© 2026 Daz Productions Inc. All Rights Reserved.