-
Defragging your machine
STORAGE DEVICE TYPES:
HDD = Hard Disk Drive = recording heads and rotating platters (common storage sizes are 1, 2, 4, 5. And even 10TB are now available at reasonable prices)
SSD = Solid State Drive = memory circuits like a giant thumbdrive (size usually in the few hundred GB range. 1TB size is rare and very expensive)
DATA TRANSFER TECHNOLOGY
SATA = Serial-ATA = Serial Advanced Technology Attachment = defines type of cable needed to connect either an HDD or SSD to the motherboard (uses a small thin connector)
PATA = Parallel-ATA (aka: IDE) = defines connection cable for older HDD (uses a wide thick connector usually with a very wide multiwire single layer flat cable)
Note: these definitions are not exact, but making them so would be more information than you want to know.
 Custom Morph tips using zbrush
It sounds like you've got the right steps. Do, however, remember to zero out the mouth realism HD and navel morphs. If you select the root and look at currently used morphs in parameters, you will see them listed. And when you return the morph, you should be loading that morph onto a G3 with the same base res and morphs zeroed out as you exported.
One way to make certain that you really and truly haven't affected the eyes or inner mouth is to create a morph target before you begin to sculpt. After you have completed the morph, you can hide, by way of polygroups, the face, lips and lashes and use the morph brush to go over the inner parts of the head to make sure nothing has been inadvertently sculpted.
You don't need to subdivide to see your details better, btw. Just turn on Dynamic Subdivision which is in the Geometry subpalette. This does not actually subdivide the mesh and so when you turn it off, you'll see your base back to normal.
Custom Morph tips using zbrushSo I found a work around kinda. I found a morph slider that corrects(expands/shrinks) the pupil geometry. I think it is from the gen 3 female head morph set but I'm not sure. So that is good. However I'm not sure what I did to cause the large pupil incident to begin with. With that being said, I would still appreciate any help to avoid causing this in the future when I'm creating morphs. Thanks again.
-Sincerely,
-Daniel
Custom Morph tips using zbrushI am currently working on a face morph for a gen 3 character. The issue I have is that when I take the morph up to 100% the geometry for the pupil expands and i get a black ring around the irises. Any help in correcting this would be appreciated.
My process:
Load g3 female
Parameters/General/Mesh Resolution/base and 0 subD level
Shaping/currently used/ Mouth realism and navel set to 0%
Export as obj, convert from daz to daz
Import obj into zbrush from tool palette
Draw tool on screen
Click edit
Turn smooth off in geometry panel
Mask eyes, teeth, eyelashes and body
Sculpt form in lowest subD level
Sculpt details in 2x higher subD level
When finished sculpting drop to lowest subD level
Un-mask mesh
Export as obj
In Daz load Gen 3 female
Open Morph loader pro
Convert Daz to Daz
Import morph obj
Rename and choose group
Click accept
Morph creates succesfully.
Turn Morph slider to 100
If I am missing something or if anyone has run across this please let me know. Thanks for your help.
Sincerely,
-Daniel
Exporting head morphs - eye problemDon't moprh the eyes, isntead use their transforms to position them. Make sure you have only the morph and the eye transforms set (unless there are other things that should be triggered by the morph), right-click on the Parameters pane to put it in Edit mode, then right-click on the moprh slider and select ERC Freeze. Your morph should be listed as the controller at the top, the eye transforms should be listed as the sub components at the bottom - if that's right,. click Accept. Test the results, if good save.
Who said Blender was hard?Hmm Gedd, I wonder if you've noticed this; when creating morphs in Blender, even with all aspects zeroed before exporting from Daz, I'm getting slight movement on the morph everywhere on G3F.
I tested on a figure I didn't alter in Blender; I imported it, then immediately exported. I get the same.
nicstt, what is your morph workflow? I just created a nose morph in Blender 2.77a on Genesis 3 Female and applied the morph in Daz Studio with no trouble. Here is my workflow:
Exporting your OBJ
- In Studio, I zero the navel and mouth realism HD morphs and set the resolution of the Genesis 3 figure to base.
- I export the figure as an OBJ with Daz scale (or whatever scale, but remember which) and with either Write Groups or Surfaces, depending on my needs.
Importing to Blender
- In Blender, in the Import Wavefront OBJ options, I select Keep Vert Order and checkmark Polygroups.
- The figure has a rotation of X90, so I use Ctrl A and apply rotation so that I can utilize X symmetry.
Creating a Shape Key
- With the figure still selected, I open the Object Data properties and under Shape Keys create a Basis Key.
- I create a second Key by pressing the plus sign next to the Shape Keys panel. I rename this new Key to describe the morph I am making. I created a nose morph and thus named it Nose01. It is important to set the value on this new key to 1.0 before you sculpt.
Sculpting the Morph
- I switched to Sculpt mode.
- Make sure X symmetry is on if needed and sculpt the shape the shape you want.
More on Shape Keys
- If I want to create another morph, I zero out or hide the eye on the key I was working on.
- Always select Basis before going on to creating a new key with the plus sign. Follow the steps listed in the previous section to work with the new Keys.
- If you wish to do a mixture of the morphs you have made, you can change the values till you have the shaping you like and then from the down arrow to the right of the Shape Keys panel, choose New Shape from Mix. Rename this mix key appropriately to describe your morph.
- There is also a way to create partial morphs from any mixes or morphs you have created where you want to, say, separate out the mouth and nose as their own Shape Keys. I can describe this technique if anyone is interested.
Export your OBJ for use in Studio
- Once you want to export the morph(s), zero out, or hide all Shape Keys except the one you want to export as an OBJ.
- I have gotten into the habit of exporting with "selected only" checkmarked.
Importing with MLP, Testing the Morph and Saving your Asset
- In Studio, remember to have your Genesis 3 exactly as you exported (morphs zeroed/base resolution) and bring in your OBJ morph through MLP (Morph Loader Pro).
- Make sure the same scale you exported at is the same when you import.
- If you need to, set up the path where the morph should go and accept.
- Test your morph by spinning up the dial.
- You can bring in multiple morphs.
- Set up the parameters.
- Save as a morph asset.
Thanks Cris; I was forgetting to set resolution to base.
What's the difference between Write Groups and Surfaces; I normally export with both.
---
For anyone exporting and inporting and new to it. You can use the Blender settings, but it is broken.
Select the Blender option in Daz;
change scale to 1%
axis conversion should display x, y, z (not x, z, y).
When reimporting: the same axis, but change the scale to 10000 (ten thousand) percent.
That will load it in Blender at the same size as it is in Daz, and with the correct orientation.
Surfaces and groups will give you different selection areas. I asked Richard to help me clarify. He said this: Groups reflect the bones of the figure (more or less), while surfaces can cross bones. They generally reflect the different maps used and areas that may need different surface properties.
To give you an example. Groups will give you a group for upper and lower neck; there is no separation on the neck with Surfaces. On the head, there is no separation of the face and lips with Groups, but you have this separation in Surfaces. Things like that.
lx, I don't use Blender as scale because I work primarily in ZBrush and need to seamlessly go between that, Blender and Studio, so I stick to Daz scale. But it's good to have that information. Thanks.
Thanks again.
Can the Face Morph Tool Kit do this?Well the most accurate results you will get from using FaceGen or from HeadShop but if you buy the Genesis 3 Female Head Morphs (there is a male one too) and have a good artistic eye, practice, and patience you will be able to get very close to the FaceGen results just by using morph sliders from the Genesis 3 Female head Morphs product. There is a big cost difference between the three products I mentioned so really it comes down to you motivation of what you want to spend your time on in DAZ Studio.
After you get the face shape right it is even more work getting textures, hair, and makeup to resemble your morph target but you are in luck because there are several hair products and character texture set products that you can use to create that character from the DAZ Store.
SimTenero Shape Reprojector [Commercial]I haven't gotten that error but what I am getting really annoyed about is that, while the sim is running, Daz's load on my processor is about 15%. I don't know if it's a limitation of the script or Studio's fault, but knowing that I could get the results in a sixth of the time is really grating on my nerves.
Regarding a tutorial, here's the Readme http://docs.daz3d.com/lib/exe/fetch.php/public/read_me/index/33193/33193_shapereprojectorguide.pdf
That said, I would love if people who have had success with the Reprojector would post their own tutorials. The Readme is barely intelligible to a non-techie like me and omits a few questions (what does the sim do if both "in" and "out" are checked? why can't I uncheck "incremental"?). As it is, I have been experimenting but I cannot get consistent results, so empiricism is out. I love the concept of this product and I am sure other users will get outstanding results, but so far it's been really confusing and not that useful. I hope to learn enough to change that.
Has anyone else been getting the error "Wrapper CalculateOverlap Error: Error: cannot access member `getNumFacets' of deleted QObject"? Seems to happen when the target figure has a geo-graft in place.
I got that problem too, but was unable to find my log to share it hehehe, my solution was to save the figure I was having conflicts, saved it as a character , loaded into the scene, reproject on it save it out again as character and then load it right into the original character and to transfer the morphs i needed, i alreadi made 300 scenes, was my only solution hahahaha
Hi Magnusx! Can I bug you with a couple of questions?
What Windows/OSX version are you running? Does it happen with any object, or just some objects?
Thanks!!!
My Renders, Now I can go to bedseeing that currently free A4 for Genesis, had to see what I could do real quick.
I'm not a fan of the head shape so that was dialed out, used some other morph dials, and we have
SHhhhhh, wait there

Great posing on this!
thank you, but have to give credit for the 'free' Body talk Poses from katastrophe from Sharecg . to make it happen, would had taken me a bit longer to do myself.
just wish they worked on Genesis 3 too
Can the Face Morph Tool Kit do this?Hi,
I was thinking about recreating characters, mostly 2d characters into 3d models. The first one i wanted to attempt was Lana Kane from the Archer TV series.
http://i.imgur.com/qkFrdSl.jpg
That's her in show picture on the left and on the right someone recreated her face for modthesims (dont know what program they used). I have a front view, side view and isometric view of her face. With those i can use morph to adjust facial features. But i wanted to know how close can the Daz morph controls get the Gen 3 female face to Lana's actual face? will i end up having to get it just close enough in Daz face morph and then from there manually adjust the verts in Blender/Maya to finish the look?
My Renders, Now I can go to bedseeing that currently free A4 for Genesis, had to see what I could do real quick.
I'm not a fan of the head shape so that was dialed out, used some other morph dials, and we have
SHhhhhh, wait there
Great posing on this!
Modeling Objects in Carrara - Q&A - Come One and AllWhat Phil said. (and what 3DAGE said - got in while I was typing). In support of spline models, what I would emphasize is time savings for support objects that might need a morph or have a logo on it. For me, it is much faster to make a beer glass or a rocket engine and put a logo on it in the spline modeler than the vertex modeler primarily because of the uvmapping. Also, the beveling is much easier to adjust if you change your mind. Same for placing logos. You use the layer's list tool to place the rectangle where you want the logo and projection mapping. With the vertex modeler,I have to fiddle with beveling the edges, getting the uvmaps clean, etc. However, if you plan to export the model to another program, starting in the vertex modeler probably makes more sense.
Here is an object with rounded ends but a squared off middle portion (maybe a rocket?) with a logo applied. There are only 5 cross sections, and only two actually needed adjusting. Placing the logo was just a matter of using the rectangle tool in the shader room. Quick and easy. Vertex modeler? Maybe if you are really good with the smoothing function, this could be modeled as quickly (though I doubt it), but just trying to draw the seams and unfold the uvmap would take longer than the entire spline process.
Who said Blender was hard?Hmm Gedd, I wonder if you've noticed this; when creating morphs in Blender, even with all aspects zeroed before exporting from Daz, I'm getting slight movement on the morph everywhere on G3F.
I tested on a figure I didn't alter in Blender; I imported it, then immediately exported. I get the same.
nicstt, what is your morph workflow? I just created a nose morph in Blender 2.77a on Genesis 3 Female and applied the morph in Daz Studio with no trouble. Here is my workflow:
Exporting your OBJ
- In Studio, I zero the navel and mouth realism HD morphs and set the resolution of the Genesis 3 figure to base.
- I export the figure as an OBJ with Daz scale (or whatever scale, but remember which) and with either Write Groups or Surfaces, depending on my needs.
Importing to Blender
- In Blender, in the Import Wavefront OBJ options, I select Keep Vert Order and checkmark Polygroups.
- The figure has a rotation of X90, so I use Ctrl A and apply rotation so that I can utilize X symmetry.
Creating a Shape Key
- With the figure still selected, I open the Object Data properties and under Shape Keys create a Basis Key.
- I create a second Key by pressing the plus sign next to the Shape Keys panel. I rename this new Key to describe the morph I am making. I created a nose morph and thus named it Nose01. It is important to set the value on this new key to 1.0 before you sculpt.
Sculpting the Morph
- I switched to Sculpt mode.
- Make sure X symmetry is on if needed and sculpt the shape the shape you want.
More on Shape Keys
- If I want to create another morph, I zero out or hide the eye on the key I was working on.
- Always select Basis before going on to creating a new key with the plus sign. Follow the steps listed in the previous section to work with the new Keys.
- If you wish to do a mixture of the morphs you have made, you can change the values till you have the shaping you like and then from the down arrow to the right of the Shape Keys panel, choose New Shape from Mix. Rename this mix key appropriately to describe your morph.
- There is also a way to create partial morphs from any mixes or morphs you have created where you want to, say, separate out the mouth and nose as their own Shape Keys. I can describe this technique if anyone is interested.
Export your OBJ for use in Studio
- Once you want to export the morph(s), zero out, or hide all Shape Keys except the one you want to export as an OBJ.
- I have gotten into the habit of exporting with "selected only" checkmarked.
Importing with MLP, Testing the Morph and Saving your Asset
- In Studio, remember to have your Genesis 3 exactly as you exported (morphs zeroed/base resolution) and bring in your OBJ morph through MLP (Morph Loader Pro).
- Make sure the same scale you exported at is the same when you import.
- If you need to, set up the path where the morph should go and accept.
- Test your morph by spinning up the dial.
- You can bring in multiple morphs.
- Set up the parameters.
- Save as a morph asset.
Thanks Cris; I was forgetting to set resolution to base.
What's the difference between Write Groups and Surfaces; I normally export with both.
---
For anyone exporting and inporting and new to it. You can use the Blender settings, but it is broken.
Select the Blender option in Daz;
change scale to 1%
axis conversion should display x, y, z (not x, z, y).
When reimporting: the same axis, but change the scale to 10000 (ten thousand) percent.
That will load it in Blender at the same size as it is in Daz, and with the correct orientation.
Surfaces and groups will give you different selection areas. I asked Richard to help me clarify. He said this: Groups reflect the bones of the figure (more or less), while surfaces can cross bones. They generally reflect the different maps used and areas that may need different surface properties.
To give you an example. Groups will give you a group for upper and lower neck; there is no separation on the neck with Surfaces. On the head, there is no separation of the face and lips with Groups, but you have this separation in Surfaces. Things like that.
lx, I don't use Blender as scale because I work primarily in ZBrush and need to seamlessly go between that, Blender and Studio, so I stick to Daz scale. But it's good to have that information. Thanks.
Who said Blender was hard?Hmm Gedd, I wonder if you've noticed this; when creating morphs in Blender, even with all aspects zeroed before exporting from Daz, I'm getting slight movement on the morph everywhere on G3F.
I tested on a figure I didn't alter in Blender; I imported it, then immediately exported. I get the same.
nicstt, what is your morph workflow? I just created a nose morph in Blender 2.77a on Genesis 3 Female and applied the morph in Daz Studio with no trouble. Here is my workflow:
Exporting your OBJ
- In Studio, I zero the navel and mouth realism HD morphs and set the resolution of the Genesis 3 figure to base.
- I export the figure as an OBJ with Daz scale (or whatever scale, but remember which) and with either Write Groups or Surfaces, depending on my needs.
Importing to Blender
- In Blender, in the Import Wavefront OBJ options, I select Keep Vert Order and checkmark Polygroups.
- The figure has a rotation of X90, so I use Ctrl A and apply rotation so that I can utilize X symmetry.
Creating a Shape Key
- With the figure still selected, I open the Object Data properties and under Shape Keys create a Basis Key.
- I create a second Key by pressing the plus sign next to the Shape Keys panel. I rename this new Key to describe the morph I am making. I created a nose morph and thus named it Nose01. It is important to set the value on this new key to 1.0 before you sculpt.
Sculpting the Morph
- I switched to Sculpt mode.
- Make sure X symmetry is on if needed and sculpt the shape the shape you want.
More on Shape Keys
- If I want to create another morph, I zero out or hide the eye on the key I was working on.
- Always select Basis before going on to creating a new key with the plus sign. Follow the steps listed in the previous section to work with the new Keys.
- If you wish to do a mixture of the morphs you have made, you can change the values till you have the shaping you like and then from the down arrow to the right of the Shape Keys panel, choose New Shape from Mix. Rename this mix key appropriately to describe your morph.
- There is also a way to create partial morphs from any mixes or morphs you have created where you want to, say, separate out the mouth and nose as their own Shape Keys. I can describe this technique if anyone is interested.
Export your OBJ for use in Studio
- Once you want to export the morph(s), zero out, or hide all Shape Keys except the one you want to export as an OBJ.
- I have gotten into the habit of exporting with "selected only" checkmarked.
Importing with MLP, Testing the Morph and Saving your Asset
- In Studio, remember to have your Genesis 3 exactly as you exported (morphs zeroed/base resolution) and bring in your OBJ morph through MLP (Morph Loader Pro).
- Make sure the same scale you exported at is the same when you import.
- If you need to, set up the path where the morph should go and accept.
- Test your morph by spinning up the dial.
- You can bring in multiple morphs.
- Set up the parameters.
- Save as a morph asset.
Thanks Cris; I was forgetting to set resolution to base. I set the sub d to zero, but I presume there is no need when setting the resolution to base.
What's the difference between Write Groups and Surfaces; I normally export with both.
---
For anyone exporting and inporting and new to it. You can use the Blender settings, but it is broken.
Select the Blender option in Daz;
change scale to 1%
axis conversion should display x, y, z (not x, z, y).
When reimporting: the same axis, but change the scale to 10000 (ten thousand) percent.
That will load it in Blender at the same size as it is in Daz, and with the correct orientation.
Is there a way to keep the bones of autofit items, or do a partial auto-fit?I'm on 4.8.0.59, and I find the Transfer Utility crashes DS a lot. More accurately, it crashes consistently on certain products, especially when I use "Merge Hierarchies." Today's example is Sapphire Fox Hair for V3, which happens to be perfect for a character I'm putting together. AFAIK, I need to check "merge hierarchies" in order to keep the original bones, which is necessary if I want to keep the original morphs. This works fine for this particular hair when converting from V3 to Genesis, but crashes DS every time when I use the TU again to convert the hair from Genesis to G3F. Is there some other method to fit the hair to G3F while retaining the morphs? Or some Transfer Utility voodoo that will help me use avoid crashing DS, while retaining the original morphs at the end? For various reasons, I find it very difficult (at the moment) to download large amounts of data, so the canned "try the newest version" response isn't going to help me much. In fact, given that I have quite a few older versions of DS installers on my drives, I'd find it more useful to know which OLDER version of DS has a more stable version of the Transfer Utility, if any. On the other hand, if someone has experience with this issue and found that it is fixed in a more recent version of DS than the one I'm running, I'm all ears. P.S. I tried converting to general instead of triax, and that didn't work, either.Post Your Renders - Happy New Year yallgreat carrara render, FifthElement, would be fine to have basic PBR materials within carrara

a test to simulate sebum layer on Danae's Lyon morph, slight adjustment in post
Who said Blender was hard?Hmm Gedd, I wonder if you've noticed this; when creating morphs in Blender, even with all aspects zeroed before exporting from Daz, I'm getting slight movement on the morph everywhere on G3F.
I tested on a figure I didn't alter in Blender; I imported it, then immediately exported. I get the same.
nicstt, what is your morph workflow? I just created a nose morph in Blender 2.77a on Genesis 3 Female and applied the morph in Daz Studio with no trouble. Here is my workflow:
Exporting your OBJ
- In Studio, I zero the navel and mouth realism HD morphs and set the resolution of the Genesis 3 figure to base.
- I export the figure as an OBJ with Daz scale (or whatever scale, but remember which) and with either Write Groups or Surfaces, depending on my needs.
Importing to Blender
- In Blender, in the Import Wavefront OBJ options, I select Keep Vert Order and checkmark Polygroups.
- The figure has a rotation of X90, so I use Ctrl A and apply rotation so that I can utilize X symmetry.
Creating a Shape Key
- With the figure still selected, I open the Object Data properties and under Shape Keys create a Basis Key.
- I create a second Key by pressing the plus sign next to the Shape Keys panel. I rename this new Key to describe the morph I am making. I created a nose morph and thus named it Nose01. It is important to set the value on this new key to 1.0 before you sculpt.
Sculpting the Morph
- I switched to Sculpt mode.
- Make sure X symmetry is on if needed and sculpt the shape the shape you want.
More on Shape Keys
- If I want to create another morph, I zero out or hide the eye on the key I was working on.
- Always select Basis before going on to creating a new key with the plus sign. Follow the steps listed in the previous section to work with the new Keys.
- If you wish to do a mixture of the morphs you have made, you can change the values till you have the shaping you like and then from the down arrow to the right of the Shape Keys panel, choose New Shape from Mix. Rename this mix key appropriately to describe your morph.
- There is also a way to create partial morphs from any mixes or morphs you have created where you want to, say, separate out the mouth and nose as their own Shape Keys. I can describe this technique if anyone is interested.
Export your OBJ for use in Studio
- Once you want to export the morph(s), zero out, or hide all Shape Keys except the one you want to export as an OBJ.
- I have gotten into the habit of exporting with "selected only" checkmarked.
Importing with MLP, Testing the Morph and Saving your Asset
- In Studio, remember to have your Genesis 3 exactly as you exported (morphs zeroed/base resolution) and bring in your OBJ morph through MLP (Morph Loader Pro).
- Make sure the same scale you exported at is the same when you import.
- If you need to, set up the path where the morph should go and accept.
- Test your morph by spinning up the dial.
- You can bring in multiple morphs.
- Set up the parameters.
- Save as a morph asset.
Its time for new Cat and Dog models!I don't care who releases it or gets a morph done of it but I want a fat arsed Wombat!

and an emu
Knowing you Stezza that makes me wonder ............. Hmmmm............ Hmmmm........ Now what in the world is Stezza going to do with a fat arse wombat and an emu??
I'm still giggling about your Kiwi Kiwi !!
 Its time for new Cat and Dog models!
I don't care who releases it or gets a morph done of it but I want a fat arsed Wombat!
and an emu
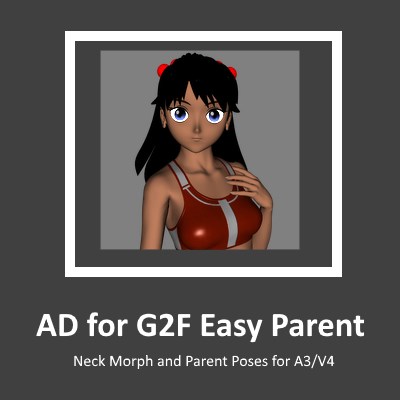
FREEBIES: Anime Doll for G2FAD for G2F - Easy Parent
This includes a neck morph to make it easier to parent the head to older figures, and a couples of Poses to auto-parent it to A3 and V4.
Daz 3D is part of

Connect
DAZ Productions, Inc.
7533 S Center View Ct #4664
West Jordan, UT 84084Licensing Agreement | Terms of Service | Privacy Policy | EULA
© 2026 Daz Productions Inc. All Rights Reserved.