-
3Delight Laboratory Thread: tips, questions, experiments
It is useful, but I don't actually use environment maps outside of test scenes. DAZ own' Environment Shader Builder macro relied on Nn/Nf vector manipulation for the lookup. When I was looking at Pixar's docs, they actually allow passing a matrix as 'envspace', but it seems 3delight devs didn't allow that with 3delight's trace ().
For the shadow catcher, you can get away with using environment (), but for a surface shader I don't think it will do. Environment () don't have parameters like brdf () and trace (), plus it doesn't do MIS, just plain importance sampling. To do proper MIS with it, you'll need to write your own importance sampling code, like PDFs and G masking/shadowing term, do the proper weighting necessary. I think Matt Ebb tried that once, though I think he was using gather (). He found 3delight's inbuilt trace () is just faster and easier to work with.
You miss the point. IS or MIS is not really important. I'm just saying that message passing as well as co-shader access and other RSL 2.0 avanced functionnallity are usefull. I'm the very lazy type that hates to do things twice when there is a way do prevent that.
You don't need to pass map right now because you use a solid sphere I got it. And that gives me the perfect example (or that's what I hope because I will not dig some archive) : If I remember correctely, Maya Sun and Sky use a combination of shaders that work together and I think they query informations that should be outside of the shader (the usual day/time/HH:MM:SS tranformed or not to suit the shaders). I don't have other Maya examples in head (and that's old story for me) but there are certainly other examples in the 3DL shader samples if you dig
Note : I dont think Matt Ebb used trace because it was faster. He just used the standard maya light that has trace but also PBGI, Occlusion, and photon mapping for the first version. The second version used advanced RSL 2.0 with coshader access to retrieve light infos and I don't remember there was any trace() used. I think there was rather a dumb shader to collect datas
Honestly, if DS have the same coordinate system as 3delight, then we won't have this problem.
What would be the ideal solution is for DS to have a functional viewport OpenGL environment sphere or sun/sky environment that it can pass to whatever renderer plugin is selected. But looking at 4.11, that doesn't exist (even with iray). That's a setup that's been available in Maya/Max/Houdini/C4D/Blender/Modo or even game engines like Unity and UE for ages.
Yes and no. Iray is a GPU renderer and the philosophy is to run a preview render so that you can have a better idea of the final output
3DL has the IPR. Having an OpenGL preview was good in the old times where CPU/GPU power was not like todays. That's just an old legacy
Even Pixar made a GPU real time preview tools for lightning purpose before rendering final frames
And really, there is an easy solution for the coordinate system. Since you speak of RIB export, you can simply export the RIB and call the 3DL renderer. It won't be done by DS but will be correct
You have to eventually pass the IBL sphere rotations to the light shader (after hiding the sphere at rendertime)
There is also the user friendliness factor where you could have a central panel with overview of many Quality/Tonemapping/Environment/User choices (ex AOV output) which centralize a bunch of common variables a bit like the Iray render panel. Instead of having to setup everything manually, for each shader, each shader instance will get the info from the central collecting point
Ex : you have three different specular models available in your shaders. Instead of going through each shader to set the specular model, you set it once in the central panel and every shader in the scene are updated
I actually agree. It would be best to have those all in one place, which is why I went and place some on a 'dumb' ambient light shader.
Since I wanted to allow viewport response when you shift the horizontal offset of the HDRI, message passing that offset was not doable. Well, technically you can setup a DS custom script on the light shader to fetch the offset parameter off the sphere, but I think that's prone to problems.
I don't really see the problem but well I don't have my head into it
You also need to keep in mind there are certain limitations in place (when doing it via pure RSL/RiSpec). For example, shutter time is controlled via Motion Blur settings in the renderer's option tab. Since it's a RiOption, light/surface shaders can only read this value, but can't change/write it. The only feasible solution is to 'split' the setting - one inside the light shader which can only affect scene exposure but have no effect on motion blur and vice versa, the one in the renderer's option which only affect motion blur but not scene exposure.
I don't understand where this subject comes from but OK. I don't understand where the problem is here either. Shaders mustn't write any renderer parameter. You do it via the renderer panel setting. The shaders only read datas at rendertime and these values won't change during render so I don't see why there would be a need for writing render settings from the shaders while rendering. I guess you want to implement a scene exposure somewhat and I still don't see the problem. Either you correct output values in linear space or you implement an imager shader (and I don't know if that workflow is correct) but that should work because you already read required datas at rendertime before the beginning of the rendering
AOV output is nice, but I think those should always be in the renderer's options. However, within the RSL framework, AOV output is at least two parts working together. Shaders need to be explicitly written to output AOV and identifier attributes. The second part is the RIB export and that means doing things via the render script. Currently, it doesn't have the code to export AOV (yet). Mustakettu's the one working on that, so you should ask her.
Not really, it's not a request. AOV is just one classical example that came to my mind and is not really difficult to implement. The only thing I will say is that if you plan to do AOV outputs, and think of making shadermixer blocks, think the strategy carefully
(BTW this discussion made me think of an old shader I wrote and could be usefull for Iray. So I'll certainly dig a bit of some old RSL)
As for BRDF choices, well, I think all other renderers put those in materials/shaders. There are overrides, but I think those mainly uses AOV and does not actually change the BRDF used by specular/reflection lobes.
This was just an example. It was because there are tons of shading models and I implemented them in the same one shader and I could easily switch between the models
Ultimately, what I'm saying is there's limitation in RSL/RiSpec and DS that makes certain things impossible or just downright hard.
Wildly thinking here, but the best thing would be a USD export for DS. It will literally open up a lot of possibilities. Renderer options for one. There's also easier lookdev/scene management, not to mention you can just have more memory to the USD standalone/renderer.
Expanding the render setting panel to add whatever options is doable. You may have more hard time with the shadermixer brick at the beginning
I was wildly thinking too. MDL is an other option but 3DL with RSL version (new version seems to only have OSL) is not supported and I don't know what would be needed for it
More Non-photorealisitic Renders (NPR II)Made some minor updates to the cover. Added more blood to the hands and removed it off his pants.
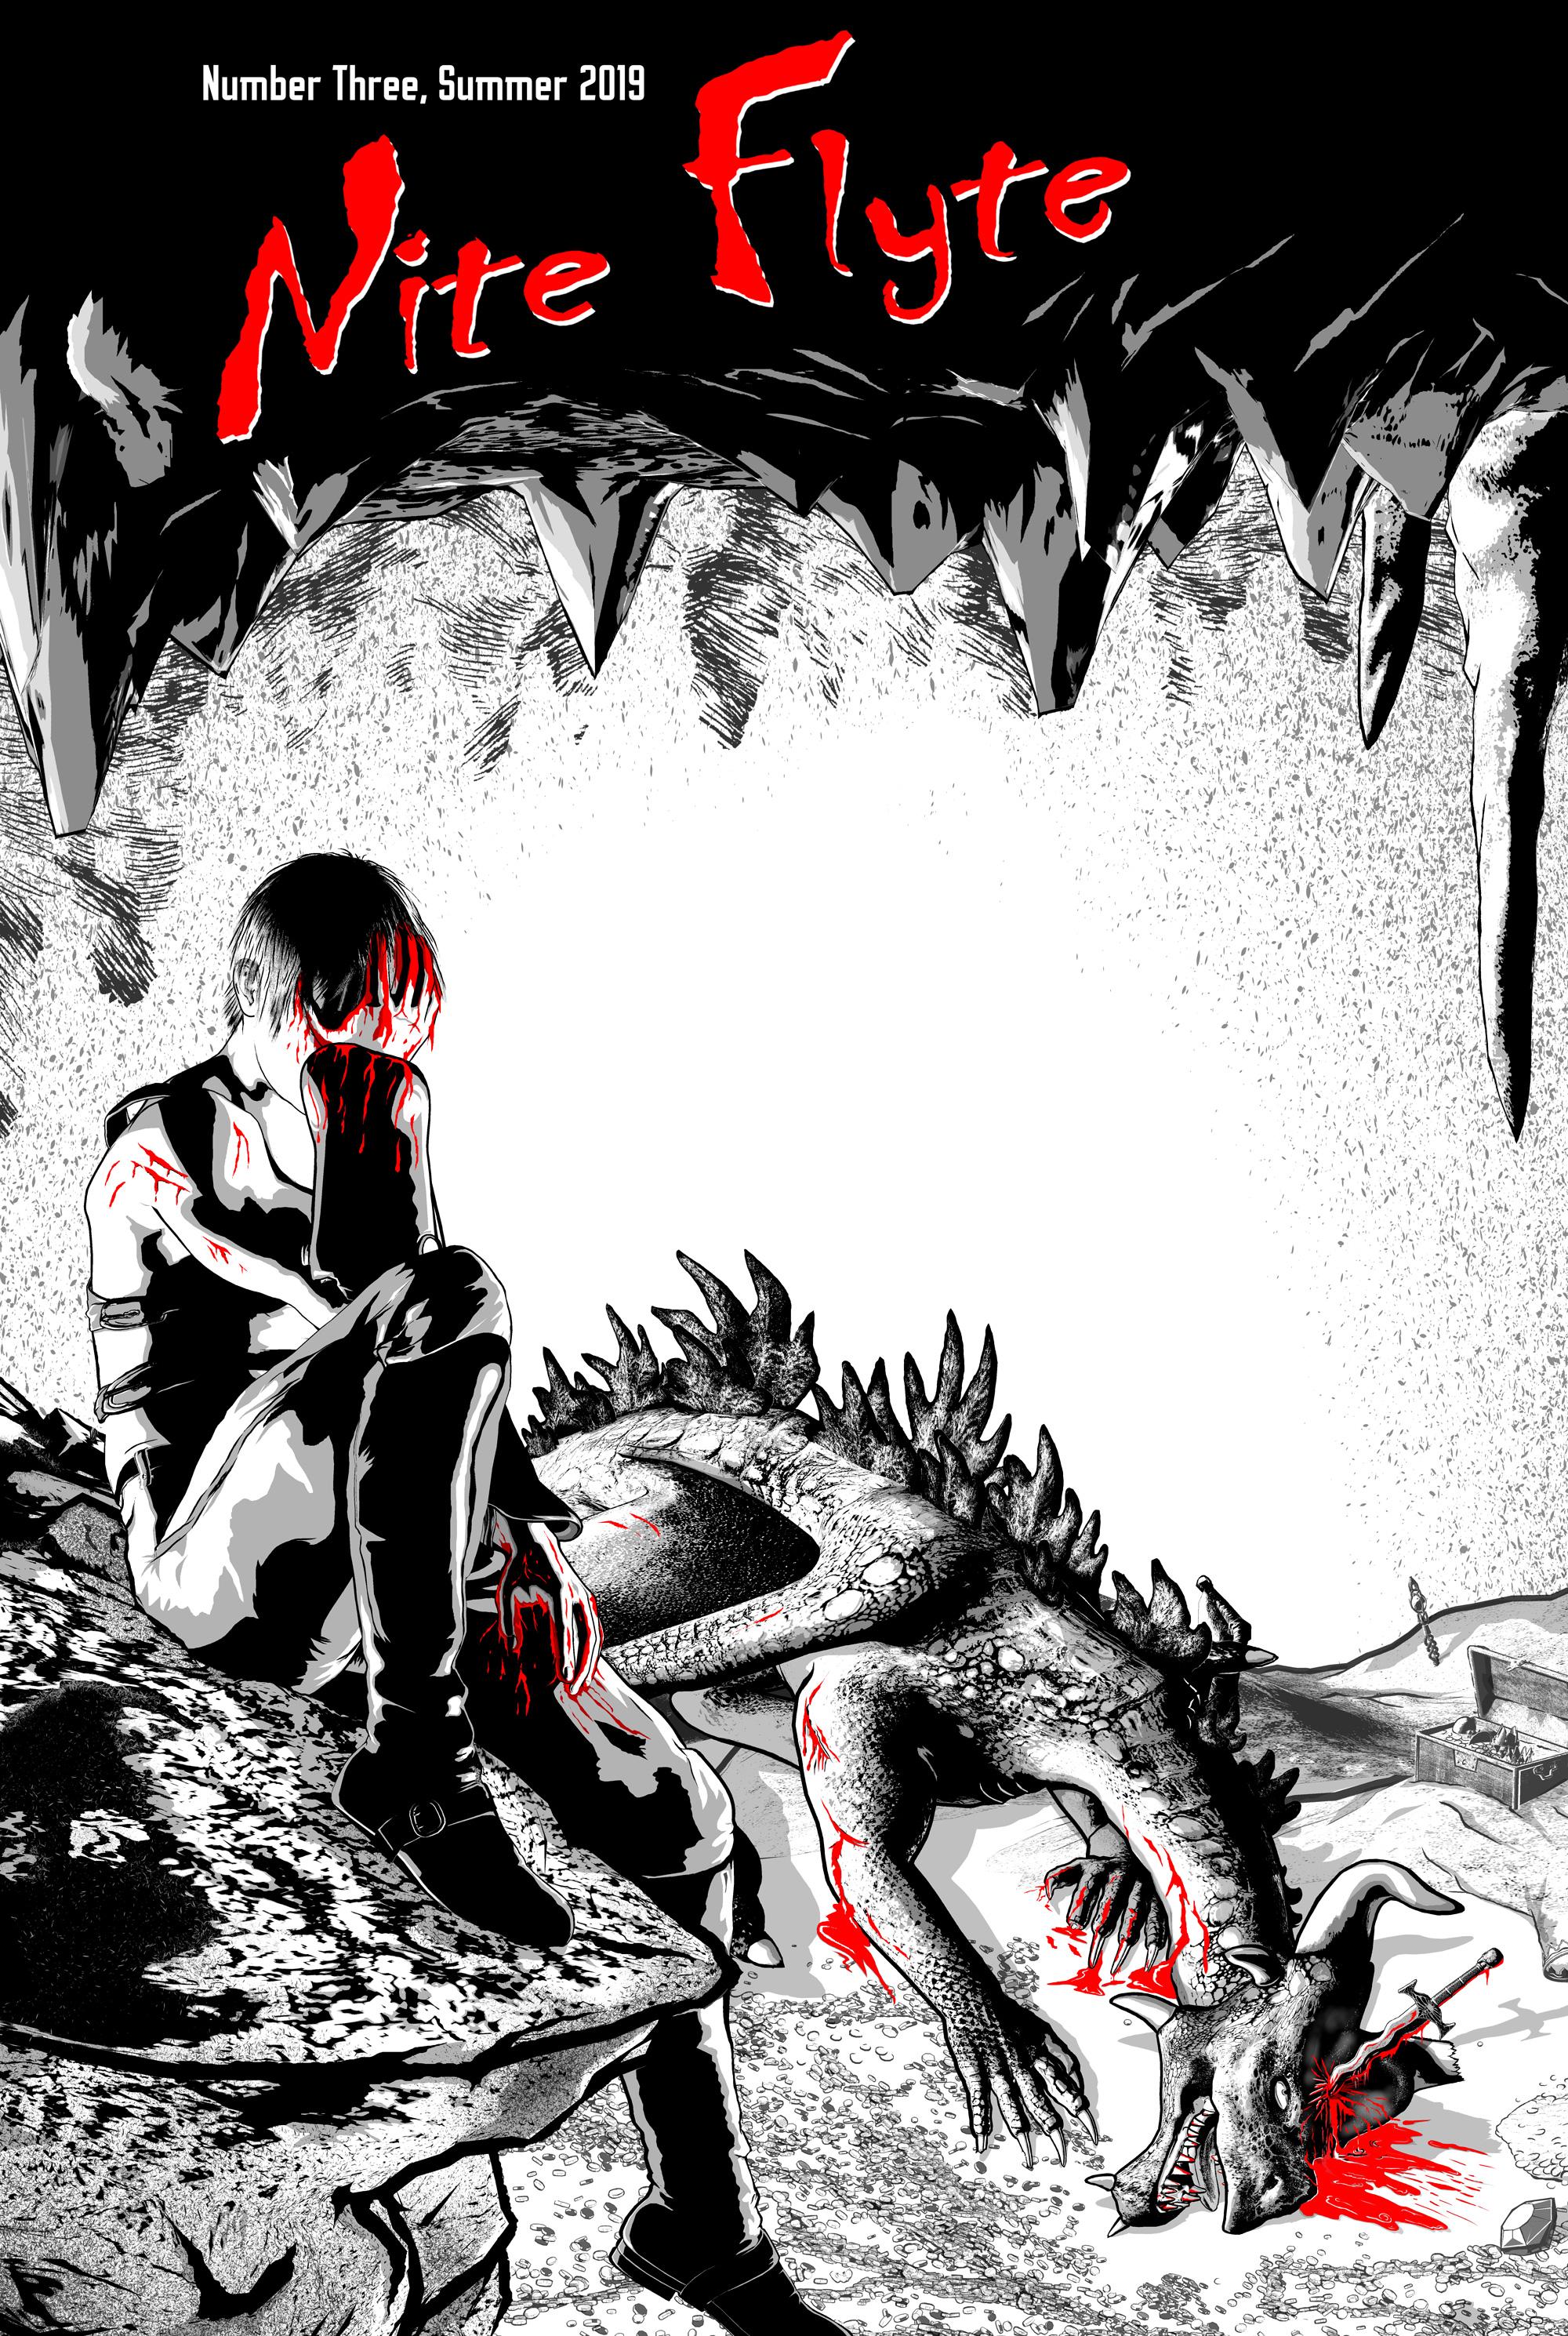
I really love how your work developed. It definitely has a much darker and emotional grab. It's great to see how the connection to the character and the story improved with the incremental tweaks. The title is although im curious, if the genre is to be portrayed along the lines of horror or thriller type.
How did you get the stalactites at toward the backside ceiling to sketch out like that, impressive work.
Ah, the title logo! That has no relationship to the content of my comic book story. Nite Flyte is the title of my contribution to a small APA, which is an Amateur Press Association. Four times a year we each create a small fanzine/newsletter, print out the appropriate copies (right now it's just 14) and then send them into a Central Mailer. The CM collects everyone's contributions and then combines them between two covers, adds a TOC and some other bookkeeping stuff, and then mails them back to us. This way, four times a year, we get to read about 50-70 pages of work by people who, like us, enjoy comics, fantasy, sci-fi and stuff like that. The name of this APA is Snicker Snack, and if you're ever interested in seeing a sample copy, let me know.
In this case, Nite Flyte is simply my contribution for the group. And in this case, with it being stark red against the strong black-and-white image, I can definitely see that the whole thing takes on a horror feel. But that's not my focus inside my 10-12 page contribution. The APA has been around for ages: next issue is #43. As you can see from my cover, this is just my third contribution.
I'm glad you like the effect on the stalactites. To create them, I took a texture from Clip Studio Paint that has a lot of sketchy lines in it (I think it's called MT Volcano). I placed it on a layer and then, using the lasso tool, just drew out the shapes I wanted and then created a layer mask so that only the areas I wanted to see were visible. I then moved the pattern around inside the layer mask until I found something I liked. I also did some touch-up work on the layer mask to keep the edges from being too crisp. Specifically, I go to the layer mask and edit it to extend a stroke here and there beyond the super-straight line created by the selection tool. I even add little twists and curls here and there to line ends to give a more hand-drawn look.
It's not a difficult process, but it does take a little time and attention to detail.
Thanks again for the feedback!
3Delight Laboratory Thread: tips, questions, experimentsIt's in the DS SDK. It's called curvebrick. You'll need Visual Studio 2010 compiler
I remember having also tried to directely create a brick inside DS and I think I got somewhat limited successfull results but don't really remember the details of what works and what doesn't. For the moment, let's just say that for complex shader bricks the DS SDK is the way.
It's a start in the right direction.
Message passing is usefull if you target performance at some point. Without environment lookup you don't have MIS for example.I know I made some complicated thing few years ago and in order to get some performance gain I remember I did not just pass environment maps. You may need to pass values and vectors
It is useful, but I don't actually use environment maps outside of test scenes. DAZ own' Environment Shader Builder macro relied on Nn/Nf vector manipulation for the lookup. When I was looking at Pixar's docs, they actually allow passing a matrix as 'envspace', but it seems 3delight devs didn't allow that with 3delight's trace ().
For the shadow catcher, you can get away with using environment (), but for a surface shader I don't think it will do. Environment () don't have parameters like brdf () and trace (), plus it doesn't do MIS, just plain importance sampling. To do proper MIS with it, you'll need to write your own importance sampling code, like PDFs and G masking/shadowing term, do the proper weighting necessary. I think Matt Ebb tried that once, though I think he was using gather (). He found 3delight's inbuilt trace () is just faster and easier to work with.
Honestly, if DS have the same coordinate system as 3delight, then we won't have this problem.
What would be the ideal solution is for DS to have a functional viewport OpenGL environment sphere or sun/sky environment that it can pass to whatever renderer plugin is selected. But looking at 4.11, that doesn't exist (even with iray). That's a setup that's been available in Maya/Max/Houdini/C4D/Blender/Modo or even game engines like Unity and UE for ages.
There is also the user friendliness factor where you could have a central panel with overview of many Quality/Tonemapping/Environment/User choices (ex AOV output) which centralize a bunch of common variables a bit like the Iray render panel. Instead of having to setup everything manually, for each shader, each shader instance will get the info from the central collecting point
Ex : you have three different specular models available in your shaders. Instead of going through each shader to set the specular model, you set it once in the central panel and every shader in the scene are updated
I actually agree. It would be best to have those all in one place, which is why I went and place some on a 'dumb' ambient light shader.
Since I wanted to allow viewport response when you shift the horizontal offset of the HDRI, message passing that offset was not doable. Well, technically you can setup a DS custom script on the light shader to fetch the offset parameter off the sphere, but I think that's prone to problems.
You also need to keep in mind there are certain limitations in place (when doing it via pure RSL/RiSpec). For example, shutter time is controlled via Motion Blur settings in the renderer's option tab. Since it's a RiOption, light/surface shaders can only read this value, but can't change/write it. The only feasible solution is to 'split' the setting - one inside the light shader which can only affect scene exposure but have no effect on motion blur and vice versa, the one in the renderer's option which only affect motion blur but not scene exposure.
AOV output is nice, but I think those should always be in the renderer's options. However, within the RSL framework, AOV output is at least two parts working together. Shaders need to be explicitly written to output AOV and identifier attributes. The second part is the RIB export and that means doing things via the render script. Currently, it doesn't have the code to export AOV (yet). Mustakettu's the one working on that, so you should ask her.
As for BRDF choices, well, I think all other renderers put those in materials/shaders. There are overrides, but I think those mainly uses AOV and does not actually change the BRDF used by specular/reflection lobes.
Ultimately, what I'm saying is there's limitation in RSL/RiSpec and DS that makes certain things impossible or just downright hard.
Wildly thinking here, but the best thing would be a USD export for DS. It will literally open up a lot of possibilities. Renderer options for one. There's also easier lookdev/scene management, not to mention you can just have more memory to the USD standalone/renderer.
3Delight Laboratory Thread: tips, questions, experimentsI doubt you'll have a lot of RSL expert to play with it. There is an example to build shadermixer block in the SDK. It would be more user friendly but requires more work
Can you point me to that example? Is it the DS script SDK or DS SDK?
Honestly though, outside of a shadow catcher, I don't see a lot of value for environment map lookups. I actually found out and fixed the issue with subsurface noise and HDRI lit scene while messing around with the new subsurface code. With the revised version, I'm still getting clean SSS even with just 256 samples and subsurface weight set to the bare minimum.
It's in the DS SDK. It's called curvebrick. You'll need Visual Studio 2010 compiler
I remember having also tried to directely create a brick inside DS and I think I got somewhat limited successfull results but don't really remember the details of what works and what doesn't. For the moment, let's just say that for complex shader bricks the DS SDK is the way.
Message passing is usefull if you target performance at some point. Without environment lookup you don't have MIS for example.I know I made some complicated thing few years ago and in order to get some performance gain I remember I did not just pass environment maps. You may need to pass values and vectors
There is also the user friendliness factor where you could have a central panel with overview of many Quality/Tonemapping/Environment/User choices (ex AOV output) which centralize a bunch of common variables a bit like the Iray render panel. Instead of having to setup everything manually, for each shader, each shader instance will get the info from the central collecting point
Ex : you have three different specular models available in your shaders. Instead of going through each shader to set the specular model, you set it once in the central panel and every shader in the scene are updated
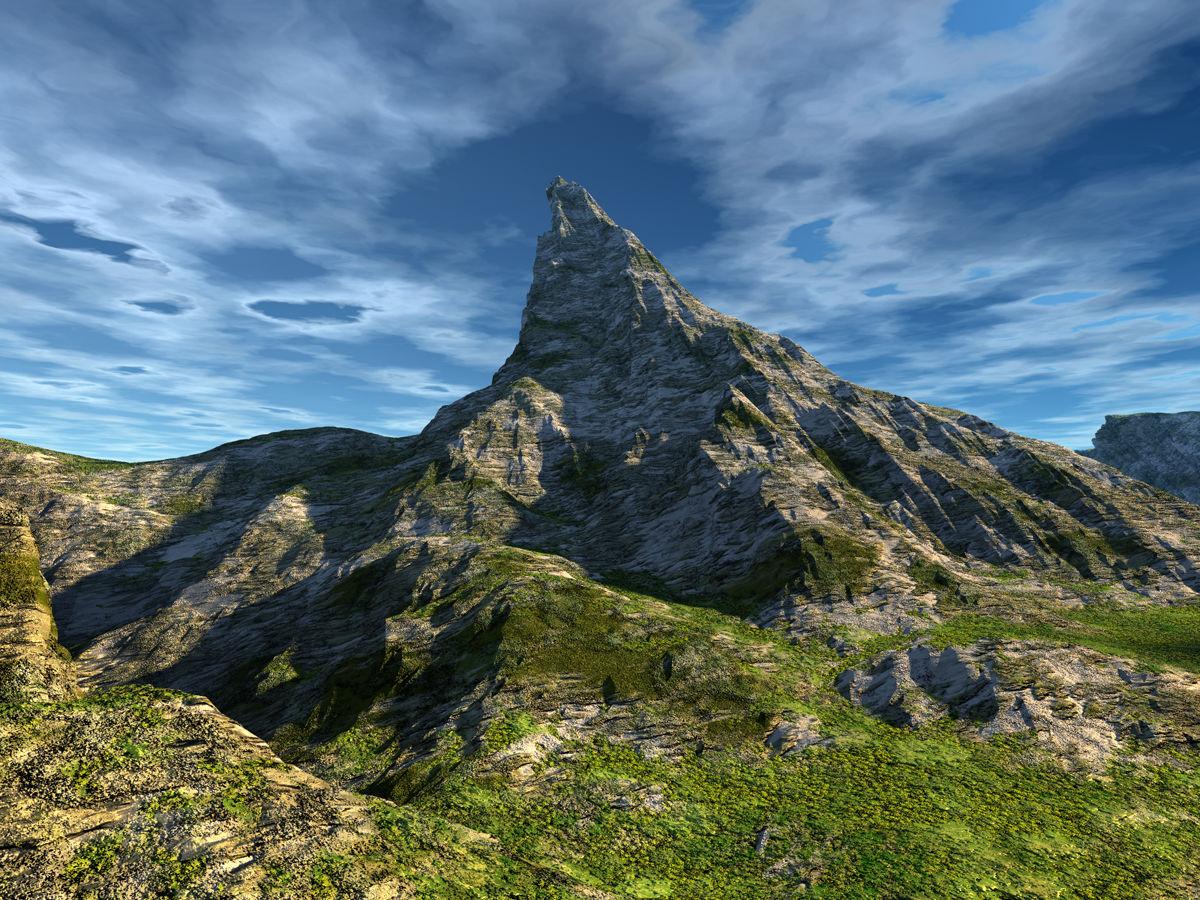
Show Us Your Bryce Renders Part 10mermaid - thank you.
Just moved the camera nearer to the central mountain in the Lonesome Wanderer scene and changed textures on the terrain, created clouds with a texture and swapped the HDRI. Just to show Jay that I came back to earth and the mountain actually resembles the Matterhorn.
 I Forgot What My Complaint Was - Complaint Thread
The air conditioner is not blowing cold air. My dad should call the repair company to have someone look at the central heating unit and the fan soon.
Updating and adding new items to a exsisting product?If you right-click on the materials folder and select Create product, then give it the name of the existing product, I think that should work. You can then, if desired, right-click on the product folder and select Edit Metadata and use the first tab to add the non-user facing files (textures) by right-click in the central panel.
Thank you that worked, its just not intuitive. One thinks to themself that would overwrite the original product, but you get a pop-up window asking if you want to add them to the exisiting product.
I'm so glad i asked as this was really starting to fustrate me.
Updating and adding new items to a exsisting product?If you right-click on the materials folder and select Create product, then give it the name of the existing product, I think that should work. You can then, if desired, right-click on the product folder and select Edit Metadata and use the first tab to add the non-user facing files (textures) by right-click in the central panel.
I Forgot What My Complaint Was - Complaint ThreadNon-complaint" Wheee, what a beautiful day here in western & central NY State today. Warm but not hot, not muggy, partly cloudy. Twas brillig and the slithy toves did gyre and gymbol in the wabe. Made a spot decision at 6:00 AM to drive 220 miles to the Renaissance Faire at the eastern end of Lake Ontario (Sterling, NY) Blew my budget all to heck but it was a nice mini-adventure.
 Four hours driving, two hours dragging my body up and down dusty hills admiring armor, leather, feathers, tights, horses, comedians, jugglers and jousting. Eating a way overpriced fish & chips and a $3 bottle of water
 , and then four more hours driving home. But I lost an hour futzing around because I stopped to fill up on gasoline and couldn't get the gas cap off. It being Sunday, most real gas stations with mechanics were closed. I finally found a truckstop and had to sweet talk a burly truck mechanic to take pity on me and see if he could break it loose. He did. After much effort and bigger and bigger tools, he broke it right in half!
  Fortunately the auto supply shop nearby was open so I got it replaced. Strange happening. Never had a gas cap seize up and break before. I didn't have enough gas to make it home and was afraid I'd have to have my car towed a hundred miles just because I couldn't get the stupid gas cap off. Oy!
Two hours of walking up and down hills at the Faire, just about killed me. Heart going pitty pat, knees screaming, feet screaming, After watching the jousting I needed shade so I stopped and rested by a Tum-Tum tree hoping for a Jabberwock to come whiffling by. And as in uffish thought I stood, two handsome costumed vendors that I was watching hawk their wares took pity on me and chased down my hat for me when it blew away, and took my empty water bottle to save me the 40 foot walk to the trash can. I must have looked pretty pitiful.
 Nvidia GPU shopping tips for large scene Iray rendering.
I use 2 titan x's with 12gb of vram and that is enough for my uses. If you have to do a large scene>> do the background in 3delight and the central charaters in Iray and composite in Photoshop or Gimp. I have stopped fighting the vram short comings of Iray in Daz Studio. I just composite. Oh I also use Mcasuals despecle script so I only render for a short while and remove the fireflies and I'm ready to go. It is just my opinion, but I think that new technology that has just come out is way over priced and a waste of money. Just wait and get it 2nd or 3rd gen card that fits your needs and don't get ripped off.
Problem with Maia HD for Ellithia 8https://www.daz3d.com/maia-hd-for-ellithia-8 by Hellboy
The Maia HD body morph loads at 100% for any Genesis 8 Female character. Problem is solved by either moving the Maia HD Body slider to 0% (Parameters / Actor/Full Body) or by uninstalling the product.
Help Ticket submitted, acknowledged by DAZ as of 1508 US Central Daylight time.
More Non-photorealisitic Renders (NPR II)This is very interesting. ZBrush has been on my list for a while now, and every time they have a sale I get really tempted (but the $800+ price tag keeps me at bay – at least until the end of the year when I have finished paying off my car and some other purchases). I'm very intrigued because it is supposed to integrate will with Manga Studio (in other words, you can use Manga Studio (Clip Studio Paint) to draw directly on the models).
So, can you pose the figures in ZBrush, or are you posing them in Daz Studio and then importing them as OBJs?
Have you seen this video on Cel Shading? https://www.youtube.com/watch?v=D4_Sc5NRUj0
I used Z brush years ago, and although it was great for sculpting I found it to be quite difficult to integrate with other software. The newer releases, such as R5 in the Youtube video, or 2018, 2019 versions make it so much easier to work with other software. The interface is still weird, but once you get used to it, I suppose it can be really helpful.
The new NPR shaders and blend styles are only available in the 2019 release. They are pretty good, and you can chnage the look of it through using various sliders.
I pose the models in Daz, which is still better than most software for posing and setting up stance positions for 3D models than most software. You have to export as an obj file to take into Z brush, and merge the UV maps down into a single image.
Posing in Z brush is quite difficult, as you are moving polygons through selections, it's much easier to reposition in Daz and re-export, but that's obviously time consuming.
You can use the polypaint tools in Z brush to paint materials, textures and height directly onto the model, which can give you some nice effects. The rendering is good and sharp. I am still evaluating it at the moment. It's got its pros and cons, but I've been wanting to learn Z brush for quite a while. The stuff the artists are designing over at Z brush Central is incredible.
If the results are better than what I can achieve in either Unity or Daz then I might seriously consider Z brush. I'll post more test renders when I produce them and let you know what I think.
Thank you very much for the info. The fact that it doesn't work with the rigging for poses is probably a good indication that this is not a tool I need to review at this time. At least not in the short term, because I already have tools I can use for sculpting the few props I need and I can use Blacksmith 3D for texturing (and since I work with simple b&w textures right now, it is more than adequate).
Still... I see some big new and shiny thing and I just want to have it!
But... I think I'll resist for now until I see it deliver something I really can't live without.
Thanks again.
More Non-photorealisitic Renders (NPR II)This is very interesting. ZBrush has been on my list for a while now, and every time they have a sale I get really tempted (but the $800+ price tag keeps me at bay – at least until the end of the year when I have finished paying off my car and some other purchases). I'm very intrigued because it is supposed to integrate will with Manga Studio (in other words, you can use Manga Studio (Clip Studio Paint) to draw directly on the models).
So, can you pose the figures in ZBrush, or are you posing them in Daz Studio and then importing them as OBJs?
Have you seen this video on Cel Shading? https://www.youtube.com/watch?v=D4_Sc5NRUj0
I used Z brush years ago, and although it was great for sculpting I found it to be quite difficult to integrate with other software. The newer releases, such as R5 in the Youtube video, or 2018, 2019 versions make it so much easier to work with other software. The interface is still weird, but once you get used to it, I suppose it can be really helpful.
The new NPR shaders and blend styles are only available in the 2019 release. They are pretty good, and you can chnage the look of it through using various sliders.
I pose the models in Daz, which is still better than most software for posing and setting up stance positions for 3D models than most software. You have to export as an obj file to take into Z brush, and merge the UV maps down into a single image.
Posing in Z brush is quite difficult, as you are moving polygons through selections, it's much easier to reposition in Daz and re-export, but that's obviously time consuming.
You can use the polypaint tools in Z brush to paint materials, textures and height directly onto the model, which can give you some nice effects. The rendering is good and sharp. I am still evaluating it at the moment. It's got its pros and cons, but I've been wanting to learn Z brush for quite a while. The stuff the artists are designing over at Z brush Central is incredible.
If the results are better than what I can achieve in either Unity or Daz then I might seriously consider Z brush. I'll post more test renders when I produce them and let you know what I think.
WIP Sci-Fi Starship BridgeYep, it looks a little empty. Additional (optional) objects are a very good idea.
Would it be possible to change the texture of the central floor to look a little more metallic and less plastic?
Would it be possible to add another hologram with enemy ships for example?
You know you use Daz too much when.This is definitely me- when even when you're asleep, some inner alarm bell goes off and you know the store probably just changed over. Around 1am Central Time.
Maximum GPU RAm for GPU rendering in IrayUntil you do please stop trying to get people to spend a couple of grand to find out for you.
it may not be a smart thing to pull out your cash for a dream.
When a person is about to let go of a significant amount of cash.
Um... the OP's original central question was, and I quote:
I currently have a PC with two Nvidia Titan GPU's of 12 GB GPU Ram each. [...] is there any way at all,... no matter the cost, the hardware setup, whatever... to combine the GPU RAM of multiple GPU's together?To which my intial answer was:
The short answer to your question is yes. The secret is an alternate driver functioning mode on Windows called "TCC" which is available on all Nvidia Quadro, Tesla, and Titan cards (starting with the 6GB Keppler generation.) Meaning that not only is it possible, the cards you already have right now should be perfectly capable of doing it.Which is the direct OPPOSITE of telling someone they need to buy new, expensive hardware to get something to work. I understand that the software/hardware support situation around Titan cards is (and always has been) extremely murky - especially to people (such as yourselves, I presume) who do not personally own them. Please understand that what I am saying in this thread about how they (and the wider Nvidia hardware/software stack they fit in to) is based on my own hands experience as a Titan card owner/operator.
TCC mode is quite a different thing from memory pooling.
Correct. TCC is the device driver model used by all Nvidia compute oriented-devices on Windows to implement their enterprise level computing platform, and Unified Memory (what you call memory pooling) is just a feature of that computing platform.
To confirm that memory pooling is working in software, one needs two identical cards and an NVlink bridge installed between them.
Any combination of two Quadro/Tesla/Titan cards from the Keppler generation or newer will do. And the only situation in which having an NVLink bridge is required is if either of the cards are a Titan RTX (since Titan RTXs apparently drop support for P2P functionality over PCI-E - or at least did as of this January when Puget Systems last looked into it.)
Think about it: this cutting edge, Nvidia only GPU technology, supposedly developed in their "flagship" rendering software, yet they forgot to highlight it in their marketing materials on numerous occasions? Does that seem likely to you?
Yes, because Iray's debut of support for Pascal-era cutting edge features (like Unified Memory) coincided with Nvidia's sales pitch for their high-powered GPU-based rendering appliance, the VCA (originally short for "Iray Visual Computing Appliance". Here's a press release from the initial announcement.) And openly marketing the fact that key advanced features of your latest and greatest pre-built hardware solution (intro price: $50,000USD) can be had on smaller economies of scale for much less money via some diy computer building wouldn't be good business.
Chaosgroup is the only company that has shown us the pudding (please prove me wrong,
Check out this thread I only just stumbled upon here on the Daz forum from a little over a year ago. It's got some interesting stuff in it like this post from a DS/Iray user who noticed that having an instance of MATLAB (another TCC P2P functionality optimized program) running in the background on his GTX960M equipped laptop was tricking his graphics driver into allowing him to perform effectively out-of-core rendering and avoiding CPU fallback in Iray (via peer-to-peer functionality, as evidenced by the mention of "peering" in his 2nd log file excerpt.) Interesting stuff.
ETA: This stuff is a lot less cut and dry (and interesting! imo) then a lot of people seem to think.
More Non-photorealisitic Renders (NPR II)Thanks all, appreciated.

I cast my vote with the "Yays." It has a good, clean look that is pleasing to look at. Definitely not looking over processed. Even though the outlines are only around the shapes themselves (got to admit I'm pleased to see the line following his jawline) but not the interior details (the strong outline around his shirt doesn't continue around his bicep where the shirt and skin meet), the outlines do help pull the figures out from the background. Overall, the effect is pleasing enough and if you can do this consistently from panel to panel I think you're on to something here.
Speaking of panel-to-panel. As someone (still) working on a comic, I can tell you one thing I've learned that is very important: You won't know how this style works until you replicate it to create a full page of your story. Honestly, until you see a few panels next to each other you're not really going to know if they fit together well, nor will you know if you're got a look that will work panel after panel, page after page. I spent quite a while working on individual images, but until I started putting them next to each other I didn't know for sure that I was onto something that would actually work.
Two things I would like to mention:
- I like your lighting on this page. It is clean, even and it makes the central character pop.
- If you are going to have a prominent black character in your story, double-check his skin tone. In this image, he's coming off a little too dark and in a more shadowy scene you might lose him altogether. Consider lightening his skin a little, or in your materials settings increase the reflections/specularity settings to give him better highlights. Lighting for people of color can be tricky, so please experiment with the settings a little more. What I'm seeing here is okay but I must question if the skin will hold up across an entire story.
Finally, I hope you don't mind if I mention your script. I absolutely LOVE LOVE LOVE the "old wardog" and "salty guts tingled" phrasing. WOW, that is evocative! It really sells the character in a few well chosen words. Kudos to you. But... (I guess you knew a "but" was coming), there are a few problems with thhe rest of the caption. Here's what you wrote:
The old wardog never second guessed himself. His salty guts tingled with an all too well sensation that an unseen deadly hunter lie just ahead.
Waiting for a trophy to be won."All too well" is not really a common phrase as it's used here; it's just odd. We're used to reading something more like: "His salty guts tingled with a sensation that he knew all too well.
Then there's "lie." That just doesn't seem finished. We would almost expect "lies in waiting" or something like that. But I would ask if that word conveys enough menace for this situation. Perhaps something more like this?
The old wardog never second guessed himself. His salty guts tingled with an all-too-familiar sensation that told him somewhere an unseen, deadly hunter was lurking just ahead. Out of sight. Hidden. Waiting for a trophy to be won by shooting all the ducks in the arcade.
And they were the ducks.
Okay, that whole arcade reference was something that just came to me, and I don't think it's all that good. But I do suggest changing "lie" to "lurking" or "secluded" or "stalking them" or something like that.
I hope I didn't come off as too negative or like a bit know-it-all. I like what I see here and hope you'll share some pages with us soon!
Not all all, I like the feedback and admit to even chuckling when I read of the line, "And they were the ducks." Of what you wrote was spot on.
I honestly only used the narrative as an afterthough, considering of the empty space there... but then that afterthought became no longer just a thought. And did get hung up with, do I use, "laying in wait" or "lieing in wait", or... ugh; so I went with "lie up ahead"; yeah a cop-out to save time.I took in the recommendations, even lightening the skin tone of the black guy. And realized that the facial expressions need to be more exagerated in the render. In the preview, the expression looks fitting, but after the render and post editting becomes more subdued. Along with getting the renders too dark (as one I did in the SciFi thread; couldn't see the smoke, except as nearly a black solid).
This one here, is of some changes and reducing the outlines (done as a Stroke effect; but this one is slightly blurred to reduce the hard black pixels). Please ignore the graphical balloon captions; those are from Photoshop; a dedicate comic program would be used.

As someone (still) working on a comic,
I know what you mean. I've been going back and forth, between near photo-realism, or comic; or graphic novel or novel with some pics; trying to get it perfect before starting. And not following the advice to just doing something, even if it is bad; just do it and then make it better.
I like the edits to the artwork. The lighter skin tone on the black guy is a definite improvement. Although I do like the thinner outlines a little more, I did like the original thicker ones, too. In both cases you created a style that would work. I would offer one last bit of advice regarding your script, and that is to consider that you have too much dialogue for a single panel. That sort of left-right balloon to balloon ping pong almost never works. This sort of scene calls for at least a full page, maybe more:
- Close up on black guy with a clear view of his face: "Dog, I see no..."
- Close up on white guy: "Tellin' ya..."
- Wide panel showing what they are looking at, including the window in question. Black guy off Panel: "You mean the window..."
White Guy off panel: "Yup. That one. He'll..." - Medium shot with both guys (the panel you've already shown us above): BG: "All right. Your call. So what..."
WG: "That's the plan. Better than sitting here..." - Small panel with BG's face showing a grin: "You know I'm calling you..."
- The previous panel you showed us, with his hand in motion to give the signal. WG: "Only if you score... on Three."
At least that's how I would break it down to try to time the action to the beats of the dialogue. Just a thought. Looking forward to seeing a full page or two from you soon.
More Non-photorealisitic Renders (NPR II)Thanks all, appreciated.
I cast my vote with the "Yays." It has a good, clean look that is pleasing to look at. Definitely not looking over processed. Even though the outlines are only around the shapes themselves (got to admit I'm pleased to see the line following his jawline) but not the interior details (the strong outline around his shirt doesn't continue around his bicep where the shirt and skin meet), the outlines do help pull the figures out from the background. Overall, the effect is pleasing enough and if you can do this consistently from panel to panel I think you're on to something here.
Speaking of panel-to-panel. As someone (still) working on a comic, I can tell you one thing I've learned that is very important: You won't know how this style works until you replicate it to create a full page of your story. Honestly, until you see a few panels next to each other you're not really going to know if they fit together well, nor will you know if you're got a look that will work panel after panel, page after page. I spent quite a while working on individual images, but until I started putting them next to each other I didn't know for sure that I was onto something that would actually work.
Two things I would like to mention:
- I like your lighting on this page. It is clean, even and it makes the central character pop.
- If you are going to have a prominent black character in your story, double-check his skin tone. In this image, he's coming off a little too dark and in a more shadowy scene you might lose him altogether. Consider lightening his skin a little, or in your materials settings increase the reflections/specularity settings to give him better highlights. Lighting for people of color can be tricky, so please experiment with the settings a little more. What I'm seeing here is okay but I must question if the skin will hold up across an entire story.
Finally, I hope you don't mind if I mention your script. I absolutely LOVE LOVE LOVE the "old wardog" and "salty guts tingled" phrasing. WOW, that is evocative! It really sells the character in a few well chosen words. Kudos to you. But... (I guess you knew a "but" was coming), there are a few problems with thhe rest of the caption. Here's what you wrote:
The old wardog never second guessed himself. His salty guts tingled with an all too well sensation that an unseen deadly hunter lie just ahead.
Waiting for a trophy to be won."All too well" is not really a common phrase as it's used here; it's just odd. We're used to reading something more like: "His salty guts tingled with a sensation that he knew all too well.
Then there's "lie." That just doesn't seem finished. We would almost expect "lies in waiting" or something like that. But I would ask if that word conveys enough menace for this situation. Perhaps something more like this?
The old wardog never second guessed himself. His salty guts tingled with an all-too-familiar sensation that told him somewhere an unseen, deadly hunter was lurking just ahead. Out of sight. Hidden. Waiting for a trophy to be won by shooting all the ducks in the arcade.
And they were the ducks.
Okay, that whole arcade reference was something that just came to me, and I don't think it's all that good. But I do suggest changing "lie" to "lurking" or "secluded" or "stalking them" or something like that.
I hope I didn't come off as too negative or like a bit know-it-all. I like what I see here and hope you'll share some pages with us soon!
Not all all, I like the feedback and admit to even chuckling when I read of the line, "And they were the ducks." Of what you wrote was spot on.
I honestly only used the narrative as an afterthough, considering of the empty space there... but then that afterthought became no longer just a thought. And did get hung up with, do I use, "laying in wait" or "lieing in wait", or... ugh; so I went with "lie up ahead"; yeah a cop-out to save time.I took in the recommendations, even lightening the skin tone of the black guy. And realized that the facial expressions need to be more exagerated in the render. In the preview, the expression looks fitting, but after the render and post editting becomes more subdued. Along with getting the renders too dark (as one I did in the SciFi thread; couldn't see the smoke, except as nearly a black solid).
This one here, is of some changes and reducing the outlines (done as a Stroke effect; but this one is slightly blurred to reduce the hard black pixels). Please ignore the graphical balloon captions; those are from Photoshop; a dedicate comic program would be used.
As someone (still) working on a comic,
I know what you mean. I've been going back and forth, between near photo-realism, or comic; or graphic novel or novel with some pics; trying to get it perfect before starting. And not following the advice to just doing something, even if it is bad; just do it and then make it better.
More Non-photorealisitic Renders (NPR II)Figuring out a quick way to create faster renders (and post edits) by a comic-book look. Not as good as the Batman pic up there... (envy). But I think this is decent for a series.
Tried to rely less on Photoshop Poster filter (for coloring), while using charcoal and a couple of other effects. Yay, Nay or Meh?

I cast my vote with the "Yays." It has a good, clean look that is pleasing to look at. Definitely not looking over processed. Even though the outlines are only around the shapes themselves (got to admit I'm pleased to see the line following his jawline) but not the interior details (the strong outline around his shirt doesn't continue around his bicep where the shirt and skin meet), the outlines do help pull the figures out from the background. Overall, the effect is pleasing enough and if you can do this consistently from panel to panel I think you're on to something here.
Speaking of panel-to-panel. As someone (still) working on a comic, I can tell you one thing I've learned that is very important: You won't know how this style works until you replicate it to create a full page of your story. Honestly, until you see a few panels next to each other you're not really going to know if they fit together well, nor will you know if you're got a look that will work panel after panel, page after page. I spent quite a while working on individual images, but until I started putting them next to each other I didn't know for sure that I was onto something that would actually work.
Two things I would like to mention:
- I like your lighting on this page. It is clean, even and it makes the central character pop.
- If you are going to have a prominent black character in your story, double-check his skin tone. In this image, he's coming off a little too dark and in a more shadowy scene you might lose him altogether. Consider lightening his skin a little, or in your materials settings increase the reflections/specularity settings to give him better highlights. Lighting for people of color can be tricky, so please experiment with the settings a little more. What I'm seeing here is okay but I must question if the skin will hold up across an entire story.
Finally, I hope you don't mind if I mention your script. I absolutely LOVE LOVE LOVE the "old wardog" and "salty guts tingled" phrasing. WOW, that is evocative! It really sells the character in a few well chosen words. Kudos to you. But... (I guess you knew a "but" was coming), there are a few problems with thhe rest of the caption. Here's what you wrote:
The old wardog never second guessed himself. His salty guts tingled with an all too well sensation that an unseen deadly hunter lie just ahead.
Waiting for a trophy to be won."All too well" is not really a common phrase as it's used here; it's just odd. We're used to reading something more like: "His salty guts tingled with a sensation that he knew all too well.
Then there's "lie." That just doesn't seem finished. We would almost expect "lies in waiting" or something like that. But I would ask if that word conveys enough menace for this situation. Perhaps something more like this?
The old wardog never second guessed himself. His salty guts tingled with an all-too-familiar sensation that told him somewhere an unseen, deadly hunter was lurking just ahead. Out of sight. Hidden. Waiting for a trophy to be won by shooting all the ducks in the arcade.
And they were the ducks.
Okay, that whole arcade reference was something that just came to me, and I don't think it's all that good. But I do suggest changing "lie" to "lurking" or "secluded" or "stalking them" or something like that.
I hope I didn't come off as too negative or like a bit know-it-all. I like what I see here and hope you'll share some pages with us soon!
More Non-photorealisitic Renders (NPR II)I took my Fuse character that I designed into Unity and rendered him out with the MK Toon shaders. (I tried importing into Daz, but it didn't like his Mixamo skeletal rig, his arms and hands stretched in loops around his head! - shame because I wanted to see how he would look in Iray)
The original Unity render came out nice. I manipulated it in Photoshop and got quite an interesting Steam Punk type look.
Let me know what you think.
Those look great - I really like the second/more purplish one. :)
Thanks, the purple one is the original render straight out of unity.
Does anybody know if you are allowed to take Daz character models into Z brush and modify them there, only for the purpose of creating 2D renders? The reason I ask is I was just checking out the forums over at Z brush and realised there's a really cool NPR set of filters now available in the latest version of Z brush. It would be awesome to do one of images of really detailed characters in NPR toon style (Might be good for comic book covers etc.)
Someone made the top row artwork at zbrush central doing a spiderman model in toon NPR:
Obviously the software sin't cheap, but another option to consider
Daz 3D is part of

Connect
DAZ Productions, Inc.
7533 S Center View Ct #4664
West Jordan, UT 84084Licensing Agreement | Terms of Service | Privacy Policy | EULA
© 2026 Daz Productions Inc. All Rights Reserved.