-
G3F iris problem
Nope. It wasn't the size of the eyes either. No amount of morph fiddling fixed this, so eventually I decided to edit the iris diffuse map to bleed the brown to the edge of the iris (God knows why the PA didn't do this!)
Admittedly, there is now a slight black ring there for some reason, but it's certainly preferable to white!
A broken neck texture... (poser pro 2014)Under the Figure Menu, at the top, change the "Figure Skinning" and see if you get a different result.
If this is a "traditionally grouped" figure, and I don't really know, since I haven't used G2, then Poser will sort of "anchor" the vertices of bounded groups to prevent seam-splitting between groups. (It sort of dupes verts to do that in fully welded, yet grouped, objects.)
What can happen when certain sort of morphs are applied is that, depending on the Skinning Method, you can end up with an extra set of verts during some morphs. It all depends on the morphs, really. Try different skinning methods and, if this doesn't correct the issue, use the Morph Tool to bring that geometry back down to where it should be. (It's probably using the base "Diffuse Color" for those faces and not the padding area or background color of the actual texture.) If you find it is using the background color of the base texture, then you need to add some padding area around the texture region, itself. (ie: Using Photoshop or Gimp, clone-brush around the edges of the face texture to extend them a bit to cover faces that they are not covering.)
You may have better results if you apply a ready-made texture pose for that texture instead of cut/paste. (It may help compensate, but I don't know that it will.) Also be sure that both the U and V scale are set to 1 in the Image Map box for the texture in the Material Room.
PS - And, another thing :) - Check to be sure that the seams between the neck and head group in G2 aren't truly split in the original model. I can't check because I don't have it. Just load the base original figure from your library and apply the "Smooth" brush action with the Morph tool to that region at a high setting. If a split seam developes, then the geometry was likely split to begin with and it might be causing issues. Rigging deformers/joint settings could be contributing to the issue because of this.
How to? Custom Star Wars morphs for M4 and V4Update!
(Sorry, I've been out of town for awhile. May have to go out of town next week, so working a bit on the project this week, as I have time.)
OK, imported morphs to check for any unsightly deformations during Expression Poses for the mouth, just to check to see if I had any major issues. And, as you can see, I did not!
1) Default M4
(Just checking the topology of the basic mouth/lips before moving with the other major areas. I'd hate to do it and then figure out I had to redo major steps.)
2) M4 Expression Smile=1
Was planning on bulking up cheeks, anyway, so it'll be smoother in that area.
3) M4 Expression Open Smile=1, Mouth Open=1
Nice, basically smooth combo expression. Sorry, he's had his teeth and gums pulled, for the moment. He'll have 'em back once he's proved he's not dangerous... ;)
4) Now it's time for the tough stuffs... How will he fair with the dreaded Lip Pucker=1 combined with Lip Pucker Wide=1????
Booyah! Some slight crowding on the centerline, which I'll fix, and the rest looks as good as a weird alien with ducklips is gonna get. :D
IOW - It appears that most expressions for M4's mouth and lower face will work fairly well, considering the new topology. The finished morph will have a bit more work done on the mouth to get the "crocodile corners/cheeks" impression correct, but there's no significant geometry crowding/ripping/weirdness going on with what I have so far. So, this is truly "doable" with decent results for existing M4 morphs. That means you can load expressions and get the basic mouth expressions, which are going to be Gunganguy's most emotive bits, to work pretty well. Head and neck rotations look very good, too, so there won't be much weirdness there, either. As before, everything on the z-axis past the nose is going to change, with eyestalks and floppy bunny ears being conforming items. (Haven't decided on if I'll use M4's eyes, but it's also a possibility, since loaded expressions should work fine and it'd be nice to use the eye expressions some of them come with. I'll see how it goes.
PS - Gungan mouths sometimes, due to the animators, pull back towards the skull more during some expressions. I'll inlcude a few "fix" morphs to give more gungan-like movement of that area towards the rear. Gungans have a huge, much larger, range of facial structural range than... any realistic species should have.. In reality, for primates, there's a reason for this - If primate facial structrues varied so widely in "real-life" primates, we'd have difficulty in determining an individual's facial expressions, which is critical social input for us. I guess gungans might use their ears or something a bit more to communicate emotions... Or Lucas was droping acid when he approved the character designs. :)
Lastly - Thanks for the project idea! It's tough, abdnormal, crazy-morphing, but that's why I signed on, so it's all good!
Poser Library into daz studio???I have been a long tim e user of poser pro 2012 but want to switch over to daz studio. Is there a way i can transfer my poser pro library/models into daz? Would be a shame if i was not able to use my models
G3F iris problemThanks. That's helpful. Maybe I had increased the size of the eyes (I need to check that).
But it would surely help to avoid this problem altogether if the iris map went right to the edge of the iris disc! I am not sure why there needs to be a bit of white space around the edge. It's just asking for trouble! ("I know, let's introduce a problem that we then need to add a correction morph to fix"
A broken neck texture... (poser pro 2014)This is a bizarre occurence I can't quite figure out.
I have sort of corrupted one of my figures lately (he crashes everytime I use him with clothes, so I'm moving everything to the fresh G2M)
I'm using Male Model texture that I've edited to suit the figure.
On one side it works
on the other, it doesn't...
Same texture, same morphs active on both of them
but there's this weird white seam in the neck on the second one.
I even zeroed out the only really bizarre morph I have (it's from GenX, thought it might be a problem) but the white was stil there
Aditionally I even loaded the skin by itself from the library but the white seam was still there.
Why is this happening?
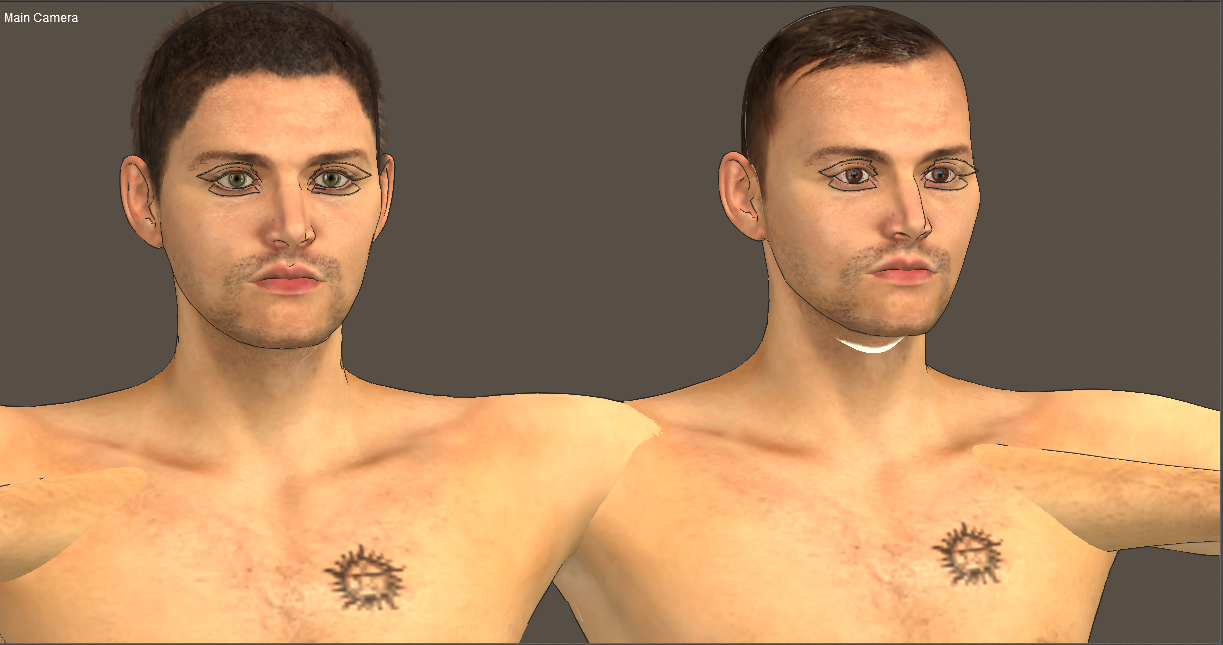
Have you checked that its using the correct UV?
Morph distorts while not at 100%I had one doing something similar...except it went 'normal' a bit before 100% (somewhere between 80 and 90%) and then stayed normal. I closed out Studio, re-exported the morph from Blender, overwriting the old one. Started Studio back up, reloaded a fresh copy of what the morph was for and reimported...this time it worked smoothly the entire time.
A broken neck texture... (poser pro 2014)This is a bizarre occurence I can't quite figure out.
I have sort of corrupted one of my figures lately (he crashes everytime I use him with clothes, so I'm moving everything to the fresh G2M)
I'm using Male Model texture that I've edited to suit the figure.
On one side it works
on the other, it doesn't...
Same texture, same morphs active on both of them
but there's this weird white seam in the neck on the second one.
I even zeroed out the only really bizarre morph I have (it's from GenX, thought it might be a problem) but the white was stil there
Aditionally I even loaded the skin by itself from the library but the white seam was still there.
Why is this happening?
Update:
To test things, I loaded him again, rendered him, found the white area still there. I put another skin on him. No white spot.
I put the skin back on him; the base skin, the one that I haven't edited. The white spot returns.
I started a new file, I loaded G2M, I applied the skin, the white spot is there again.
Someone please explain to me why this has happened.
Why this skin worked a few months ago but has now somehow broken
I've done nothing to the file itself. There's no reason for it to be like this.
Morph distorts while not at 100%Hi!
I know there are a lot of topics on morphs distortions, but I could`nt find something specific to my case.
I am loading a ZBrush morph for a hair through Morph Loader Pro. Problem is, when applying the morph, the mesh explodes everywhere untill it reaches 100%. At 100% it looks correct. It`s not the first time I work with morphs, but I never had this issue. The scale is correct and I`m not (knowingly) messing vertices.
If it wasn`t for the fact it lloks as intended when fully applied, I`d think there is indeed a vertex order issue, but this is weird. Anyone had this issue before? O.o
Problem with custom morphHey everyone, I need some help with something, but unfortunately due to the anture of the morph ive created, I cannot post pictures(its an adult asset). I am editing the omgdick3 to allow the anus to open up fully. Ive gotten my morph made in zbrush, and have ONLY edited the anus, but for some reason when I apply the morph, the testicles increase in size as well. Any idea what may be causing this?
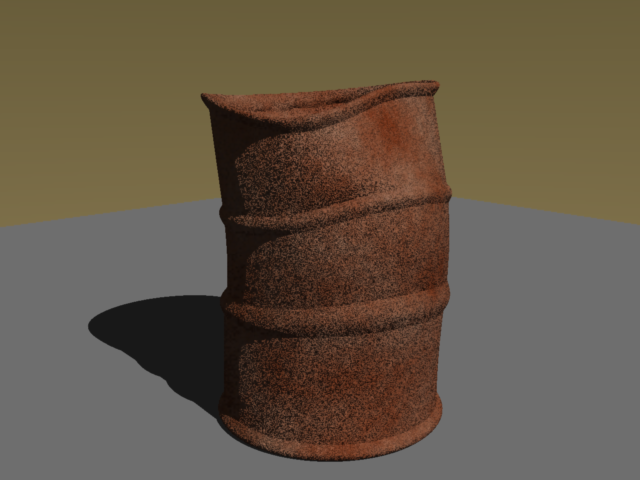
Animation Clubs 3rd animation finished. Watch the final film now.Wdgjohn, Your barrel model is perfect for this animation..

While buitlings, autos and props have been created... I took the time to add morphs. Now all I need is to do a better job. I'm including one .car file along with examples of a few morphs... I added 4... sorry... got a bit carried away. Be careful with the "crush" morph... it is easy to overdue and will not look good with various colours. In my haste I accidentally created a few n-gons, drat.
This is rather low poly... I need a bit more geometry to create the tiny dings I'd wanted to add. :(
I'm not adding this to Anim Club's downloads because I'm not happy with it yet... need to start over and redesign. It may be good enough for this animation... I don't expect this version to be included. Gotta go... more learning/experimenting to do yet.
Desert Dude , the cactus is looking good. I will probably upload a bunch of stuff to the database later on.
Quote from DesertDude
"Here is the first cactus, sorry I started yesterday morning all fresh and ready to do a lot when I encountered Normal Map hell...I knew something was a bit off the other night. I thought Normal Maps were pretty straight forward to understand, boy was I wrong. Anyway, I think I solved things, but it took a long time to trouble shoot. More coming soon.
There is a Mixer in the color channel mixing a color with the texture map. The texture map got a little "hot", so you can mix any color with it to try to get it to fit into your environment a bit better."
G3F iris problemThe iris isn't attached to the eyeball...the correction morph is moving it in/out a little to keep it from intersecting/poking out/creating a visible gap with the eyeball.
Here is the correction morph at zero:
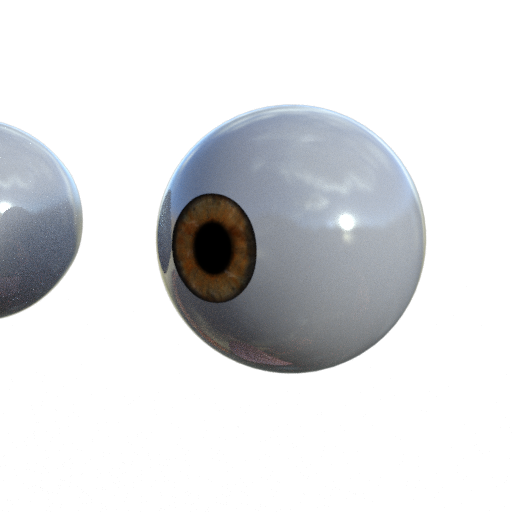
A -100%
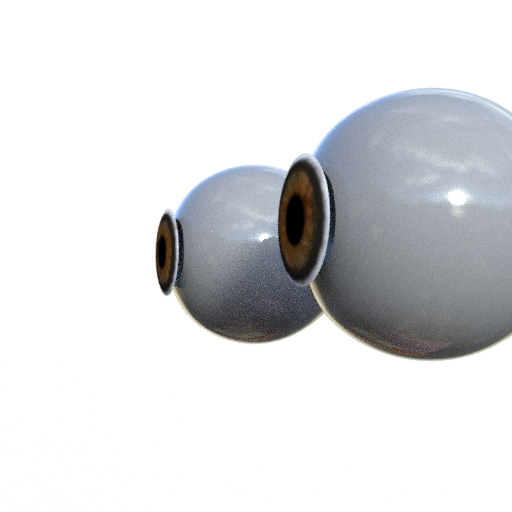
At 100%

And at -7.1%
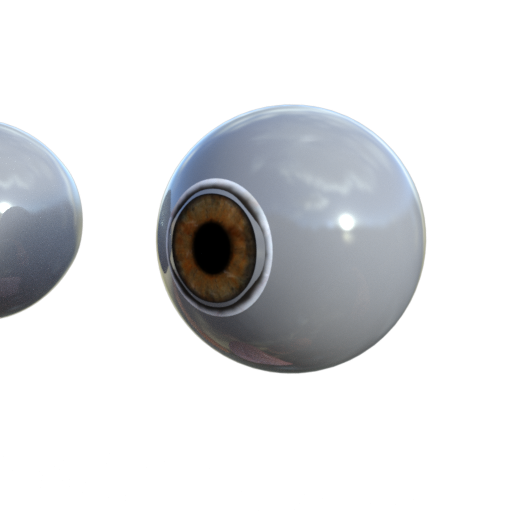
Now other eye morphs and size changes, especially changing the size of the iris will affect how much correction will be needed.
Question for DartanbeckBesides the costumes, this image also shows what I was talking about as far as my browser setup is concerned.
The Dark Star, by Stonemason, is all set up as a Base scene in my Browser in my own custom browser setup.

Additionally, Rosie (in this and other costumes), Dart (in this and other costumes) ahve their own custom browser spots, since they are the two main characters.
The Sci-Fi crew members are also saved into the browser just as they appear in this image, except for position and, perhaps, poses. They do each have an individual pose - different than all others when they're saved to the browser. Dart and Rosie both have hand made poses - made by rotating individual joints, not using morph dial posing features - the SciFi crew poses are loaded from Predatron's LoRez figures poses and then tweaked a bit by hand (by rotating joints - not using morph dials)
The reason I do not use morph dial pose features for saved characters is so that Pose files work as expected when/if they're used. Morphforms or morph dial operated poses will alter poses loaded from the library, adding extra work - digging through the hierarchy to find the pose dials used, and remove their values.
I do love using Morphforms in my work. They're great for tweaking aspects of animations. But I use these AFTER I animate, not in initail character file saves.
Coming Soonish - MetamorphYou can make a stand-alone base figure. You can make add-ons for an existing figure. What you cannot do is make a figure that is designed, or tweaked, to use content from another figure (via its basic shape or a clone).
At least, I suppose, content from one of DAZ's own (or its PAs') figures. How much would Daz interfere with, say, G3M clones for old Poser (or S1M "Project Human") figures? I don't mean Dork wearing Mike7 duds, but vise versa.
Making a morph/clone for, let's use MakeHuman, G3M that looks like/matches the MakeHuman figure would be fine...the usage for MH allows that. Making a G3M 'clone' for MH...not allowed. Clones are just morphs saved in a particular manner/with particular settings. Matching your original figure to Genesis, Generation 4, etc is the problem. Matching them to your figure...as long as it is totally yours or you have the right to do so, no problem.
G3F iris problemWhich character is this? If her eyes were enlarged, the limits on the correction morph could now be too low...
it is Chiyo HD for G3F (by Raiya).
I did try switching off limits on the parameters of the iris correction morph, but at extreme values (e.g. 500% it seems to move the iris inside the skull - which looks extremely odd).
I have never seen these white rings around an iris before. Do you know what causes it?
And what is the iris correction morph actually doing?
G3F iris problemWhich character is this? If her eyes were enlarged, the limits on the correction morph could now be too low...
G3F iris problemIs that image a render?
If so, check for a displacement map on either the iris or sclera...unless SubD levels are increased, for Iray, displacement maps will move too much of the mesh and 'override' the adjustment morph (too much large scale movement for the morph limits).
hi. yes, it's a render.
I checked, there is no DISP map on either the iris or the sclera
G3F iris problemIs that image a render?
If so, check for a displacement map on either the iris or sclera...unless SubD levels are increased, for Iray, displacement maps will move too much of the mesh and 'override' the adjustment morph (too much large scale movement for the morph limits).
Animation Clubs 3rd animation finished. Watch the final film now.
Guys - I'm sorry, I probably won't be able to finish the buildings in any reasonable amount of time - some personal stuff came up unexpectedly. I am putting everything "as-is" on my DropBox for you.
Link: https://www.dropbox.com/sh/2twaec306rwl763/AACTqZMSl6Av_fsZbeFdkCI0a?dl=0
What's done:
- Buildings Modeled
- Buildings UV Mapped
- Buildings Textured
What's not done:
- Separate out any windows and doors that need to be able to move
- Rig and/or add constraints to those items
The Zip contains a .CAR with the model and textures, plus I have also included the actual texture maps separately in case they didn't save within the file for some reason.
Sorry again - I really wanted to try and do a couple more basic buildings that could be replicated to make more blocks but I don't think I will have time until much later in the week.
Plenty good enough... Thank you so much MDO!!! Seriously!
I've just had a terrifying bit of family news fall on me as well. I'll still try and cope... but my time has been seriously limited - possibly. We'll see.
What you've completed so far should be plenty good enough for us to be able to take it from here for this animation project. It looks fantastic! Thanks again!
I compliment all on being such great and quick modelers! Very nice work indeed!
 While buitlings, autos and props have been created... I took the time to add morphs. Now all I need is to do a better job. I'm including one .car file along with examples of a few morphs... I added 4... sorry... got a bit carried away. Be careful with the "crush" morph... it is easy to overdue and will not look good with various colours. In my haste I accidentally created a few n-gons, drat.
This is rather low poly... I need a bit more geometry to create the tiny dings I'd wanted to add. :(
I'm not adding this to Anim Club's downloads because I'm not happy with it yet... need to start over and redesign. It may be good enough for this animation... I don't expect this version to be included. Gotta go... more learning/experimenting to do yet.
Plenty good enough for this. I wanted them as low-poly low-focus elements, so they're plenty good enough for that! Thanks!
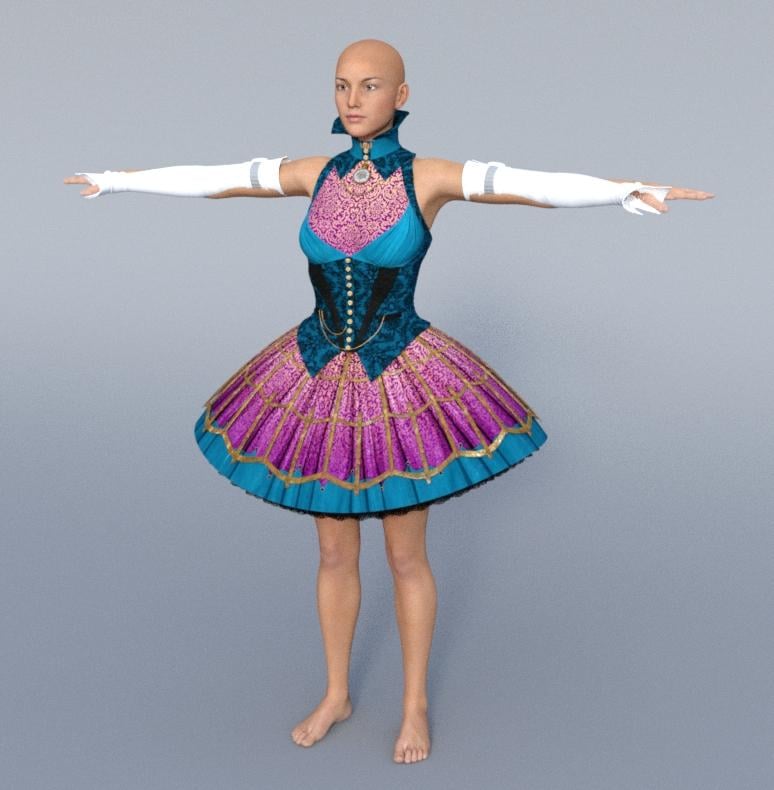
RDNA Bundles- Deals and ReviewsI am thinking about buying the Hattie Madder outfit: http://www.daz3d.com/hattiemadder for Victoria 4, I wonder how it autofits to Genesis 3 female, have anyone tried it? the shoes probably doesn't work so well but the rest of the outfit?
Here's the dress autofitted (Full Body) to G3F, had to morph it a bit (lots of fit morhps included) to remove some poke-through. The sleeves though won't fit, don't know if there's a way to make them work. Iray render with default texture, no iray shaders.
Daz 3D is part of

Connect
DAZ Productions, Inc.
7533 S Center View Ct #4664
West Jordan, UT 84084Licensing Agreement | Terms of Service | Privacy Policy | EULA
© 2026 Daz Productions Inc. All Rights Reserved.