-
AIUTO...CHI CONOSCE L’ITALIANO? PARTE DODICI
Che bello! Hanno sistemato quella brutta faccenda del DIM! Ora posso scegliere quale usare e non mi forza ad usare quella trappola di Central!

Però vedo che si sono trasferiti, non stanno più a Salt Lake City ma a Sale Lake City.

Vabbè che "salt" vuol dire "sale" in italiano... Ma da loro vuol dire "svendita".
 Beta for DazCentral, your new Content Manager
Thank you!
Install Manager is back!
I guess enough people complained that it was put back on the after purchase page.
------------------------------------------------------------
Download through

Download and install your products automatically.
DOWNLOAD AND INSTALL
Download through DAZ Install Manager
Download and install your products automatically through DAZ Install Manager.
DOWNLOAD AND INSTALL
Real World Camera Collection by SerumPurchase the camera collection here
https://www.daz3d.com/real-world-camera-collection
Hey there! Serum here. I just wanted to post what i wrote for the included PDF so people had a resource for how to use the cameras.
feel free to comment. I will answer what i can but please bear in minds that i am not on the forum too often.
First of all I want to thank you for purchasing my real world cameras. It's support from people like you that allow me to live the creative life that I now live.
Outside of being a 3D artist on Daz I am a professional photographer and have been for over 15 years at this point.
As you can imagine I have a lot of lenses for my cameras!
Each and every lens has a specific use and some work better for certain situations than others.
Unfortunately out of the box Daz does not come with what i would refer to as real world lenses.
Instead daz provides a suite of tools for you to craft your perfect lens.
That is where I decided I would fill the gap because as a working professional photographer I like to reach for my favorite lens and so i wanted the same for when i am using Daz.
And such I have created a collection of real world cameras that I can reach for when creating my renders.
At first it is a little fiddly to get to grips with but keep at it eventually the process becomes second nature. (much like photography)
How real cameras work.
Cameras really have not changed that much over the past 100 years but in basic the way that the camera works is light hits various surfaces and bounces off surfaces then goes into your lens which is then focused onto either a sensor or film.
In rendering it's essentially the same process but the direction of light is reversed.
So in the case of 3d rendering we start with the sensor and the rays shoot through the lens and then bounces around the scene until it finds a light source.
It's okay you didn't need to know that but the overview gives us a good place to start.
Camera Formats
There are many types of cameras out there but the majority fall under these 3 categories which are denoted by their format type.
-
Full Frame- These are the most common type of camera out there and are denoted with a sensor size of 36mm across. Most professional cameras tend to be Full Frame as such I have created the most options for this category.
-
Medium Format- These cameras have a larger sensor to capture the information usually around 6-7cm which give a wider field of view than the full frame cameras.
-
Large Format- These are the big cameras that you will have seen where they often have large bellows and often the photographer would be under a cloak behind the camera. The capture medium on these cameras is measured in inches because the sizes can be quite large.
Lens Types
There are many lens types out there all denoted by their size in millimeters.
For this Example I will stick with assuming that the camera we are using is a Full Frame camera.
The lens types fall into 4 Categories that are provided in the collection.
-
Wide Angle Lenses - These lenses have a wide field of view and let in a lot of the scene and fit it onto the sensor. Sometimes that angle can be so wide that when all of that information is presented to the sensor it can be distorted due to the curvature of the lens. This effect may be wanted or not wanted depending on the shot. The centre of the image will be less distorted than the outer edges so it is advised to have your subject placed more central on lenses with distortion. Common Wide angle lenses which are included in the collection are as follows: 16mm, 24mm, 35mm. The way to know which is the wider angle is the smaller the number the wider the angle.
-
Normal Lenses- These lenses have little or no effect on the field of view. As such they are meant to mimic what the human eye sees without zooming in or distorting to fit in more of the scene and are incredibly useful for a more natural look.
Lenses in this Category which are included in the collection would be the 50mm and 59mm lenses
-
Telephoto Lenses- These are classified as any lenses that have a smaller field of view than a normal lens. In short what that means is that they cover less of the image than a normal lens. The effect of this is that the telephoto lenses fit less onto the sensor than the normal or wide angle lenses but because the image still fills the sensor this has the effect of zooming in. The way to determine how zoomed in is to look at the millimeter size which works in the opposite way to the wide angle lenses. The higher the milimeter the more “zoomed in” the image.
Lenses included in the collection: 85mm, 105mm, 120mm,150mm, 200mm.
-
Portraiture lenses- These lenses are specifically crafted for shooting living subjects and include all of the previous types of lenses but have been designed to be as flattering as possible.
Let's Talk Compression
You may or may not know this but all lenses have an artifact called compression.
Compression is kind of what it says on the tin in that the scene is compressed.
What i mean by that is the background that is behind your subject can be made to look closer or further away than it really is.
Wide angle lenses will push the background further away whilst telephoto lenses will bring the background closer literally compressing the image.
This is something that the photographer takes into account and it becomes an artistic choice.
Let's put this into practice.
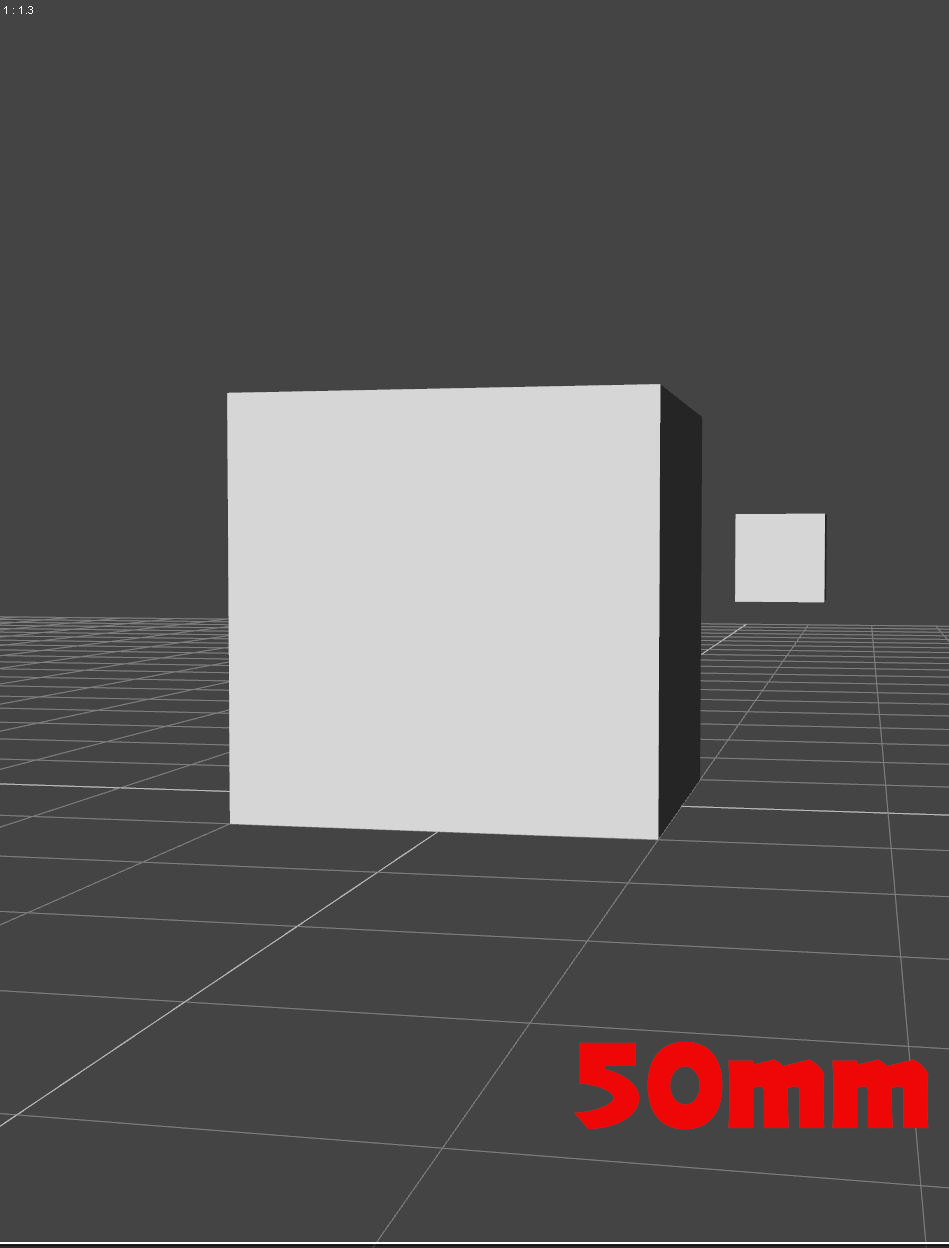
Take a look at the example below where I have placed 2 cubes into a Daz scene.
The closer cube in this example is our subject and the cube further away will be our background.
The cube positions do not change only the camera positions so they all roughly have the front cube at the same size across all three images.
Look at the rear cube and the differences between a Wide angle lens, A normal Lens and a Telephoto Lens.
As you can see above the more wide angle the further back the background appears to be whilst the more zoomed in you are the background appears closer to the camera.
Aperture Blades and Bokeh Balls!
Aperture
Inside each real world lens is a series of blades called the Aperture. What this does on a real world camera is control the volume of light hitting the sensor but this is not something we will concern ourselves with as we have other ways in Daz of controlling how bright the image is.
Instead we will concentrate on the other function of the Aperture which is to control our Depth Of Field (DOF) which is essentially how much of our scene is in focus from the camera to the background.
Aperture settings are represented by an Fstop number such as F5.6, F8 etc.
The way it works is the higher the number the more things that will be in focus.
Conversely the opposite is true the lower the number less things will be in focus.
What you choose is all artistic choice.
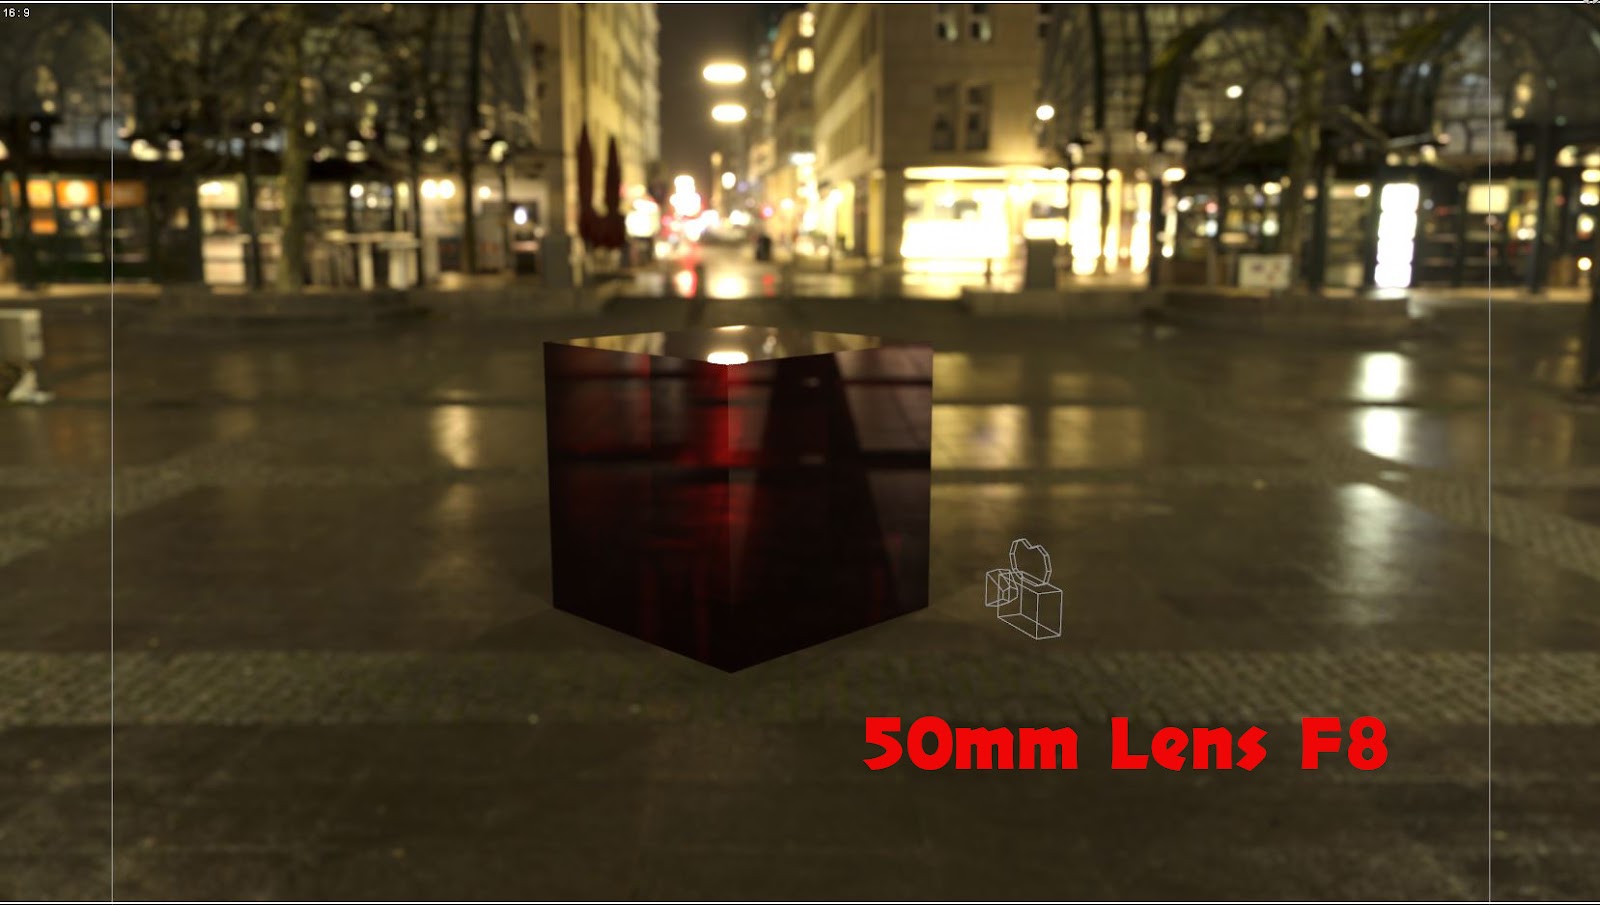
Here are some examples below of our cube in a scene with a HDRI Background. Notice how the background changes as the Aperture is opened up wider.
This is a powerful creative way of separating your main subject from the background or including the background.
It's different with different lenses and distances!
There is no set amount of space that will be in focus; it changes between lenses and distance to the subject.
This is why photographers have so many lenses to provide those creative choices to get the shot.
Here is the key to aperture use.
-
The closer to the subject the camera = less area that will be in focus at any F Stop
-
The further away from the subject the camera = more area will be in focus at any F Stop
-
The more Telephoto the lens = The less area that will be in focus at any F Stop
-
The more Wide Angle the lens = The more area will be in focus at any F Stop
What this ends up meaning is you may need to choose between the lenses you have in order to achieve the right balance of what is in focus or not.
Aperture Demonstration.
It's all about them Bokeh Balls!
Wikipedia describes Bokeh as “bokeh (/ˈboʊkə/ BOH-kə or /ˈboʊkeɪ/ BOH-kay;[1] Japanese: [boke]) is the aesthetic quality of the blur produced in the out-of-focus parts of an image produced by a lens. Bokeh has been defined as "the way the lens renders out-of-focus points of light".[5] Differences in lens aberrations and aperture shape cause some lens designs to blur the image in a way that is pleasing to the eye, while others produce blurring that is unpleasant or distracting ("good" and "bad" bokeh, respectively).[6] Bokeh occurs for parts of the scene that lie outside the depth of field. Photographers sometimes deliberately use a shallow focus technique to create images with prominent out-of-focus regions.”
Translated this means the pretty out of focus balls that you will see in images. it's usually where pinpoints of light are in the image which are out of focus which gives a pleasing look to the image.
The more open the aperture the more pronounced the bokeh.
Let's take the previous example to see the bokeh in the image.
We will use the F1.8 Aperture image and I will highlight those lovely Bokeh Balls for you.
Should they be that shape?
Well that is an artistic choice you have.
The shape of the bokeh is determined by how many aperture blades there are in the lens.
The standard lenses included with the real world lens collection are based on classic photography lenses which have 9 blades.
Luckily included with the collection are the portraiture lenses all of which have a massive 21 blades in to create a more circular bokeh.
See the difference below.
But why do I need to know all this?
In order to make the best choices for the camera you pull out of the bag you need to know how your choice affects the image.
Photography is all about balance and the effect of the sensor size works in conjunction with the lens and aperture
It's all your artistic choices
Some basic things below to remember about the artist choices you will be making .
-
The Larger the format you choose the wider field of view (More Wide Angle)
-
The Smaller the format you choose the more narrow the field of view (More Telephoto)
-
The smaller the mm on a lens the wider the angle (Zoomed out)
-
The higher the mm on a lens the more telephoto (Zoomed in)
-
The smaller the mm on a lens the further away the background will look
-
The higher the mm on a lens the closer the background will appear in your renders.
-
The lower the Aperture number = The less things in focus
-
The Higher the Aperture number = more things in focus
Conclusion
Wow that is a lot of information to take in but i wanted to give you a crash course so that you have a baseline of knowledge to draw from so that you can use this tool in such a way that you get the most out of your renders.
Where Should I Save Things?Daz Central and Daz Install Manager (DIM) are external appliations using the same zips, the latter allowing more configuration. Installing within Daz Studio, through the Install pane or one of the product lists, is Daz Connect.
Okay... so which is most compatible with Smart Content? Or does it matter? I can't backtrack far enough to figure out how I installed the Gen3 Essentials, but I think it was in the original program download, right? Seems like that content should be installed with 100% connection to Smart Content, but it wasn't...
I find this baffling. I'd think it was somebody's job to make all this stuff play nice together.
HeadShop 13 with LoveChildMaybe check your account again, John Alexander Hopper. After reading your post, I went and checked My Account and I had two files to download under the manual install. The second one was the Morpher.
One question from me though. Since this was an upgrade (for me), I assume I was suppose to let it install to the same folder as version 12 and then allow the morpher folder to overwright what was already there. Correct?
Thanks.
I have purchased HeadShop 13 with LoveChild on 21 June. As yet I am still unable to use it due to the fact that the purchased product does not show up in DIM, and only one of two files are listed in the Manual Download section. Daz Central is a no-go for me after being burned with that abomination last week. From reading the documentation that came as part of the first file, I am missing something called 'Morpher'.
I have had a support ticket open with DAZ for a couple days now, with no replies or any sign of activity. I know they're busy but still a pretty poor show when your customer has spent almost $60 and is unable to make use of the product they purchased!
I'm keen to see what results I can achieve with HeadShop 13, and as soon as I have this situation resolved I might even find out!
(* edited because I managed to mis-spell 'DAZ' of all things! )
Just re-checked. Definitely only the one file to download. Still with a name ending '1 of 2'.
HeadShop 13 with LoveChildI have purchased HeadShop 13 with LoveChild on 21 June. As yet I am still unable to use it due to the fact that the purchased product does not show up in DIM, and only one of two files are listed in the Manual Download section. Daz Central is a no-go for me after being burned with that abomination last week. From reading the documentation that came as part of the first file, I am missing something called 'Morpher'.
I have had a support ticket open with DAZ for a couple days now, with no replies or any sign of activity. I know they're busy but still a pretty poor show when your customer has spent almost $60 and is unable to make use of the product they purchased!
I'm keen to see what results I can achieve with HeadShop 13, and as soon as I have this situation resolved I might even find out!
(* edited because I managed to mis-spell 'DAZ' of all things! )
1. Please realize that HeadShop is manual install, not DIM (see enclosed). There is also a README in the same folder to guide installation.
2. There is a folder "morpher" inside the zip file (look again).
3. Consider that we in California are 16 hrs behind Japan. A message sent at 12:41 am California time is answered now, 6 hrs later at 6:39 am local time. That is not slow.
Thank you for the response. However if you re-read my message you will see that I was saying that DAZ support was being slow, not you. Incidentally, that support ticket is STILL unanswered.
There is NO folder called Morpher inside the zip file. there are 2 files - HS13full.exe and README.pdf (see attached screen capture)
*EDIT: Your screenshot does indeed show 'Manual Install' - however it says right next to that 'DAZ Central' which is the supposed replacement for DIM, so it's rather a moot point.
Where Should I Save Things?Daz Central and Daz Install Manager (DIM) are external appliations using the same zips, the latter allowing more configuration. Installing within Daz Studio, through the Install pane or one of the product lists, is Daz Connect.
New Face MoCap ComingI believe Daz Central's approval of new products - especially complex ones like this - have slowed due to the pandemic.
But I CANNOT WAIT for this, or the mixamo addition.
I wonder whether these products will come to the Daz store at all. Mixamojo and Facemojo are already being sold on Laylo's website.
Can't get Daz Studio to install on a new computer.[Can't get Daz Studio to install on a new computer] Via Daz Central. It was stuck at "Installing... 78%" for hours, so I canceled the installation and tried again; now it's stuck at 71%. What can I do about this?
How do I install DAZ on DRIVE DYou don't have to do anythign more than tell the application where to put the content - you certainyl don't (bugs and errors aside) need to fiddle around with the data/folder tree. The new daz Central does, I think, ask which drive to use and goes from there - at the expense of custom paths, which many of us want, but it's there as an option.
HeadShop 13 with LoveChildMaybe check your account again, John Alexander Hopper. After reading your post, I went and checked My Account and I had two files to download under the manual install. The second one was the Morpher.
One question from me though. Since this was an upgrade (for me), I assume I was suppose to let it install to the same folder as version 12 and then allow the morpher folder to overwright what was already there. Correct?
Thanks.
I have purchased HeadShop 13 with LoveChild on 21 June. As yet I am still unable to use it due to the fact that the purchased product does not show up in DIM, and only one of two files are listed in the Manual Download section. Daz Central is a no-go for me after being burned with that abomination last week. From reading the documentation that came as part of the first file, I am missing something called 'Morpher'.
I have had a support ticket open with DAZ for a couple days now, with no replies or any sign of activity. I know they're busy but still a pretty poor show when your customer has spent almost $60 and is unable to make use of the product they purchased!
I'm keen to see what results I can achieve with HeadShop 13, and as soon as I have this situation resolved I might even find out!
(* edited because I managed to mis-spell 'DAZ' of all things! )
HeadShop 13 with LoveChildI have purchased HeadShop 13 with LoveChild on 21 June. As yet I am still unable to use it due to the fact that the purchased product does not show up in DIM, and only one of two files are listed in the Manual Download section. Daz Central is a no-go for me after being burned with that abomination last week. From reading the documentation that came as part of the first file, I am missing something called 'Morpher'.
I have had a support ticket open with DAZ for a couple days now, with no replies or any sign of activity. I know they're busy but still a pretty poor show when your customer has spent almost $60 and is unable to make use of the product they purchased!
I'm keen to see what results I can achieve with HeadShop 13, and as soon as I have this situation resolved I might even find out!
(* edited because I managed to mis-spell 'DAZ' of all things! )
1. Please realize that HeadShop is manual install, not DIM (see enclosed). There is also a README in the same folder to guide installation.
2. There is a folder "morpher" inside the zip file (look again).
3. Consider that we in California are 16 hrs behind Japan. A message sent at 12:41 am California time is answered now, 6 hrs later at 6:39 am local time. That is not slow.
[In store now] Felidae by AM - Snow Leopard [Commercial]For the folks interested, Snow Leopard is now finally available: https://www.daz3d.com/felidae-by-am--snow-leopard
"Mysterious, beautiful and very difficult to spot, the Snow Leopard is native to the mountain ranges of Central and South Asia and like all the other big cats, is critically endangered.
Finely reproduced for Daz Studio and built on the Lion base figure, the Snow Leopard is a must-have, coming with a wide collection of poses, morphs, and controls to customize and finely tune every detail.
Get the Snow Leopard for your outdoors, prehistoric or storybook projects!
Optimized for both Iray (dForce and Catalyzer) and 3Delight. Catalyzer version 1.9 required for use with the Catalyzer Iray figures."
HeadShop 13 with LoveChildI have purchased HeadShop 13 with LoveChild on 21 June. As yet I am still unable to use it due to the fact that the purchased product does not show up in DIM, and only one of two files are listed in the Manual Download section. Daz Central is a no-go for me after being burned with that abomination last week. From reading the documentation that came as part of the first file, I am missing something called 'Morpher'.
I have had a support ticket open with DAZ for a couple days now, with no replies or any sign of activity. I know they're busy but still a pretty poor show when your customer has spent almost $60 and is unable to make use of the product they purchased!
I'm keen to see what results I can achieve with HeadShop 13, and as soon as I have this situation resolved I might even find out!
(* edited because I managed to mis-spell 'DAZ' of all things! )
Beta for DazCentral, your new Content ManagerI'm wishing I would have read all of these comments before installing and running DazConnect. I'm now having to spend HOURS restoring backups of my folders because DazConnect made assumptions that were not correct.
My recommendation to users: If you have customized installation paths in DIM and DAZ Studio, stick with DIM.
My recommendation to DAZ: 1) Use the EXACT paths setup by DIM and in the DAZ Studio custom paths. 2) Prompt and warn the user before making such changes perminant. Example: "Your current content is set to V:\custom\documents\DAZ 3D\InstallManager\ManifestFiles. DAZConnect would like to change it to C:\My Daz Library\DAZ 3D\InstallManager\ManifestFiles. Do you want to allow this change? Y or N" 3) Keep DIM around until folks with custom paths can test it for you. Compensate those testers as it will require a LOT of effort on their behalf to make sure it works. (My experience today is an example of that. DazConnect completely screwed up my content.) DazConnect is NOT ready for prime time.
I would make the feature suggestions in 2) via https://www.daz3d.com/help/help-contact-us
3) need not be a concern: Daz Central uses the DIM zips and Central is essentially the same as DIM but with fewer decisions for the user to make - DIM is going to remain for more experienced users who are likely to need at least some of those additioonal options.
That's good to know DIM is staying around.
Thank you!
Where Should I Save Things?Can't figure out how to install this again except through Daz Central, and that gives the same result. The video under the Install tab is a dead link...
Figured out how to uninstall from the Content Library, and then reinstall from there, and now everything seems to work.
It's hard to emphasize how truly aggravating this file management system is. I imagine that somebody has reasons for wanting several different ways to do the same thing, but at the very least, it should be crystal clear where everything is actually going, where the system is searching for things, and how to set default pathways up from the relevant tools themselves.
To be fair, though, almost every package I've used for related purposes seems to have something similarly bizarre- but different- going on in their file system. This only makes it worse, though, because it's harder to remember the 'right' way to do things once you've figured it out in the twenty-third program...Where Should I Save Things?I spoke too soon...
So, I don't see any of those circled triangles anywhere. If I click 'browse to file location', the figure is shown in My Daz 3D Library. It still will not load. Right click on the icon, there's no option to delete it. There is a 'group as' button, and under that is a checked box for 'None' which cannot be unchecked.
I also see a few assets, like G3F, that show a different kind of icon with a white picture frame with a triangle and exclamation point in it. This will not allow 'browse to file location,' but otherwise behaves like the first one.
Daz Central shows G3 Starter Essentials, where I presume these items came from, as installed.
Since I can't uninstall things from Smart Content that it doesn't believe exist, I'll try to uninstall them from Daz Central- but how should I reinstall them to make them work right?
Animation in Daz Studio.Split to its own thread as it is not about Daz Central
i downloaded daz studio 4.12 but lipsync was missing what do i do i really need this my boss is very angry
LipSync is 32 bit only, so you need to install that version of DS to set up the voice tracks. You can then save the result and open in the 64 bit version for further work
How do i render an animation i created
In the Render Settings pane you need to set the render type to Image Series or Movie - the former is best as it iis easier to recover from errors or to correct a short segment, then stitch the images together in a video editor. Whichever you do you will need to set the filename as the render goes to disc rather than appearing on screen.
New install- is there an optimum choice of directory locations?I've not used Daz Central either, and I'm in no hurry to do so given the horror stories I've read here. DIM works fine, why change it?
What do you mean by "will my bought items in DIM be transferred across?" My understanding from your original post was that your HDD had failed, you'd lost your existing bought content, and would need to re-download it. If that is the case, then the list of items that you've bought is held on DAZ's servers and can be downloaded via DIM or DC as you choose.
If you still have all those downloaded products somewhere accessible locally, then you can copy them to a directory of your choice and tell Daz Studio and DIM where to find them (Daz Central too, I assume, though this is where people seem to have had problems). I started a thread about this last year, when I moved my own content to an external drive: https://www.daz3d.com/forums/discussion/332926/moving-daz-assets-from-one-drive-to-another
New install- is there an optimum choice of directory locations?It's arrived, whee! Ok, a final question: it's been a while since i downloaded anything from the installer. When i re-establish my content library, do i just use daz central; will my bought items in DIM be transferred across? I haven't used daz central yet so any tips would be appreciated :)
Daz 3D is part of

Connect
DAZ Productions, Inc.
7533 S Center View Ct #4664
West Jordan, UT 84084Licensing Agreement | Terms of Service | Privacy Policy | EULA
© 2026 Daz Productions Inc. All Rights Reserved.