-
Anime Toons and Filatoon Shader Q&A
ainm.sloinneadh said:
daveso said:
is this, or parts of it, Premier member content only?
It's free to all. There's a paid expansion too - extra morph sliders, materials and some expressions: https://www.daz3d.com/genesis-9-toon-essential-shapes-bundle. Also available to all.
And the Vicky anime release is available to everyone too. Only the dark elf add-on is Premier exclusive.
Anime Toons and Filatoon Shader Q&Adaveso said:
is this, or parts of it, Premier member content only?
It's free to all. There's a paid expansion too - extra morph sliders, materials and some expressions: https://www.daz3d.com/genesis-9-toon-essential-shapes-bundle. Also available to all.
Anime Toons and Filatoon Shader Q&AOrangeFalcon said:
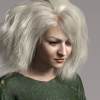
I LOVE this product and the updates! For my examples I am using a Face Transfer to animize her, so to speak. What you need to do for any figure loaded outside of th default anime build is to manually remove the G9 face antomy (eyes, mouth, brows, etc). Then you can add the toon versions and customize them! I was confused as to why the toon materials weren't apply. For my examples I have the 3D FT, then the toon version, and her anime render styles.
Note that with the glasses I have, it will obscure the anime makeup. I have a couple products and it all works the same. If anyone has an ideas on how to fix it, please let me know.
Yes.
Create a couple of simple shapes that make a nice 'shine' on the glass - just like they do with the Base Anime figures' Floating Iris highlight sparkles.
Place those where they should make the glass shine, them remove the glass from the glasses.
You maight also go for an option like they do for the shadow plane of the eyes on those Base Anime.
Play around with using simple shapes with FilaToon shaders to get the right look
EDIT: Oh... and fantastic work, by the way! I love what you've done with this!!!
Anime Toons and Filatoon Shader Q&AI LOVE this product and the updates! For my examples I am using a Face Transfer to animize her, so to speak. What you need to do for any figure loaded outside of th default anime build is to manually remove the G9 face antomy (eyes, mouth, brows, etc). Then you can add the toon versions and customize them! I was confused as to why the toon materials weren't apply. For my examples I have the 3D FT, then the toon version, and her anime render styles.
Note that with the glasses I have, it will obscure the anime makeup. I have a couple products and it all works the same. If anyone has an ideas on how to fix it, please let me know.
Genesis 9 Starter Essentials Missing(ish) from StudioAs everyone probably already knows, this product has been updated with the toon starter assets: https://www.daz3d.com/genesis-9-starter-essentials. Or it may not have been - it's not very clear to me and the toon starter assets don't appear on the product page. In DIM, though, there were updates to the Genesis 9 Starter Essentials packages (1 and 2 of, now, 3). A new Genesis 9 Toon Starter Essentials package has also popped up in DIM, which I installed. Curiously, while having a different package name, it was suffixed with "3 of 3" in DIM.
In Studio, the new Toon Starter assets are there, listed under Genesis 9 Starter Essentials in smart content. All the previous Genesis 9 Starter Essentials assets are now missing from smart content. They appear to be still installed, although I can't find the files for the characters that were released as an update to the product (the 2 of, previously, 2 package). I assume they're there somewhere as, IIRC, Face Transfer 2 uses the materials in that update as its base materials and Face Transfer 2 is still working.
Also missing from Genesis 9 Starter Essentials in smart content is the expansion pack I purchased: https://www.daz3d.com/genesis-9-starter-essentials-expansion. It seems to still be installed, but I rely heavily on smart content (my library is ginormous and products get installed all over the shop - I save the content library pane for things I save manually and will know how to get back to).
I'm wondering whether there has there been an error in the release of the Genesis Toon Starter Essentials. Was that supposed to be released as a separate product and not bundled as a 3 of 3? It doesn't have the same package name as the other two packages and I'm assuming it's overwritten all the smart content metadata for those packages.
Or maybe I'm missing something obvious here? Can anyone else either shed any light on this or confirm they have the same problem?
Installing, activating, and accessing Daz Studio Premier featuresThank you for this DIM filter... but I am not seeing the Queue option :( Any advice?
Richard Haseltine said:
The plug-ins provided as part of Daz Studio Premier need to be installed, like any plug-in, through Install Manager with Daz Studio closed. In DIM pasting
rx::ci::^Premier -
into the filter box at top-right should show the Premier add-ons and allow them to be installed, assuming that you have the Download Filters set to include plug-ins.
Once installed, open Daz Studio and log in to your account (Connect>Login..., for the plug-in/feature activation you do not need to update metadata though you do if you also wish to download the content that is tied to your membership; that does not include the free bundles, which are not tied to remaining a member). You should then be prompted to restart Daz Studio.
Once DS is running you can find the new add-ons in the following locations:
- Geometry Sculptor shows up in the Tools menu (remember that, like other content creation tools, it disables any GeoGraft's mesh hiding and won't show interpolated hairs for dForce/Strand Based Hair)
- Pose Converter shows up in Edit>Figure>Pose
- Shape Transfer shows up in Edit>Figure>Shape
- DForce Manager shows up in Simulation Settings pane / Manage
- Render Queue shows up on Render Settings pane / Queue
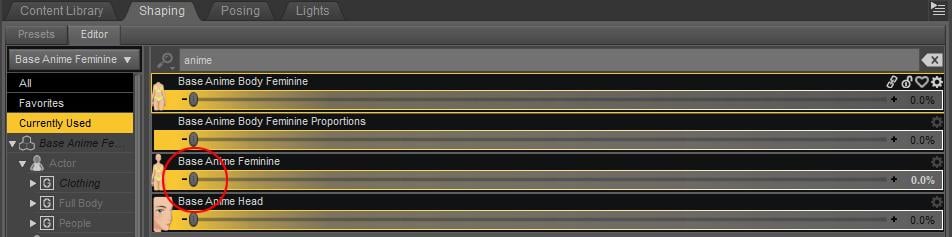
Anime Toons and Filatoon Shader Q&ATo use on Genesis 9 without the toon morph but other Genesis 9 morphs, load the gender anime figure you want, and then search for anime and select currently used in the shaping tab.
There's proportion dials connected to the main dial so you need to actually zero the main dial, not just the body and head dials. On the shaping tab search for Anime, then select Currently Used and then find the main morph - for the female that is Base Anime Feminine and for the male its Base Anime Masculine - that will then zero all proportion dials as well.
Following this method will keep the custom eyes, lashes and eyebrows that works with the outline and has a lot of customisation to work with the filatoon shader.
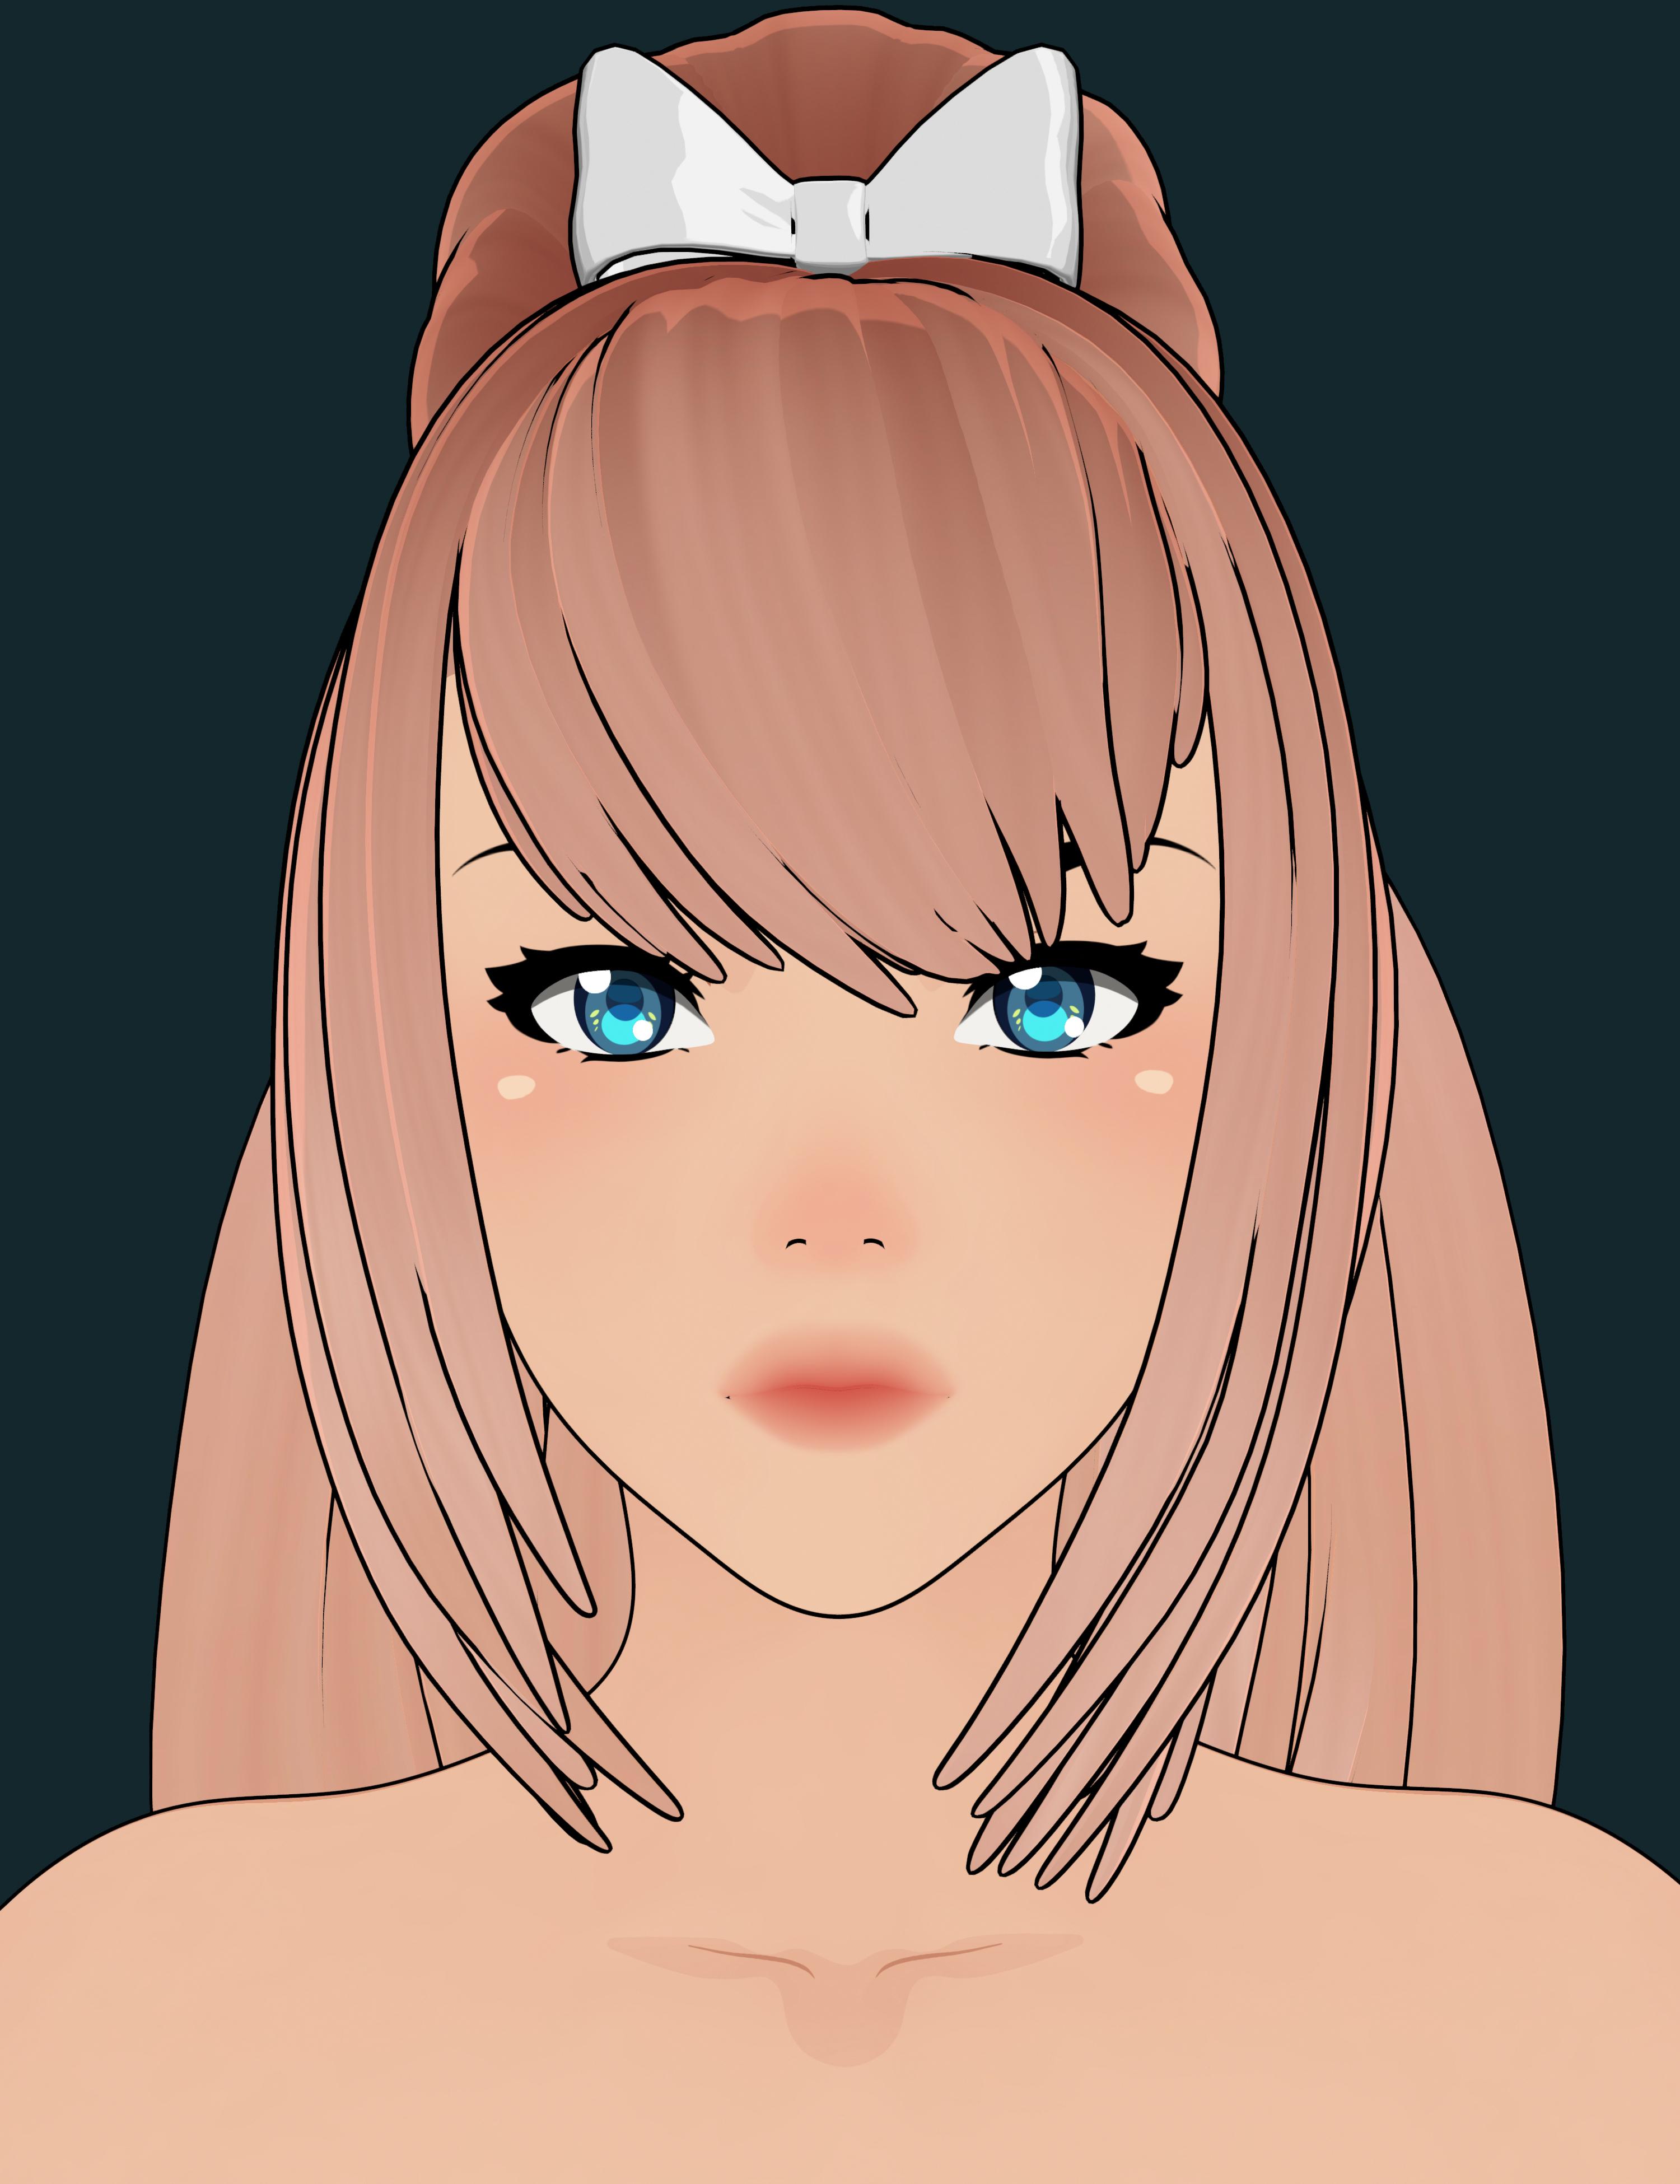
I found that using the anime morph at 30% and a G9 morph at 70% gives me the best results. This is Josie 70%, Base Anime 30%
 Chuck's AI Bumping Thread
FacePop in Depth
FacePop is an extension for Automatic1111's Stable Diffusion WebUI and ForgeUI that enhances AI img2img processing by tackling the challenges of facial inconsistency when characters appear at different distances and orientations within images. It employs advanced face detection to locate faces—even small or tilted ones—and then crops, upscales, and rotates them to an upright position.. By processing these faces separately and reintegrating them into the original image with masking to prevent double processing, FacePop attempts to accurately preserve consitancy of characters across various image compositions.
Analyzing the Example Images of Manuel
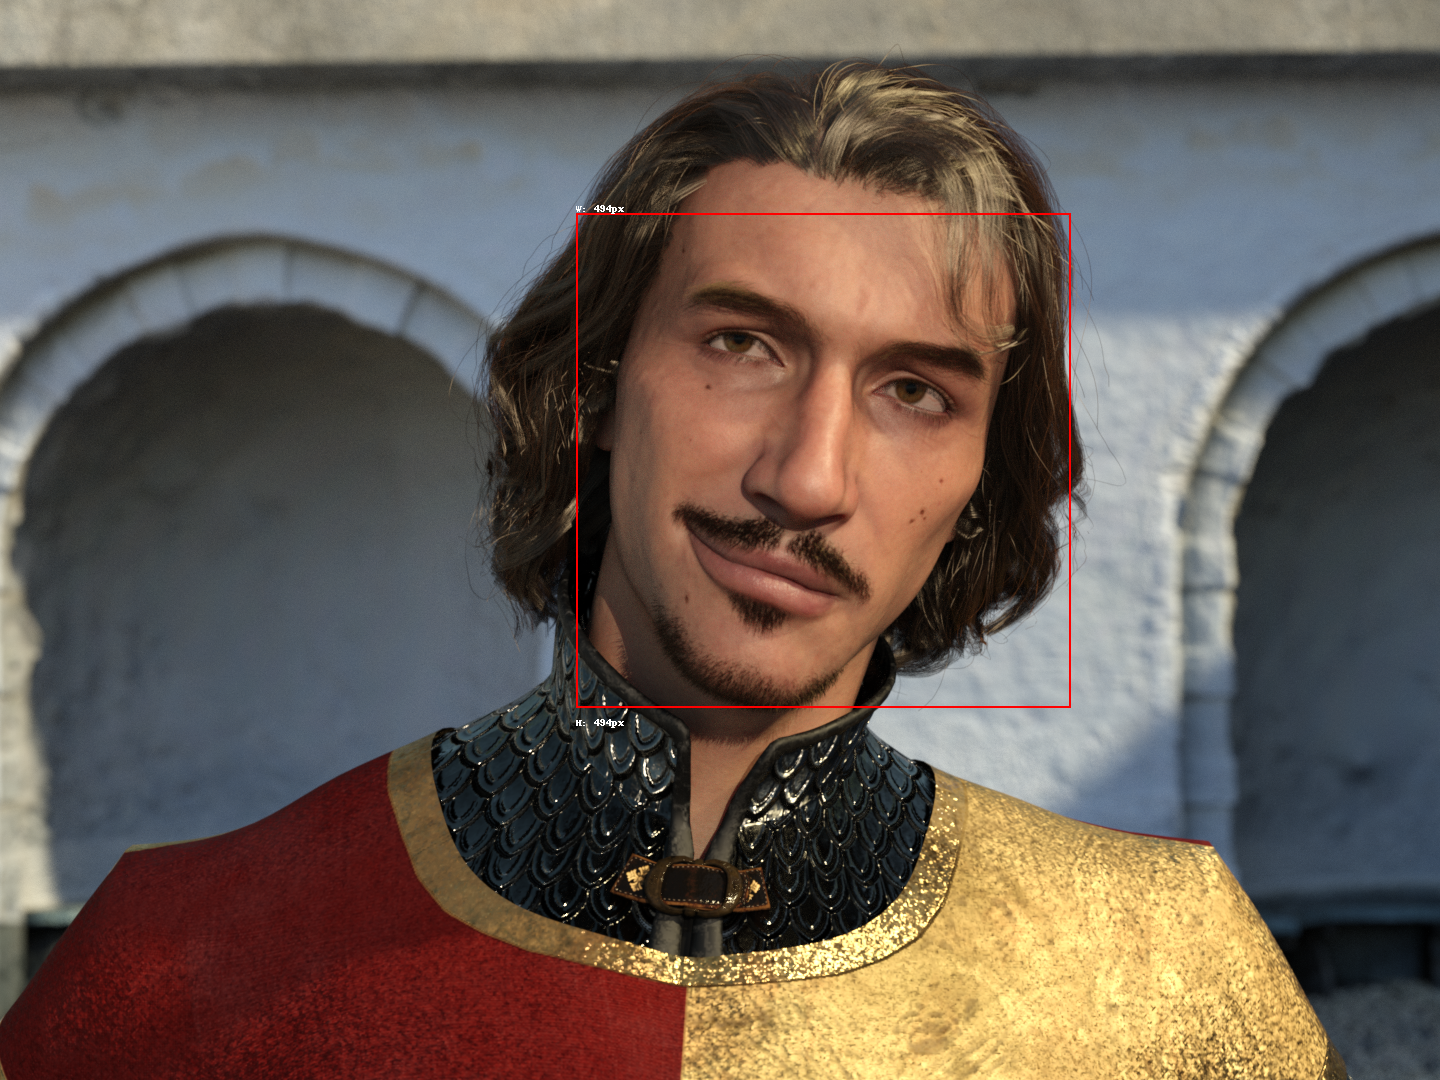
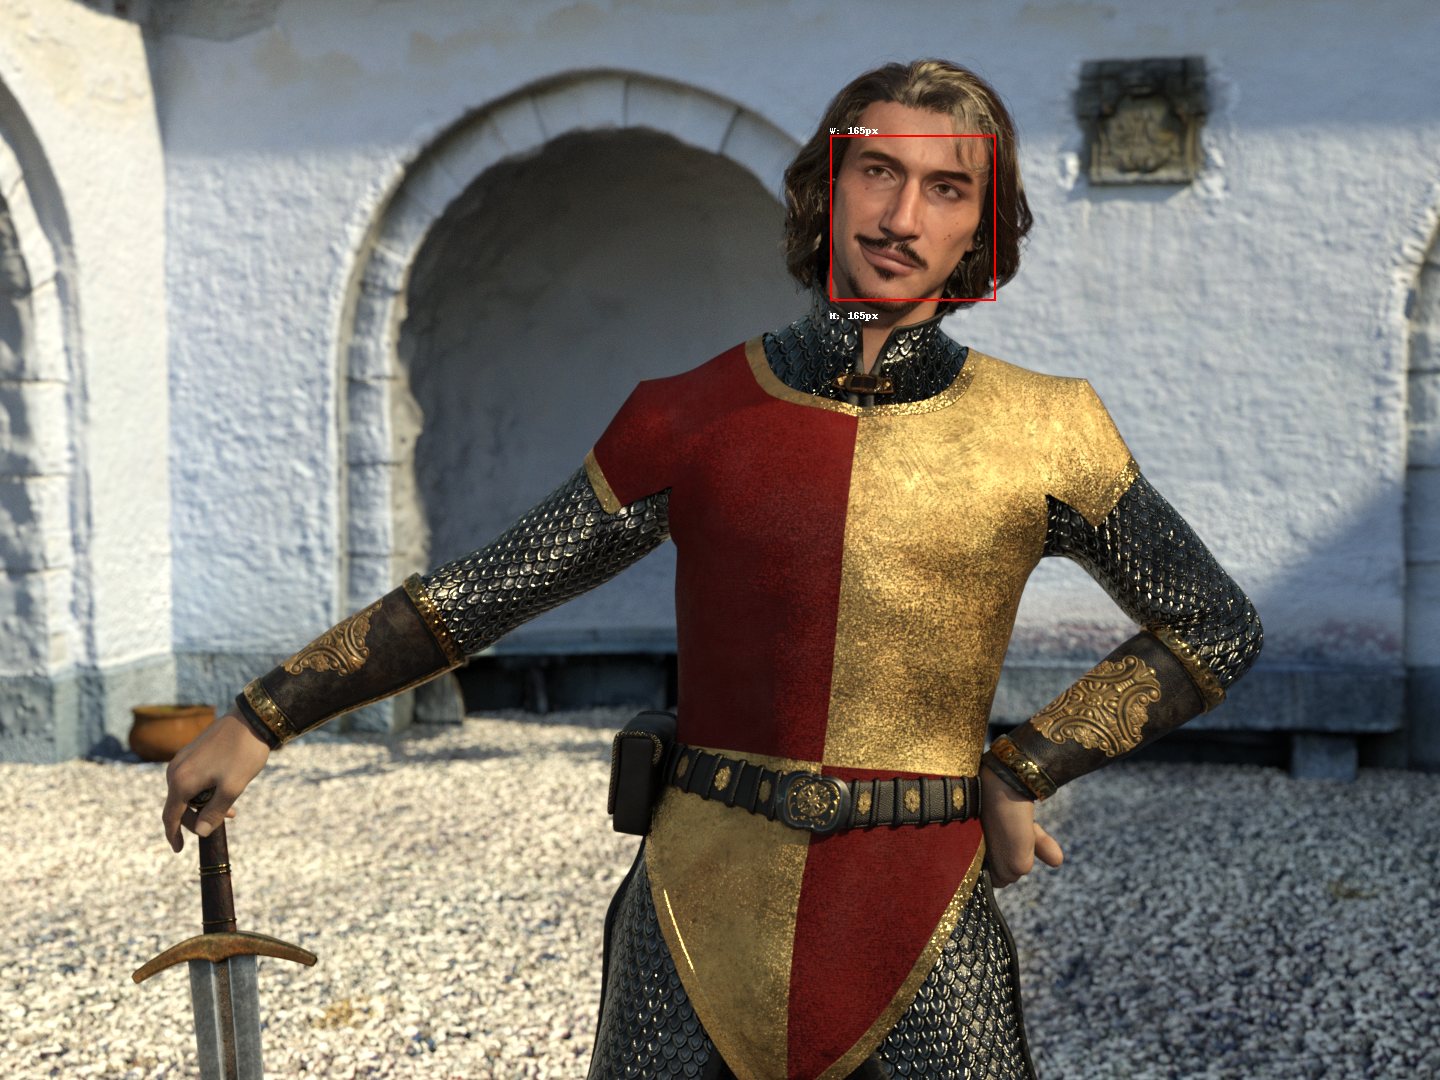
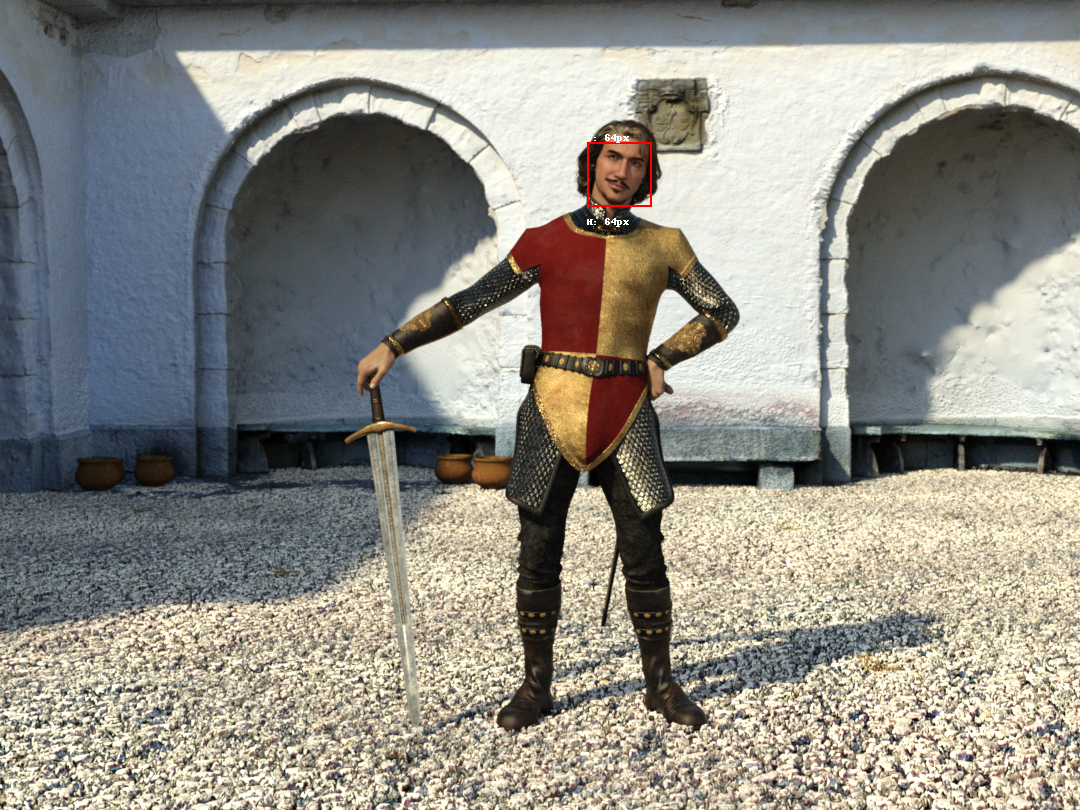
Consider three rendered images of Manuel at a resolution of 1080x810 pixels (a 4:3 ratio), each capturing him in a cocky stance with his head tilted approximately 15 degrees to his left.
-
Close-Up Shot:
- Face Detection Box: Approximately 494x494 pixels.
- Description: Manuel's face occupies a significant portion of the frame, displaying detailed facial features such as skin texture, eye color, and subtle expressions.
-
Medium Shot:
- Face Detection Box: Approximately 165x165 pixels.
- Description: Manuel's upper body is visible, with his face smaller in the frame. Key facial features are still discernible but less detailed.
-
Long Shot:
- Face Detection Box: Approximately 64x64 pixels.
- Description: Manuel appears full-body within the scene, and his face occupies a minimal area of the image, resulting in a significant loss of facial detail.
These images serve as practical examples to explore how varying face sizes and orientations impact the performance of AI models during img2img processing.
Technical Issues Illustrated by the Example Images
Let's setup Automatic1111's Stable Diffusion Webui for doing an AI Bump using IPAdapter and our Character Profile Package of Manuel.
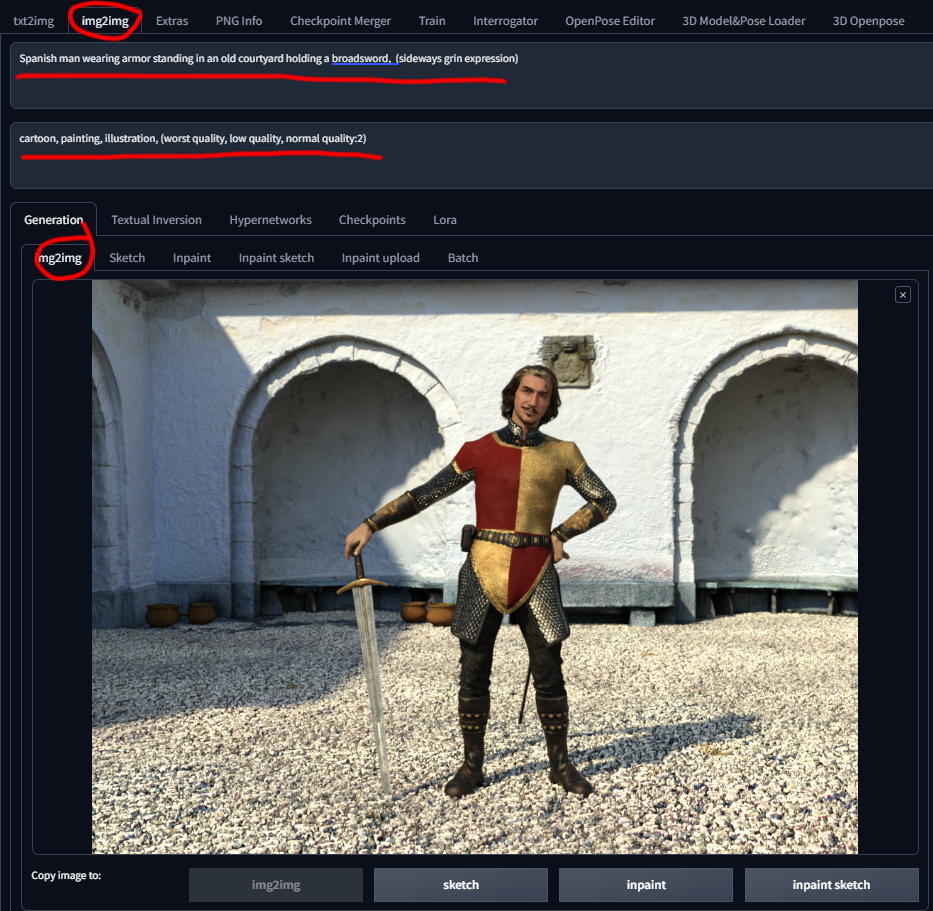
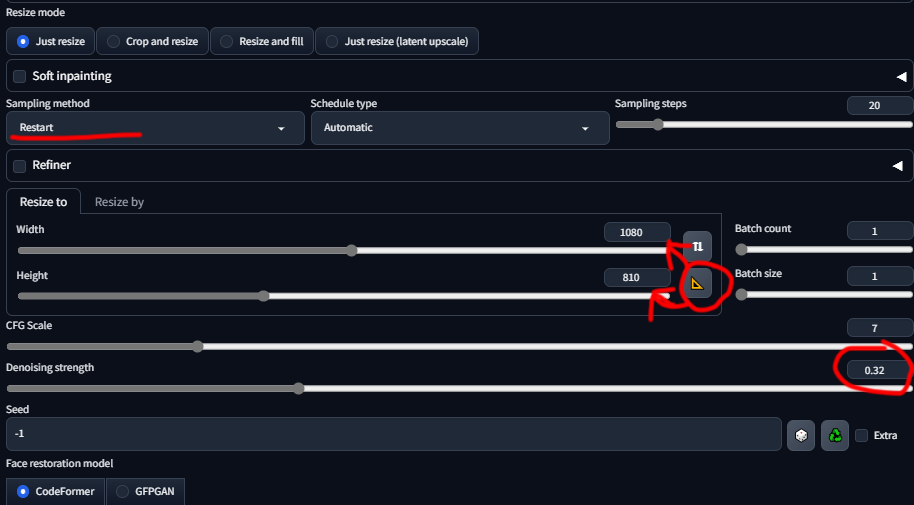
You can see my configuration above. One thing to note is the denoising is set low for SD1.5 model of .32. The lower this is set the less the AI Bump will drift the final image from the original. Other models will handle denoising and CFG differently and .32 might be considered too high. Reference the information to whatever model you using for averages and recommended settings, as well as just experiement.
Configure ControlNet with IpAdapter PlusFace and use our Character Profile Package for Manuel for guidance.
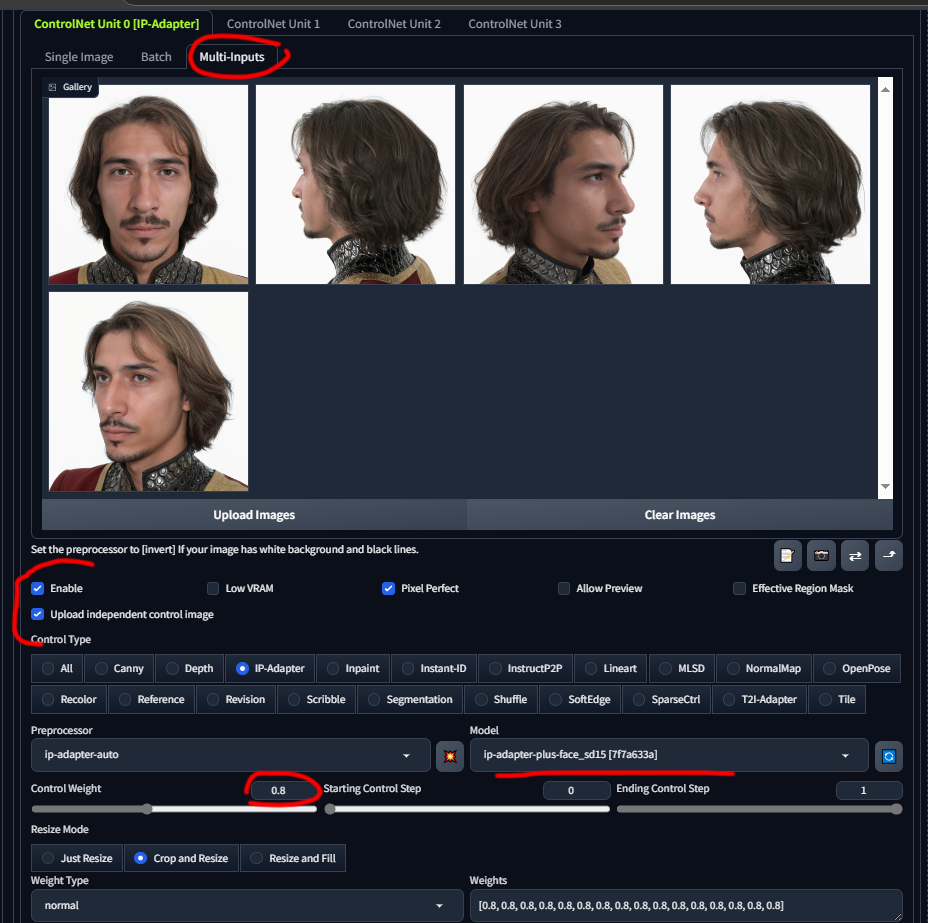
Here is our results without FacePop
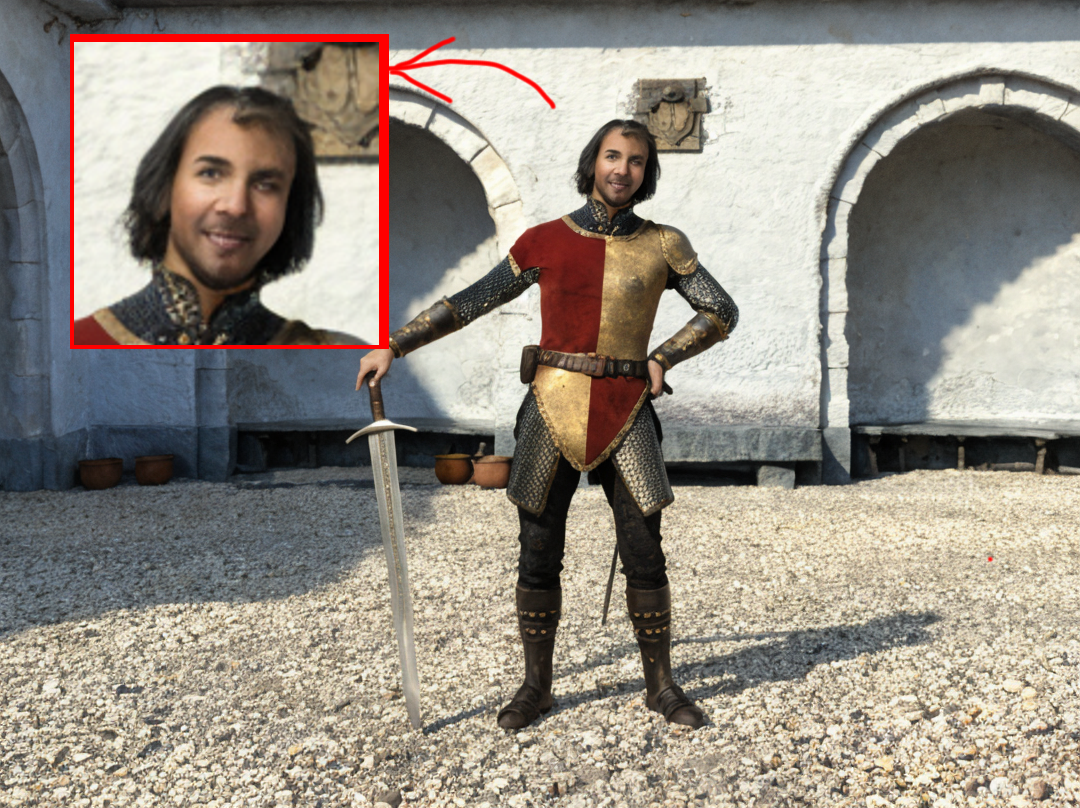
Even though we used CN and IPAdapter the results are less than amazing or consistant of Manuel.
Let's try this again with FacePop now active. We will also open and enable the Seperate Face Processing section. By activating we can override the default WebUI settings whe processing the face. We can specify Sampling Steps, CFG Scale, Denoising as well as a different Prompt and Negative Prompt (note: even when enabled if prompts are left blank they will use the default ones from above.)
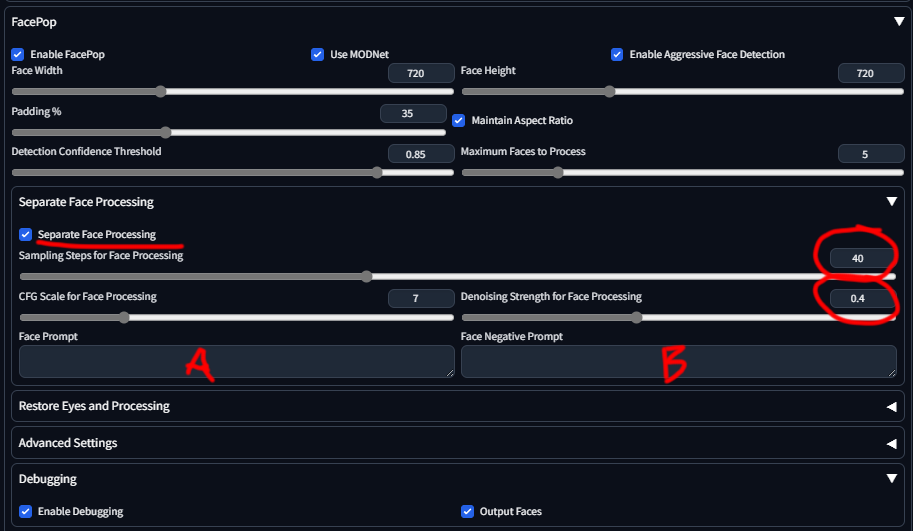
By default Output Faces is enalbed, which will include the face only processed image in the output folder along with the final processed image.
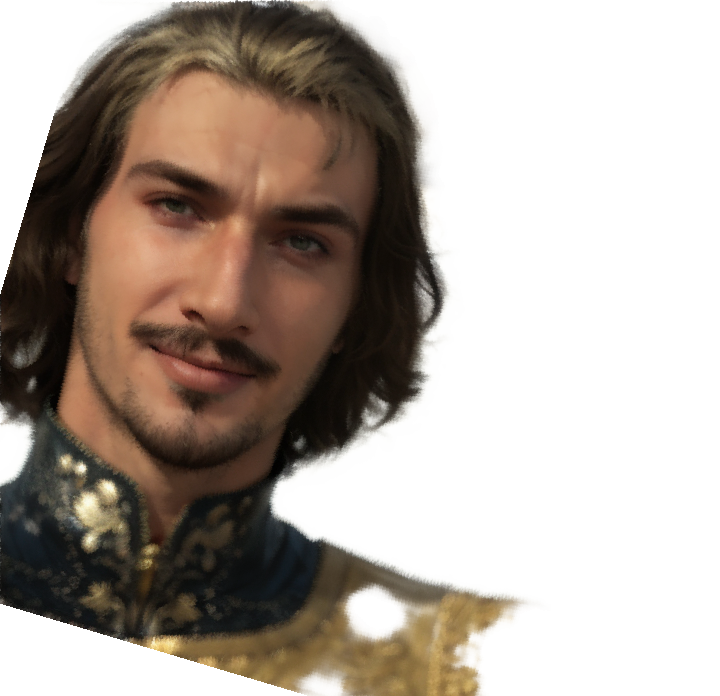
Final Image
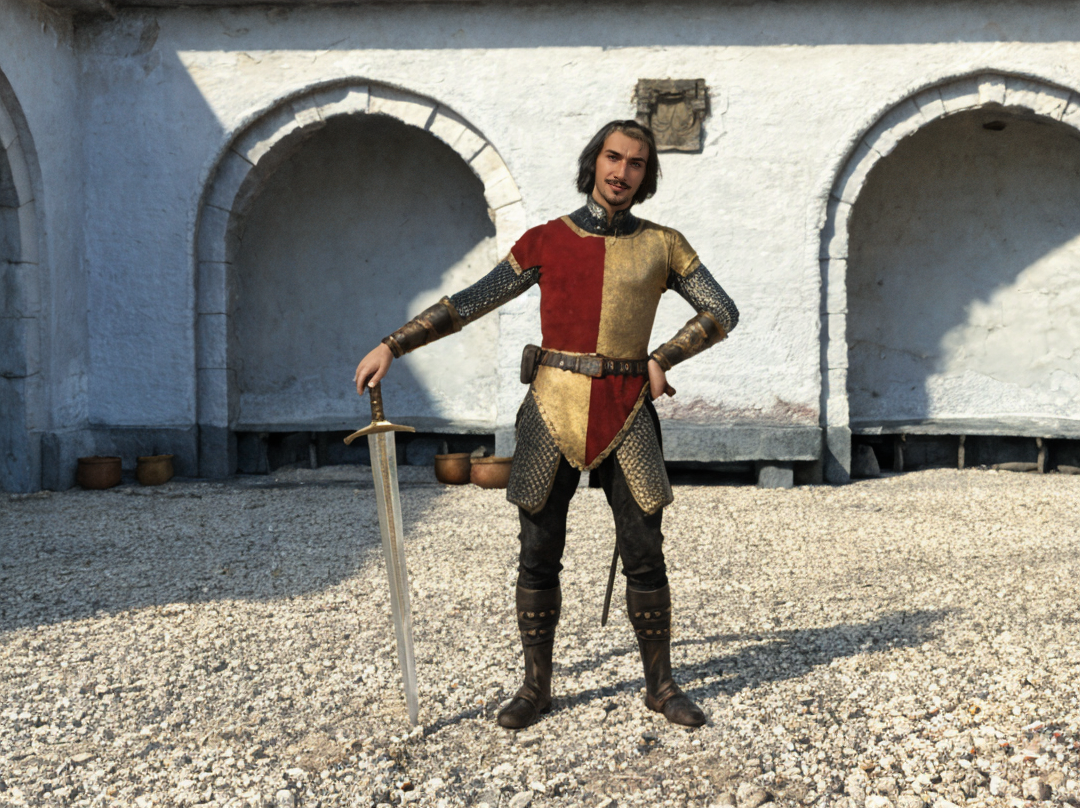
The results are probably not so obvious with the Long Shot of the AI Bumping, except to demonstrate how using these techniques without proper scaling and alignment, you will get inconsitant and poor quality results.
So let's repeat the exact same process just swapping out the Medium and Closeup shots.
Medium Final Results.
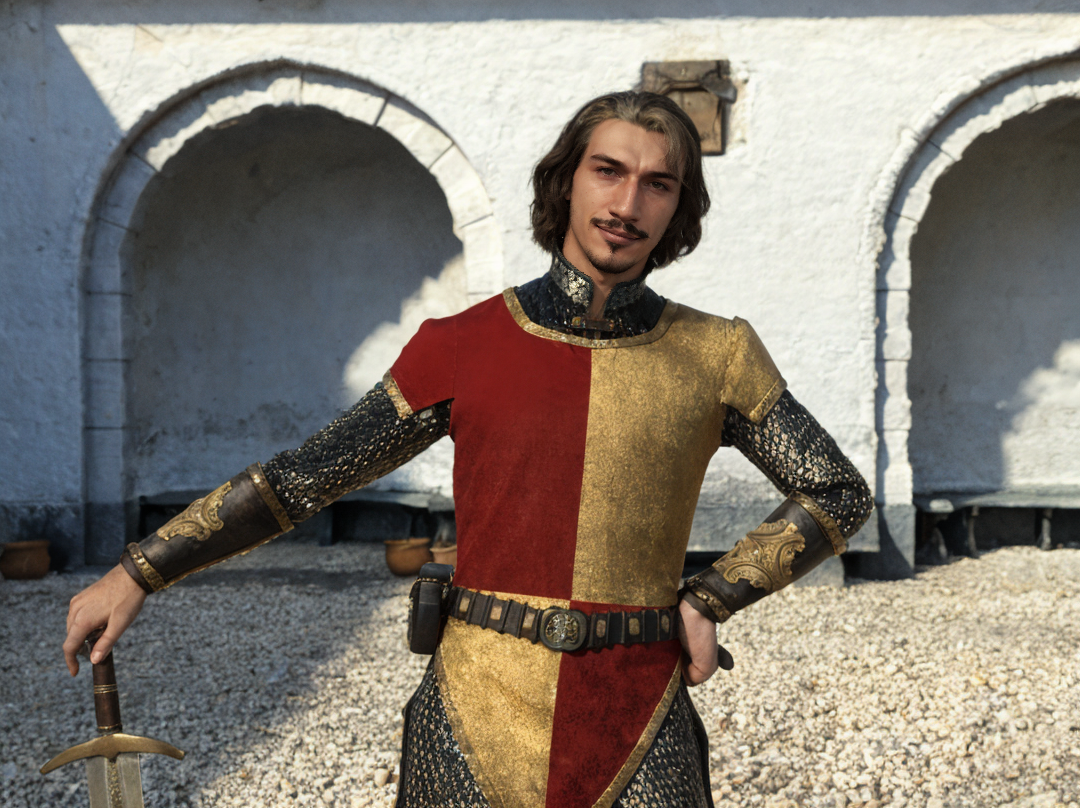
Close Up Shot
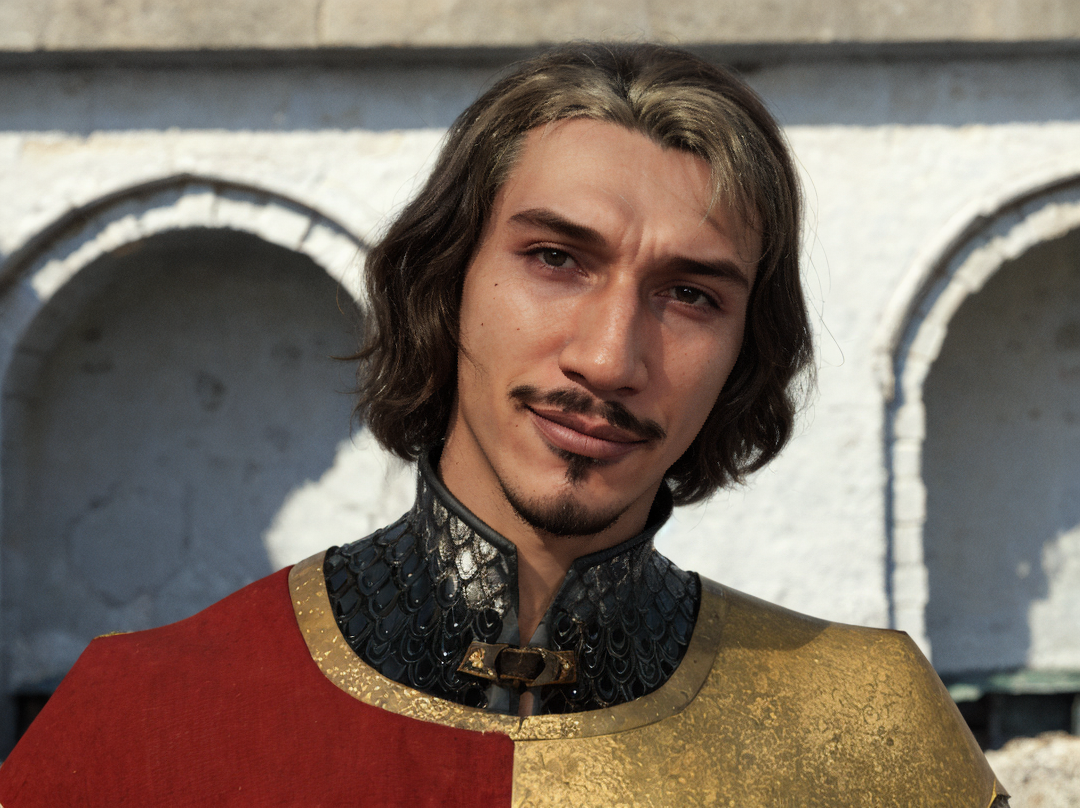
1. Impact of Face Resolution on Feature Extraction
-
Close-Up Shot (494x494 pixels):
- High Detail Availability: The abundance of pixels allows the AI model to capture intricate facial features, enabling accurate recognition and processing.
- Effective Convolutional Processing: Convolutional Neural Networks (CNNs) can generate detailed feature maps, leading to high-quality outputs during img2img transformations.
-
Medium Shot (165x165 pixels):
- Moderate Detail Loss: While primary features like eyes, nose, and mouth are visible, finer details such as skin texture and subtle expressions begin to blur.
- Reduced Feature Map Quality: CNNs receive less information, resulting in less detailed feature representations and potential degradation in output quality.
-
Long Shot (64x64 pixels):
- Significant Detail Loss: Critical facial features merge or become indistinct. The low pixel count hampers the AI's ability to process the face accurately, often leading to poor or unrecognizable outputs.
NOTE: Even with FacePop's upscaling of the face there is still going to be signifcant detail loss due to the abscene of information due to pixelation. The only way to really overcome this is to render the image at larger resolutions.
2. Challenges with Face Detection and Landmark Localization
-
Close-Up Shot:
- High Detection Accuracy: Face detection algorithms easily identify Manuel's face, and landmark localization is precise due to the high resolution.
- Accurate Alignment: The model can align and process the face correctly, preserving Manuel's distinct features.
-
Medium Shot:
- Reduced Detection Accuracy: The smaller face size may introduce minor errors in detecting facial landmarks, affecting alignment and potentially introducing inconsistencies in the generated image.
-
Long Shot:
- Detection Failures: The face may fall below the minimum size threshold required by detection algorithms, leading to failure in identifying the face.
- Incorrect Landmark Placement: Even if detected, low resolution can result in inaccurate landmark localization, causing distortions in the processed image.
3. Effects of Head Orientation
- Head Tilt at 15 Degrees:
- Alignment Complexity: The tilt introduces rotational variance, making it more challenging for face detection and alignment algorithms, especially those trained predominantly on upright faces.
- Impact on Different Shots:
- Close-Up: High resolution mitigates orientation challenges, allowing for correct alignment.
- Medium and Long Shots: The combination of lower resolution and head tilt increases the difficulty, leading to potential misalignments and inconsistent outputs.
4. Information Loss Demonstrated
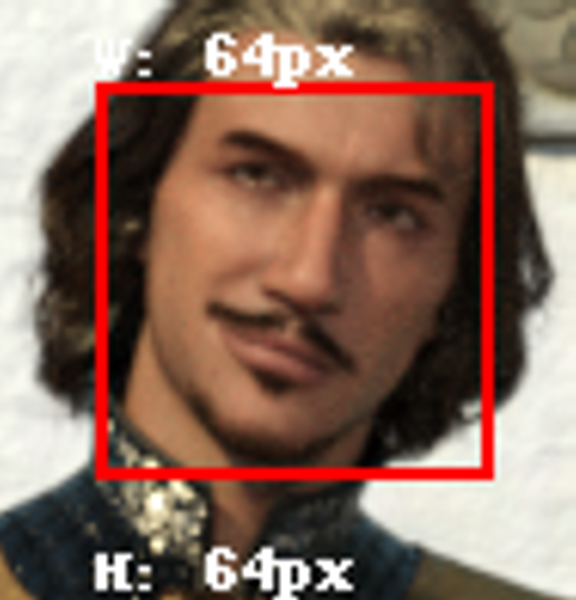
-
Nyquist Sampling Theorem Implications:
- Close-Up Shot: Satisfies the sampling requirements, capturing high-frequency details essential for accurate reconstruction.
- Long Shot: Violates sampling conditions due to insufficient pixels, resulting in aliasing and significant information loss.
-
Pixelation and Quantization Errors:
- Long Shot: Each pixel represents a larger area, causing pixelation that obscures fine details and introduces quantization errors, which the AI may misinterpret during processing.
Inconsistencies Observed in AI img2img Processing
1. Variability in Generated Outputs
-
Close-Up Shot:
- Consistent Facial Features: The AI produces a detailed and accurate representation of Manuel, maintaining consistency with his original appearance.
-
Medium Shot:
- Slight Deviations: Minor inconsistencies may arise due to reduced detail, such as subtle changes in facial proportions or expressions.
-
Long Shot:
- Significant Inconsistencies: The AI struggles to reconstruct Manuel's face accurately, potentially altering key features or even misrepresenting his identity.
2. Artistic Style Fluctuations
- Style Transfer Issues:
- The AI may apply different artistic styles or fail to maintain stylistic consistency across shots due to insufficient detail guiding the transformation, especially in the Long Shot.
3. Pose and Expression Misinterpretation
- Misalignment Effects:
- In lower-resolution images with head tilt, the AI might misinterpret Manuel's pose or expression, leading to unnatural or unintended results in the processed images.
4. Amplification of Artifacts
-
Noise Introduction:
- Low-resolution images are more susceptible to noise, which the AI may incorrectly amplify or incorporate into the output, degrading image quality.
-
Distortion Effects:
- Errors in face detection and alignment can cause distortions, such as warped facial features or disproportionate elements in the generated images.
Technical Factors Contributing to Observed Issues
1. Convolutional Neural Network Limitations
-
Receptive Field Challenges:
- In the Long Shot, the receptive fields of CNN neurons cover too large an area relative to facial features, leading to overgeneralization and loss of critical details.
-
Pooling Layer Effects:
- Downsampling layers further reduce spatial dimensions, exacerbating the loss of already limited information from low-resolution inputs.
2. Face Detection Algorithm Thresholds
-
Minimum Size Constraints:
- Detection algorithms may require faces to be above a certain pixel size (e.g., 80x80 pixels). The Long Shot's 64x64 face falls below this threshold, resulting in detection failure.
-
Orientation Biases:
- Algorithms may be less effective at detecting tilted faces, especially at lower resolutions, due to training biases towards upright faces.
3. Generative Adversarial Network (GAN) Challenges
-
Discriminator Limitations:
- In low-resolution scenarios, the discriminator may not effectively guide the generator towards accurate facial reconstructions, leading to poor-quality outputs.
-
Mode Collapse Risks:
- The generator might produce repetitive or generic faces when it cannot extract sufficient distinguishing features from the input, particularly evident in the Long Shot.
How FacePop Works to Improve AI img2img Processing
FacePop is a specialized tool designed to tackle the challenges of AI img2img processing when characters appear at different distances and orientations within images. It enhances the quality and consistency of facial features in generated images, ensuring characters like Manuel look accurate and recognizable across all shots. Here's how FacePop achieves this:
1. Aggressive Face Detection
-
Comprehensive Scanning: FacePop uses an advanced face detection algorithm that aggressively scans the entire image to locate any faces, no matter how small or tilted they are.
-
Why This Matters: Traditional face detection might miss small or angled faces, especially in long shots. FacePop's method ensures that every face in the image is detected for processing.
2. Cropping and Upscaling the Face
-
Cropping the Face: Once a face is detected, FacePop crops it out of the original image.
-
Upscaling the Face: The cropped face is then upscaled to a default size of 720x720 pixels. Users can adjust this size based on their preferences. The aspect ratio is maintained by default to avoid stretching or squashing the face.
-
Adding Padding: An additional padding is included around the face—by default, this is 35% of the 720x720 size, but users can customize this. Padding ensures that the surrounding areas (like hair or parts of the neck) are included, which helps in seamless reintegration later.
-
Why This Matters: Upscaling increases the number of pixels representing the face, providing more detail for the AI to work with. Padding ensures context is preserved around the face.
3. Correcting Face Orientation with Mediapipe
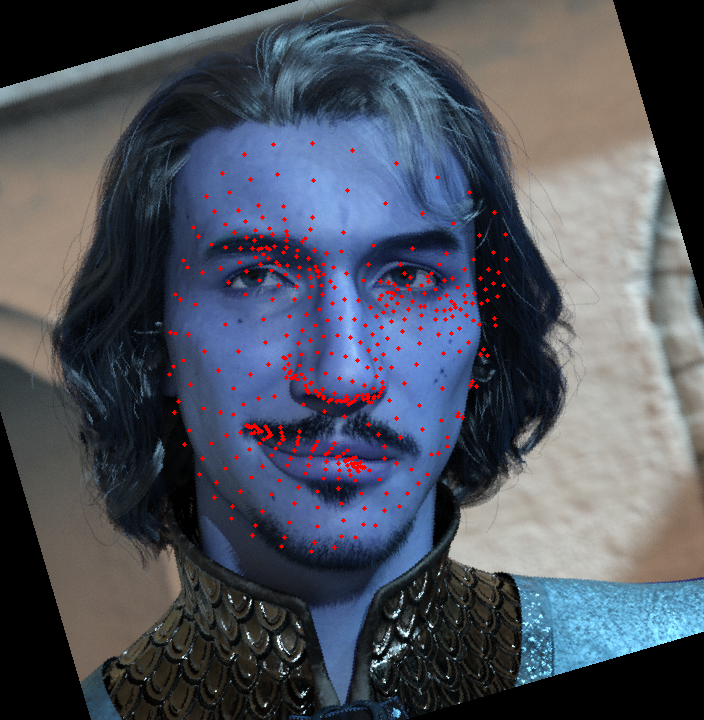
Note: Why blue? At this stage the extension has converted the image to OpenPose module's native format of BGR which is different than the standard RGB. The image indicates the detected rotated upright position, while the red dots indicate the faceical landmark position's original non rotated location.
-
Using Mediapipe's Landmark Detection: FacePop employs Mediapipe, a powerful tool that detects facial landmarks such as the eyes and nose.
-
Rotating to Upright Position: By analyzing the positions of the eyes and nose, FacePop calculates the angle of the head tilt. It then rotates the upscaled face so that it's upright.
-
Why This Matters: Aligning the face to an upright position simplifies the AI's task, as most models are trained on upright faces. This improves the accuracy of facial feature processing.
4. Separate AI Processing of the Face
-
Isolated Processing: The upscaled and rotated face is processed separately through the generative AI model (like Stable Diffusion).
-
Enhanced Quality: Because the face is now larger, upright, and isolated, the AI can focus on enhancing details, correcting imperfections, and applying styles more effectively.
-
Why This Matters: Processing the face separately ensures that the AI has the best possible input to work with, leading to higher-quality and more consistent results.
5. Generating a Face Mask
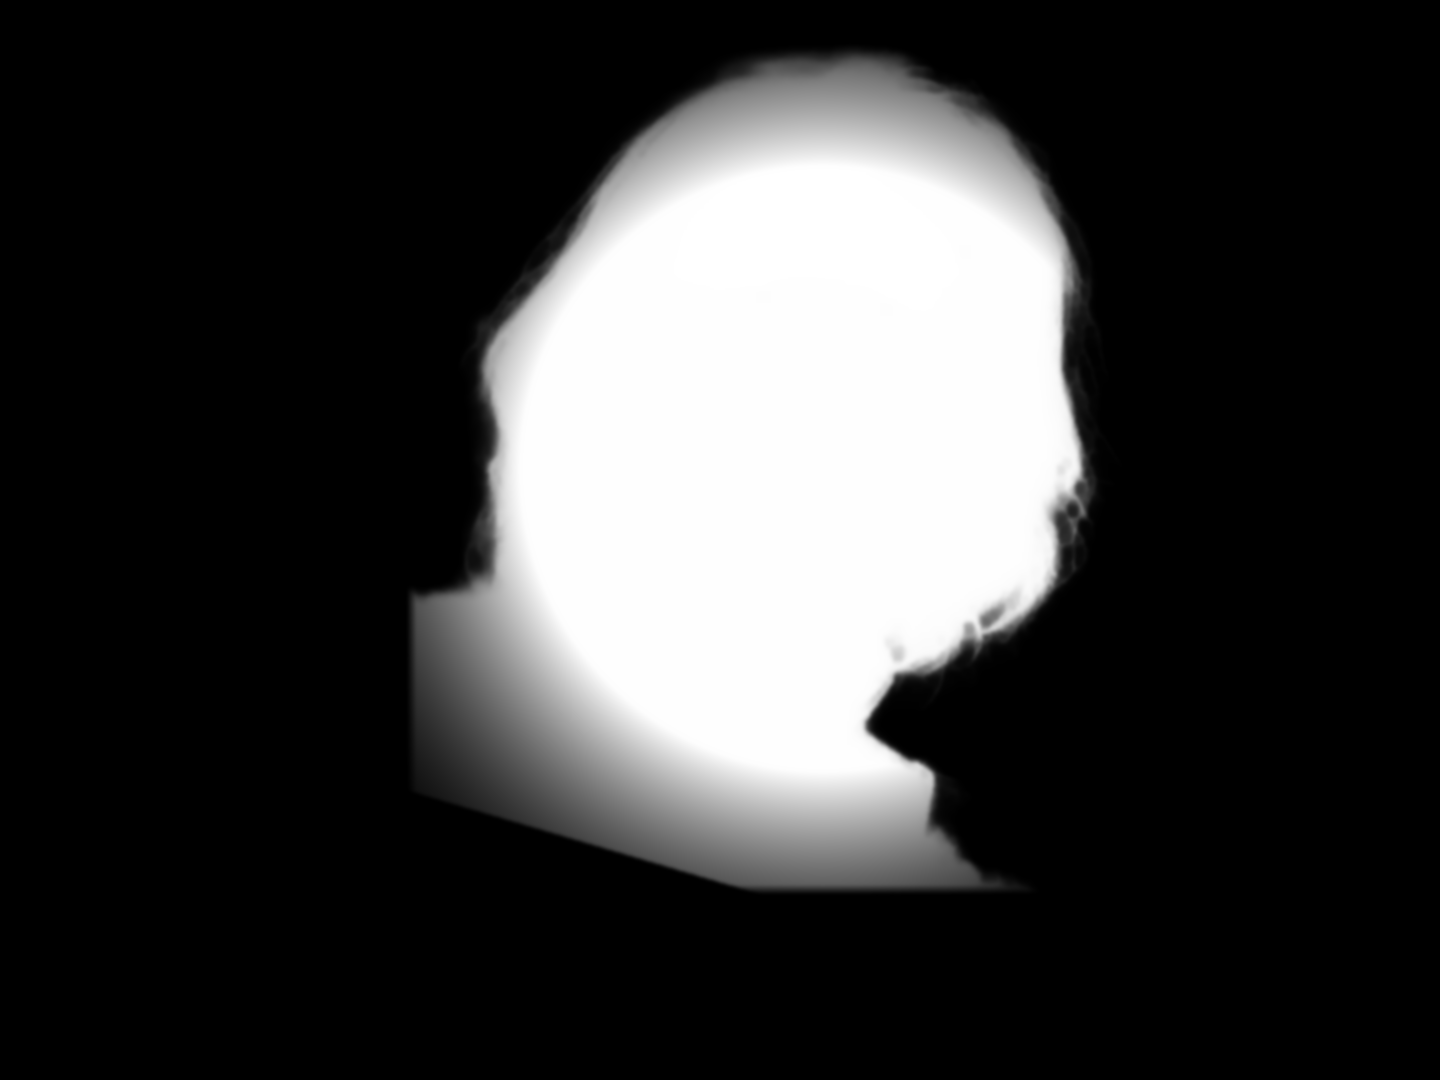
-
Creating the Mask: Alongside processing the face, FacePop generates a mask—a black-and-white image that indicates where the face is located within the original image.
-
Alignment with Original Image: The mask is carefully aligned so that when the processed face is placed back, it fits perfectly over the original face area.
-
Why This Matters: The mask ensures that only the face area is updated in the final image, preventing any overlap or double processing.
6. Reintegration into the Original Image
-
Restoring the Face: After processing, the enhanced face is rotated back to match the original angle and scaled down to fit the original image size.
-
Seamless Blending: Using the mask, the processed face is overlaid onto the original image, replacing the old face without affecting the rest of the image.
-
Preventing Double Processing: By processing the face separately and using the mask during the final image generation, FacePop ensures that the face isn't processed twice, which could cause distortions or inconsistencies.
-
Why This Matters: This step ensures that the improvements made to the face are integrated smoothly, maintaining the integrity of the original image while enhancing the character's facial features.
7. Background Removal with MODNet
-
Using MODNet: FacePop includes MODNet (Mobile Object Detection Network) by default, which is a tool that removes the background from the face image during processing.
-
Focusing on the Face: By eliminating the background, the AI model concentrates solely on the facial features without interference from surrounding elements.
-
Why This Matters: Background elements can sometimes confuse the AI or introduce unwanted artifacts. Removing them leads to cleaner, more accurate facial enhancements.
How FacePop Addresses Previous Challenges
-
Improved Detail in All Shots: By upscaling the face to a larger size, even faces from long shots (previously only 64x64 pixels) become rich in detail, allowing the AI to process them effectively.
-
Handling Head Tilts: Rotating the face to an upright position before processing eliminates issues caused by angled faces, ensuring consistent results regardless of the original orientation.
-
Consistent Character Appearance: Processing the face separately and reintegrating it carefully ensures that Manuel's facial features remain consistent across close-up, medium, and long shots.
-
Enhanced AI Performance: With better input data (larger, upright faces without background distractions), the AI model can perform at its best, leading to higher-quality outputs.
Anime Toons and Filatoon Shader Q&AFinally the toons and the filatoon shaders are available :) I haven't had this much fun with a new feature in Daz Studio in a long time, and pretty much everyone who had the opportunity to test and play with it said the same.
You will find a new folder called Genesis 9 Toon with 2 figures - Genesis 9 Base Anime Feminine and Genesis 9 Base Masculine. MallenLane did an absolutely amazing job on sculpting and rigging the toons, everytime I use them I smile because its such a pleasure to work with :)
The Filatoon shader is used in combination with Filament’s fast rendering. The toon outline is accomplished by creating a geometry shell and applying a special shader to it.
***A general request - please don't post in this thread if all you have to say is you don't like it, it creates long threads to wade through in search of answers - I'd like to keep this thread easy to read for those users serious about wanting to learn and use the shaders and figures.
edit : under render settings I'm recommending to turn mipmaps off, but test with both options to get the best result for your image
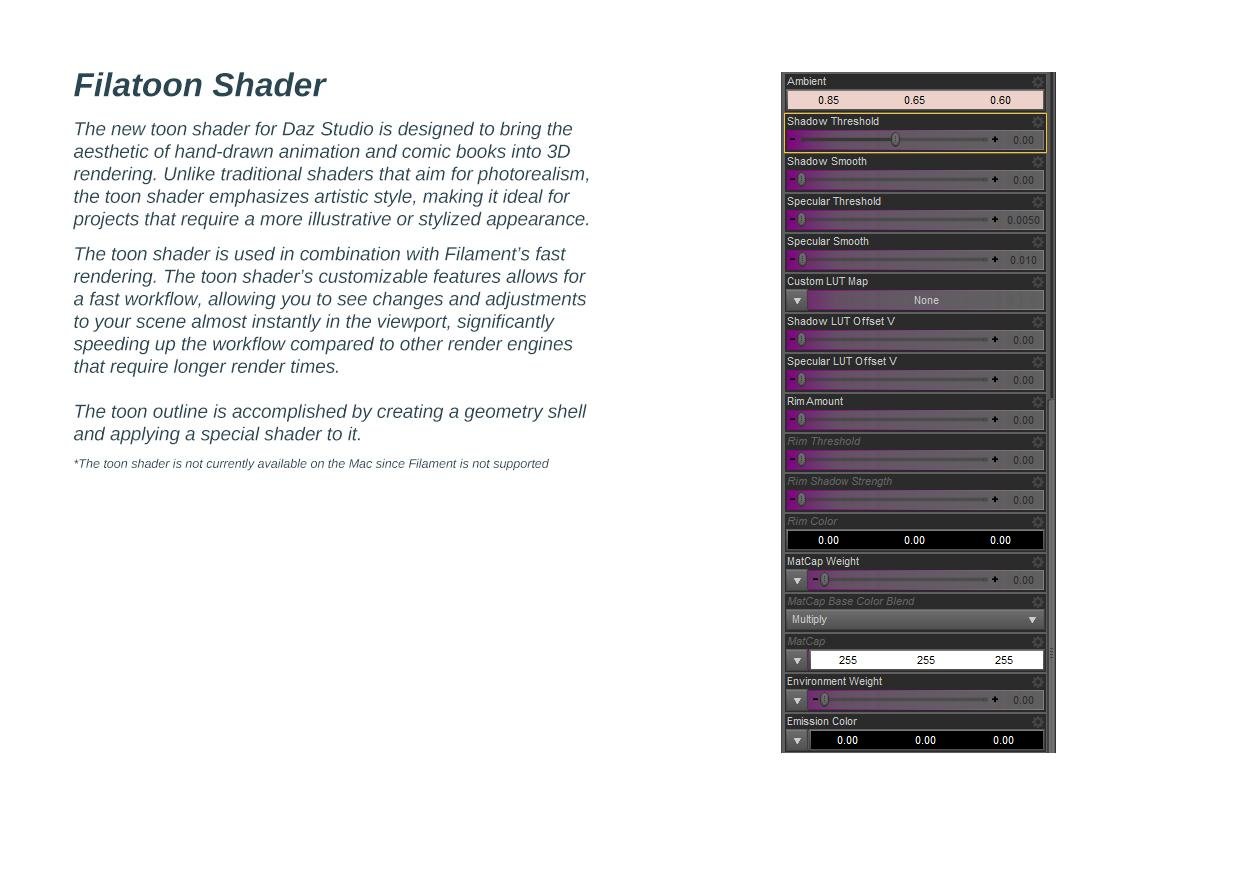
Text for translation purposes:
Filatoon ShaderThe new toon shader for Daz Studio is designed to bring the aesthetic of hand-drawn animation and comic books into 3D rendering.
Unlike traditional shaders that aim for photorealism, the toon shader emphasizes artistic style, making it ideal for projects that require
a more illustrative or stylized appearance.
The toon shader is used in combination with Filament’s fast rendering. The toon shader’s customizable features allows for a fast
workflow, allowing you to see changes and adjustments to your scene almost instantly in the viewport, significantly speeding up
the workflow compared to other render engines that require longer render times.The toon outline is accomplished by creating a geometry shell and applying a special shader to it.
*The toon shader is not currently available on the Mac since Filament is not supported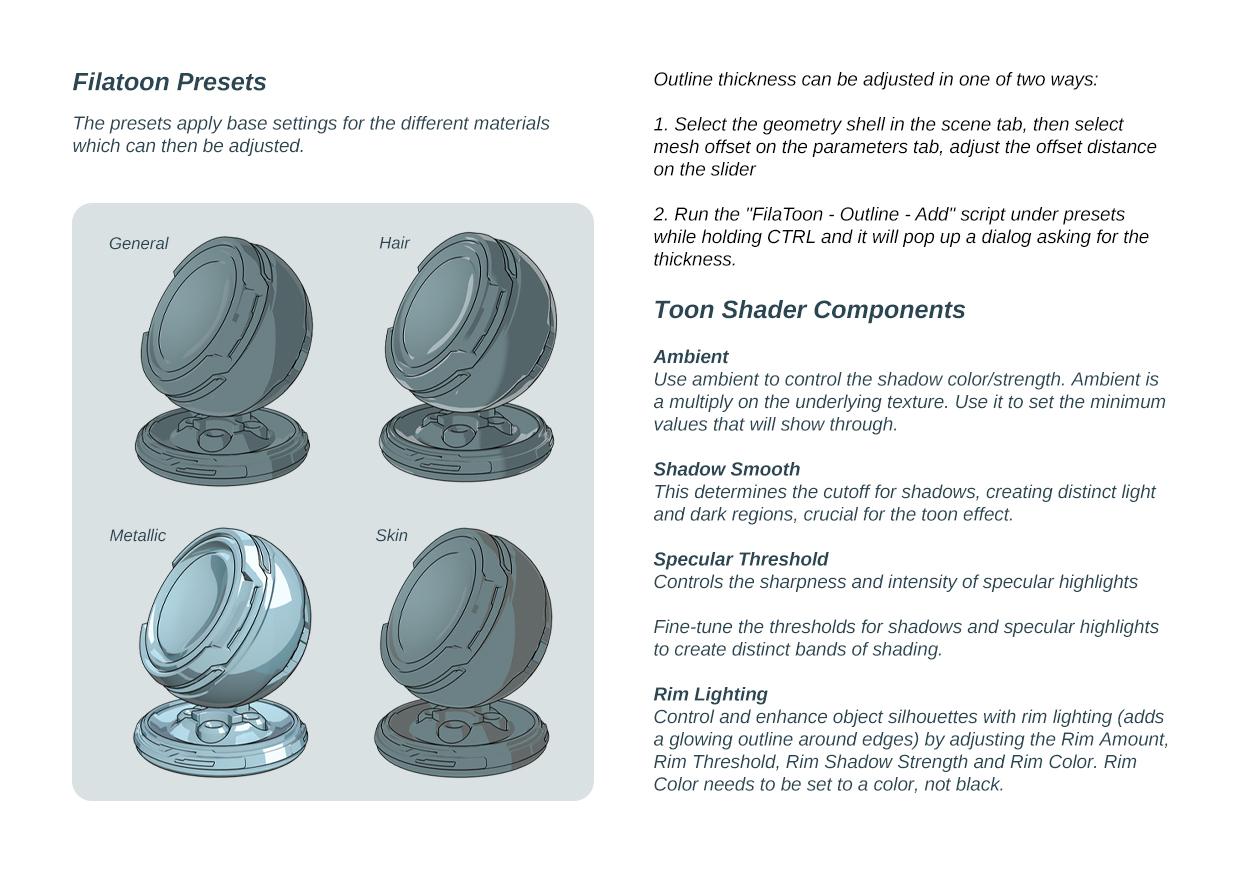
Text for translation purposes:
Filatoon Presets
The presets apply base settings for the different materials which can then be adjusted.
Outline thickness can be adjusted in one of two ways:
1. Select the geometry shell in the scene tab, then select mesh offset on the parameters tab, adjust the offset distance on the slider
2. Run the "FilaToon - Outline - Add" script under presets while holding CTRL and it will pop up a dialog asking for the thickness.
3. Filatoon - Constant
Use this preset for items that do not require an outline or shadow. The shadow line and outline are turned off, making it suitable for elements like eyelashes (which use alpha textures), irises, eye highlights, and eyebrows. It's also ideal for any clothing details where an alpha channel for opacity is necessary. It will remove the geoshell.4. Filatoon - General
Ideal for use with clothing, props, and environments. This preset includes a standard gray ambient shadow and a subtle rim light, providing a balanced and versatile toon shading effect.
*Can be applied to individual materials and tweaked5. FilaToon - Hair
Specifically designed for use with hairstyles, ensuring that hair renders with the appropriate toon shading properties.6. FilaToon - Skin
Tailored for characters' skin, this preset ensures that skin tones and details are shaded correctly within the toon shader framework.7. FilaToon - Metallic
Perfect for metallic items such as buckles. This preset enhances the reflective and shiny characteristics of metallic surfaces within the toon shader. Adjust the environment weight on the shader (last one on the list)... slide it from 0 until you get the effect you wanted.
Toon Shader Components
Ambient
Use ambient to control the shadow color/strength. Ambient is a multiply on the underlying texture.
Use it to set the minimum values that will show through.Shadow Smooth
This determines the cutoff for shadows, creating distinct light and dark regions, crucial for the toon effect.Specular Threshold
Controls the sharpness and intensity of specular highlightsFine-tune the thresholds for shadows and specular highlights to create distinct bands of shading.
Rim Lighting
Control and enhance object silhouettes with rim lighting (adds a glowing outline around edges) by adjusting the Rim Amount,
Rim Threshold, Rim Shadow Strength and Rim Color. Rim Color needs to be set to a color, not black.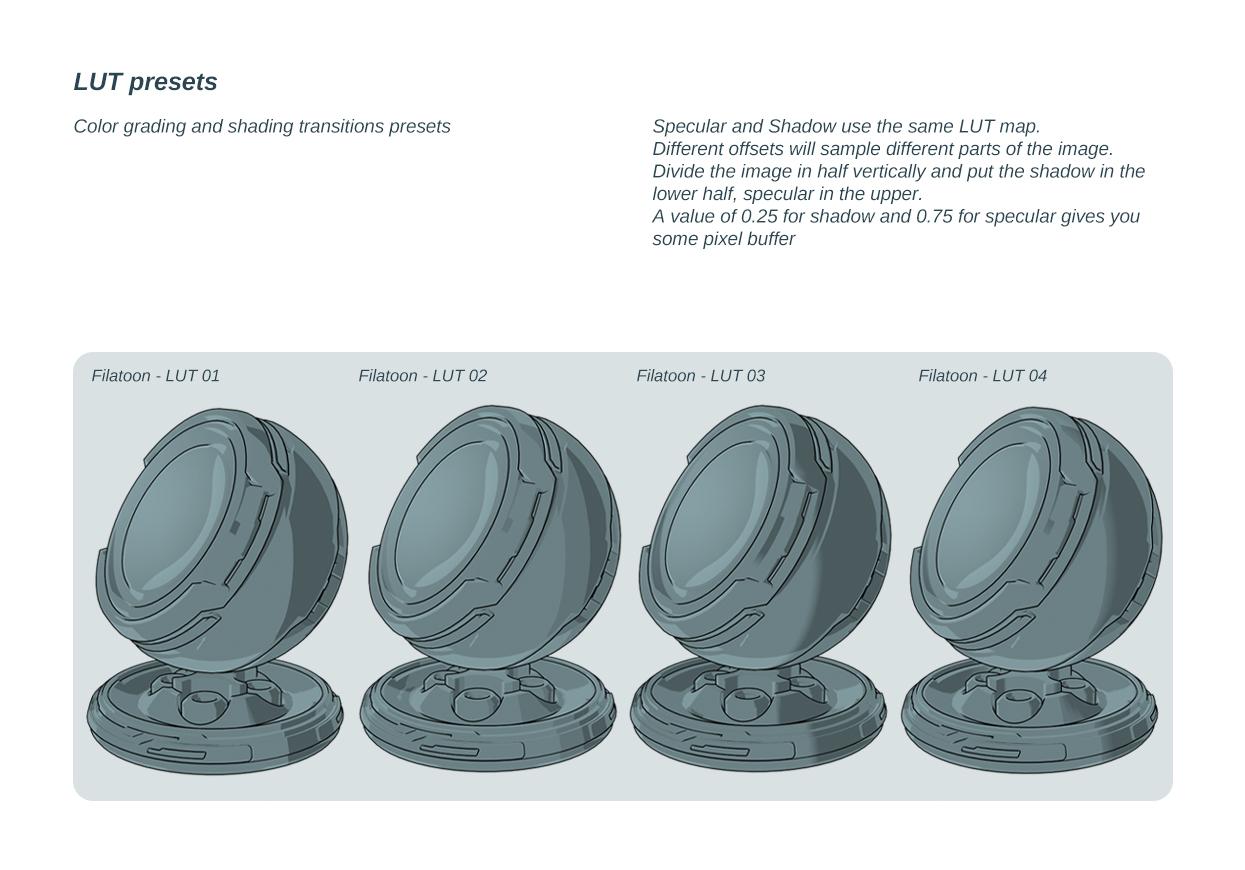
LUT presets
Color grading and shading transitions presets
Specular and Shadow use the same LUT map.
Different offsets will sample different parts of the image.
Divide the image in half vertically and put the shadow in the lower half, specular in the upper.
A value of 0.25 for shadow and 0.75 for specular gives you some pixel buffer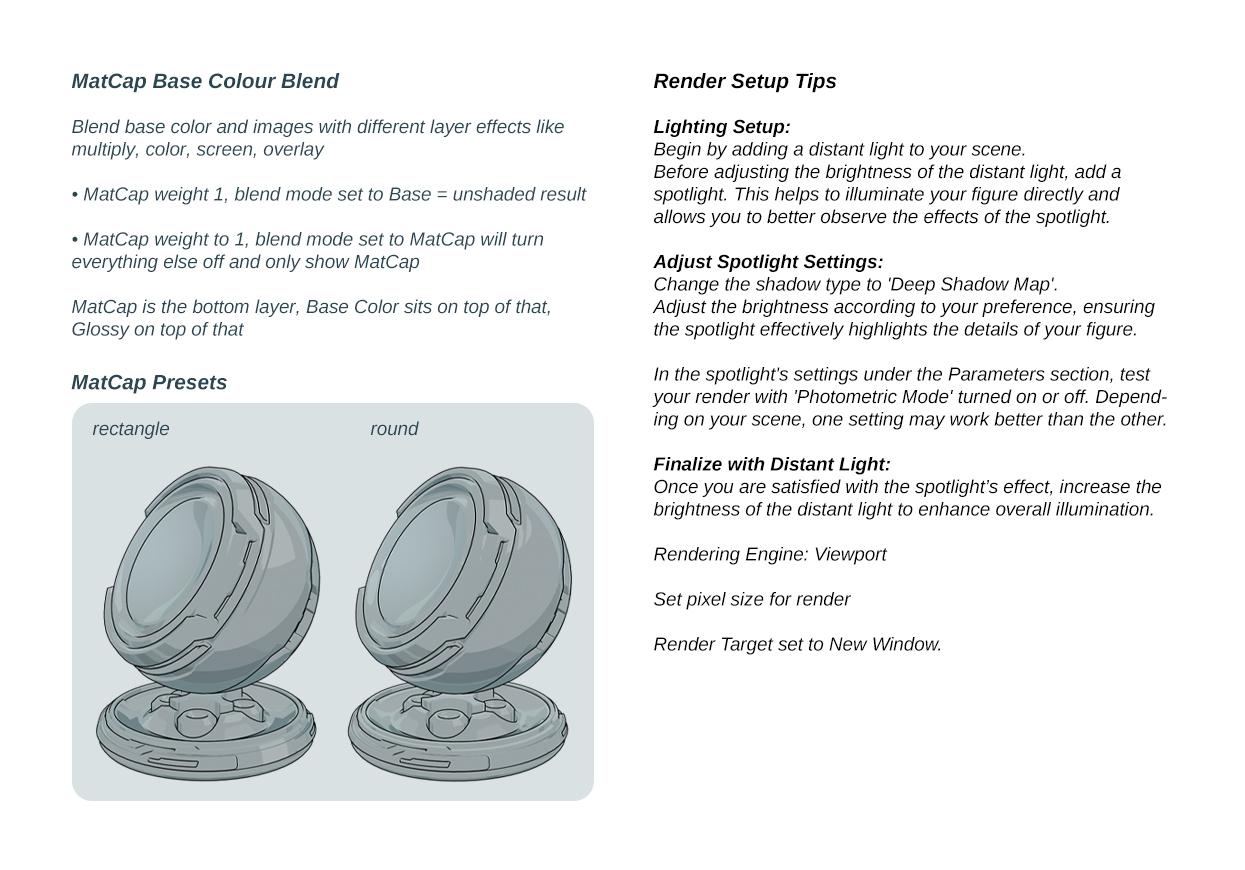
Text for translation purposes:
MatCap Base Colour BlendBlend base color and images with different layer effects like multiply, color, screen, overlay
• MatCap weight 1, blend mode set to Base = unshaded result
• MatCap weight to 1, blend mode set to MatCap will turn
everything else off and only show MatCapMatCap is the bottom layer, Base Color sits on top of that, Glossy on top of that
Render Setup Tips
Lighting Setup:
Begin by adding a distant light to your scene
Before adjusting the brightness of the distant light, add a spotlight. This helps to illuminate your figure directly and allows you to better observe the effects of the spotlight.Adjust Spotlight Settings:
Change the shadow type to 'Deep Shadow Map'.
Adjust the brightness according to your preference, ensuring the spotlight effectively highlights the details of your figure.In the spotlight's settings under the Parameters section, test your render with 'Photometric Mode' turned on or off. Depending on your scene, one setting may work better than the other.
Finalize with Distant Light:
Once you are satisfied with the spotlight’s effect, increase the brightness of the distant light to enhance overall illumination.Rendering Engine: Viewport
Set pixel size for render
Render Target set to New Window.
Q : Where can I find the FilaToon shader scripts
A : My DAZ 3D Library > Shader Presets > Filatoon. Under that you will find FilaToon - Base and Filatoon - Outline. You can also apply any of the presets and it will create the outline geoshell if it doesn't exist (except for FilaToon - Constant, it will apply the shader without the outline). If everything is black after you apply the preset make sure you're in the Filatoon renderer, and either turn on Auto Headlamp or add some lights.Q : How do I accentuate the black line in the middle of the nose as well as the lips?
A : Mouth Lips Part (3 shapes and 1 overall controller) was added under Pose Controls>Head>Mouth>Base Anime to control the gap between the lips to force line visibility at the lip seam; lines require a gap of space between geometry to appear. Three different regions so you can show the line where you want it, for things such as side smirk etc.Q : the outline is dotted or not showing on clothing
A : the outline shell needs to have a bit of thickness and if for example the edge is just a thin mesh it loses the line. First thing you can try to improve it is to use the expand all on the clothing item, the geoshell sometimes get hidden by the body if its tight fitting, so looser is better in this case. That should fix the dot lines.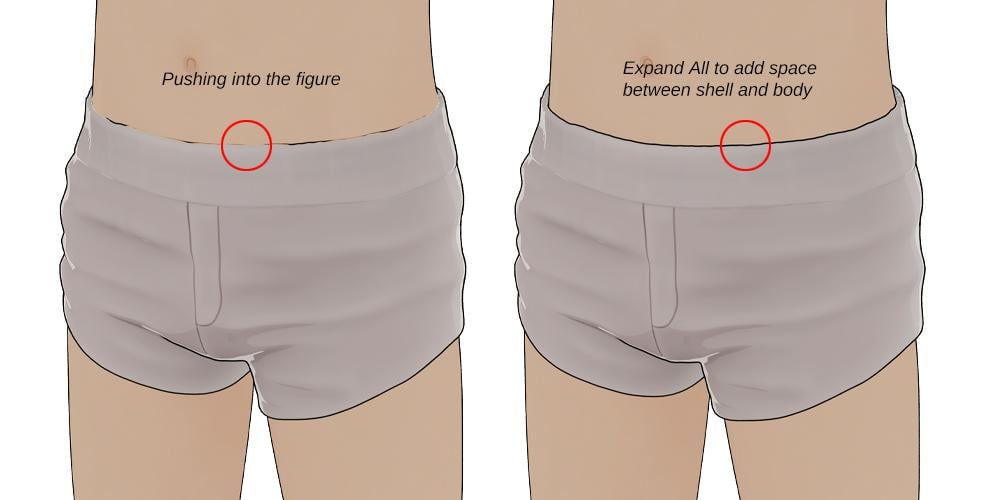
Q: How to make a surface looks metalic with FilaToon and Filament drawstyle
A: Apply the metallic preset to your item, then find the environment weight on the shader (last one on the list)... slide it from 0 until you get the effect you wanted.Q: The eyes create an optical illusion of always looking at the viewer
A: If you load a Toon figure and zero out the anime morph to get the default Genesis and that happens, you can use Toon Iris Depth Left and Right to fix it :)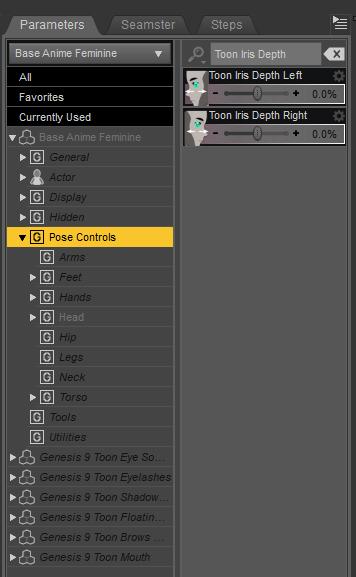
Tips and tricks from users in this thread :
Lights parented to nulls : https://www.daz3d.com/forums/discussion/comment/8905426/#Comment_8905426How do I use strandbased hair :
https://www.daz3d.com/forums/discussion/comment/8908286/#Comment_8908286
https://www.daz3d.com/forums/discussion/comment/8908356/#Comment_8908356
A: You need to have line tesselation set to 3 for both viewport and renderHow to control the effect of the specular highlights : https://www.daz3d.com/forums/discussion/comment/8920431/#Comment_8920431
How to use transmapped hair : https://www.daz3d.com/forums/discussion/comment/8923351/#Comment_8923351Premier Membership FAQ (Questions Only Please)P302 said:
1. I own the Meshgrabber 3.0 Products and since once bought products stay untouched I would expect them to still work (even the Premier plugins offer more/better functionality) after I upgrade to Premier or unsubscribe from Premier Membership. Is this correct?
That's correct.
2. The Meshgrabber Products allowed to create Morphs based on the modifications. These morphs will still work after an upgrade and after unsubscribing from Premier. Correct?
As long as you save the scene with the created morph properties or save the morph(s) as Modifier Assets (i.e. Morph Assets...)
3. Does the new Geometry Sculptor plugin also allow creating morphs? Will those morphs still work after I unsubscribe Premier? In other Words: can I create content (esp. with Geometry Sculptor) which won't work if - for whatever reason - I decide not to continue with Premier Membership?
Yes, it does. Again: the created morphs or saved the Modifier Assets of them are not Geometry Sculptor plugin and/or Premier tier dependent anymore.
Premier QuestionsSnowSultan said:
douglasmartinsxd said:
The shape transfer allow me to transfer a g9 body morph or a head morph only to genesis 8
I tried transferring a G8 head and body morph to a G9 figure and it completely screwed up the hands. The shape did transfer, but it's unusable because posing it horribly warps the fingers.
I got the very same issue after converting one of my custom G3F characters to G9 with the plugin. Then I converted the figure with the way of Fit-Suit manually, there's no such issue at all.
The plugin also uses the way of Fit-Suit but just automates the whole workflow, so that's definite a bug.
Installing, activating, and accessing Daz Studio Premier featuresI installed all premier plugins, but can't see:
- Pose Converter shows up in Edit>Figure>Pose
- Shape Transfer shows up in Edit>Figure>Shape
I already did run the "Update and merge Menus" without success.
All others are there. Any idea?
Thanks
[Released] Mopat: Motion Path Animation PluginI had to uninstall Typi3d fonts and Mopath because it makes Daz crash when I try and use Figure Converter and/or Transfer Character Shapes.
It seems that even when not being used Typi3d and Mopath are using resources that Figure Converter needs to run.
And then there is the issue that on my machine when it try and convert the path to keyframes Daz Crashes. (It worked like once and won't work again.)
I would like to have these programs installed in Daz (and use them) but I use Figure Converter a lot and not being able to convert paths to keyframes negates the usefulness of Mopath.
Typi3d works very well except for it being incompatible with Figure Converter.
I wonder if it is my version of C++ it would be nice to have some response to these inquiries. Thank you.
I assume updates are coming.
 Premier Questions
douglasmartinsxd said:
The shape transfer allow me to transfer a g9 body morph or a head morph only to genesis 8
I tried transferring a G8 head and body morph to a G9 figure and it completely screwed up the hands. The shape did transfer, but it's unusable because posing it horribly warps the fingers.
Premier QuestionsThe shape transfer allow me to transfer a g9 body morph or a head morph only to genesis 8
Premier QuestionsArtAngel said:
Here's a bit of transparency for you. If any of you guys own ManFriday tools you already have the tools at your disposal for free. She seems to be the only one so far who has opted to transfer the plug-ins we bought to be part of Premier. Will edit this in a jiffy. Gotta go do a roundup (on my offline pc) . Luckily I own them all. So let me show you how to find them ...
It sounds like they still work in 4.23, which is good. Is 4.23 working well for people?
Saving Morph Assets has disappeared from DAZ 4.23.0.1 (64-bit)Trying to save a morph I just made by using the usual procedure.
Saving as Morph Asset(s) is not accessible anymore.
Is the functionnality still there? If not, major setback!
Premier QuestionsCharlie Judge said:
ArtAngel said:
Here's a bit of transparency for you. If any of you guys own ManFriday tools you already have the tools at your disposal for free. She seems to be the only one so far who has opted to transfer the plug-ins we bought to be part of Premier. Will edit this in a jiffy. Gotta go do a roundup (on my offline pc) . Luckily I own them all. So let me show you how to find them ...
Except for the improved Mesh Grabber 4.
Oh that one? The one we got strung along waiting for? Right. MF is a great coder, and that might be well worth renting for some. . . but not for me. I'm happy with what I have and own.
Premier QuestionsArtAngel said:
Here's a bit of transparency for you. If any of you guys own ManFriday tools you already have the tools at your disposal for free. She seems to be the only one so far who has opted to transfer the plug-ins we bought to be part of Premier. Will edit this in a jiffy. Gotta go do a roundup (on my offline pc) . Luckily I own them all. So let me show you how to find them ...
Except for the improved Mesh Grabber 4.
Premier Membership FAQ (Questions Only Please)
Just one-way to G9 ~maikdecker said:Elliandra said:
8. What does the "Free Legacy Content" consist of?
Does this mean, that these "weekly" freebies are from now on Premier only?
12. Will the Premier Character Converter actually convert Genesis 3 characters to Genesis 9?
- It is supposed to transfer the character shape.
Is that a transfer TO G9 only, or can G9 shapes transfered to G8/G3, too?
Daz 3D is part of

Connect
DAZ Productions, Inc.
7533 S Center View Ct #4664
West Jordan, UT 84084Licensing Agreement | Terms of Service | Privacy Policy | EULA
© 2026 Daz Productions Inc. All Rights Reserved.