-
The "Complaints 'R' Us, complaint thread"
Usual cause of morphs deforming geometry like that is the morph extends geometry beyond the bounds of a vertex group, think there is a way to fix that if you unweld vertices, adjust bones and re-weld, but you need something like blender I guess that gives you geometry ops, not sure how Studio handles welds I’veonlyused the script function,one of the DZbone() calls I think :)
How to fit M4 hair to Genesis 8 ?Yes, I forgot to tell I purchased this product.
Cesar hair is a prop (?), I used the Transfer Utility to force Autofit.
The Midget's works in progress.That's pretty amazing. Didn't know you could make own clothes/outfits. Simple props in Hexagon maybe, but clothes? Wow!
That might be long range goal since PAs probably aren't going to make props/clothing for a Pratchett 'Discworld' project I have in mind.
Anyway, best wishes on it!
--Bruce
Thank you. I'm a Discworld fan too but it's probably a bit ambitious for me at the moment, otherwise I would make a start for you.
Wow, you came quite a long way since I visited your thread the last time!

Will you create a morph for the chin area of your character, to make is smoothly fit to the rest of the head? Or is this the intended look?
The idea was to stetch edge rings in Blender to create an extreme morph and see if Daz could create it. I want to adjust under the chin but the ridges running from the chin towards the cheek bones were intentional. I may try to go even more extreme the next time I work on her.
ZDG random Daz Studio discoveries and questions.yes, as I thought, a hell of a lot of work compared to just fixing eye orientation in a figure shaping dial.
OK, so the one hairstyle sort of looks better with the Alien morph with the Alien dial reduced on the hair, however, now as an example, the hair is inside the figure cuz it is no longer following the shape of the figure. That was what I was first saying about an argument for making the ears separate, to begin with. Clearly, from the promos, Marcius never intended the alien figure to be used with hair. Again, the eyes on the Alien shaping dial, well, that really needs to be fixed, lol.
The eye orientation, I'm guessing is a simple find and remove the lines changing the bone orientations in the dial duf/dsf/whatever-file (rotations, not transits), or it is a checkbox somewhere in the ERC freeze window. Both sound like an easier fix for the PA that has the original stuff to do that with. And, only the PA that made the thing, can share that fix with everyone that purchased the product, lol.
And yes, very nice maps to work with in 3delight, thanks. Just a simple mask overlay in gimp to combine the Iray tattoo maps with the Diffuse maps, and wah-lah.
The Midget's works in progress.Wow, you came quite a long way since I visited your thread the last time!
Will you create a morph for the chin area of your character, to make is smoothly fit to the rest of the head? Or is this the intended look?
ZDG random Daz Studio discoveries and questions.It's possible to separate the ear morph from the head morph using weight mapping magic, I know how to do it with morphs you import but I forget how to do it on a morph already there.. there's a video floating around about it somewhere though.
ZDG random Daz Studio discoveries and questions.yes, that is the fix. If, if, the ear is a separate dial from the rest of the figure. With the Alien variant of Marcius's Rapha for Genesis 8 Female, it is all one single dial. It can't be fixed without going back to Zbrush and removing the ear from the figure morph, and making it its own morph.
The fact that the eye orientation is all messed up in the Alien variant morph, is a tad more pressing of an issue tho. That breaks eye pose controls.
Just (re)starting 3d, downloaded Daz3d; what else do I have to buyDo you want to use pre-made morphs for shaping, or create your own shapes by modelling?
If you want to do your own body morphs, you already have what you need (like, Hexagon and the Genesis 8 Starter Essentials). You'd use the Hexagon bridge for import into the programm, and creating the morph. You'd need skins, of course, and you can't do HD morphs of the figure. There's a couple of free tutorials, (like https://www.daz3d.com/forums/discussion/comment/3530151/#Comment_3530151) or you can buy one, for example: https://www.daz3d.com/how-to-create-a-new-custom-daz-studio-character
If you want to buy things, you'd start out with the male and female base morphs, like
- https://www.daz3d.com/genesis-8-male-body-morphs
- https://www.daz3d.com/genesis-8-male-head-morphs
- https://www.daz3d.com/growing-up-for-genesis-8-male-s
- https://www.daz3d.com/aging-morphs-for-genesis-8-male-s
- https://www.daz3d.com/shape-shift-for-genesis-8-male-s
- https://www.daz3d.com/vascularity-hd-for-genesis-8-female-and-male
- https://www.daz3d.com/body-mixer-for-genesis-3-and-8-male
- https://www.daz3d.com/200-plus-head-and-face-morphs-bundle-for-genesis-8-female-s-and-male-s
- highly recommended: https://www.daz3d.com/rarestone-s-face-morphs-collection-for-genesis-8-male
- ditto: https://www.daz3d.com/rarestone-s-face-morphs-collection-for-genesis-8-female
This is not a complete list, of course, as there's male and female ones, specialized ones for ethnecies (which you probably could dial in with the other morph sets). One thing you might want to consider is that morphs are usually time savers (you could dial them in, but it would take a lot of time), and that you start out with a symmetrical base character, so you want to look for morphs that allow right and left different morph settings
What you also can do is buy some of the more extreme shaped characters, like Olie 8 and George, which you then can mix into small doses into your characters. George is recommended, as he brings in bend morphs for obese people, that are sorely needed, and he's a quick way to make any given male character more realistic.
The "Complaints 'R' Us, complaint thread"Aaand now that all that's wrapped up, a couple of the 3D's I've been working on:
First up another venture into zBrush where I tried to make some silly carnivorous plant with my limited knowledge of things.
Then a little scene that's half my own modeling, and half stuff from elsewhere (People models included in Cinema 4D, and ofc the Mantiraptor from here at DAZ)
Then finally just me messing around because whatever. Our very own Sea Dragon, and then two vehicle models I got off a free models website. Included two diff views because I was having fun.
The mantiraptor scene was rendered in Cinema 4D's physical render, but I'm trying to transfer it over into Vray the past couple days. The Sea Dragon scene was started and finished in Vray.
And uh, I'll try and not forget about the forum and wander off again ><;
Very cool Rezca:)
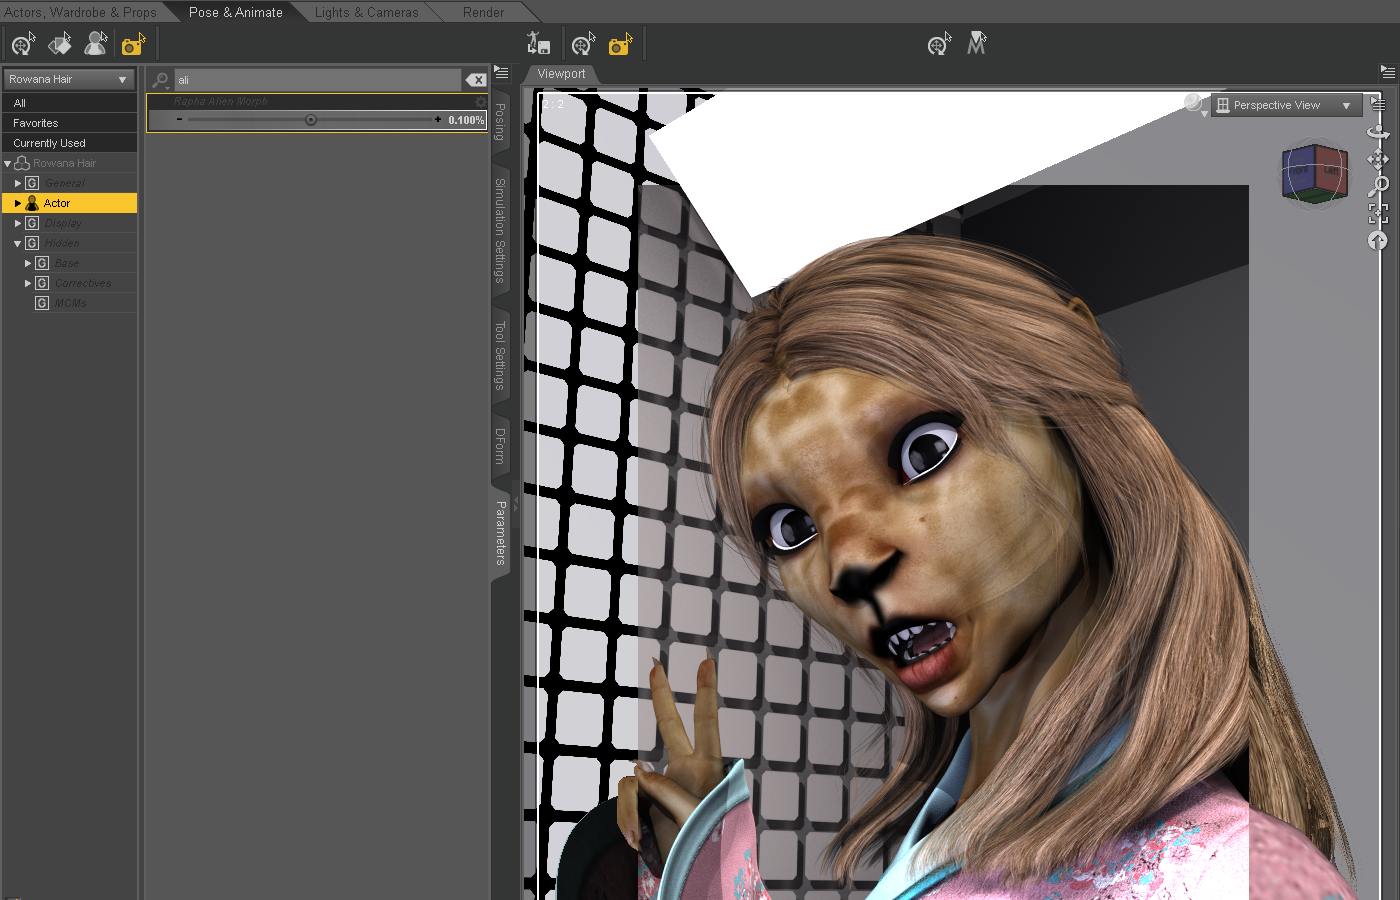
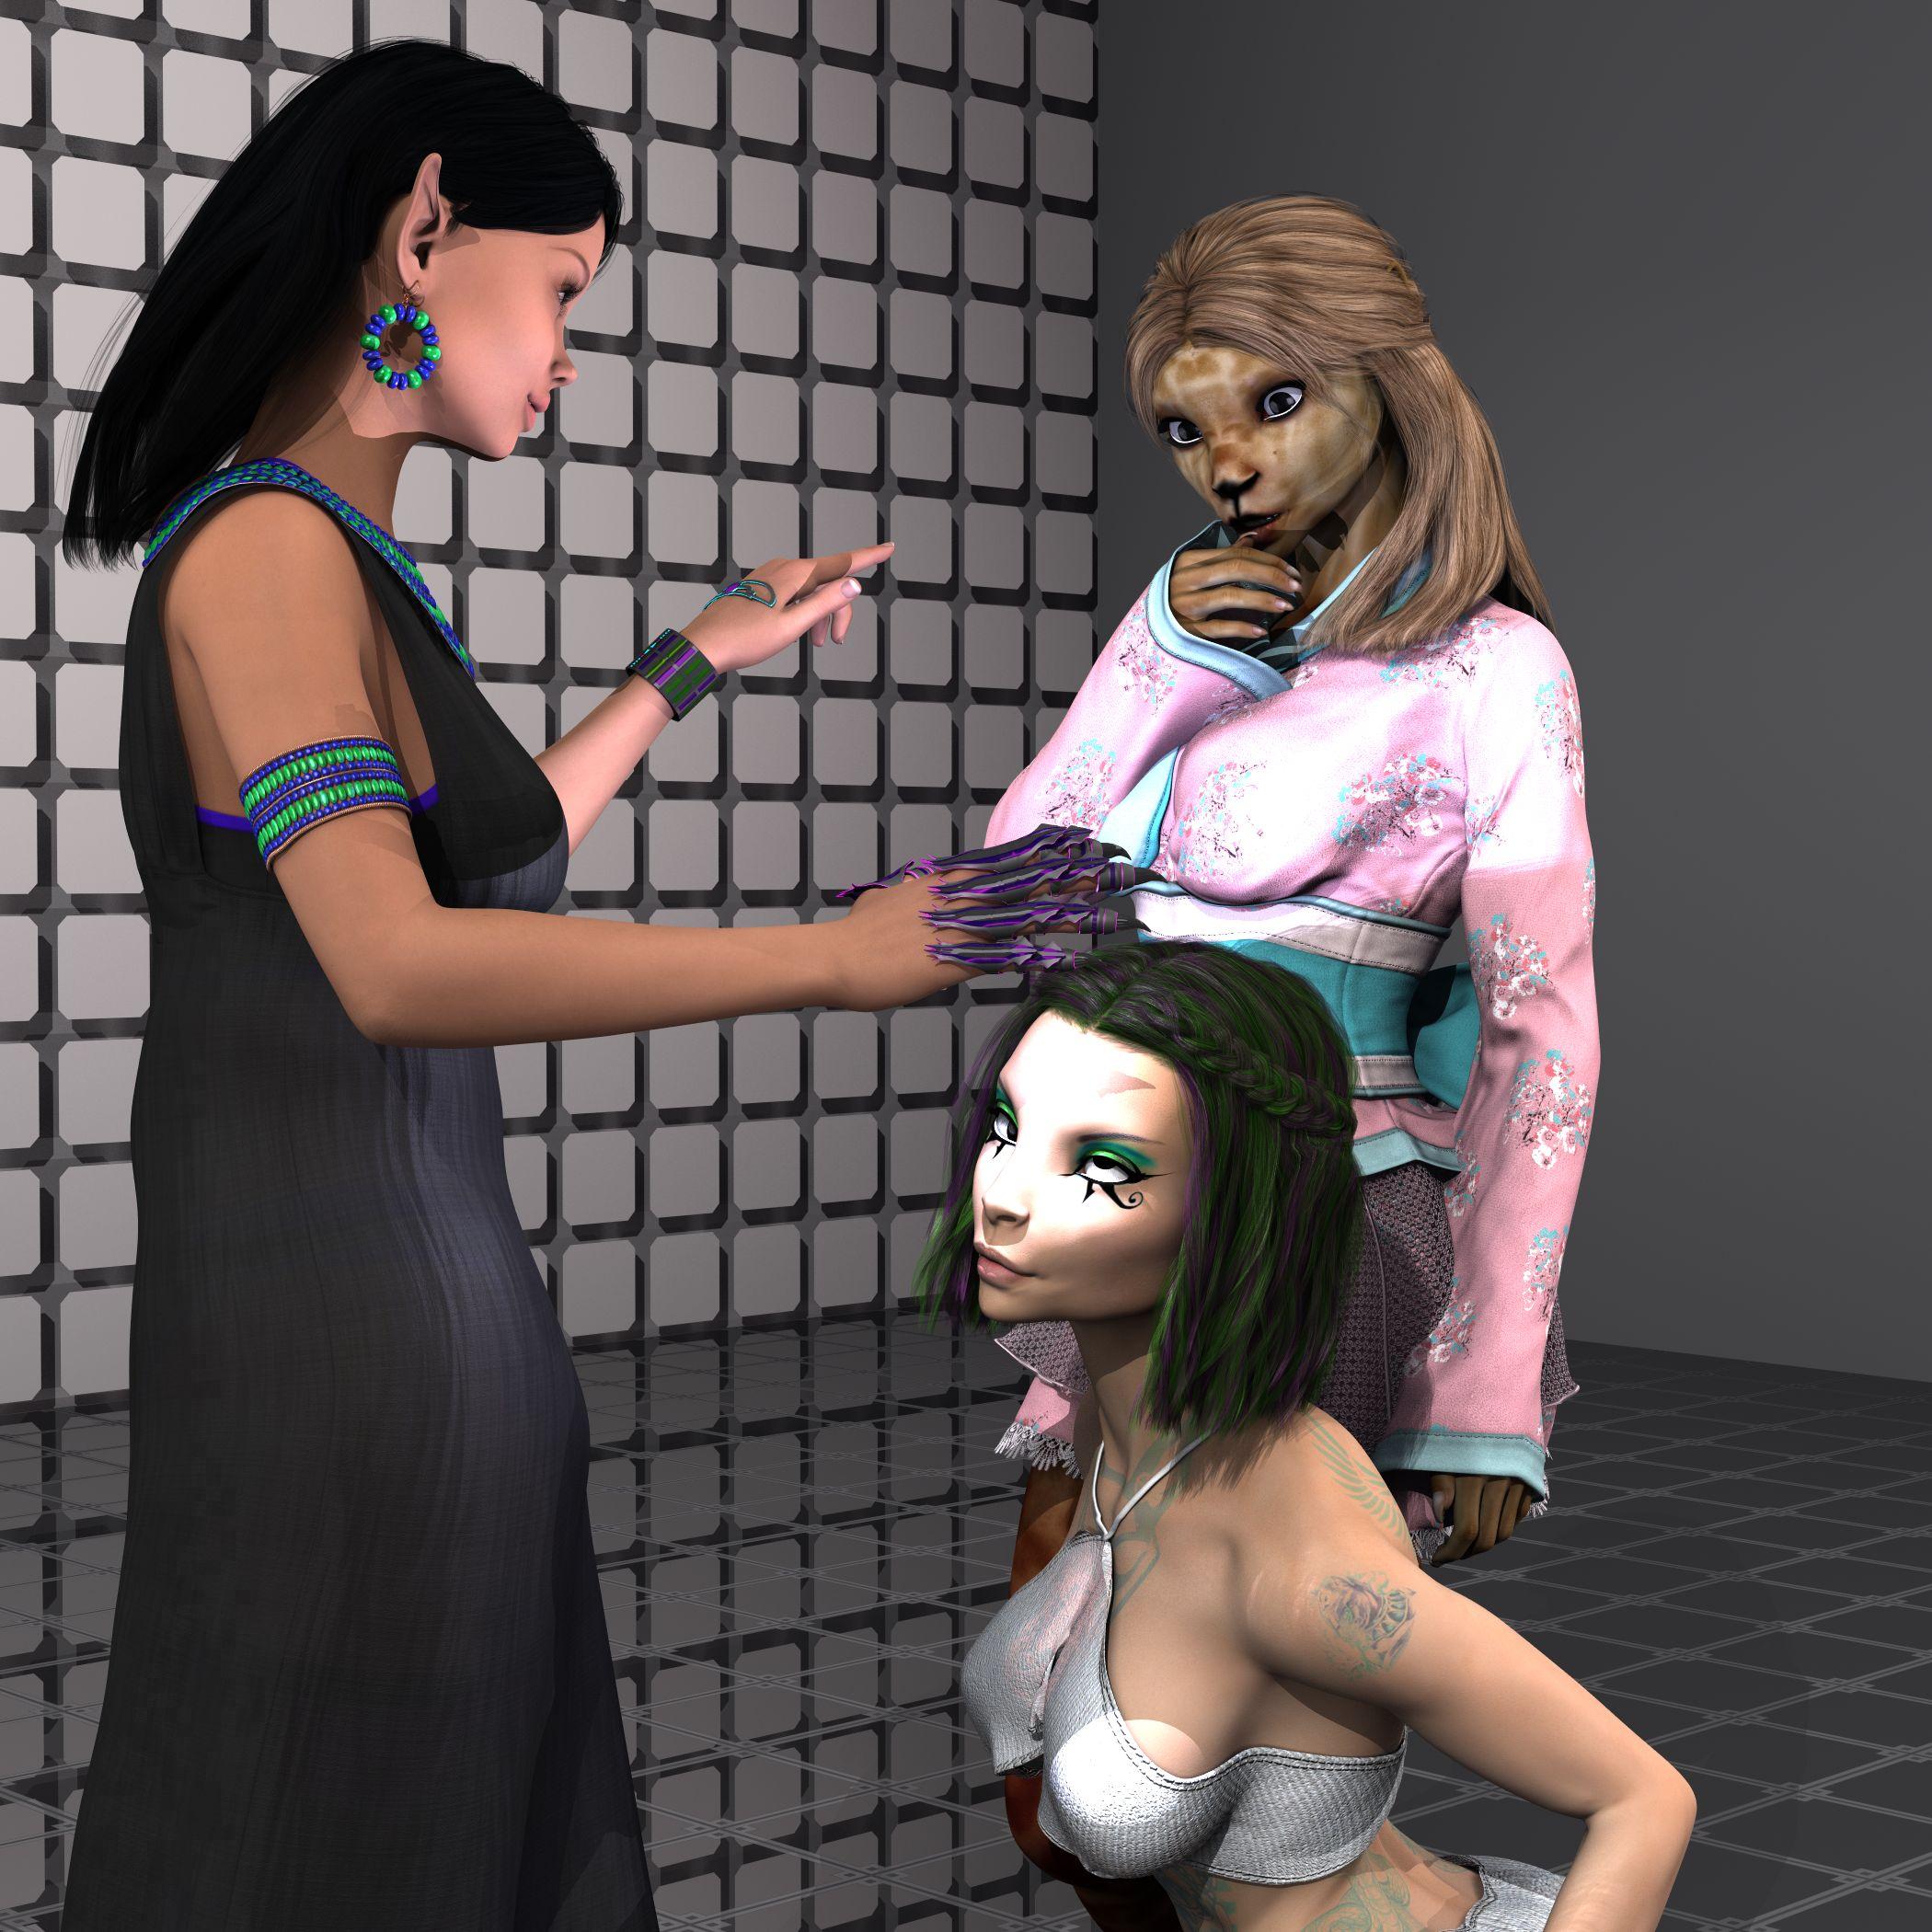
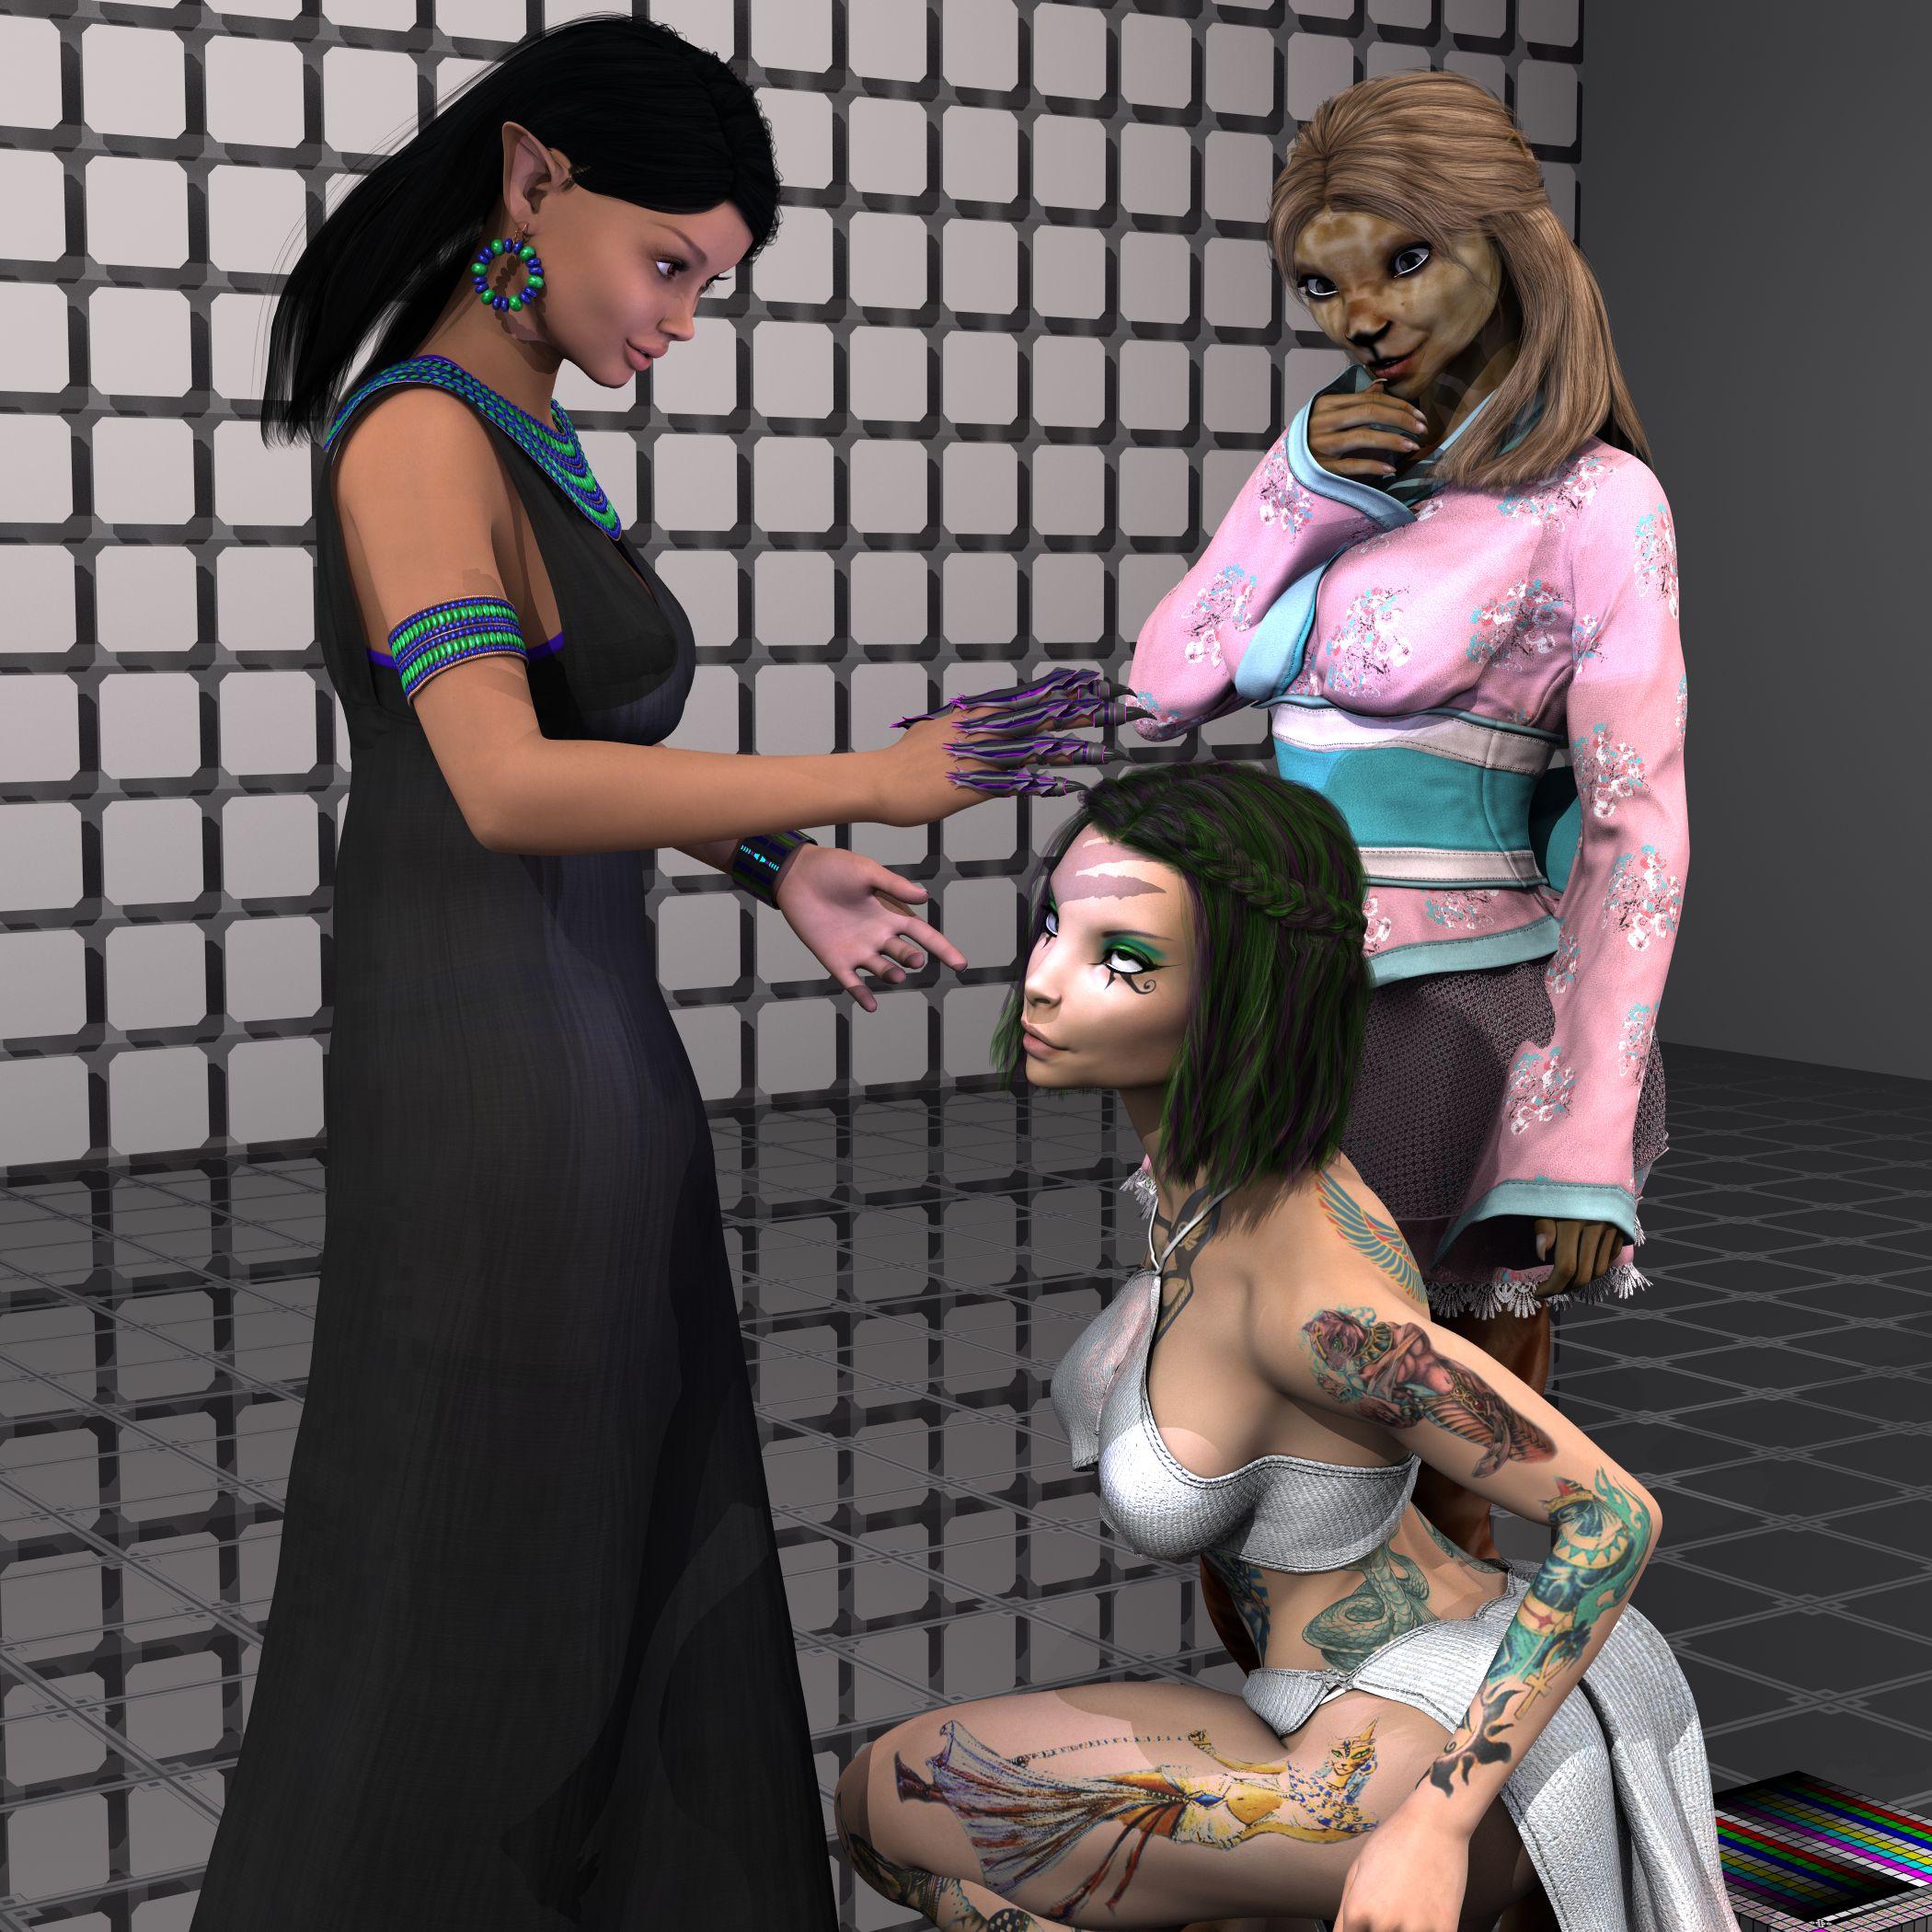
ZDG random Daz Studio discoveries and questions.Well, it's a bit of a sweltering weekend here in Southern Hoth. I do hope everyone had a good May the fourth and Cinco de Mayo. Some time ago, I had said some harsh words about someone's figure maps, it appears there has been a considerable effort in that area from the PA, thanks. I would like to point out one small note, as I know so many PAs insist on doing full figure morphs with no separate dials for anything. While I can understand that to a point, Let me make one small argument in favor of separate dials for some things, like pointy ears.
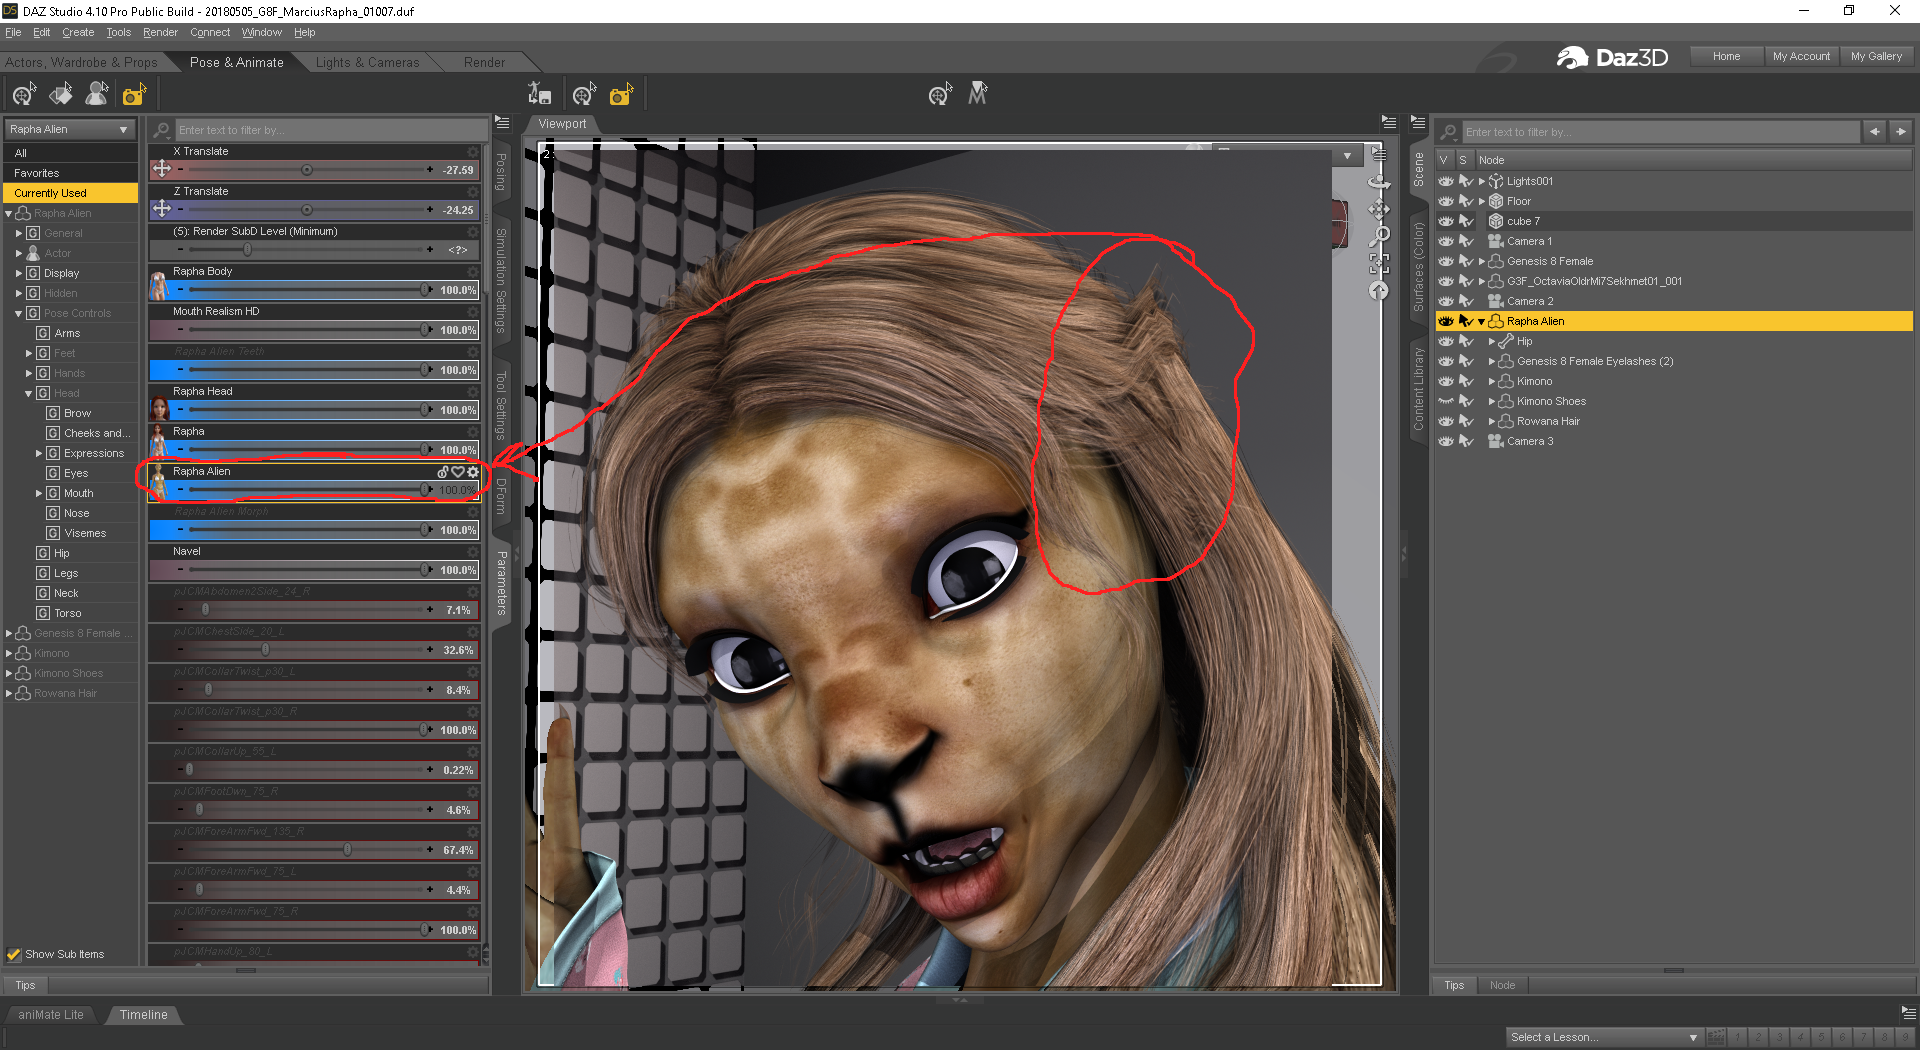
the ears on this figure, are only available on the full Alien body and head dial, the other dials are for the human variant and do not have ears to go with. See that anomaly over the ears in the hair, The only way to fix that, is to turn OFF Auto-follow on the Ear dial, and because that dial also controls the height, shape, and size of the head the hair is supposed to be on, that will not work without the hair ending up some where else in the scene disconnected from the figure.
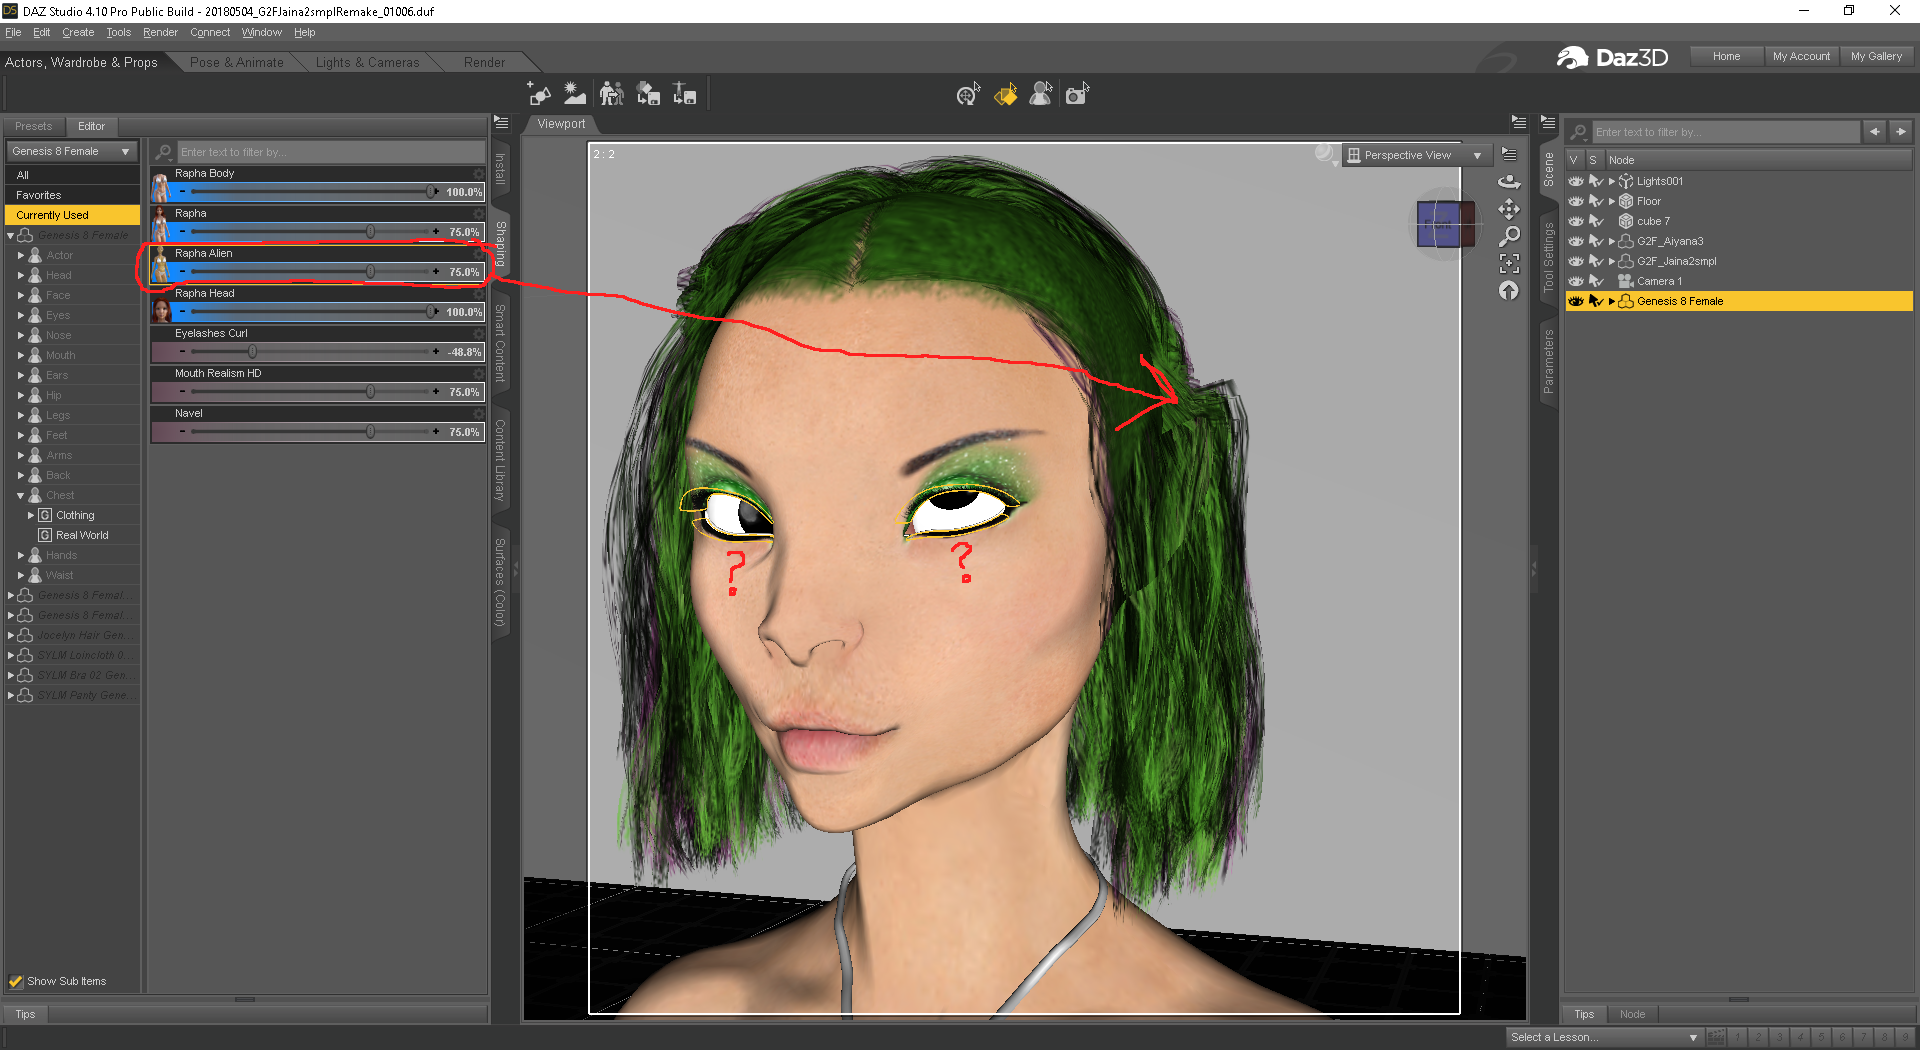
I can understand now, why the figure with the cute ears, was never shown with hair, because the shaping dial doesn’t work with ears at all. Now, as much as I want to bug Marcius over fixing that, it really is more of a want compared to another issue that makes the Alien morph dial completely useless for use in a scene.
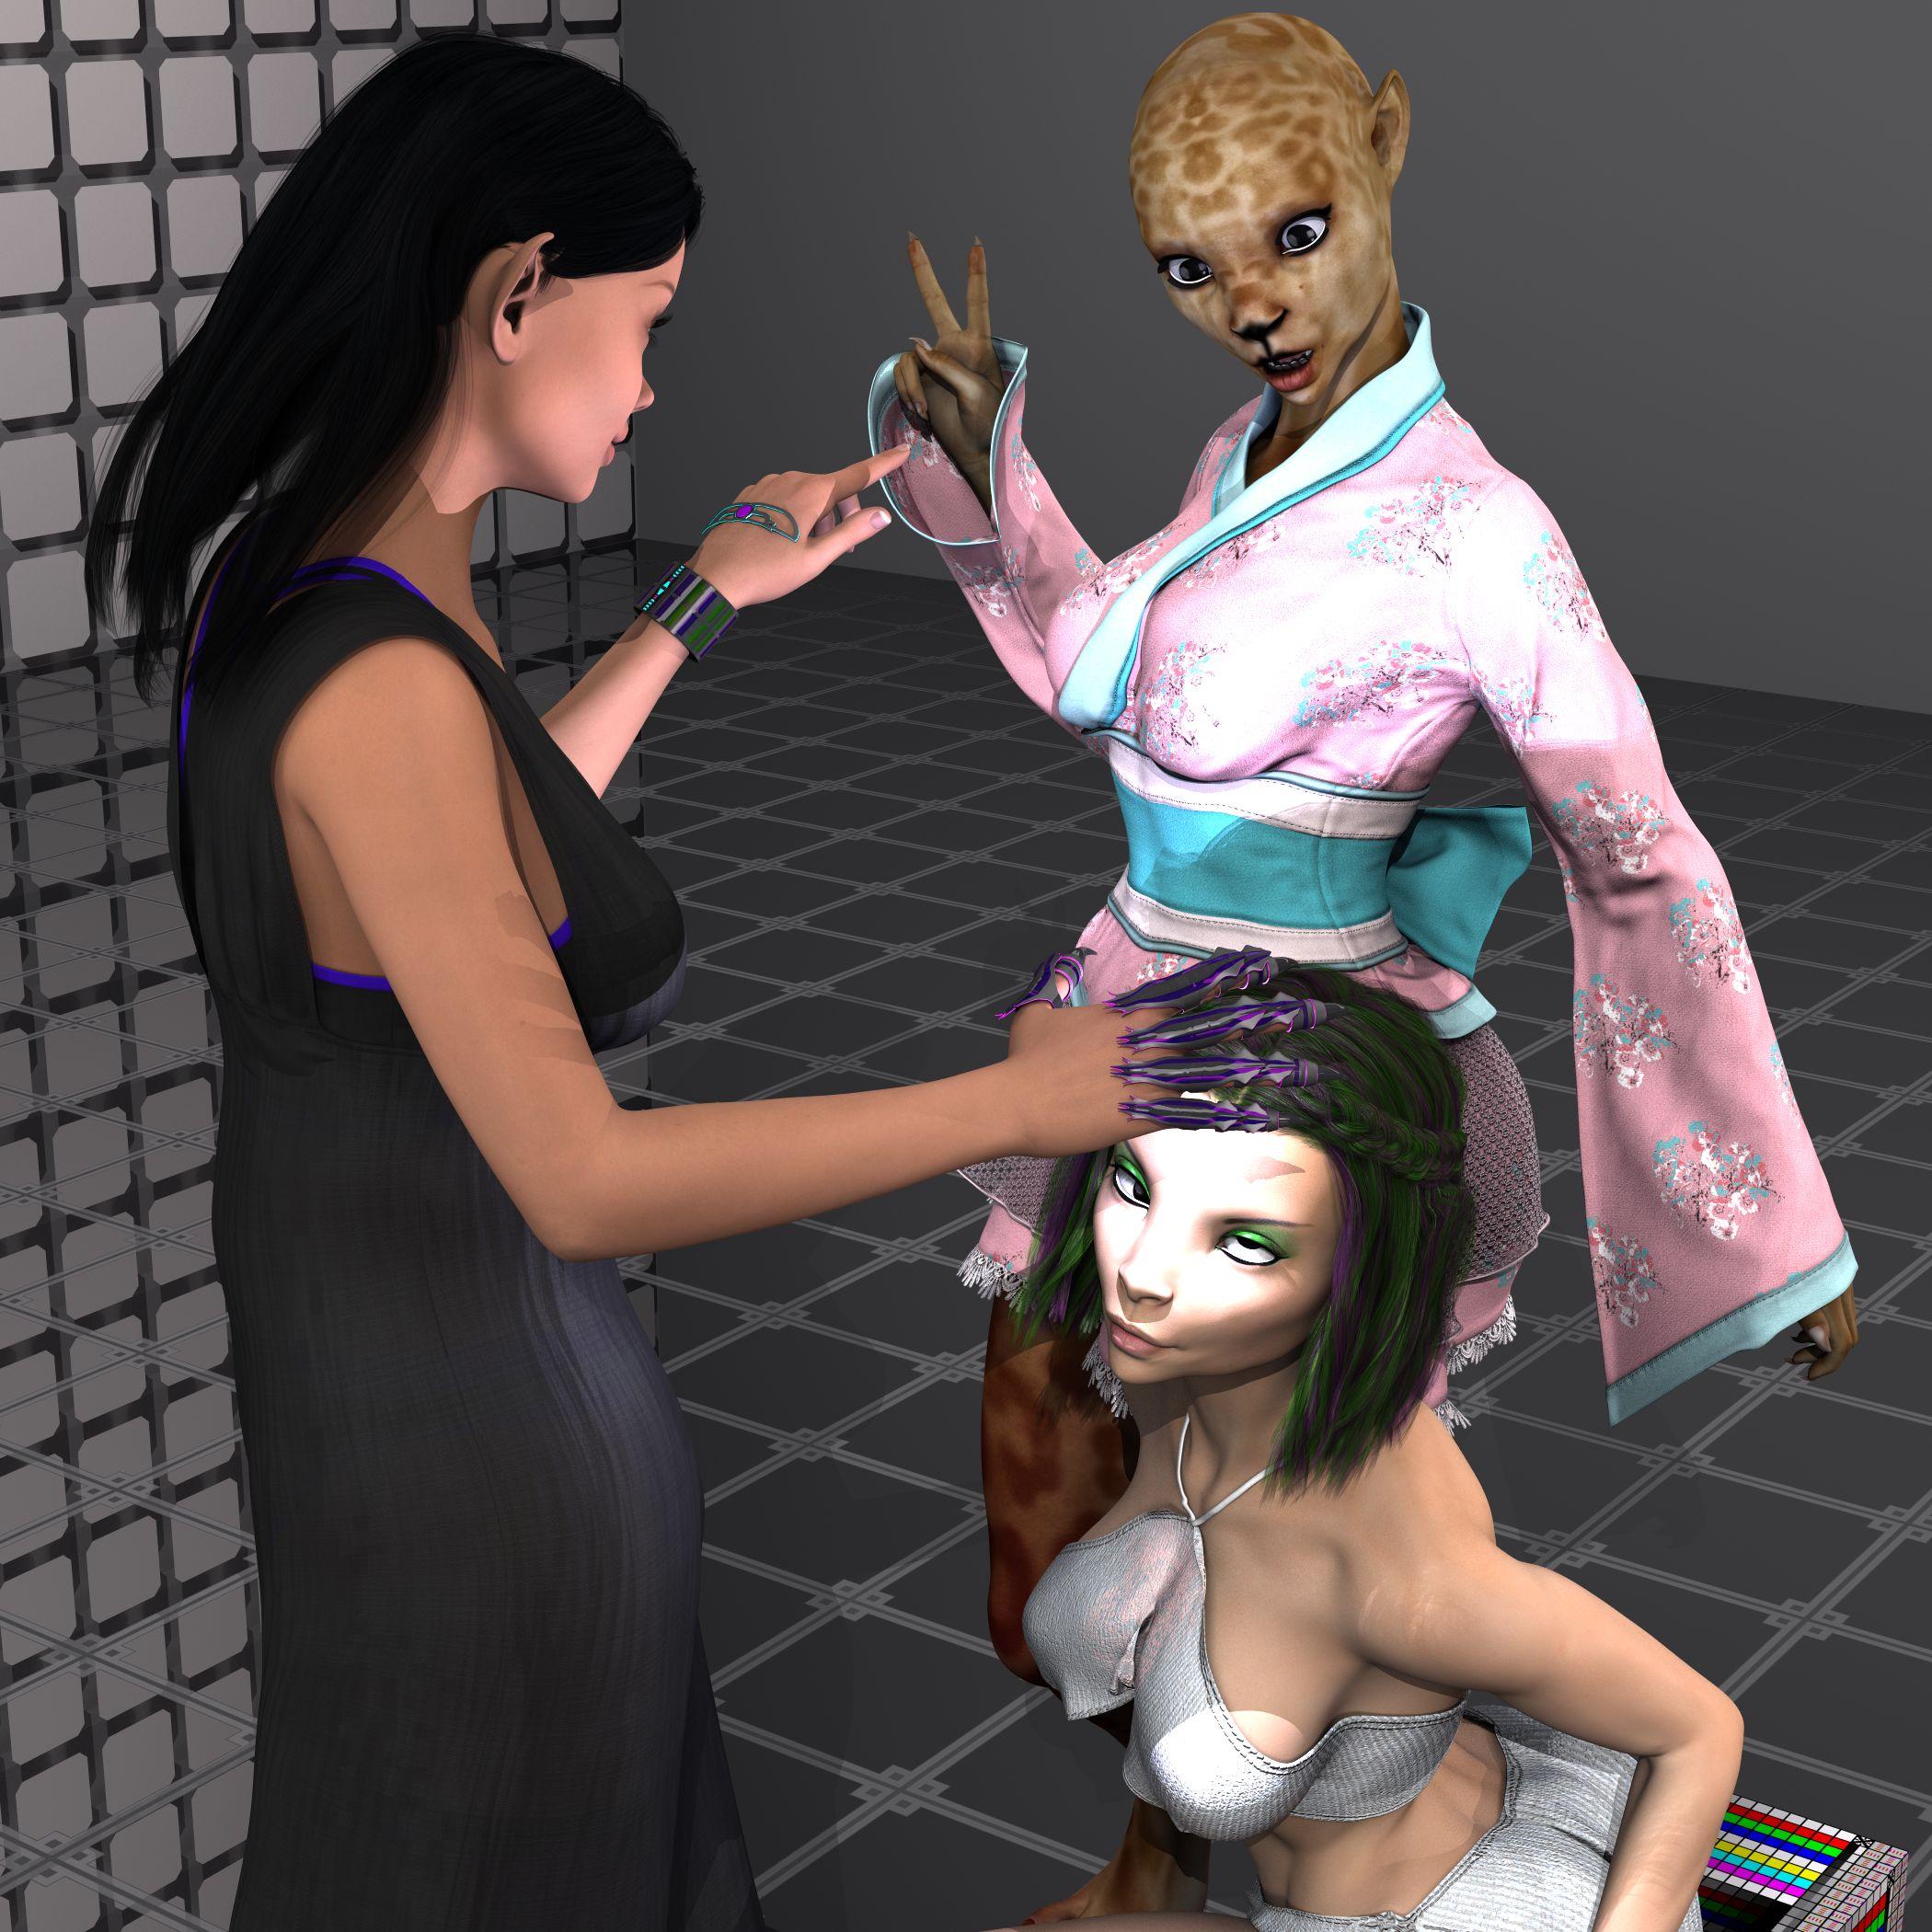
This was not what I originally thought of doing for a scene with the figure, however after seeing how the Alien morph dial broke the eye pose controls, well. (sad sigh) At least the work on the Diffuse maps is much improved, again, thanks for that. I suspect the eye thing is a simple checkbox that was mistakenly checked or unchecked when the ERC freeze was done to make the Alien dial. Sadly tho, I'm not really sure what one it would be, tho I will guess many other PA's that make figures know more about that stuff. Marcius, your not the first PA to have a cross-eyed figure dial, I have seen that before a few times. It must be a simple mistake and an easy fix.
Just (re)starting 3d, downloaded Daz3d; what else do I have to buyTL;DR: I want to mold my own characters, male and female. What is the minimum I need to buy. Links appreciated, if this has already been answered.
I'm getting really confused with all the dependencies between the products available. I currently want male and female bases that I can mold into characters and pose myself. I can build a few simple props in Hexagon and backgrounds aren't a problem, but the different morphs and things are very confusing.
If I want to create my own Genesis 8 characters, from teen to adult, will full freedom to modify shape in the body and face, what is the minimum I have to buy. I'm fiddling around with the Daz3d free content, but I think I want more. In addition to pre-baked characters, there seem to be several options for types of morph packages. Do they all play together well? Is there a minimum set that I should start with, and a path to continue on?
Money is of course a factor (don't want to throw it away), but mostly I don't want to waste time learning things that won't help down the road.
Hitting us over the head with DforceHowever, I had odd results when trying to merge the sub-scene back into the original scene - often the simulation was completely reset and I had to start over within the scene.
Which raises another question: is it possible to save a scene and retain the simulation so that it is still draped when the scene is re-loaded?
Yes, but remember that it represents a large chunk of data that is embedded in the file, so the scene will take mroe disc space.
I frequently set up elements of a scene in separate files, and then merge them into the final scene. Sometimes the files include dForced items as well. I almost always use the Animated Timeline for draping, and if there are multiple files with dForce items, I set the total frame count to the same in all files.
However, there is a better way, and I've started using it all the time. Once you have completed your simulation and are happy with the drape, create a morph of the drape and save the file. When you merge the file into the main scene, the morph will merge with it. And because the drape is now a morph, you don't have to worry about losing the drape. You can also save those morphs as Morph Assets, if they are something you may want to use again.
Here are instructions I posted, modified from the step-by-step Richard posted for me: Turning Your Perfect Simulation Into A Morph (I still refer to this post often.)
I have no idea how much the morphs add to the file size, but I suspect it is less than the "chunk of data" Richard mentions above.
Wait, I thought we could freeze a simulation? Wouldn't that keep it from re-simulating when something else is being simulated? It's a one-click button on the parameters tab of the simulated item. No hoop-jumping ;)
Laurie
As @barbult said, the "Clear" button in Simulation Settings will clear all the simulations. There is a menu item for clearing the selected item, but the easiest thing to do, imo, is to follow @RGcincy's instructions and create a Short-cut Key to Clear Simulation on Selected Item(s).
Hitting us over the head with Dforce
Well, I'm pretty sure about that behavior, but I could be wrong. I've tried hard to use that clear button lately when items are frozen. Does it seem to work differently for you?However, I had odd results when trying to merge the sub-scene back into the original scene - often the simulation was completely reset and I had to start over within the scene.
Which raises another question: is it possible to save a scene and retain the simulation so that it is still draped when the scene is re-loaded?
Yes, but remember that it represents a large chunk of data that is embedded in the file, so the scene will take mroe disc space.
I frequently set up elements of a scene in separate files, and then merge them into the final scene. Sometimes the files include dForced items as well. I almost always use the Animated Timeline for draping, and if there are multiple files with dForce items, I set the total frame count to the same in all files.
However, there is a better way, and I've started using it all the time. Once you have completed your simulation and are happy with the drape, create a morph of the drape and save the file. When you merge the file into the main scene, the morph will merge with it. And because the drape is now a morph, you don't have to worry about losing the drape. You can also save those morphs as Morph Assets, if they are something you may want to use again.
Here are instructions I posted, modified from the step-by-step Richard posted for me: Turning Your Perfect Simulation Into A Morph (I still refer to this post often.)
I have no idea how much the morphs add to the file size, but I suspect it is less than the "chunk of data" Richard mentions above.
Like others, I find autofit to be unpredictable, to say the least! I have several V4 items I purchased when I was first getting started, naively believing they would look the same on G2F as they did on V4 with autofit, having purchased a product for that purpose. I was wrong. This was years before dForce.
I appreciate Daz's requirement that dForce clothing sold at Daz must include rigging, at least to the extend the same clothing type would have rigging without dForce. I have several long dresses that are pre-dForce that do not use rigging on the skirt, relying on morphs instead. It sounds like some PAs are still doing that with dForce dresses, with fewer morphs, perhaps.
If you purchase a dress like that, and find the skirt is useless without using dForce due to a lack of movement morphs, return the item for a refund and be sure to state it's because of the lack of morphs, making the dress unusable as rigged clothing. PAs will never know this is a problem if you don't return their products and state this is why.
I think - though I may be corrected - that compitibility only works G3 -> G8 with clothing, not G8 -> G3.For autofit to work from G8 to G3, you'll need G8 clones for G3. You can create your own using instructions from Redz. The link is posted in the Mprphs from G3 to G8 thread, but here's the link copied from Singular Blues signature: Redz's Tutorial for Adding Clones to G8F
I've used this to create clones both directions, and prefer my own clones created using this tutorial to those provided by the G8 Starter Essentials. (There is one typo in my copy. If it hasn't been fixed, it will be where you're asked to delete a figure from the scene, but it's the wrong figure. It should be obvious as it's asking you to delete the figure you need to create the clone.)
That said, I prefer using Sy's tutorial, linked earlier in this thread, to convert clothing from G8 to G3, or G3 to G8, with no need for autofit.
Wait, I thought we could freeze a simulation? Wouldn't that keep it from re-simulating when something else is being simulated? It's a one-click button on the parameters tab of the simulated item. No hoop-jumping ;)
Laurie
Correct. Just don't hit the clear button on the simulation page. That will clear even frozen simulations.Hmm...they'll need to fix that. Theortically the only thing that should be cleared is the item you have selected when you press the "Clear" button ;). Oh, well...it's young tech and will improve.
Laurie
my old friend emotiguy and new look for emotigirlHAHAHA FUNNY man!
Just another senior moment. I found the way to morph emotigirl to the roundbal shape and football shape but the map in my origina sportspack did not work properly on emotigirl... It seems that the map I used was incorrect for the girl but worked on the guy. I am in the process of updating the maps to fit both and toying with the iray rendering ... on the laptop this one took almost 2 hours to render but it does not have the annoying redline that the original sportspack left on the girl. I have created a new master copy to work with that wil work with both. Here is a sneak peek at the iray emotigirl football.
Hitting us over the head with DforceHowever, I had odd results when trying to merge the sub-scene back into the original scene - often the simulation was completely reset and I had to start over within the scene.
Which raises another question: is it possible to save a scene and retain the simulation so that it is still draped when the scene is re-loaded?
Yes, but remember that it represents a large chunk of data that is embedded in the file, so the scene will take mroe disc space.
I frequently set up elements of a scene in separate files, and then merge them into the final scene. Sometimes the files include dForced items as well. I almost always use the Animated Timeline for draping, and if there are multiple files with dForce items, I set the total frame count to the same in all files.
However, there is a better way, and I've started using it all the time. Once you have completed your simulation and are happy with the drape, create a morph of the drape and save the file. When you merge the file into the main scene, the morph will merge with it. And because the drape is now a morph, you don't have to worry about losing the drape. You can also save those morphs as Morph Assets, if they are something you may want to use again.
Here are instructions I posted, modified from the step-by-step Richard posted for me: Turning Your Perfect Simulation Into A Morph (I still refer to this post often.)
I have no idea how much the morphs add to the file size, but I suspect it is less than the "chunk of data" Richard mentions above.
Like others, I find autofit to be unpredictable, to say the least! I have several V4 items I purchased when I was first getting started, naively believing they would look the same on G2F as they did on V4 with autofit, having purchased a product for that purpose. I was wrong. This was years before dForce.
I appreciate Daz's requirement that dForce clothing sold at Daz must include rigging, at least to the extend the same clothing type would have rigging without dForce. I have several long dresses that are pre-dForce that do not use rigging on the skirt, relying on morphs instead. It sounds like some PAs are still doing that with dForce dresses, with fewer morphs, perhaps.
If you purchase a dress like that, and find the skirt is useless without using dForce due to a lack of movement morphs, return the item for a refund and be sure to state it's because of the lack of morphs, making the dress unusable as rigged clothing. PAs will never know this is a problem if you don't return their products and state this is why.
I think - though I may be corrected - that compitibility only works G3 -> G8 with clothing, not G8 -> G3.For autofit to work from G8 to G3, you'll need G8 clones for G3. You can create your own using instructions from Redz. The link is posted in the Mprphs from G3 to G8 thread, but here's the link copied from Singular Blues signature: Redz's Tutorial for Adding Clones to G8F
I've used this to create clones both directions, and prefer my own clones created using this tutorial to those provided by the G8 Starter Essentials. (There is one typo in my copy. If it hasn't been fixed, it will be where you're asked to delete a figure from the scene, but it's the wrong figure. It should be obvious as it's asking you to delete the figure you need to create the clone.)
That said, I prefer using Sy's tutorial, linked earlier in this thread, to convert clothing from G8 to G3, or G3 to G8, with no need for autofit.
Wait, I thought we could freeze a simulation? Wouldn't that keep it from re-simulating when something else is being simulated? It's a one-click button on the parameters tab of the simulated item. No hoop-jumping ;)
Laurie
Correct. Just don't hit the clear button on the simulation page. That will clear even frozen simulations.Hmm...they'll need to fix that. Theortically the only thing that should be cleared is the item you have selected when you press the "Clear" button ;). Oh, well...it's young tech and will improve.
Laurie
Hitting us over the head with Dforce
Correct. Just don't hit the clear button on the simulation page. That will clear even frozen simulations.However, I had odd results when trying to merge the sub-scene back into the original scene - often the simulation was completely reset and I had to start over within the scene.
Which raises another question: is it possible to save a scene and retain the simulation so that it is still draped when the scene is re-loaded?
Yes, but remember that it represents a large chunk of data that is embedded in the file, so the scene will take mroe disc space.
I frequently set up elements of a scene in separate files, and then merge them into the final scene. Sometimes the files include dForced items as well. I almost always use the Animated Timeline for draping, and if there are multiple files with dForce items, I set the total frame count to the same in all files.
However, there is a better way, and I've started using it all the time. Once you have completed your simulation and are happy with the drape, create a morph of the drape and save the file. When you merge the file into the main scene, the morph will merge with it. And because the drape is now a morph, you don't have to worry about losing the drape. You can also save those morphs as Morph Assets, if they are something you may want to use again.
Here are instructions I posted, modified from the step-by-step Richard posted for me: Turning Your Perfect Simulation Into A Morph (I still refer to this post often.)
I have no idea how much the morphs add to the file size, but I suspect it is less than the "chunk of data" Richard mentions above.
Like others, I find autofit to be unpredictable, to say the least! I have several V4 items I purchased when I was first getting started, naively believing they would look the same on G2F as they did on V4 with autofit, having purchased a product for that purpose. I was wrong. This was years before dForce.
I appreciate Daz's requirement that dForce clothing sold at Daz must include rigging, at least to the extend the same clothing type would have rigging without dForce. I have several long dresses that are pre-dForce that do not use rigging on the skirt, relying on morphs instead. It sounds like some PAs are still doing that with dForce dresses, with fewer morphs, perhaps.
If you purchase a dress like that, and find the skirt is useless without using dForce due to a lack of movement morphs, return the item for a refund and be sure to state it's because of the lack of morphs, making the dress unusable as rigged clothing. PAs will never know this is a problem if you don't return their products and state this is why.
I think - though I may be corrected - that compitibility only works G3 -> G8 with clothing, not G8 -> G3.For autofit to work from G8 to G3, you'll need G8 clones for G3. You can create your own using instructions from Redz. The link is posted in the Mprphs from G3 to G8 thread, but here's the link copied from Singular Blues signature: Redz's Tutorial for Adding Clones to G8F
I've used this to create clones both directions, and prefer my own clones created using this tutorial to those provided by the G8 Starter Essentials. (There is one typo in my copy. If it hasn't been fixed, it will be where you're asked to delete a figure from the scene, but it's the wrong figure. It should be obvious as it's asking you to delete the figure you need to create the clone.)
That said, I prefer using Sy's tutorial, linked earlier in this thread, to convert clothing from G8 to G3, or G3 to G8, with no need for autofit.
Wait, I thought we could freeze a simulation? Wouldn't that keep it from re-simulating when something else is being simulated? It's a one-click button on the parameters tab of the simulated item. No hoop-jumping ;)
Laurie
The "Complaints 'R' Us, complaint thread"Aaand now that all that's wrapped up, a couple of the 3D's I've been working on:
First up another venture into zBrush where I tried to make some silly carnivorous plant with my limited knowledge of things.
Then a little scene that's half my own modeling, and half stuff from elsewhere (People models included in Cinema 4D, and ofc the Mantiraptor from here at DAZ)
Then finally just me messing around because whatever. Our very own Sea Dragon, and then two vehicle models I got off a free models website. Included two diff views because I was having fun.
The mantiraptor scene was rendered in Cinema 4D's physical render, but I'm trying to transfer it over into Vray the past couple days. The Sea Dragon scene was started and finished in Vray.
And uh, I'll try and not forget about the forum and wander off again ><;
Hi, there!
Feed me!
The guy who's flying that helicopter is too low! He's about to become lunch!
Dana
Diomede's Notepad, Sketchpad, and Chilling PadThanks, @themidget and @Wanderer.
A couple people have asked about modeling their own content when they want that specialty item not available in the store. I had an old thread in the cmmons devoted to making content. Here are some links to comments in that thread that I would recommend to someone getting ready to do advanced kitbashing or beginning modeling. It needs to be updated for DForce, but these should still be helpful to some.
content creation does not have to be scary
Vickie in a barrel -https://www.daz3d.com/forums/discussion/comment/939565/#Comment_939565
Some basics of modeling clothingaround a figure, selection, manipulaiton, using extrude and similar tools - https://www.daz3d.com/forums/discussion/comment/941914/#Comment_941914
and
https://www.daz3d.com/forums/discussion/comment/941921/#Comment_941921and - https://www.daz3d.com/forums/discussion/comment/941930/#Comment_941930
on edge flow - https://www.daz3d.com/forums/discussion/comment/941938/#Comment_941938
and - https://www.daz3d.com/forums/discussion/comment/941951/#Comment_941951
boots from hexagon to studio - https://www.daz3d.com/forums/discussion/comment/947417/#Comment_947417
weightmaps and joint bends
https://www.daz3d.com/forums/discussion/comment/947661/#Comment_947661patience55 on types of skirts -https://www.daz3d.com/forums/discussion/comment/950253/#Comment_950253
and
https://www.daz3d.com/forums/discussion/comment/952092/#Comment_952092on the difficulty of JCMs - https://www.daz3d.com/forums/discussion/comment/979163/#Comment_979163
custom morph creation - https://www.daz3d.com/forums/discussion/comment/2394546/#Comment_2394546
In RE: iREAL Animated Ocean Water SystemIt'd be easier to use with Lagoon Living than the The Pool House but you could both if you did enough set up work and camera positioning. You could tile the ocean blocks and use it's morph capabilities to make a sort of reasonable shore line or distant ocean view or a close up very wavy ocean if the ocean was supposed to be near enough.
Thanks very much. I might be buying that soon.
A few to viewNo need to apologize just keep your renders coming ,you are using Iray right ? I like the look
Yes, IRay with practically default settings. The experimentation was with skin shaders (Altern8), character mixing and morph dials.
Daz 3D is part of

Connect
DAZ Productions, Inc.
7533 S Center View Ct #4664
West Jordan, UT 84084Licensing Agreement | Terms of Service | Privacy Policy | EULA
© 2026 Daz Productions Inc. All Rights Reserved.