-
Error, duplication of changes to the body, on clothes!
Are you using the transfer utility with the morphed figure, setting the Source Sahpe, and checking Reverse Source Shape from target as I suggested above? Could you post a screen shot of the Transfer Utility dialogue?
FIX THE PELVIC DISTORTIONS - SOLVED -So it's OK posed in the base shape but distorts when any morph is added? And this is a fitted item, not the base figure itself?
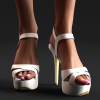
Problems with Toe Morph Warping ShoesThis is the expected behaviour if the shoes do not hae a rigidity map to stop morph trasnfer and if the morph is set to AutoFollow. If you don't want anything to pick up the morph clcik the gear icon on its slider>Parameter Settings, uncheck AutoFollow, and click Accept. If you do want other things to follow the morph then you can
- zero it in the shoes - you will probably need to enable Show Hidden Properties in the parameter pane's option menu to see it
- create a do-nothing dummy morph of the same name (not label) in the shoes - get the name from the Parameter Settings dialogue, select the shoes, fit to and select None, Edit>Figure>Clear Generated Morphs, right-click in the Parameters pane and set Edit Mode to on (if it isn't), right-click in the parameters pane>Create New proeprty, in the dialogue give it the name of the morph, and click Accept - now when you fit the shoes back to the figure they will not get the toe morph.
- if you don't want any morphs to transfer to the shoes use the Geometry Editor to select the areas you want to keep stable, right-click>Geometry Assignment>Create Rigidity Group from Selected.
Loading a Mac scene in WindowsAs long as the same content is installed, yes - Scene files and presets use relative paths (just store the location of the fiel within the content diectory). Older .duf files and very old .daz files may point to asset files that were created for imported content, those will exist in the Data folder in your first DS cntent directory on the mac and would need to be brought over.
Thanks for your response! Most of my scene is composed of native Daz files and it's free content. I don't have any old files. So if I save my scenes on a flash and then transfer them to a new Windows PC should it be fine? What is important for me is that all the lights, cameras, props and the morphed Genesis figures remain the same.
Problems with Toe Morph Warping ShoesI created some toe morphs in Zbrush, but when I try to apply them to a figure wearing shoes, the shoes become warped because they follow the path of the toe morph. This didn't happen on Genesis 3. Anybody know how I can fix this? Thanks.
G8 Foot morphs?When I tested G3F and the Beauty Toes (and the FootArch which is part of the base G3F Body Morph pack from DAZ), all it was doing was denting the bottom of the foot and pulling out the top of the foot. So it's not really bending it in the right place. Strange that the FootArch morph in G8F just barely bends the sole of the foot - more of a slight curve just below heel.
G2F AND MYSTERIOUS JCM!I know the IK nothing to do with this, if I wrote that is because the ungry about slowing my products, and I spent time until 2:00AM, I eat with the art. I think you understand what I say. ;)
Anyway I'm paying more attention to your tutorial, xpecially the pics above the ones with bend legs. This is a good bending, and this, I remember to seen until yesterday. This is the reason of my question, "maybe I've deleted or saved over some important settings that Daz use to control the way it morph?"
Now I'm going to read your steps written here. Let you know.
FIX THE PELVIC DISTORTIONS - SOLVED -Well, it happening with any morph. The base shape G3F seems ok when dial 0, Distortion start when dial go to 100 of the morph. At the same time you a lil change of the height. I do my FBM in the standard way, I made more than 50 characters for sale. If you remember when we'll fixed the JCM corrective for Reiko catsuit you can see in the pics that side side legs bend at 85% is good. It happens with all bend front or side pose. Strange effect, I'm stubbor and I would have noticed the defect, since that happening with Daz shapes too. This is the reason about my question "I saved or deleted some important parameters of the bones align?" Anyway I'm going to look for what the Current Used panel says and I let you know.
bend deforming morphsYou can't literally do what you ask, but - depending on the cause of the issue -therea re a couple of things you can try. You may simply need to use adjust rigging to shape to accomodate the way the chnage of shape affects the bending, or you may need to create a corrective morph that kicks in only when both the bend and your morph are applied.
Error, duplication of changes to the body, on clothes!Please don't post images showing textured nude figures.
If you need to model around a shaped figure (and it isn't recommended) then you need, in Transfer Utility, to use the Source Shape button to tell DS which moprh was applied (or use Current) then in the extended options you need to check Reverse Source Shape from Target.
Error, duplication of changes to the body, on clothes!Ok the problem is not CG Body Morph.
I have made another test, I have take Genesis 3 original, I have amplified the breasts and done a duplicate in 3Ds Max, this is the result.
Any physical changes made on Genesis 3 are duplicated on the "dress" imported... and now?
Obviously no error in the areas of the body that have not been touched...
Mod Edit :- Image removed due to nudityError, duplication of changes to the body, on clothes!With or without smoothing modified active, I have the same problem on the breasts, for example.
With SM active I can solve a problems, but I have others.
But the problem is, that I don't have never used SM before...
Auhmmmm it seems, as if CG Body Morph were activated again on the imported dress.
Thanks again
NanàError, duplication of changes to the body, on clothes!Hello!
After a reinstallation of my pc I have found a BIG problem with Daz3D.
I have tried to import one simple body suit model made in 3Ds Max.
But when I use Transfer Utility, the "dress" does not fit on the model, as he did before.
My Genesis 3, have a simple retouch with CG Body Morph.
With all dress already bought, I have not problem.
Then the problem is, the import from the max, I suppose.
But, with Genesis 3 original, I do not have any problems ... maybe the problem is CG Body Morph?
But why do not you have problems with dress in the Daz library?
And why before reinstallation did it work quietly?
I'm going crazy!
Thanks in advance.New plugin: Phong tessellation and displacementDoesn't this kinda bring us closer to being able to use HD in Carara? Probably wishful thinking. lol
I have to look into that "HD" thing. Unfortunately, as "HD" was supposed not to work in Carrara, I've never bought any product using it. The only one I have are some clothes:
https://www.daz3d.com/kung-fu-hd-for-genesis-2-male-s
https://www.daz3d.com/wicked-night-outThe second one has a displacement map, so maybe it could be done. The first one has an "HD Morph". I clearly need more data on it. according to documentation, it's linked into subdivision:
HD morph:
High Resolution. Used for objects clearly visible in the foreground of your image
Accurate physically calculated shadows are cast, works great with Physically based rendering (PBR).
For the best result dial in exactly the same (render) SubDivision level for the morph as it was created for.
You can improve system performance by adjusting the (render) subdivision to a lower level but then you will see less detail.
Allows export the model as .obj . at the highest SubD level to use or render in 3rd party software.
Does anyone know how "HD" is supposed to work on a technical level?
I think I'll buy a cheap "HD" character preset to reverse engineer it... Depending on how it's done and how I can link that "Morph" to actual mesh, maybe it could be done.
hd morphs use a different file extention (not dsf)
stephanie 8 doesnt include a base lvl jcm for her elbows.
New plugin: Phong tessellation and displacementOf course, It's not limited to HD morph. You can sculpt in an other tool like sculptris or zbrush (or modifiy in the vertex modeler a subdivided mesh), import back and do exactly the same operation.
What do you think of this idea?
I have very bad luck using Carrara vertex modeller to create or alter morphs, in or out of animation mode. Especially on faces for eg heavy brows for Neanderthals. They end up all edgy and pointy. That's why I have to do it in Zbrush, then imp/exp... and have to be very careful not to break the mesh! Your idea sounds much more doable.
Wish there was a way in Carrara's vertex modeller as well to jump into the middle of an object and select vertices/plygons. Sometimes I get the green lasso and can do it, other times it totally fails and these are on items without protected topology such as a terrain in a medium scene, nothing huge. If there's already a tool for that, someone please tell me!!
Cheers for all your hard work to keep Carrara alive! I'd contribute as well.
 SileneNew plugin: Phong tessellation and displacement
I think I'll buy a cheap "HD" character preset to reverse engineer it... Depending on how it's done and how I can link that "Morph" to actual mesh, maybe it could be done.
Done. I've used my monthly platinum coupon to buy https://www.daz3d.com/zaniyah-hd-for-genesis-2-female-s
I'll look into it and report back
OK, I looked into it and HD Morph file format seems to be the next top secret thingie just close to Coca Cola secret formula or KFC secret recipe.
I'm very sure I'd get into deep troubles with DAZ were I trying to crack that. So I won't.
Note to moderator: I said I wouldn't break any copyright.
Instead, I have a more general purpose idea. What if I could generate a displacement map depicting the differences of 2 meshes with identical UV but different resolution and/or morph?
So in Studio, you export your character with subdivide 0, then with subdivide 4 or 5 with HD on as an Wavefront OBJ file. You import both in Carrara, trigger the plugin and then...
Displacement maps are created so that you can have the low res one looking exactly like the second one or apply them to the original figure.Of course, It's not limited to HD morph. You can sculpt in an other tool like sculptris or zbrush (or modifiy in the vertex modeler a subdivided mesh), import back and do exactly the same operation.
What do you think of this idea?
Glad you are not trying to crack that Top Secret that might incur the wrath of having the boys sent around.
Being able to create extra displacement maps would be great, I would then be able to add extra detail that I want to my critter morphs. Also looking at doing some critter/spaceship modelling next year and being able to add further detail while keeping a lower poly model would be awesome - especially for Carrara renders that are getting up in size. Many thank-yous for the work that you are doing/thinking of doing !!!!
Dear Samsil..Oh! And another suggestion: if you have either Tousled Hair or Commander Hair for G3/G8, put that on your character, delete the actual hair but keep the cap, and then fit Top Fade or similar hairs to the cap. Tousled and Commander have enough useful morphs to make up for almost any lack. (And those morphs help make hairlines look slightly more male for some hairs.) You may need to use either Cutout Opacity/Opacity Strength to hide the cap after that, because the hairlines may not match up -- you absolutely will need to do that with Top Fade -- but it's still worth it. (Tousled has one more hairline morph than Commander does, which is helpful.) You can then either use the Tousled/Commander's Expand All adjustment, or even a smoothing modifier for the cap against the character.
Thanks, @vwrangler, for that excellent suggestion! I'm going to try that out as soon as I can.
Dear Samsil..There were a lot of morph options on most of the hair products from Samsil that I puchased, A lot more than I usually see which I love, as a matter of fact. :)
Was there one product you had in mind that may need more morph love, xyer0?
Pick a Samsil hair, any hair. Where are these morphs hidden? I, too, own them all (including from Rendo), and my girls with Samsil braids have no choice but Tyra Banksian foreheads (fiveheads, really) because there is no hairline height morph, nor is there a sideburn morph or even one temple morph (he should include a character cranium morph so I don't have halo hair). The Box Braids have a few morphs, but none for action/wind movement. The new Shaft Hair has only a Shorten morph, which I needed to lower the height of the afro, but I wanted length on the sides and A LOT MORE length in the back.
This lack of morphs may have to do with an inherent drawback of fibermesh hair, as I notice that Neftis' hairs have no morphs and @RedzStudio has a lot less than OOT & AprilYSH non-fibermesh hairs (though she does supply enough morphs to have style changes and make the hair actually fit the head, thank you very much, madam!) As far as numbers of polygons go, that must be due to getting all those realistic tiny curls, I guess.
Of course, I'm looking a gift horse in the mouth seeking geek, not Greeks. Samsil fills a niche that no one else was inspired to or could be bothered to fill. For that, he deserves all the praise he gets. But I have to use his hairs on my extras and background people because they rarely stand up to CU scrutiny. That being said, I buy every product he releases as soon as possible because they are like unicorns. When you have a monopoly, you can offer as few options as you wish.
How to clear scene animation and keep figures in place?I think I can provide an easy solution for you.
1. go to the keyframe in the timeline where you have posed your figures like you want to
2. select all the Figures with Ctrl+click in the Viewport or the Scene pane
3. go to the main menu and choose Edit>Figure>Memorize>Memorize Figure (Pose)
4. go to the main menu and choose Edit>Figure>Clear Animation>Clear Figure (Pose)
optional steps for Items (those can be props and also can be Cameras, Lights, Groups, Nulls... I hope you get what Items are)
5. select all the Items in the scene
6. go to the main menu and choose Edit>Object>Memorize>Memorize Selected Items
7. go to the main menu and choose Edit>Object>Clear Animation>Clear Selected Items
After that all keyframes are deleted from the timeline but your figures and items stay (in the pose) like you want them. That is because you Memorized them with this all currently used property values gest set to default values - be careful with that. You can now also go to a frame and Restore a Figure to the memorized state. If you want the Property values to reset to be zero by default again first use Zero Figure then Memorize Figure.
I wrote Memorize Figure (Pose) in parenticies because also morph shapes can be animated you may better use just Memorize Figure and Clear Figure to take care of the shape not changing. Also you have to Memorize Items / Objects (DazStudio isn't consitent with the naming) if you want to stop those from floating around, btw also even lightning and Surface properties will get animated. You can use Clear Selected Items on lights to stop them from animating their values. For Surface settings you can only save a Material Preset and apply it to the Frame Zero and maybe you need to apply it to other key frames.
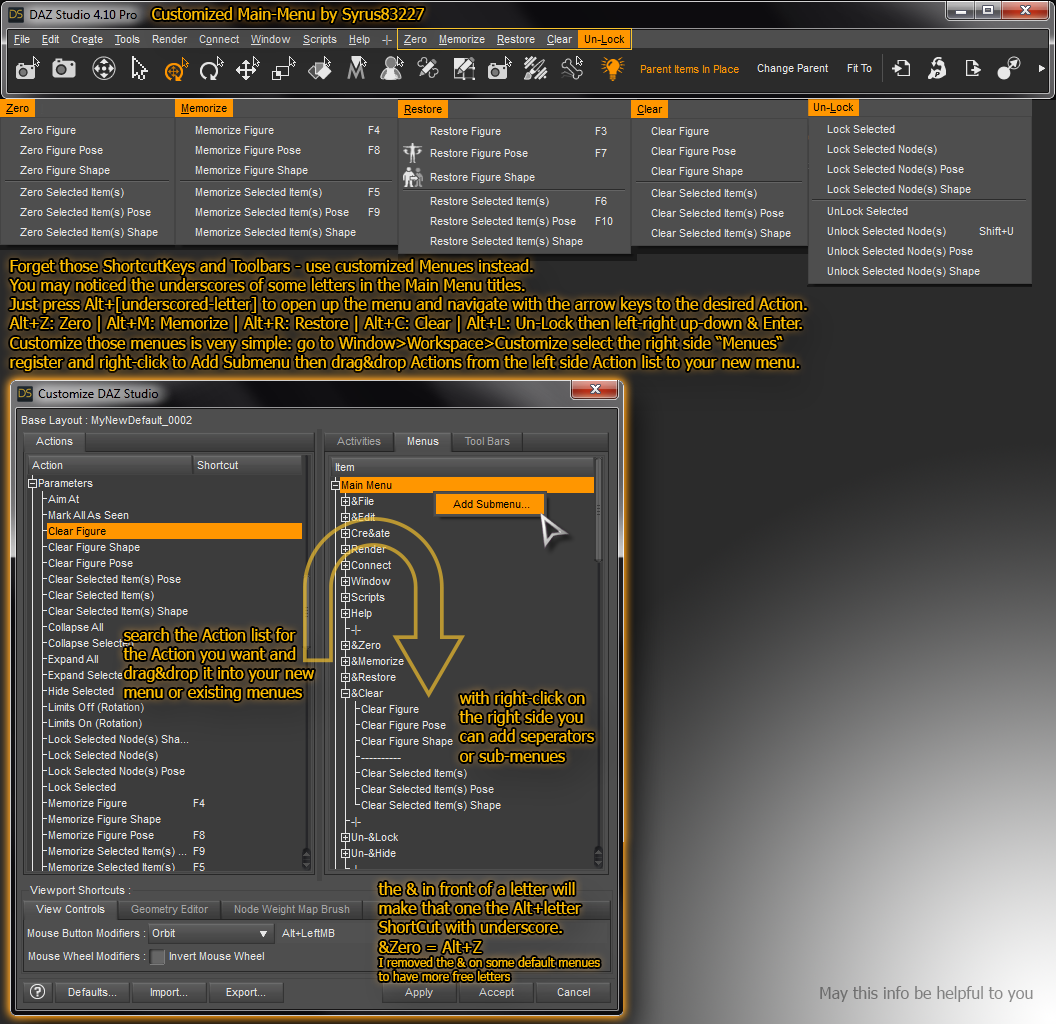
Its faster to acces those Memorize/Clear... commands from the Parameters pane Options Menu (the little button with those lines and a triangle). Its even faster to assign a keyboard shortcut to those commands like I did on the F2 to F8 keys with the Window>Customize dialogue.
See my thread about changing keyboard shortcuts here:
How to Customize Daz Studio - to speed up Workflow!? [WIP]
Especialy the custom Menus can help if you don't like to use or can't remember additional keyboard shortcuts.
 New plugin: Phong tessellation and displacement
I think I'll buy a cheap "HD" character preset to reverse engineer it... Depending on how it's done and how I can link that "Morph" to actual mesh, maybe it could be done.
Done. I've used my monthly platinum coupon to buy https://www.daz3d.com/zaniyah-hd-for-genesis-2-female-s
I'll look into it and report back
OK, I looked into it and HD Morph file format seems to be the next top secret thingie just close to Coca Cola secret formula or KFC secret recipe.
I'm very sure I'd get into deep troubles with DAZ were I trying to crack that. So I won't.
Note to moderator: I said I wouldn't break any copyright.
Instead, I have a more general purpose idea. What if I could generate a displacement map depicting the differences of 2 meshes with identical UV but different resolution and/or morph?
So in Studio, you export your character with subdivide 0, then with subdivide 4 or 5 with HD on as an Wavefront OBJ file. You import both in Carrara, trigger the plugin and then...
Displacement maps are created so that you can have the low res one looking exactly like the second one or apply them to the original figure.Of course, It's not limited to HD morph. You can sculpt in an other tool like sculptris or zbrush (or modifiy in the vertex modeler a subdivided mesh), import back and do exactly the same operation.
What do you think of this idea?
Daz 3D is part of

Connect
DAZ Productions, Inc.
7533 S Center View Ct #4664
West Jordan, UT 84084Licensing Agreement | Terms of Service | Privacy Policy | EULA
© 2026 Daz Productions Inc. All Rights Reserved.