-
PBR and Shader Quality: Iray vs Everything Else
would someone kindly tell me what the developers behind engines like LuxRender, Cycles, and Octane are doing to make their shaders look more realistic than Iray?
There are many reasons why assets in the DAZ Store do not look as photo realistic as they could and should in 2018.
Agreed that there are still challenges for skin. But to be clear I am talking about environments and props in this post.
- - -
MDL - the shader language
The Shader Language of Iray is the Material Definition Language MDL. In theory it would offer all features to make photo realistic images.
There is nothing wrong with this shader language. It could even be supported by other render engines like Octane.
- - -
Shader Builder - Shader Mixer - Node Graph Editor
One limitation is that it is not user friendly to work in the current shader builder or shader mixer.
You can not adjust in real time all the existing materials in a scene in a node graph editor but need to rely on a time consuming import export process.
In addition there is still not a node graph editor for the whole scene.
After seven years of DAZ Studio I have not observed a significant update to that system.
As a result instead of everyone being able to experiment and build advanced shaders only a few published artists provide some solutions.
When you check the material settings of DAZ3D licensed products you may notice that many only use some very basic material settings while advanced options remain untouched.
- - -
Low detail vs high detail geometry and maps
One other important factor is the ongoing insistance of some DAZ3D published artists of using normal or bump maps.
Experienced eyes and even casual viewers can spot that something is off with the lighting because those maps do not produce accurate physically shadows but some sort of simplification.
Artists that create images for achrchitecture or other projects that focus on photo realism use high resolution assets in combination with displacement maps.
Some say that Iray can not handle displacement that well as other render engines. This may be true in some cases but not in all.
Some published artists are used to their workflow of creating low detail assets and have not adjusted for GPU rendering.
- - -
It could be possible to include both in most environment and prop products:
- a low detail version with bump and normal maps
- a high detail version with displacement maps or the original high resolution geometry.
- - -
alternatively:
DAZ3D could focus on high resolution assets that allow photo realism.
Morph 3D could focus on low resolution game assets.
Trying to do both at the same time may result in no customer group being fully happy.
- - -
'Add node' DForm to AutoFitted Clothes not workingYou could try right-clicking on the figure and selecting Transfer Active Morphs, if those are morphs (which the product says they are). If you want to use a dForm to match the moprhs, or tidy up the auto matching, then it would surely be better to apply it to the clothing in the first place.
Ok what I did was click on G3F then go to Assets -> Transfer Active Morphs but it said 'you must select a Figure with parametric joint parameters..........' so nothing happens. Right clicking on G3F doesn't show any Transfer Active Morphs option.
'Add node' DForm to AutoFitted Clothes not workingYou could try right-clicking on the figure and selecting Transfer Active Morphs, if those are morphs (which the product says they are). If you want to use a dForm to match the moprhs, or tidy up the auto matching, then it would surely be better to apply it to the clothing in the first place.
'Add node' DForm to AutoFitted Clothes not workingWhich item is it?
The clothes I used in particular is https://www.daz3d.com/aphrodite-kallipygos but I found that other V4 clothes don't work as well. I also wonder if this is caused by a custom breast morph I'm using on the problematic model: https://www.renderosity.com/mod/bcs/breasts-factory-for-g3f/112202/ First I enlarged the breasts using this morph then applied the d-form to the breast area so I'm not sure if this morph 'registered' with V4's clothes
Hobo's or Street peopleThinking through the kitbashing:
The homeless also have a lot of clothing that is layered and ill-fitted. Layered to more easily insulate themselves in varying temparatures and ill-fitted as they take what they can get. Many have hats, especially in colder climates for this reason as well.
The clothes and hats might need a morph or two to appear ill-fited as mentioned. Layers can be fitted on top of other clothes using "Fit to and Collision" but beware of poke-thru. Due to lack of fresh water on a regular basis, clothing textures should be stained and worn looking. Colors are more drab and faded from sun. A layer of dirt is not necessary but may be appropriate.
The homeless themselves are usually well-tanned but weathered. Not the glorious Sun God kind of tanned but old-man of the sea tanned and weathered due to their exposure to the elements. Very often they have very developed crows feet from squinting due to their exposure to the sun and living outdoors.
Most have backpacks, bags, trashbags, grocery bags to caryy all their worldy possessions and shopping carts as that is what is available.
How's my logic so far..... besides depressing. :(
How do I avoid "Topology has changed..." trying to GoZ back to Daz Studio?You don't need to change the mesh, just uncheck "Export at current resolution" and Daz will transfer the base mesh to ZBrush. This mesh has a vertex order that needs to be returned. I rarely if ever have problems with move, move topo, sculpting, masking, etc. Just don't do something like subdivide then delete lower subdivisions and expect daz to take your 4 mil poly mesh and strap it to whatever the equivalent mesh is in Daz.
The vertex order needs to stay the same. There's a video from "FlippedNormals" on Youtube called "Our Top Modeling Secret: Vert Reordering" that explains vertex order and shows you what happens when a 3D application lets you morph a mesh you've changed (it's ugly).
How do I avoid "Topology has changed..." trying to GoZ back to Daz Studio?What is the most aggressive I can be while modifying a Daz Studio Genesis 8 model before I get this error?
I have noticed that I have to set before I send to ZBrush, Base Mesh, 0 subdivisions. Is there any other restrictions? Is there already a protocol to follow somewhere? I don't see any.
I was successful just using Topological Move, but can I do more?
It created a new morph that I named, and it had it sent to the ZBrush Morphs library, but I can't for the life of me, find where tf that is!
Thank you for any help.
Need help with character creation (Morph Controlled Morphs, etc.)I'm new to Daz and I'm trying to create a character, but all of the official tutorials on the site are out of date. I've read through some older posts and gleaned a few things, but I kind of need specifics.
So, I've sculpted my character, and I've completed all of the steps in the "Advanced: Creating Morph Controlled Morphs (WIP)" tutorial up to "Step 4: Establish Morph Criteria". And from there, I know from reading other threads that the "Property Editor" no longer exists and that I'll be using the "Property Hierarchy" pane and the Parameter pane in edit mode, but can someone give me a specific example of how I move a corrected morph in my parameter pane into where it needs to go in the property hierarchy pane and any additional settings I need to apply? I started with the "Mouth Smile Open" morph, if anyone could use that as an example...
Or if someone could just point me to a tutorial, free or to buy, that explains this in a way that's up to date, I'd appreciate it.
FIX THE PELVIC DISTORTIONS - SOLVED -Hi Max,
I saw this 'bug' too as I was trying my own instructions in the new video I was recording. I wasn't shure if I did something wrong or if I had to save the Morph Assets first, then reload the scene to have the ERCs and JCMs work correclty, but that was just my geuess. It seems the joint rotation (Left Thigh ZRotation Side-Side) dosn't control the JCM in a linear way how it should by the ERC[Add] link. Also I wondered why my Genesis 2 Female in the video had such strage compressions in the Calf and the back of the Thighs as I dialed the JCMs in. But that could also be caused by the fact that I linked both controllers the CTRL_ERC_BBHelper_All-ON and the CTRL_ERC_BBHelper_Thighs-ON DazStudio G2F BasicWear 02 BeautyBend.
At least in the lateset official release v4.10.0.123 I'm currently using. Maybe try this ERC-JCM with an older DazStudio version (Its good to have a backup of older installer ZIPs to compare functionality in different versions). Here is the ChageLog from the Documentation Center » Public » Software » Daz Studio » v4.x » 4.10.0.123 Change Log But I haven't found anything what could have been changed about ERCs in the latest release what could cause this issues.
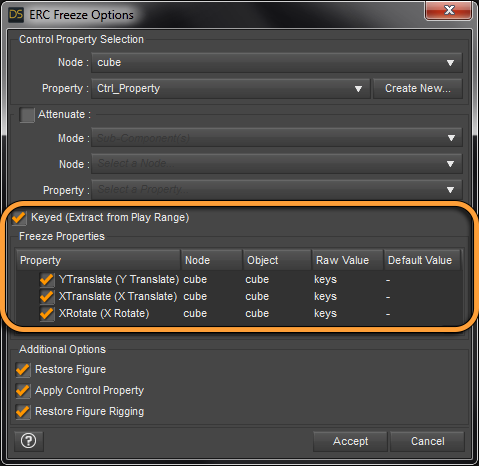
Another thing you could try is use the ERC-Freeze instead the usual method dial the rotation and the JCM up with everything else at default on the figure. Then link the JCMs to the FBM as a controller in 2nd Stage > Controller > ERC[Multiply].
Finaly I would say the only workaround to have the JCMs and the ERCs working as you want is the ERC-Freeze option Keyed (Extract from Play Range)
by selecting this in the ERC-Freeze dialog you can save the porperty changes in the animation on the timline for the joint rotation and the JCM. With this its possible for example to fine tune the calf and the Thighs compression and let it start at a defined degree of joint rotation, I mean if the shin bend rotation is at an point where the calf actualy hits the thigh to start the compression. Well I will maybe try this next with the Better Bend for Genesis 2 next time I do recordings.
References:
Information on ERC Freeze feature
Linking a JCM with a rotation range
Enhanced Remote Control (ERC) - Documentation Center - Daz 3D
ERC-Freeze / Property Hierarchy / merge property Sub-Components
[Quote]: Triax Weightmapping pistons and other telescoping joints. Is it possible?
Syrus_Dante said:
Nice work, you made it. I see you already set limits on these x rotation and y translation properties.
While watching my old post I see I must have somehow missed to give the link to the Image series and the sceenshots I've talked about.
Sorry for that here they are: DS Rigging a Piston at imgbb.com
At Rigging_Piston_036.png you can see how I've created a new pose control property. Then I've posed the Figure_Piston and added that pose to the Ctrl_Piston_Up-Down property with ERC-Freeze.
With the footswitch of the ram figure you could also do some ERC-Freeze to have pose control properties for easy animating that can be accesed in the Parameters pane with the figure body node selected, instead of moving the bones around individualy.
But since this is a short secquence animation you may need about 4 keyframes on the timeline to rotate the footswitch down followed by the piston.
In ERC-Freeze there is an option called Keyed (Extract from Play Range) with this you can save a sequence of timeline frames to a property slider this can be useful sometimes.
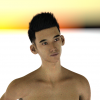
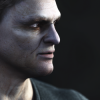
 Fiddling with Iray skin settings...
Nonesuch,
The vert first thing I'll be doing with Iray is figuring out a better way to do the SSS than what we have now. Not that what we have inst great, but I'm convinced we can go further.
Sorel,
The problem is that its very difficult to truly discern just how light or dark a skin tone might be. So much depends on the lighting, sin ce human skin does absorb some light where other surfaces int he room might not.
What I am saying is there are varying degrees of whiteness, and blackness or whaterness to skin tones. So really just how light or dark your renders should appear is hard to say, both can be correct.
As promised here are some recent examples of what I am doing. Scattering direction is -0.25 in all cases. There are medium and dark skin tones. Please forgive the lifeless expressions and posing. I didnt see the use in spending hours tweaking a pose when the study at this time is merely the skin surfacing.
All rendered in Octane 4. Genesis 1
First Image and second image use the same texture, however the roughness is slightly greater in the first Image which creates a nice sheen on the skin. However the second image closeup I decided to lower the roughness.
You will notice that Second Image and Thrid image are the exact same morph, but with a medium skin tone. For crazy fun sake I applied that exact same medium skin texture to a female.
I'm very happy with my current hair shader, and with Carrara's implementation of hair.
So how am I doing in terms of realism? Feedback is greatly appreciated.
Thanks for your time.
As far as realism I forgot to comment but those are better in my eye than harsh heavily bump & normal mapped style because that's how I see people in real life too. If I was doing a portfolio of beatiful model types for a new clothing line you'd do them like that and not with the harsh bumpier realism. Those are all excellent!
Duplicate formulas error messageI should probably clarify that GEN4 is simply for my own reference. I create a basic start file for every model type I use, (G3M G3F G8M G8F etc) with basic pose, lights, background etc. Every time I modify or change the setup I save it as the 'next generation' start file. GEN4 is my latest iteration. So it really means nothing more than that. (My current G3M start file is GEN7 G3M START !!)
I've not converted any morphs or shapes from any other models. The only thing I've dabbled with on that front is clothing. And seeing as the base models are loaded without clothing in the start files, it couldn't be that - especially as it states it's to do with an aging morph.
It's not the end of the world, it's just a mild annoyance. If I can fix the error it'd be a big bonus, if I have to live with it, I'll manage :)
Fiddling with Iray skin settings...Nonesuch,
The vert first thing I'll be doing with Iray is figuring out a better way to do the SSS than what we have now. Not that what we have inst great, but I'm convinced we can go further.
Sorel,
The problem is that its very difficult to truly discern just how light or dark a skin tone might be. So much depends on the lighting, sin ce human skin does absorb some light where other surfaces int he room might not.
What I am saying is there are varying degrees of whiteness, and blackness or whaterness to skin tones. So really just how light or dark your renders should appear is hard to say, both can be correct.
As promised here are some recent examples of what I am doing. Scattering direction is -0.25 in all cases. There are medium and dark skin tones. Please forgive the lifeless expressions and posing. I didnt see the use in spending hours tweaking a pose when the study at this time is merely the skin surfacing.
All rendered in Octane 4. Genesis 1
First Image and second image use the same texture, however the roughness is slightly greater in the first Image which creates a nice sheen on the skin. However the second image closeup I decided to lower the roughness.
You will notice that Second Image and Thrid image are the exact same morph, but with a medium skin tone. For crazy fun sake I applied that exact same medium skin texture to a female.
I'm very happy with my current hair shader, and with Carrara's implementation of hair.
So how am I doing in terms of realism? Feedback is greatly appreciated.
Thanks for your time.
Those look awesomely soft skinned in the way they look. Care to share the shader & render settings?
Fiddling with Iray skin settings...Nonesuch,
The vert first thing I'll be doing with Iray is figuring out a better way to do the SSS than what we have now. Not that what we have inst great, but I'm convinced we can go further.
Sorel,
The problem is that its very difficult to truly discern just how light or dark a skin tone might be. So much depends on the lighting, sin ce human skin does absorb some light where other surfaces int he room might not.
What I am saying is there are varying degrees of whiteness, and blackness or whaterness to skin tones. So really just how light or dark your renders should appear is hard to say, both can be correct.
As promised here are some recent examples of what I am doing. Scattering direction is -0.25 in all cases. There are medium and dark skin tones. Please forgive the lifeless expressions and posing. I didnt see the use in spending hours tweaking a pose when the study at this time is merely the skin surfacing.
All rendered in Octane 4. Genesis 1
First Image and second image use the same texture, however the roughness is slightly greater in the first Image which creates a nice sheen on the skin. However the second image closeup I decided to lower the roughness.
You will notice that Second Image and Thrid image are the exact same morph, but with a medium skin tone. For crazy fun sake I applied that exact same medium skin texture to a female.
I'm very happy with my current hair shader, and with Carrara's implementation of hair.
So how am I doing in terms of realism? Feedback is greatly appreciated.
Thanks for your time.
Those look pretty great! I have to say though, I feel perhaps the bump is a little too strong in certain places, but I as well agree that bumps that are just b&w diffuse maps are no longer cuttting it. I have been dabbling in zbrush a lot more lately, I hope to produce a character eventually. I know modeling all the pores and other skin details can be time consuming but the overal result looks so much better. I also made some additional adjustments to my shader using the -0.5 and I think I am content with it. I will post some resultts later.
Render Freeze on Subsurface Scattering - low detail render settingsArgh
This was just a test render and it froze.
Having trouble rendering. Carrara freezes when doing subsurface scattering even on low settings. I do have four figures in the scene, but they have purchased Carrara skin shaders applied with no other adjustments. Shouldn't be a problem. The figures are two G2Fs and two Genesis 1s. The G2Fs have Ringo's The Girl 6 shader. One Genesis 1 has the default Michael 5 shader that comes with Carrara 8.5 and the other has Ringo's David 5 shader. The clothing is also pretty basic. The two G2F's are wearing outfits that come with the Victorian Innocence bundle for V4. I think their shaders are designed for Poser legacy so shouldn't be a problem, I think. Converted to G2F using the transfer utility but no other changes. The two Genesis 1s are wearing the Edwardian Evening Suit for David converted to use with Genesis. Again, the shaders for the Edwardian Evening suit are designed for Poser legacy so shouldn't be a problem, I think.
The render settings are also very basic. I just have the one defaut light in the scene. The render settings are default, except I reduced the size of the render squares to about 1/3 of default. I have it set to render to a png file, no render passes. I've attached the freeze and the task manager report.
Fiddling with Iray skin settings...Nonesuch,
The vert first thing I'll be doing with Iray is figuring out a better way to do the SSS than what we have now. Not that what we have inst great, but I'm convinced we can go further.
Sorel,
The problem is that its very difficult to truly discern just how light or dark a skin tone might be. So much depends on the lighting, sin ce human skin does absorb some light where other surfaces int he room might not.
What I am saying is there are varying degrees of whiteness, and blackness or whaterness to skin tones. So really just how light or dark your renders should appear is hard to say, both can be correct.
As promised here are some recent examples of what I am doing. Scattering direction is -0.25 in all cases. There are medium and dark skin tones. Please forgive the lifeless expressions and posing. I didnt see the use in spending hours tweaking a pose when the study at this time is merely the skin surfacing.
All rendered in Octane 4. Genesis 1
First Image and second image use the same texture, however the roughness is slightly greater in the first Image which creates a nice sheen on the skin. However the second image closeup I decided to lower the roughness.
You will notice that Second Image and Thrid image are the exact same morph, but with a medium skin tone. For crazy fun sake I applied that exact same medium skin texture to a female.
I'm very happy with my current hair shader, and with Carrara's implementation of hair.
So how am I doing in terms of realism? Feedback is greatly appreciated.
Thanks for your time.
I'd say you are doing pretty well. I'll see how I feel about that -.25 with my skins. I think your models need some specular work. The skin seems nice, but... dry. The second fellow, his lips in particular, I think are more "real" than the rest. Base skin is good. But something is missing (its hard to ignore those dead stares).
Evilded777,
Thanks for looking at the images! The specular you mention is actually something I was hoping to discuss. I have been looking at people under typical indoor lighting situations and have come to realize that most often they do not display too many sharp or crispness in the specular reflections, skin seems more matte generally, provided the light sources are broad shaped, like ceiling lights that are several feet long and are several inches wide. The specular is very different when the model is placed close to a small light source, like a bulb roughly the size of the palm of a human hand. As you will observe with the third image, he is placed within the room in a place where he is not in the direct path of any of the ceiling light sources. All of his light seems to be from indrect bounces within the room. The young lady wearing the same texture is indeed directly beneath one of those ceiling lights, but as is the roughness setting is a bit higher and that is why she gets that sort of sheen effect around her nose. I've seen humans with rougher skin that this actually happens in real life. I've also seen people with skin so smooth especially in certain areas where the specular can seem almost glasslike and more pronounced. So maybe I need to use a map to specify the roughness in different areas of the face instead of using a global parameter setting. I've also noticed that human foreheads and tips of the nose tend to be much shinier than other parts of the face, and that the face ov erall is sually about double the shininess of the rest of the body.
One of the things I am doing is I'm packing sufficient details into the normals/bump type maps that on their own they do a lot of breaking up of the specular for me, the roughness ends up serving as a master control that twekas it all upwars and downwards as needed.
As I stated before none of these maps are derived from applying actual photos in any way, all tissue samples are derived from painting with brushes, every pore, every wrinkles, every vein or other shading detail. I have done this because I'm no longer convinved that photo based skins have the level of detail that I can produce using brushes and painting in 3d. The lip for example is 100% faked, and actually not my personal favorite aspect but I'm glad it was pleasing to you, means I should rethink my aversion.
Anyhow, later I will upload a few examples of these same skin setting but under a strongly specular light such as the direct sun (relatively small but bright, to give strong hard shadows and sharp intensie specular highlights.
More on the way! As always your feedback is greatly appreciated, Evilded777!
Problem with G8 Male ScleraChanging the render settings doesn't make any difference. If there is a "cornea bulge correction morph" I can't find it. Both G8 F & M have skin SSS but when I add them the the male's whole eye sockets go from black to white. ... There seems to be something up with the "attach a file" here as in my last attempt to upload a JPG of the render I got "uploading" for over and hour and nothing uploaded. I'll try again using a different file name, but I don't think it will upload. Ooo! It has done. This is with the skin SSS at 25%. Without the SSS the male's eyes render totally black. I now think it's a glitch in the "Base MAT All Maps" and that I'll have to report it to customer services.
Ok, sorry I couldn't help:( Did you try applying some other characters' eyes to the male? You should file a report, meanwhile maybe some other forumer can help you;)
L'Adair's WIPsReal life has been persistent these past weeks. (We're in the long, slow process of getting the house ready to put up for sale. So many things we ignored for years, due to lack of funds, must now be taken care of first. Anyway…) I have made time to work in Daz Studio and now I have something I can share here.
First, I did a quick scene showcasing Jepe's newest product, the V8 Art Deco Statuettes package. I loaded one of the premade props, changed the face morph, added some hair and then tried different shaders on things until I liked the effect. I tinkered with both of LY's Leonine Pro lights sets until I found a light/background that set off the statuette and added one of the light presets to produce highlights. I'm pretty sure the HDRI and lights are both from the second set, LY Leonine Pro HDR Lighting Vol.2. The whole thing from opening DS to finished render took less than a day. For me, that's lightning fast. You can see the finished image in my gallery here. (Currently sitting at 23 likes. The best I've seen since "The Royal Mouser" last February!)
The statuettes product is awesome. The included poses are for V8, but they applied just fine to both Edie and Ollie. I assume they will apply nicely to any G8 character or figure. The pedastals have their own presets, but the other props used to create the 15 premade statuettes are only available with those presets. I think that's a smart move, though, as most of the time you're going to want them in that configuration. In spite of the "Prop" designation for the presets, these statuettes load multiple props parented to a fully functioning V8. You can modify the pose, change the shape with any morphs you own for G8F, even replace V8 with another figure and apply the same pose from the included poses.
And that's exactly what I did, replacing V8 on the left with Ollie and V8 on the right with Edie. I applied one of the mirror poses to Ollie, so his "up" leg was on the same side of the lamp as Edie's, effectively hiding from the camera the fact he has no "junk". This image took a couple of days to set up, as using figures other than V8 resulted in a lot of pose tweaking of the arms and hands, for this particular statuette. Here's the finished prop:

Edie is "wearing" a G2F hair, Lady Florence. It didn't want to play nice on the G8 fogure, so I added G2F to the scene, fit the hair to her, posed her so that her head, shoulders and back were in the right place to match Edie, and then hid her. I could have converted it to a prop, but that would limit my ability to tweak it, if that became necessary. Ollie is wearing the scalp cap from the Short Afro hair, which loads the cap separately and parents the hair to the cap. I deleted the hair, applied the shader to the cap, added a normal map from Mec4d's vol 1 PBS shaders tiled to 10, added back the opacity map for the scalp set to .10 tiling, letting the normal map add the texture for the hair. I also added a normal map from the same shader set to add lines to the Florence Hair.
I'll be adding some close ups soon, but it may take a couple of days. I have to babysit my render machine so can't leave it to render overnight. The fans are trying to die on the water cooling system. (I have a new one on order but it won't arrive for a week or so.)

Anyway… I used this prop—with some modifications—in the image I submitted for the PFDLives edition of Llola Lane's monthly challenge. I hid parts of the lamp, applied a shader from Mec4d's Vol 3 shaders to the remaining metal parts, and added a heart from RDNA Hearts. The heart uses the same glass shader from Jepe's product as the prop shown above, though the pattern doesn't show up in the image:

I admit, I hadn't set out to create a lamp with a heart for the challenge, but once the statuette was complete, it made perfect sense to use it that way.
The set is Stonemason's Downtown Loft : Living Area with the extra buildings gone and a plane with a stock image of NYC at night outside the windows. I didn't do much to the interior of the set. I removed any props from inside the loft that weren't in the camera frame to make the image render faster, and added an overhead ghost light to give the impression of a ceiling light on in the room behind the camera. I also moved and/or removed various props from the shelves.
Problem with G8 Male ScleraChanging the render settings doesn't make any difference. If there is a "cornea bulge correction morph" I can't find it. Both G8 F & M have skin SSS but when I add them the the male's whole eye sockets go from black to white. ... There seems to be something up with the "attach a file" here as in my last attempt to upload a JPG of the render I got "uploading" for over and hour and nothing uploaded. I'll try again using a different file name, but I don't think it will upload. Ooo! It has done. This is with the skin SSS at 25%. Without the SSS the male's eyes render totally black. I now think it's a glitch in the "Base MAT All Maps" and that I'll have to report it to customer services.
Fiddling with Iray skin settings...Nonesuch,
The vert first thing I'll be doing with Iray is figuring out a better way to do the SSS than what we have now. Not that what we have inst great, but I'm convinced we can go further.
Sorel,
The problem is that its very difficult to truly discern just how light or dark a skin tone might be. So much depends on the lighting, sin ce human skin does absorb some light where other surfaces int he room might not.
What I am saying is there are varying degrees of whiteness, and blackness or whaterness to skin tones. So really just how light or dark your renders should appear is hard to say, both can be correct.
As promised here are some recent examples of what I am doing. Scattering direction is -0.25 in all cases. There are medium and dark skin tones. Please forgive the lifeless expressions and posing. I didnt see the use in spending hours tweaking a pose when the study at this time is merely the skin surfacing.
All rendered in Octane 4. Genesis 1
First Image and second image use the same texture, however the roughness is slightly greater in the first Image which creates a nice sheen on the skin. However the second image closeup I decided to lower the roughness.
You will notice that Second Image and Thrid image are the exact same morph, but with a medium skin tone. For crazy fun sake I applied that exact same medium skin texture to a female.
I'm very happy with my current hair shader, and with Carrara's implementation of hair.
So how am I doing in terms of realism? Feedback is greatly appreciated.
Thanks for your time.
I'd say you are doing pretty well. I'll see how I feel about that -.25 with my skins. I think your models need some specular work. The skin seems nice, but... dry. The second fellow, his lips in particular, I think are more "real" than the rest. Base skin is good. But something is missing (its hard to ignore those dead stares).
Problem with G8 Male ScleraThe render settings and everything else is default. If there were any problems there then surely the G8 female would have the same eye problem? I've just loaded the G8m & G8f together to compare all their basic settings and both are identical, but while the female's eyes are as they should be, the male's are all black. Pre-render the male's eyes are totally visible, but they turn black when rendered, while the female's eyes render perfectly.
I haven't installed the G8:s so can't check, so have to guess. Did you try to dial in cornea bulge correction morph, or whatever it's called on G8M? If not, give it a try! Are the IOR (index of refraction) values identical for the female and the male? Go to your render settings editor and check your raytrace depth, if it's set to 1 it might not be enough, try upping it to 2 or 3 to see if that makes a difference!
Daz 3D is part of

Connect
DAZ Productions, Inc.
7533 S Center View Ct #4664
West Jordan, UT 84084Licensing Agreement | Terms of Service | Privacy Policy | EULA
© 2026 Daz Productions Inc. All Rights Reserved.