-
Altering G3 or G8 mesh in Blender
Shape keys, are in affect, morphs.
I think what I remember is that I could export the figure and a garment, make a morph and associate that with a shape key and export that back to DAZ Studio. Then, with the objects still loaded in Blender, create another shape key and continue morphing and export that as a second/third/etc., importing each back to DAZ Studio with Morph Loader.
This was more convenient than re-exporting the figure/clothing for each individual morph. Without searching for the original tutorial, that's how I remember it.
Genesis 9 delayed until at least 2020. Will you be buying it?If g9 is backward compatible, I'll use it. But, I'm definitely not interested in rebuying every morph package and utility. I spend more time shopping than rendering as it is.Bones of geograft displaced when character shape appliedSyrus_Dante, thanks for the input.
I am pretty sure I did memorize the rigging for the geograft at several points before using the Transfer Utility, because I was paranoid about losing all the work I had done getting the bones positioned exactly as required. I've tried again after unfitting the geograft, then refitting it - no joy.
The bones of the geograft don't follow any morph. The full body Height morph is a good example, at least a simple one. With that dialed to 100% for G3F, the figure gets a bit shorter (oddly, not taller...negative is taller, huh). The bones of the geograft stay exactly where they were before dialling the morph, the mesh does not - see attached image. You can see the projected FBMHeight morph that is projected on to the graft on the right, dialled to 100%.
The same effect happens if load a default G3F, dial the Height morph to 100% and then load the geograft. The geograft mesh is in the correct position, but the bones are above it at the same level as they would be on a default G3F.
In the property hierarchy, the projected FBMHeight morph has no sub-components or controllers - none.
If I use Adjust Rigging to Shape on the geograft, the bones of the geograft still don't move. Instead, the mesh of the geograft moves up (in this case) to where the bones are - the opposite of what I would expect this option to do! It is adjusting shape to rigging, definitely not desirable. The same happens if I set the projected morph to 0% - mesh moves up, bones stay put.
The Ultimate Super-Hero Freebie List!So I'm trying to do Darkseid but I can't find a good mask/helmet for him. ANyone have any ideas or know where I can look?
If you're willing to go back to the original Freak, there's this: http://heromorph.com/hmdownload/index.php?main_page=product_info&cPath=67&products_id=192
I have no idea whether it might work well enough with another 3rd Millennium character.JoeQuick has an older set of props/morphs/kit to accompany this set, and designed for the same figure. Michael 3 is the only other figure that can use Freak3 morphs.
https://sharecg.com/v/44938/gallery/11/Poser/Morph-Tunic-and-Helmet-for-F3
Altering G3 or G8 mesh in BlenderGeoGraft examples for Genesis at ShareCG
Forum posts about GeoGrafts
Geograft/Clothes With Extra Bones In Daz Studio 4.9 Part 1 SikleYield - YouTube
Forum posts about Blender
There are various options to export/import the OBJ files in Daz Studio and Blender.
In the thread How to export only selected clothing as an object in DS you can read about creating automated "silent" OBJ Export scripts with all settings as a preset. There is even an option to only export what is selected instead of what is visible.
If this seems to be too complicated you could also use this script from mCasual mcjHideAllBut that will hide everything exept what is selected before exporting. Unfortunately you have to use this script twice, first press Hide All But Selected, then export next run the script again and choose Show All Objects. Otherwise you get trouble to unhide everything because this script hides every node by node in the scene.

I once explained the OBJ export/import form Daz Studio to Blender and back here.
I think step by step instructions are the best to explain this process, also for other interested readers. Here we go...
1. Export the OBJ from DazStudio
As I saied before... ehm wait maybe somwhere else allready, in the DS "OBJ Export Options" dialouge use the DAZ Studio (1 unit = 1 cm) preset (Scale: 100%).
What you dont want to export needs to be hidden (see "Ignore Invisible Notes"). You get an OBJ that you can easily import again without remembering which export options you had used. Its all Daz scale and orientation with this.
 Export_OBJ-Options_IgnoreInvisibleNodes_1.png 382 x 507 - 61K
2. Import this OBJ file into Blender
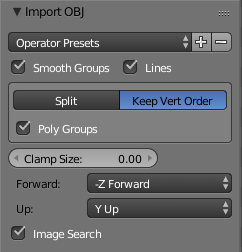
Once you are in the import OBJ window you get these options in the bottom left.
"Keep Vert Order" and "Poly Groups" had to be selected everytime once you opened up Blender. At least with the latest Blender versions.
But for the orientation (in DS its called ''Axis Conversion") you also have to change the settings to Forward: -Z Forward and UP: Y Up.
Again there is no standarisation how to call the axis for up/down, left/right and front/back XYZ.
Edit: It's not just brining it to another 3D space its like brining it to another universe where the laws of physics are different.

Your imported object should now have the right orientation within Blender. The default Daz scaling is quiet big compared to the default Blender scale but this dosnt matter.
3. Export OBJ from Blender
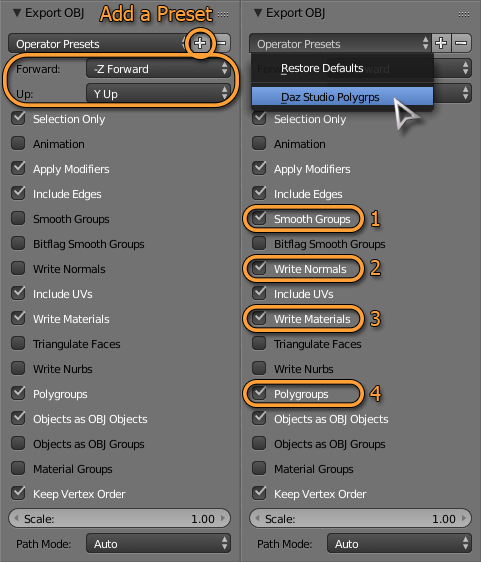
Something that I may have forgotten to explain before, because once set you never have to change that, are the "Export OBJ" options. Here I have created myself some preset.
You see Forward and Up are setup the same way like in the import options - strange somehow I thought it must be inverted +Z Forward and -Y Up but no - these settings turn it around to the DS orientation again. Once you have changed all settings save yourself a preset with pressing the plus.
 Blender_ExportOBJ_1.png 481 x 562 - 91K
1 Smooth Groups - this is refering to the specific edge weight for shading angle - it is sayed that DazStudio cant import those and the OBJ format dosnt support this - at least thats how I interpreted what Richard saied here: Help unwrapping a "simple box top" seems it requires some testing
2 Write Normals - here they meant the 'Vertex Normals' which means the overall shading angle can be set in "Auto Smooth - Angle:"
3 Write Materials - with this the .MTL file gets written to the same location as the .OBJ file - that saves the Material Groups (in DS they are called Surface Groups) and Texture references
4 Polygroups - in Blender this is setup with the "Vertex Groups" and in DS its called the Face Groups, but be carefull with that - in Blender you define the groups with single vertices and a vertex can also be assignd to more that one group - in the OBJ file format the groups are defined by polygons and can only be assigned to one group - if you dont fix that within the Blender "Vertex Groups" your Face Groups in DS gets messed up.
Not everything is needed to be saved into the OBJ file - it depends of weather you want to use this as a Morph Target (nothing except the vertex possitions are needed for that) or a new object that maybe should become a figure in DS.
No warranty for correctness of the abouth information - just my rougth guess.
[Edit_1] Further references and links:
Creating Clothing Morphs With Blender and Daz Studio by SickleYield at Youtube
Watch this video @ minute 3 the Export/Import gets explained.
Genesis 1 Eaten by Hideous TrollThanks for the input, sadly no joy, the Editor tab on mine is under shaping and I can use it to dial out the Orc-ness or easier use the Zero option in the pane menu or main EDIT menu. but saving the morph asset does not help, it comes back when I load again.
Checked the logs and the basic female appears to load, then there is a flurry of activity regarding dzassetdaz.cpp loading stuff, and some of it failing, that refers to "GhostofMacbeth" Orc settings, which I have not installed so cannot uninstall. Tried searching for dzassetdaz.cpp which I assume is a C++ file with a view to editing it but comes up nothing found. Also checked the GENESIS.DUF file, but nothing odd in there and no scripts attached in any menu settings I can find.
One thing I cannot explain, I notice when saving the Morph settings it says it is using the ANDREA file, which I have not loaded, my basic Genesis is LANA based.which I assume is standard as I never changed it.
Had you zeroed the Default Value in Parameter Settings? Parameters will have its own Editor tab, with a Currently Used group - Shaping and Posing are just sub-sets of the ful Parameters pane.
Genesis 1 Eaten by Hideous TrollThanks for the input, sadly no joy, the Editor tab on mine is under shaping and I can use it to dial out the Orc-ness or easier use the Zero option in the pane menu or main EDIT menu. but saving the morph asset does not help, it comes back when I load again.
Checked the logs and the basic female appears to load, then there is a flurry of activity regarding dzassetdaz.cpp loading stuff, and some of it failing, that refers to "GhostofMacbeth" Orc settings, which I have not installed so cannot uninstall. Tried searching for dzassetdaz.cpp which I assume is a C++ file with a view to editing it but comes up nothing found. Also checked the GENESIS.DUF file, but nothing odd in there and no scripts attached in any menu settings I can find.
One thing I cannot explain, I notice when saving the Morph settings it says it is using the ANDREA file, which I have not loaded, my basic Genesis is LANA based.which I assume is standard as I never changed it.
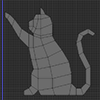
Altering G3 or G8 mesh in BlenderIs there any way that I can export G3 or G8 mesh to blender /Maya and make changes there and import it back to Daz?
You can export an OBJ file from DS and import it into Blender. There are more detailed explanations available e.g. Youtube videos, other forum posts, so I won't repeat those here, but essentially
- i) Hide everything except the figure in DS.
- ii) Set the figure to Base Resolution if you intend to create a morph later. It will be simpler if the figure is at world centre, has not been scaled, has no morphs applied.
- iii) File->Export, choose a file name and the options you want from the dialog. Take care with the scale: which one you use isn't as important as remembering it, as you will need to use the same when importing back to DS. I set it to Custom and 100%.
- iv) Import the OBJ into Blender. Make sure that the Keep Vertex Order and Polygroups options are checked.
- v) The figure will be huge by Blender standards. Under Display in the N panel, set lines to 200 and scale to 5.
- vi) Make your changes. If you are creating a morph target do not add verts, or change the vertex order. Grab, sculpt, proprtional edit all are fine. (Shape keys are a boon if you are creating numerous morphs for the same figure.)
- vii) Export to OBJ. Check the Polygroups and Keep Vertex Order options on export.
- viii) Import OBJ into Daz as a static object, or use in Morph Loader Pro if you are creating a morph. Specify the same scale you used when exporting from DS.
I understand that you cannot add any new polygons to the base mesh. Is that correct?
If I want to add new poligons to daz base mesh, is there any other way?
Correct. You would have to create a geograft to add new polys, though a parented prop may be good enough in some scenarios.
[Released] RSSY Clothing Converter from Genesis to Genesis 8 Male [Commercial] RiverSoft Art and Sickleyield are proud to present the RSSY Clothing Converter from Genesis to Genesis 8 Male! Finally, use your Genesis clothing with your Genesis 8 Male characters! Automatically convert your entire wardrobe of clothes, including high-heels, using the new RSSY Clothing Converter script! The RSSY Clothing Converter from Genesis to Genesis 8 Male has been carefully crafted to handle the different rigging and shapes between Genesis and Genesis 8 Male, even adding special rigs for loincloths, capes and a special dress/tunic rig that adds pose bones to avoid that "sticking to the legs" effect.
The Clothing Converter script provides batch execution for automatically converting your Genesis clothing to Genesis 8 Male clothing in your Library. Easily select the wardrobe items in your Library, select an output directory and execute the script. Even better, icons and categories are copied from your Genesis clothing to the new Genesis 8 Male clothing items.
Your new Genesis 8 Male wardrobe is completely Smart Content aware! They will show up when you select a Genesis 8 Male. Plus, all materials shown in Smart Content for your Genesis item will show for your converted Genesis 8 Male item. Converted clothing, instead of using Auto-Fit, produces vastly less distorted results, especially with high-heels!
The Clothing Converter script does not work with accessories or wearables (e.g., outfits). High-heeled shoes may require a manual step during conversion if the original shoes do not include a foot pose.
The script may not be able to convert all clothing items without issues. Converted items may exhibit poke through. Usually, this can be fixed by adding a smoothing modifier or a push modifier.
- Convert Genesis Clothing items for use by Genesis 8 Male"
- Convert Dresses/Tunics, Pants, Shirts, Skirts, Shoes, Loincloths, Capes, Coats etc.
- Copies icons from Genesis clothing to Genesis 8 clothing for a professional look.
- Automatically convert your entire wardrobe with one operation!
Features
- RSSY Clothing Converter from Genesis to Genesis 8 Male:
- Clothing Converter Script (.DSE)
- Foot Poser Script (.DSE)
- Clothing Converter Manual (.PDF, .DSA)
Promotional video describing all the options and features of the Clothing Converter line of products
How to convert Footwear with Clothing Converter products
Important Fix (11/30/2018)
There is an error in the script, which affects both the female and male versions of the product. The transfer rigging-figure space step is not happening in the script (except for footwear). Fixing this DRAMATICALLY improves gloves, bodysuits, anything on the extremities of the figures. The reason why it's noticable for males compared to the females product is that G8 male has large shoulders and arms, placed higher up, than Genesis. The shape difference with the arms/shoulders of G8 Female is substantially less. Please copy the attached RSGenesisClothingConversionFunctions.dse below to Data/RiverSoft Art/Common directory. There will be an official patch from Daz; this is for immediate use. You will need to reconvert shirts with arms, gloves, and bodysuits. I apologize for the error.
JV's doodlesPoppy!
Harper HD morph, Reese HD skin.
 Bones of geograft displaced when character shape applied
Maybe the issue you have now comes from something that went wrong before you have used the Transfer Utility. You have to make shure to you use Memorize Rigging in the Joint Editor before projecting the morphs.
To fix this you could unfit the geograft, then manualy dial in all 'auto generated' morphs and character shapes you have issues with, one by one with the Joint Editor active to see if the bones of the geograft follow the shape or not. I have the suspicion that the only thing you have done wrong is not to save the morphs that where auto-generated or transfered with the Transfer Utility imediatly as Morph Assets. You may have saved a scene file and now that you open it again there are problems with the auto-generated or transfered morphs that no longer include the joint placement properties. Of course this is just my wild speculation of what eventualy went wrong.
Its even easier to see if the joint placement properties are saved with the morph or not. You could set the Parameters pane to Edit Mode, right-click the morph and choose 'Show in Property Hierarchy'. With the Property Hierarchy pane you can expand the the hierarchy tree of the morph and have a look under 1st Stage [Add-Substract] > Sub-Components, if there is a list of bone joint placement properties listed and controled by the morph. Those joint placement properties are all called something like CentrerPoint X Translation, EndPoint Y Translation and so on.
If the bones don't follow the shape, zero the geograft figure and dial in one morph where the bones don't follow the shape. Then switch to the Joint Editor tool and use the "Adjust Rigging to Shape" from the right-click menu on the viewport. Next the bones should fit to the shape but you need to save the 'adjusted' positions into the morph slider that was dialed up. Therfor you right-click on the morph with the Parameters pane in Edit-Mode and choose ERC-Freeze from the menu, make shure only those joint adjustments properties are selected in the ERC-Freeze list, it sometimes shows alot of other things not to save with the morph.
Is it possible to save a hair pose?It depends on the type of the property sliders you have moved to get the desiered pose or hair style idk how you want to define it.
If there has been bones moved around or a controler propertie that moved them those are most likely pose controls. Have a look into the Parameters pane and the morphs you have used maybe some are of type Shape others of type Pose. It can be confusing sometimes but Shapes gets saved as Shape presets. Click the gear icon on some of the sliders an see the property type in the Parameter Settings.
Here is what you could also do:
Actualy if I dial in some character specific shape like hair behind the shoulders, volume, length ect. I tend to create a new control property name it something like Ctrl_hairstyle_01 maybe I add the character name to it and set it to be of type shape. This way the hair style dosn't get reset if you use Reset Figure Pose. You could also pose the hair and create a new control slider for that set it to be Type Pose, then right-click ERC-Freeze.
Now that you have an slider for Ctrl_hairstyle_01 you can even create a new property on the figure with the same name but let it empty, set the one property on the hair to 'Auto Follow' in the Parameter Settings now you have a 'remote' control property. Then link the Ctrl_hairstyle_01 on the figure to the Character shape controler and the perfectly fitting hair style morphs gets automaticly applied if the character morph gets dialed in. Most times I add my own fitting morphs with DFormers and Smoothing modifier collision, thats why I created a controler for all these shapes. At least thats how I've done this several times. Finaly you have to remeber to save all those new properties as Morph Assets.
Is it possible to save a hair pose?It should be possible. It depends whether the morphs are categorized as shapes or poses. (You can check this by examining the morph properties in the property pane, by clicking the cog wheel to the right. If they are shapes, then save as a shaping preset, if poses, then save as a pose preset.
Bones of geograft displaced when character shape appliedI have created a geograft to replace the right hand of Genesis 3 Female. It is rigged with 20+ bones. It is intended to be non-organic, so to avoid it being distorted by projected morphs I have applied rigidity (via a group with participants and refs and a weight map) to all but a couple of rows of polygons where it joins the G3F figure. This all works well with the base G3F figure: geograft bones can be rotated and the geograft posed as desired.
However, when I apply a full body morph e.g. the Height morph or the Victoria 7 shape, whilst the geograft's mesh is unaffected by the morph (except near the join with G3F) the geograft bones all become displaced from their correct positions. As a result, because the bones and mesh no longer line up correctly any rotation of the geograft bones results in the geograft mesh breaking apart. The amount and direction of the displacement varies with the morph applied to G3F. To be clear, the bones are displaced because they are not moving; the mesh is moving but retaining its shape. When I dial the Height morph, for example, the geograft mesh follows the end of the arm; the geograft bones don't, even though they move when the figures right arm is posed. The geograft has a Right Forearm Twist bone, and I used the Transfer Rigging (Figure Space) to 'weld' that to the same bone in G3F. The geograft bones and mesh follow the forearm when posing.
It seems I have made some mistake in creating the geograft, but cannot figure out what I have done or not done in error. I'll be grateful for any suggestions how I can fix this.
Gargoyle for G8M [commercial]If you have a moment, could you tell us a little about the morphs that the wings have and how many material zones they have? Thanks very much.
The wings have 2 material zones, one for the membrane the other for the arms
There are pose controls for Wing Wrap/Left/Right, Flap Up/Left/Right, Flap Down/Left/Right, Bend Fingers/Left/Right, and a morph to change the scale of the wings.
G8F Morph Loader Pro modifications - clothing and eyelashes do not fit after reloadYou need to save your new morph as a morph asset. If it’s only saved in the scene file the autofollow is breaks when you reload the scene.
Thank you Redz, it worked! Countless hours figuring out why it brakes the entire set...resolved with one line of brilliant suggestion. To sum up for somebody who has the same issue:
I loaded G8F, than imported obj via morph loader pro, dialed it to 100%, rigged and erc freezed it, edited morph (name, color, 0-100% etc) and then saved it as morph asset in Actor/Full Body/People/Real World.
And now I can take new G8F and just dial that morph with no fear that all resets itself after character reload...Thank you!
Custom Morph HelpCan't you do just your adjustment morphs, importing the modified shape (made with all scaling reset to 100% if need be) with Reverse Deformations? If you bake all the component morphs into one you lose all ERC links to corrections - adjust the rigging brings that aspect back, but you've still lost corective morphs on joints or other morphs. Doing it with just your chnages as a new morph there's much less to tidy up.
Oh wow - I didn't even know you could change those details in the bottom of the morph loader. That's exactly the sort of thing I was looking for - works perfectly. Thanks!
G8F Morph Loader Pro modifications - clothing and eyelashes do not fit after reloadYou need to save your new morph as a morph asset. If it’s only saved in the scene file the autofollow is breaks when you reload the scene.
G8F Morph Loader Pro modifications - clothing and eyelashes do not fit after reloadI loaded g8f, change to base mesh resolution, subdev level 0, delete eyelashes, export to wavefront (obj) with all appropriate settings.
I modify character in blender, make legs and neck longer, body slimer, and export to wavefront (obj) with all appropriate settings.
I load g8f in Daz3d, open Morph Loader Pro, apply my morph with positive confirmations (no errors and geometry mismatches), crank it up to 100%, rigg it, apply ERC freeze, so far so good, no problems.
I load a few garmets, check eyelashes, all fit perfectly: eyelashes are hugging eyes on elongated neck, shorts are hugging waist and legs, all perfect, save it as scene or subset.
PROBLEM: reload character from scene/subset, eyelashes are not fitting, clothing is not fitting to the new figure with 100% dialed morph (everything fits original g8f shape, see picture attached) Please help!
Thank you, Linday!Me too! I was so thrilled to see an update to the horse in general that I put it in the cart first and *then read the description, Lol! What an excellent HD morph and texture set. So yes, Thank you to the vendor!!!
Daz 3D is part of

Connect
DAZ Productions, Inc.
7533 S Center View Ct #4664
West Jordan, UT 84084Licensing Agreement | Terms of Service | Privacy Policy | EULA
© 2026 Daz Productions Inc. All Rights Reserved.