-
Please help me find a Dforce skirt with a ruffle that starts out as a circle around waist
Jan_Scrapper said:
I tried, and while I didn't get an explosion, it doesn't seem possible to get the dress to drape over the legs of the characters if they are on their knees or sitting:
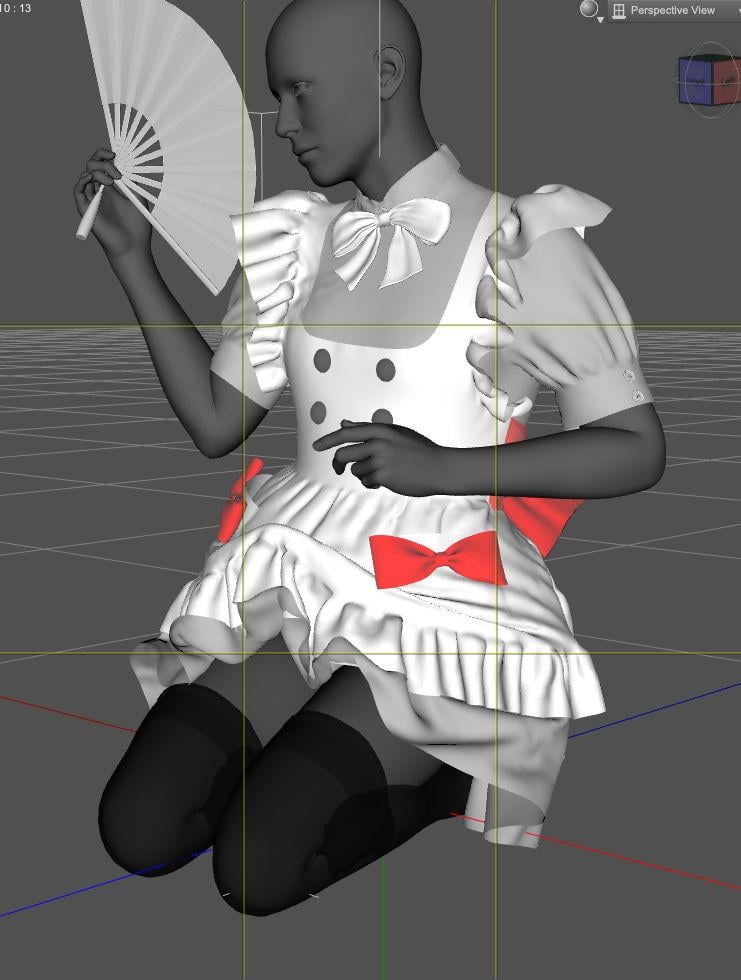
Initially, I thought it could be related to the morph (I initially used Hanako 9, because it's among the supported shape), but going back to Genesis 9 Base didn't solve the problem. Then, maybe it was because the pose applied a Y translation on the hip bone but even after moving it to the root bone, the part that is up still went up
 I have no idea why that part is going up.Please help me find a Dforce skirt with a ruffle that starts out as a circle around waist
I have seen and done many Dforce blanket sims.
I want the skirt to be like a circle blanket with a hole in it.
Richard, I definitely understand what you are saying.
I should have qualified my statement about a morph I could use BEFORE the sim. The skirt would start in a circle at the waist, then flows down toward the ground as the animation timeline plays.
This was was I was wanting several months ago. I finally made an actual posed dress in MeshyAI. Then I posed G9F upper body with the dress. A LOT of work LOL. Turned off the lower part of her body.

Here are some of my posts which shows this is something I have wanted for a long time.
Solved! I am looking for skirt like the one in Graceful Blooming promos - Daz 3D Forums
Can I turn off the morphs in a Dforce Clothing Item? - Daz 3D Forums
I have many skirts with ruffles now and everyone I tried for my Alice In Wonderland scene blew up :(
Please help me find a Dforce skirt with a ruffle that starts out as a circle around waistJan_Scrapper said:
This is so beautiful!!! Did you just do that???
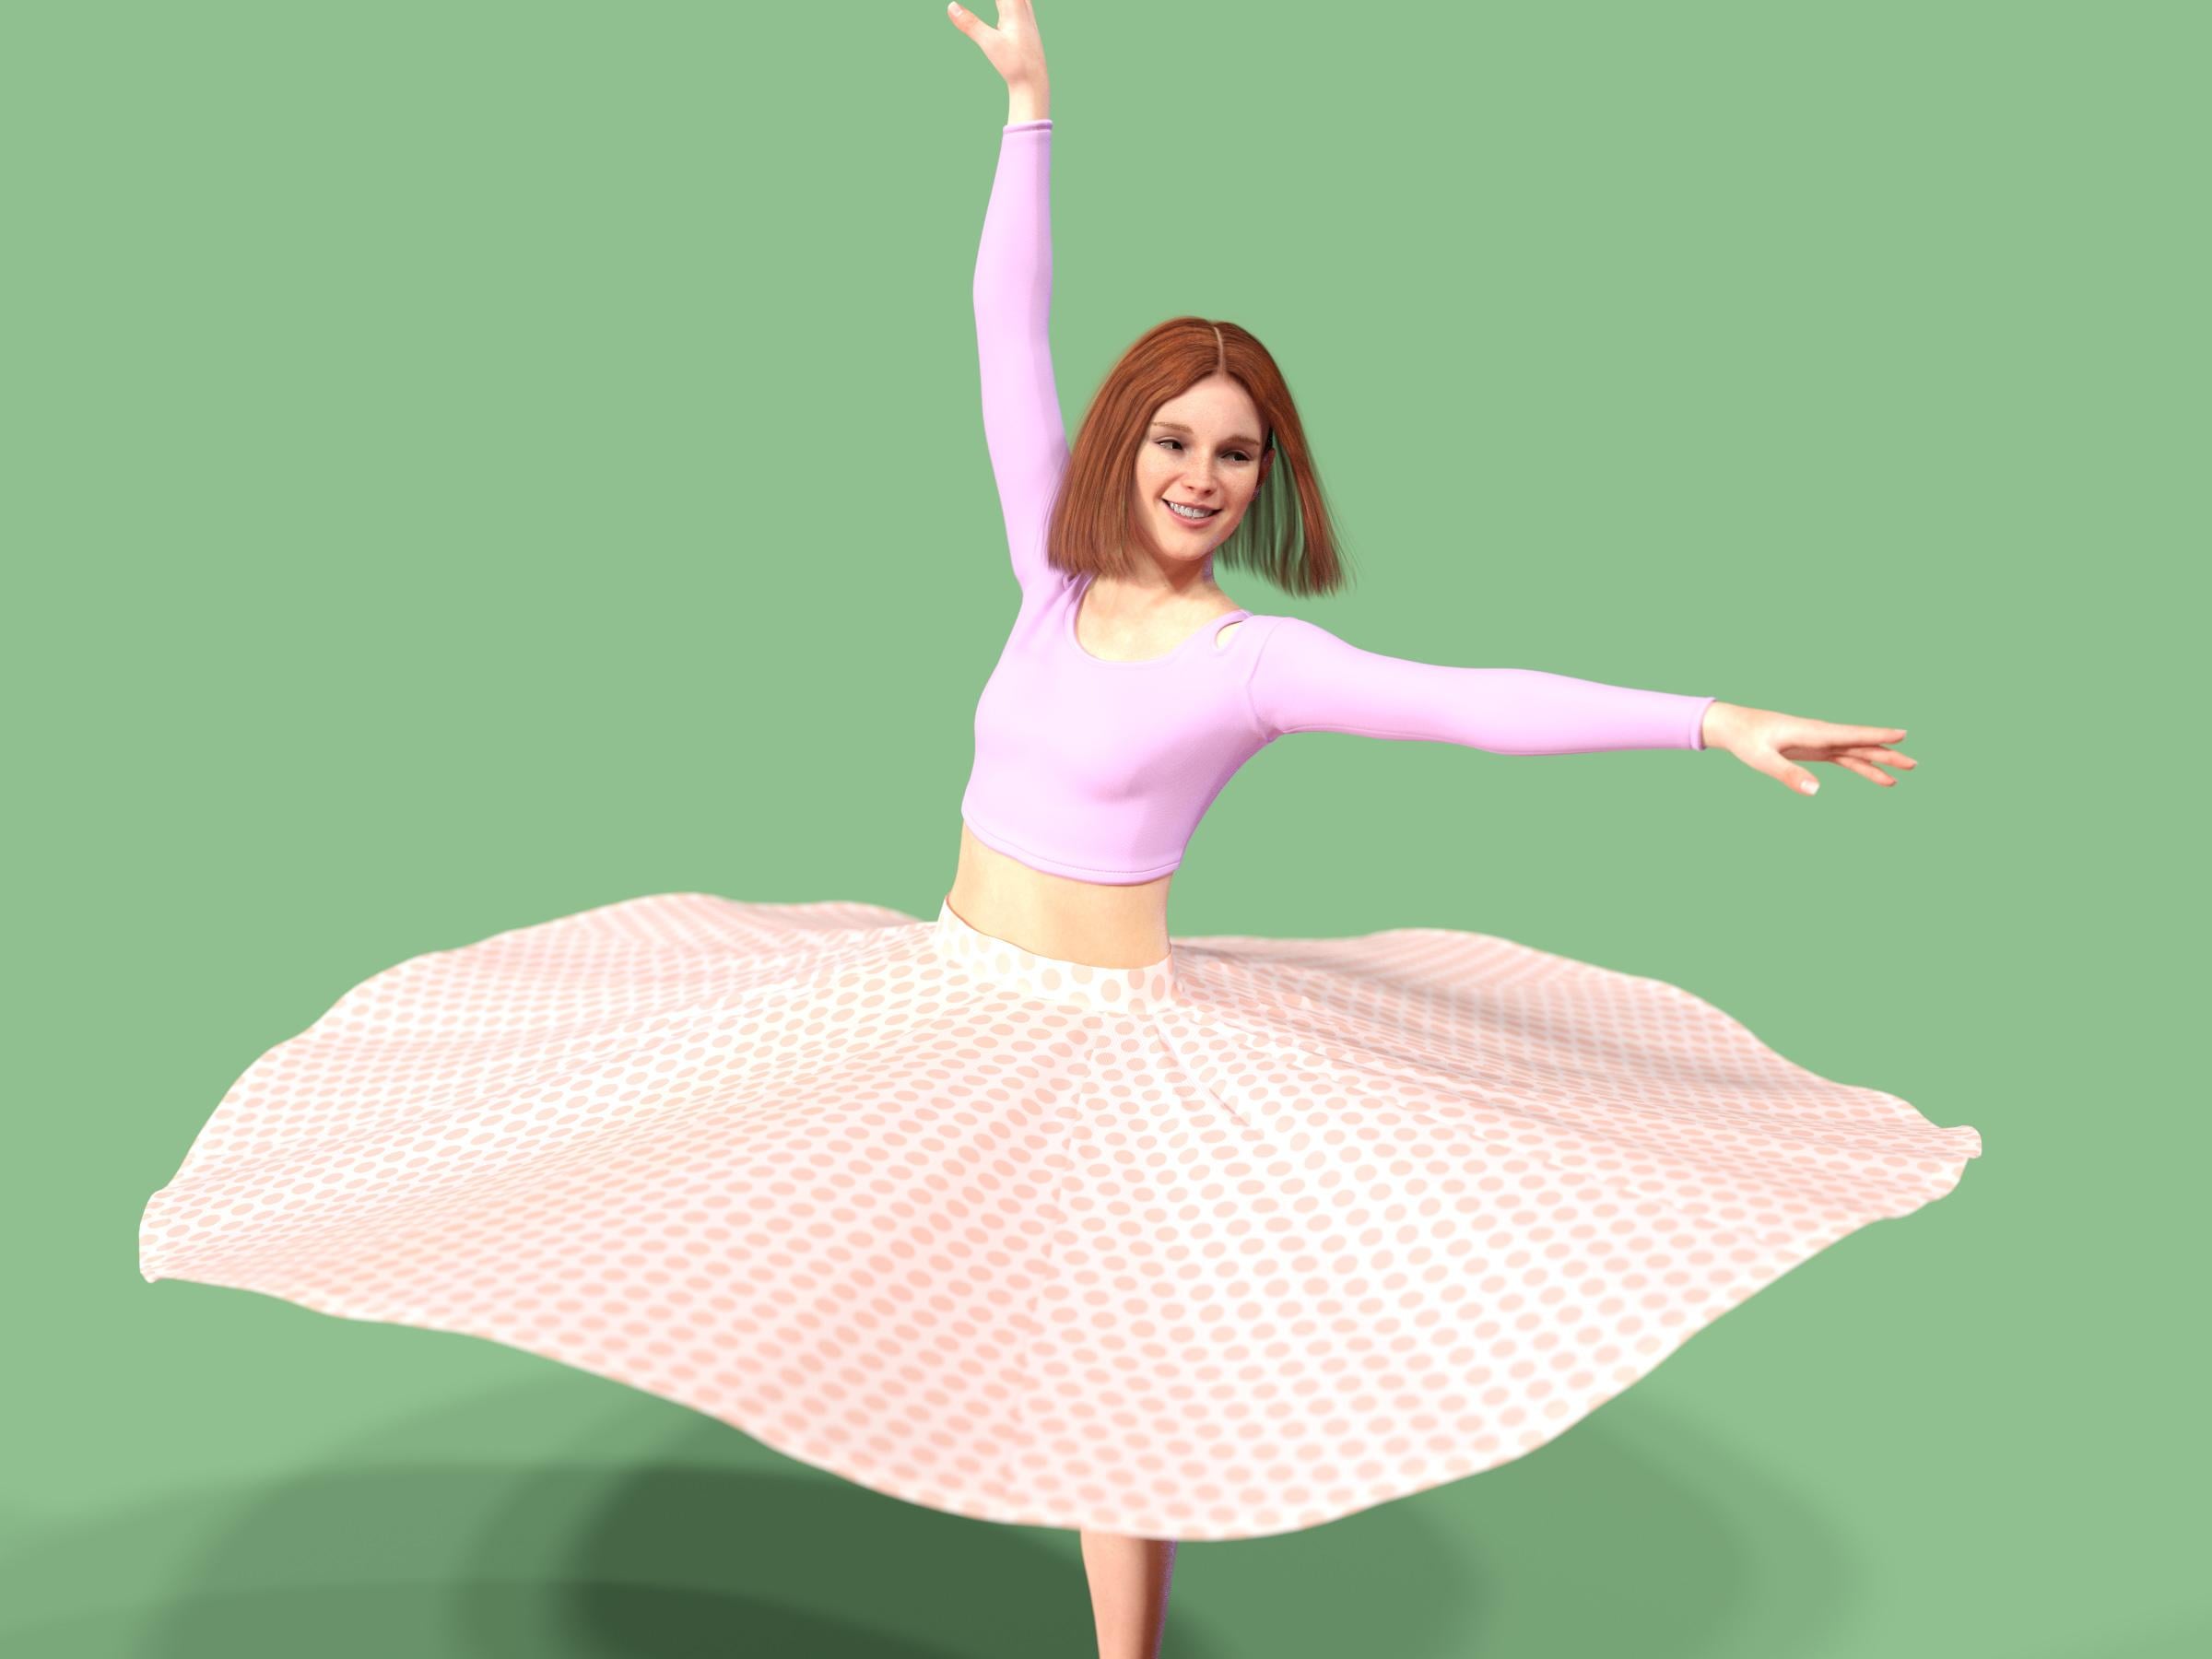
Something I did some time back, originally because someone was having trouble getting their own effort to work, and I threw something together for testing purposes.
It's hypothetically in the pipeline as something I might release, but needs a load of boring stuff done like figure fits, presets and thumbnails.
There could be a morph which lifted the skirt up into a circle.
That it can do. There was half a mind to include several pre-done simulations for various spins and the like, because it's difficult to do without dForce deciding to snag on something.
 Please help me find a Dforce skirt with a ruffle that starts out as a circle around waist
Matt_Castle said:
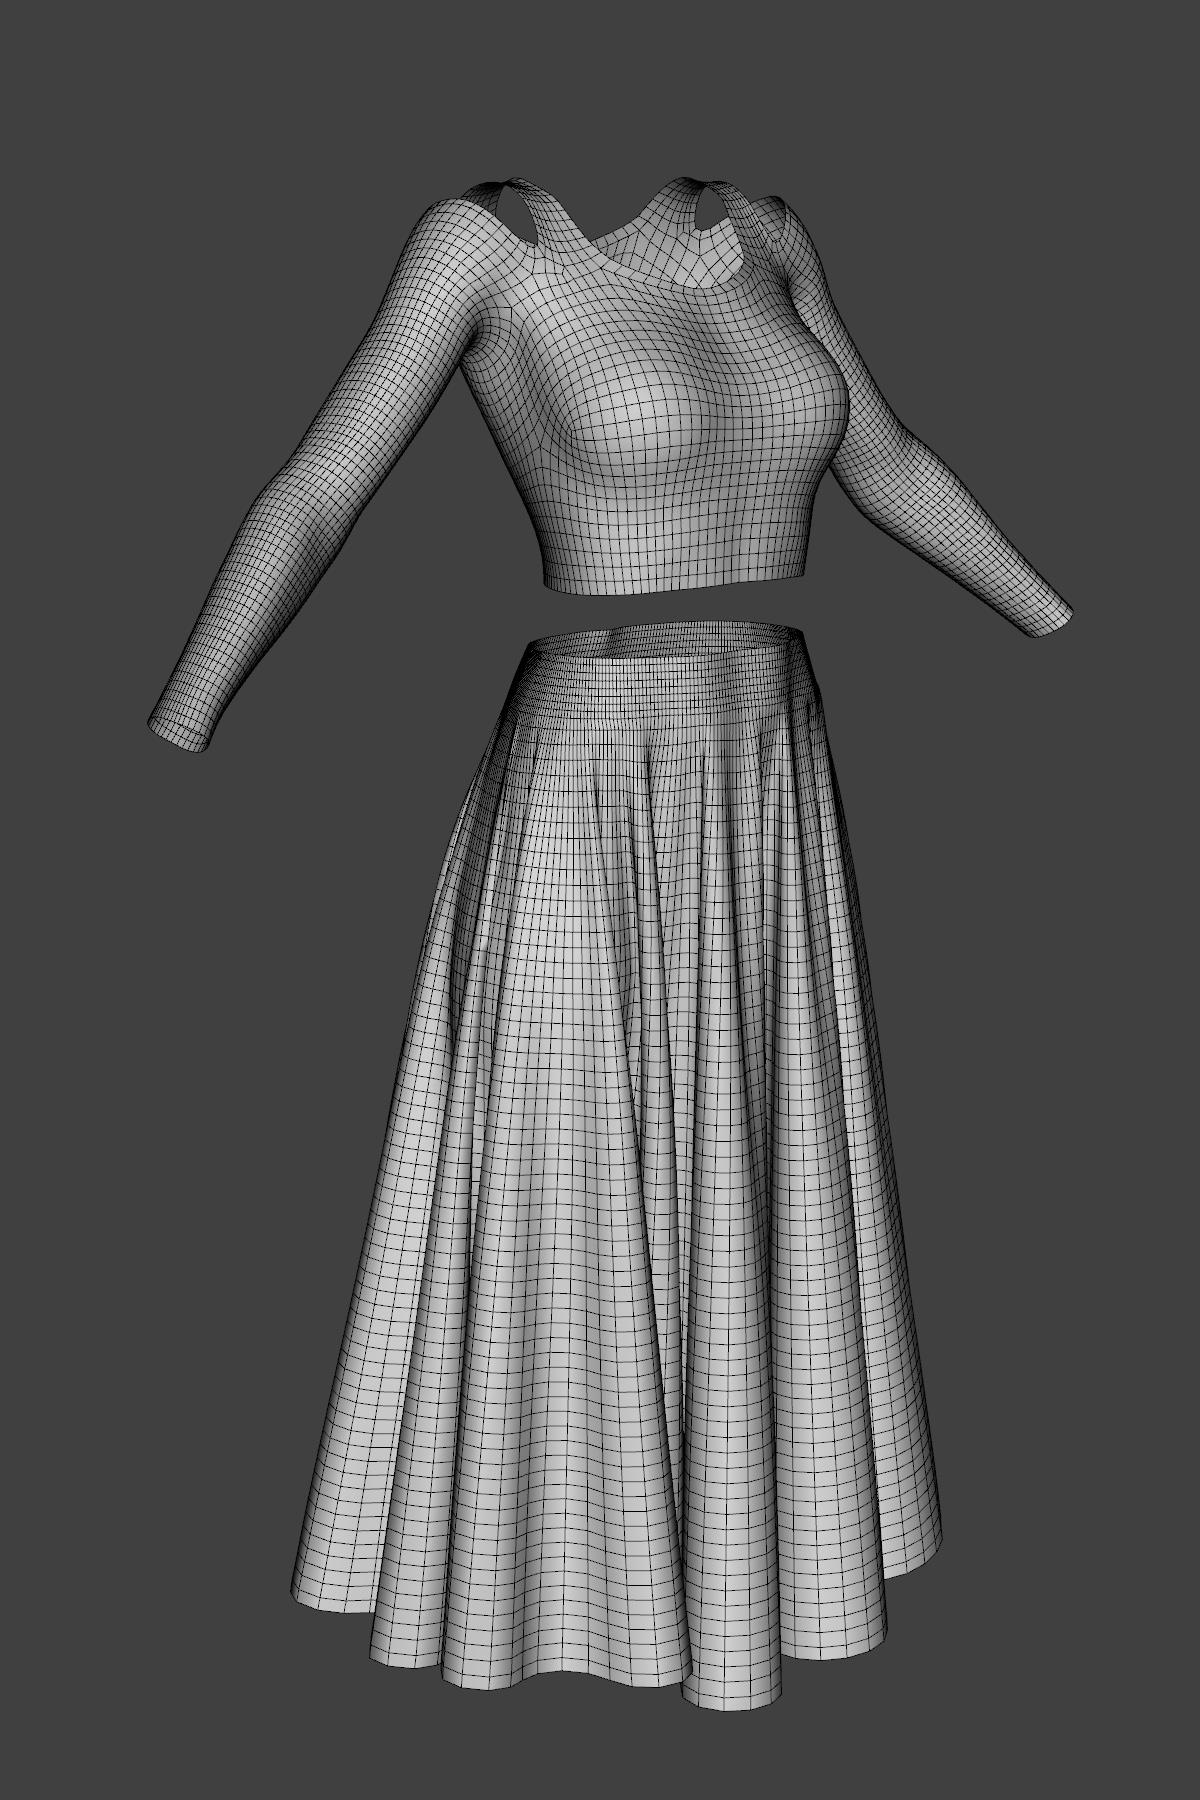
I wouldn't touch AI-created mesh with a bargepole when it comes to dForce. A good dForce mesh needs smooth topology; anything that is going to be inefficent at best and probably completely collapse, and more likely just detonate.
This is the kind of thing where trying to fix the AI mesh will be more effort than just starting from scratch.
When I was making a full-circle skirt, my mesh was just completely square topology:
This is so beautiful!!! Did you just do that???
I do not know anything about modeling :(
So, I want a ruffle on the bottom and I want the skirt to be mid-calf if straight. Also, I would like a waist band. The skirt, the ruffle and the waist band need to have separate materials zones. I would certainly purchase this is I could get exactly what I wanted.
I had a scene where I wanted the girl to be picking flowers in her garden and sort of crouching. I wanted her skirt to flow over the sidewalk and border rocks.
Sirts that start down cannot flow properly for this sort of thing. There could be a morph which lifted the skirt up into a circle.
I need to start with the skirt in a circle around her waist.
Trying not to lose my old freebie development topicsAfter running into several problems, which I noted with annoyance in this post, I found a procedure that works for me - so I've added the process I'm using to capture the pages, attachments and all, to a later post below , and deleted all the stuff about the problems I was having as that's no longer relevant.
Since the HiveWire3D forums are closing at the end of this month I'm archiving the forum pages I want using the 'Save Page Now' option on the Wayback Macine's web archive homepage. I'm doing this because the Wayback Machine's normal archiving process doesn't always capture everything. Here's links to Wayback Machine captures of the Hivewire topic on 24 July:
- HiveWire 3D Forums Will Be Closing ...
- HiveWire 3D Forums Will Be Closing - page 2 ...
- HiveWire 3D Forums Will Be Closing - page 3 ... Electroharpist's posts (#56 and #58) with links to HiveWire3D, SmithMicro and RDNA forum backups
First and foremost, Electro-harpist posted a link to a 7z backup on the Wayback Macine of seven subforums: Poser, Poser Scripts, Poser Shaders, DAZ Studio, DAZ Scripts, DAZ Shaders and Photoshop. Also links to partial zip backups of SmithMicro and RDNA Poser forums:
- Hive Wire Forums Backup June 2026.7z : HiveWire3D users : Free Download, Borrow, and Streaming : Internet Archive - 7z / torrent...a quick check indicates that it seems to have captured all pages of all topics including all images and all attachments.
- Smith M Forums complete - for Poser users ...ZIP./ torrent.."a PG 'family friendly' cut of the archive"..."one page per forum thread. Images have also been retrieved... (about 25% are missing...), and have been reduced for overall archive file-size..."
- Community archive of the old Runtime DNA forums ...ZIP / torrent..."a reasonably complete archive of the Poser technical forum threads and posts to late 2015 (pre Poser 11)"...but..." no forum-post images..."
- SHARECG-backup ...torrent only - "...selected 3D models, Poser and DAZ items, tutorials, freeware and a full archive of the Scripts section. Plus the associated Web pages..."
Anyway, here are the direct Wayback Machine links for a few of my topics that I don't want to lose:
- My rather infrequent, and possibly apocryphal, 'books project'. ...1 attachment (17 - captured), images look ok
- My rather infrequent, and possibly apocryphal, 'books project'.- page 9 ...13 attachments (164,165(3),166,167,168(2),169,171,172,173,178 - captured) , ok
- My rather infrequent, and possibly apocryphal, 'books project'.- page 8 ... 16 attachments (142(5),143(4),144(4),149,152,153 - captured) , ok .
- My rather infrequent, and possibly apocryphal, 'books project'.- page 7 ... 6 attachments (121(2),127(2),136,139 - captured) , ok - the missing image in post #129 isn't the WM, see post #130
- My rather infrequent, and possibly apocryphal, 'books project'.- page 6 ... 2 attachments (101(2) - captured) , ok
- My rather infrequent, and possibly apocryphal, 'books project'.- page 5 ...9 attachments (85(2),85,91,92,94,95,96,97 - captured) , ok
- My rather infrequent, and possibly apocryphal, 'books project'.- page 4 ... 3 attachments (65,73,797 - captured) , ok.. .
- My rather infrequent, and possibly apocryphal, 'books project'.- page 3 ... 3 attachments (53,77,607 - captured), ok...
- My rather infrequent, and possibly apocryphal, 'books project'.- page 2 ... 1 attachment (307 - captured) , ok.
- Instantiation Via (Poser) Geometry Swapping ? - 1 attachment (1), ok.
- Instantiation Via (Poser) Geometry Swapping ? - page 2 - .no attachments, ok
- Instantiation Via (Poser) Geometry Swapping ? - page 3 - .4 attachments (53(4)), ok.
- Instantiation Via (Poser) Geometry Swapping ? - page 4 - .no attachments, ok
- Instantiation Via (Poser) Geometry Swapping ? - page 5 - .no attachments, ok
- Instantiation Via (Poser) Geometry Swapping ? - page 6 - .no attachments, ok
- Instantiation Via (Poser) Geometry Swapping ? - page 7 - .1 attachment (130), ok.
- Towards better grass in Poser... ... 2 attachments (11, 15 - all captured), images look ok
- Towards better grass in Poser... - page 2 ... 2 attachments (30,36 - all captured), images look ok
- Towards better grass in Poser... - page 3 ... no attachments, images look ok
- Towards better grass in Poser... - page 4 ... 5 attachments (65, 66 (3), 77 - all captured), images look ok
- Towards better grass in Poser... - page 5 ... no attachments, images look ok.
- Poser Firefly Candles ? ...no attachments, no obvious missing images
- Poser Firefly Candles ? - page 2 ...3 attachments (posts 25 (2) and 31 - all captured), no obvious missing images.
- Poser Firefly Candles ? - page 3 ...2 attachments (posts 42 and 52 - both captured), no obvious missing images
- Poser Firefly Candles ? - page 4 ...no attachments, no obvious missing images
- Upping the ante with the Poser atmosphere's Depth Cue (I'm still using Poser 11 with Firefly) - page 1 ...2 attachments (posts 5,13, both captured), no obvious missing images.
- Upping the ante with the Poser atmosphere's Depth Cue (I'm still using Poser 11 with Firefly) - page 2 ... 2 attachments (posts 21, 37, both captured), no obvious missing images
- Freazypose - a free PoserPython script to add EasyPose controls to a figure. - ok
- Freazypose - a free PoserPython script to add EasyPose controls to a figure.- page 2 - 1 attachments (21), ok
- Possibly Unexpected Ways To Use Nodes - thumbnails with links to full size images (3,4,9,14(2)) - ok
- Random colour tiles (Poser 11 FireFly/SuperFly) - 9 attachments (2,3,4,6,8,9,11,12,13) - ok
- Callback created using parm.SetUpdateCallback() not behaving as expected - 4 attachments (1,2,3,4) - ok
- The first four segments of a millipede - not sure if this'll go anywhere :) - 3 attachments (1,7,18) - ok
- Using a greyscale mask to blend two colours... without actually blending. ?! :OS - 3 attachments (8(2),9) - ok
- Minyassa's How do I make a smog layer in the sky with volume? - ok
- More Realistic Distance Falloff For Poser Atmosphere Depth Cue - ok
- Animatable LED Counters, Clocks, Etc, Using The Material Room - ok
- Easy Shader For Creating A Height Map Render Of Your Scene - ok
- Using Poser 11s cloth room for a maypole dance ! - 2 attachments (2(2)), ok
- I Hope You're Ready For Stupid Questions: Chain Figures. - ok
Miscellaneous
- A Few Books By The Cheapskate... - ok
- A Few More Books By The Cheapskate... - ok
- Favourite openings from books - ok
- Gadget Girl's How to check if a prop is (or isn't) in a scene - ok
- Please Jog My Brain - How Do You Combine Props/OBJs In The Setup Room? - ok
- Sparky's Problem with Normal Maps in Poser - ok
- English Bob's Parenting props to a posed figure - ok
- PoserPython: Selecting Node(s) In The Material Room ? -
- PoserPython Wacros and Scripts - WacroMaterials() -
- Gadget Girl's Where should Poser geometry files go? Best practices. -
- Where should Poser geometry files go? Best practices.- page 2 -
- Where should Poser geometry files go? Best practices.- page 3 -
- Where should Poser geometry files go? Best practices.- page 4 -
- Where should Poser geometry files go? Best practices.- page 5 -
- Where should Poser geometry files go? Best practices.- page 6 -
- jonrea's Movement morph for prop in DAZ -
- kobaltkween's Materialize, a free and open source texture creator -
- The Naughty Elf Present
- Dawn Of The Dead
- Ghostman's FBM morphs for Gnobbit 2016-03-06 freebie page (download not available as you need to be logged in)
And CGBytes 'The Node Knows' topics that I thought had gone forever - they're just mostly gone forever...
- 'The Node Knows' forum capture 26 Jul 2016, ...in fact 2 of my 6 topics on that that page were partially captured
- Distance From Camera To Point Being Rendered ? - Material room sneakiness, DepthCue, P nodes, underwater, fog... ...only page 1 captured of a two page topic, and no images captured (the forum software seemed to prevent image serving unless logged in)
- Firefly: dU, dPdu, and dNdu (and dV, dPdv, and dNdv) nodes - Trying to understand them by playing and thinking out loud.. ...only pages 1+2 of a 4+ page topic, no images
Some of my old SmithMicro topics I've found on the WayBack Machine because I found old dead links in some of the above.
The following WM search link shows the URLs of all CGBytes forum pages that have ever been captured https://web.archive.org/web/*/http://www.cgbytes.com/community/forums.aspx*, so if you know yor topics ID number (the ###### in the 'http://www.cgbytes.com:80/community/forums.aspx?g=posts&t=######'; topic URL) you should be able to check whether WM ever captured it. Unfortunately there are very few captures of subsequent pages, which have an extra &p2, &p3, etc on the end of the URL - these are probably specific captures of whole topics by people who knew what they were doing.
LIVE! In the store NOW!! LowPi - the Low Poly Figure, and Crowd Creator Scripts@AsuCafe I'm glad you found the notes helpful. Yes, fingers get mangled. I think it is because the Transfer Utility is trying to map individual Genesis fingers to the LowPi "mitten hands". I had to do quite a bit of fiddling in Blender to move vertices around and smooth things to get reasonable fingers. Your image looks really good, though.
Thank you for the good trip wishes. I'm still not completely packed. I get easily distracted. Like this thread. But at least it proved to be useful time spent for your progress with the task.
LIVE! In the store NOW!! LowPi - the Low Poly Figure, and Crowd Creator Scriptsbarbult said:
These are just personal notes, not intended to be shared as a tutorial, but they might help you.
Create skin wearable for LowPi:
Load LowPi and dial the hidden clone morph of the skin you want to use (G9, for example)
Load the base character of the generation of skin you want to use (G9, for example)
Pose, scale, morph the character to match LowPi as closely as reasonably possible.
Set character to Mesh Resolution Base.
Export the character (only the character) to OBJ.
Import the OBJ
Use transfer utility to rig the character OBj to LowPi. From LowPi Current Shape to Character OBJ, no template, Reverse Source shape from target, parent to source figure.
Select LowPi and dial out clone.
Since importing an OBJ with materials doesn't really import the Iray Uber channels completely, copy all surfaces from the original character (Genesis 9, for example) and paste those surfaces onto the new character rigged and parented to LowPi.
Select rigged character now parented to LowPi.
Run V3D Scene Optimizer to reduce the 4K skin Maps to 1K.
Save as Figure/Prop Assets
Delete rigged character now parented to LowPi.
Select LowPi and load the asset just saved.
Click the visibility eye icon to hide LowPi hip and all hip children in the scene.
File/Save As/Wearable(s) Preset.
Choose a folder to save in and a name for the wearable.
(A Wearable(s) Preset Save Options dialog pops up) Make sure that the Genesis 9, and nothing else, is checked on the Wearable tab (it should be by default).
Activate the Other tab in the Wearable(s) Preset Save Options Dialog.
Check "Include Other Settings in Preset".
Uncheck LowPi and click the triangle to expand the LowPi hierarchy.
Click the triangle to expand the Display hierarchy.
Check the [P] Visible box.
Click Accept.
To create various character skins (not shapes) apply a G9 character skin material to the G9 wearable. (If it is a hierarchical material preset, you will have to load a real G9 and apply the skin to it and then copy all the surfaces and paste all the surfaces to the G9 wearable.)
Run V3D Scene Optimizer to reduce the 4K skin Maps to 1K.
File/Save As/Material(s) Preset. Select a folder and filename for the character skin preset and Accept.Notes:
Sometimes the saved skin asset needs to be helped in Blender or other modeling app, to fix distorted fingers (G8 had this problem pretty bad.)
Sometimes LowPi geoshell clothing doesn't fit over the wearable skin, because the wearable skin is a little larger than LowPi in certain places. A modeling app like Blender can be used to fix that.
Sometimes with female conversions, the breasts are a problem. I used Blender to shrinkwrap the converted G8F to LowPi and tweaked the size from there.
When reimporting as a morph I create a dformer to attenuate the shrinked OBj so it doesn't import the head, hands or feet changes.
This is very helpful, thank you so much! Although there are still some issues with posture and fingers, I think I can figure it out with a little more time. This is the first time I've successfully loaded so many characters into a scene and rendered it. I wish an artist could develop such a tool. Thanks again, and have a nice trip.
editing geometry on one figure affects another?Jessie said:
I needed a pair of ears for character A (a gen 9 figure. Supposed to be a "beast man" - human face with wolf ears on top on head while human ears remain on side of head.) I figured the best way to do this was to add a second gen 9 figure (we'll call it B), add the Lycan 9 morph, and in the geometry editor, hide everything but the ears. Because the face and ears are one thing, this requires selecting everything but the ears, adding them to a new face group, and hiding that.
This works great for B, because I get want I wanted - just the ears. However. Whatever I do to B on a geometry level, it's reflected on A. Like:
I give B a new facegroup called "HIDE ME".
A ends up with a new facgroup called "HIDE ME"
How do I stop this
I think I've seen that happen before when deleting polygons using Geometry editor, but it only happened temporarily. I seem to remember that when I saved the scene, and the reloaded it, the deletions only impacted on the desired figure, rather than both. This might be similar to what you are doing with hide.
editing geometry on one figure affects another?I needed a pair of ears for character A (a gen 9 figure. Supposed to be a "beast man" - human face with wolf ears on top on head while human ears remain on side of head.) I figured the best way to do this was to add a second gen 9 figure (we'll call it B), add the Lycan 9 morph, and in the geometry editor, hide everything but the ears. Because the face and ears are one thing, this requires selecting everything but the ears, adding them to a new face group, and hiding that.
This works great for B, because I get want I wanted - just the ears. However. Whatever I do to B on a geometry level, it's reflected on A. Like:
I give B a new facegroup called "HIDE ME".
A ends up with a new facgroup called "HIDE ME"
How do I stop this
LIVE! In the store NOW!! LowPi - the Low Poly Figure, and Crowd Creator ScriptsThese are just personal notes, not intended to be shared as a tutorial, but they might help you.
Create skin wearable for LowPi:
Load LowPi and dial the hidden clone morph of the skin you want to use (G9, for example)
Load the base character of the generation of skin you want to use (G9, for example)
Pose, scale, morph the character to match LowPi as closely as reasonably possible.
Set character to Mesh Resolution Base.
Export the character (only the character) to OBJ.
Import the OBJ
Use transfer utility to rig the character OBj to LowPi. From LowPi Current Shape to Character OBJ, no template, Reverse Source shape from target, parent to source figure.
Select LowPi and dial out clone.
Since importing an OBJ with materials doesn't really import the Iray Uber channels completely, copy all surfaces from the original character (Genesis 9, for example) and paste those surfaces onto the new character rigged and parented to LowPi.
Select rigged character now parented to LowPi.
Run V3D Scene Optimizer to reduce the 4K skin Maps to 1K.
Save as Figure/Prop Assets
Delete rigged character now parented to LowPi.
Select LowPi and load the asset just saved.
Click the visibility eye icon to hide LowPi hip and all hip children in the scene.
File/Save As/Wearable(s) Preset.
Choose a folder to save in and a name for the wearable.
(A Wearable(s) Preset Save Options dialog pops up) Make sure that the Genesis 9, and nothing else, is checked on the Wearable tab (it should be by default).
Activate the Other tab in the Wearable(s) Preset Save Options Dialog.
Check "Include Other Settings in Preset".
Uncheck LowPi and click the triangle to expand the LowPi hierarchy.
Click the triangle to expand the Display hierarchy.
Check the [P] Visible box.
Click Accept.
To create various character skins (not shapes) apply a G9 character skin material to the G9 wearable. (If it is a hierarchical material preset, you will have to load a real G9 and apply the skin to it and then copy all the surfaces and paste all the surfaces to the G9 wearable.)
Run V3D Scene Optimizer to reduce the 4K skin Maps to 1K.
File/Save As/Material(s) Preset. Select a folder and filename for the character skin preset and Accept.Notes:
Sometimes the saved skin asset needs to be helped in Blender or other modeling app, to fix distorted fingers (G8 had this problem pretty bad.)
Sometimes LowPi geoshell clothing doesn't fit over the wearable skin, because the wearable skin is a little larger than LowPi in certain places. A modeling app like Blender can be used to fix that.
Sometimes with female conversions, the breasts are a problem. I used Blender to shrinkwrap the converted G8F to LowPi and tweaked the size from there.
When reimporting as a morph I create a dformer to attenuate the shrinked OBj so it doesn't import the head, hands or feet changes.
Simple Question about custom Folders and consolidating them into the "default" directory.crosswind said:
As long as they're Daz content, they can be moved... but it's always up to your choice. No problem ! Have a nice weekend !
Well, there is custom content from me, characters and such, which I was a touch worried about (face transfer files, etc).It's also HD space, turns out that I was holding a ton of duplicated files. Had a stiff drink, and did the "drag and drop," removed the custom folders and everything under one folder structure. Thought I lost a bit of work, but found it afterwards. Booted a scene I did last week, all customizations still present, and re-rendered it for a minute just to check. Everything works. Cheers and thank you. As for the "custom actions" file, didn't need to do anything, not missing any content either. I'm guessing when Daz rolled out the Daz Central, it modded my base directory, and as such there was a small problem since then. Anyways, thank you muchly.
Character creator to DAZ (character only !!)That's right, you have no way to directly import character mesh from CC into DS, as a morph, by using Morph Loader Pro, because the geometry (vertices count) doesn't match.
In such a case, the usual way is to use the software: Faceform Wrap to wrap the character mesh exported from CC (fixed geometry) with a G8 mesh (floating geometry). Then import that G8 mesh as a Morph into DS ~
Edit: There're a few tutorials on youtube, or firstly check : https://www.versluis.com/tag/wrap/
as well as some tricks of using Wrap in here:
https://www.daz3d.com/forums/discussion/662696/issue-with-some-poses-after-creating-a-new-face-morph/p1
https://www.daz3d.com/forums/discussion/658421/question-for-the-wrap-app-usersCharacter creator to DAZ (character only !!)I don't think it's possible to export from Character Creator 5 to DAZ Studio 4 or 6.
Firstly, there is no direct import or export from and to DS format. To bring a DS model into Character Creator 5 (or vice versa) it has to be converted to an FBX file first.
Secondly, If you import a DAZ figure into Character Creator 5, CC5 doesn't keep the original DAZ geometry. Instead, it automatically converts the shape and texture of the DAZ Studio model to the CC5 model, making it a CC5 morph. Unfortunately, it does't work the other way. It won't convert its geometry to DAZ Studio geometry on export, which is what you want to do..
Nevertheless, Character Creator 5 (and IClone 8) are far stronger for animation than DAZ Studio 4 or 6. I'm not sure if I can post a link, but I'll try.. Here's a video of importing DAZ content into CC5.
Looking for a tutorial on hairfelis said:
Hair can be a bigger topic.
Their are two types of hair that works differently, polygon hair (classic hair aka haircards) and strand based hair.
If you are looking for a different color than what is offered with the product, you can tweak surface settings or images to get the wanted solution.
If you are after a moderately different style, you can morph the hair, inside Daz Studio with dFormers or Mesh Grabber (Mesh Grabber only works on polygon hair, unless you are Premier member and have access to Geometry Scultur) or in an external modelling application.
This vidoe by Jay Verluis gives an introduction to usage of hair
Thank you for the link. I actually use Jay's tutorials quite a bit; I think his tutorials are a cut above everyone else's, in any subject matter. I looked through his videos, and I must have missed this one. Thank you once again.
Let's appreciate/discuss today's new releases - ongoinger still further threadGordig said:
https://www.daz3d.com/elysion-grace-suit-for-genesis-9-and-8-female-with-centaur-variants
Damn, G9, G8, AND centaur variants?
How bizarre. I wonder which devilishly handsome rogue might have helped that happen...
... okay, I admit it, it was me.
The general story is that I had a workflow I wanted to test and Ruris was willing to let me loose on his work in progress set.
So, as what I was testing was mostly a process for streamlining making corrective fits, this product ended up with G8F support - and what I think is fair to describe as quite a lot of it (even if G8F support is increasingly outmoded these days). Unless I forgot one, every core character for G8F and G8.1F is covered (as well as a few Gen7 core shapes from that Gravity Studios converted for "7 for 8" products). And the list on the product page is s actually quite cropped, as it skips over mentioning the core morph pacakge's breast shapes, Daz's Transgender morph set, Zev0's Breast Control, Soto's Breast Utilities, and various incidental things like Mechasar's Beverly (it mentions the G9 version, but forgets her G8.1 version).
The centaur support was not originally on the plans, but happened anyway. Because I thought it was funny.
Alas, the way that yesterday's new Centaur 9 shapes are set up means that the Centaur 9 wearables are not auto-following them well, but I will have a package out to fix those later. (The corrective fits have been made, but need at least some testing. When we were working on this, we had no knowledge that Daz themselves had new centaur stuff in the pipeline that they were going to group this with, so I'm rushing to catch up with that).
Looking for a tutorial on hairHair can be a bigger topic.
Their are two types of hair that works differently, polygon hair (classic hair aka haircards) and strand based hair.
If you are looking for a different color than what is offered with the product, you can tweak surface settings or images to get the wanted solution.
If you are after a moderately different style, you can morph the hair, inside Daz Studio with dFormers or Mesh Grabber (Mesh Grabber only works on polygon hair, unless you are Premier member and have access to Geometry Scultur) or in an external modelling application.
This vidoe by Jay Verluis gives an introduction to usage of hair
Products not compatible with Daz Studio 6, zero warnings on store pages + crashes on DS4future_boy_f2de9c36c5 said:
Having issues with Aiko 4 on Daz Studio 6, as it doesn't load at all.
Victoria 4 works fine(aiko 4 is just a morph preset) it's the DSB script that's no longer supported.
You'll need to remove the DSB script, or make a sub directory containing only the CR2 to use it in studio now.
The issue here, you won't get the Powerloader screen, nor will 3delight materials be loaded.
Other file formats that have been retired are daz, dso, dsd, dsv, and ds.
This means many material presets won't work either as they are ds format files.
The only way to get around some of these problems is to load them in DS 4 and save as a scene subset(for full figures) and Material preset for materials.
Now, before anybody freaks out about needing to go back and forth between the poser and daz studio formats, you don't need to.
What i recommend is to create a "Link" directory for your poser assets, and you won't ever have to leave the daz studio format again.
This script, will create Link(DJL) files for every asset in the directroy or drive selected in content library when run. NOTE: THIS SCRIPT WON'T CREATE A LINK FOR THE DSB FILE ONLY THE CR2.
One thing to be aware of, the script will put the link files in the highest folder listed in CDM(content directory manager) by default(though you can select a different folder in the popup), and the file path will be one directory down from what's listed in CDM.
The "default" top directory in CDM is "My Daz 3D Library", and the poser format link directories will start at "Runtime".
I recommend making a new directory, adding it to CDM, and putting it at the top of the list of Daz Studio formats.
After the links are created you can move the directory to any folder you want, and keep or remove the links folder
Be aware that you should not move link(DJL) files in daz studio, as it will create copy of the original file and not a copy of the link file. If you want to move stuff around, do it in explorer.
[Released] Hat Check for Genesis 9 [Commercial]Sorry, I did read your answer back then, but completly forgot to answer. Thank you for the answer, I'll see if I'm able to find the scene file.
In the meantime, I think the discussion is lacking a finished render: I did have to tweak the hat a bit after Hat Check created the morph because a hair strand or two were slighty poking through (I was using the default settings for Hat Check and didn't test if changing them would fix the problem: it was faster to solve it using the various morphs of the hat itself).
 Character Splitter
 Version 4 available, with new features & upgrade to Studio 6 :
- upgraded to Studio 6 (should also work with Studio 4.5+, not tested)
- simplified workflow
- relevant D-Former preset for the figure is automatically applied (if located in 'Scripts/Character Splitter' folder)
- reference vertex is automatically inferred from the applied D-Former. Custom (and newer) figures / D-Formers no longer require to manually find & set it. Field is kept in the GUI so it can be overwritten if need be
- non-morphed attachments (eyelashes, tear, mouth, eyes & eyebrows) no longer need to be deleted, you can now exclude them from 'Head' tab (they are excluded by default)
- accurately display morphs in the 'Shaping' pane
- should now be agnostic to your content library paths & custom figures
- sliders are available on each tab (Head, Body & CTRL) to allow testing morphs without leaving the script
- added a new 'Preset' tab to allow saving a character preset (when a controller is created), or a shaping preset for each morph (otherwise). This tab becomes available when morph(s) & controller have been created
- from last tab, you can browse to each dsf file by clicking on its path
- added a new 'Show Log' button at the bottom of 'Log' tab, which opens Studio log file
- replaced built-in DzPathComboBox by a custom tree view. This allows to set paths manually or to use a user-friendly interface to browse existing paths from installed morphs
- limit available base paths to 'Actor > Full Body', 'Actor > Head' & 'Actor > People', which are the relevant paths respectively for body, head and controller in a character split
- path browser is initialized only when needed, which allows faster start of the script
- warn user when image card size doesn't match specifications (and expected size is mentioned in the tooltip)
- re-ordered GUI & splitting logic code to get a clean log file
- improved morphs & cards deletion
- process should now exit cleanly when running into trouble (no stalling)
- optimized code
- updated documentationRepository available @ https://github.com/Mike3D/Character-Splitter-for-DAZ-Studio (click on '<> Code' button and choose Download ZIP).
 Character creator to DAZ (character only !!)
Hi,
I know there is a thread with a similar title, but the question is not the same.
I have already headshop and Facegen for Daz Studio, but they do not always have good results. I have seen Character Creator has also a similar addon, but before I get my hands on it to try Character creator with it, does anybody have experience of exporting from character creator a character to use as morph in daz, and any pointer no how to do it ?
Notice I am not talking about exporting the whole character with textures,etc., rather getting a object with a mesh compatible so that it can be imported in DAZ studio to create a morph for e.g. G8.Thanks
Daz 3D is part of

Connect
DAZ Productions, Inc.
7533 S Center View Ct #4664
West Jordan, UT 84084Licensing Agreement | Terms of Service | Privacy Policy | EULA
© 2026 Daz Productions Inc. All Rights Reserved.