-
G1 UVs to G8
Evacyn, you can use the Map Transfer utility in DAZ Studio to convert an Aiko 5 or any other Genesis UV texture to Victoria 5. Then you can put the texture onto Genesis 8 using "Legacy UVs for Genesis 8: Victoria 5".
For tutorials on the Map Transfer utility see either:
https://www.daz3d.com/forums/discussion/184696/tutorial-from-map-transfer-to-material-presets
https://www.daz3d.com/forums/discussion/95701/tutorial-converting-custom-genesis-2-uvs-to-genesis-3Nights of Romance - On Sale Now [Commercial]Simply amazing set!
Had a question... is there any "tipped glass/drinking" liquid morphs or options? I like when I can have my figures actually drinking with the glass tipped.
No it doesnt have that specific morph. The wine glass has a ripple morph (but no movement since shape of the glass limited that some without causing some oddities with either the morph or the refraction) and then it has an empty mat. The Champagne has more morphs that change the setup of the bubbles so if you have a bunch on a table and then to raise or lower the fluid level and then the mat for empty
(You found the one thing Id not included LOL) I had looked into it but the way I did the liquid for refraction etc it would have caused some oddities/issues so I made the decision to not to include it.
I resistedI'll admit that I didn't resist Eva (I wanted some of the older bundles, as they helped cover some ethnicities and fashion styles I've not got many options for), but I'm trying to resist more now, particularly characters. Clothes, hair and the like can't be blended together, layered with each other's materials or modified with morph packages in the same way as the considerable number of characters I've already got.
I'm now at the point that If I'm buying something, I'm at the point it needs to be filling a new niche in my collection, stupidly cheap or both, and I've actually been going through my wishlist clearing out things that fall much more into "want" than "need".Products Converted from Studio to PoserNotes on Making Clothing Poser Native
Edited 26/12/19
There’s not much point in going to the trouble of making a Genesis base figure Poser native unless you are going to do the same – and with reasonable results – for clothing and hair. So far, I’m finding that this can be done easily enough but with not always with prefect results – the Poser morph brush is very handy for fixing those problems though. Products that are sold with Poser Companion Files appear to be reliably convertible so far, while some of those without can be a little problematic (I may be able to find fixes for which I’ll post about later should they be successful or not). I’ll try to focus my initial posts on these later items, which I think will be of more use to other shoppers.
Again, I really just follow the method suggested for Netherwork’s File Optimiser (with a couple of small changes) along with an added stage to introduce Fit Control morphs – if you don’t have that product, then you can skip that stage.
In Poser and pre-Genesis Studio, we have always relied on content creators supporting various body morphs in their clothing products (I’ll call these supported morphs). These days, there appears to be much more reliance on Studio’s auto following feature, which algorithmically morphs clothing to fit the figure’s body shape. This is pretty good these days but it does have some limitations – such as the shrink wrap effect, which is why I use the Fit Control morphs (looking through the store, there are other similar products that look like they do the same thing).
Supported morphs work very well with the converted products I’ve tried but morphs created by the auto follow feature can generate some poke-through in a Poser native format, some of which can be dealt with using the Fit Control morphs, while others will need Poser’s morph brush to tidy up.
Make sure you’ve reinstalled the Fit Control product after you’ve finished converting the Genesis base.
Before starting, I like to create a folder for the geometry files that the File Optimizer will want to copy.
Stage One: Fire up Studio and load your Genesis figure, conform a clothing item you want to convert, then run the Fit Control script to add those morphs to the clothing. Save this as a new clothing item (I use Save As>Support Asset>Figure/Prop Assets) and with these new items selected, create Poser Companion Files. If you are not adding Fit Control morphs, then, if the product doesn’t have Companion Files already, make them now.
In theory, it should be – and is – possible to add morphs within Studio but they don’t seem to work terribly well in Poser, sometimes behaving as if offset, so we need to add them there. In Poser, there are two options available. The first is Poser Pro’s Copy Morphs feature, which works very well but is not open to users of the Poser Standard edition, who will need to rely on the DSON importer’s Copy Active Morphs. With some items I had run into some odd behaviour from Poser but it looks like that can be avoided by working on each item of clothing individually in Stage Two.
Stage Two: Keeping Studio running, open Poser and load your Genesis figure using its Poser Companion File. Dial in all the morphs that you will want to transfer to your clothing – don’t worry about how hideous the figure will look with them all present (and it really, really will).
Now, conform ONE item of clothing and using the DSON scripts, copy the active morphs. Next you must select the clothing and Figure>Conform To… NONE. You can now save this back as a new cr2, with a new name (I’m usually using the suffix PN to indicate that it’s Poser Native) and delete the item from the scene so that you only have your Genesis figure there. Move on to the next clothing item and repeat.
It is important that the clothing is not conformed when you re-save it and also that there is no other clothing present, as both conditions can, apparently randomly, cause weird things to happen in Poser – in particular, you can end up with a new and unwanted object saved by Poser with no UVs.
Stage Three: Run Netherwork’s File Optimiser on the new cr2 files and then load it into Poser. Change the skinning method to Unimesh and make sure that you set subdivision to 1 for rendering and set up the materials (you may have Poser Companion Files to do that or you may have to do it yourself in the material room) before re-saving.
Future Posts
As I work through the library of Genesis 1&2 products that I've been buying, I'll post confirmed successes and failures in future posts. If anyone else would like to post about products that they have successfully converted, then we could build a list from which other Poser users can make decisions about whether to buy Studio products. I have, in the latest round of sales, started buying up Genesis 3 base shapes, along with some clothes, so I shall, at a later date, attempt conversions of them also.
Does Aiko 3 still need love? AKA Any interest?I used nothing but A3 (with the XinXin character partial morph mixed with the Realistic morph and a pinch of something else, can't recall now) with Poser 7 from initial release up until about 2014/2015 when I really started looking more at Daz Studio. Kinda had to since I went from A3 to Vicky 6 (V3 wasn't all that to look at, V4 looked like Poser Dork with a pectoral disorder, and I skipped V5) and Genesis 2 didn't work in Poser as well as it should have.
However, I loaded up an old A3 character/PZ3 the other day and the low-resness of the texture map hit me in the face. Ran it through re-shade and bumped it up to 4K resolution. Much better, but still you can tell.
If anything, I'd say she needed 2K textures at least, and not just blown-up copies.
But then I really didn't touch A3 until the character morphs. As an anime fan, I don't think the stylized look translates to 3D. That look works in 2D best, but the pointy chin needs to be toned down for 3D.
Help identifying character.Anyone know which character morph was used for Capri Hair for Genesis 8 Female?
Easy Environments: Winter Bridge (Daz Studio) [Commercial]Willow! I think I haven`t seen you on an Easy Environments thread since the skybox days lol.
Lol ... I still lurk and see what you put out. Of course, I stil use the skyboxes for almost all of my renders, and so far, nothing beats your light sets. Those are my first go-to-items for any scene, especially an outdoors scene. If you'd like, I can show some of them if you think it may revitalize some of your older products? I've also found a work-around for your refusal to cater to one person's needs, lol. I can share how I do that, too, if you like.
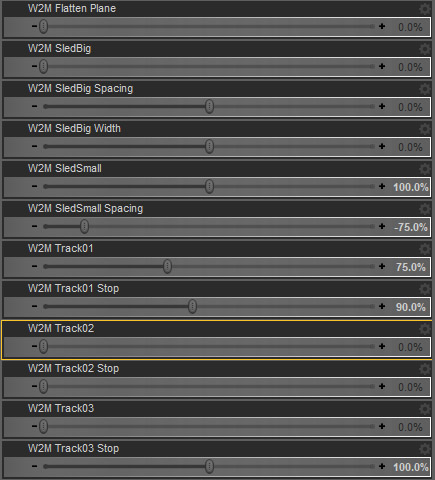
Yes, "Tracks" are the footprints. 01 is the main line, 02 runs next to it (for characters walking side by side), 03 runs towards 01 (for characters meeting).
The "Stops" are two parallel prints at the end of each track. On the vertical image above your post the girl stands in a "stop" morph.
"SledSmall" is for wintersport/toy sleds, "SledBig" is for something like a Santa Claus sled (it ends a bit behind track01).
"Spacing" allows small adjustments to the distance between sled-lines to fit them to various models (small adjustments because I was limited by the footprints).As a few others have noted lately, I'm still using the ancient 4.7 software, so the image is kinda weird for me. Will it work in 4.7?
 Lee 8
Lee 8Riku, no changes to morph or texture. Posed with Hyan with Mei Lin 8 character watching the happy couple.
Just wanted to do a scene that looked like someing from a drama while also playing with Lee 8. For some reason when I added lights it looked great before rendering, but then the final picture is way darker than I wanted.
Easy Environments: Winter Bridge (Daz Studio) [Commercial]Willow! I think I haven`t seen you on an Easy Environments thread since the skybox days lol.
Yes, "Tracks" are the footprints. 01 is the main line, 02 runs next to it (for characters walking side by side), 03 runs towards 01 (for characters meeting).
The "Stops" are two parallel prints at the end of each track. On the vertical image above your post the girl stands in a "stop" morph.
"SledSmall" is for wintersport/toy sleds, "SledBig" is for something like a Santa Claus sled (it ends a bit behind track01).
"Spacing" allows small adjustments to the distance between sled-lines to fit them to various models (small adjustments because I was limited by the footprints).escrandall, sorry, there is no direct way to scale the tracks.
But ... maybe simply scaling up the whole groundplane would work (and adjusting uv-tiles for the snow01 surface accordingly).
If your creature is four-legged I don`t think it will look perfect though.-
Lee 8That latest render looks great EJWorks! Whenever I try to blend characters, their faces get smooshed and look really weird, so I'm glad to see that it can be done. I really do like Lee 8 and he's one of the main figures I'm using for my animated series. So though I have nothing rendered with him yet, I'm going to be using him a lot!
When face smooshing occurs, I dial down the original character. I've found that if the percentages, when added together, are significantly higher than say 125 %, the smooshing happens.
I read something like that in forum discussions a while back and that's what really helped me improve blending characters. Another thing I noticed is sometimes it is better to load Genesis 8 base figure and then dial in the two figures I want to blend.
Today I went ahead and loaded Erik figure and then played with the persentages for Luca and added Luca's material set. When Luca is dialed in at only 30% his elf ears are also part of the morph, so I then went to the ears and dialed them down to 0. Also, I didn't like how the lips looked, I thought they were too puckered up/pouty so I used https://www.daz3d.com/rarestone-s-face-morphs-collection-for-genesis-8-male it breaks details of the face, such as lips, into even smaller groupings that can be changed. It comes in handy for fine tuning the face/ears when I want to change a particular part of a character set, or alter how blending has mooshed things. Also https://www.daz3d.com/200-plus-head-and-face-morphs-for-genesis-8-male-s is good too.
Don 't give up on your own mixing, it takes time to get a feel for it. I feel like every time I get excited over a new base figure I'm on the learning curve all over again. Some things don't blend the way I expect them to.
Does Aiko 3 still need love? AKA Any interest?Wish I had grabbed the digitigrade legs before the creator pulled them from Rendo. Maybe I'll finally try creating a Genesis head graft and use the Michael 4 Creature Creator legs.
As an option to the CC legs, there's also the HFS creature morph sets. Versions for M/F and G3 and G8. Much beefier than in the old Jenelson Kasa set for A3 (a very nice character, but those skinny geometry-swapped legs need a good bit of tweaking).
Associate my custom Antonia morph with Antonia figure."does it have lots of free expansion slots for morph injection?"
Yes, it does.
I'm not sure whether one of the ancient Injection Magic or Injection Pose Builder utilities, still available in the store, would do the trick or not, rather than a lot of tedious manual editing.
In any event, lukon would want to go back to the standard version that uses JCMs, rather than the weight-mapped version, which does not, by design.
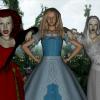
Does Aiko 3 still need love? AKA Any interest?It is quite possible to get A3 onto Genesis 3. Below is A3's shape and skin on G3F.
Getting the same onto G8 is trickier, but possible. To answer the OPs question, if I pick up an A3 resource, either Morph or clothing, and I wished to use it, I would transfer it to a later figure.
Does Aiko 3 still need love? AKA Any interest?@ MissBadWolf
Back to your original question. I think that, at the very least, A3 needs to be pulled forward to Genesis 3. I'm not sure where or when I acquired the morph (i.e. which product I bought or got for free) that added Aiko 3 to my Genesis 3 sliders, but one does exist.
In my attached image, you can see two versions of Aiko 3 (over the 3). The second one (in blue) is the Genesis 3 version using the slider I just mentioned. I think I used Aiko 7 I used Aiko 5 textures.
A 'hidden' Aiko 3 slider does appear in my Daz install for Genesis 3, though. Just search for Aiko under parameters, if you have it, it should be the first 'greyed out/red' entry on the list, or at least near the top of the 'hidden' morphs.
The biggest issue with using said slider is that you still need to pick a skin texture. If you were thinking of pulling A3 forward into Genesis, yeah updated A3 textures for Genesis 3 (or 8 if you are ambitious) that closely resemble the original textures while having the detail we come to expect from Genesis 3 (added maps, etc.), yeah that might be something I'd be interested in (if the prise is reasonable). Depending on where that Aiko 3 morph slider came from that works with Genesis 3... well you may have it already.
I think Aiko 3 is still very much a cutie!
Edit: Just opened my lineup file. The second '3' is a Genesis character, using Aiko 5 textures.
Any way to create a morph to Item A, from Item B(with different number of vertex?)There's a product in the store to do this. Name escapes me.
It's a basic "shrink wrap" morphing algorithm, and genesis to cube and sphere were among the samples, although it can do pretty much anything.
And if all you need is to morph Genesis into a cube, check with mCasual or look through his free scripts. I thought he did that one. I did find his mcjAddSphereMorphLite script, select something and morph it into a sphere. Cubes are easy (sorry Richard, but they really are. Remember, a cube is basically a sphere with all the angles rounded to 90 degrees, and anything can be blown up into a sphere in a few simple steps).
Morphs from G3 to G8I’ve also just started collecting and formatting the data necessary to explain G1/G2 to the script, as well as the data necessary to allow the script to transfer from those figures to G3/8.
This sounds very nice to me!
I hope you problems will be solved soon!
 Headshop 11 Questions
I'm making this separate as there is a lot here. Some images of things created with both Headshop 11 and Facegen.
First is an Asian woman with freckles in Headshop. This is G3F.

The texture is pretty decent, its quite clear. The shape however is less so.
This is the same woman with Facegen.

Nevermind the skin color as I only swapped the face texture and dialed in her shape. You can see that Facegen can capture more of the cheek area, however the overall quality is more blurry and soft.
Then I combined the two head shapes and used the HS texture.

I can manage the camera flash with some texture editing, Overall this is a good result, and it shows how photo quality matters. This was a decent size photo.
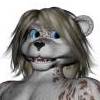
Here is a lower quality photo source, an old photo of Dio. This time I have both HS and FG results for G8M.

This time the desired result is sort of the middle. FG Dio is on the right, he does not look bad, but he comes across as very young. The HS Dio on the left has some features pretty on point, the slight crook in his nose and chin, however the overall shape is too square. The textures are pretty similar. Another note is how the FG Dio has funny eyes. They sit too high on the face, and somehow are small.
For this image I cleaned up the texture and combined the 2 head morphs again on the left side.

He still looks young, but maybe closer.
These results are comparible because the photos don't smile. I obviously cannot compare photos that have smiles, Facegen cannot do those at all.
I had more, but somehow I seem to have lost them. I have no idea how.
One thing I noticed about an earlier HS morph created by another forum member was that the face was too thin. Generally speaking FaceGen also seems to err on creating faces (and noses and so on) that seem too thin to how we perceive them in real life. It depends on the picture and even using multiple eual quality pictures from almost the same angle doesn't result in the same face geometry morph being created for the same person. That's a big clue that the likenesses are just middling approximations in the case of both FaceGen and HeadShop. Both have a ways to reach consitent quality. The kind of quality that could be used in facial recogniztion systems for example.
By thin I don't mean fat vs skinny but narrow.vs wide. It could by that the light model / material model using iRay doesn't have the right translucency giving us the illusion of hard well-defined surface while proper skin & body translucency would make the surfaces seem softer and not so hard and well-defined.
The skinnines is caused by the different focal lenghts of each photo. Fisheye lens photo will look different from telephoto lens. Since neither programs take the focal lenght of the picture in account, the out put is adjusted to a mean standard lens.
As for Outrigger's comment about face shape: the good news is that you can adjust face shape in HeadShop; either by moving the Smoothen slider to the right or by manually using the Autodots (recommended only for experts).
Ah, interesting. So if a photo included the focal length & such and HS adjusted for it the face looking to narrow would stop?
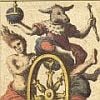
[Released!] VisualMenus [Commercial]I've never seen the anatomical elements called a Transfer Utility before, but the description is accurate.
 (That is what the image brings to mind due to the somewhat similar graphic used for 'male'.)
I'd like to congratulate you on your support.
Morphs from G3 to G8I figure I should probably say something, since it’s been a while since I’ve said anything at all, publicly.
First, I’d like to thank my alpha testers for all of their effort. It’s definitely paid off.
Second, the script is basically complete, at this time. There are nagging issues with transfer accuracy around he pupils, which I haven’t tracked down. It seems, however, that all of the basic technical issues with making the script work have been solved.
That said, the product is not ready. I’ve only just started the design of the User Interface. I’m incorporating feedback from testers now. I’ve also just started collecting and formatting the data necessary to explain G1/G2 to the script, as well as the data necessary to allow the script to transfer from those figures to G3/8. I’m not sure how long this will take, as my personal problems haven’t particularly improved. I have been taking steps to deal with those, but the steps are part of the reason I can’t give an ETA. My hope is to complete the product and testing before the end of December.
Despite my earlier confidence, examination of V4 leads me to believe I’d have to write a completely different script to do that job. While I could integrate that into the current script in a way, I doubt the script would be finished before Daz releases its next figure if I did. As such, I’m not gonna. I did want to, but I’ve decided that my efforts are better spent looking forward rather than trying to duplicate all the functions of Generation X. I suppose one could argue that adding support back to Genesis is the opposite of that, but the logic of the script will support any figure based on Daz’s Genesis structure. It’s just a matter of telling the script how to handle the differences between Genesises.[Released!] VisualMenus [Commercial]If anyone is interested in this icon I whipped up... it's for the Transfer Utility
Drop it in any folder you like and then browse to it to put it in the Menu!
Daz 3D is part of

Connect
DAZ Productions, Inc.
7533 S Center View Ct #4664
West Jordan, UT 84084Licensing Agreement | Terms of Service | Privacy Policy | EULA
© 2026 Daz Productions Inc. All Rights Reserved.