-
Poser Clothing
Is it possible to put Poser clothing on Genesis figures without having to transfer Genesis figures into Poser?
Tynkere Carrara FAQ scrapbook & other thingsSorry, I don't have off road car so can't help with that.
Hair
I will chip in my two cents on hair. These are just my random thoughts on some approaches. Your mileage may vary. For me, hair is a series of compromises. Attempts to create realistic hair by modeling a mesh either rely on transmapped alpha maps to create the illusion of detail or have extremely high polygon counts, or both. The poly counts of fiber mesh hair models in particular strain my computer's resources. Dynamic hair native to Carrara is great, but its appearance is very sensitive to changes in lighting. Although the dynamic hair renders as expected with the standard Carrara renderer, it does some unexpected things with the Toon filter and with the NPR render engine, both of which I like. Fortunately, the ever generous and amazing Philemo has created a plugin to convert dynamic hair to mesh, which can help with the rarely used by others Carrara NPR render engine.
- classic approach - conforming figures and parented props made from relatively simple meshes that are parented/conformed to the head. These rely on transmaps for details like hair fringe. This type of hair is very common. A Poser artist named Kazaburo was making great transmapped hair decades ago. Some current hair figures are essentially still this same approach. I have a whole folder of this type of hair that was made for V4 that I have converted for use with Genesis and Genesis 2 using the transfer utility in Studio. In Carrara, they load and conform/parent like any other figure or prop. Load times and conforming times (morph projection) are directly related to the complexity of the underlying mesh, but many of these have relatively simple meshes and load/morph relatively quickly. Like any other item made for Poser or Studio, some tweaks have to be done for the shaders. Generally, only have to tweak once and then save a global Carrara shader to the broser.
Here is an example of Daz's fairytale hair that was made for V4. It is a conforming figure, relatively high density as these things go, but loads and performs well in Carrara.
- Once a conforming/pareted hair (in this case converted from V4 to Genesis 2 using Studio) is loaded and conformed to Genesis 2 in Carrara like any other item, you can change the hair color using the Daz material pose presets. Highlight the hair figure subfolder (not actor) and double click the material preset in your content folder. In the attached, I changed from the default color to blonde by using this selection and double click method.
- Like any other item designed for either Poser or Daz Studio, it is best to tweak the shaders for Carrara. Here you can see that the default materials for the Fairytale hair look too smooth plasti, and shiny.
- To tweak for Carrara, now select the actor level of the hair model, and go to the shader room and check the settings. For this hair model, the default load has white highlights (equal to 100%), almost zero shiny, and the default bump actually is zero. You can confirm that a transmap did load in the alpha channel and other settings as desired.
- For this example, I adjusted the shaders for the front right strands of hair. I decreased the highlight and increased shiny and bump. In this test render, compare the adjusted hair tothe unadjusted.
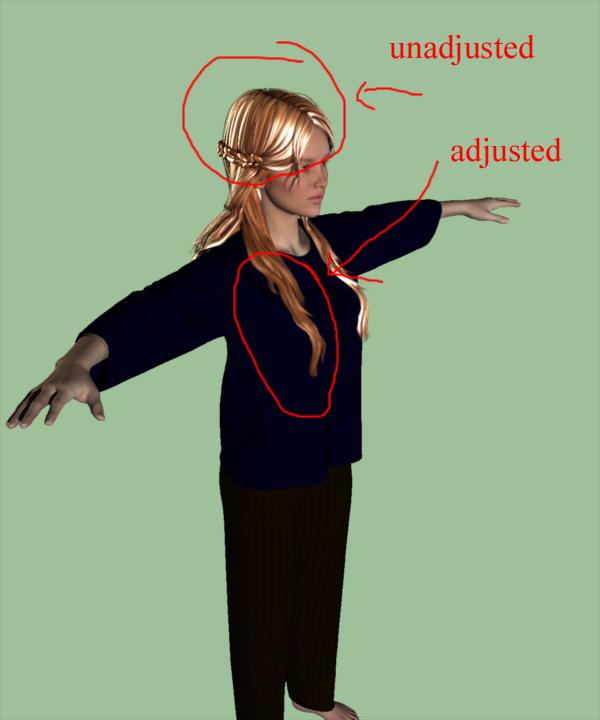
- Once satisfied with your Carrara tweaks for all sections of hair, you can save the global settings for all sections by clicking and dragging from the multicolored sphere to the shader folder of your lower browser.
Even though that example was for V4 hair, the same principles apply to transmapped mesh hair designed for Genesis, Genesis 2, etc.
 No HD, No Peace! Or... A little peace? I dunno...
I can recall one speciifc person who dislikes the HD and announces they won’t buy it even if it is free as part of a bundle offer.
But most people I think seem to want it. I think the reason it isn't included is because its a cash grab. People will pay extra for it, so they sell it as a different product.
Tha actually why I usually don't get the HD morphs. I'm not against selling products - no profit means no Daz, no Daz means I'm risking my credit card on other sites again - but my refusal to get them has to do with the pricing. Taking Zelara, for instance, the base figure with PC comes to $31.47. The HD morph for Zelara is $27.97. That's less than a 4 dollar difference. I'm not a modeler by any stretch so I don't know the work involved, but I can't justify buying the figure a second time to get some wrinkles on the knees and ankles when for that same amount I can pick up an OutOfTouch bundle with an HD character that comes with hair and outfit, especially when all but the skimpiest outfits are going to cover up the HD zones anyway!
Creating an "open" or "unbutton" morph for a top that doesn't have oneA related option is to use the Daz Studio geometry editor to delete faces or vertices to, for example, “unzip” a zipper or open a shirt front and then save the modified garment as a new asset. This shouldn’t affect the existing rigging or weight mapping. From there, you can either move things around by using deformer, or else create a morph on the modified mesh using the normal techniques. Might save some hassles by doing the mesh modifications in DS rather than externally.
Hey this sounds exactly like what I’m after.
Is there any chance you could elaborate a bit further on these processes and maybe a guide or tutorial please?
Morph Loader Pro: Geometry errorWell
Theres no parenting
Exported & Imported as Daz Studio, Poser, Blender no change.
I have Lightwave & Hexagon as well but I've been hitting this for days and I need to move forward.
So I'm dumping this and using Predatrons low poly arabs instead.
Since others are using Morph Loader & Blender okay I'm taking that its me.
I'll have to investigate solving this when I have spare time.
Thank you everyone for the advise.
Morph Loader Pro: Geometry errorNo, Morph Loader Pro is not "busted". It works fine. Be sure ONLY the ONE object you are going to morph is visible in the scene when you export to OBJ. Hide everything else before export. The exported object must not have anything fit to it or parented to it. It must be at base resolution (no SubD). Be sure you export and import with the same scale factor. In Blender, be sure you "keep vertex order" on import and export. These are the Blender settings I use for import and export.
Morph Loader Pro: Geometry errorHi I am morphing a low poly prop (not a figure), one of the low poly Medina City Scape characters to give the illusion of a walk cycle at a distance.
This is a simple one plane shuffle (left right etc) of the feet & hem of the cloths in Blender, nothing super complicated.
Unfortunatly I am getting a Geometry does not match error when I load the modified file.
I thought this was me so I restarted from scratch making sure I didnt screw the mesh up but with same result.
As a sanity check I deleted everything and imported the prop and saved it un-altered (so the geometry is unchanged) to a new folder and then again loaded the new file with Morph Loader Pro, same result.
As a further sanity check I repeated this with Wings3d with the same result.
Q: Is Morph Loader Pro busted?
Or have I missed something?
I've done morphs for PoserPro no problems for years but DS seems a bit fussy.
KA Carly HD For Genesis 8 Female [Commercial]Nice work for your first character! When I purchase a character the first thing I look at is the head morph and I really liked Carly's. I never use the body morph on any character because I haven't found any that fit my tastes and I have several custom shapes I use all the time. No offense, Carly was to normal, dumpy looking for my tastes, but luckily there are morphs to make any character closer to each users tastes.
Next up is the skin and I liked the quality of what I saw in the promos, even though I normally gravitate twords darker, tanned, less freckled skintones
Next up are any extras that other characters don't have and the fibermesh options sealed the deal for me, especially the peach fuzz.
Been playing around with Carly for the last few hours and overall I'm happy with my purchase and the thought of you doing an "older, more 'weathered' male" is intriquing even though I rarely use male figures, so keep up the great work.
Here is a quick render. I did give her skin some sun, changed the makeup and the eyes, but the face and skin is still 100% Carly
 Heels, begone?
damn I wish I had the time to prove you wrong, I barely have time at the moment to start up my PC (on ipad typing this), a dollar the number of times people have told me something is impossible because they cannot think outside the box would make me wealthy enough to retire.
I would create at least 3 child bones on my wedge heeled shoe base that using it as the source for the transfer utility on heeled shoes would transfer the weightmapping to.
I could then rescale those child bones to shorten or zero any mesh assigned to them
my issues are I am not a DAZ studio user in general so never really got into all the joint controlled morphs and fancy stuff that WONT WORK in my app of choice Carrara!
doesn't mean I couldn't learn to do them or geografts another thing Carrara incompatible, I just so far have spent my energy finding workarounds against these DAZ studio features.
NVIDIA External GPU Attached to a CHEAP Laptop?That's exactly why eGPU's are so useful: they have their own power suppply and ventilation, so you don't need to rebuild half your computer if you want to add a GPU it was not intended for. Beware on purchase though, some units sold as eGPU's do NOT come with a graphics card, but are only a case with ventilation, powersupply and the appropriate slot to insert a graphicscard. On top of that, your laptop or desktop or whatever you want to use it for will need a USB-3 port, for the higher data transfer speed. Some older rigs still have USB-2 instead of USB-3, so make sure you have the right one, they look similar at first glance.
So let me get this straight - the GPU actually DOES the IRAY render? It's the graphics card that does the render? Or is the graphics card just showing you the render as it's being done?
34th Daz3D Bryce Render challenge ■■ Robots and Robotics ■■SOLVED - never mind
Question - the conforming tin man suit did not port with the tin man morph. Is that normal? (EDIT - solved by sending through separately, pic above substituted)
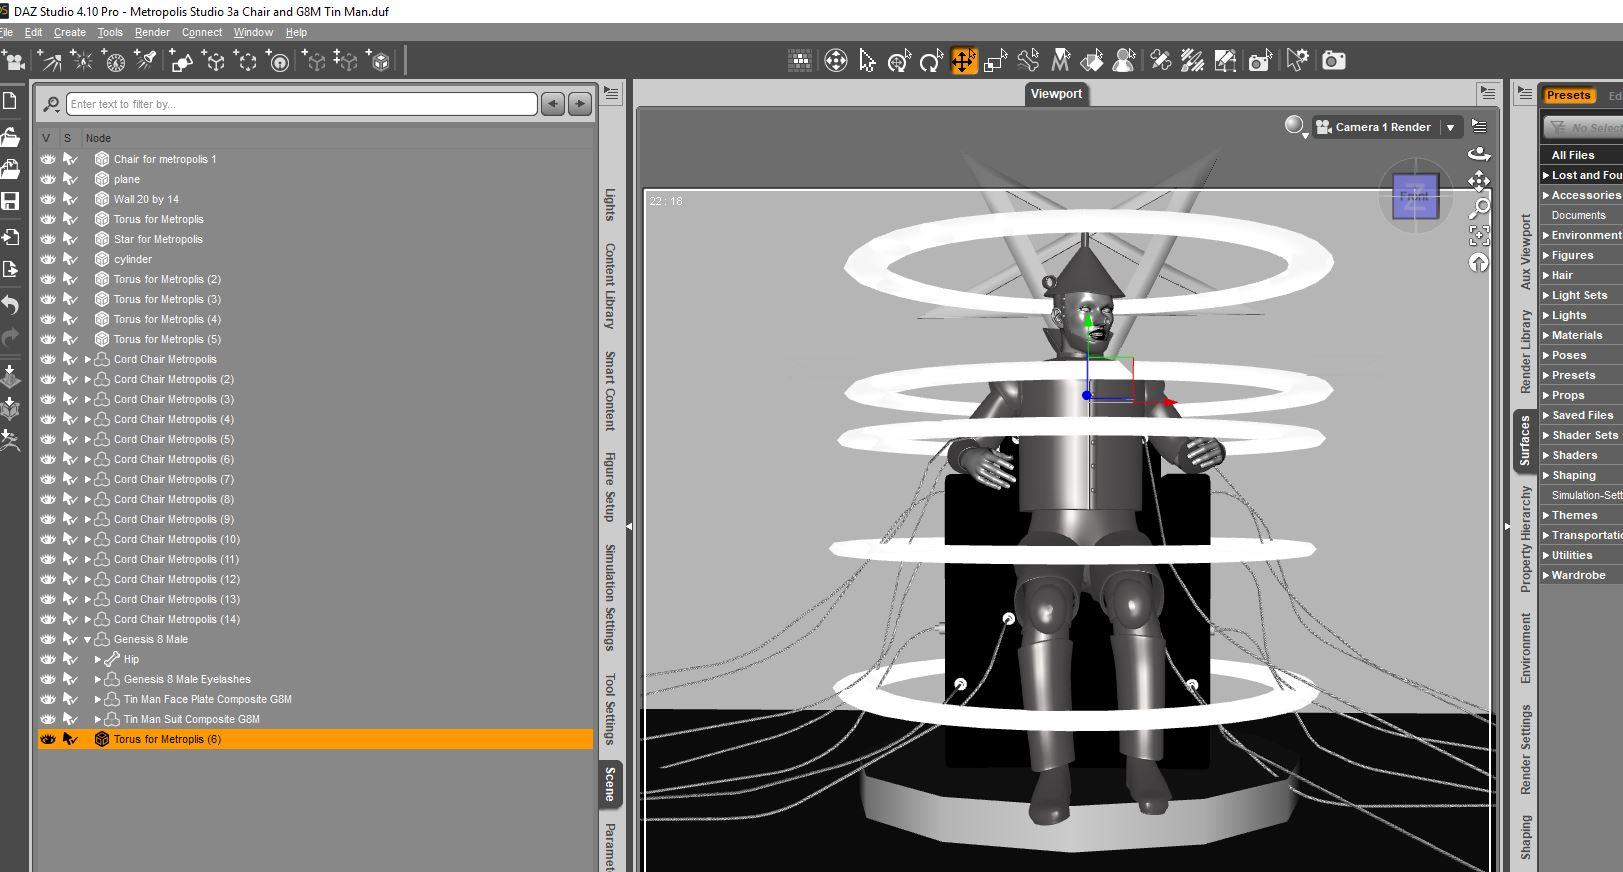 34th Daz3D Bryce Render challenge ■■ Robots and Robotics ■■
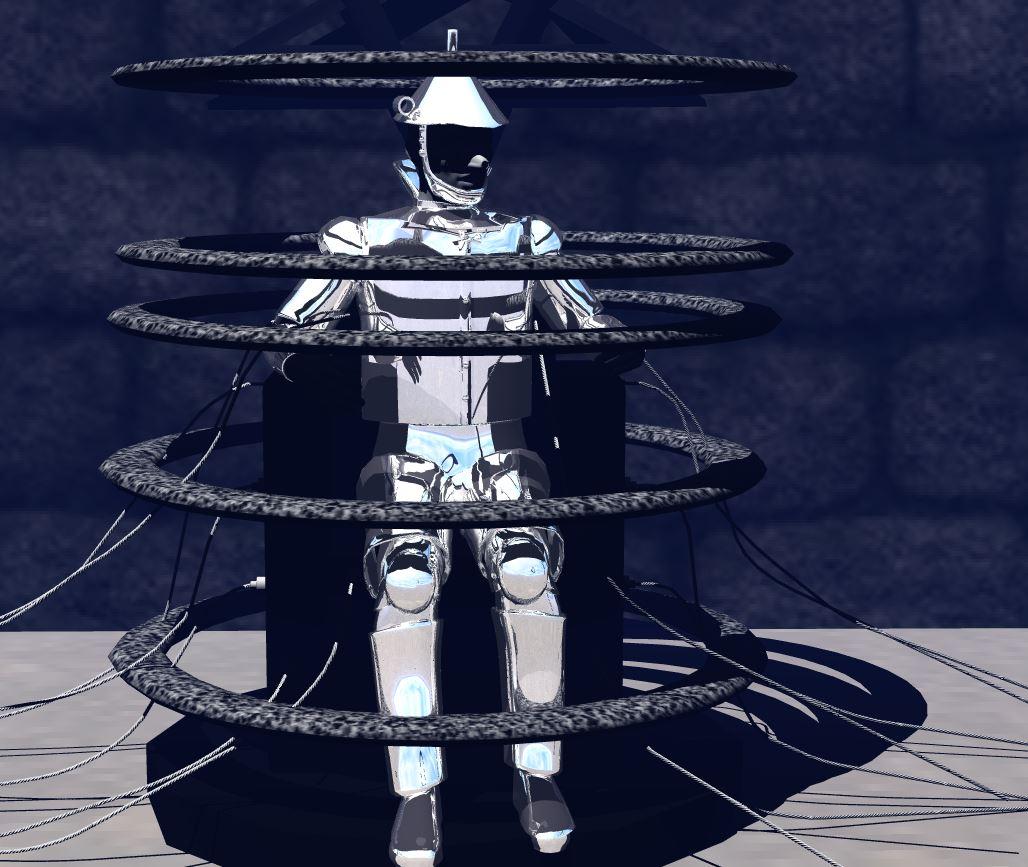
OK - Perfect Timing. I had promised myself to enter the next Bryce challenge (which is now this one). I have used Carrara to render a tribute to Metropolis and the Wizard of Oz. I have used Daz Studio to render a tribute to Metropolis and the Wizard of Oz. This month, I will use Bryce to render a tribute to Metropolis and the Wizard of Oz (assuming I can get my file issues sorted out). Just check my avatar (although I change my avatar often). I have never posted a Bryce render, so I hope it is OK to ask lots of questions.
I encourage everyone to render a tribute to Metropolis and the Wizard of Oz! Everyday. Using every program. Posting in every forum.

Not an Entry
Woohoo! I was able to get my bridge working and port my tin man morph to Bryce. I promise to try to come up with something more original, rather than just repeat my avatar.
I see links to tutorials, and I have an old Bryce 5 handbook. Hopefully, that is enough to get me started with the basics such as surface materials and lighting. Any other suggestions to ease the learning curve welcome.
EDIT - Substituting NAE pic - updated because of solution of next post.
 KA Carly HD For Genesis 8 Female [Commercial]
She didn't go in the wishlist, I bought her immediately.

I like the option of having the peach fuzz, if it had been required, I wouldn't have gotten her. I want to be able to decide to use it or not. Interesting, unique approach- kudos!
I like some of the Plain Jane (poor Janes!) looks, because we can always morph them into something we like / want to improve or change.
So far as eyebrows, I noticed another vendor (perhaps more than one) doing the fibermesh, painted, and combination of both options, and that is the way to go. I will be looking for that in all characters and prioritizing buying those. I hate the fibermesh eyebrows frankly, they can look horrid in different lights. Combining with the painted look seems to soften them and work in most lighting. Another thing I hate is blush on characters, I want a no makeup option or I don't buy it. And don't put eyeliner with the different eyeshadows, have the with and without eyeliner options.
I also like acne (SLIGHT) and non-acne characters- but no one offers more than one version of the acne face that I know of, so that may be something to consider. No one keeps the same acne all the time.
I also like it when vendors do a variety of eyebrows, not just change the colors. @darwinsmishap comes to mind.
Kudos on your first character!!!! Will showcase her in my thread soon in Art Studio.
February 2019 - DAZ3D New User Challenge - Lighting@testingtesterson35 That is an awesome render, great idea, use of textures, light, pose, and camera work. Very nice character (assuming morph?).
I find the lack of gravity acting on her hair very unrealistic, a real knock on an otherwise stellar image. I agree with Shinji but, also where the smooth armor ends at her chest, check if it's clipping into the undergarment.
This might be trouble depending on how you built your set/environment, but if you are wanting to play up the cramped feel, you might consider bringing the screen right wall into frame more. I suspect you could fill the space vertically by grounding the elbow and displacing some hair on top. The hair could get tricky. Really interested to see how this one ends up.the clipping is from the arm being too far across the fix settings may have a hard time moving it that much without making the armor sit way away from the body
NVIDIA External GPU Attached to a CHEAP Laptop?Sure. Most of the eGPU's attach by way of USB type C so the laptop needs that sort of connector.
So, if I loaded all my content and runtimes etc. onto an external HD, and plugged it into a cheap Windows laptop, then pluged an external NVIDIA GPU into the laptop - I could render IRAY?
You should but you getting up there on the number of external conectors you need. You might also find it cheaper to buy a cheap desktop and a decent GPU at that point.
But wouldn't all those issues of adequate "power suply" and ventilation be solved by just haveing it in the housing for the external GPU? Or do those housings not have adequate fans and power suplies?
That's exactly why eGPU's are so useful: they have their own power suppply and ventilation, so you don't need to rebuild half your computer if you want to add a GPU it was not intended for. Beware on purchase though, some units sold as eGPU's do NOT come with a graphics card, but are only a case with ventilation, powersupply and the appropriate slot to insert a graphicscard. On top of that, your laptop or desktop or whatever you want to use it for will need a USB-3 port, for the higher data transfer speed. Some older rigs still have USB-2 instead of USB-3, so make sure you have the right one, they look similar at first glance.
How do I crash a car?I was following this thread with interest but had nothing to add.
Nice idea and looks good so far. Here are a few Tutorials I found:
D Former Tutorial- Screenshots
How to Use a Push Modifier: Creating a Blanket / Adjusting ...
Here is my short how-to for DFormers:
First thing I do with a dFomer is to parent the dFomer_Field to the dFomer_Base with drag&drop in the Scen pane. Its just easier to move them around all together with the universal translate tool gizmo. Then I translate the dFomer until the dots on the mesh are about where I want the deformation to be. Next I start to scale or tanslate the DFormer_Field for further adjustment, it can help to scale it up on one axis Y for vertical deformation and X for horizontal. If you start to scale or rotate the DFormer the placement of the DFormer_Base is used as the origin point.
If the default Shpere Influence Field deformation is not what you want you can open up the Tool Settings pane, switch the tool to Node Weight Map Brush, select the DFormer and press the button Add Map behind Unused Maps: Influence Weights. The initial weight map gets projected from the default sphere influence field. Now you can use the paint add/substract and smooth brush to define the weight map. Ofcourse you have to apply some transformation to the DFormer itself to see any effect.
Is almost like sculpting in 3D but better because you can always come back and manipulate the DFormer and the weight map. I've attached some screenshots and while doing I've discovered that I could add the SubD modifier to the pimitive plane and then I was able to paint the weight map on the subdivided vertices. First I coudn't belife my eyes for years now I paint weight maps on clothes without subdivision and if I do weight maps on figures I can only paint on the base mesh. When did they add this freature or why it dosn't work with figures is a mystery to me. See the attached screenshots maybe they can help.
On screenshot 10 I've added another DFormer. Then in Geometry Editor I've switched to Edge Selection mode and selected every second edge, then right-click select loop and so on. In the end I've got a zig-zag deformation that I painted irregularities ontop with the weight map brush. Later I've combined the mountain deformation of the other planes DFormer to the new plane with the DForm pane button Add Node where you can choose another DFormer in the scene to also have influence on more than one object.
Finaly you could "bake" the current deformation to a morph slider with the button Spawn Morph also found in the DForm pane. This should give you some ideas what is possible with DFormers and how you could further deform the car body.
Get Version 4 ! mcjHatsAreTheFashionOfTheDay : Fit Any Hair in Hats Pc/MacThat is an interesting idea. Do you mean I could change the position of the plane and run it again with a new morph name? I may try that.
Get Version 4 ! mcjHatsAreTheFashionOfTheDay : Fit Any Hair in Hats Pc/Maci didnt try it but for difficult cases you could change the name of the morph in the script's UI and add a second fit-morph
when you run the script a second time, if you leave the morph name as-is, you'll notice the script starts by zeroing the existing morph, then it creates the new one and sets its strength to 100%
if you change the morph-name, the existing fit-morph will be left at 100%
and the script will create a new morph that further fits the hair
I tried the deforce High Resolution (subD) Bang Bob hair again with the Romi Headcloth. That headcloth is very asymmetrical where it meets the head. However, I was able to get surprisingly good results. I dialed a couple headcloth morphs a little bit to get a slightly better fit around the head. I never could have achieved anything close to this without your collider and script. It is great! The latest version of the script handled changing the resolution to base and back to my selected resolution just fine. I was able to save the scene ane reopen it just fine, too.
Centaur 8 PredictionsThis was the sort of discussion I was hoping to spark. Nice and friendly!
I'll have to hunt down that morph transfer script. My main thing is I already have so many lovely Gen 8 ladies.
And if they did a Gen 9 this year... Yeah, I'd be one of those that stuck to gen 8. Unless it was a vast improvement AND came with all the clones for clothing. I totally get the whole "invested" thing. That's the primary reason I hesitate to grab the Centaur is because I'm already so heavily invested in gen 8. But hey, if I can transfer morphs...
For horse, I've got the HIvewire horse. I really liked the Fresian model. I have yet to explore whether or not the Daz Horse 2 stuff fits it.
One of my problems with PAs, and it was mentioned, is that they tend to build towards their own sense of style/vision. I feel as if I'm being shoehorned in creating *their* idea. I do like things I can kitbash, but somethings are difficult to do anything with other than the intended final result. There is a "Vampire Hunter" outfit that I liked the pants on, but when I took a closer look, it was sold as a one-piece outfit. Maybe top could be made transparent, maybe not, but I passed on the purchase because I didn't want to take the risk of not being able to use it for what I wanted it for.
I know rawart makes some nice stuff, but again, I've felt shoe-horned with some of the purchases. (And I'd really love an update to the Medusa hair so I can more easily apply it to a gen8.) I purchased the No Suit, and really wish it had better documentation. Can't figure out if it will actually work for what I want it for. Can't figure out how to apply skin mats to certain zones. Granted, I haven't put much time on it, but I still thought better documentation would go a long way. (And examples)
But that's true for many nifty PA tools/utilities/assets. I see that apparently I can load different base skins into skin builder 8, but I have yet to figure out HOW. (Just an example) So one thing Daz Original content generally has going for it is better documentation, or at least, better labels on things.
Anyway, there is a reason I spend good money on morph packs and converters. While there are a couple models I'll use as-is, (Rochelle is a doll) I like to customize to fit my vision of the character.
From what I can gather here, it looks like my best bet is to pick up C7 when it goes on sale again, and also keep an eye out on morphs for Genesis 3 male/female. And also pick up that morph transfer thing. Add to my shopping list, but I'm sure I'm not the only person looking at a wishlist of over 1,050+ items! I'd like to kitbash together an Orc Centaur, and I'd really love to figure out how to do an Andalite, though I'd think I'd need a deer morph of some kind to get the more elegant shape.
And while we're on the subject. Would really like a more graceful option for Unicorn, other than slapping a horn on a horse. In mythology they were described as having cloven hooves and a more graceful form. I just can't reconcile the current option with the more classic vision I want to use. : (
In the comic shared, yeah. That is a bit different because it's a dress that compliment the shape of the centaur. Those big hoop skirts work nicely, and I imagine there would be a cut-out for the hoop part to fit. I do think it would look nice if it had an expanse of fabric draped over the horse half, though. Being hand-drawn, the artist can reshape things so it looks "right." whereas the dress options I've seen for C7 just look wrong. Then again, it would be nice to have something to cover up the transition area. Maybe there are some wide belts I could use for the same purpose. (Or I suppose I just put on a full shirt instead of skimpy bikini top.)
I've been building a tabletop RPG, and that becomes my main reason for wanting centaurs. I want to incorporate them into one of the settings I'm designing. I'd love to do my own art. Glad we've got this discussion going, as I'm having a blast AND learning things.
Saphirewild's Randomness RendersNot sure everyone knows yet but I am working on some new characters with the help of Dracorn's amazing tutorials
I will be posting most of them over in this THREAD which is the thread I am learning all the details on how to morph and reskin characters etc......
But some will end up here as WIP or Final renders!
Like this one here is a final render with my new character Soshi Yan!
Titled: Another Escape Plan
Daz 3D is part of

Connect
DAZ Productions, Inc.
7533 S Center View Ct #4664
West Jordan, UT 84084Licensing Agreement | Terms of Service | Privacy Policy | EULA
© 2026 Daz Productions Inc. All Rights Reserved.