-
Loading morphs into Daz from another 3d program - trouble shooting glitch
Did you check Reverse Deformations when you imported your morph, with the pose still applied that you hd on export? Did you use the same preset in the OBJ export dialogue and the morph import dialogue?
Loading morphs into Daz from another 3d program - trouble shooting glitchI just used Morph Loader Pro to import a modification I made to the hand pose in Zbrush but the morph isn't working as I expected and is giving me a reeeeaaally weird glitch morph.
I don't have Zbrush and Daz on the same computer so I followed these steps:
1) Daz set figure to base mesh resolution
2) Daz set figure subD to 0
3) Export obj
4) Opened in Zbrush, made sweet freaking morph, and exported the obj
5) Used morph loader pro to import morph to Daz
6) carfully adjusted sliders
As you can see from the attachements, the morph is just on the hand positioning, but in Daz the whole arms are being affected. What am I doing wrong?
Welcome to Hatsune Miku Anime Manga Cafe ☕
Original character Sorenda
Base Aiko 3, Kioki Morph
Is there a fast and easy way to join 2 surfaces so they can share the same tiled texture?I noticed sometimes there is a red circle and I can select a single face, but sometimes there is no red circle and I can select only through right click which does not have an option for single face selection. Right now I want to turn part of an internal wall into separate surface to make an emission light from it but the single face selecion doesn't work. How I can create new surface from several adjacent polygon?
Are ypou sure there isn't soemthing in the way, and that you have the basic model selected in the Scene?
You mean the model, part of which is the polygon I want to select?
Yes.
Also is there a way to transfer only 1-2 icons from Tool Settings - Active Tool dropdown menu to the toolbar?
Only if they have actions listed in the elft-hand part of Window>Workspace>Customise - in which case you can drag them into the desired tool bar in the tab on the right of the dialogue.
I saw they all are listed in the right part under the Tools tab but are disactivated. Can I delete all the icons I don't want to appear (for now) and then activate them?
If they are there you can just drag them into a tool bar - click the tab on the right fro Tool Bars, expand the one you want, and drag the commands of interest across.
Is there a fast and easy way to join 2 surfaces so they can share the same tiled texture?I noticed sometimes there is a red circle and I can select a single face, but sometimes there is no red circle and I can select only through right click which does not have an option for single face selection. Right now I want to turn part of an internal wall into separate surface to make an emission light from it but the single face selecion doesn't work. How I can create new surface from several adjacent polygon?
Are ypou sure there isn't soemthing in the way, and that you have the basic model selected in the Scene?
You mean the model, part of which is the polygon I want to select?
Also is there a way to transfer only 1-2 icons from Tool Settings - Active Tool dropdown menu to the toolbar?
Only if they have actions listed in the elft-hand part of Window>Workspace>Customise - in which case you can drag them into the desired tool bar in the tab on the right of the dialogue.
I saw they all are listed in the right part under the Tools tab but are disactivated. Can I delete all the icons I don't want to appear (for now) and then activate them?
Is there a fast and easy way to join 2 surfaces so they can share the same tiled texture?I noticed sometimes there is a red circle and I can select a single face, but sometimes there is no red circle and I can select only through right click which does not have an option for single face selection. Right now I want to turn part of an internal wall into separate surface to make an emission light from it but the single face selecion doesn't work. How I can create new surface from several adjacent polygon?
Are ypou sure there isn't soemthing in the way, and that you have the basic model selected in the Scene?
Also is there a way to transfer only 1-2 icons from Tool Settings - Active Tool dropdown menu to the toolbar?
Only if they have actions listed in the elft-hand part of Window>Workspace>Customise - in which case you can drag them into the desired tool bar in the tab on the right of the dialogue.
Converting Carrara hair to polygon hair for other packages ?would love to use modas cuts on G3 or Aiko 3. there's a few hairs only works on V4 geometry. a way to transfer the hair groups to a disembodied hair cap?
those use haircaps and I have used them on your Carraractors
Is there a fast and easy way to join 2 surfaces so they can share the same tiled texture?I noticed sometimes there is a red circle and I can select a single face, but sometimes there is no red circle and I can select only through right click which does not have an option for single face selection. Right now I want to turn part of an internal wall into separate surface to make an emission light from it but the single face selecion doesn't work. How I can create new surface from several adjacent polygon?
Also is there a way to transfer only 1-2 icons from Tool Settings - Active Tool dropdown menu to the toolbar?
Show Us Your Iray Renders. Part VIIBecause I'm contrary, decided to make a male render of Bastet.
(Used Genesis 8 Male clone, used Morph Rigger to get it to pose properly)
Converting Carrara hair to polygon hair for other packages ?would love to use modas cuts on G3 or Aiko 3. there's a few hairs only works on V4 geometry. a way to transfer the hair groups to a disembodied hair cap?
long, straight hairThanks for the suggestions. I already have both the alice and the drop wet hair. The alice hair is closer to the look I'm after, but the crown is a bit too tall (to my eye) to be realistic and it doesn't quite drape correctly. (What do you mean, OCD? Moi?)
Classic long hair looks interesting, but at 5 min for the simulation on a 1080Ti, I'll probably be dead before it finishs on my (10 year old Core2 duo) laptop.


Dformers aren't hard to use. They just take some time to position where you want them. Start by adding a Dformer to the hair. Then, select the "field" and start moving and scaling it via transforms to get it about where the reddest portion covers most of the crown. Then select the actual Dformer parented to the base and use the transforms to lower the crown. If it is affecting the rest of the hair too much, go back to the field and start modifying the scale and or position. Once you've got it all looking like you want, go back to the Dformer menu and save your new morph...something like Alice Hair Low Crown. From that point on, you'll be able to morph the crown anytime you use the Alice hair.
Copy partially morphsFrom a single morph, or trying to separate the ehad morphs from the body morphs in a shape made from multiple morphs?
Post Your Renders like it's the year 2020!!!Beach Buddies
bought the beach buggy then hacked away to make it RH drive..


Ireally a
Stezza - I really appreciate the subsequent explanation. I am always amazed at the combination of quality and quantity of your renders. I don't think my computer could render that fast even if I had the creativity to build the scenes non-stop. Wow. I forget, is scooby a morph of the hivewire dog, or is he one of your many wacky models? Either way, very expressive!
Transferring Facial Morphs to Maya using the Automated Tools | How?Hey, does anyone know how to successfully take G8 facial morphs into Maya with the various Maya scripts / tools that exist like G8 for Maya and 3dtoAll ... neither of these scripts that automate the process seem to successfully transfer the face morphs .. im guessing the faces morphs in Daz are controlled by bones? .. given every other useless body morph does transfer over into the shape editor lol
Thanks
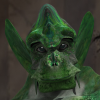
DavidAncient Bastet for genesis 8 Females [commercial]Ancient Bastet
https://www.daz3d.com/ancient-bastet-for-genesis-8-female
Whether Ancient Gods or Ancient Aliens, the mysteries of Egypt return again with Bastet, the cat headed Goddess.
The set comes complete with custom crafted High Definition Morphs, and Highly detailed Textures for the utmost realism.
- Product Includes
- One Bastet Character Preset
- One Bastet Full Body HD Morph
- One Bastet Shaping Preset
- Two Bastet Full Body Material Presets including anatomical elements
- Four Face Material Presets
- Four eye Material Presets
- Includes both Iray and 3Delight Material Presets


 Morphs from G3 to G8
But did we really need the extreme morphs like old 3D Universe figures ?
I don't complain, just I'm curious to know if the DAZ core figures (and their addons) would be enough as a start point and maybe, if there are a lot of requests, to add later the possibility to convert the extreme characters like RawArt's products.
As others said, this depends on who "we" are. I'm just not willing to say the tool does the job when it only does half. Better to simply remove the ability to do that job and work on it some other time.
I don't think saying it supports the core figures would be kosher, or advisable. One of the 3DU morphs it fails on is not a toon. Just skinny. Which means I can't certify that it will work on all non-"extreme" morphs (allowing, as was stated, that extreme is in the eye of the beholder).
Without being rude that project is almost 2 years old.
I mean the time is running fast.
Question:
What will happen when Genesis 9 will be released ? Will the development include it too ??? I mean the development may never end if a new generation is released every 2 years.
This project is considerably less than 2 years old. It just feels like it's not. I wrote an early script some 2 or three months after G8 dropped. It reached stable (but still wrong) capacity right as G8M came out. I started work on a companion script to move figures between G8Ms, and pondered doing a cross figure capable script. Then I noted small addition to the script API documentation (or possibly an extension of the API). This presented the opportunity to automate much faster, with a smaller script (the current script is less than 2000 lines, the previous scripts was about 20,000 lines). I wrote a proof of concept about that time.
At this point, my life basically imploded. I took a good few months off. But I came back to it, and started to tackle the issues in earnest last summer.
The thread is 2 years old, but this work on the script is not.I suspect Genesis 9 will be not particularly difficult, given the current status of the script. One assumes this will be finished before that happens, but as I am not (and won't be, very likely) a vendor who gets early access, one can't expect G9 support to drop instantly. Given that I am homeless, I would expect support to come along about the time G9M comes out. I've reasons for saying this based on today's work.
Until DAZ makes it easier to transfer morphs from one generation to another, this probably would be a continuous project (at least once it comes out. I’m just wondering if it can be open source so it can become easier to work on)
If I open the source, I won't be able to sell it (it's really just a clever exploit). I've said I will make it available as source code and supporting data in the event that I am convinced it will never reach saleable quality. I definitely underestimated the difficulty of transferring beyond G3/8. That's my bad, as far as the delays go. OTOH, everything I said is true. The principles I was using didn't really change until I realized they were going to generate horrible results with G1. And, the fix I've come up with, while not really working right on G1 also didn't work right on G3. But I failed in such a way that it told me how to fix it, and now G8F<>G3F is a going thing, again. Much more accurate and should work on any morph, rather than having the shoulders break down when the scaling is in the morph deltas and not the figure scale control (where Daz wants it).
It was a minor pain in the buttocks to do it, but it only took about an hour and half to do it and track down the remaining issues. I've only done three tests (Two "extreme," one not) but they were all morphs that had caused problems before. The results are excellent. Because it took so little time, I have gone back to looking at G1 (I basically gave myself the next 3 days to do what I did this morning {yesterday I spend banging my head against G1, exhausting all of the ideas I'd come up with while walking back to the shelter, after announcing I wasn't working on G1 [and nesting parentheticals]}, so I have some time). I proceeded to waste today by adding all of the newly generated data to the wrong file and wondering why the tests were failing to generate the results I wanted. But, in my defense, my new prescription seems to have failure point at just exactly laptop distance, and reading glasses don't seem to work when I test them in the store. So, I wasn't seeing that I was editing the backup copy.And I just finished the first good test after doing all that. It's working. (It might not be working well. I seem to need to gather the data in different ways to get a solid result, but like I said, gathering G3<>G8 only took 90 minutes. It is working. Finally.)
At this point I'm going work on and save what I've got, today, then go to G8F>G3F (right now it only works G3>G8, but it should be just a matter of inverting that data. I just need to write script to do that {For those who feel much fear for long delays, most of the issues I have involve writing a script to solve. I've gone from "I hate to code, and refuse to do it," to "I hate to code, but if I write a script, it'll save a lot of time." [I don't intend to nest this aside as deeply as I did before ... Damnit!]}). After that, it's "and so on" until I have all of the G3<>G8 combo moves mastered. Then I'll go back to G1 and examine further to see if there are more difficut surprises. If so, I'll strip G2 and G1, and release the final beta (Really, baring some tester really showing a fault. All of the things I wanted to "fix" no longer apply with the newest method. It's just a matter of cleaning and idiot proofing the UI). If not, I'll go ahead and finish G1/2 support.Nice to see progresses and some relief for your situation!

No need to rush, just make it work fine with Genesis1 and I'll surely buy it!
aiko 4The easiest way to get Aiko 4 loaded is to simply load the Aiko 4 .cr2 file, available under the Poser Formats part of your Content Library tab: Figures > DAZ People > Aiko 4. That will load both V4 and Aiko at once, with the Aiko 4 head and body morphs already applied. All V4 morphs and additional Aiko 4 morphs will also be available under the Parameters tab with the figure selected in the scene. Textures will need to be added separately.
If you have not done so, I would advise installing the Powerloader which is available for V4 from your DAZ3D Product Library. The Power loader initializes V4 to accept additional morphs and will provide a pop-up window whenever V4 is loaded withoptions to select any additional morphs for the figure that you may have (including Aiko 4) Checkboxes allow you to choose what you want loaded.
There is a third way, although with the other two available it usually wouldn't be needed. I suppose if you had V4 loaded without the Aiko 4 morphs, then decided that you wished to add them, you can do that too. You can inject the Aiko 4 .pz2 file with V4 selected in the scene, which is again found under the Poser Formats part of your Content Library tab. Go to Pose > DAZ's Victoria 4 > Morph Injections > INJ Aiko V4. That will add Aiko 4 morph sliders to V4, but will not dial them in. To apply them, you must find them under the Parameters tab and adjust the appropriate sliders. The A4 body morphs can be found under the Parameters tab with V4 selected (root node) under Morphs | Shapes > Aiko 4. For the head morphs, you must select V4's head in the scene, then the A4 sliders can be found under the head. Again they are under Morphs | Shapes > Aiko 4.
Need a 3D artist to create a photo of a realistic character G3Final thing is the likeness shown above in FG will not be as good once exported to DAZ Stdio as a morph.
But the FG creates a morph of the head. There are methods to improve the similarity with a photo?
Yes, because DAZ Studio Genesis models purposely try to keep polygons so low the number of polygons available for facial detail when exported to DAZ Studio are also limited so not all the details in FG can be translated to the Genesis facial polygons. That FG morph still makes a great starting point. My FaceGen Obj with textures in FaceGen almost always look spot on when in FaceGen but exported to DAZ Studio they usually loose quite a bit of that detail.
To get the likeness even better you need to create bump, normal, displacement and even Dual Lobe in the Surfaces (for the particular oil/sweat gland of an individual) maps to match the person you are creating a likeness of. It's not a lot of detail that will be missing so don't go overboard. You are lucky in the fellow you are making a likeness is very distictive individual.
The alternative to that is to export the DS character with the morph applied to an external modeling app and modeling the missing detail but really unless you are already expert human 3D modelers it's doubtful you will improve upon's FaceGen's results. Still though if you have interest in learning that there is a good starting point for you.
Unreal Engine rolls out Real Time Ray TracingIt is now officially here, ray tracing in video games (aside from 2 commercial releases). Now anybody using Unreal 4.22 Preview can work ray tracing into their projects. But there is much more to this update than simply ray tracing. Every time I mention video game engines can be the future of rendering, the instant retort I see is "But game engines take short cuts!" Ok then, how about looking at just what Unreal Engine can do right now, today? Here is a list of features being rolled out with 4.22.
Rendering Updates:
- Real-Time Ray Tracing and Path Tracing (Early Access)
- Added ray tracing low level support.
- Implemented a low level layer on top of UE DirectX 12 that provides support for DXR and allows creating and using ray tracing shaders (ray generation shaders, hit shaders, etc) to add ray tracing effects.
- Added high-level ray tracing features
- Rect area lights
- Soft shadows
- Reflections
- Reflected shadows
- Ambient occlusion
- RTGI (ray traced global illumination)
- Translucency
- Clearcoat
- IBL
- Sky
- Geometry types
- Triangle meshes
- Static
- Skeletal (Morph targets & Skin cache)
- Niagara particles support
- Triangle meshes
- Texture LOD
- Denoiser
- Shadows, Reflections, AO
- Path Tracert
- Unbiased, full GI path tracer for making ground truth reference renders inside UE4.
- Added ray tracing low level support.
- Runtime Render Graph API
- Preview of the upcoming Render Graph API, only a small portion of the renderer has been converted.
The full update list can be found here:
So...unbiased, full GI path tracing in a video game engine! As the bullet point implies, this mode is not quite real time ray tracing. But this means you can crank everything up and use this mode for still images. I wonder how fast it is?
In case you are wondering, sub surface scattering is already available in Unreal.
Is there anybody out there who exported Daz models to Unreal and tried the new preview in unbiased mode?
Carrara Challenge 45: Extinction and De-extinction! Less than two days to go!Forgot to add
- Bunyip, love the latest robot image. Think I might have lamb chops for dinner.
- Stezza, the dodo morph is brilliant. great movement and exprssion on the scientist. Another classic.
- Headwax, thanks for the suggestions regarding the DNA helix. Maybe that idea can be salvaged.
Thanks.
Lamb chops with mint sauce, honey carrots, snow-peas, & garlic mashed potato - yummy !!!!
Daz 3D is part of

Connect
DAZ Productions, Inc.
7533 S Center View Ct #4664
West Jordan, UT 84084Licensing Agreement | Terms of Service | Privacy Policy | EULA
© 2026 Daz Productions Inc. All Rights Reserved.