-
MRL dForce Long Hair morph location?
Hello, I purchased MRL dForce Long Hair but when I load it up I don't see the advertised morphs (hair back, narrow, shorter, etc.).
I'm looking under the parameters and shaping lists of both figures that appear when this product is loaded into the scene. Should I be looking somewhere else?
The new Centaur 'n stuff thread - reloadedYes the duf morph is able to be redistributed
just set up a matching data folder structure with the dsf in it
The new Centaur 'n stuff thread - reloadedUhm ... I this one is very outdated (DS 4.6), used Dawn and I never uploaded it on Sharecg ... but maybe it still works?
http://www.mediafire.com/file/w31lg0rpmdr5ogc/PMDInjectionToDazStudioMorphMorphLoaderPro.pdf
Thank you for your ssistance, but I think I found a workflow.
I tried opening the Poser cr2 with the morph applied in Studio (only the horse). Then I switched it to Triax Weight mapping. I loaded the DS version of Harry, switched it to base resolution and tried to transfer the morph with the transfer utility (only the morph). But then Studio crashed every time I tried.
So I exported the shape of the cr2 horse as OBJ with DAZ scaling and used this with morph loader pro on the DAZ version. This worked! If I save the morph as asset, it can be distributed, right?
Proof of concept, V4 left, G8 right:
Celebrity Look-a-Likes for 3D figures Part 2Keep in mind, I am guessing here. So don't take my word as gospel. However, I do fancy myself knowledgeable in celebrity faces.
I googled her before I posted. The moles either side of her nose are an exact match so you are indeed spot on as far as I'm concerned.
Yeah, it's the moles that I noticed as well. Though, the nose is a big miss. Maybe MDC based his morph off of images of Blake Lively before she had work done to her nose.
Default genesis load corrupted?Hey,
I'm currently using DS4.11? (The most recent version after it was suggested I update) and using Genesis 1. Everything was working fine after the update. I only noticed the weird non-default Genesis character last night. Tried to dl an uncorrupted version but had no luck so decided to ask here.
As to the morphs, it's a mixture of different ones. Like I have .50 of Aiko 5 for the entire body, some elf-ear morph (Lorelie? or something) bits and pieces of others and a really weird scale thing going on. (The head is scaled to .18%) and I swear the feet are bigger than they should be despite it saying nothing is different.
Would I still take a look at the dsf's? Or something else?
Before following any of the procedures lined out below, create a backup, or have the original installers handy to try again if something breaks.
First, check the Aiko 5 morph dial. Click the gear icon.
the first thing to check here is if the default is set to zero, the secon is if there is a controller dial causing the issue.
If default is zero that's a good thing, if it's default is other than zero, it could get fun trying to figure out what is changing it.
The next thing to check is the Controller tab, see if anything is listed there, if there is, that's probably the dial that's causing the issue.
Goto the particular dial and check if the default is zero on that dial, if not, set it to zero, both the dial and the default parameter, make sure everything else is zero, except scale that should be 100%, and update the dsf. File>save as>support asset>Save modified asset.
Make sure that the only items listed are the base genesis dsf and the particular dial, and hit save.
I Forgot What My Complaint Was - Complaint ThreadApparently, Vore is the way to get lots of views on Deviant Art.
I'm going need a morph for bigger tongues, an esophogus set, and a stomach set.
You should visit Renderotica then.
I had to go there for armpit hair. My own won't work in Studio.I would go to Renderoitica but they have stuff not safe for work. Basically it has stuff that if I am seen looking at would give the wrong impression of what I am up to I guess. I know it has useful stuff but that is not all it has. I am still trying to figure out how to texture a human 3D model with artistic photos of nudes that I have permission to use in that way. (I bought them with that license.) I am not sure how I can explain away renderotica with their poses and stuff that is related to that stuff.
I Forgot What My Complaint Was - Complaint ThreadApparently, Vore is the way to get lots of views on Deviant Art.
I'm going need a morph for bigger tongues, an esophogus set, and a stomach set.
You should visit Renderotica then.
I had to go there for armpit hair. My own won't work in Studio.Default genesis load corrupted?Either you have downloaded a custom character (dial spun or custom morph) and it's default value isn't set to zero, or you have somehow managed to overwrite some of your morph assets which has changed their default value.
Couple of my friends do the second one pretty regularly (at least once a month), still have no idea how the hell they do it (and neither do they).
I have no choice but to make my own HD morphs, so how do I do it? I have zbrush.Thanks for sharing. The render though doesn't really show properly where the torso & head seams meet.I do also have a test render of Olympia 7's HD details on G8F, which may possibly illustrate those areas better, although it's not rendered to very high quality. This does at least illustrate the chin and shoulder seam areas. While there are a few creases in those areas, they are true to the HD morph, and don't correlate to the seams on between materials.
(This is not however on Olympia's SD shape, so the HD details don't really match the morph and it may look a little odd in places).

Because they're simultaneously baked from the HD morphs, the displacement maps are consistent across all zones, so as long as they use the same displacement parameters, the displacements on those materials will match.
Many of the bump maps I find unnatural looking for skin textures on certain zones of the body. Will check it out, but am guessing from all my test renders so far, will continue to minimize or stay away from normal & bump maps.In this case, the bump map is made directly from the HD morph; although they work in different fashions, bump and displacement maps both use a height map format along the normal vectors of the face, so the actual input data is interchangeable.
The difference here is that you're just trading normals caused by tesselation of the surface for one calculated at the incidence phase, so while there is a slight difference in where the final surface is along the base mesh's normal, the final normals correlating to any given point on the UV map can be exactly the same if correctly configured. As this trade-off reduces issues with mesh clipping while preserving the same apparent surface contours, it's a reasonable compromise.
If you ever do a HQ render @4k with the 2 characters side by side and showing the skin details, would love to see it. (4k so a person can zoom in and pan through)
My hardware really isn't up to 4K rendering, I'm afraid. I'm either on a slightly old ultrabook, or a compact desktop that relies on half-height graphics cards*.
* Although it does have the blessing that other than limited space, it does still use proper desktop hardware, rather than being one of those compact desktops that's really a laptop in disguise. (And although the CPU is now a few generations old, it is nearly the top of said generation, so it holds up reasonably well).
How do I move my content to another drive?For some content I used the Install Manager, other items were downloaded from within Daz Studio. Do those count as the same thing?
No. Not the same thing.
It just means more steps in the process.
I'm going to create a step-by-step for you. It will take a bit of time, but should be posted later today.
I'm doing the same as winduptoy, and I have several hundred non-DAZ items (Rendo, etc.).
What do I need to do with them? I assume DIM won't transfer them.
I'd hate to have to reinstall them manually, hunt them down, create new products in the Content Library, etc.
Could I just copy the DAZ 3D Library from the C drive and paste it onto the D drive? (In my case, F)
And, since the new drive is a large SSD, should I move Studio to it for speed?July, 2019 - Daz 3D New User Challenge - Portrait RenderingThis is a custom-morphed character combining several models and using rarestone’s head morphs, and the shapeshifter morph package.
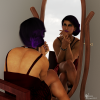
(There's supposed to be 2 images, but only 1 will upload right now for some reason) I chose to go a bit non-traditional as far as “rules” for portraits go. So here’s some of the stuff I broke: Both my images are wider angled rather than a traditional portrait crop. I instead used the environment, architectural lines and light/shadow to frame the figure as best I could. In the second image, the body and outfit are very important to the overall image so I did not want it cropped off. There’s an assortment of lights in the lighting setup I put together but for the first image I intentionally used a very non-traditional approach for the key light… aiming from a lower angle pointed upwards normally will give an unnatural “creep” factor to a figure’s face, but I did it in a way that I intended for it to add interest to the look of the character and some edge to her overall look and expression.
I also tested the images with DOF, and having the room’s background and cityscape blurred actually detracted from the overall feel of the portrait imo. Even though DOF often does, it really didn’t enhance the focus on the figure in this case. Wondering if there were any thoughts on this and if others see problems with how I went about composing these 2 portraits.
Even though I can’t think of anything that hasn’t already been mentioned, I will try to keep up and offer whatever constructive criticism I can offer to others in this challenge. Thanks very much for any feedback.
There is nothing wrong with breaking the "rules".
I think the choice of red hair is a good one. It really draws the eye away from the bright cityscape on the right to her face. I find myself drawn to that one eye that is visible.
I think the lip rings need to be adjusted slightly? They are right on the edge of her lip at the bottom and I think should be just below the lip's edge. I found this image after a quick Google search.
Great start.
Auto_adapted...Can I delete these safely?If it was just Poser content then probably as you could just load them back in again.
However it's not just Poser content that gets saved into there, anything you might have used Autofit on and saved as a scene/subset/wearable will also be in there, same goes for the Transfer Utility.
Basically anything that doesn't come as DUF/DSF will end up in there when you save it as a scene/subset.
Default genesis load corrupted?Hey,
I'm currently using DS4.11? (The most recent version after it was suggested I update) and using Genesis 1. Everything was working fine after the update. I only noticed the weird non-default Genesis character last night. Tried to dl an uncorrupted version but had no luck so decided to ask here.
As to the morphs, it's a mixture of different ones. Like I have .50 of Aiko 5 for the entire body, some elf-ear morph (Lorelie? or something) bits and pieces of others and a really weird scale thing going on. (The head is scaled to .18%) and I swear the feet are bigger than they should be despite it saying nothing is different.
Would I still take a look at the dsf's? Or something else?
Default genesis load corrupted?What's the morph causing the issue?
what version of DS are you using?
And which genesis, 1,2,3,8, are you using?
If you've updated the version of DS or Genesis it might be causing the error.
If you're adventurous you could check the dsf associated with the morph dial causing the error.
Default genesis load corrupted?Ok, so this is a recent development I've encountered.
I load a new scene and click the default Genesis model but it loads with some foreign morph already shaping my character. I have to manually go in to the parametres and zero the figure to get it to the actual default shape. I have no idea why it does this, the morph it loads isn't even a dialled one. I have since reinstalled the Genesis model but it still loads with this odd shape.
It wasn't doing this a few weeks ago and I have no idea what I've done to alter this.
Any suggestions on why? Or how to correct this, please?
July, 2019 - Daz 3D New User Challenge - Portrait RenderingSince I somehow triggered you to enter the challenge, I feel I have to leave a comment on your image (first one, can’t see the 2nd) as well ;) Great portrait overall, I can just share some observations on mostly details:
I really like the custom character morph and the colors in the image. Although you said, that you didn’t like the DOF, I still think at least a tiny blur on the buildings in the background could improve it.
Regarding the cropping, try to place the character in the left 3rd of the image (no need to break all rules at once ;) ). Maybe even reduce the height by cutting more from her chest, but leave some space for the bones. Overall it could be more calm if you cut away the orange light on the left (although by itself it looks beautiful and it adds to the colors, so up to you what you like better)
The hair strands, especially on the right side, look very transparent. You could try doubling the hair and applying slightly different morphs to gain more volume (or maybe just increase the opacity)
Her eyes look a bit flat, but eyes are always hard to get great. Did you dial in the cornea bulge? Do you have an Iris concave morph? Setting thinwalled off for cornea and eye moisture surfaces might help a bit, too, but increases rendertime.
The sky seems a bit bright for the evening/nighttime setting, but color wise the blue fits beautiful. Not sure if I would change it, probably try darkening it a little.
The light box in front of the window is floating above the floor.
Tiny detail: The bottom part of her piercing goes directly in the lip, probably it should pierce the skin slightly below the lower lip.
[Released] RSSY Hair Converter from Victoria 4 to Genesis 8 Female [Commercial]Do you have show hidden properties checked?
Thanks carrie58 ! That did the trick. At least for 2 out of 3 hair files I have tested.
It seems like not all morphs are transferred. I also think they shouldn't be in the "hidden" section at all.. My old eyes hate reading grey on grey.
The authorship information is alright.
It's a pity as I am a big fan of the RSSY converters and I was really waiting for this one... sigh...
The script is telling the Transfer Utility to transfer ALL morphs so I am unsure what I can do about this one.
Don't know if it is related but I was using M4 Midnight Hunter the other night and I found I had to turn off limits and really yank up the numbers before seeing any movement in the back flap of the trench coat - or any of the transfered morphs. Maybe the morphs need to be x10 or x100 strength to see the movement that the original has? And maybe the morphs are there but only appear to be not working. (Don't like the Grey on Grey either but nothig you can do about that)
I don't know.
 @zzspriest, which item are you not seeing the morphs?
It is the Christine Hair, a DAZ Original.
Darn, I don't have that one. I have wishlisted it to get it when it is on sale and test it.
Did some research. Looks like whether the morphs are converted properly or not depends on where they are placed in the original file.
For example :
- Laurel hair or Reby hair : Morphs are located under "head" - this converts perfect, the morphs are visible under "head" in the converted file. And work great.
- Christine hair, Melody hair : Morphs are located under "neck". They appear in the converted file as "hidden property"..
- any hr2 hair : No original morphs are transferred at all. Only the converter morphs are there.
I have not checked my whole library but for the ones I tried followed the above.
Interesting. This is definitely not the behavior I am seeing (though I don't have Christine or Melody hair). For those hairs, if you change the path to under head, does that help?
Well... I managed to move the morphs of the original file so they come out in DAZ under "head" instead of the "neck", Converted this one - and it worked ! Morphs are transferred and perfectly visible and they work as they should. I'm not a computer guy and sure these things are way more complicated but I have the feeling that the converter sometimes doesn't know where to show the transferred morphs. The only converter child is "head" and if the original was placed somewhere else (neck) the morphs come out hidden, Or are not transferred at all if it was a hr2 file. I suppose in the end it is just one checked box somewhere in DAZ Studio that will make everything work just fine.
Interesting that it worked. Could you detail what you did for others?
July, 2019 - Daz 3D New User Challenge - Portrait RenderingThis is a custom-morphed character combining several models and using rarestone’s head morphs, and the shapeshifter morph package.
(There's supposed to be 2 images, but only 1 will upload right now for some reason) I chose to go a bit non-traditional as far as “rules” for portraits go. So here’s some of the stuff I broke: Both my images are wider angled rather than a traditional portrait crop. I instead used the environment, architectural lines and light/shadow to frame the figure as best I could. In the second image, the body and outfit are very important to the overall image so I did not want it cropped off. There’s an assortment of lights in the lighting setup I put together but for the first image I intentionally used a very non-traditional approach for the key light… aiming from a lower angle pointed upwards normally will give an unnatural “creep” factor to a figure’s face, but I did it in a way that I intended for it to add interest to the look of the character and some edge to her overall look and expression.
I also tested the images with DOF, and having the room’s background and cityscape blurred actually detracted from the overall feel of the portrait imo. Even though DOF often does, it really didn’t enhance the focus on the figure in this case. Wondering if there were any thoughts on this and if others see problems with how I went about composing these 2 portraits.
Even though I can’t think of anything that hasn’t already been mentioned, I will try to keep up and offer whatever constructive criticism I can offer to others in this challenge. Thanks very much for any feedback.
Darwins' Schtuff Pt DeuxI hope your family vist went well! Looking forward to seeing the morph pack in the store

Trish
I have no choice but to make my own HD morphs, so how do I do it? I have zbrush.Yes.
This is the only picture I currently have access to (I'm away from home at the moment),
Thanks for sharing. The render though doesn't really show properly where the torso & head seams meet. Hair obstructs forehead seam and under jaw is not visible due to angle. And with my test found the seams only in a full sunlight and using iray live preview as I panned around the character. They didn't show in several light situations or from several angles. But still very interesting possibility that you present.
The main issue with converting to a displacement rather than an HD morph is that the displacements only apply at the rendering stage, so they can't be taken into account in collisions, which does make them more liable to have issues with mesh clipping.
Mmmm, that sounds problematic. Will have to test that. That's a potentially big negative.
However, displacement maps are also compatible with the bump map parameter,
Many of the bump maps I find unnatural looking for skin textures on certain zones of the body. Will check it out, but am guessing from all my test renders so far, will continue to minimize or stay away from normal & bump maps. Thanks to a quality Belladzine's product where there was something incomplete (minor bug) think maybe I found a better way
 . Will test when I get time again.
so it is possible to partially apply the results as bump maps rather than entirely as displacements, so reducing the positive displacement slightly and dialling some of it in on the bump map channel reaches a compromise where you get to keep most of the detail in the silhouette but with much the same look otherwise and no need to slap adjustment modifiers on everything.
Also do you have a sample file of your HD morph to displacement? Would love to see it.Not one I can share; the files obviously contain Daz morph data, and while the Daz licence covers me for the personal modification of assets, I'd be breaching the terms if I shared the Blend files or final displacement maps with anyone else.
If you ever do a HQ render @4k with the 2 characters side by side and showing the skin details, would love to see it. (4k so a person can zoom in and pan through)
Well a few pixels would be enough. Actually, if the displ. map is correctly made, based on a mid gray value, there should be no need to use maps for the other zones. I use 3DL and use displacement maps on pretty much every character I create. Well 3DL uses micro displacement so it doesn't handle it the same way as Iray, so not sure if there's a difference. Anyway, I've found that displacement is not properly calibrated. Don't know if it's a DS issue or a 3DL issue, though. When using that midgray map that should equal zero displacement I actually use a min value of -1.01 with a max value of 1:) With those values I can use a map for the torso only with no visible seams even at high strenght. Granted, if you insert graymaps for the other mat zones there should be no issues.
Thanks Sven for input. Will try adding a mid-grey to the head/neck transition. Honestly am cynical that it will work with only a few pixels. But guesses based on experince can be wrong. So I will test when I get time again. Will be a while before i can get that in depth again Did find that the arm and leg displacement maps matched well with the torso. But if what Matt says about collision is right, that could add additional issues with clothing and so on.
Seems would be much simpler if Daz let me buy the HD-addon techno for a fair price.
Daz 3D is part of

Connect
DAZ Productions, Inc.
7533 S Center View Ct #4664
West Jordan, UT 84084Licensing Agreement | Terms of Service | Privacy Policy | EULA
© 2026 Daz Productions Inc. All Rights Reserved.