-
[Released] Character Converter from Genesis 3 Female to Genesis 8 Female(Now Conv JCMs) [Commercial]
That to me looks like an issueof texture try applying G8's eye textureoops my bad you already did that ....well fudge.....
Yeah, I noticed someone else a couple pages back converted Ophelia 7 and I saw the same thing with the eyes, and come to think of it, it also shows the same wonky pupil shape in the script's .pdf guide...so I'm beginning to think it's a limitation that I either have to accept or just stay with these characters on G3.
It is a limitation of the conversion. I wish the conversions were perfect, but aside from pushing the tolerance extremely low and the textures (both of which you have already done), there is not much more to do. And please return it if this is a deal breaker for you.
Thank you for confirming, so I know I'm not doing something wrong!
Here's the funny thing - I did try converting the same character via Sickleyield's manual process (the one on DeviantArt)...and her face came out looking pretty much the same as when I used your script...short of the eyes. The irises stayed round. But the body was all sorts of wonky. I wonder if I can combine the two processes and have your script handle the body and the manual steps handle the head, each separated using X-Tools. It sounds really roundabout and tedious, but it's something to try.
Hmmm. That is strange. SY's process was a lot of what I do. Did you use her process when she used the "transfer eyeballs sideways" method or after she switched to using the tolerance?
I'm not sure, lol. It was this one - https://www.deviantart.com/sickleyield/journal/Tutorial-Transferring-Character-Morphs-G1G2G3G8-409437916 *edit* Oh, that was before she added the 2019 update part, so it was before using the tolerance function. But the body didn't transfer right, so I used X-Tools to separate and use just the head.
Ok, I *think* I figured out the old method that SY did. However, it does not do as well as I hoped. It makes rounder eyes except for one area, but it does seem to depend on the tolerance. I might add it as an option. What do you think?
Tolerance Only (0.06)
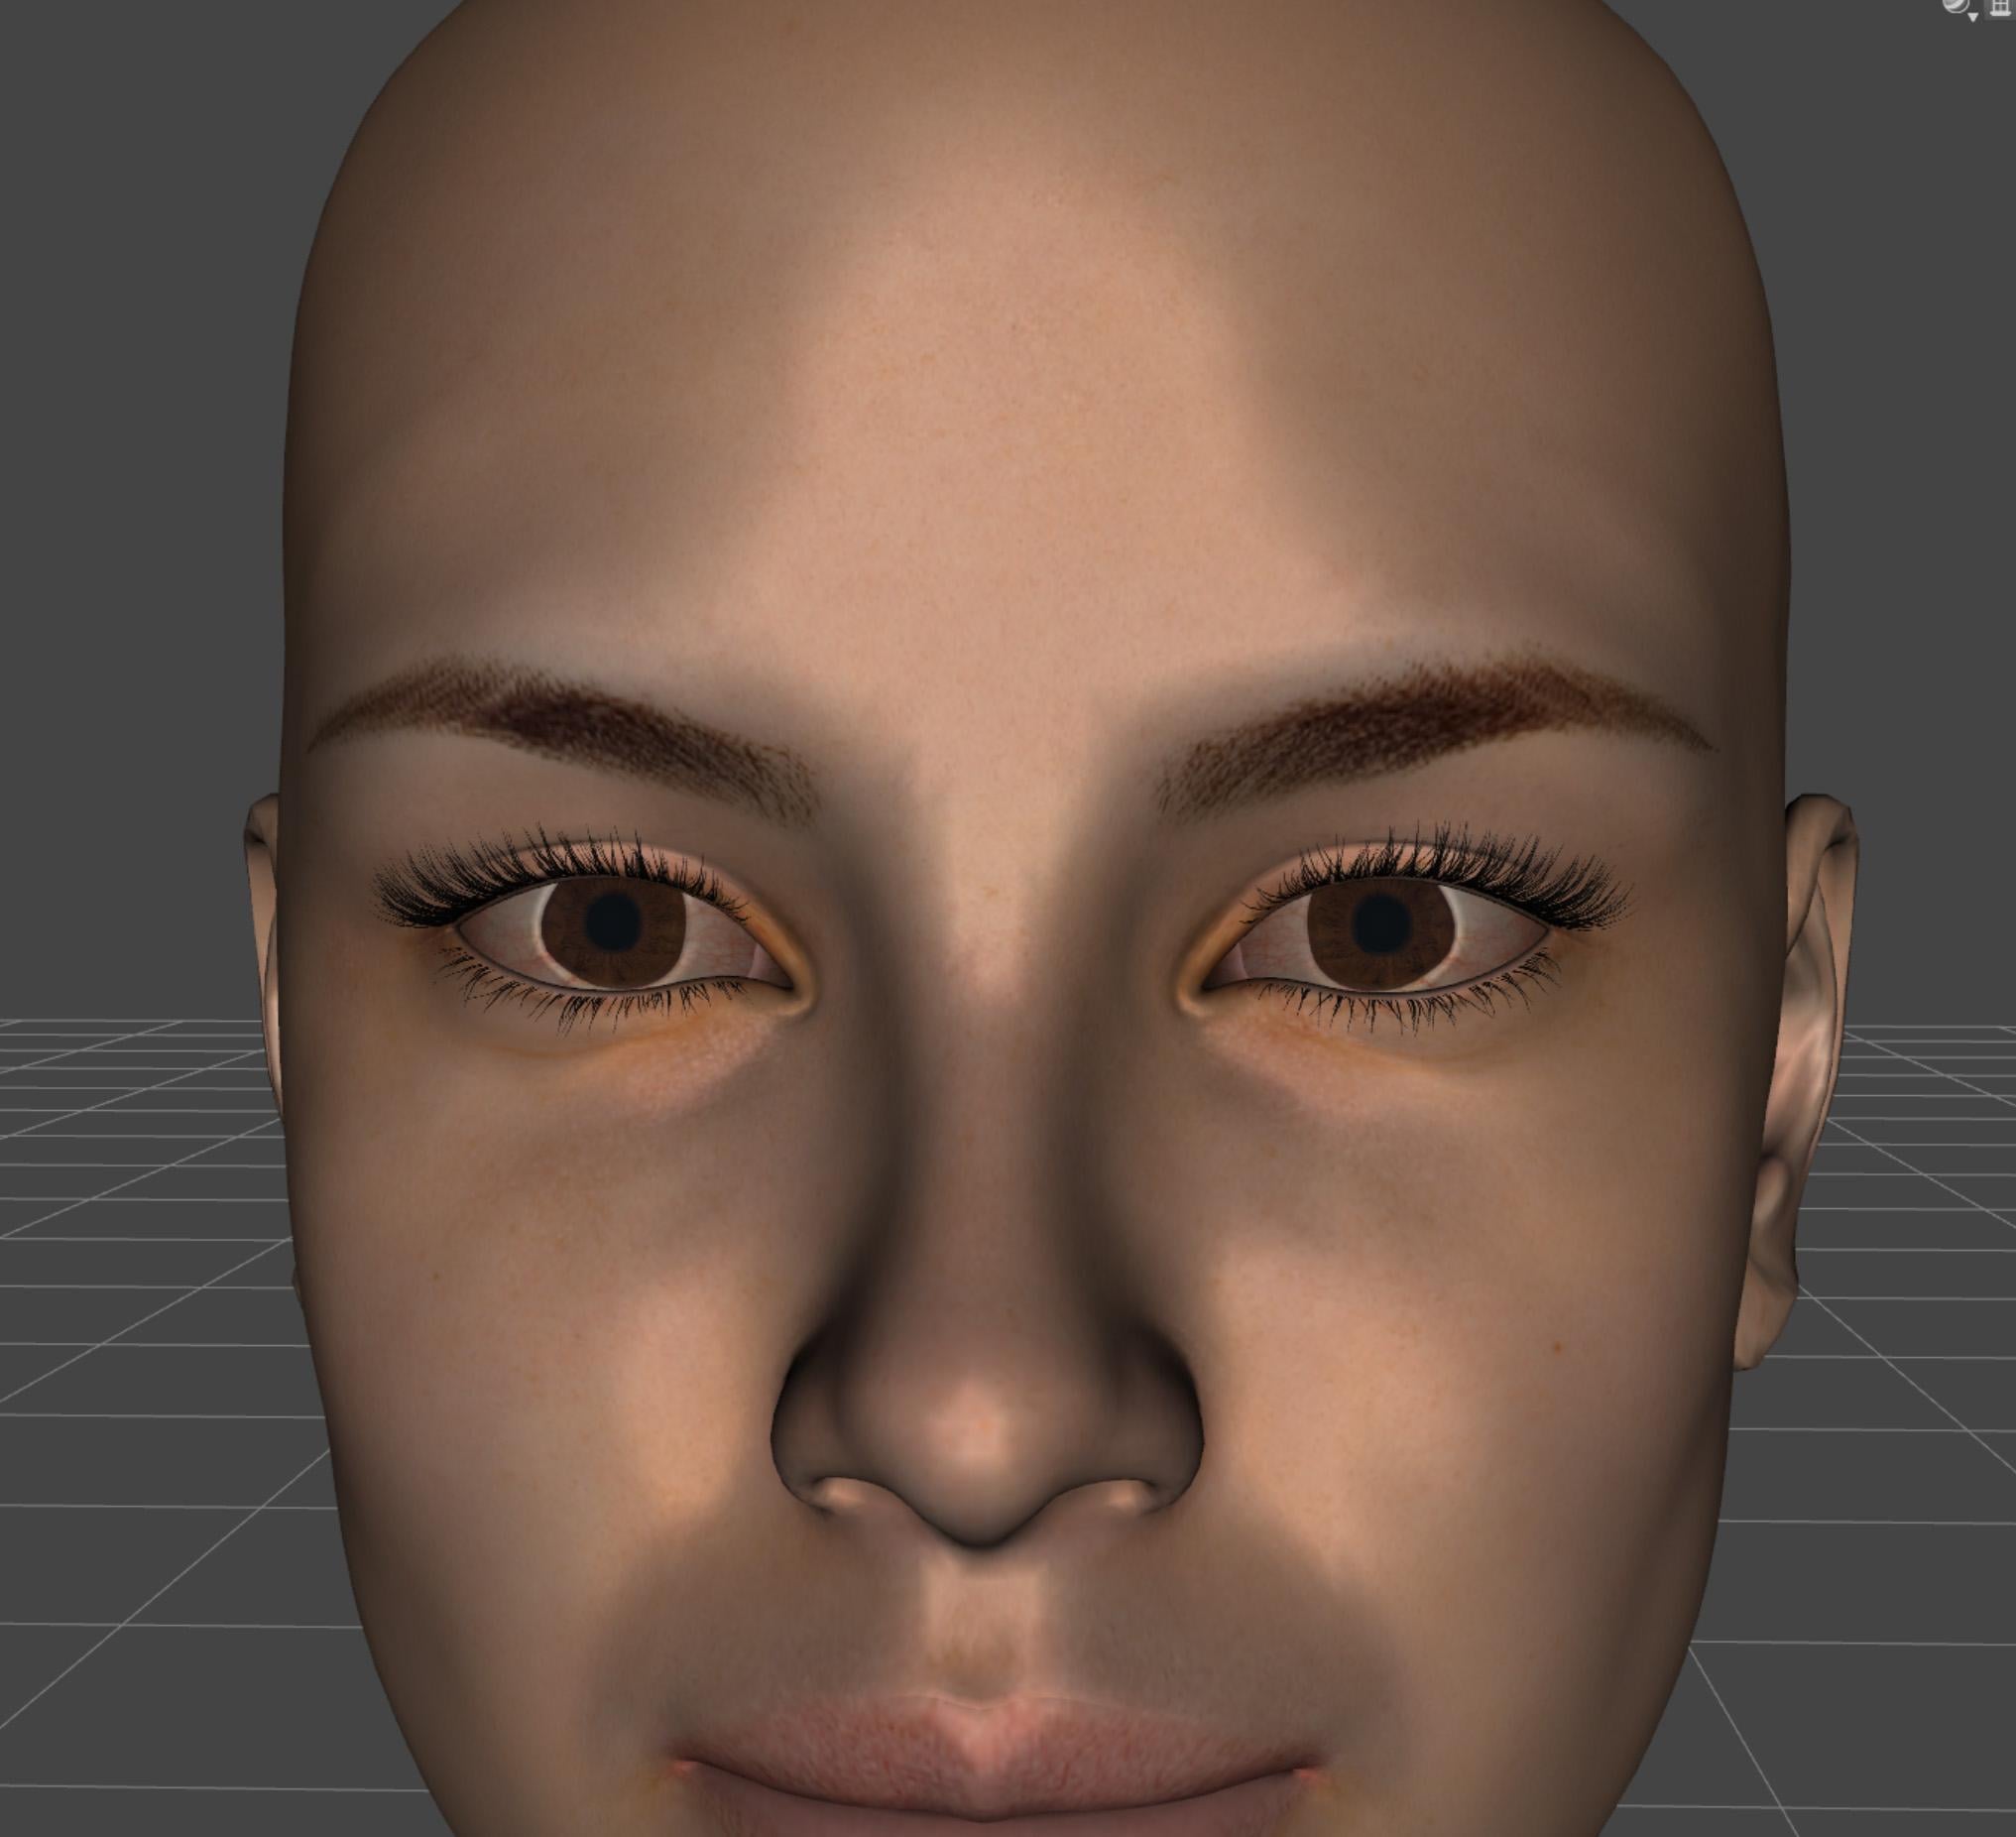
Eyes Translation, Tolerance is 0.0005
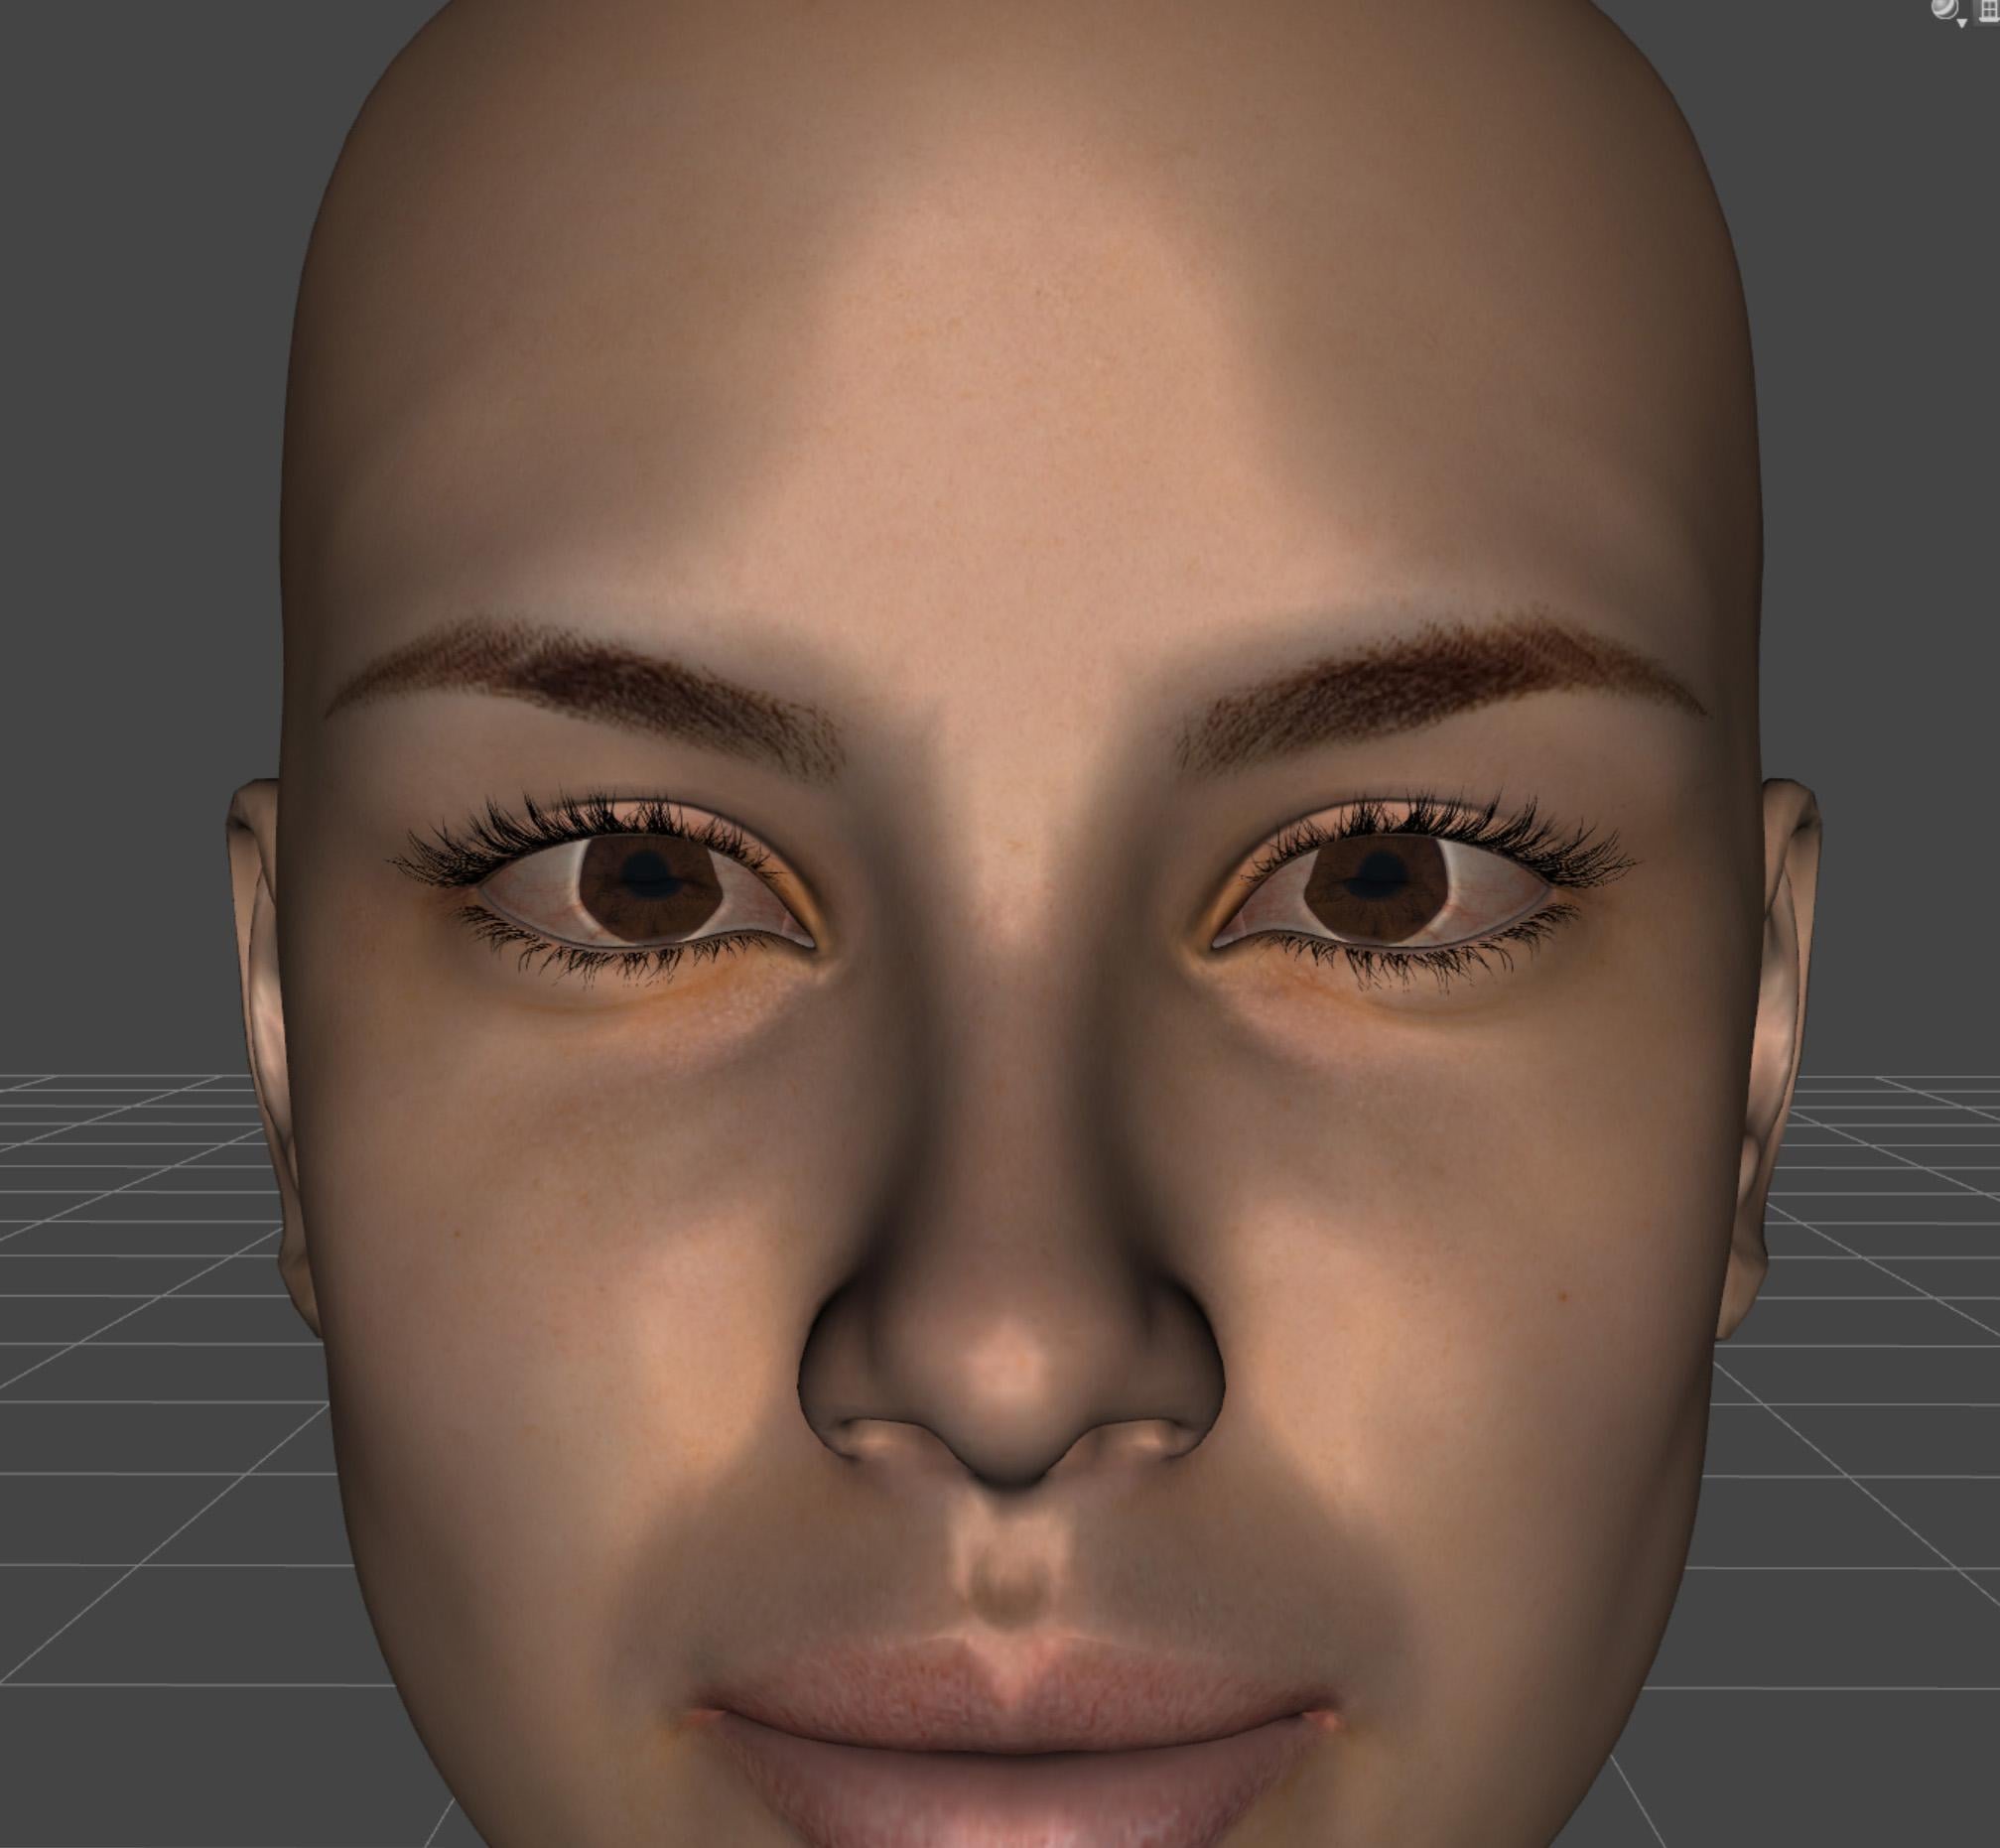
Eyes Translation, Tolerance is 0.06
EDIT: Made mistake. Uploaded correct image this time

Sickleyield has kindly been trying to help me improve the eye conversion. She gave some tips that make this:
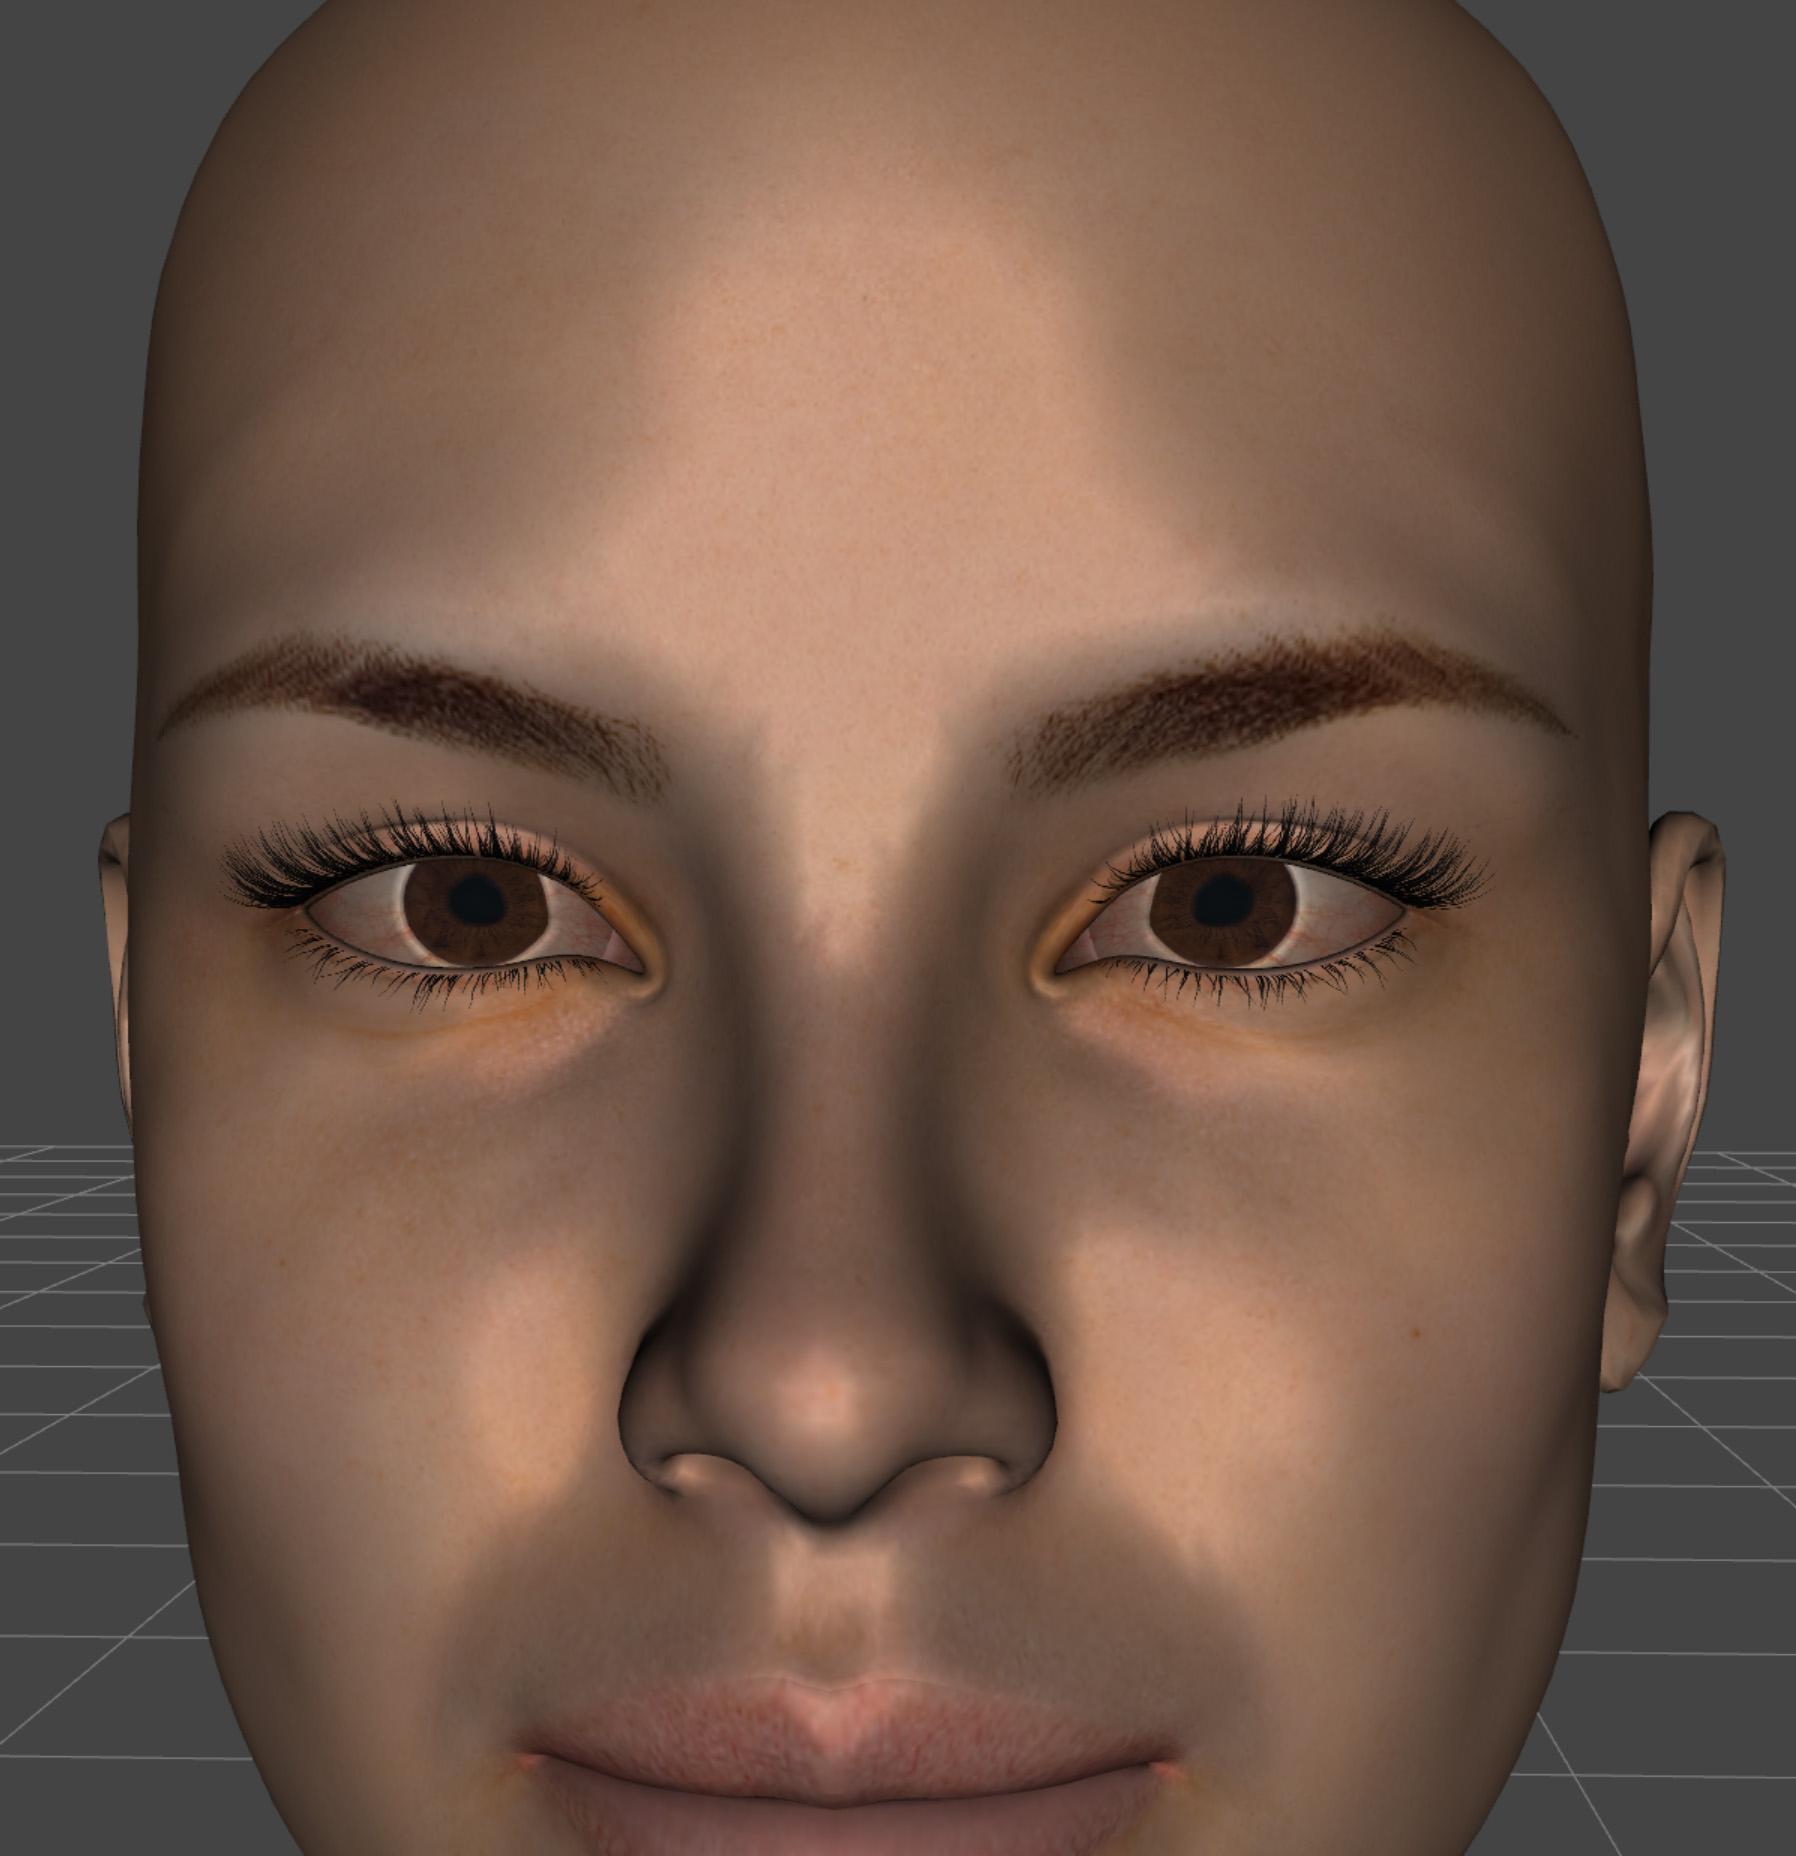
Not perfectly round, but a nice improvement. I will add this to the list of changes to be submitted once CC from G3M->G8M comes out.
This is much better! And I so very much appreciate trying to improve the eyes process because I would absolutely love to get my main characters onto G8. If I have time this weekend I will try to reproduce the process I used to get my dial-spun girl onto G8. It was a two-step process because I first used SY's to do the full body, and then I used X-Tools to isolate just the head from that conversion. I'm not sure if X-Tools in any way did something to fix the eyes in the process of saving that morph.
Help! Writer Needs Aliens!!Thanks all for your comments!
To vwrangler: The 3rd finger is the thumb. My workaround is to dial the thumb joints down to almost 0 or 0. Yep, postwork can take care of that. David 8 is available here - https://www.daz3d.com/david-for-genesis-8-male
To Gordig: Maybe you're right, morphs won't do this
To mmitchell_houston, true, I can get in GIMP [poor man's Photoshop] and do postwork.
However, Odaa has the best idea! True, that twin-fingered hand is not going to show in the thumbnail anyway, and since the characters have different skin colors than we do for the most part, [when they're sick, they look a bit Hispanic or grayish if it's really bad] I can probably get by just not showing the hands or feet.
Thanks for the suggestion that I contact Dariofish via DeviantArt, but my account is messed up and I have not had any luck getting on there. I can look, even download, but can't log into my account.
I guess I'll just hope that some PA will do a hands/feet package someday and include a flattening/rectangular morph. In the meantime, I'll just get busy with what I have. Maybe someday I'll get my skills there and if I do, I'll put it out there for all to enjoy :)
Again, thanks very much for all of your suggestions!
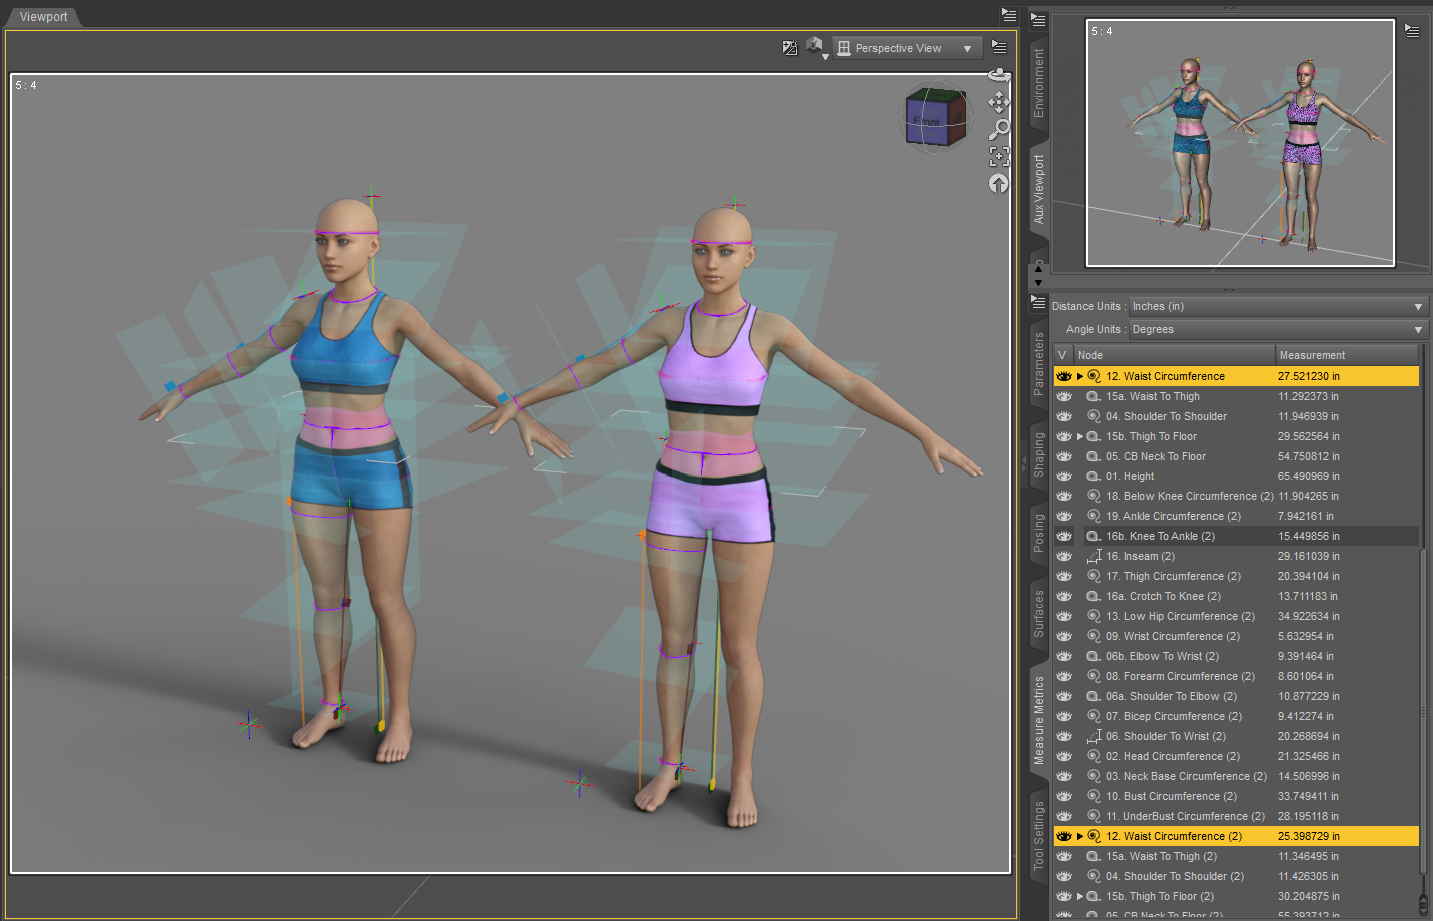
Figure Metrics and GF8 HeightSo I played with this a bit today. For folks who aren't familiar with Measure Metrics / Figure Metrics, I loaded a base G8F, put on some clothes and the Measure Metrics "wearable".

She loads in at 70 inches tall. Which is 5' 10" (About 178 cm).
What I want to adjust to make her height change is the Height morph which is included in the Genesis 8 Female Body Morphs.

To show the difference between that and just changing her Scale parameter, I dialed the height up to 100% (which as I said actually makes G8F shorter) and then loaded a second one and used scale to set her to about the same height. You can see in the screenshot the two body shapes are visibily different and the measurement of their waists bears this out. What I want is the look on the left, still a mature woman, but shorter. To me, the look on the right has the effect of changing her age by making all dimensions smaller.
I then loaded up the Figure Metrics script. On the Configuration tab, I've changed the mapping between measurements and several morphs that I have available which I feel are more accurate than the defaults that FM loads with. I've highlighted where I tied the adjustment of the Height value to the Height Full Body Morph (FBM) property on G8F.
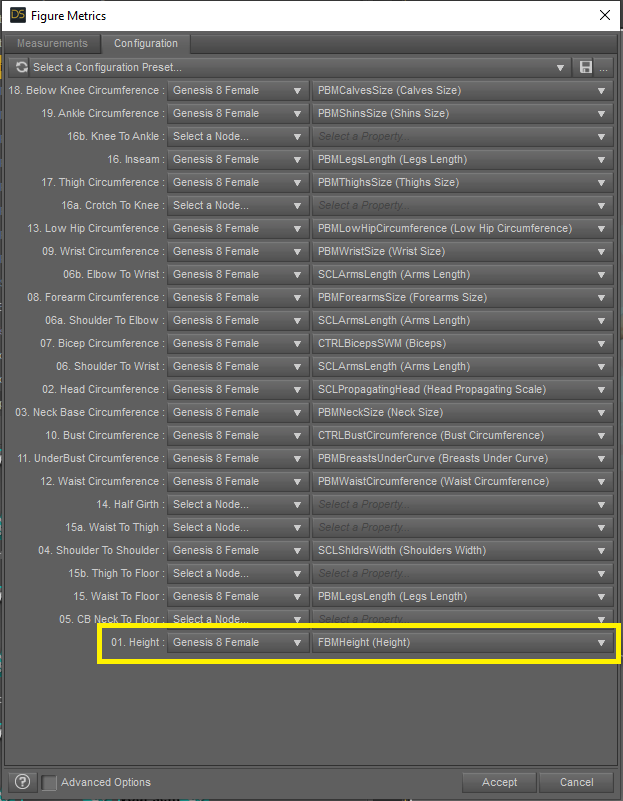
My goal was a character who was 62 inches tall. As I mentioned, I have reaalized that the Height morph can't make that height. The shortest it gets is about 65 inches. But I wanted to recreate the issue I saw that prompted this thread.

So I entered 62 inches and hit accept. The script runs and this was the result...

The girl on the left actually GREW 6 inches to 76 inches (which is the height you'd get if you manually adjusted the Height morph to -100%). So I reset and tried again with value of 66 inches, which ended up giving the same result. She grew instead of shrinking from her default of 70.
So, even though it seems like FM is REALLY confused that trying to reduce the height requires an increase in the Height morph value, I thought about Quixotry's advice on the parameter limits. So I turned them off.
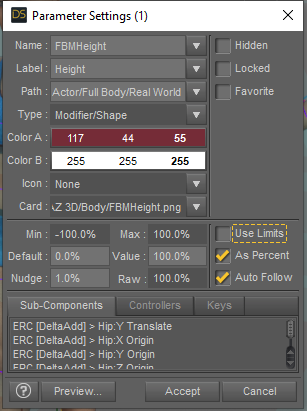
Then I tried the same thing, entering 62 inches for the target height. Hold on to your hats, this was REALLY funny!

She disappeared? No ... look at the height value in the MM pane. She's now 8608 inches (21.8 KM) tall! When I framed her in the viewport, you can't even see the other girl, she's smaller than a pixel. :D
So it looks like FM isn't going to be able to reliably adjust the height of my figures using the Height morph. I can do it by hand and get what I need. Even removing limits by hand will probably work okay as long as I don't get super crazy about it!
I just wanted to share the results I got from this test tonight, in case anyone else is trying to play with the Height morph and gets confused about the adjustments like I did.
dForce Dress ScrambledAssuming you originally modelled the dress around the figure (so it basically fits) then you could take it back into Wings and adjust it till it's clear of the figure. (Maybe scale it up a tiny amount.)
Alternatively (and I'm not certain this will work, but it may be worth a try) then use the Transfer Utility to allow it to be "Fit To" the figure. Is the dress a .obj file you imported into Daz Studio? If so then the process would be to select the dress then: (1) Edit - Object - Rigging - Convert Prop to Figure; then (2) Edit - Object - Transfer Utillity... - set the source to the female figure, target to your dress, and if you are offered any Projection Templates in the drop-down list pick "Dress" or similar [I can't test this bit because I have SickleYield's templates product installed which gives lots of options and I can't remember which come as standard] and let it fit to source figure (tick box at the bottom - you'll need to "Show Options" to see that) This will do it's best to make the dress fit the figure. Then try the simulation again.
3D Art Freebie Challenge-August 2019-"Best Friends Forever" -Entries Thread OnlyHere's my (first) entry for this month's contest:
Tommie, Ashley, and Maria,
Besties.
All figures Genesis base
Freebies:
Die_trying's V4 morphs for Genesis (Tommie, Ashley, Maria)*
Pin-up Girl Pack (Tommie)*
Ultimate Shader Pack (Chrome shaders—with reflection maps removed—for Tommie's wristwatch, earrings, and necklace, Ashley's eyes)*
Ella V4 (Tommie's eyes)*
Sandra for V4* (Tommie's skin)*Satin shaders (Maria's top, ashley's top, tights, and gloves)*
Super Shine Shader pack (Tommie's truck)*Glass Shaders (Sapphires in earrings)*
M3 Baseball Cap (Tommie)*
Cross My Heart tenth down (Tommie)
Stud Earrings (Tommie)*
Genesis Lacy Female Underwear (Tommie)*
Bossy Boots for Genesis (Tommie)*
HFS EVAN Expansion set (Ashley's Eyes)*
R72 Leather shaders Asley's and Maria's belts,boots,)*
The Major (Tommie's Ashley's and Maria's jackets)*
Tomboy Tanktop (Tommie)*
Rosalie Rose (Maria)*
Cuffed Heeled Boots (Maria)*
Hoop Earings for #Dream's Lusitana (Maria's Earrings)*
Ghastly's Generic Anime/Manga Head morph for Genesis (Ashley)*
Gothic for V4 (Ashley’s gloves)*
Karma for V4 (Ashley's top)
Tights for Genesis (Ashley's tights)*
Leather Belt for M4 Archiaus (Ashley's belt)*
Cuffed Ankle boots for Genesis (Ashley's boots)*
Olessa's Treasure Earrings (Ashley's Earrings)*
V4 Pearls and Fans (Ashley's Earrings)*
Post Apocalyptic Vehicle Accessory Pack (Truck Flood lights)*
License Plate and Frame (Truck license plate)*Truckbed Tool Chest (In Truck bed)*
Light Recon Vehicle (LRV)*
LRV add-ons (LRV)*Sky Dome (sky)*
Dystopia City Blocks 11-20 (Buildings, city skyline, asphalt)
MoveS for Hitomi (Tommie) [biweekly freebie 2 JUL 2019]
Sassafrass Poses for V5 (Ashley and Maria) [Biweekly freebie 5 AUG 2019]
Paid For Items
Willow for Genesis 2 Female (Tommie)Marja Hair for Genesis (Tommie)
End of Summer Hair for Genesis and Genesis 2 Female (Ashley)
JeanZ Skirt for Genesis (Asley)
Dark Moods for Genesis (Maria's pants and belt)
No-count Items
Genesis Evolution Head Morphs and Body Morphs (All characters)
Ramwolf's Freebie Morphs for Genesis (All characters)*Blue F-150 (Truck)
Ford Emblem (Truck)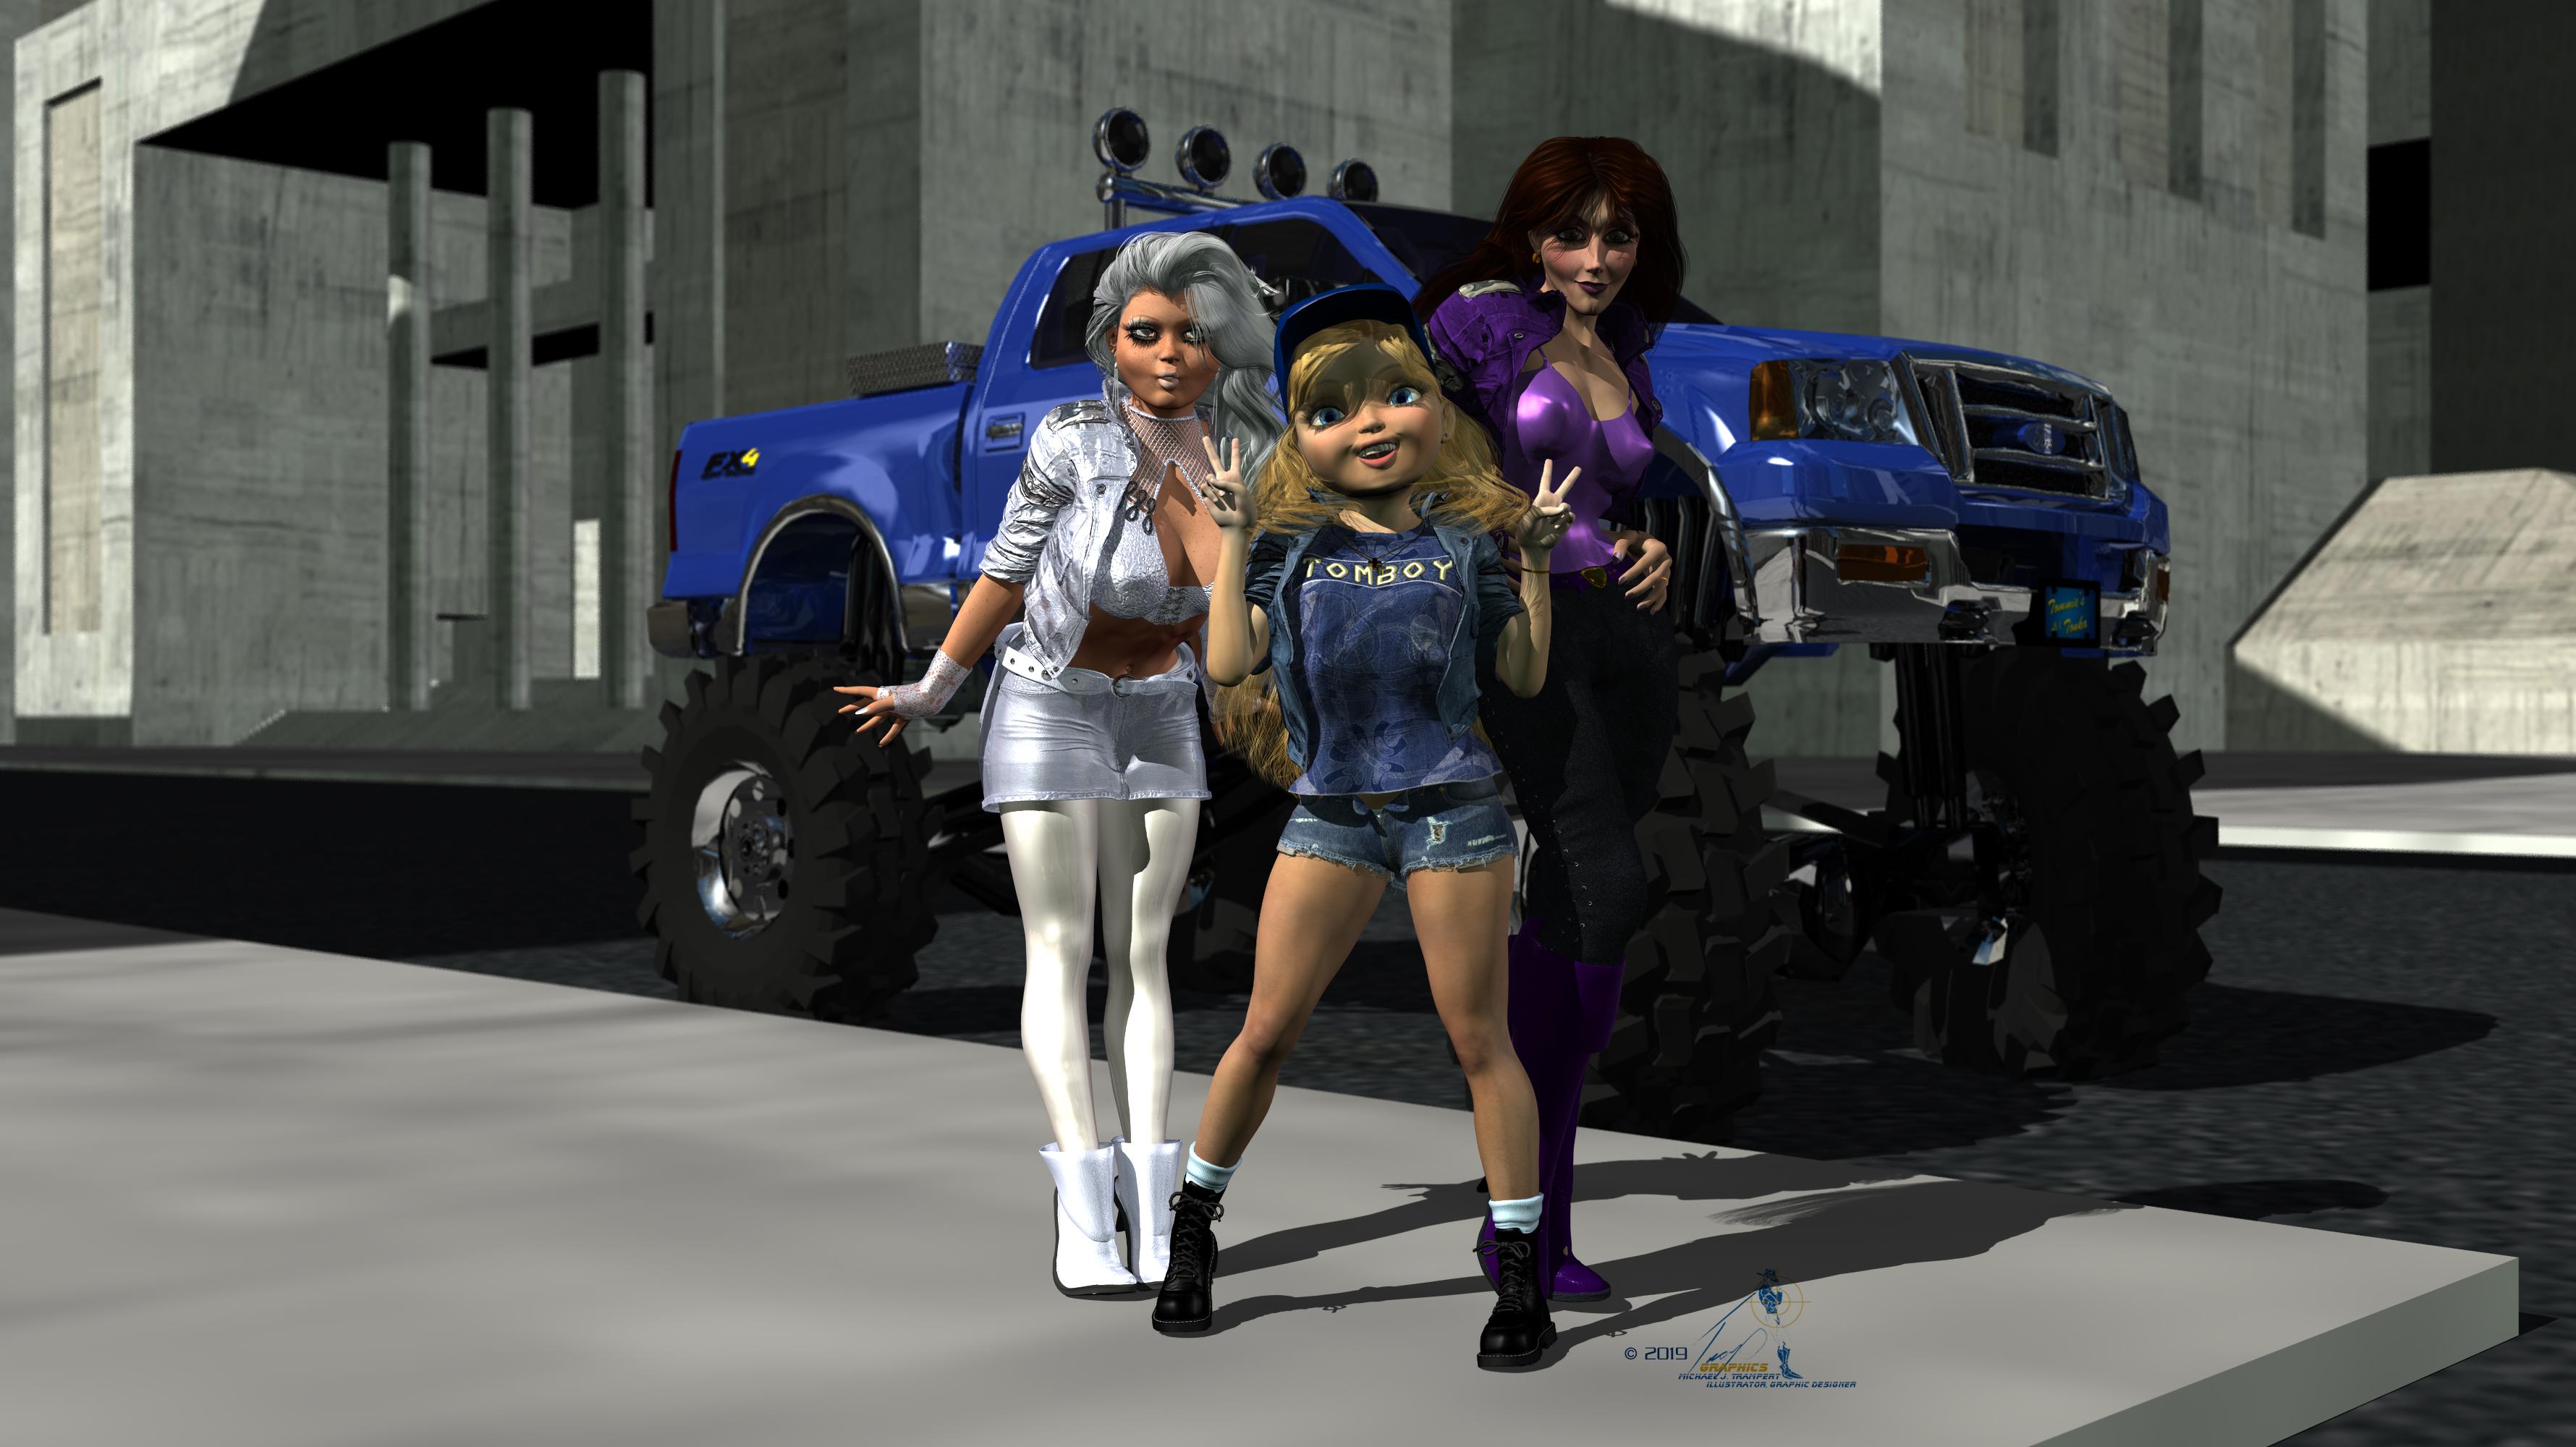 3D Art Freebie Challenge-August 2019-"Best Friends Forever" -Main Thread Only
Here's my (first) entry for this month's contest:
Tommie, Ashley, and Maria,
Besties.
All figures Genesis base
Freebies:
Die_trying's V4 morphs for Genesis (Tommie, Ashley, Maria)*
Pin-up Girl Pack (Tommie)*
Ghastly's General Purpose Anime Team Morphs ( Kageto, Yosei, Kitsune)*Ghastly's Big Eye Anime Team Morphs (Yosei, Kitsune)*
Ultimate Shader Pack (Chrome shaders—with reflection maps removed—for Tommie's wristwatch, earrings, and necklace, Ashley's eyes)*
Ella V4 (Tommie's eyes)*
Sandra for V4* (Tommie's skin)*Satin shaders (Maria's top, ashley's top, tights, and gloves)*
Super Shine Shader pack (Tommie's truck)*Glass Shaders (Sapphires in earrings)*
M3 Baseball Cap (Tommie)*
Cross My Heart tenth down (Tommie)
Stud Earrings (Tommie)*
Genesis Lacy Female Underwear (Tommie)*
Bossy Boots for Genesis (Tommie)*
HFS EVAN Expansion set (Ashley's Eyes)*
R72 Leather shaders Asley's and Maria's belts,boots,)*
The Major (Tommie's Ashley's and Maria's jackets)*
Tomboy Tanktop (Tommie)*
Rosalie Rose (Maria)*
Cuffed Heeled Boots (Maria)*
Hoop Earings for #Dream's Lusitana (Maria's Earrings)*
Ghastly's Generic Anime/Manga Head morph for Genesis (Ashley)*
Gothic for V4 (Ashley’s gloves)*
Karma for V4 (Ashley's top)
Tights for Genesis (Ashley's tights)*
Leather Belt for M4 Archiaus (Ashley's belt)*
Cuffed Ankle boots for Genesis (Ashley's boots)*
Olessa's Treasure Earrings (Ashley's Earrings)*
V4 Pearls and Fans (Ashley's Earrings)*
Post Apocalyptic Vehicle Accessory Pack (Truck Flood lights)*
License Plate and Frame (Truck license plate)*Truckbed Tool Chest (In Truck bed)*
Light Recon Vehicle (LRV)*
LRV add-ons (LRV)*Sky Dome (sky)*
Dystopia City Blocks 11-20 (Buildings, city skyline, asphalt)
MoveS for Hitomi (Tommie) [biweekly freebie 2 JUL 2019]
Sassafrass Poses for V5 (Ashley and Maria) [Biweekly freebie 5 AUG 2019]
Paid For Items
Willow for Genesis 2 Female (Tommie)Marja Hair for Genesis (Tommie)
End of Summer Hair for Genesis and Genesis 2 Female (Ashley)
JeanZ Skirt for Genesis (Asley)
Dark Moods for Genesis (Maria's pants and belt)
No-count Items
Genesis Evolution Head Morphs and Body Morphs (All characters)
Ramwolf's Freebie Morphs for Genesis (All characters)*Blue F-150 (Truck)
Ford Emblem (Truck)All Links Check Out Plz Move To Entries Thread
[Released] Character Converter from Genesis 3 Female to Genesis 8 Female(Now Conv JCMs) [Commercial]That to me looks like an issueof texture try applying G8's eye textureoops my bad you already did that ....well fudge.....
Yeah, I noticed someone else a couple pages back converted Ophelia 7 and I saw the same thing with the eyes, and come to think of it, it also shows the same wonky pupil shape in the script's .pdf guide...so I'm beginning to think it's a limitation that I either have to accept or just stay with these characters on G3.
It is a limitation of the conversion. I wish the conversions were perfect, but aside from pushing the tolerance extremely low and the textures (both of which you have already done), there is not much more to do. And please return it if this is a deal breaker for you.
Thank you for confirming, so I know I'm not doing something wrong!
Here's the funny thing - I did try converting the same character via Sickleyield's manual process (the one on DeviantArt)...and her face came out looking pretty much the same as when I used your script...short of the eyes. The irises stayed round. But the body was all sorts of wonky. I wonder if I can combine the two processes and have your script handle the body and the manual steps handle the head, each separated using X-Tools. It sounds really roundabout and tedious, but it's something to try.
Hmmm. That is strange. SY's process was a lot of what I do. Did you use her process when she used the "transfer eyeballs sideways" method or after she switched to using the tolerance?
I'm not sure, lol. It was this one - https://www.deviantart.com/sickleyield/journal/Tutorial-Transferring-Character-Morphs-G1G2G3G8-409437916 *edit* Oh, that was before she added the 2019 update part, so it was before using the tolerance function. But the body didn't transfer right, so I used X-Tools to separate and use just the head.
Ok, I *think* I figured out the old method that SY did. However, it does not do as well as I hoped. It makes rounder eyes except for one area, but it does seem to depend on the tolerance. I might add it as an option. What do you think?
Tolerance Only (0.06)
Eyes Translation, Tolerance is 0.0005
Eyes Translation, Tolerance is 0.06
EDIT: Made mistake. Uploaded correct image this time
Sickleyield has kindly been trying to help me improve the eye conversion. She gave some tips that make this:
Not perfectly round, but a nice improvement. I will add this to the list of changes to be submitted once CC from G3M->G8M comes out.
Issues with morphs projected on to geograftsSo, after much wailing and gnashing of teeth, I have reached some kind of conclusion here, though not the final destination I had in mind.
Long story short.
There is a bug (if you're me, perhaps a 'feature' you're Daz3D, I'm guessing) which affects geografts that replace a GxF/M body part (hand, arm, foot, leg etc.) whereby the bones in the geograft do not follow the bones of the figure when a morph is applied to the figure which moves the figure's bones e.g. FBMHeight.
This completely wrecks the rigging of the geograft, because the mesh the bones deform has moved with the main figure. The issue can be worked around by creating an ERC controller property to move the geograft bones to match the geograft mesh. Sadly, this has to be done for every single morph that you want your geograft to support. So, not a practical solution if you want to cover more than a couple of morphs.
The issue does not appear to affect geografts that are adding something to the figure e.g. horns, tails, genitalia, rather than replacing an existing body part.
Full story and workaround for those interested enough.
The problem has been described in detail earlier in this thread. I have been testing using a simple and ugly geograft to replace G3F's right hand. When you apply FBMHeight to the figure, for instance, the five bones in the geograft that have no equivalent in the G3F rig do not move down with the bones in the arm.
I found some helpful information to somewhat explain this behavior in Blondie999's tutorial 'Advanced Rigging in DS4 Pro' (from the Daz store), where exactly the same issue is described. So, it's not me doing something wrong, which is a relief.
Blondie999 refers to an option in the Joint Editor to display 'ghost bones'. As I understand it, these represent the memorized state of the bones. When the morph is applied to a figure, these 'ghost bones' stay put and actual bones move away from their memorized positions - well, except crucially for any bones belonging to geografts that replace body parts. These bones, for some reason (bug?) stay stuck to their memorized positions. Blondie999 describes the process to create an ERC property controller to move the geograft bones to where they should be, but the method is based on DS 4.0.3.47, so cannot be applied today without significant revision.
Below is my adapted method using DS 4.11.0.383, which is definitely not perfect.
- Make sure the geograft rigging is memorized, without any relevant morph(s) applied.
- Apply a morph to the GxF/M figure that causes the issue e.g. FBMHeight.
- With the geograft selected, use the Adjust Rigging to Shape function. Uncheck all geograft bones except the ones that have not moved as needed. Check all 3 'Adjust...' options at the bottom of the dialog. This should cause the geograft bones to move to match the geograft mesh, more or less. Test the rigging*.
- In the Properties pane, find the auto-generated morph on the geograft with the same name as the morph on the figure that you dialed up. Put the pane into Edit mode, right-click this auto-generated morph and choose 'ERC Freeze'.
- Click the 'Create New' button, give the property a name different from the morph you applied (e.g. FBMHeightGraft) and check the 'Create as Empty Morph' checkbox. Change the path if you like. Click Create.
- Back in the ERC Freeze Options dialog, check the list of Freeze Properties for any 'rogues' that you don't want to be controlled by the new property e.g. I somehow had the FBMHeight on the main figure, and weirdly a small twist on the Right Forearm Bend bone. Deselect them.
- Check all 3 checkboxes under Additional Options and hit Accept. Note - this includes the Restore Figure Rigging option, which Blondie999 recommends not checking. I tried not checking it but had issues with that, which were resolved by checking it.
- Now you have a property slider on the geograft which when at 100% should line the geograft bones up with the geograft mesh, and also with the figure bones. We don't want to have to dial this manually when we apply the morph to the figure; this property needs to be controlled automatically by the morph on the main figure. So...
- Dial the morph on the figure and the new property on the geograft down to 0. Clear the auto-generated morph (e.g. FBMHeight) on the geograft (Scene pane 'waffle' menu, Assets->Clear Generated Morphs).
- Rename the new property on the geograft to match the name of the morph on the figure e.g. 'FBMHeight'. This stops Daz Studio auto-generating a morph with this name on the geograft in future.
- Select the morph on the main figure (FBMHeight), right-click and choose 'Show in Property Hierarchy'. (I suggest docking the Property Hierarchy to keep it visible/accessible.)
- In the Properties pane, find the new property on the geograft, and drag and drop it onto the main figure morph under Sub-Components->1st Stage (Add/Subtract).
- The new property should now dial up/down automatically in line with the morph slider on the main figure, and as a result the bones of the geograft should stay aligned with the geograft mesh and with the bones of the main figure.
*Hopefully, the adjusted bone positions will be acceptable. For most purposes they probably will, but this is where I still have issues. Firstly, for the full hand geograft I have been attempting to build, the bone positions aren't precise enough and hence the mesh deformation isn't right. In theory, I could adjust this manually, but the number of bones involved makes this very tedious and time consuming, and the lack of certain tools in Daz Studio make it practically impossible. In addition, when I tried adjusting the rigging in the simple test geograft, problems arose in the rest of the process which I could not resolve. However, I did not try very hard because it has become apparent, regrettably, that my intended project is not achievable in DS at present.
Daz>Blender>adjust clothing mesh>Daz-tips on how to do this?The process you described should work, yes. But it may be too complicated depending on what type of mesh adjustments you want to do, if you just move vertices around and not add or remove parts of the mesh then creating a morph might be enough.
Exporting Scenes with TimelineI think this is because DAZ made dForce a surface property, and surfaces by default cannot be animated. The only workaround I'm aware of is to make a morph and apply it to the object/figure at frame 0.
dForce Dress ScrambledOh, and how is the clothing "attached" to the figure - did you use the transfer utility to make it into a fitting garment, parent it (if so, to which body part) or just load it and try to simulate from there? I get blow-ups if the garment is neither fitted nor parented.
Daz>Blender>adjust clothing mesh>Daz-tips on how to do this?Hi,
I needed to modify a swimsuit in Blender and bring it back to Daz. Can anyone give me any tips or hints or maybe even tutorials on the best/easiest way to do this?
I have a G8F with a body morph shape applied to it, the swimsuit is autofit to that. I thought that i would just export the G8F and swimsuit as OBJ. Use the body in blender as a guide and just adjust the mesh of the swimsuit. Then from there reimport it into Daz and use the transfer tools to reapply the G8 rig and weight maps to the swimsuit? i think i saw a tutorial by sickleyield i think on something similar but it involved a G3 and G8 figure and not clothes. Would something like that work? or do i need to rerig and redo skin weights in Blender from scratch before i reimport it?
3D Art Freebie Challenge-August 2019-"Best Friends Forever" -Main Thread OnlyHere's my (first) entry for this month's contest:
Tommie, Ashley, and Maria,
Besties.
All figures Genesis base
Freebies:
Die_trying's V4 morphs for Genesis (Tommie, Ashley, Maria)*
Pin-up Girl Pack (Tommie)*
Ultimate Shader Pack (Chrome shaders—with reflection maps removed—for Tommie's wristwatch, earrings, and necklace, Ashley's eyes)*
Ella V4 (Tommie's eyes)*
Sandra for V4* (Tommie's skin)*Satin shaders (Maria's top, ashley's top, tights, and gloves)*
Super Shine Shader pack (Tommie's truck)*Glass Shaders (Sapphires in earrings)*
M3 Baseball Cap (Tommie)*
Cross My Heart tenth down (Tommie)
Stud Earrings (Tommie)*
Genesis Lacy Female Underwear (Tommie)*
Bossy Boots for Genesis (Tommie)*
HFS EVAN Expansion set (Ashley's Eyes)*
R72 Leather shaders Asley's and Maria's belts,boots,)*
The Major (Tommie's Ashley's and Maria's jackets)*
Tomboy Tanktop (Tommie)*
Rosalie Rose (Maria)*
Cuffed Heeled Boots (Maria)*
Hoop Earings for #Dream's Lusitana (Maria's Earrings)*
Ghastly's Generic Anime/Manga Head morph for Genesis (Ashley)*
Gothic for V4 (Ashley’s gloves)*
Karma for V4 (Ashley's top)
Tights for Genesis (Ashley's tights)*
Leather Belt for M4 Archiaus (Ashley's belt)*
Cuffed Ankle boots for Genesis (Ashley's boots)*
Olessa's Treasure Earrings (Ashley's Earrings)*
V4 Pearls and Fans (Ashley's Earrings)*
Post Apocalyptic Vehicle Accessory Pack (Truck Flood lights)*
License Plate and Frame (Truck license plate)*Truckbed Tool Chest (In Truck bed)*
Light Recon Vehicle (LRV)*
LRV add-ons (LRV)*Sky Dome (sky)*
Dystopia City Blocks 11-20 (Buildings, city skyline, asphalt)
MoveS for Hitomi (Tommie) [biweekly freebie 2 JUL 2019]
Sassafrass Poses for V5 (Ashley and Maria) [Biweekly freebie 5 AUG 2019]
Paid For Items
Willow for Genesis 2 Female (Tommie)Marja Hair for Genesis (Tommie)
End of Summer Hair for Genesis and Genesis 2 Female (Ashley)
JeanZ Skirt for Genesis (Asley)
Dark Moods for Genesis (Maria's pants and belt)
No-count Items
Genesis Evolution Head Morphs and Body Morphs (All characters)
Ramwolf's Freebie Morphs for Genesis (All characters)*Blue F-150 (Truck)
Ford Emblem (Truck)Figure Metrics and GF8 HeightI feel like we are talking past each other. You can see from my screen shot that I was able to type your desired value directly. No sliders, no sliders working backwards etc. Is there some reason that doesn't work for you?
The Configuration tab is where you map the measurements to properties that will adjust them.
First thank you for continuing to try to help! :)
I have some screenshots at home of what my issue has been. I'll add those to this thread along with some results of the testing for my new theory that the "Height" parameter/morph on GF8 is just too limited for what I was trying to do.
Question about exporting morphs of a custom beard in DAZ 4.11I don’t know of any plugin which would do that, no.
I’m not sure if simply trying to re-save the automatically generated morph as a morph asset with the right name would work as I never tried.
If it doesn’t, the way to do it would be this:
- Export the various morphs as obj:
- Apply one morph to the figure wearing the beard
- Export the morphed version of the beard as obj
- Remove the morph you used
- Repeat for each morph you want in your beard
- Load only the beard in DS, then for each morph:
- Set all morphs to 0 on beard
- use Morph Loader to create a morph from one of the obj
- save it as a morph asset with the same name as the corresponding figure morph so it replaces the automatic one
But yes, that would take a lot of time
Ponytail Hair in image for H&C School Uniform?Now, I'd like to ask a question about something else. What is the name of the face morph used in the main image to the Vertigo Ponytail hair?
I have to admit, the Vertigo ponytail hair is the prettiest for a 3D figure I have ever seen.
Question about exporting morphs of a custom beard in DAZ 4.11Thank you Leana for the info!
I know the process of creating morph shapes inside traditional modeling software like Maya. It is quite time consuming, especially when it has to fit to an underlying sets of morphs from the face.
Is it possible to create the morphs in DAZ in a somewhat generic way? (eg. pull up slider smile-left, save morph, pull up slider smile-right, save morph, and so on..)
Do you know of any plugin that might help me in that regard?
[Released] Character Converter from Genesis 3 Female to Genesis 8 Female(Now Conv JCMs) [Commercial]That to me looks like an issueof texture try applying G8's eye textureoops my bad you already did that ....well fudge.....
Yeah, I noticed someone else a couple pages back converted Ophelia 7 and I saw the same thing with the eyes, and come to think of it, it also shows the same wonky pupil shape in the script's .pdf guide...so I'm beginning to think it's a limitation that I either have to accept or just stay with these characters on G3.
It is a limitation of the conversion. I wish the conversions were perfect, but aside from pushing the tolerance extremely low and the textures (both of which you have already done), there is not much more to do. And please return it if this is a deal breaker for you.
Thank you for confirming, so I know I'm not doing something wrong!
Here's the funny thing - I did try converting the same character via Sickleyield's manual process (the one on DeviantArt)...and her face came out looking pretty much the same as when I used your script...short of the eyes. The irises stayed round. But the body was all sorts of wonky. I wonder if I can combine the two processes and have your script handle the body and the manual steps handle the head, each separated using X-Tools. It sounds really roundabout and tedious, but it's something to try.
Hmmm. That is strange. SY's process was a lot of what I do. Did you use her process when she used the "transfer eyeballs sideways" method or after she switched to using the tolerance?
I'm not sure, lol. It was this one - https://www.deviantart.com/sickleyield/journal/Tutorial-Transferring-Character-Morphs-G1G2G3G8-409437916 *edit* Oh, that was before she added the 2019 update part, so it was before using the tolerance function. But the body didn't transfer right, so I used X-Tools to separate and use just the head.
Ok, I *think* I figured out the old method that SY did. However, it does not do as well as I hoped. It makes rounder eyes except for one area, but it does seem to depend on the tolerance. I might add it as an option. What do you think?
Tolerance Only (0.06)
Eyes Translation, Tolerance is 0.0005
Eyes Translation, Tolerance is 0.06
Can't Find Genesis Expressions Morph DialsI don't have this product to check, but I seem to recall some of the older products had expression packs that only had presets, no dials.
I'll be back as soon as DIM finishes loading. I want to check something…
Okay. Looking at the list of installed files for a G2F expressions pack show only .duf files, which would be presets. They are installed under /People/Genesis 2 Female/Expressions/[productname]. It's all or nothing with those, (unless you change the facial bones manually, of course.)
Looking at an expressions pack for Ivan 7, I'm seeing dsf files loaded in the data directory. For example:
/data/DAZ 3D/Genesis 3/Male/Morphs/Zeddicuss/Z_Barbarian_Expressions_Ivan_7/Z BE 24.dsfYou can use DIM to view the installed files of your Genesis Expression pack. Just locate it by typing the name into the filter field in the upper right, and clicking on the Installed tab. It should be isolated. Right-click on the small arrow icon to the right of the product name and select "Show Installed Files…" from the menu. The resulting popup window will list all the files, and you'll be able to verify that this product uses presets only by the lack of any paths beginning with /data/
Hello,
Thank you for the reply, but I have since found out that the morph dials are under the 'head' parameter section and not the main full body/head parameter. I guess this was the way they did it for expressions back in the Genesis days. I normally don't use Genesis, but I find their lower polygon counts makes for great background characters. Setting the Sub-Level down all the way certainly reduces the rendering overhead. While they are not as easy on the system as billboard people (flats), it still helps.
Thanks!
Geo
XTransfer Module 1- Genesis 3 to Genesis 8 Morph Converter (Commercial)No Idea..... We ran into a serious issue where the morph deltas sometimes refused to stick when you opened a new Genesis 8. So when you dialled up the morph slider the figure didn't change. It's a bug in studio but we busy on a work around because we cannot wait for a studio update just to address this problem. We will get our sales when the time comes lol...hopefully

Daz 3D is part of

Connect
DAZ Productions, Inc.
7533 S Center View Ct #4664
West Jordan, UT 84084Licensing Agreement | Terms of Service | Privacy Policy | EULA
© 2026 Daz Productions Inc. All Rights Reserved.