-
Please, can you identify the texture?
For morph sets, I like to use Victoria 7/8 with a modified shader.
Those brows were from a freebie set by AprilYSH "fleek"
CLOSED!Making a Genesis 8 figure a kidI would have thought it was in relation to what the child was doing. Since even a PG-13 movie can show a kid in the bath. It doesn't have to cover or censor him, since it is and should not be asociated with anything sexual. If you go more towards teenagers, things tend to get murky.
Although looking at daz store, newborns are fine with nipples. Anything older is not.
Anyways, I will follow the rules since I do not care one way or another and am not about chaging them. I was just explaining my train of thought when I posted the image.
Back on topic, I have played some more with the morph dials. The rigging was a part of the problem. The other problem was using the height measurement that kind of makes the figure disproportionate.
I am now able to bring down to size almost everything. The only problems are I can't seem to be able to downsize the stomach area and the calves, ass and crotch area are starting to look weird and I can't find a dial to correct them.
Exporting anatomical elements morphsI am trying to export the anatomical element morphs as an fbx and then import it to UE4. I am using DAZ 4.12 and UE4 4.24. When applying the "Merge fitted Figures" function, the morph targets appear in the export mode and I guzess, I can export them. However, I cannot use the exported fbx-file as the bone structure seems to be screwed up (in UE4 I get the error message that there are multiple "hip" bones) and so, I cannot import the file at all. Without the "Merge fitted Figures" funtion I can export the model with the anatomical elements and import it to UE4 but then without the morph targets.
I came accross this video: https://www.youtube.com/watch?v=TsO4OEG4O-w
The guy in the video is using a Genesis 2 model. I am not sure about the DAZ Version that he is using. It might be older than DAZ 4.12. However, it seems to work perfectly well in these circumstances and with DAZ 4.12 and Genesis 8 it does not work...
Shape Splitter - Divide, Combine and Save (The new version is already available. 1.2.1)[Commercial]Two open tech support questions directed at the vendor and he’s been AWOL since October (aside from never providing the promised manual). I for one won’t be buying anything from him again, as the documentation is (as others have stated) wholly lacking. This problem is *not* going to happen to me again.
That's your right. Your problem isn't a technical issue that the vendor needs to patch; it's a rather brash request for a personalized tutorial within a 4 day time frame during the holidays. It seems like most people in this thread have tinkered and found out how to use this product to make some amazing things. The documentation cannot cover step-by-step every permutation of vertex/bone/plane splitting for edge cases. Hobbyist software or not, some trial and error goes a long way.
No step by step screenshots here, just good old reading and deduction using what we know of Daz figures in general. This product assumes the user knows a thing or two about that.
I assume by "morph creation of a character’s feet" you want to separate the feet morphs from a character to use elsewhere. First load in a default G8 and run the script. In Step 1, the product needs a way to know how to divide a character. Right away when we launch the script, we see the Easy panel doesn't divide the target part; we want the feet only, not the entire legs. The Material panel also doesn't do what we want because the feet don't have their own material surface zone (check it). But in the Bones panel we can scroll down and see that, lo and behold, there is a heirarchy for the feet bones (left and right feet). Select all the child bones for the left and right feet (including all the toes).
In Step 2, click where it says "Select a property..." and start typing the morph you want to separate. So if you like Victoria 8's feet, you would write "Victoria 8" and choose FBMVictoria8 (Victoria 8 Body). FBM = female body morph. Don't choose FHM as that's the head only.
The video then clearly shows how to preview and save out the morph for use with other characters. You can tinker with including more bones when transplanting the feet, as some characters are taller than their base counterparts, so the ankles can get distorted if you don't also include the shin bones. Victoria 8, for example, has this problem.
There are more advanced uses of this product to do the same thing, but this is the quick and dirty, figure-it-out-in-15-minutes method of transplanting feet.
500 Pages in Content Library - Am I the first to hit this landmark?I've always been afraid ot messing with files, due to messing up the file paths. What can you move and what can't you? Sounds like data and runtime stay put? @nath
I have a 'paltry' 412 pages.
With regards to moving and finding things, Nath pretty much covered it but I will say that I only have 2, maybe 3, products that cannot be moved. Apart from data and Runtime (although I do know enough to move folders in the Textures folder and repath to it) I move everything. I come from a Poser background in 2006 and organising Runtimes/Libraries is second nature. I often wonder how people find content when it is installed under so many different folders and vendor named folders. If I'm looking for a character called AAA how would I know to look under a folder beginning XXX because that's the vendors name? If I'm looking for a script that converts clothing why would I not have a folder called 'Clothing Converters'?
The picture attached shows my Library. Everything gets put under these main folders, but rest assured pretty much all the sub folders are non standard ;)
I have become really adept at hand editing duf, dsf and json files and if something needs repathing it takes me seconds in Notepad++. A small price to pay to find things where I'm looking for them. If I ever find a way to hand edit paths in dsa files I'll be all set.
That's a nicely elegant library, though it doesn't show how you deal with products that come formatted for Poser.
I have 14 Poser runtimes, all organised, and added through the Content Directory Manager. Any Poser content installed via DIM gets moved out to the relevant Poser runtime :)
Yes, but when you install Poser content, the everything goes into the runtime folder, and there's very little consistency in where things go from vendor to vendor... ie textures may be under materials or poses, props and sets may be in Figures or Props... are you manually creating new presets for each and every asset? If you only have a small number of assetss that don't come ready made in DAZ formats, I can see that as being something that's doable, but I have over somewhere in the neighborhood of 10,000.
Custom Categories is how I make do at the moment, where, thankfully, you can have the same item listed several times in different places, and you can copy enitire folders with a few keystrokes.
Wthout going into labourious detail, I have a set of folders setup in the Runtimes for characters/props and poses/materials. All content is moved into them. It sounds mad, which it is if you try and do it all at once in one go but I have had this system going since Poser 6 so it's only a few items a week, if that, for me since I mainly moved over to Studio. It's why sharing these content management schemes is fraught with peril, if you didn't start the scheme early then trying to implement one when you have masses of content is a task not to be taken on lightly.
Yeah, that's what I suspected. If, as Cher said, I could turn back time... As it is, I'm going to be picking up a new render computer in the very near future and I may break down and install everything fresh except for a handful of favorite created characters and sets, while keeping everything else on the old machine as an archive. I bought a program from Dimensnion 3D a while back that I THINK will let me pull just the assets needed for an existing scene and transfer them to a different machine... need to dig that up and find out.
AIUTO...CHI CONOSCE L’ITALIANO? PARTE DODICIE poi, fruga fruga, trovo questo: https://www.daz3d.com/mirror-geometry
Cioè... Mi stai dicendo che posso invertire tutto quello che voglio senza dover passare da Silo o Blender e senza ri-riggare?

*muore*
Mi fa molto piacere che serva a qualcuno! :D
Io l'ho visto e mi son chiesto proprio a cosa servisse xD
*torna in vita*
Purtroppo è limittato solo a Genesis8 e compari.
 Niente di utile all'orizzonte.
Veramente io avevo un programmino esterno a DAZ che faceva la stessa cosa, lo usai anche su Genesis e funziono perfettamente.
(づ◔ ͜ʖ◔)づ Dove trovo questo software?
Imago non mi ricordo come si chiama, ma è uno senza installazione. Appena sono a casa vedo di mandartelo, o al limite ti dico il nome. Però aspetta, se non ricordo male faceva solo il mirror, in pratica rendeva i due lati identici, chiedendo di replicare ad esempio il destro sul sinistro.
Dammi solo il nome, evitiamo di infrangere eventuali licenze.
MTMirror, buone feste a tutti voi.
Buone feste anche a te!

MirrorMT è per i morph, Crios, non per le mesh. Hai fatto confusione.

Infatti, ti dicevo che non mi ricordavo bene.
CLOSED!Making a Genesis 8 figure a kidHi,
I was trying to make a Genesis 8 figure a kid at around age 7, 1.20 meters height.
I tried different techniques, from scaling down the body in blender and importing it as a morph to using the genesis 8 body morphs from DAZ originals.
Nothing seems to work.
It seems crazy to me that we can make the head of a kid in a few seconds but we can't make a body.
Can anyone help me out, if they managed to do it (without the Growing up Bundle) and tell me which sliders they used.
This is my result with the morphs.
A bit of an issue with eyes using Face TransferI did some Surface comparisons between the EyeMoisture settings of standard G8 female and a G8 Female with a Face Transfer. The setting that causes the dark overlay is "Share Glossy Inputs". Make sure that this is OFF.
Another setting that needs to be changed is: Glossy Layered Weight - make sure this is 1.0.
I don't think that the following have a major impact, but I changed them anyway to make consistent with the G8 Female's eye moisture settings:
Base Color: 1.0 1.0 1.0
Glossy Color: .78 .78 .78
Gloss Color Effect: Scatter Only
Refraction Index: 1.33
Now my render has normal eyes! Hope this helps you as well!
Mike
Honesty, it's not realy perfect. But the bug is easy to corrige.
1) creat your character with face transfert and save it.
2) apply a skin of another caracter, the bug of the eye is automatic correct.
3) apply the original skin create by facetranfert (by surface > defaut templates, the textures are in the list, easy to find it). you can to apply the original eye without problem.
4) Be happy (i'm)
Foot Issue with Lilikh BootsI'm using She Orc by Rawart and Lilikh Outfit. I am having the issue shown in the image. If I zero the She Orc Morph, the boots shrink. The in-built boot adjustments do not expand enough to 'cover' the amount of shrinkage. Is there a way to remove the She-Orc morph from just the toes part of the boots only? It may be possible to fix just the toes with the Expand options available on the boots.
Thanks!
Figure shape won't zero outi think you need to zero out these manually
these morphs stays all the time with the caracter.
expressions on the other hand can be reseted.
Thanks.
How do I clear/reset expressions?
Yeah, and these are the settings that wouldn't save as a shaping or character presets. Hardly any of the settings saved as a shaping preset. I thought I'd be able to save just the head as per another thread but that didn't work at all. I ticked everything but Animal. I'll have to make a Single Dial Morph [SDM] with it. It's easier to dial in and out. I was worried about lot os SDM's on top of other SDM's though. My characters have got very 'inbred'. :)
It seams if you have anything dialled in with an SDM it won't dial out with the 'Zero...' Because I had SDM on SDM it was complicated. When I went through the 'Currently Used' and found any SDM's and dialled them out I managed to reset the figure. I really only wanted to zero out the body and save the face but it looks like I'm going to have to go through everything and dial out the bits I don't manually then save yet another SDM for the head.
I'm trying to save time because loading a new G8M takes over a minute on my computer. That is still quicker than dialling out morphs manually.
CLOSED!Face transfer Skin does a lot more than geometryI noticed that the created skin make helps the model look a lot like what you would want but once you remove the skin, or add a new one, he looks nothing like it.
I will add a few renders of 8 generated models for same person with different skins (not the generated one) and I am curious if anyone recognises the celebrity that was the basis for generation.
First render is no skin
Second render is Gen 8 Male skin.
Third render is Burchard skin.
Forth render is Dante skin.
Does anyone recognise the celebrity? I will post the ones with the generated skin later, if noone recognises (I would never guess with these skins).
CLOSED!Shop Filter addHello,
I was not sure where to post this, I hope this is the place.
I think a very good addition to the shop, would be a filter by product type.
By that I mean: morph, character, pose, bundle and so on.
I feel like this would be very helpfull and it's weird that it isn't already available. If it is and I can't see it, could you please direct me to it?
Face TransferWhen I tried an image which had shoulders and all and tons of colour in the background, I had that first error--> "face transfer failed to generate try a different source image". After that I made darn sure that all my faces are just the faces by themselves and nothing else.
I don't think this plugin will do well if you have the wrong lighting and shadows and hair across the face, as it actually messes up the textures and adds shadows and darkening to the face when you want to add hair to the figure. A lot of post processing needs to be done and from working with it tonight, all the renders I have done makes it seem like the person is like a younger version of the actual image- or them, but not them really, if that makes sense. Even with heavy forehead lines, it doesn't pick up everything. But when combined with artistic digital touchup, it works really well. I had to add in the hair, and add lines on the face as the software didn't generate them as the original photo has. In the end, a semi-realistic grayscale drawing combined with 3d looks amazing. :) But for someone who is looking for a proper 3d version of themselves, this software won't do the trick. It gets close, but it is not perfect. I did purchase the unlimited version, so I will be using it in my digital artwork.
Here is the end result after having touched up and drawn in the hair over the existing hair plus drawn in a lot of the beard and eyebrows. Works like a charm then- as an art piece. :)
The last piece I uploaded is using his Face, but with morphs and Viola! New character has been created and there is no post processing besides the fact that it is gray scale now.
"How to" neededOk. I am trying to transfer some V4 clothing. Ultimately it needs to go to G8F but i don't mind starting small.
When I load a G3F and select her in the parameters tab i click on hidden but no clones option appears. What am I missing?
Face transfer stretches neckGiraffe neck syndrome! Yes, that's a problem with Face Transfer. It usually happens when the person in the source photo has long, shoulder length hair, so the sides of their face is obscured. Since Face Transfer uses some kind of automatic face detection algorithm, not much can be done about it. The best thing you can do is find another photo of the same person with their hair pulled back.
Or, if you really like the photo, you could try to draw in your own fake neckline in Photoshop. I haven't tried that yet, but it would require a lot of trial and error.
Daz Studio Pro BETA - version 4.12.2.60! (*UPDATED*)So are we saying that NVidia drivers 441.66 have improved matters?
That's the way it looks with my Titan RTX. Haven't had the chance to test it out yet on my GTX 1050-equipped laptop. But based on my knowledge of the underlying things at play, this particular bug fix (essentially raytracing acceleration memory leaks) should apply on both platforms.
Switched to 441.66 a week ago.
Regular Public DS 4.12.0.86 continues to be a reliable workhorse.
Did have to use Beta 4.12.1.40 for a bit to trouble-shoot> Did 7 morph changes (not material updates this time) in live IrayPreview in 4.12.1.40 with 441.66 and.... PC-system dropped to CPU.
Whereas, in 4.12.0.86 I can do changes all day long, for days on end. Did not really see anything definitive re: ""individual-scene-object-placement dependent"" other than the more objects, then the more spatial relationships etc need to be defined. And not so much anything about subroutines for pockets of scene geometry density or anything like that.
Imagine for a second that you wanted to render an incredibly simplistic scene with only 4 separate triangles in it where each triangle sits in its own front corner of the virtual scene space. This is what the BVH Acceleration Structure for that scene configuration would most likely look like:
- Bounding Box Front-Top
- Bounding Box Left
- Triangle #1
- Bounding Box Right
- Triangle #2
- Bounding Box Left
- Bounding Box Front-Bottom
- Bounding Box Left
- Triangle #3
- Bounding Box Right
- Triangle #4
- Bounding Box Left
That's a heirarchical structure with a total of 10 items in it that need to be stored in a file somewhere for constant analysis by your Path Tracers.
Now imagine rendering the same scene except this time with one triangle in the front top right corner and the rest in the front bottom left. This is how the BVH Acceleration Structure would now read:
- Bounding Box Front-Top-Right
- Triangle #1
- Bounding Box Front-Bottom-Left
- Triangle #2
- Triangle #3
- Triangle #4
That's a heirarchical structure with a total of only 6 items in it (a 40% size reduction from before) despite the fact that the scene's content remains exactly the same. Hence why I say individual-scene-object-placement also plays a role in how much memory is needed to accommodate the construction and storage of these acceleration structures.
Oh that's a helpful description. So it does break into sub-environments for raycast compute.
It's just like the extended Tableo of Contents of something like a physics textbook. Except that instead of breaking paragraphs of text down into chapters/headings/subheadings/etc based on topics, its breaking down collections of triangles into an increasingly detailed descriptive hierarchy based on location in a specific representation of virtual space.
Do you know how specifically how many Bounding box designations there are? Don' want to assume based on your naming conventions, which may be hypothetical? or Not.

BHV construction is completely open-ended and infinitely tweakable. So yeah, my examples here are completely just made up by me at the spur of the moment.
Heh.
My reason for asking that question and the other probing questions following that was to get an idea of best practices for scene layout.Your interesting & illustrative example (10 vs 6 items in hierarchial structure) leads me to believe there may be be better ways from a camera POV (and probably items outside of camera POV for impact on lighting) to try and setup the "Scene Layout" in certain ways to optimize for BVH and reduce render times alot. The previous example gave me hope there may be ways to do that. The latest replies are a bit more abstract and mean I probably have to do scene testing of many different varaibles.
Would you happen to have any tangible examples you could share?
And also want to say, the abstract you provided is very helpful already. So if you don't have anything tangible, am grateful for what you shared already.
Just means I need to figure out how that applies to my scenes, and how I can improve layout, given my tendency to want to put alot of Geometry&Mats into my scenes.And are they static or relational to scene size?
Depends on what you mean by scene size. If by scene size you mean texture data needing to be stored, then the asnwer is no. If, however, you mean scene size in terms of scene object/polygon count or virtual space (ie.small room vs large room) then the answer becomes either yes or sort of respectively.
For example, a large room vs small room. Would the large room have more BVH "bounding box" sub-areas, or are there just more items&virtual space in the same number of BVH subareas? This would be good to know in terms of populating a scene. That is you keep some areas or quadrants of the scene unpopulated (similar to your example 10 vs 6).
BHV Accelleration Structure complexity = camera viewpoint * scene content * scene content layout
Hence why BVH Acceleration Structures are normally generated on the fly at the start of each render. Because nearly every rendering scenario (the exception being exactly the same scene with light intensities or textures modified) needs a potentialyl completely new BVH to describe it efficiently.
Thanx for confirmation that camera viewpoint is a prime variable. What role do things play that are outside of the camera view and yet affect the light ? Like a tall bookcase, a wall, a roof, a light source etc? This comes under "scene contents" but yet camera viewpoint acts as a filter. Somehow seems logical all scene content despite camera POV has to be factored in to get correct lighting end-result? So that confuses me how camera viewpoint in that case matters?
As you can probably guess, my hope/goal is to reduce scene render times by 10-30% with optimized scene layouts recognizing BVH realities.
MimicMolly's Renders & WIPsBack to the first tattoo and makeup, I have made some quick SSS maps for the translucency slot and now they look as they should. (This is Sanjay 8's skin at 45% translucency. I really hate how he and Kala 8 look very pale and rely on translucency to look darker.) Anyway, if you're wondering why your custom tattoo or makeup isn't the correct color, check the translucency slot. There may be a texture there that also needs editing.
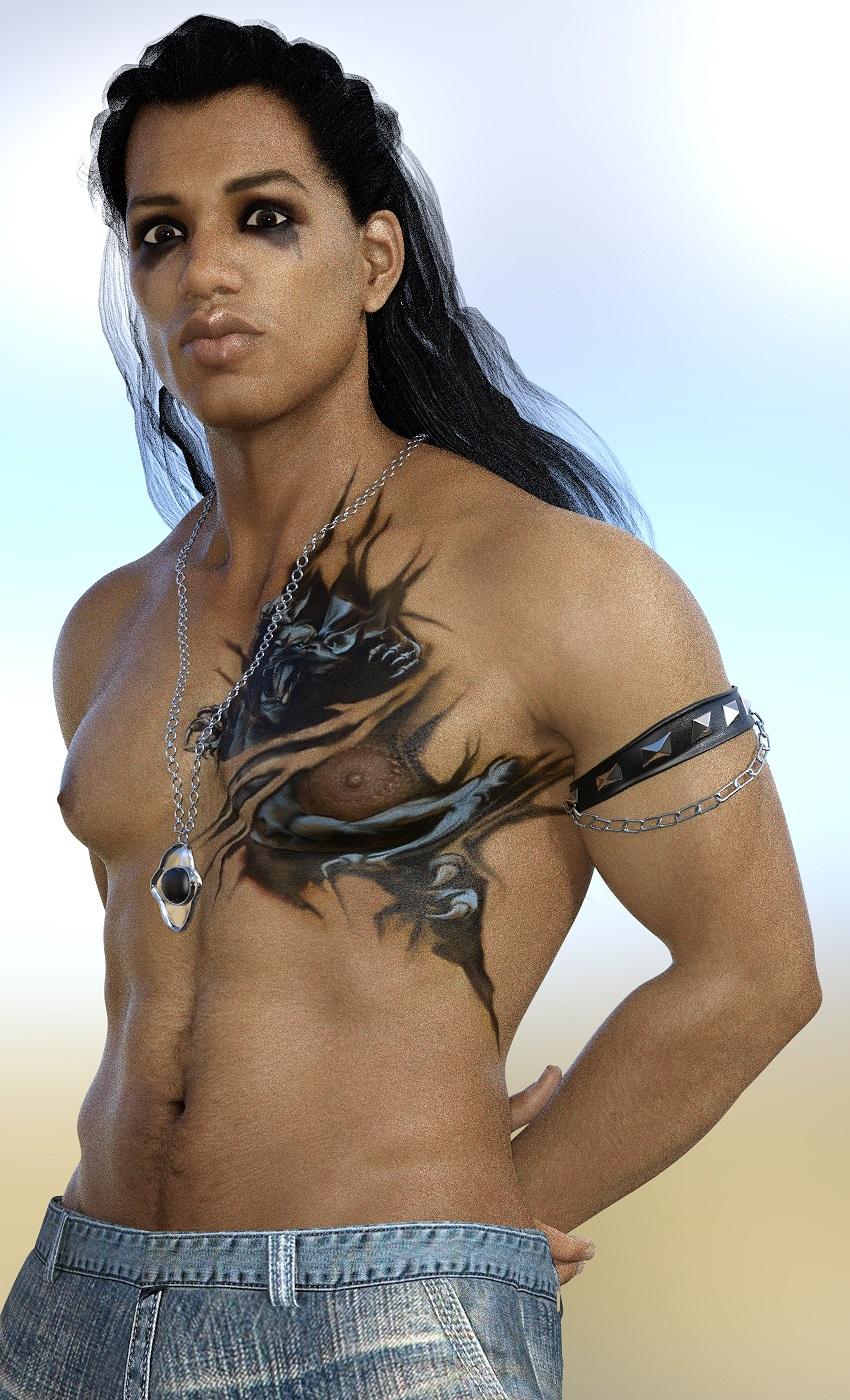
However, when working on the Ryuu tattoo, I noticed that the way the map transfer works on Genesis 1 and G8 is different. The UVs are not quite the same. Not sure if this has affected Lynn's tattoo. I'll have to go back tomorrow and try the map transfer again to compare the results. I think something might be up, but I'm unsure.
Show Us Your Iray Renders. Part VIIThe Jocelyn Hair from the Teen Josie 8 bundles has always been strongly reminiscent to me of Serana from the Skyrim "Dawnguard" DLC. Not identical (Serana has four braids and a slightly different styling), but well within my capacity to morph and edit, so as she was by far my favourite of the various companion characters of the game (being central to the add-on's plotline helped her be a lot more developed than anyone else), so I've decided it was time to redo an old Source Filmmaker render of mine.

It's been a fairly lengthy process, because it's taken a lot of asset editing in Blender and Photoshop to recreate the character on G8F, but I'd like to believe the end result is reasonably faithful to the original character appearance, while also being a considerable step-up from the quality of the original game model. (The original game textures... aren't exactly great, particularly as they're not helped by some bad normal maps that shipped with the game making a lot of characters appear to have pixellated noses. In this case, I decided to use a modified version of Tasha 8's vampire materials).
500 Pages in Content Library - Am I the first to hit this landmark?the Unimeshes became redundant once everyone got DAZ studio pro with morphfollower which is now called transfer active morphs.
Before that rather than buy them all or buy DAZ studio advanced or pro which was pointless as a Carrara and Poser user, I bought Morphing Clothes by Dimension 3D from Content Paradise. I simply saved cr2 files of my figures with every morph injected in Poser then transfered them into any clothing I bought.
It was a nice little money spinner if you didn't want to use default figures I thought
Report sales errors here. "There's Always Another Sale™"
Agree with @barbult. I love the reference to Narnia and smoke signals.The thing is Daz doesn't know that it doesn't work, not truly. Daz employees can't make it go wrong Daz Moderators can't make it go wrong and when it does go wrong it goes wrong for different people in different ways, sometimes even different errors to the same person on different days. The percentage of people who are reporting it going wrong are not the majority of the customer base. The Daz people have asked for screen shots, they have examind them used the self same cart contents and cannot get them to go wrong. So far they haven't had that "AHA" moment when suddenly you see the common denominator. Once they have found a common denominator a bug is fixable.
And until then I guess its not considered a bug? so doesn't actually require fixing.
It is, but until you have found what causes a bug you can't fix it.
Sure you can, it just means accepting that what you have is somehow broken, taking a deep breath and saying "This doesn't work right. I'll stop doing this, this way, I won't do something exactly like this again and if I have to do something similar, I'll try a completely different way of doing it." The trick is to remember that what you are trying to solve is the PROBLEM, not a bug.
Yes, they could have chosen to change the offer, assuming people who can take those kind of decisions were available to decide it. That's not fixing the bug though, which is what the post I answered was talking about.
Fixing the bug isn't the most impoprtant thing, fixing the overall problem is. When the ship is sinking and you can't see any obvious holes, that's not the time to conduct a survey to look for pinholes in the keelplates. You man the pumps, ready the lifeboats, make for the nearest harbor and or transfer to another ship. And, seriously, if they haven't been able to find the bug in the first week, what are the odds that the same people will be able to find it in the next three?
As for people who could make those decisions not being available over an entire week... no, sorry, that makes no sense unless DAZ is based in Narnia or only communicates internally via smoke signals and semaphore. It'll be 2020 in just a few days and the entire world is just a text away.
Daz 3D is part of

Connect
DAZ Productions, Inc.
7533 S Center View Ct #4664
West Jordan, UT 84084Licensing Agreement | Terms of Service | Privacy Policy | EULA
© 2026 Daz Productions Inc. All Rights Reserved.