-
Natural Eyes for Genesis 8 [Commercial]
I'll start with the gray ring. Because I made these eyes to suit a whole lot of applications, and I know every vendor has their own unique way of altering, I left a little wiggle room of space. They are designed to be used with the morph dialed i so that there should be almost no gray area left.
The reflection. Cut and paste cornea is lovely but obviously is not a "real" reflection. There are options for that in this product too though :)
To use a real reflection takes a bit more work out of the box. You can try spinning the dome which can take eons to get right, or you can try out one of agentunawares free hdri's that cast nice shadows and reflects.(the portrait light set at deviant is lovely) or any of dimension theorys light probes with the "direct" reflect.
You can also try adding a catchlight to the eye. Make a rectangle, add an emissive shader, line it up in front of the figure and move it around to cast a little light in the eyes. Then parent it directly to the head. Or you can save yourself some time and pick up the lightset I did for pc club. There are I think 10 catchlights that will parent in the proper place to the head :)
duplicate formulas - solvedGoing back to the question if it is caused by a morph package, how would one track which package it is and how would one be able to correct it? Or is it not worth the trouble?
Fibermesh Eyebrows, how to remove the "paint"?Just got Jenni 8. The promo pic shows great fibrous eyebrows, nicely groomed, which tipped the sales for me. How can I achieve that in a render? I keep getting some kind of background under and around the fibers, which I guess is supposed to be eyebrow pencil, but I don't want heavyily penciled eyebrows, I want just the hairs. I have randomly tried different settings in Surfaces panel, but I never get just fibers, the Selector gets a wide outline. I tried the "thicker-thinner" morph for Jenni's brows morph in Parameters. Doesn't do much. The Selector for Surfaces tool just outlines a wide area not just the hairs. I need some help with this.
 GoZ to Daz3D crashes due to missing files?
I have this same problem and it's so frustrating. I just got a new macbook pro and i'd been waiting till i got it to upgrade DS from 4.8. Here I was thinking I'm going to go nuts creating morphs to share and apparently GoZ has been broken for some time and nobody has a clue if/when it will be fixed. Of course I can still sculpt morphs in Zbrush and import with morph loader but it's kind of a pain not to mention even more of a pain if I want to add complimenary morphs to dialed up or posed characters. I've tried going through the forums to find answers if they are there and I missed them, I apologize but is there any mention that DAZ is working on this? I remember there was a time when they actually had a contact number on the site and you could call and talk to someone there. They would maybe even look into a question and call you back. Yeah.. I'm that old. :P
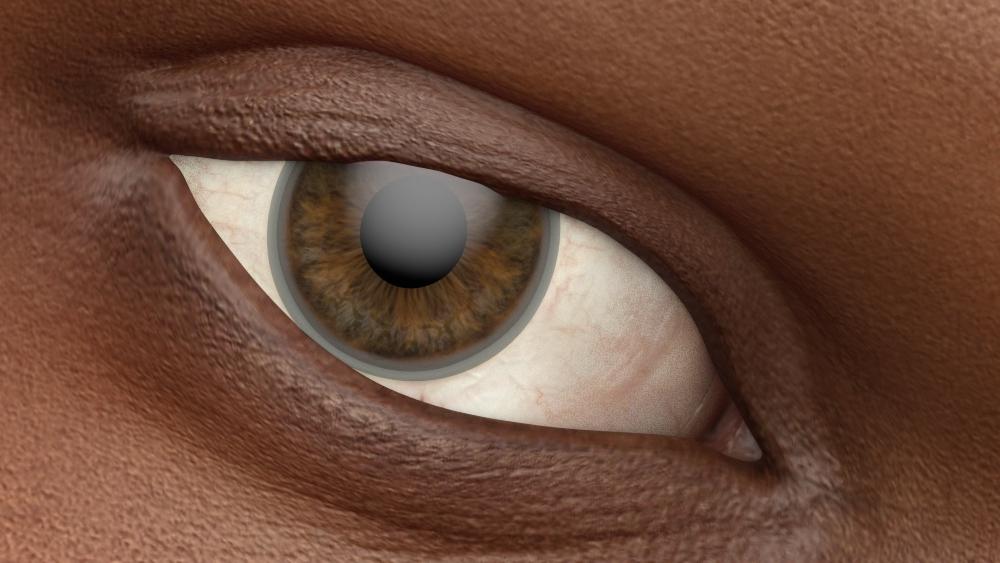
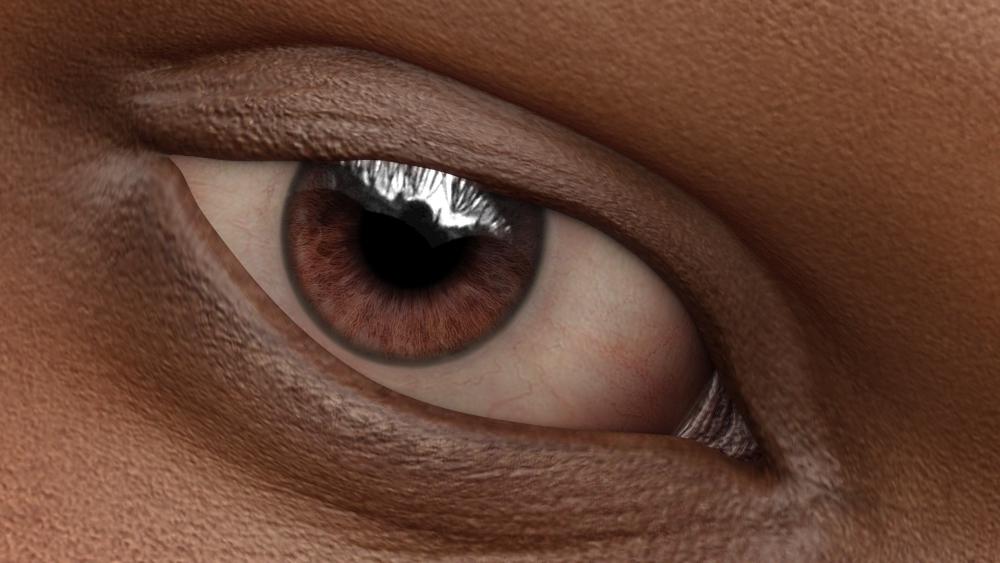
Natural Eyes for Genesis 8 [Commercial]I just got this product and am trying it out. Is that gray ring around the iris, between the iris and sclera supposed to be there, and is it supposed to be that harsh? I don't see that ring in the promo images or other renders posted here.
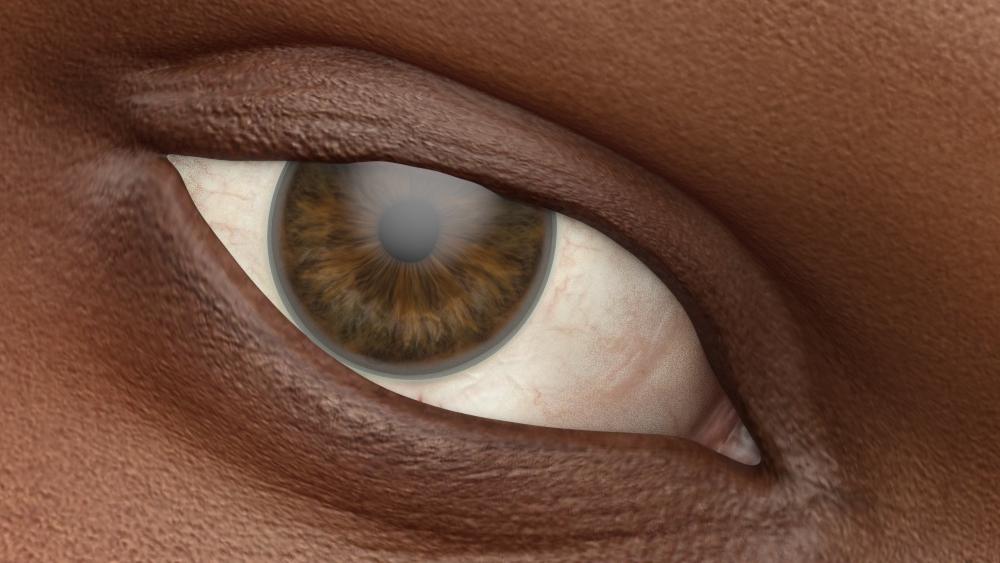
This is what I did: I applied one of the eye colors and dialed in the iris and lacrimal morphs and the cornea bulge morph. This G8F character is a dialed shape consisting of several morphs. I rendered with your recommended render settings for quality 6 and ratio 98%. The lighting is an HDRI from Leonine HDR Pro Lighting. I rendered to completion (did not stop early).
The original Darcy 8 eyes look so much better than the Natural Eyes, I must be doing something wrong with the Natural Eyes. Can you offer advice?
Natural Eyes Without Iris or Lacrimal Morphs
Natural Eyes With Iris and Lacrimal Morphs
Darcy 8 Eyes (have canned reflection in cornea cutout map)
 Re New Cecilia Lau Character
I just wanted to say well done to WindField the designer! Being a fan of wuxia as soon as I saw the thumbnail I recognised the model as the actress Liu Shi Shi, Cecilia Lau being her name for the West. This new 3D character is exceptionally accurate. I've seen quite a few characters which either by chance resemble or are actually based on Shu Qi, but none of them quite get there. I've also tried morphing a Shu Qi but I also can't quite get there; while currently I've been trying to morph a Jiang Xin (my favourite mainland Chinese actress), but she has such a unique smile that I just can't get it right. So in light of my failed attempts, seeing this new model of Liu Shi Shi aka Cecilia Lau I'm mega-impressed!

Wow, that girl Jiang Xin is gorgeous, I would surely buy her. I purchased the Cecelia character yesterday.
Index of all Furry / Anthropomorphic figures for Gen8?Oh dear lord, this looks awesome.
And with Xtransfer and the other converters from Riversoft you can take any of the Genesis 3 figures and transfer morphs to Genesis 8, if you want. (Although fair warning, if the figure has a geograft, that won't work)
Didn't know about that, thanks.
And how about LAMH?
https://www.daz3d.com/look-at-my-hair
Did anyone tried to use it on a genesis figure, is it easy to use?
LAMH is good, but I think Strand Based Hair and dForce Hair are better. For one, LAMH needs to be applied last and then the figure cannot be reposed. Good LAMH furs are taxing for the machine, as well.
Strand Based Hair is in Daz for free, it isn't as resource hogging and the figure can be freely reposed. The only issue is that the editor is much less intuitive than in LAMH, especially when it comes to styling and cutting the hair. It also has no good symmetry tools for it.
dForce hair is not easy to edit, as you cannot actually make it. You can just make custom maps for it.Help restoring a corrupted G8F base figure" If that is the way that the figure loaded, then they are obviously not zeroed."
No, that is not the way the figure loaded! Sorry if I am presenting this in a confusing way I am trying to be clear. I set it that way to show that the degree of eyes closed is not the default. They are closed perfectly at this value 80 rather than 100 which is where they should be perfectly closed. They load with dial showing zero (but you can't see in a screen capture that anything is wrong because 20% closed doen't look like much different.) I am trying to show the problem so you can see it.
I am fairly confident that I know what the problem is, does anybody know where the memorization information is stored?
"If the problem is only when you close the eyes and not on the base loaded g8f"
It is on the base G8 female. There is no morph active.‘show hidden properties’
does not show anything, the program while hiding something doesn't seem to know that it is. It is a possibility I hadn't thought much about though, it could be in this realm, I will remove all my hidden eye closed mcms and see what happens.Timeline: dForce vs AnimationWhat are you wanting - just to bake the fnal simulated shape to a morph, clearing everything else? But then if you animate the figure it will merrily poke through the clothing a it moves.
No - all I want to do is as I described in my previous post: clear the timeline. A major plus would be the ability to select a frame and create a scene from that frame without bringing in the rest of the timeline too. Another option would be a scene-subset which ignores the timeline but that too, at the moment, keeps all of the timeline frames with the Scene Subset.
Timeline: dForce vs AnimationWhat are you wanting - just to bake the fnal simulated shape to a morph, clearing everything else? But then if you animate the figure it will merrily poke through the clothing a it moves.
Timeline: dForce vs AnimationThere are two reasons why I would use the timeline in DAZ Studio: dForce simulation and animation. However, I'm wondering about how to use both in the same scene. What complicates things is that I use the same scene for stills and then again as a base for the animation. So I create the still and use the timeline for dForce simulation. Then when I want to use that as the base for an animation, the timeline is already occupied with keyframes which are not necessarily wanted in the animation.
So, back to the frequently asked question: how to I clear the timeline of the dForce animation stuff so that I can start fresh with the animation? The way I am doing it now is to save the scene twice and use one for dForce and the other for animation but I am often cursing myself for forgetting to do that or deciding to animate the scene after I've already "spoiled" it with dForce simulation.
I am working on a animation using deforce for the ballet costume , its a Ballet animation with a very flowy skirt and dynamic bodysuite .
I start by building my main character with the deforce outfit & first turn off everything visible to simulation that you do not want to interact with the deforce items, like hands fingures, props that would make the outfit blow apart during simulation. and save it as your main go to character you can load for each new scene you build for your animated story.
Now take your character and create your animation with nothing else in the scene but the character and the deforce outfit and hair your using & once your happy with your animation bake it to the timeline to lock it in, now save it the scene and then your ready run your deforce simulation for the character oncce you have your animation cycle baked into the timeline. once you have everything deforce created and animated with your simulation again done bake that to the timeline as well & start adding in your environment and props next. it a huge time saver and helps to build your environment set up as a sub scene first that can be reloaded and then you can just load it into the character scene when your done simulating deforce items.
So far I have 4 scenes 20 to 25 seconds long each scene there will be 8 - 20 to 25 second long or around 650 keyframes each totally :148 seconds of film in this animated short going by my story board. I usually just make short 4 to 10 second scene when using deforce But i am making a animation of "Dance of the Sugar Plum Fairy" and the winter scene I used for the stage is pretty big and the dance requires the character to dance on her toes all over the scene so that s why I made each scene so many keyframes this time ..
I am building and simulating deforce in Daz 4.12 . But I am rendering the final scene in daz 4.10 because its much faster less CPU drop back and crashes when rendering.
here is a screen shot of my my next scene ready to be sent over for rendering
Thanks for the detail in your explanation. I might be misunderstanding, however, because I am not seeing how your method avoids the dForce animation remaining on the timeline when you wish to animate the scene further. For example, you might wish to render that scene again with the characters moved around somehow - like a continuation. I guess it doesn't apply to your workflow as you are creating one animation therefore just one scene. My issue is using the scene for the next iteration of a storyline or use that scene as the basis for another animation. In these cases I am stuck with the dForce animation in the timeline with no way to clear it. The clear animation options tend to reset characters and morphs to zero (the nuclear option).
As mentioned, all I can come up with is trying to remember to save another copy of the scene *before* I start dForce animations. Or to drape the clothing on a character in a separate scene-subset and merge her into the main scene, ready draped. But does that sub-scene contain the dForce animation? I need to check that.
Once you have your first deforce items simulation completed, turn off the visabliltiy of those Items simulation under the display tab. and then load your next character & deforce item into your scene. By turning off the simulation of your first deforce item it will still keep its deforce morphs simulation you just created and but turning it off kees you from clearing or resimulating the same item over again But you will be able to simulate a new item without messing it up once you turn off the simulation of the first item. and when I am ready to ready I bake everything characters deforce items and animated props to the timeline and save before rendering in case daz has a crash I can just reload the scene without having to go through all that work again .
Again, we are missing the issue. I'm not concerned with saving the dForce simulation - in fact I want the opposite. I want a clean timeline after simulation. Turning off visibility does not remove the timeline frames. I use the "visible in simulation" option all the time with dForce along with freezing the simulation of some while allowing others to simulate. I also use the option to clear the simulation data for one item without affecting other dForce items in the scene.
So to re-state my issue - all I want is a way to clean the timeline without resorting to the nuclear option of resetting the pose, morph, etc. to zero. What you are describing is baking to the timeline which is actually the opposite of what I need. Sorry to have been so poor at explaining.
XTransfer Module 1- Genesis 3 to Genesis 8 Morph Converter (Commercial)Can I see this bone rigging? As well as the dialed morph causing it. Thanks
Buy Something That Doesn't Work in Carrara? Post your Questions and Workarounds here. (please)looks like dragonling is gonna need the HD plug-in https://www.daz3d.com/da-dragonling-hd-for-daz-dragon-3
http://docs.daz3d.com/doku.php/public/read_me/index/65485/file_list
Dragonling HD.dhdmbut the eye morphs are dsf
 MCMDADEyesCloseLeft.dsf
and the displacement maps will need the phong plug-in
looks like will need only the 1 morph converted
i feel like leaving my coffee mug next to my monitor is a catastrophy waiting to happen
Cartoons - how are you doing?Hi, i´m new in DAZ. I would like to know what morphs were used to make these characters.
I think the 1st two are Toon Girl for G8F and the 3rd is Cartoonized for G8F You'll need to apply various morphs at various percentage strengths to get those exactly or something different that you like but they started with those I think.
Then they mix & match various skin materials, shader settings, hair, and clothing to get what you see.
I'm going to disagree about Toon Girl, because her head is GIGANTIC if you go past even 10% strength. I'd say it looks more like Posey and/or Toon Generations, although it looks like it could just as easily also be Cartoonized.
Yes, you probably are right. I almost said Toon Generations 8 myself maybe only with Toon Girl 8 at a low percentage. Or Toon Generations 8 combined with Girl 8 combined with DAZ Originals Head Morphs & DAZ Originals Body Morphs. There are lots of ways to get to a character that looks essentially the the same stylistically. There used to be only 1 way to do that and that was the DAZ Originals Head / Morph / Expressions products.
The poster should ask directly the maker of those renders if they mind sharing the list of products used and the morph dials used in percentage terms. Or even share the scene or presets. They might not answer or say no but it's not difficult to get a similar character if they don't answer.
V4.2 + translate tool or sliders = moves out of pose.The attachments best explains whats happening.
I’m not sure how to explain this but because of the current issues with GPU rendering dropping to CPU I chose over the weekend to revisit some older projects involving V4. Using Studio 4.12.1.40 Beta and Public release 4.12.0.86.
And a new problem has shown up. It appears that when the ‘translate tool’ or even sliders are used, V4 moves out pose, not just directional move but the whole body, most times the foot twitches while it traverses some distant to be placed elsewhere in a scene. During that time the entire body will move out of pose just a bit but only a bit and only at the initial move.
This problem also happens with M4.
I’ve tried uninstalling, followed by a total removal of the v4 folders. I’ve gone so far as to even install V4 alone on a separate drive to trouble shoot this issue and to no avail, it continues to happen.
It does not occur with Genesis on up.
I’ve also tried to replicate this issue by using an exact layout of the V4 folder with 4.2 morph and ++ morph on a different computer using Studio 4.9. It truly doesn’t matter if the morphs are loaded or not, it still happens with the base layout of v4.2 (which is installed via the Install Manager as is Studio) (FYI the Laptop GPU is incompatible with anything higher than 4.9 (GTX 560).
On my tower system I’ve gone so far as to test this problem out with Studio 4.10 and 4.11. and while trouble shooting driver issues also using NVidia Studio driver 441.12, 441.66 (studio) and 441.12 drivers.
The problem persists through all aspects.
I’m hoping this is a configuration issue in the current 4.12 Public release and 4.12 most recent beta and easily fixed with a simple click someplace like the draw settings or such.
System specs are 3.8GHz i7, 32Gb Ram, RTX2070 (8gb ram), (2)GTX 960 (4Gb ram). Nvidia driver is 441.66 Game driver as the Studio driver does not support the GTX 960 and windows disables the two cards as useless, and Studio cannot and will not render using the GPU. it's an instant CPU render.
The attachment will show the character was only moved a tiny bit but the whole body moved out of pose.
Any help would be great.
Morphs on base models G3All right. Before removing "all" morphs {cause some are normally pretty good to keep}, would you clarify what you mean by "messed up"? Some characters do call for other morphs in their make-up.
It might be only one morph that needs to be removed, adjusted or replaced.
For major surgery: To fix the morphs:
Go to your Product Library and download the Genesis 3 Essentials Female and/or Male packages.There are a few folders with morphs in them.
The base collection is:
data\DAZ 3D\Genesis 3\Female\Morphs\DAZ 3D {if these are what need fixing, copy in the new files}
Any additional morphs, presumably the ones you want to remove, should be in folders NOT under this 2nd folder of DAZ 3D.
data\DAZ 3D\Genesis 3\Female\Morphs\Other Name(s) {I would suggest backing them up into a zip folder in case you change your mind or need them again for some reason}
Thank you so much. Everything worked out for me.
Most welcome, happy it worked out for you :-)
Need a refresher on Saving a character presetOkay, I'm not sure whether this ought to be here or in the Studio forum.
XTransfer is out, and I've got it working for DAZ O and PA characters. Now I need to move a handful of my own dial-spins. Obviously there can be no transfer until I can get them into a format that gives me a single dial to spin. These are G3 characters and use no GenX2 morphs, just DAZ O and PA morphs, with 3DU's Toon Generations 2 prominently featured.
Ideally I would like to be able to split the head and body morphs into separate dials, but if that's not readily doable, I can happily live with a single character dial.
So. What are the necessary steps?
The "Powered by Hot Pockets" Complaint ThreadStill Complaining: More progress but no cigar yet.
 I now have all four computers seeing each other and able to transfer files to each other both directions. But now I'm all spagettied up with excess shared folders and some permissions issues, and one computer that won't let me change the "Shared Folders" list through the "Computer Manage" dialog. (*sigh*)
 Time for a Sunday afternoon, shot of peach brandy, some soft sleepy classical music and a nap.
 Buy Something That Doesn't Work in Carrara? Post your Questions and Workarounds here. (please)
Just FYI: V4 for Genesis 2 Female does work for applying V4 UV mapping to G2F in Carrara.
It comes with V4 clones, which brings up V4 in the Auto-fit dialog in Carrara, but I haven't been gettiung proper fitting that way. I haven't tried fitting first in Daz Studio since I don't have a version of my character in DS form. But that might work as an option.
there is another product for V4 UV https://www.daz3d.com/victoria-4-for-genesis-2-female you need to manually do maps in Carrara after loading it
I fit clothes in DAZ studio and save as support asset
Yup. That's what I bought. Just double-click the Material preset file to get V4 UVs on G2F. It comes with fitting clones too.
Thanks for the know-how. I'll try that. I tried fitting G2F clothes to Genesis in DS (which worked well) and saved as separate support assets, but they don't fit to Genesis in Carrara afterward. Maybe I saved them wrong(?).
they need to be a figure asset not a scene subset
also do the UV and materials in DS and save as a character preset
I thought that too, but I read somewhere (Carrara store page?) recently that applying a character preset to another in Carrara will transfer the proper UV mapping as well - so I tried it and it works!!!
So I could load Victoria 6 and apply Aiko 6 to get Aiko's maps, for example. Right in Carrara!!!
yes those are character presets, what I meant is you save your V4 UV ones as well in DS to do the same thing
Right, I know. But the product comes with one already: My Daz3d Library > People > Genesis 2 Female > Materials > Victoria 4
There's one file in there to add the UVs to G2F
Index of all Furry / Anthropomorphic figures for Gen8?Oh dear lord, this looks awesome.
And with Xtransfer and the other converters from Riversoft you can take any of the Genesis 3 figures and transfer morphs to Genesis 8, if you want. (Although fair warning, if the figure has a geograft, that won't work)
Didn't know about that, thanks.
And how about LAMH?
https://www.daz3d.com/look-at-my-hair
Did anyone tried to use it on a genesis figure, is it easy to use?
Daz 3D is part of

Connect
DAZ Productions, Inc.
7533 S Center View Ct #4664
West Jordan, UT 84084Licensing Agreement | Terms of Service | Privacy Policy | EULA
© 2026 Daz Productions Inc. All Rights Reserved.