-
Blender Bridge for Daz Studio
Okay, so I am back after many hours of sweat and toil, or dev and error checking - whichever comes first, or floats your boat...
I completed everything that I wanted to accomplish with the OP's linked DS - Blender bridge, less custom icons and creating custom collection upon import in 2.8x
- It is updated to 2.8x (in 2.81) and tested in 2.81 and 2.82 -- Not 2.83 alpha, nor 2.80
- It has a dynamic folder/file selection located in Addon Preferences (along with customizing/changing N Panel Tab) linked to your bridge folder of your choosing/creation -- There is only one file created by the DS side - this is always selected and used. Now, nobody is stuck not having the correct hard-coded file path, and not having a working addon.
- It has error checking, and a stricter export qualifier.
Remember, this isn't a proper bridge, or anything like TeleBlender or Diffeomorphic -- It is a Content Creation Tool bridge for morph target work on your figures/objects. More like millighost's old one we were using a few years ago (that I was currently updating for my own use before this thread).
So, if you got through all that - here's what I am here for; I am looking for a couple of beta testers for both B2.79 and B2.82 -- You don't have to do both, but I would like some testers for the 2.79 version as well as the more sought after updated 2.8x version. Windows only for now -- I have to look into the file pathing changes needed for Linux and possibly Mac...
I want to make sure there aren't any bugs outside my environment (shouldn't be, but everyones systems differ, so...), before I share it in the wild.
Let me know if you are interested.
Too Many G8 Characters?...having a nice gene pool to choose from helps though I often do a fair amount if "frankenmixing" using percentages of several different character shapes and heads then do the finishing work with the various morph and resource kits I have. One of the difficulties of trying to create younger custom characters is getting a smaller or more petite form that doesn't just look like a downsized adult,or in the case of younger girls, where the breast mesh doesn't distort or collapse when simply dialling the size down (which can affect how clothing fits look).
Broken morphs.Was a homebrew morph that was broken.
Thanks for the info, opened scene in winzip and used the internal viewer, then confused myself trying to convert it to a percentage.......
Dynamic clothing wont move on figureOk yeah I get that, Ive run a ton of simulations (clothing simulations are daz's coolest feature btw). What I'm asking is what causes some parts of clothing to not run in the simulations. Dforce is present, for example the dress is has only one surface setting all the same from head to to. But the skirt moves correctly against the legs when you run a simulation while the upper body part of the dress keeps the morph dforms unchanging. There is no movement of cloth against skin above the waist. As the figure is animated, the upper part of the dress acts like there is no simulation happening at all.
I just realized I used the wrong termin my original question. Don't think I've ever used Dynamic clothing actually. I got mixed up because there is a static and dynamic state in the simulation object type settings. I got no idea whate a drape even is, and it's the one part of daz I don't really care to learn cause dforce is to cool to use anything else. Simulated dforce stuff is quite possibly the coolest thing I have ever used a computer for, and my first computer was a commodore 64 in the 80s lol.
Thanks for the answer though, you answered the question I actually asked rather than the one I meant. Get it right next time!
Dynamic clothing wont move on figureHow do I get Dynamic clothes to move against a figures skin? LIke a strap just starting to slide down a shoulder, or the like. I'm trying to get that to work, but it just sticks like glue even with a morph that drags it out far enough that it should just fall straight down.
Everything I've tried involving weightmaps and the surface simulation settings has failed.
Thanks
Dynamic clothing is only moved via the Dynamic Clothing Panel. One runs a drape.
Dynamic clothing wont move on figureHow do I get Dynamic clothes to move against a figures skin? LIke a strap just starting to slide down a shoulder, or the like. I'm trying to get that to work, but it just sticks like glue even with a morph that drags it out far enough that it should just fall straight down.
Everything I've tried involving weightmaps and the surface simulation settings has failed.
Thanks
Too Many G8 Characters?It puzzles me, too, because to me tinkering with combinations and kitbashing is at the soul of the hobby. But I understand people want and do different things... just... seems so foreign to me, heh.
Like, even taking two figures and just mixing them; X at 40%, Y at 60%. Woo. Maybe some youth or aging dials. 5 mins, tops.
After that, experimenting with morph packs. I often find noses too small in most figures. Thankfully, 'nose flesh size' dial fixes that in seconds. Maybe a little more fiddling with nose height, mouth width... ooo, nasolabial folds...
That's miles way from actually diving into a modeling program to make a unique face, and gives you so much freedom to achieve a unique look.
Heck, how about the shape randomizer?
But I also agree there was a slew of female middle aged characters that came out like Jenni, Leisa, Babina and more that I can't remember the names of that added nothing to the gene pool.
You consider Leisa and Babina "middle aged"?
Leisa looks about 40 but not Babina. I was thinking of CJ or Ellithia I guess. They all look so similar, I get confused.
Too Many G8 Characters?It puzzles me, too, because to me tinkering with combinations and kitbashing is at the soul of the hobby. But I understand people want and do different things... just... seems so foreign to me, heh.
Like, even taking two figures and just mixing them; X at 40%, Y at 60%. Woo. Maybe some youth or aging dials. 5 mins, tops.
After that, experimenting with morph packs. I often find noses too small in most figures. Thankfully, 'nose flesh size' dial fixes that in seconds. Maybe a little more fiddling with nose height, mouth width... ooo, nasolabial folds...
That's miles way from actually diving into a modeling program to make a unique face, and gives you so much freedom to achieve a unique look.
Heck, how about the shape randomizer?
But I also agree there was a slew of female middle aged characters that came out like Jenni, Leisa, Babina and more that I can't remember the names of that added nothing to the gene pool.
You consider Leisa and Babina "middle aged"?
For me, yes for Leisa, but Babina is not there yet IMO. Even though the old (pre 94) standard was from 40-60, I consider 35-55 middle aged,
Too Many G8 Characters?It puzzles me, too, because to me tinkering with combinations and kitbashing is at the soul of the hobby. But I understand people want and do different things... just... seems so foreign to me, heh.
Like, even taking two figures and just mixing them; X at 40%, Y at 60%. Woo. Maybe some youth or aging dials. 5 mins, tops.
After that, experimenting with morph packs. I often find noses too small in most figures. Thankfully, 'nose flesh size' dial fixes that in seconds. Maybe a little more fiddling with nose height, mouth width... ooo, nasolabial folds...
That's miles way from actually diving into a modeling program to make a unique face, and gives you so much freedom to achieve a unique look.
Heck, how about the shape randomizer?
I so feel the same way, creating is what this experience with DS and 3D is all about to me. I would guess that those that posted that they just install and render would not be doing digital imagery if there wasn't a DAZ3D and they had to do it the old fashion way of actually being creative and using a modeling app and such. Makes me wonder the ratio of users that are this way since I keep seeing more forum posts along the same lines.
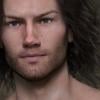
Serious question about men's clothingThe way the shirt is UV mapped divides the front right down the middle. The normal maps have that "explosion" of colors that you often see on textures beyond the visible "seams". The minute you place the shirt on anything other than a default G8 and have the figure posed even slightly, the shirt stretches and exposes those edges. I know I'm not explaning this well, but poke around in the texture folder and you'll see what I mean.
The first is the shirt on Tristan's morph with a slight twist to the waist.
The second is with the normal map set to 0. Because some of the add-on textures use that same normal map, the problem exists with it, too.
Yeah, my example was on a G3 (manually converted with SY's method). I have since converted that character to G8.
You'd just think the seam would have been put down the side or something...
Serious question about men's clothingThe way the shirt is UV mapped divides the front right down the middle. The normal maps have that "explosion" of colors that you often see on textures beyond the visible "seams". The minute you place the shirt on anything other than a default G8 and have the figure posed even slightly, the shirt stretches and exposes those edges. I know I'm not explaning this well, but poke around in the texture folder and you'll see what I mean.
The first is the shirt on Tristan's morph with a slight twist to the waist.
The second is with the normal map set to 0. Because some of the add-on textures use that same normal map, the problem exists with it, too.
[Released] ManFriday's Mesh Grabber [Commercial]hey Manfriday will you also update your Turbocontent for custom content in the future? sadl atm, you only look in this thread :(
I replied in the Turbo Content thread. Please don't mix topics, this only confuses everyone.
I just asked here, because you didnt commented there anymore ;(... since december.
Uhh rotating beta cool!
Update: my first experience was kinda... dissapointing, maybe I do it wrong...
And yes I made it wrong :D now I managed it, so it just need a bit learning! and FINALLY, without Zbrush or anything, I can open that diaper ^^
before:
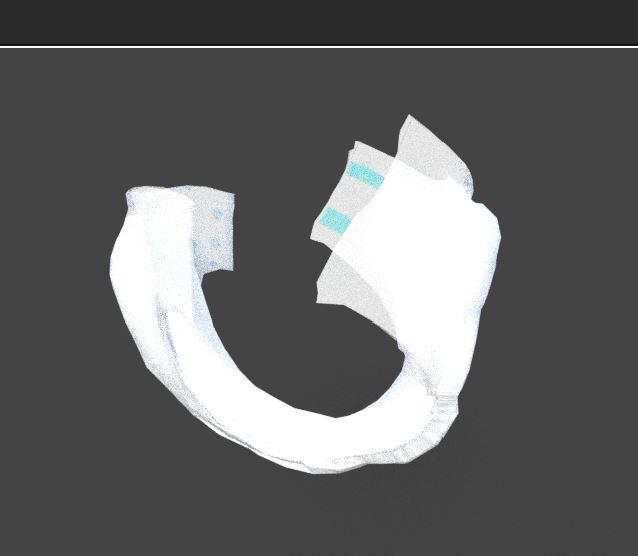
After:
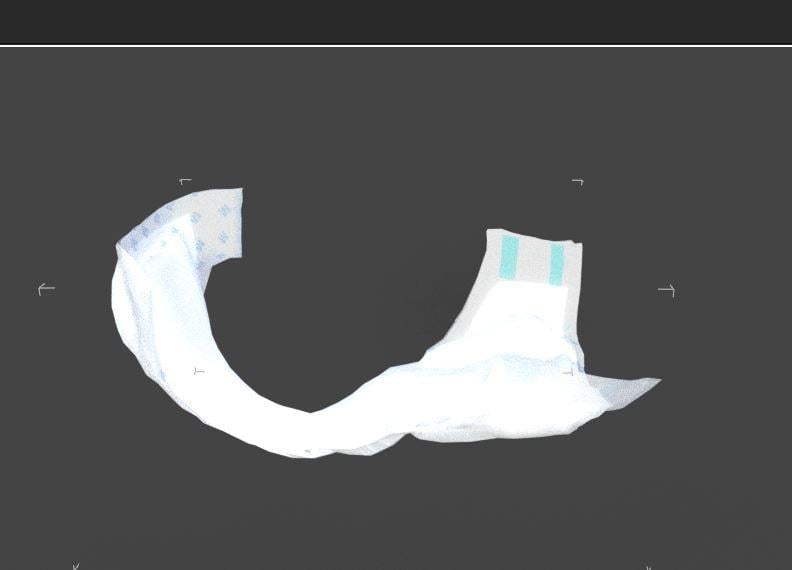
Absolute what i wanted :)
and I'm sure it will be much more ^_^
(Now I just need to learn/understand, how I can make this "opening" into a morph...)
you said it in your PDF.
"It is however possible to convert the Mesh Grabber deltas into a morph. To create such a morph, export the object with deltas as an OBJ file using Daz Studio’s “File” → “Export” and re-import that OBJ with Morph Loader Pro (“Edit” → “Object” → “Morph Loader Pro”)."
let's see if I understand it.... xD....
Update, in the export window did I not see any "delta settings" I guess, delta is just how you call the movement from mesh grabberß I think I saw that word in the resetting mesh grabber windows.
I did export it as .obj as you said but... with morph loard pro can I not load a .obj O_o....
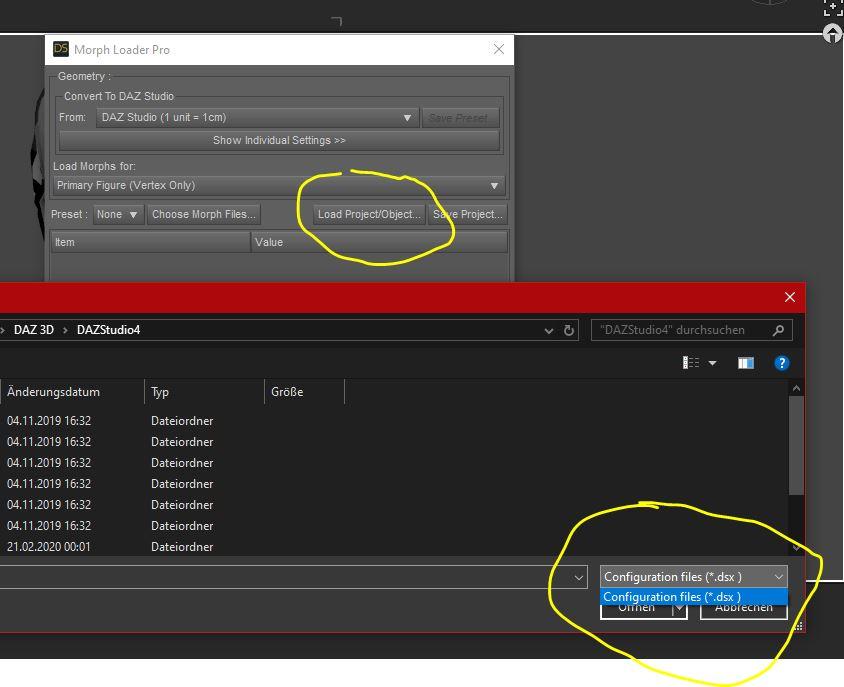
so.... I assume you should be more clear with the tutorial if I dont understand it :P
Edit: I just saw left form it the other loading button....^^....
worked, thanks!!
BJ Misumi HD questionIn the Parameters tab, I'm finding it under Head/Pose Controls/Expressions, which seems like the right placement for the morph.
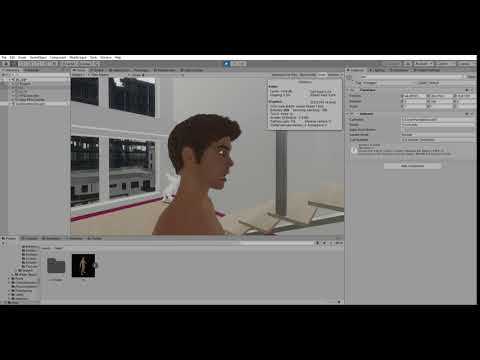
Genesis 8 eye lashes and hair doesn't following the body (after Merge Fitted Figures option)It's a little hard to follow the video, images are usually clearer with a video as a supplement if needed. I assume from the attachment that this is happening in DS too. Is this a custom morph, spawned from dForms or imported through one of the Morph Loaders? If so, has it been saved as a morph asset? If you click the gear icon on the morph's slider and open Parameter Settings is AutoFollow checked?
This human body and hair is 3rd party content I found. Yes I tried AutoFollow thing like this video (https://www.youtube.com/watch?v=92aGAkPVwbc) I'm not sure this is true I tried on basic character with all parameters selected this is right place right ?
Too Many G8 Characters?It puzzles me, too, because to me tinkering with combinations and kitbashing is at the soul of the hobby. But I understand people want and do different things... just... seems so foreign to me, heh.
Like, even taking two figures and just mixing them; X at 40%, Y at 60%. Woo. Maybe some youth or aging dials. 5 mins, tops.
After that, experimenting with morph packs. I often find noses too small in most figures. Thankfully, 'nose flesh size' dial fixes that in seconds. Maybe a little more fiddling with nose height, mouth width... ooo, nasolabial folds...
That's miles way from actually diving into a modeling program to make a unique face, and gives you so much freedom to achieve a unique look.
Heck, how about the shape randomizer?
But I also agree there was a slew of female middle aged characters that came out like Jenni, Leisa, Babina and more that I can't remember the names of that added nothing to the gene pool.
You consider Leisa and Babina "middle aged"?
Too Many G8 Characters?It puzzles me, too, because to me tinkering with combinations and kitbashing is at the soul of the hobby. But I understand people want and do different things... just... seems so foreign to me, heh.
Like, even taking two figures and just mixing them; X at 40%, Y at 60%. Woo. Maybe some youth or aging dials. 5 mins, tops.
After that, experimenting with morph packs. I often find noses too small in most figures. Thankfully, 'nose flesh size' dial fixes that in seconds. Maybe a little more fiddling with nose height, mouth width... ooo, nasolabial folds...
That's miles way from actually diving into a modeling program to make a unique face, and gives you so much freedom to achieve a unique look.
Heck, how about the shape randomizer?
I agree. The whole fun of DS for me is creating characters. I might do test renders of core characters for the forum but the part I like most is playing with the zillion morph packs and skins I have and making something my own. Even when I post pseudo out-of-the-box characters, I often make small tweaks and play with skin settings, expressions, eyelashes and more.
But I also agree there was a slew of female middle aged characters that came out like Jenni, Leisa, Babina and more that I can't remember the names of that added nothing to the gene pool. I don't think Nida adds anything to the gene pool that I can't do myself with all my morphs. So I only pay for character bundles with a character that adds to the gene pool or one with clothes and hair I like (or ones that come with tons of freebies.) The rest I wait till I get for free with another bundle that I do like. I usually prefer the PA addons more than the base character anyway and sometimes it's those addons that convince me to buy the base. I still haven't rendered about 80% of the base characters I own, but I do dial in small amounts to other characters on occasion. Many I have not yet used at all!
Genesis 8 eye lashes and hair doesn't following the body (after Merge Fitted Figures option)It's a little hard to follow the video, images are usually clearer with a video as a supplement if needed. I assume from the attachment that this is happening in DS too. Is this a custom morph, spawned from dForms or imported through one of the Morph Loaders? If so, has it been saved as a morph asset? If you click the gear icon on the morph's slider and open Parameter Settings is AutoFollow checked?
Genesis 8 eye lashes and hair doesn't following the body (after Merge Fitted Figures option)Hi I'm new in daz there is a problem I can't deal with it as in the title hair and lashes not following the body after merging I found a similar thing in this link (https://www.daz3d.com/forums/discussion/207166/genesis-8-eye-lashes-do-not-follow-face-morph) but it didn't help or I am too stupid to I can't to do it how can I solve this ? There is a video of my model on unity (
 )XTransfer Module 1- Genesis 3 to Genesis 8 Morph Converter (Commercial)
I bought the script... Very deluded by the results...

The shapes I transferred from Genesis1 to Genesis3 (which works fine in G3) are totally distorted once transferred from 3 to 8.
 Wavy arms, arched legs, bumped neck...
There will be an addon to make a direct transfer? Or perhaps I'm doing something wrong, even if the script is really simple and I followed step by step all the phases?
The update should fix this...And no there will be no direct transfer from G1 to G8.
I hope the update can help me...
However, I think you should make a "G1 to G8" plugin, Im sure lots of people will buy it. There are many special chars in Genesis1!
 Nida 8 new gal
Thank you Mollytabby, xyer0 and barbuit!
..... Yep, something is coming ......
Yippee! You have given me a United Nations of U.N.ique types that cover a LOT of bases: Nikolina, Sisters Tammie and Rachelle, Arti, Zhirong, East Asian Men and Women, Good Guys, Elsa, Andrea---and that's just Genesis 8! I don't know if it would be commercially viable, but a remix of I Am and Man in the Mirror for Genesis 8 would be products unlike anything currently available, just like those were in their day, and I could use the help on non-toon regular people.
I love the diversity also. Some great characters. Man in the Mirror was one of my favorite morph sets. These morphs from Fuesling and Sickleyield are similar and pretty good:
https://www.daz3d.com/sf-people-that-you-meet-character-shapes
https://www.daz3d.com/fsl-genepool-dialed-shapes-for-genesis-8-male
https://www.daz3d.com/fsl-genepool-dialed-shapes-for-genesis-8-femaleDaz 3D is part of

Connect
DAZ Productions, Inc.
7533 S Center View Ct #4664
West Jordan, UT 84084Licensing Agreement | Terms of Service | Privacy Policy | EULA
© 2026 Daz Productions Inc. All Rights Reserved.