-
[Released] Character Converter from Genesis 3 Female to Genesis 8 Female(Now Conv JCMs) [Commercial]
The script doesn't save morphs. And I have to go through Force convert because it doesn't recognize characters, even those from DAZ.
Can I see the Daz log of the conversion?
13:27:37 GMT+0200 (Paris, Madrid (heure dété)): Executing Script
13:27:37 GMT+0200 (Paris, Madrid (heure dété)): Selecting Preset: E:/Poser Pro 2014 Content/People/Genesis 3 Female/Characters/Bethany 7.duf
13:27:37 GMT+0200 (Paris, Madrid (heure dété)): Converting character from E:/Poser Pro 2014 Content/People/Genesis 3 Female/Characters/Bethany 7.duf to E:/Poser Pro 2014 Content/People/Genesis 8 Female/Characters/Bethany 7.duf
13:30:20 GMT+0200 (Paris, Madrid (heure dété)): Bethany 7 is of type Actor/Character
13:55:12 GMT+0200 (Paris, Madrid (heure dété)): Error saving morphs
13:55:12 GMT+0200 (Paris, Madrid (heure dété)): Execution Complete.
I need the Daz Log (Help->Troubleshooting->View Log File) for the conversion, not the script window log.
What part of the report? it is really very long.
2020-05-03 13:55:07.739 WARNING: ..\..\..\..\..\src\sdksource\fileoutput\dzassetoutfile.cpp(611): Failed to create file path.
2020-05-03 13:55:07.740 WARNING: ..\..\..\..\..\src\pluginsource\DzAssetIOFilters\dzmorphsupportassetfilter.cpp(936): Failed to write Morph Asset(s).
2020-05-03 13:55:12.312 Failed to save Morph Asset(s). See the log for more details.
2020-05-03 13:55:12.320 DEBUG: Error: Operation failed
2020-05-03 13:55:12.320 DEBUG: Error saving morphs
2020-05-03 13:55:12.321 DEBUG: END Conversion of E:/Poser Pro 2014 Content/People/Genesis 3 Female/Characters/Bethany 7.duf
2020-05-03 13:55:12.352 DEBUG: Execution Complete.
2020-05-03 13:57:55.134 Script executed successfully: E:/Poser Pro 2014 Content/Scripts/RiverSoft Art/Character Converter/Character Converter G3F to G8F.dseBest from when it starts the conversion to the end. Just with what you posted, I can see that it failed to create the path (directory). I would like to see what path it thought it was supposed to create.
Morphs loaded with morph loader are too "round" upon applying SubDHello people, so... yesterday I tried to make a severed feet morph for G8F. Everything went fine, I managed to make the morph perfectly even in the place of the "cut":

I was following a tutorial that said I needed to export the G8F .obj in base resolution, with no SubD. I did it, loaded the morph with loder pro with a success, but...
When I apply the morph, and ten turn G8F back into high resolution mode, it looks like this:

It seems like the Catmark SubD alghorithm is trying to soften up the edges of the cut, which I don't want. The problem goes away when I switch to Bilinear, but then the rest of the geometry is too "jaggy" or "boxy".
Is there a solution to this?
Thanks in advance
[Released] Character Converter from Genesis 3 Female to Genesis 8 Female(Now Conv JCMs) [Commercial]The script doesn't save morphs. And I have to go through Force convert because it doesn't recognize characters, even those from DAZ.
Can I see the Daz log of the conversion?
13:27:37 GMT+0200 (Paris, Madrid (heure dété)): Executing Script
13:27:37 GMT+0200 (Paris, Madrid (heure dété)): Selecting Preset: E:/Poser Pro 2014 Content/People/Genesis 3 Female/Characters/Bethany 7.duf
13:27:37 GMT+0200 (Paris, Madrid (heure dété)): Converting character from E:/Poser Pro 2014 Content/People/Genesis 3 Female/Characters/Bethany 7.duf to E:/Poser Pro 2014 Content/People/Genesis 8 Female/Characters/Bethany 7.duf
13:30:20 GMT+0200 (Paris, Madrid (heure dété)): Bethany 7 is of type Actor/Character
13:55:12 GMT+0200 (Paris, Madrid (heure dété)): Error saving morphs
13:55:12 GMT+0200 (Paris, Madrid (heure dété)): Execution Complete.
I need the Daz Log (Help->Troubleshooting->View Log File) for the conversion, not the script window log.
What part of the report? it is really very long.
2020-05-03 13:55:07.739 WARNING: ..\..\..\..\..\src\sdksource\fileoutput\dzassetoutfile.cpp(611): Failed to create file path.
2020-05-03 13:55:07.740 WARNING: ..\..\..\..\..\src\pluginsource\DzAssetIOFilters\dzmorphsupportassetfilter.cpp(936): Failed to write Morph Asset(s).
2020-05-03 13:55:12.312 Failed to save Morph Asset(s). See the log for more details.
2020-05-03 13:55:12.320 DEBUG: Error: Operation failed
2020-05-03 13:55:12.320 DEBUG: Error saving morphs
2020-05-03 13:55:12.321 DEBUG: END Conversion of E:/Poser Pro 2014 Content/People/Genesis 3 Female/Characters/Bethany 7.duf
2020-05-03 13:55:12.352 DEBUG: Execution Complete.
2020-05-03 13:57:55.134 Script executed successfully: E:/Poser Pro 2014 Content/Scripts/RiverSoft Art/Character Converter/Character Converter G3F to G8F.dseBest from when it starts the conversion to the end. Just with what you posted, I can see that it failed to create the path (directory). I would like to see what path it thought it was supposed to create.
[Released] Character Converter from Genesis 3 Female to Genesis 8 Female(Now Conv JCMs) [Commercial]The script doesn't save morphs. And I have to go through Force convert because it doesn't recognize characters, even those from DAZ.
Can I see the Daz log of the conversion?
13:27:37 GMT+0200 (Paris, Madrid (heure dété)): Executing Script
13:27:37 GMT+0200 (Paris, Madrid (heure dété)): Selecting Preset: E:/Poser Pro 2014 Content/People/Genesis 3 Female/Characters/Bethany 7.duf
13:27:37 GMT+0200 (Paris, Madrid (heure dété)): Converting character from E:/Poser Pro 2014 Content/People/Genesis 3 Female/Characters/Bethany 7.duf to E:/Poser Pro 2014 Content/People/Genesis 8 Female/Characters/Bethany 7.duf
13:30:20 GMT+0200 (Paris, Madrid (heure dété)): Bethany 7 is of type Actor/Character
13:55:12 GMT+0200 (Paris, Madrid (heure dété)): Error saving morphs
13:55:12 GMT+0200 (Paris, Madrid (heure dété)): Execution Complete.
I need the Daz Log (Help->Troubleshooting->View Log File) for the conversion, not the script window log.
What part of the report? it is really very long.
2020-05-03 13:55:07.739 WARNING: ..\..\..\..\..\src\sdksource\fileoutput\dzassetoutfile.cpp(611): Failed to create file path.
2020-05-03 13:55:07.740 WARNING: ..\..\..\..\..\src\pluginsource\DzAssetIOFilters\dzmorphsupportassetfilter.cpp(936): Failed to write Morph Asset(s).
2020-05-03 13:55:12.312 Failed to save Morph Asset(s). See the log for more details.
2020-05-03 13:55:12.320 DEBUG: Error: Operation failed
2020-05-03 13:55:12.320 DEBUG: Error saving morphs
2020-05-03 13:55:12.321 DEBUG: END Conversion of E:/Poser Pro 2014 Content/People/Genesis 3 Female/Characters/Bethany 7.duf
2020-05-03 13:55:12.352 DEBUG: Execution Complete.
2020-05-03 13:57:55.134 Script executed successfully: E:/Poser Pro 2014 Content/Scripts/RiverSoft Art/Character Converter/Character Converter G3F to G8F.dseShaping Genesis 8 modelHere are the base head and body morphs packs for Genesis 8 Female:
https://www.daz3d.com/genesis-8-female-head-morphs
https://www.daz3d.com/genesis-8-female-body-morphs
There are several tutorials on how to manually transfer morphs from one figure to another. Here are a few of them:Auto Muscle Enhancer HD [Commercial]Daz3d do have https://www.daz3d.com/musculature-hd-morphs-bundle-for-genesis-8 and https://www.daz3d.com/add-some-veins-hd-for-genesis-8 for you to play with. You can add these products to your controls. You can also add AME on top. You just need to blend them the way you want it to be. Note: AME is controlled by JCM.
I create these products so that I can use in my animation production. I am one of those people who do not like too many sliders. I just like to pose the character and move on to the next pose and expecting the pose in between will have the correct morphs. That is what Auto is all about. Auto morphs are controlled by Joint Control Morphs = Daz calls them JCM.
JCM is morphing that is linked to 2 parts of the body together to control a bend. For example. the elbow bend is a morph that blends the lower arm and the upper arm together. One cannot have the morph separated. If one is off then the bend will look unnatural. The separated morphs here will be the upper arm muscle and the lower arm muscle. AME is the skin morphs on top of these 2 muscles and the blended skin wrinkle as the arms are bend.
Again. AME is not an individual morph. It is multiple morphs combine to look like one. The bend, the twist, and the projection must work together as one.
To split up the morphs into a few sub-morphs will be a dif process and it would have to be a dif product. = creating a set of morphs like the 2 named product above = will end up being the same and it is already done.
I understand what you are asking. Unfortunately, I do not have any plan to dive into making the sub-morphs.
Shaping Genesis 8 modelI purchased a character for Genesis 8 female, but the only options are to apply the body and head morphs. I wanted to reshape the character to be more unique, but there are no options to do anything else.
Is this due to the character having no basic morph options, or do I need to purchase a morph pack? I can't seem to find any body/head morphing options for the base model either.
Is there a way to convert Gen2/3 characters to Gen8 without needing to buy a converter?
TritiumCG Freebie ThreadI think Rihanna might be my closest likeness yet, my commissioner seemed to think so. :)Yeah, it's one of your best...
I used her in a render I can't link here, due to it being NSFW, but anyone ready for a bit of nudity can find it @Renderosity searching the artist list for T0mcat00 (that's zeros, not Os)
Thanks, that is a beautiful render! :)
thank youYou're welcome!
It’s impossible to make a realistic Mia Sand morph, because Mia Sand herself doesn’t look realistic.
LOL! That thought did cross my mind as I was making it! XD
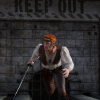
I messed up and don't know what I did. (added sample renders)I think I applied an undressing morph to clothing that did not have that morph and ever since, anytime I pose a figure or try to apply body shapes they come out distorted.
My question is how can I tell what I did and is there a way to undo it?
This is happening to all of my females, this doesn't happen with the male figures.
Wild guess, nobody knows exactly what you did.
Ideas:
Did you try reinstalling the base figure?
What did you use or do to apply a morph to clothing? Is this a morph you made yourself? Clothing morphs do not affect figures.
With the disfigured model selected, on the Parameters Tab select the option to show what is in use. Maybe you can find the affected morph. Morphs are stored in subfolders in the data folder - find remove or replace it.
GenX2 - Need HelpThanks, Havos! I'll try that.
So you load the base character (David 3 for example) and then inject all the head and body morphs and then export that as a CR2. Then you use this as the source file in GenX2. And you load the character injection file. Is that the head morphs and body morphs under the pose folder? Or a different file. Do you drop those files in the center box of GenX2 or do you have the base character loaded in the scene and apply the head or body morphs to it? And do you just load the head or body morphs separately depending on whether you are creating a head or body single morph? I know there is an option to get the non-zero morphs from the character in the scene.
I'm just not clear on what pp2 you are refering to, if it's not the head and body injection morphs. (I just checked and my head/body morph files are pz2. Is that the same thing? And if this is the right file, why do you have to inject them again, if they were already saved to the CR2 that was exported? Also, if you injected the morphs, will any of them have values? Or do you have to select one? Or set one?
Sorry about all the questions. Hopefully, this will be the last time. I really appreciate your help and I would really like to move David 3 to some of the other generations, as he was always one of my favorite characters. So that's why I keep pestering you.
Thanks again.
GenX2 - Need HelpOkay, I got it to work, but I didn't know I got it to work. I selected one of the morphs that were listed in GenX2 when I dropped David 3 in there. (I did not inject all the available head and body morphs.) And then I ran the transfer. Then I closed and opened Daz Studio and the only thing I saw was the morph I had selected under Generation X when I loaded Genesis. But then I happened to notice that there were these head morphs for David 3 under one of the other sections and I also found one that does the whole figure.
Or did the head and body morphs come from the David 3 for genesis product that I own?
In any case, I'm not clear on one thing. How does on one thing. How does selecting one of the morphs i.e. neck spandex transfer the character morphs. Wouldn't there have to be a head and a body morph that you could select so that you could transfer them.
Thanks
If you successfully transfer just one morph, then it will also add the head and full body morphs for that figure.
Remember for a figure like D3 there is no basic head and body morph that gives it the shape, the mesh itself defines the shape.
To give you an idea of how I use these old figures, I firstly create a CR2 file by injecting all the morph packages into the base figure and then exporting that figure as a CR2. I have done this for V4,M4 and all the generation 3 figures. Then I select this CR2 file as the source in the Gen X tab. You then load the character injection file (normally a pp2 file) and then select all non zero values. I then transfer the character as a single head morph and a single body morph, even though it might have consisted of many morphs on the original base.
I only use the CR2 files when moving morphs, I do not load the figure into the scene, although that is a method some people use.
Tears HD Plentiful TearsSee if there are morph dials on the figure or the head.
morph dials under poses, expressions. Never would have thought to look there.
Thanks.
product to inj face rigging to V4 and M4I did autofit m4 with all his morphs++ etc injected to Genesis 3 once,
hid genesis 3
if you ignored facial animation for mouth and eyes with bones and used his morphs instead most other stuff works quite well including genesis 3 morphs on the mesh
the face bones have the welding issue for mouth and eyes
I used that to export an obj for morphloader on M4 to transfer morphs from genesis 3 to M4so it could be done if the welding issue could be solved not m4 skeleton though
How to make imported clothing work with Genesis 8Then you need to adjust the model to fit the default shape, or pose the figure to fit and use the Bake Rotations command in the Jint Editor right-click menu to make thata proxy zero pose. Then you can use the Transfer Utility, and then if you used the second optin pose the rigged coat to match the default pose for the fgure and bake the coat's rotations.
true iray skins for blender are on the way ..These advances are great news and I am encoraged to give the plugin another go and really try to get to grips with it this time.
On a side note: I wonder if Thomas (or anyone) would be interested in also creating a simple bridge for exporting from DAZ to Blender in a similar manner to the way GoZ does it for ZBrush? Just for morphs and perhaps material zone changes. The export process, compared to GoZ, is a bit long-winded with object hiding and selecting, remembering to set base resolution, setting the export parameters in DAZ and the import/export parametrers in Blender and then figuring the best way to use Morph Loader. I don't have ZBrush but remember how easy it was when I tried it, or how simple it is to export to Hexagon (although I prefer Blender to Hexagon for these purposes).
product to inj face rigging to V4 and M4the mesh needs to be unwelded
you can actually use the transfer utility on all of them using clones but mouths are welded shut, eyeballs welded to sockets etc
just the skins work somewhat better
Celebrity Look-a-Likes for 3D figures Part 2Your model morphs are superb. I've downloaded Simone Missick, the actress that plays Misty Knight on Netflix Marvel's Luke Cage and added my own texture to her. I believed she turnt out okay.
I was commissioned to do four celebrity morphs recently, I figured I'll add the links here for anyone who may be looking for these actresses:
Rila Fukushima: https://www.deviantart.com/tritiumcg/art/Rila-Fukushima-Head-Morph-for-G8F-832636705
Simone Missick: https://www.deviantart.com/tritiumcg/art/Simone-Missick-Head-Morph-for-G8F-832845496
Christa Linder: https://www.deviantart.com/tritiumcg/art/Christa-Linder-Head-Morph-for-G8F-833172249
Sophia Loren: https://www.deviantart.com/tritiumcg/art/Sophia-Loren-Head-Morph-for-G8F-833997794
All freebie downloads: https://www.deviantart.com/tritiumcg/gallery/67331252/daz-studio-freebies
Thank you so much! I'm glad that you like them! If you ever upload your renders of Misty or any of my morphs to Deviantart, leave a link in the comments on the morph's page and I'll feature it. ^_^
I was recently commissioned to do a full body morph of Rihanna: https://www.deviantart.com/tritiumcg/art/Rihanna-Head-and-Body-Morphs-for-G8F-838891936
I know she's been done before, but the commissioner insisted on my take specifically. :) Anyway, I hope some of you guys will find some use for her too.
Thank you for another great morph.
Here are 2 quick renders of this amazing work.
Tears HD Plentiful TearsSee if there are morph dials on the figure or the head.
TritiumCG Freebie ThreadIt’s impossible to make a realistic Mia Sand morph, because Mia Sand herself doesn’t look realistic.
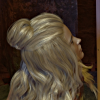
IRAY Photorealism?Surprised no one mentioned how incredible she looks. If you could put her in an environment it would be sweet to see. Personally I'm not a big fan of skin studies in black environments because in real life a single light in an perfectly dark room or space is physically impossible or at the very least implausible. Also it onluy shows you the way the skin looks as lit by the tight bright specualr type lighting that gives us the refelctions. Basically its easier to pull it off when the only light hitting the model is "direct" lighting. However I think the bigger challenge is getting skin to look as it should with indirect lighting in place as well. I'd LOVE to see you take her and put her in a real "place" and see how she looks. Love what I'm seeing here!
Technically she's in a dark room (a dark grey cube to be precise) I try to avoid rendering in voids because you end up losing some bounce light (there would be less on the undrside of her neck for instance)
I was going for studio portrait with a ring light (here's an internet example)

But my setup is still is a bit abstracted I definitely want to stick her in more of a scene, although even in scenes my aestetics tend more photoshoot than candid (or if not photoshoot, dramatic even in the realworld most of the photos I take are of dramatically backlit trees)
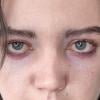
@jcade I agree. The eyes look fantastic! Would you mind sharing the secret?
The eyes are Parris' macro eyes with some tweaked settings, but the main key is that I switch the sclera material to eyemoisture, because I fund the gen3 way of dealling with eyes so much less fiddly its not even funny. I can use "thinwalled off" without getting weird shading on the sclera. Morph wise there's the cornea buldge morph and an iris depth morph. Looking at further reference I think I need to turn the specular strength down which is a new one for me
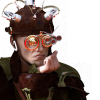
Aaaaaaaaad here is a full filmic comparison. Left is straight out of Iray, and right is run through filmic (with the look set to high contrast) Filmic just looks more photolike to my eyes
If you also render out a depth pass you can also do some nifty compositing tricks (as long as you're okay with some nodes) like using the defocus node to do depth of feild in post, I do this all the time when rendering buildings. Its so much faster its not even funny. (you can also use it sparingly to ad a tiny bit of dof to portraits, but because of the quality of the depth maps Iray outputs, it doesn't play great with transmaps>hair)
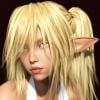
This is amazing. If you dont mind could I also share your other work here? I think the hair you render is some of the best I've ever seen.
This is strand based hair rendered in blender.


I still find blender better for long hair, as I have never been able to get clumping to work in Garibaldi on long hair without clumping through the skull (does someone here know how to fix this? I will love you forever) Its also easier to combine multiple hair groups in blender. some of those small strands were actually a seperate hair object and you can edit both while seeing the other one and all the objects in the scene, which you can't in Studio. On the other hand, Studio is great for short hair, and while you can't have multiple interacting hair objects you do have selection sets, which blender doesnt and it makes me sad
Daz 3D is part of

Connect
DAZ Productions, Inc.
7533 S Center View Ct #4664
West Jordan, UT 84084Licensing Agreement | Terms of Service | Privacy Policy | EULA
© 2026 Daz Productions Inc. All Rights Reserved.