-
Hidden folder in my DAZ library
Hi, no they got hidden when I used a program to restore some file off a faulty drive. I had some folders on that old drive containing morphs I made myself a while back, and i restored probably too may folders. I din't try deleting the files , but I did re-download and overwrote the morph files that weren't working, however this didn't fix the problem. The problem was the folders i restored had got set to hidden. I set all the folderers to unhidden and now everything is working again. Before I worked out about the hidden folders I was worried I might need to reinstall Studio, since nothing I did would make those morphs visible, but as I say, it's all fine now.
Thanks
[Released] Rotations Add-On for ManFriday's Mesh Grabber [Commercial]Hey,
someone has an idea how to achive to fold a jeans with the rotation addon together like this one:

If I tried it... the resolut is not so good as I wished :)

The first thing you have to do is get the garment laying flat. Try positioning the jeans horizontally above the "floor", (a large, one division plane primitive will do,) and dForce them. Once they are flat, create a morph for that, (how to here,) so you don't lose it accidentally. Save the file.
Once the garment is flat, use the Geometry Editor tool to select one side of the pants. Back that off the width of a few polys where the two sides connect so you have some that can bend. You may have to experiment with this to get the right width of un-selected polygons. Right-click and scroll down to the assignment menu, (sorry, doing this from memory, but it's the last item,) open the flyout and select Create Selection Set from Selected…. Name your new selection set, so you don't have to do this again, and it will serve as a starting point if you need to increase or decrease the polygons selected. Save the file.
With one side of the garment selected, choose the Mesh Grabber tool. Hold down the Ctrl key and move widget to the top of pants, Position your view of the Viewport so that you are looking "down" the pants from the top of the pants. Select Z to Cam in the Tool Settings. You'll need to experiment as to where the widget needs to go, how large the influence, and how strong the Gain, but from this point, with one side selected, you should be able to "fold" those pants. How well will depend on many variables, including the mesh of the pants you selected to work with.
Good luck. Please be sure and share your results here, good and bad.
Fully functional DAZ3D Characters in Unreal EngineThank you for your reply, David. Also, your "Daz to Unreal" plugins are fantastic! They really do speed up the process of transfering my Daz Studio's skeletal meshs and key framed AniBlocks for Genesis 3 figures into Unreal Engine 4.
Honestly, I have no idea how to implement my skeleton theory. I'm actually a beginner with Blender, Autodesk software (like Maya and 3ds Max), and Unreal Engine 4.
So, I'll just figure out how to make keyframe animations for my Genesis 3 Males and Females in Daz Studio. Then, I'll use your plugins to transfer my animations into Unreal Engine 4.
Daz3d to Blender WorkflowOhh damn I did her hair and shaders to her in her A pose. I now know that I can move shaders between files but can I do that with her hair too? I assume its possible since redoing her hair for every pose sounds horrifyingly tedious lol.
As for going back to Daz, well before Blender it was the only choice I had for rendering haha. Now if possible I have no interest of going back to Daz3d after exporting out my initial model.
I've never used Alembic before though and I just did a quick google.. and have no idea what they're saying hahaha. Why would an alembic file be better than an obj?
Btw just to make sure I understood you clearly, your workflow is basically..
- Get model adjusted to your liking in Daz
- Pose her in Daz but with A pose somewhere in the animation (?)
- Bring her to Blender and add shader and hair (?)
- Change the timeline till where model is in A pose
- Import A pose model from Blender to MD
- Fit the clothes on her in MD
- Move the timeline till she is in her desired pose and clothes move along
- Export clothes to Blender as an alembic where model is also in desired pose (?)
Haha did I understand the above correctly or am I way off base here?Her hair is a particle system attached to the body. It will go wherever her body object goes.
And complexity is actually Alembic's flaw; it is designed to do much more than other interchange formats. Alembic won't afford you any advantage that obj won't, if you're not animating. I don't know if there are other ways, but it does work very well to simulate things in MD. I have actually simulated entire shots with it by importing the unsubdivided model's animation via Alembic. I have no knowledge about the morph technique you mentioned.
Unfortunately, and fortunately, I work with mocap data and so my workflow is not really relevant for you. But I would do:
Create the character, and pose it in Daz
Don't sim anything from a memorized position, but start with the A=pose at the first frame, and you desired pose at 30. Export that, without SubD, to MD.
Fit the clothing on the A-Pose in MD,and simulate. Export the garment at frame 30 to Blender via obj.
Go back to Daz and export the character, with SubD, to Blender via obj. It should fit mperfectly on the character.
Groom the hair in Blender.
Texture and light everything, and render.
I don't *think* there's anything ridiculous in there, that was just the first workflow I tried that worked; I stopped thinking about it after that :)
Carrara Challenge # 52 - Carrara Cryptids WIP thread--Entries EndedI'm so loving these critters!
@DesertDude, wow, thank you for showing the wing experiments. They bending and posing options from your set up seem like they will be better than most wings out there. You are tempting me to play with feather creation again :-)
@Diomede, your cyclops seems more real with each step. I thought the hair would make him seem less scary, but it doesn't.
@Headwax, all the textures at play in the Toothfairy image are stunning.
@Wendy, thank you for the hair tip! I had wondered about something like that, but didn't know where to start.
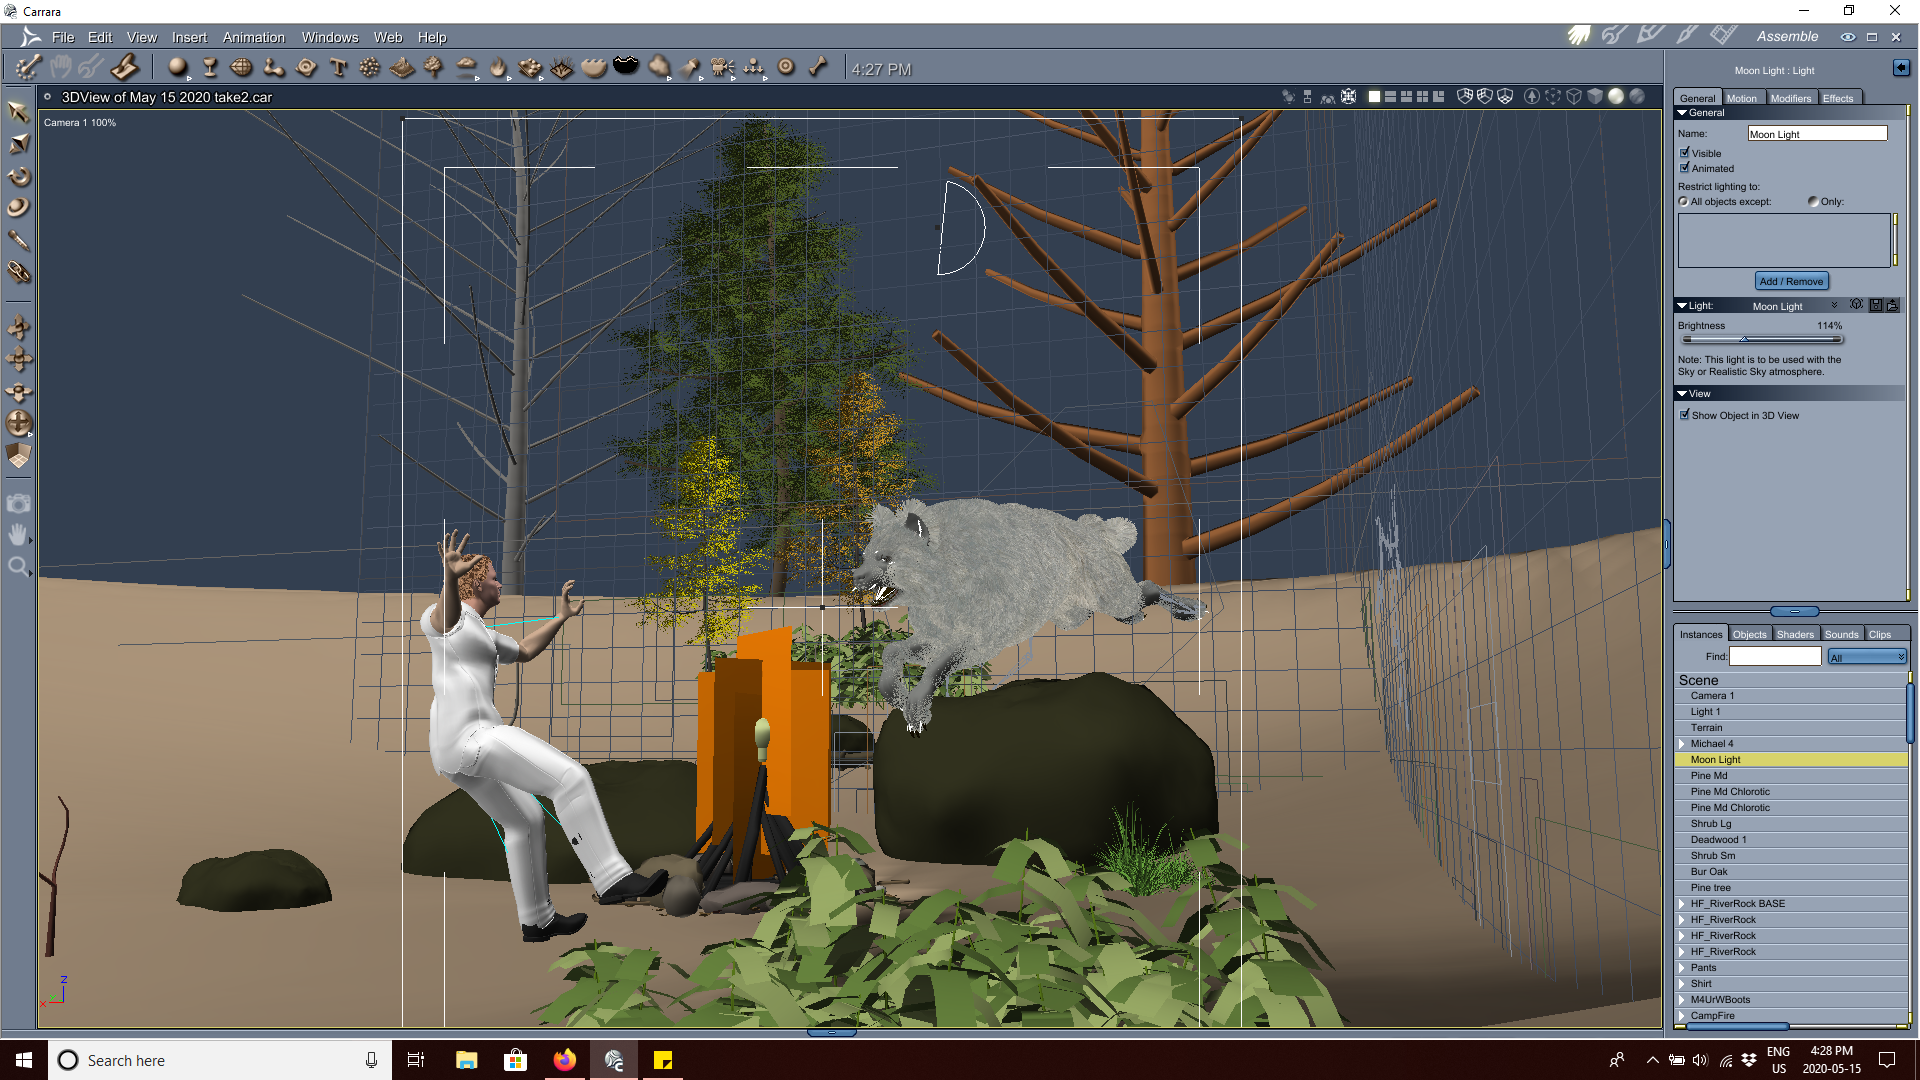
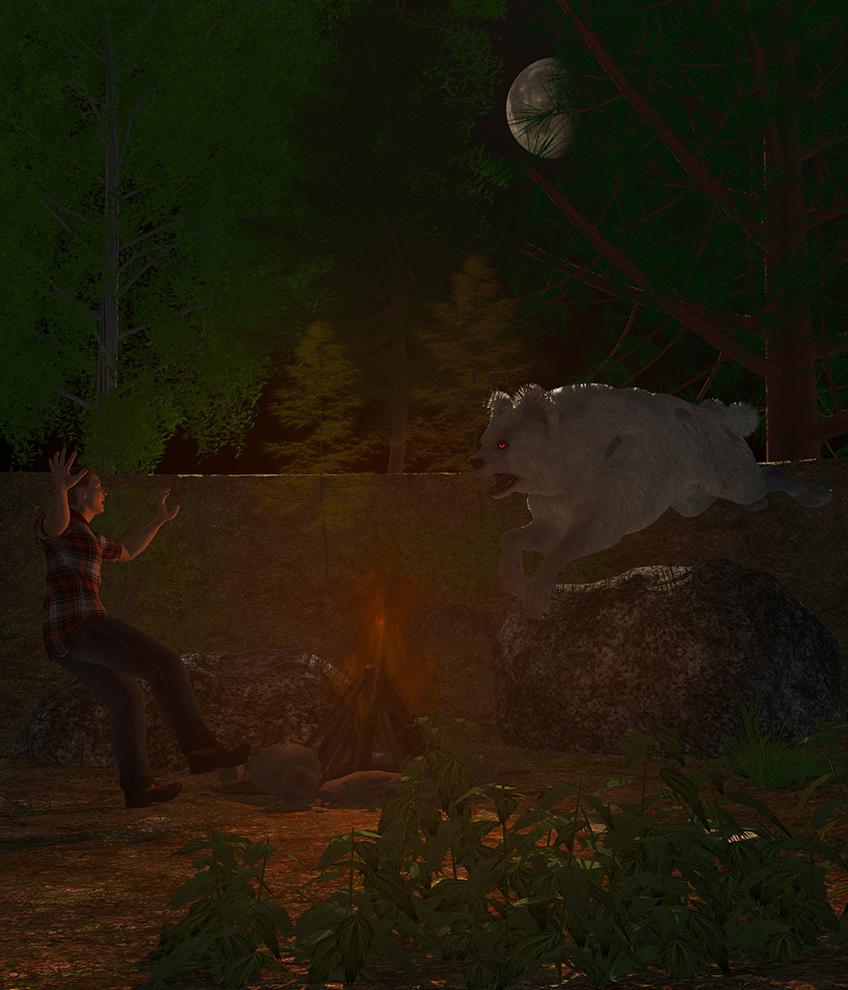
Here is the Weheela, or white wolf. Some believe it is simply a very large white wolf, others a dire wolf, and my pick a prehistoric Amphicyon survival. The Amphicyonids are giant bear dogs, some as big as polar bears. I love the whole idea of megafauna. I've used Dog 8 with Rawart's Bear Dog morph, added some of the Dog 8 morphs, and then Carrara fur. I also had a go at combining moonlight and fire light. I played with adding an orange bulb into the center of the fire. The bulb has glow added in the effects tab. Postwork was playing around in Topaz Impressions.
 Can no longer use Daz on my Mac after 15 years
Unfortunately, I now know that it was not my computer (Macbook Pro 2013) – but rather Daz 4.12.1+ incompatibility with Mac's Catalina OS that has caused serious problems working in the application for the past few months. As a result, one of my favorite applications will get shelved going forward. And that's after 15 dedicated years (May 2005) of working in Daz and buying tons and tons and tons of content on daz3d.com.
How do I know it's not my computer? Just bought a new Macbook Pro to support all my 3D work in ZBrush, Maya, Blender, etc., - 64 Gigs of RAM, 2.4 Ghz 8-core Intel Core i9, and a pretty hefty graphics card. I did not transfer over Daz from my old computer. Just content. I did a 100% fresh install; but to my complete shock, after working in Daz for a little more than 3 hours tonight, I'm having identical problems I had on my 2013 machine (on Catalina), even after a completely fresh install. Both the Beta 4.12.2.6 and 4.12.1.117 exhibit the same behavior:
-
1-2 crashes per hour.
-
Extremely long lag times for loading content (e.g., one character).
-
Freqeunt lags in the process of merely manipulating a character.
Check to see if the character, or likely clothes/hair, have Smoothing Modifiers applied
-
When I save a file, two "Save" dialog boxes pop up overlapping each other (exactly what happened on my old computer) that both read "Filtered Save". I select one and save, and then about after 6 additional saves, Daz crashes.
Use File>Save (or File>Save As), rather than ctrl-s - there is an issue with shortcuts in the General reelase (fixed in the new Publicx Build)
-
When rendering, a dialog box pops up that says I am already rendering, which is false.
Again, us Render>Render rather than ctrl-r or switch to the Public Build
-
When I've been lucky enough to get past 30 minutes of working in Daz and I save an existing file, it treats it if it were a new file... "Untitled". So it's essentially "Save As" forever after that point. At times the old file I had been working on was never saved anyway.
As Leana says, make sure you have soemthing entered in Daz Studio>Preferences for the Author name
-
From time to time, after rendering, Daz crashes. It also randomly crashes from time to time after merely saving (or trying to save) the scene I'm working on.
NONE of this happened before 4.12.1.117, or before Catalina. It's really sad because I have deadlines and Daz used be fantastic for certain parts of my workflow. I was really, really hoping this new computer would solve the problems, but it looks like I can't use Daz anymore, at least until these serious problems are solved. And that's after working with Daz for over 15 years. Really, really, really disappointed.
In dire need of a new system, so I decided to splurge ... big time!I am buying a new system at the end of the month.
I agree completely that buying a top specced beast machine to only use Daz studio, is wasteful.
I am not even installing any of the "Kiddie pool" software on my new machine.( Daz studio, Iclone etc), I will leave them on my older PC and transfer character assets ,as needed, across the network
My new PC is going to have only pro production software and windows itself will be the only "paid" software
Blender 2.8x (free alternative to Maya, Max,C4D,Modo)
Davinci Resolve (free alternative to Premier & Final cut) Davinci Fusion (free alternative Adobe After effects)
Natron compositor (free alternative to Nuke)
Krita (free alternative to Photoshop)Good luck. LTT did a video on switching from Adobe suite to things like DaVinci. They decided the productivity cost was higher than the suibscription so they stuck with Adobe.
I remember that video. I'm a big fan of LTT. Everything they do is both entertaining and very informative
Bug Report: Animators Beware, DS 4.12.1.117 deletes values keyframes en masseYes, I see this in 4.12.1.117 using just the Timeline following the steps in the first post (and I also see barbult's issue with the property groups not showing unless their display is toggled off then on).
Lord ... And here is generally displaying a keyframe? This is just ANOTHER bug that only creates a lish of inconvenience. But a bug that after reloading the scene erases all the keys related to the morph parameter is a serious problem, which makes it impossible to work. I have to use castles.
Daz3d to Blender WorkflowSubd is completely up to you. I don't think I've ever gone above 2.
As for hair, yeah, a few of us are struggling with getting a handle on it. I've seen what competent people can do with it, and very quickly, though. If you're using 2.83, though, you can put the character in a collection and then set that collection as the collision collection. That should vastly improve penetrations and just look more natural.
As for the irises, you could fix it in Blender, there's probably an edge loop you could slide, but I think you should really find a morph in Daz for that sort of thing... stand on the shoulders of giants, ya know?
Thank you again! Is it possible to move a model from Blender back into Daz to edit or do I have to re import a new model and restart the shading process all over again?
Also should I make sure to import her as high res?I actually wouldn't know... there might be a way, but I'm sure it is not easy.
But if I were you, I'd copy the blend file before the export so you can just File/Append all your materials that you worked so hard to perfect.
And there are two ways to go about choosing what resolution to export at. If you want it EXACTLY how it is in Daz, export at High Resolution, and the file will be large. If you can deal with very slight differences, convert to base resolution and apply a subdivision surface modifier once in Blender. The file will be lighter. But for one character, and one frame, I'd just export at High.
Again, thank you so so much for your mega helpful comments! I redid everything again with my first model using the second model's skin shader and spent the whole day working on hair. I'm glad to say... I'm really proud of her hair! Hah!
Woah. I like the hair, too! Congrats!
Hehe thank you! Now moving onto the next stage, do you recommend I use rigify on her for posing?
Should I save this file as base such that if I ever want to use this character, I'll duplicate from this file since it already has her shaders and hair in it and then change the scene around her accordingly?
For Marvelous Designer, between it and Daz3d, I would first get the A pose of my model, bring her to Marvelous Designer, get the outfit on her, go back to Daz and change the pose to what I want and then bring that model into Marvelous Designer as morph target. Once the outfit is fitted into her pose, I then save the outfit as obj and bring that obj back into Daz.
Are the steps basically the same between Blender and Marvelous Designer?I import both posed and unposed. I tend to import some poses for use, which if you rigify, you can't do.
Rigify really is brilliant, expecially for animation, but great for just for single poses too.
Take advantage of the pose library feature in blender.
I was trying to follow @benniewoodell 's youtube video but it seems like for him, once he clicks rigify, everything moves along with the model including her clothes. However when I click rigify, her clothes and eyebrows, eyelashes/peach fuzz from daz all gets left behind. I've attached how my scene collection looks.
EDIT: Okay nvm, I just didn't merge rig for all of them. Turns out all it takes is for me to post a question on a public forum first before I can suddenly figure it out by myself lol.
Daz3d to Blender WorkflowSubd is completely up to you. I don't think I've ever gone above 2.
As for hair, yeah, a few of us are struggling with getting a handle on it. I've seen what competent people can do with it, and very quickly, though. If you're using 2.83, though, you can put the character in a collection and then set that collection as the collision collection. That should vastly improve penetrations and just look more natural.
As for the irises, you could fix it in Blender, there's probably an edge loop you could slide, but I think you should really find a morph in Daz for that sort of thing... stand on the shoulders of giants, ya know?
Thank you again! Is it possible to move a model from Blender back into Daz to edit or do I have to re import a new model and restart the shading process all over again?
Also should I make sure to import her as high res?I actually wouldn't know... there might be a way, but I'm sure it is not easy.
But if I were you, I'd copy the blend file before the export so you can just File/Append all your materials that you worked so hard to perfect.
And there are two ways to go about choosing what resolution to export at. If you want it EXACTLY how it is in Daz, export at High Resolution, and the file will be large. If you can deal with very slight differences, convert to base resolution and apply a subdivision surface modifier once in Blender. The file will be lighter. But for one character, and one frame, I'd just export at High.
Again, thank you so so much for your mega helpful comments! I redid everything again with my first model using the second model's skin shader and spent the whole day working on hair. I'm glad to say... I'm really proud of her hair! Hah!
Woah. I like the hair, too! Congrats!
Hehe thank you! Now moving onto the next stage, do you recommend I use rigify on her for posing?
Should I save this file as base such that if I ever want to use this character, I'll duplicate from this file since it already has her shaders and hair in it and then change the scene around her accordingly?
For Marvelous Designer, between it and Daz3d, I would first get the A pose of my model, bring her to Marvelous Designer, get the outfit on her, go back to Daz and change the pose to what I want and then bring that model into Marvelous Designer as morph target. Once the outfit is fitted into her pose, I then save the outfit as obj and bring that obj back into Daz.
Are the steps basically the same between Blender and Marvelous Designer?I import both posed and unposed. I tend to import some poses for use, which if you rigify, you can't do.
Rigify really is brilliant, expecially for animation, but great for just for single poses too.
Take advantage of the pose library feature in blender.
Daz3d to Blender WorkflowSubd is completely up to you. I don't think I've ever gone above 2.
As for hair, yeah, a few of us are struggling with getting a handle on it. I've seen what competent people can do with it, and very quickly, though. If you're using 2.83, though, you can put the character in a collection and then set that collection as the collision collection. That should vastly improve penetrations and just look more natural.
As for the irises, you could fix it in Blender, there's probably an edge loop you could slide, but I think you should really find a morph in Daz for that sort of thing... stand on the shoulders of giants, ya know?
Thank you again! Is it possible to move a model from Blender back into Daz to edit or do I have to re import a new model and restart the shading process all over again?
Also should I make sure to import her as high res?You can edit the mesh.
You can add geometry; it may cause issues, but I have done, to the rigged figures, without issue so far.
I'm considering sculpting some changes to see how it goes.
Adding items and parenting them to the appropriate bone or mesh part is very useful.
Auto-Fit List list of items@chris-2599934
Thanks for this nice step-by-step idea. Scene identification gives results similar to Auto-Fit originally made for G3F. I guess with a bit of Mesh Grabber or (probably) better a morph done with GoZ in ZBrush, this should do the trick. Though JCM of the boots don't behave properly at all. I miss some rigging/weighing knowledge to make all that work properly. If I had that knowledge I'd model my own boots ;) (Really have to work on that rigging own assets part...)
I managed to get a decent result using [...] item originally made for : "Genesis 3 Female". But if the original boots for boots for G8M bend decently well (Engineer Boots for Genesis 8 Male(s)) , when Auto-fitted, all JCM (if there were any in the original product ?) and the weighing isn't as good as the original.
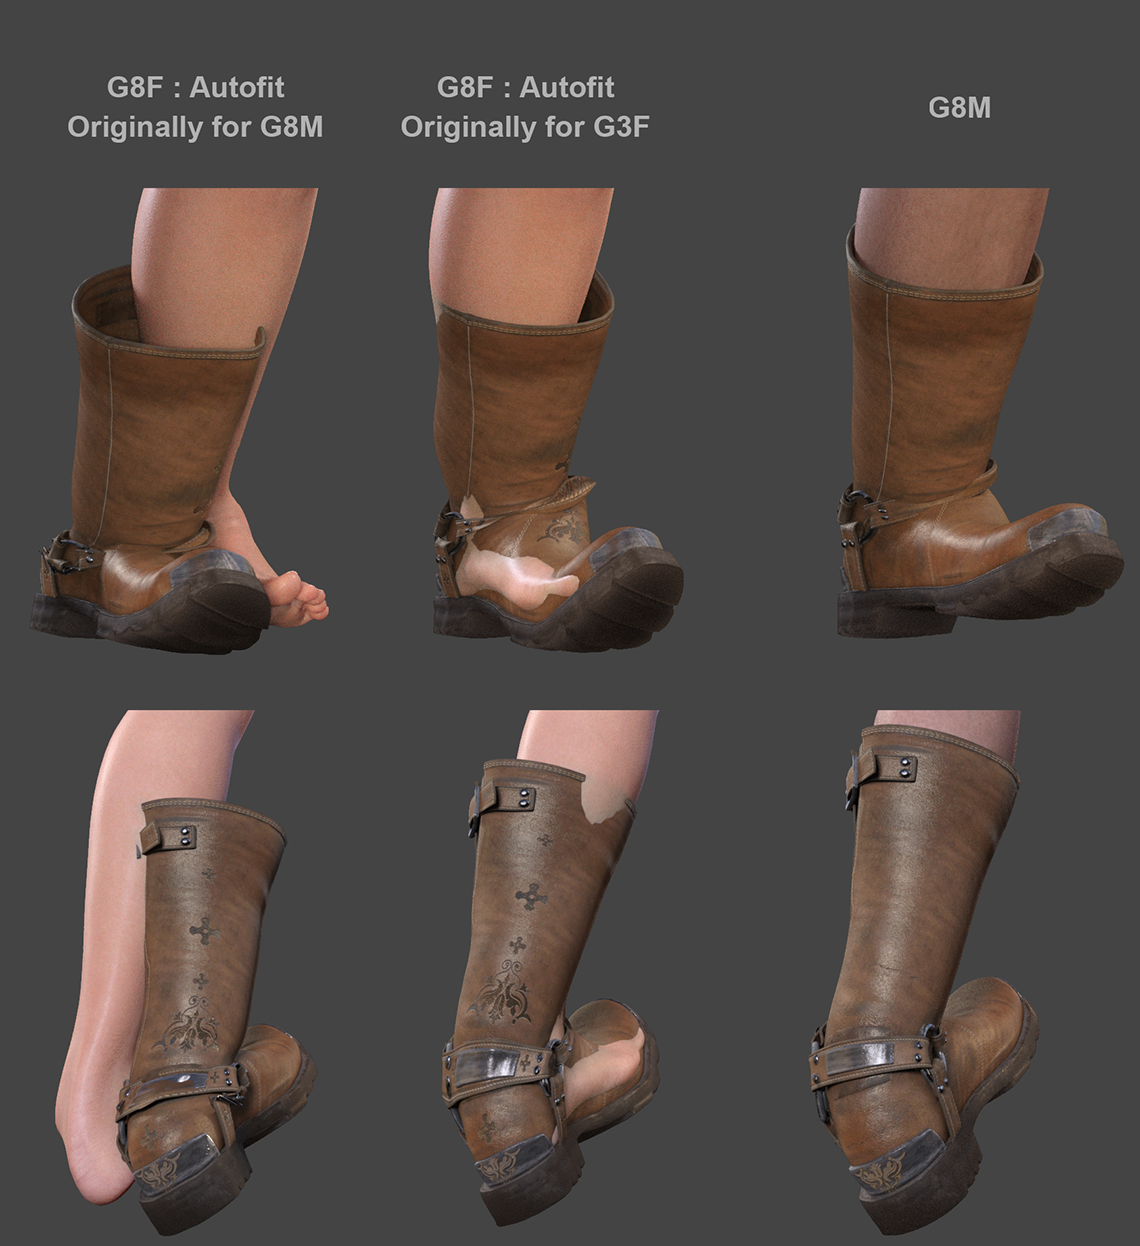
Genesis 8 Cross-Figure Resource Kit seems a bit pricy to fit 17$ boots. It would take my virtual boots at 45$ which is more than I'd put in real shoes :) But it seems like an excellent tool if one were to create assets to sell on stores I guess. I'll have a look into that, sounds like an excellent option, thanks for the tip. I guess this tool does what we can do straight from within DAZ interface. But it ain't simple to figure it out..
Damn you're right, I didn't even think about that. Auto-Fit menu is different and lighter because it's the new G8 Auto-Fit. Thanks for pointing that out.
I'm building my own clothes/shoes, etc in MarvelousD/ZBrush/Maya/RizomUV/SubstanceP. This is my job so to say. No limits there I can do more or less anything. But I need to figure out how to rig, define weights, define JCM and then save Assets properly (hard to find good tutorials about all that) and I guess (I hope !) I'll find those boots issue trivial in a few weeks ;)
Thanks all for your help. I think I'm gonna fit them boots with G3F compatibility. Then morph them in ZBrush to position them properly. Then figure out how to define JCM and weighing. If I can do all that, then it will be a perfect transfer of a G8M asset onto G8M. And a good first step into building one's own assets.
Cheers.
The Marvelous Designer ThreadI've always used the transfer utility. It will give the garment some default weight mapping and will autofollow character morphs and poses. I'm not sure I have the terminology correct.
Daz3d to Blender WorkflowHehe thank you! Now moving onto the next stage, do you recommend I use rigify on her for posing?
Should I save this file as base such that if I ever want to use this character, I'll duplicate from this file since it already has her shaders and hair in it and then change the scene around her accordingly?
For Marvelous Designer, between it and Daz3d, I would first get the A pose of my model, bring her to Marvelous Designer, get the outfit on her, go back to Daz and change the pose to what I want and then bring that model into Marvelous Designer as morph target. Once the outfit is fitted into her pose, I then save the outfit as obj and bring that obj back into Daz.
Are the steps basically the same between Blender and Marvelous Designer?I would really pose her in Daz Studio before exporting. I gripe a lot about Daz Studio, but you will never hear me say anything bad about the rig, posing tools, or even ready-made pose assets that you can just buy for cheap. Not to mention that if you use a Blender rig, you'll be throwing away the JCMs and JCJs, which are two of the things that set Genesis models apart from everything else. With Rigify, I think you will quickly learn just how good the Genesis framework is, and how much it really does for you :)
That being said, people swear by Rigify... I've never used it though.
You don't have to duplicate her. You can keep her in her own blend file, and "link" to her in another. You'll probably want to keep the character in one file, the environment in another, VFX stuff in a third, etc... that way you can change things independently of one another, and it makes loading and saving a lot faster. "Appending" is another operation, but that's not what you want in this case... it's like File/Merge in Daz Studio.
As for getting MD stuff back into Daz, I'm afraid I can't help you with that either... once out of Daz Studio there's no way I would go back in :) and I often really want to know why people would actually do that. Getting things back into Blender is trivial. There's a Marvelous Designer thread here where people are doing some seriously impressive stuff, though. I'm sure there are a half a dozen people there who could tell you anything you wanted to know, and even some things you didn't know you wanted to know.
My workflow has been to export an Alembic file without subdivisions, that starts in an A-pose, and import that into MD. I fit the clothes, run a sim, and export the resulting garment to Blender as Alembic. I just import it on top of the subdivided Alembic I exported from Daz. It works perfectly, but I'm sure you could use obj as well. You might have to fiddle with the scaling, as it didn't seem to work as logic would suggest. On second thought, you know, there's really probably someone on that MD topic that could inform you better.
But seriously, why are you trying to get things back into Daz Studio? :)
The Marvelous Designer ThreadI use a particle size of 10 usually and quadrangulate the mesh. dForce doesn't like triangles. I export from MD as thin and welded. in DS I make it a conforming garment with the Transfer Utility. I apply the dForce Dynamic Modifier and it simulates pretty well with default settings. (I haven't made elaborate clothing with many layers.) For hard to fit character shapes I often use an animated simulation starting at G8F and morphing to the desired figure. Then I export the garment OBJ and make an FBM for the character, so I don't have to do this the next time.
I made this polo shirt for G8F and then made an FBM for Mabel following the animation technique I described above.
All very encouraging. I have a bunch of ready-made garments that I can use for practise (from CG Elves) and there are some low-priced garments from the already mentioned Evgeniya Petrova at ArtStation. Is the Transfer Utility step important? I've never used it before.
By the way - I'm really impressed at the skill you've already developed in such a short time.
Bug Report: Animators Beware, DS 4.12.1.117 deletes values keyframes en masseDaz has tried to incorporate Keymate and Graphmate features into the Timeline pane. The Timeline pane is still buggy, IMO. I have unresolved help requests open. I think it is their intent that the Timeline will replace Keymate and Graphmate. Keymate and Graphmate are no longer available in the Daz Store.
And I am petty glad that I bought them years ago because the new timeline needs a lot of work so I rely on KeyMate/Graphmate. But the problem with saving a scene and losing settings is particularly annoying. I found it happened on morph dials but probably on other things too.
Daz3d to Blender WorkflowSubd is completely up to you. I don't think I've ever gone above 2.
As for hair, yeah, a few of us are struggling with getting a handle on it. I've seen what competent people can do with it, and very quickly, though. If you're using 2.83, though, you can put the character in a collection and then set that collection as the collision collection. That should vastly improve penetrations and just look more natural.
As for the irises, you could fix it in Blender, there's probably an edge loop you could slide, but I think you should really find a morph in Daz for that sort of thing... stand on the shoulders of giants, ya know?
Thank you again! Is it possible to move a model from Blender back into Daz to edit or do I have to re import a new model and restart the shading process all over again?
Also should I make sure to import her as high res?I actually wouldn't know... there might be a way, but I'm sure it is not easy.
But if I were you, I'd copy the blend file before the export so you can just File/Append all your materials that you worked so hard to perfect.
And there are two ways to go about choosing what resolution to export at. If you want it EXACTLY how it is in Daz, export at High Resolution, and the file will be large. If you can deal with very slight differences, convert to base resolution and apply a subdivision surface modifier once in Blender. The file will be lighter. But for one character, and one frame, I'd just export at High.
Again, thank you so so much for your mega helpful comments! I redid everything again with my first model using the second model's skin shader and spent the whole day working on hair. I'm glad to say... I'm really proud of her hair! Hah!
Woah. I like the hair, too! Congrats!
Hehe thank you! Now moving onto the next stage, do you recommend I use rigify on her for posing?
Should I save this file as base such that if I ever want to use this character, I'll duplicate from this file since it already has her shaders and hair in it and then change the scene around her accordingly?
For Marvelous Designer, between it and Daz3d, I would first get the A pose of my model, bring her to Marvelous Designer, get the outfit on her, go back to Daz and change the pose to what I want and then bring that model into Marvelous Designer as morph target. Once the outfit is fitted into her pose, I then save the outfit as obj and bring that obj back into Daz.
Are the steps basically the same between Blender and Marvelous Designer?The Marvelous Designer ThreadI use a particle size of 10 usually and quadrangulate the mesh. dForce doesn't like triangles. I export from MD as thin and welded. in DS I make it a conforming garment with the Transfer Utility. I apply the dForce Dynamic Modifier and it simulates pretty well with default settings. (I haven't made elaborate clothing with many layers.) For hard to fit character shapes I often use an animated simulation starting at G8F and morphing to the desired figure. Then I export the garment OBJ and make an FBM for the character, so I don't have to do this the next time.
I made this polo shirt for G8F and then made an FBM for Mabel following the animation technique I described above.
Daz Studio Pro BETA - version 4.12.2.60! (*UPDATED*)Unfortunately, I now know that it was not my computer (Macbook Pro 2013) – but rather Daz 4.12.1+ incompatibility with Mac's Catalina OS that has caused serious problems working in the application for the past few months. As a result, one of my favorite applications will sadly get shelved going forward. And that's after 15 years (since May 2005) of working with Daz and buying tons and tons and tons of content on Daz3d.com.
How do I know it's not my computer? Just bought a new Macbook Pro to support all my 3D work in ZBrush, Maya, Blender, etc., - 64 Gigs of RAM, 2.4 Ghz 8-core Intel Core i9, and a pretty hefty graphics card. I did not transfer over Daz from my old computer. Just content. I did a 100% fresh install; but to my complete shock, after working in Daz for a little more than 3 hours tonight, I'm having identical problems I had on my 2013 machine (on Catalina), even after a completely fresh install. Both the Beta 4.12.2.6 and 4.12.1.117 exhibit the same behavior:
-
1-2 crashes per hour.
-
Extremely long lag times for loading content (e.g., one character).
-
Freqeunt lags in the process of merely manipualting a character.
-
When I save a file, two "Save" dialog boxes pop up overlapping each other (exactly what happened on my old computer) that both read "Filtered Save". I select one and save, and then about after 6 additional saves, Daz crashes.
-
When rendering, a dialog box pops up that says I am already rendering, which is false.
-
When I've been lucky enough to get past 30 minutes of working in Daz and I save an existing file, it treats it if it were a new file... "Untitled". So it's essentially "Save As" forever after that point. At times the old file I had been working on was never saved anyway.
-
From time to time, after rendering, Daz crashes. It also crashes after merely saving (or trying to save) the scene I'm working on.
NONE of this happened before 4.12.1.117. It's really sad because I have deadlines and Daz used be fantastic for certain parts of my workflow. I was really, really hoping this new computer would solve the problems, but it looks like I can't use Daz anymore, at least until these serious problems are solved. And that's after working with Daz for 15 years. Really, really, really disappointed.
Submit support tickets. These all sound like bugs that should be relatively easy to reproduce (and therefore fix) if documented properly. Something that most likely rarely happens given how few OS X Daz Studio users there seem to be these days.
Can no longer use Daz on my Mac after 15 yearsUnfortunately, I now know that it was not my computer (Macbook Pro 2013) – but rather Daz 4.12.1+ incompatibility with Mac's Catalina OS that has caused serious problems working in the application for the past few months. As a result, one of my favorite applications will get shelved going forward. And that's after 15 dedicated years (May 2005) of working in Daz and buying tons and tons and tons of content on daz3d.com.
How do I know it's not my computer? Just bought a new Macbook Pro to support all my 3D work in ZBrush, Maya, Blender, etc., - 64 Gigs of RAM, 2.4 Ghz 8-core Intel Core i9, and a pretty hefty graphics card. I did not transfer over Daz from my old computer. Just content. I did a 100% fresh install; but to my complete shock, after working in Daz for a little more than 3 hours tonight, I'm having identical problems I had on my 2013 machine (on Catalina), even after a completely fresh install. Both the Beta 4.12.2.6 and 4.12.1.117 exhibit the same behavior:
-
1-2 crashes per hour.
-
Extremely long lag times for loading content (e.g., one character).
-
Freqeunt lags in the process of merely manipulating a character.
-
When I save a file, two "Save" dialog boxes pop up overlapping each other (exactly what happened on my old computer) that both read "Filtered Save". I select one and save, and then about after 6 additional saves, Daz crashes.
-
When rendering, a dialog box pops up that says I am already rendering, which is false.
-
When I've been lucky enough to get past 30 minutes of working in Daz and I save an existing file, it treats it if it were a new file... "Untitled". So it's essentially "Save As" forever after that point. At times the old file I had been working on was never saved anyway.
-
From time to time, after rendering, Daz crashes. It also randomly crashes from time to time after merely saving (or trying to save) the scene I'm working on.
NONE of this happened before 4.12.1.117, or before Catalina. It's really sad because I have deadlines and Daz used be fantastic for certain parts of my workflow. I was really, really hoping this new computer would solve the problems, but it looks like I can't use Daz anymore, at least until these serious problems are solved. And that's after working with Daz for over 15 years. Really, really, really disappointed.
Daz 3D is part of

Connect
DAZ Productions, Inc.
7533 S Center View Ct #4664
West Jordan, UT 84084Licensing Agreement | Terms of Service | Privacy Policy | EULA
© 2026 Daz Productions Inc. All Rights Reserved.