-
Mystique 2 & Expansions for G8F [Commercial]
My own that I'm working on that will be released as the official Mystique character for the Mystique line of products. I have more info about this upcoming character on my artstation blog (artstation link in signature).
Love the bend corrective morphs they look great! She is a insta-buy!
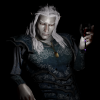
Mystique 2 I had to do some mesh grabber in some spots on the hose nothing major tho mainly around the knee area. The veil on the other hand I went round and round with. The veil comes back to far over the hair/ears which made it look funny with this image (It looks fine when the hair is down like in the promos). I also tried to dforce it to take on more of the face shape but nope it didn't matter what I did it would always fall through her face for some reason. So I got out my handy mesh grabber and along with the included morphs made it close to what I was going for. The set only includes a white bottom with the skulls where the bra comes with white and black but it was an easy fix to change the color!
Stunning outfit as usual!!
(I just realized I hid the choker and didn't turn it back on *forehead slap)
Great render! What character are you using? You should be able to correct all stocking issues with the adjustment morphs provided. To be absolutely perfect, as a product, you would need a morph for every joint bend for every supported character.
The veil was designed to match that of reference images which came back a bit further actually. Usually, with a veil, you need complimenting hair to go with but exposing the ears (where the veil ends) I don't think is a bad thing.
Everything looks great though, good job!Which figure was used for the promo of this product?
https://www.daz3d.com/mystique-2-for-genesis-8-femalesThanks
My own that I'm working on that will be released as the official Mystique character for the Mystique line of products. I have more info about this upcoming character on my artstation blog (artstation link in signature).
I've read your blog, can't wait for the character and various morphs. As well as the additional content. The weekend is almost over

The character will more than likely be coming to Daz. I haven't decided yet but I think I can turn it into a big enough product for a daz release. Also, with all the custom bending morphs, I have to follow that up with the proper clothing morphs for that bend. I have a lot more work ahead of me for this one than I originally planned.
Another blog update will be coming later today explaining more and the Garter Belt will become available for purchase.Daz Studio Pro BETA - version 4.12.2.60! (*UPDATED*)Hi all, any news on DAZ bug fix for daz NOT saving any morph animations? :) This has be very frustrating bug that is hindering my work tremendously..
If anyone has an older version of DAZ 4.12.0.8xx that can post for people to download and install untill this bug is fixed, that would be wonderful. That version used to save morph animations fine..
help... :)
The only way to obtain an older version is to request one from Customer Services:
But make sure you request Studio not Daz, they won't neccessarily be sure what you're talking about as Daz has a number of products.
Rig "Morphing" for Daz StudioI only set the Tiger morph. As you can see in the images, the rig adjusts itself between the two breed morphs. That's what I'd like to get to export as well.
Anyone know what environment this is? - Now Bryce to Daz.Wow ... started looking for a decent mesa way back in 2014 and still can't find one.
Anyone know of anything new out there that is usable in Daz?
You can get some very solid mesa scenes by fiddling with Terradome 3, and mix and matching the morphs and shaders from the various Terrain morph packages. For closeups, though, you may want to swap out shaders or just do what I usually do, which is drop another landscape prop in on top or in front of the TD3 portion, something like vikike176's Wastland 2, Powerage's Terrain Creator for DS/Iray, or Powerage's Desrt Environment for DS Iray, all from over at Rendo, as it's asking a bit much of any single object to look good both in closeup and distance without being absurdly large.
Is it possible for me to export Animation from Daz to Blender ?Alembic works, but when I exported it off Daz and import it into Blender, I got an error Alembic alembic archive in obsolete hdf5 format is not supported, I looked around for a solution, but there wasn't much about it. So the only way I found is to Import into Cinema then Transfer in Blender.
Better FBX Import, I don't even know probably more a thing for game engines, didn't really help in this situation.
Thanks guys for helping out.Use this one.
saving autofitted breaks it for domino transferI usually save my Autofits as support assets as I need to for Carrara but decided to be lazy and just save scene subsets as was just using these in DAZ studio.
I found reloading you cannot upfit them to another genesis generation or between genders, they don't bring up the dialogue and just fit wrong.
They do work fine on the figure they are saved on.
I am just wondering if there is a trick to bring up the autofit dialogue rather than start over as V3 and M3 stuff on Genesis going to G8M and F so no clones to skip the domino process.
I could make clones, did on my other PC but that too has it's issues.
Export from Daz never comes back in as a morphAlso, you have to be careful what tools you use in zbrush. A lot of the nice and fancy features changes polygon count. If the polygon count changes at all, it cannot be used as a morph.
IMPORT OUTFIT+TEXTURE FROM CLO/MD TO DAZ! HELP!!!Export as OBJ, using cm as the unit, then import into DS at 100% - assuming you modelled around an exported DS figuer exported at 100% that should line up, you can then use dForce to simulate or transfer utility to rig (or both in turn)
Export from Daz never comes back in as a morphHello.
A friend wanted me to make his face and make it Dazable!(tm). Following tutorials online, I exported out the Genesis 8 Male by GoZ into Zbrush and then sculpted the head. According to the tutorial [https://www.youtube.com/watch?v=MtYFaIZah6A] I should be able to goZ it back to the OG. However, when I do it never let's me add it as a morph, only as a new character. The guy from the tutorial talked about another way, just exporting the mesh as an OBJ, importing to Zbrush, change things, and then use Morph Loader Pro to do the morph and he mentions that you can't change the vert order or it won't work. But that one doesn't match, either.
So I did some digging. Some people say to use the Dev model version of the Gen8 Male. I did that. Some say don't use the eyelashes. Did that. None of it comes in.
What's more, is that I exported both in GoZ and with a regular OBJ export and then imported it right back in w/o changing anything and it *still* doesn't see them as the same object.I'm wondering if there's something in the export settings that are changing the vertex order?
I also tried to use the Transfer Utility to transfer the weights and rigging from the OG Gen 8 model to the new Alex Model (that's his name, the guy that wanted me to make his face), and a lot of the face verts never get transfered, but the rest of the body seems to do pretty well. That's probably got something to do with how different the face looks. My model is asymmetrical (as most faces are, of course) and the nose is shifted out from anywhere near the nose on the OG Gen 8.
I'm not sure what I'm doing wrong and I'm not sure if there's a decent work around to this issue. Any help would be greatly appreciated.Is Daz Studio (as we know it) Heading South?I've always thought Studio 5 should be based on Blender. With Blender's introduction of long term support from 2.83, it is very viable.
... I can't see it happening though.
From what I remember of the last time I tried Blender, you'd have to type ctrl-alt-7 to select an object, pressing the up arrow would save a file, and a mouse click would shut down the app. It was as if they rebelled against anything working as expected. And buying a book on the subject was futile because by the time the book was published the entire interface would change to something completely incompatible with the version the book was based on. I've seen posts on this forum that say Blender has gotten better since then. But I wouldn't want to risk being stuck with the one interface that makes DAZ Studio seem well done.
Ctrl-Alt-7 to select? That must have been some version before I tried Blender several years ago. It used to be Right-Click to select but now it is Left-Click by default, just like most other applications out there. Nevertheless, I do find Blender intimidating, mainly because of the sheer extent of tools available from a single interface. Well, they have tabbed different versions of the interface to cater for different tasks but it would take me years to have a comprehensive familiarity with all of Blender. Not that overall familiarity is essential - I gather many people just use it for the task at hand and ignore the rest. So it can be learned piece-meal. Two things I would miss if I had to transfer from DAZ Studio to Blender tomorrow: I like the way I can maniplulate the cameras in DAZ Studio in that the viewport is the view from a camera instead of, as with Blender, some independent observer who has to switch to camera view to see what the render will look like. DAZ Studio is also much better at posing and moving stuff around the scene - at least for me it is - but then I've been using DAZ Studio for 15 years so that's not surprising.
This is digression, however. There's a dedicated Blender sub-forum here now so maybe this part of the discussion should be taking place there. As for DAZ Studio itself, I am very concerned that development seems to have dried up and am hoping that it is merely the quiet before the explosion of a major new release with soft-body physics and a working animation timeline. One can but dream.
How to apply G8M rigging to the hidden clones?
Hi Catherine, thank you so much for your detailed tutorial! Will try, thanks a lot!Hi, dummy question here. I tried to make a G8M character more interesting so I dialled in the hidden clones available. I know there are rigging issues when using clones because the bones are different so I tried to turn on the joint editor to adjust rigging to shape, but it didn't work. Did I miss something? Thanks!By your comment, it appears that you have dialed in more than 1 hidden clone. It doesn't work that way ;-)
After dialing in several morphs, you would need to make "one morph" from them using your modeler. After bringing it back into D/S to make the morph, then adjust the rigging. Remember to use the ERC freeze afterwards and turn it back to zero before saving.
Hi Catherine, thanks for your tips! Actually I just dialled one hidden clone to 100% at a time... do you suggest I directly exporting the dialled character (at G8M zero pose) as obj, then useing morph loader pro to apply it to a default G8M, then adjusting rigging to shape and ERC freeze? Thank you in advanceWell it is rather important not to damage any of the hidden clones. I'm only aware of them being used for auto-fit clones, not to be messed with.
1. Be sure that the bridge options in D/S for Hexagon are "advanced."
2. To make a morph, dial in the shape you want {G8M at base resolution, NO eyelashes} and shoot that over the bridge to Hexagon. Back in D/S return G8M's shape to default, from Hexagon shoot the morphed figure back over the bridge to D/S and make the morph. {reverse deformations, unique name, leave the landing place at default as that can be changed later}
3. On the Parameters Tab right-click on a dial, check Edit mode, right-click on the dial and/or use the wheel cog now to access the Parameters. Make the correct decisions for the type of morph, where you want it landing, colour(s) for the dial, 0 - 100% on min/max, etc.
4. Dial the morph in full, "bone" tool, right-click on a bone and Edit to have the bones match to the mesh. Return then to the Pointer tool.
5. Dial the morph in full, on the Parameter's dial, on the morph's dial - right-click or use the wheel cog [I don't have D/S open to check which it is right now] to click on ERC Freeze. On the pop-up, all the options at the bottom selected, then accept it.
6. Dial the morph out to 0%, Save the morph using your own name/handle and for the product folder put something like "private" to remind yourself NEVER to share such a derivative morph ;-)
7. All this being said, this is along the lines of how I would do it - it is NOT recommended to make shaping morphs from the hidden clones which are intended for use as auto-fit clones. [that's one reason why they tend to be hidden]. The requirements for an autofit clone are not the same as for a shaping clone. Matters such as fingers and headshapes could be off the richter scale.
8. IF any of these autofit clones just happen to be of the ones I made then it is verboten. Even I haven't tried to do such with these as I know how I made them.
9. Much better shaping morphs, for eg. of any of the legacy figures, can be obtained by purchasing them from the store. They come on sale now and then and in the October sales last year even spent a day or so at $1.99 :-) Put them on your wish list for IF/when the day comes 'round again if $ is tight. One of the reasons professionally made shaping morphs are/should be better is because it is not uncommon for various morphs to require jcms and stuff like that to make the figures look nice and proper. Much more complex even than adding a few jcms to clothing as 'every' muscle has to move just so.[Released] Expression MixerI don't quite understand what they are used for (I am using google translator to understand them, and sometimes it translates things wrong).
Could you please explain to me the step by step to transform something done with this fantastic tool into a spawn morph?I don't really do this so I am not sure. I googled this procedure. https://www.daz3d.com/forums/discussion/comment/590779/#Comment_590779
You can use ERC freeze to create a master property that will set all of the others, if you wish, but it may be simpler just to save a Pose preset for each - having a property is mainly useful if you are wanting to use variable amounts for the expression.
Set your compound expression, with everything else zeroed.
Put the Parameters pane in edit mode (Parameters pane option menu, or right-click in the Parameters area)
Right-click in the Parameters list (or in Property Hierarchy pane) and launch ERC Freeze.
At upper-right click Create New. Give it a name and label, click the drop-down button next to Path to pick the base location and then edit to add a new sub-folder if desired. Make any other changes (you may want different limits) and click Accept.
In Freeze properties check that all and only the morphs you want are checked.
Click Accept.
Your figure should appear unchanged, but now only the new property is set. Save as a morph asset if you want to make it available for all instances of the figure.
How to find the morphs that alter a bone's transform value, for a given frame?Here's the context: Parameters pane. This is probably more relevant to animators but not necessarily, because I'm just trying to track down what's going on for a given frame.
Quick example for dial twirlers: Eyelids Lower Up-Down. You set it to a modest negative value in frame 0. Later on you want to wink the right eye so you prepare to twirl down Eyelids Lower Up-Down Right. It is already at the negative value set by the changes-them-both dial you set at frame 0. Some higher-up morph has changed this dependent morph. In this case you know which one it is, but it isn't always that simple.
What if you are twirling a dial or want to zero something, but suddenly you hear behind you: "Um? I'm controlling that value? But go ahead on this frame if you want. Good luck." Hey where did that voice come from? You spin around. It's gone! Who said that?? That's the quest in this question.
A common experience I would think is when you'd like to zero a parameter. You can set the value to zero, but you don't get a nice black 0.00, you get a white 0.0000 meaning some morph is affecting the value. Or at least that's how I interpret that situation.
Besides the white 0.0000 (your theme might color it differently anyway), another way to see what's going on is to bring up GraphMate or the new Timeline Advanced View, settable by right-clicking on the Timeline tab and choosing View Mode -> Advanced View. I'm using 4.12.2.6 beta, but the new Timeline was added in the first release of 4.12 I believe.
Let's say you are trying to zero out the Y translation from Something -> Properties -> General -> Transforms -> Translation -> Y Translate. Don't forget to breathe!
In both GraphMate and the new Timeline you can see that the actual value over time is not an interpolated curve through the center of the keyframe boxes (GraphMate) or circles (Timeline), but rather that same interpolated curve translated up by about two units. Let's find out what morphs are causing this to happen, shall we?
Well, the only way I've ever been able to find out has been to keep track of the primary dials I have twirled via Favorites. Often I don't have those when loading older scenes or perhaps even my Favorites don't account for everything. What about "Currently Used?" Well, it shows all the second-order values so it looks like theres more to remember than there really is. A single facial expression can cause 10 to 20 face morphs to go non-default, and they show up in Currently Used. You should be able to zero out your Favorites and get a nice clean nothing for Currently Used. Again, the hierarchy is not shown, just a flat set in the Currently Used list. So unless you've done the Favorites thing or written down what you changed, you can't reverse engineer the prime dial movers. Or can you? That's the broader question. The zoomed in version is hopefully more concrete and task-based: what set of morphs are contributing to a given value, for a given bone, on a given frame?
Differences between HD and non-HD characters in terms of resources?If the Render SubD level is the same (for iray) then both should use the same amount of memory for the geometry in rendering, as far as I know. HD morphs move the vertices geenrated by SubD, but they don't add them in the first place. Of course having the HD morph deltas loaded will increase the amount of system RAM used, and may require additional processing in generating the data to be sent to Iray.
Is zeroing the HD morphs in the Parameters tab the same as effectively "unloading" the HD morphs? I replaced the HD male with a non-HD one and the issue is resolved. Apparently, my computer does not like the two HD characters together.
Is it possible for me to export Animation from Daz to Blender ?Alembic works, but when I exported it off Daz and import it into Blender, I got an error Alembic alembic archive in obsolete hdf5 format is not supported, I looked around for a solution, but there wasn't much about it. So the only way I found is to Import into Cinema then Transfer in Blender.
Better FBX Import, I don't even know probably more a thing for game engines, didn't really help in this situation.
Thanks guys for helping out.Well it's primarily for game engines that animations embedded in FBX files that retargeting animations to different models was designed for. However, as Wolf359 said you can retarget in Blender without the BetterFBX product using Blender's native FBX import of your animations.
Here try this turorial:
https://connect.unity.com/p/retargeting-animations-with-blender-2-80
How to apply G8M rigging to the hidden clones?Hi, dummy question here. I tried to make a G8M character more interesting so I dialled in the hidden clones available. I know there are rigging issues when using clones because the bones are different so I tried to turn on the joint editor to adjust rigging to shape, but it didn't work. Did I miss something? Thanks!By your comment, it appears that you have dialed in more than 1 hidden clone. It doesn't work that way ;-)
After dialing in several morphs, you would need to make "one morph" from them using your modeler. After bringing it back into D/S to make the morph, then adjust the rigging. Remember to use the ERC freeze afterwards and turn it back to zero before saving.
Hi Catherine, thanks for your tips! Actually I just dialled one hidden clone to 100% at a time... do you suggest I directly exporting the dialled character (at G8M zero pose) as obj, then useing morph loader pro to apply it to a default G8M, then adjusting rigging to shape and ERC freeze? Thank you in advanceWell it is rather important not to damage any of the hidden clones. I'm only aware of them being used for auto-fit clones, not to be messed with.
1. Be sure that the bridge options in D/S for Hexagon are "advanced."
2. To make a morph, dial in the shape you want {G8M at base resolution, NO eyelashes} and shoot that over the bridge to Hexagon. Back in D/S return G8M's shape to default, from Hexagon shoot the morphed figure back over the bridge to D/S and make the morph. {reverse deformations, unique name, leave the landing place at default as that can be changed later}
3. On the Parameters Tab right-click on a dial, check Edit mode, right-click on the dial and/or use the wheel cog now to access the Parameters. Make the correct decisions for the type of morph, where you want it landing, colour(s) for the dial, 0 - 100% on min/max, etc.
4. Dial the morph in full, "bone" tool, right-click on a bone and Edit to have the bones match to the mesh. Return then to the Pointer tool.
5. Dial the morph in full, on the Parameter's dial, on the morph's dial - right-click or use the wheel cog [I don't have D/S open to check which it is right now] to click on ERC Freeze. On the pop-up, all the options at the bottom selected, then accept it.
6. Dial the morph out to 0%, Save the morph using your own name/handle and for the product folder put something like "private" to remind yourself NEVER to share such a derivative morph ;-)
7. All this being said, this is along the lines of how I would do it - it is NOT recommended to make shaping morphs from the hidden clones which are intended for use as auto-fit clones. [that's one reason why they tend to be hidden]. The requirements for an autofit clone are not the same as for a shaping clone. Matters such as fingers and headshapes could be off the richter scale.
8. IF any of these autofit clones just happen to be of the ones I made then it is verboten. Even I haven't tried to do such with these as I know how I made them.
9. Much better shaping morphs, for eg. of any of the legacy figures, can be obtained by purchasing them from the store. They come on sale now and then and in the October sales last year even spent a day or so at $1.99 :-) Put them on your wish list for IF/when the day comes 'round again if $ is tight. One of the reasons professionally made shaping morphs are/should be better is because it is not uncommon for various morphs to require jcms and stuff like that to make the figures look nice and proper. Much more complex even than adding a few jcms to clothing as 'every' muscle has to move just so.Transfer HD into Normal Map imageDoesn't the figure come with normal maps?
Unfortunately not, it is very poor on the textures but what I understand it's not the same thing, usually they are creating normal maps from texture and the HD is something else.
Fortunately I've managed to transfer the HD to a normal map and ambient occlusion map, and I'll post a tutorial in the near future.Edit
Below my work so far, an example with normal map and ambient occlusion without a depth map, also the original render.
It's not perfect but there is a clear difference, you can see at the eye, nose and mouth level.Differences between HD and non-HD characters in terms of resources?If the Render SubD level is the same (for iray) then both should use the same amount of memory for the geometry in rendering, as far as I know. HD morphs move the vertices geenrated by SubD, but they don't add them in the first place. Of course having the HD morph deltas loaded will increase the amount of system RAM used, and may require additional processing in generating the data to be sent to Iray.
Is it possible for me to export Animation from Daz to Blender ?Alembic works, but when I exported it off Daz and import it into Blender, I got an error Alembic alembic archive in obsolete hdf5 format is not supported, I looked around for a solution, but there wasn't much about it. So the only way I found is to Import into Cinema then Transfer in Blender.
Better FBX Import, I don't even know probably more a thing for game engines, didn't really help in this situation.
Thanks guys for helping out.Face Transfer Automation - Referencing Existing Widgets - HelpYou mean that these functions could be private?
In that case, I believe my best option would be to locate the combo box widget and pass variables to it directly. Maybe use a general approach to loop thorough all QObjects till I locate this one (not sure if this is even possible).
I have tried looking into the Face Transfer script files but they seem to be encrypted. Makes sense, since there is a free and unlimited version of this plug-in. Will purchasing the interactive license give me access to the plug-in's source code? I have read the description of the interactive license but it seems vague to me, not really sure what it unlocks.
If however,
You want to create an experience where someone can alter what is happening, such as an application or a video game that changes depending on what the user does, then such things will generally require access to information about the 3D assets so that it can move them around, alter them, and generally manipulate them to change the user experience.
Not sure if this means access to the source code or something else.
Daz 3D is part of

Connect
DAZ Productions, Inc.
7533 S Center View Ct #4664
West Jordan, UT 84084Licensing Agreement | Terms of Service | Privacy Policy | EULA
© 2026 Daz Productions Inc. All Rights Reserved.