-
Geograft Question
Richard Haseltine said:
In order to use the Transfer Utility the figure needs to be weightmapped. The older dragons use parametric (Poser) rigging, based on include/exclude angles (lines projecting from the centre of the joint defining what moves, what stays put, and the transition between them) and spheres (two spheres doing a similar job). You could copy them, but I am far from sure you could graft to a parameteric figure at all and there would be no guarantee the parameters could be tweaked satisfactorily.
Your image isn't showing - Gallery links now expire, you would do better attaching to the post.
Thanks Richard,
Creating the Tri-Ax for the MD was pretty easy, and once I did, the geograft took with no problems.
As you mentioned, there are definitely some tweaks needed for the maps as well as a ton of display issues when trying to pose the figure--DAZ seems to not like this and flips out (display blanks out and figure is freezing in some really weird positions when I'm adjusting dials for the MD now). I've seen this behavior before, and I know there's a fix for it but I've forgotten how. But this is certainly a step forward! Much appreciated!

Also, hoping the bloody picture is posted correctly now....
 Why does DAZ DO this sort of thing!? edit---nope, it's not~! Can you please show my how?? I have no idea how to "post" a picture here!
 pwiecek said:
I'm not sure if this thread is applicable
Thank you very much, pwiecek!
I only had time to skim through this, but it looks promising. At the very least this could useful in creating some clothing for the MD/Dragonfolk characters.
BTW, I think it'd be a damned good idea if such tutorials like this could all be collected and put into their own Forum Folder (hint, hint, nudge, nudge, wink)
Also, while looking for old thread that I was hoping to have useful info, some threads seem to have "expirations", too. From Imported back to DAZ gone wrong - Daz 3D Forums:
Richard Haseltine said:
If you have loaded it as a morph, and if you have changed the height or other proportions in the new morph, then you will need to adjust the rigging to the shape. DS will do this for you in most cases, though you may need to tweak - it's covered in this thread: http://www.daz3d.com/forums/viewreply/254575/
Dead link.
Dentures?FirstBastion said:
I am sometimes surprised to find what I have in my library. But I apparently have those teeth, and heres a straight iray render of the M4 poser prop and materials. They have a denture morph, yet are still quite big.

I can't see the image.
Creating PropertiesHoplite490 said:
Not an animation. I have some models from other artist that do this. For instance, an airplane when the gears come down. I will see that all the bones used in the property do not move at the same time. Example, gears come down and then rotate, not drop and rotate at once. Is this done in animation? I can convert that to a morph/property? If, so do you know of a link I can use to learn how?
Is this similar to what you are trying to do?
https://www.versluis.com/2022/05/manual-rigging-in-daz-studio-without-the-figure-setup-tool/
and "the other one" I have now found (!): https://www.versluis.com/2021/07/rigging-basics/
(Jay's always worth a watch anyway
 )Import material Daz to blender
crosswind said:
chrisvn said:
crosswind said:
You bought the product from Renderosity.com ... The vendors there usually have to split the product into multiple ZIP packages, like the one in your ss4, from 01 to 06. You need to put those six ZIP files into a folder, and unzip all of them. Then you'll got the sub-folders: data, People, Runtime.
Then copy them into the root directory of your Daz Library !
I looked at the installation note and on the manual the instructions were to unzip the folders directly into the Library, so I did that, I was able to use the cropped hoodies except one where I don't see the US colors and there are edges that interact with the character's skin and also when you move it the hoodie goes through the skin (screen_V1), I think it's more a settings thing, but I'm new to this is there a tutorial for that?
You either can unzip the package file one by one or holistically unzip them into a temp folder and copy them to the library all together. I always install 3rd-party product with Content Wizard, so I always make a one package without any garbage folders / files (e.g. Documents... etc.)
Short Hoodie 10 material preset is with "US textures"... though I never use it ~~
The issue you had is because of the character's shape is Sakura 8 but the vendor didn't give a FULL HEAD MORPH for it on the hoodie. You can follow this tutorial to fix the FHM... https://youtu.be/HLt0jpxQA20?si=UeJ67vXsv0k2HCg1
The tutorial from Mada is for fixing FULL BODY MORPH (FBM) but you can follow it similarly to fix FHM for the hoodie. I fixed it by using Blender. (ss1) If you don't know Blender or ZBrush but have Mesh Grabber, you also can fix it...
I noticed that to change the hoodie material at first it didn't work, then clicking on the eye deactivated it then reactivating it by clicking on the hoodie for example I changed it and it's the same for the rest this is correct way (screen_V2) ?
The material presets work for me. I couldn't reproduce any issue with them. Maybe it was a glitch on your side....
Yes, in the end, so since I unzipped it, it went well, I unzipped it directly into the library the necessary files...
But I have the colors with the same hoodie selection as you, however in fit to I don't have sakura 8 but genesis 8 and yet I have the same selection as you! I don't understand because we have to put the genesis 8 female body first..(screen V1 et V2 )
Regarding the video link, it's too advanced for me, I don't even know how to go into editor mode!!! If it worked for you, it will work for me too!
And for the clothes that pass through the body when the character moves, do you think it is necessary to save the body in collisions? I have not tried in blender, I will have to try
The Doctor Appreciation thread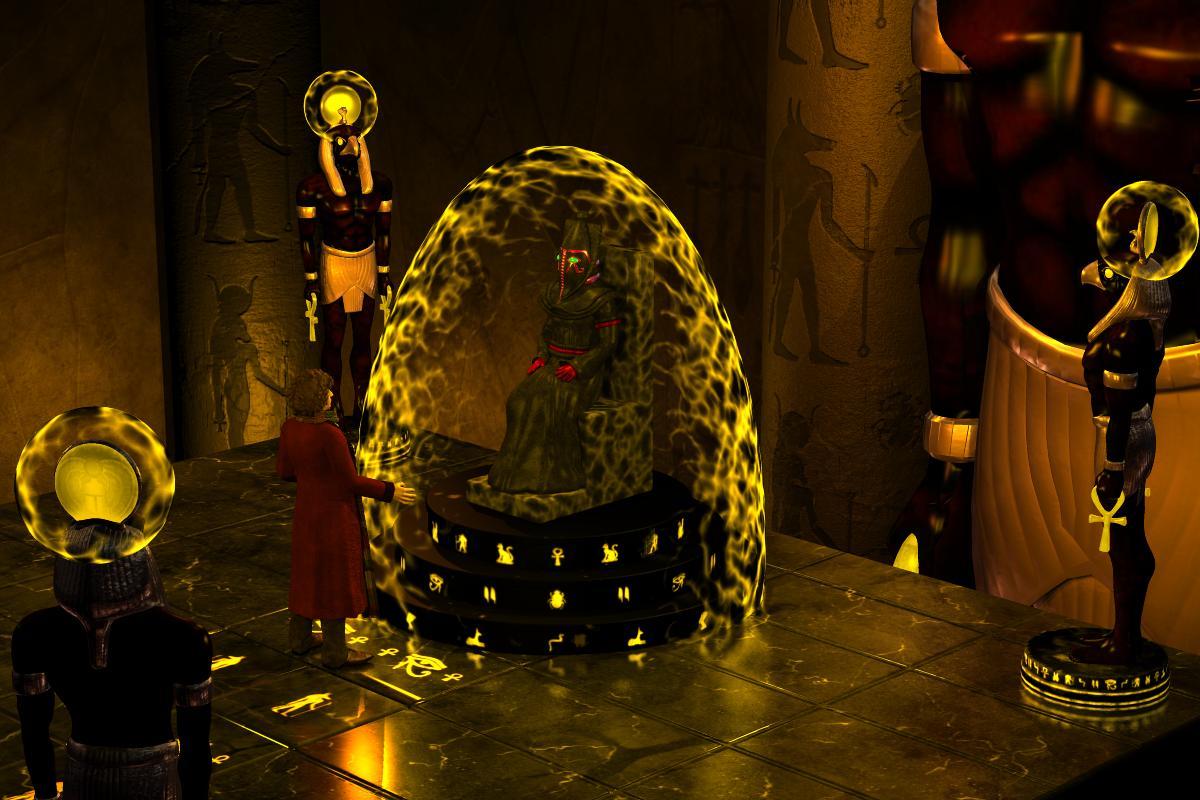
Just an oddball mental exercise. How might have Sutekh's prison/tomb appeared if "The Pyramids of Mars" were produced today? Rather than the confining chmaber with the abstract Jackson Pollack paint scheme, we probably would have seen something on the scale and granduer of the Brandon Frasier "Mummy" flicks. I used the "Temple of Anubis" as a starting point, but I chucked the jackal headed statuary in favor of the hawk headed Horus as he was the Osiran who defeated and imprisoned the psychotic demi-god.
But I couldn't even attempt this project until I had Sutekh distinctive mask and pectoral collar I could affix to one figure or another. I have literally searced "on and off" for a few years trying the find something. Anything for download depicts his "real face" usually just a straight up jackal, not the Egyptain themed "Man in the Iron Mask" type helmet. Well, that's not quite true. Some 20+ years ago, there was a group called Who3D that intended to animate missing episodes of Doctor Who using...Poser. One of the members, Adam Bullock, had a collection of models one could download in a format called "Anim8or". One of those was a whole Sutekh figurine. Let's just say the central part of the helmet, the teardrop section with the Ehyptian themed bas relief dertails was usable, the rest, uh, not so much. Well, the other week I got off my a$$ and tried to "box model" (in Wings3D) new "frills" for the mask and whole new collar/yoke. The "frills" were almost too easy, the collar, well that took two full on modeling sessions. Here's the result.
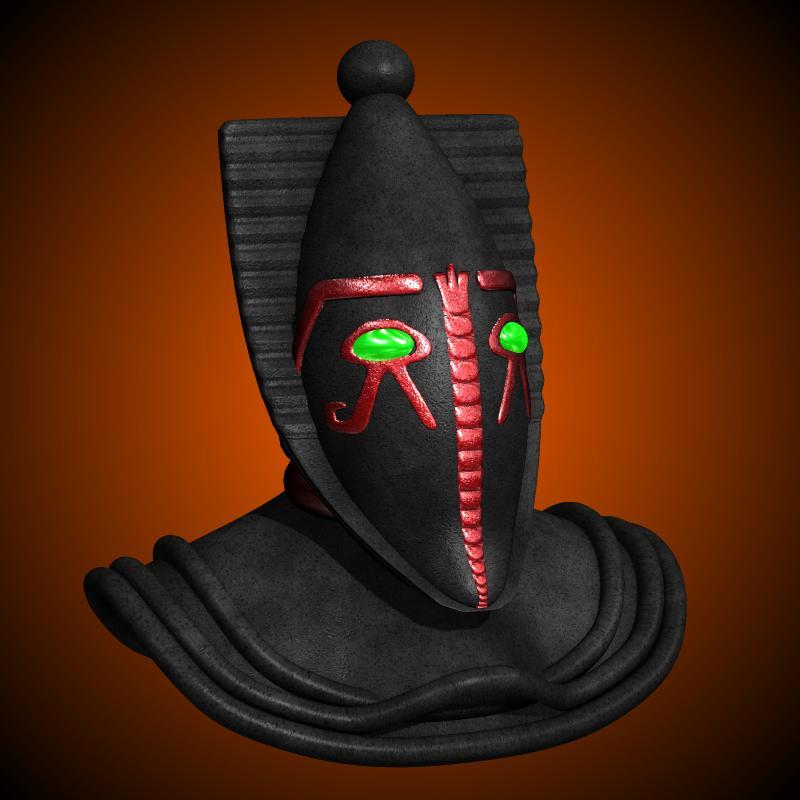
Once I got it to a passable level, I "parented" the props to a vintage PoserWorld figure called the "Evil Keeper". I chose it as it had a great "sitting" morph that bent the "skirt" section in a believable way, closely capturing the pose as Gabriel Woolf sat in the original story. After assembling the simple granite chair, I placed everything within the setting and puttered with lighing for a few days. This is the result.
Using Lycan 9 Ears on human characters?I think as long as these are either morphs or geografts that attach to the normal G9 figure, you should be able to mix to your heart's content. Morphs from Lycan and Nahr certainly do appear in the morph lists for all G9 characters when I call them up.
With the claws and especially teeth, I don't know, there might be fitting issues. You could just try it out though, you can always return an item for 30 days.
Daz Studio 2025 (6.25.2025.x) - "evergreen"New Features
(... that were not made available in a 4.20, 4.21, 4.22, 4.23, or 4.24 build)
DrawStyles:
- Filament
- Now available on macOS
- NVIDIA Iray
- Added a Drawing > Draw Node Wireframe property that toggles drawing of the wireframe for a mesh over the top of the rendered surface
- Provides "like-kind" parity with the Filament DrawStyle (since 4.12.2.51)
- Added a Drawing > Draw Node Wireframe property that toggles drawing of the wireframe for a mesh over the top of the rendered surface
- Texture Shaded
- Now draws a temporary blue surface when the images for a textured surface are still loading
- Provides "like-kind" parity with the Filament DrawStyle (since near inception)
- Improves loading speed, as it allows objects to be drawn before all images are loaded/resampled
- Now draws a temporary blue surface when the images for a textured surface are still loading
- Wire Texture Shaded
- Now draws a temporary blue surface when the images for a textured surface are still loading
- Provides "like-kind" parity with the Filament DrawStyle (since near inception)
- Improves loading speed, as it allows objects to be drawn before all images are loaded/resampled
- Now draws a temporary blue surface when the images for a textured surface are still loading
- Universal
- Allows a base DrawStyle to be selected for the scene
- Draw Settings > Display > Scene View > Scene DrawStyle
- Default (Texture Shaded)
- Wireframe
- Lit Wireframe
- Hidden Line
- Wire Shaded
- Smooth Shaded
- Wire Texture Shaded
- Texture Shaded
- Draw Settings > Display > Scene View > Scene DrawStyle
- Allows individual objects to override the base DrawStyle
- Parameters > %ObjectRoot% > Display > Scene View > DrawStyle Override
- None (use Scene DrawStyle)
- Wireframe
- Lit Wireframe
- Hidden Line
- Wire Shaded
- Smooth Shaded
- Wire Texture Shaded
- Texture Shaded
- Parameters > %ObjectRoot% > Display > Scene View > DrawStyle Override
- Allows individual surfaces to override the object override
- Surfaces > %ObjectRoot% > %Surface% > Display > Scene View > DrawStyle Override
- None (use object DrawStyle Override)
- Wireframe
- Lit Wireframe
- Hidden Line
- Wire Shaded
- Smooth Shaded
- Wire Texture Shaded
- Texture Shaded
- Surfaces > %ObjectRoot% > %Surface% > Display > Scene View > DrawStyle Override
- Allows a base DrawStyle to be selected for the scene
- Depth
- Allows Near and Far distances to be adjusted in Draw Settings > Depth Adjust
Render Engines:
- NVIDIA Iray 2025.0.3
- See Release Notes
- Adds support for Blackwell (50 Series) GPUs
- Adds support for Adaptive Displacement/Subdivision (see NVIDIA Iray - Programmer's Manual : 7.8.4 Displacement - Fig. 7.7)
- Added support to the Iray Uber (MDL) shader
- Added support to the MDL Surface brick in Shader Mixer
- Control via Surfaces > %ObjectRoot% > %Surface% > Geometry > Displacement > Displacement Adaptive Quality
- 0.0 = no additional subdivision
- 1.0 = up to 32 additional subdivisions per edge, as needed
- ...
View Tools:
- Strand-Based Hair Editor
- Now a fully integrated View Tool instead of a modal dialog
- View multiple viewports, from different angles, concurrently
- View different DrawStyles, per viewport
- Work directly in the viewport
- Quickly switch between tools
- Hide/Show nodes
- Dock, undock, move, resize Tool Settings
- ...
- Universal Tool (and derivatives: Rotate, Translate, Scale)
- Now provides a Selected Style setting in the Tool Settings pane that provides options for how visual feedback for selected nodes is drawn
- Cues - Draws bounding box corners (same as 4.x - default)
- Wireframe & Cues - Draws the wireframe of the geometry associated with the selected node(s), using the style highlight color, and bounding box corners
- Halo & Cues - Draws a halo around the perimeter of the geometry associated with the selected node(s), using the style highlight color, and bounding box corners
- Similar to the way selection is drawn for the Surface Selection tool
- Each derivative tool (Rotate, Translate, Scale) maintains its own Selected Style setting
- Now provides a Selected Style setting in the Tool Settings pane that provides options for how visual feedback for selected nodes is drawn
- Node Weight Map Brush
- Added an Automatically Convert Selection action
- Controls whether geometry selection is automatically converted from one type to another when the active type is changed
- Viewport Context Menu > Geometry Selection > Convert Selection > Automatically Convert Selection
- Tool Settings Option Menu > Geometry Selection > Convert Selection > Automatically Convert Selection
- Added an Automatically Convert Selection action
- Geometry Editor
- Added an Automatically Convert Selection action
- Controls whether geometry selection is automatically converted from one type to another when the active type is changed
- Viewport Context Menu > Geometry Selection > Convert Selection > Automatically Convert Selection
- Tool Settings Option Menu > Geometry Selection > Convert Selection > Automatically Convert Selection
- Added an Automatically Convert Selection action
- Geometry Sculptor (Premier)
- ...
Panes:
- Content Library
- Now provides the ability to have multiple Manage pages
- A Duplicate Page action has been added to the context menu for a given container in the Container View
- Clicking the action causes a new instance of the 'current' Manage page (sub-pane), labeled Manage (#) where # is the i'th instance, to be created as a sibling to the primary Manage page
- When 2 or more pages exist, a tab bar near the top of the pane is revealed
- Pages labeled Manage (#) can be detached into custom panes
- The primary Manage page cannot be detached or deleted
- Closing a detached Manage (#) page causes it to reattach
- Pages labeled Manage (#) can be deleted via a Delete action in their respective context/option menu
- Deleting a Manage (#) page causes numbering of the pages created after it to adjust
- Preference actions in the Options Menu apply to all Manage page instances
- API calls apply to the 'current' Manage page instance
- Assets in Results Views can be dragged/dropped onto containers in Container Views on different Manage pages
- Assets in Results Views can be dragged/dropped onto a category in Category Views on the Smart Content pane (or Presets pages of the various property-based panes)
- A Duplicate Page action has been added to the context menu for a given container in the Container View
- Now provides the ability to discretely hide/unhide products
- A Hide Product action has been added to the context menu for a given product in the Container View, when the product is not discretely hidden
- Clicking the action causes the product to be marked as hidden
- An Unhide Product action has been added to the context menu for a given product in the Container View, when the product is discretely hidden
- The Show Hidden Products preference must be checked to see hidden products (see below)
- Clicking the action causes the product to be marked as unhidden
- A Hide Product action has been added to the context menu for a given product in the Container View, when the product is not discretely hidden
- Now provides the ability to discretely hide/unhide assets
- A Hide Asset action has been added to the context menu for a given asset in the Results View, when the asset is not discretely hidden
- An Unhide Asset action has been added to the context menu for a given asset in the Results View, when the asset is discretely hidden
- The Show Hidden Assets preference must be checked to see hidden assets (see below)
- Clicking the action causes the product to be marked as unhidden
- Now provides the ability to change the label of a product
- A Relabel... action has been added to the context menu for a given product in the Container View
- Clicking the action causes a dialog to appear
- Changing the label of a product does not modify its name, only what is displayed
- A relabeled product displays the original name in the Info page of the Information Panel when selected
- ...
- A Relabel... action has been added to the context menu for a given product in the Container View
- Now provides the ability to change the label of an asset
- A Relabel... action has been added to the context menu for a given asset in the Results View
- Clicking the action places the asset into edit mode
- The change is committed when the [Enter] key is pressed or any area outside the edit field is clicked
- Changing the label of an asset does not modify the name of the asset, or the file that an asset references, only what is displayed
- A relabeled asset displays the original name in the Info page of the Information Panel when selected
- ...
- A Relabel... action has been added to the context menu for a given asset in the Results View
- ...
- Now provides the ability to have multiple Manage pages
- Smart Content
- Now provides the Compatibility Selector that is present in the primary Files and Products views, when viewing the contents of a product
- Now provides the Filter By Context option that is present in the primary Files and Products views, when viewing the contents of a product
- Unchecked by default
- Checked state does not persist between sessions
- Now provides an Add-Ons page in the Information Panel
- Elevates functionality provided by the Explore Add-Ons... action, in the context menu of an asset, to a higher level of the UI
- Selecting an asset on the Files page, or within a product on the Products page, populates the page with categorized assets that are compatible with the selected asset
- Now provides a Targets page in the Information Panel
- Elevates functionality provided by the Explore Targets... action, in the context menu of an asset, to a higher level of the UI
- Selecting an asset on the Files page, or within a product on the Products page, populates the page with categorized assets that the selected asset is compatible with
- Now displays the hidden state of a product in the Info page of the Information Panel when a product is selected
- Now displays the metadata file path for a product in the Info page of the Information Panel when a product is selected and the file that provides metadata can be found
- Now displays the hidden state of an asset in the Info page of the Information Panel when an asset is selected
- ...
- Parameters
- Added a Display > Scene View > Node Color property to all node types
- When set to a non-black (0, 0, 0) value on a bone, the value of this property overrides the Display > Scene View > Node Color property on the associated skeleton, causing the bone to be drawn in the color chosen when the Display > Scene View > Bones > Show Bones property on a skeleton is active
- ...
- See the Scene pane (below) for other potential uses of this property
- Added a Display > Scene View > Node Color property to all node types
- Scene
- Added a Node Color (C) column
- Provides a means of classifying/grouping nodes in the scene by color
- Allows the use of color to quickly (at a glance) distinguish left, from center/trunk, from right
- Allows the use of color to quickly (at a glance) distinguish node types from one another
- Allows the use of color to quickly (at a glance) distinguish bones belonging to the same skeleton from other/parented objects
- Clicking a color swatch prompts for a color to assign to the Node Color property
- Holding [Ctrl/Cmd] while clicking applies the selected color recursively to each Node Color property of each decedent node
- Holding [Alt/Option] while clicking resets the Node Color property
- Holding [Ctrl/Cmd] + [Alt/Option] while clicking resets the Node Color property, and recursively each Node Color property of each decedent node
- Clicking the icon creates an undo item - the same as changing the Node Color property in the Parameters pane
- Provides a means of classifying/grouping nodes in the scene by color
- Selectable (S) Column
- Clicking the icon now creates an undo item - the same as changing the Selectable in Viewport property in the Parameters pane
- Visible (V) Column
- Clicking the icon now creates an undo item - the same as changing the Visible property in the Parameters pane
- Added a Node Color (C) column
- Timeline
- Now provides the ability to filter/search the Dopesheet
- Functions similarly to filtering/searching in the Scene pane
- Operates on the labels of properties
- Supports the common Syntax Selectors and Syntax Modifiers used throughout the application for Advanced Filtering
- Wildcard (
wc::) - Regular Expression (
rx::)- Case Insensitive (
ci::)
- Case Insensitive (
- Wildcard (
- Now provides the ability to filter/search the Dopesheet
- DForm
- Clicking the "Spawn Morph..." button now presents a familiar dialog that allows greater configuration at creation time
- Script IDE
- See Script IDE Pane
Actions:
- Customize...
- Accessible via the Window > Workspace menu
- Added support for filtering/searching the views in the dialog
- Operates on the Action (Label) column of the Actions page
- Operates on the Item column of the Activities, Menus, and Tool Bars pages
- Supports the common Syntax Selectors and Syntax Modifiers used throughout the application for Advanced Filtering
- Wildcard (
wc::) - Regular Expression (
rx::)- Case Insensitive (
ci::)
- Case Insensitive (
- Wildcard (
- Duplicate Node(s)
- Accessible via the Edit > Duplicate menu
- Now detaches the geometry of duplicates from the object being duplicated if the [Ctrl/Cmd] key is pressed when the action is triggered
- Duplicate Node Hierarchies
- Accessible via the Edit > Duplicate menu
- Now detaches the geometry of duplicates from the objects being duplicated if the [Ctrl/Cmd] key is pressed when the action is triggered
- Content DB Editor...
- ...
- New actions that operate on the values of properties in the Parameters pane:
- Memorize Figure By Type...
- Accessible via:
- Edit > Figure > Memorize menu
- Parameters pane Options > Memorize menu
- ...
- Accessible via:
- Memorize Figure By Path...
- Accessible via:
- Edit > Figure > Memorize menu
- Parameters pane Options > Memorize menu
- ...
- Accessible via:
- Memorize Selected Item(s) By Type...
- Accessible via:
- Edit > Object > Memorize menu
- Edit > Figure > Memorize menu
- Parameters pane Options > Memorize menu
- ...
- Accessible via:
- Memorize Selected Item(s) By Path...
- Accessible via:
- Edit > Object > Memorize menu
- Edit > Figure > Memorize menu
- Parameters pane Options > Memorize menu
- ...
- Accessible via:
- Restore Figure By Type...
- Accessible via:
- Edit > Figure > Restore menu
- Parameters pane Options > Restore menu
- ...
- Accessible via:
- Restore Figure By Path...
- Accessible via:
- Edit > Figure > Restore menu
- Parameters pane Options > Restore menu
- ...
- Accessible via:
- Restore Selected Item(s) By Type...
- Accessible via:
- Edit > Object > Restore menu
- Edit > Figure > Restore menu
- Parameters pane Options > Restore menu
- ...
- Accessible via:
- Restore Selected Item(s) By Path...
- Accessible via:
- Edit > Object > Restore menu
- Edit > Figure > Restore menu
- Parameters pane Options > Restore menu
- ...
- Accessible via:
- Zero Figure By Type...
- Accessible via:
- Edit > Figure > Zero menu
- Parameters pane Options > Zero menu
- ...
- Accessible via:
- Zero Figure By Path...
- Accessible via:
- Edit > Figure > Zero menu
- Parameters pane Options > Zero menu
- ...
- Accessible via:
- Zero Selected Item(s) By Type...
- Accessible via:
- Edit > Object > Zero menu
- Edit > Figure > Zero menu
- Parameters pane Options > Zero menu
- ...
- Accessible via:
- Zero Selected Item(s) By Path...
- Accessible via:
- Edit > Object > Zero menu
- Edit > Figure > Zero menu
- Parameters pane Options > Zero menu
- ...
- Accessible via:
- Clear Figure By Type...
- Accessible via
- Edit > FIgure > Clear Animation menu
- Parameters pane Options > Clear Animation menu
- Timeline pane Options > Clear Animation menu
- ...
- Accessible via
- Clear Figure By Path...
- Accessible via:
- Edit > Figure > Clear Animation menu
- Parameters pane Options > Clear Animation menu
- Timeline pane Options > Clear Animation menu
- ...
- Accessible via:
- Clear Selected Item(s) By Type...
- Accessible via:
- Edit > Object > Clear Animation menu
- Edit > FIgure > Clear Animation menu
- Parameters pane Options > Clear Animation menu
- Timeline pane Options > Clear Animation menu
- ...
- Accessible via:
- Clear Selected Item(s) By Path...
- Accessible via:
- Edit > Object > Clear Animation menu
- Edit > FIgure > Clear Animation menu
- Parameters pane Options > Clear Animation menu
- Timeline pane Options > Clear Animation menu
- ...
- Accessible via:
- Lock Selected Node(s) By Type...
- Accessible via:
- Edit > Object > Lock menu
- Edit > Figure > Lock menu
- Parameters pane Options > Lock menu
- ...
- Accessible via:
- Lock Selected Node(s) By Path...
- Accessible via:
- Edit > Object > Lock menu
- Edit > Figure > Lock menu
- Parameters pane Options > Lock menu
- ...
- Accessible via:
- Unlock Selected Node(s) By Type...
- Accessible via:
- Edit > Object > Lock menu
- Edit > Figure > Lock menu
- Parameters pane Options > Lock menu
- ...
- Accessible via:
- Unlock Selected Node(s) By Path...
- Accessible via:
- Edit > Object > Lock menu
- Edit > Figure > Lock menu
- Parameters pane Options > Lock menu
- ...
- Accessible via:
- Memorize Figure By Type...
Importers/Exporters:
- Wavefront Object (*.obj) Importer
- Added a Read Objects option
- Adds support for parsing "o" (object) statements during import
- When enabled, multiple objects within the same file are imported as separate objects/nodes in the scene
- When disabled, multiple objects within the same file are consolidated into a single object/node (previous behavior)
- ...
- Added a Read Objects option
- Wavefront Object (*.obj) Exporter
- ...
Preferences:
- Content
- Now provides a Show Hidden Products preference
- Unchecked by default
- When checked, causes products that have been discretely hidden to be displayed in Product Views
- e.g., Smart Content > Products, Content Library > Products
- Now provides a Show Orphaned Products preference
- Checked by default
- An "orphaned product" is any product where the metadata file path for the product cannot be resolved
- ...
- Now provides a Show Hidden Assets preference
- Unchecked by default
- When checked, causes assets that have been discretely hidden to be displayed in Asset Views
- e.g., Smart Content > Files, Presets pages of various property-based panes, Content Library
- Now provides a Show Orphaned Assets preference
- Checked by default
- An "orphaned asset" is any asset where the path of the file that the asset references cannot be resolved
- ...
- Now provides a Thumbnail Saving preference for the creation size of tip images (if creating tip images)
- Now provides a Show Hidden Products preference
Miscellaneous:
- Image Button Menus (mappable properties)
- The applied/active image is now positioned at the top of the image list, instead of its alpha-numerically sorted position
- Each image (short name) listed in the menu now displays its absolute filename in a tootip when the cursor is hovered
- ...
The Sky is Falling Complaint ThreadComplaint: Today's mini-adventure boogered by seasonal vacation.
 Whole schedule thrown off. Caught bus at 8:00AM, arrived at Urologist's at 8:35AM for a 10:15 appointment. Walked across street(and up the hill one block, huff-puff) to discover that the normally open breakfast restaurant was closed all week.
 Returned to Urologists because there's nothing else in the area except more doctors, various industrial buildings and the hospital. Prepared to wait an hour and a half for my appointment but put on my desperate-ancient-person mask and pleaded to be moved up in line. Got a quick "no" and went back to waiting. Then just as I was about to order an UberEats delivery, to at least use some of my waiting time eating a quickie breakfast from the Tim Horton's 4 blocks away, the nurse came and called my name. Surprise! OK, got in to see Urologist early. Yay! No problems reported, no problems detected, AOK. Happy, happy. Joy, joy!
 But it's still only 9:20AM. So, I trudged my lame body down the hill 4 blocks to the Tim Horton's and had breakfast, and picked up two plain donuts and a blueberry muffin to take home. Wasted 45 minutes there and called the bus dispatcher for advice on how to catch a bus from the Tim Horton's to WalMart on the far side of the city. Unfortunately, she said it would take about two hours and a transfer to get there.(it's only three miles)
However, if I had caught the bus from the Urologists, as I had originally planned, it would have been faster and easier, but I wasn't about to walk back up the hill 4 blocks. So I took an Uber($$) which took me and my two plain donuts and the blueberry muffin to WalMart. Arrived there about 10:00AM. Got many of the things on my grocery list. Picked up my new eyeglasses. Stopped into the in-store Subway and picked up a footlong turkey sub sandwich to take home. So now it's about 11:00AM and Applebee's and OliveGarden are now open but they're on the other side of the huge WalMart parking lot, and there's no fast-food restaurant within 3 or 4 blocks, and my lame body was already complaining about the earlier four block hike down the hill, and I was in no mood for another hike, even just across the WalMart parking lot. So, I called another Uber that took me and my two plain donuts & blueberry muffin, and my groceries and sub sandwich to my favorite hole-in-the-wall restaurant in the decrepit strip-mall on the near side of the city, where I had a cheap but wonderful lunch (hot turkey sandwich & mashed potatoes with a heavy slathering of savory, thick, dark brown gravy. Mmmm... gravy)
 But like all other restaurants in this city, too much salt for ancient-people (I'll hold 5 pounds of water for three days). Don't tell my Cardiologist.
After lunch I walked to the other end of the decrepit strip-mall to the Chinese take-out to get two orders of Szechuan Chicken combo w/fried rice & eggroll to take home for my holiday celebration, and ordered an Uber to take me, and my two plain donuts & blueberry muffin, and my groceries, and my sub-sandwich, and my two Szechuan chickens home where I unpacked my treasures then collapsed into my chair and fell asleep for an hour. I hadn't counted on my selected breakfast restaurant being on vacation, screwed up the timing of my whole morning.

Non-Complaint: Mini-adventure over, expensive, exhausting, but successful. Mischief managed.
 Creating Properties
Not an animation. I have some models from other artist that do this. For instance, an airplane when the gears come down. I will see that all the bones used in the property do not move at the same time. Example, gears come down and then rotate, not drop and rotate at once. Is this done in animation? I can convert that to a morph/property? If, so do you know of a link I can use to learn how?
Geograft QuestionIn order to use the Transfer Utility the figure needs to be weightmapped. The older dragons use parametric (Poser) rigging, based on include/exclude angles (lines projecting from the centre of the joint defining what moves, what stays put, and the transition between them) and spheres (two spheres doing a similar job). You could copy them, but I am far from sure you could graft to a parameteric figure at all and there would be no guarantee the parameters could be tweaked satisfactorily.
Your image isn't showing - Gallery links now expire, you would do better attaching to the post.
Geograft QuestionI was wanting to create geografts for some of my favorite characters, specifically dragons.
I was able to follow a tutorial made from Meshology.ca (hosted by Seaghan and Kim) and successfully created the attachement I wanted for DAZ Dragon3, but when I tried something similar for the Millennium Dragon, I'm running into a problem with the step where I'm supposed to use the Edit/Figure/Transfer Utility for setting up the geograft to the figure: No matter what I do, the MD is not selectable.
I even tried applying the Edit/Figure/Geometry/Convert to SubD to MD, which worked. However, the Transfer Utility still does not allow me to select MD.

As part of my troubleshooting, I confirmed that the DAZ SubDragon can be selected in the Transfer Utility, so it seems to me that some figures are allowed to be geografted, but others are not. Is that correct?
If that's correct, is there any way to find out which figures can have geografting and which ones cannot BEFORE we try to make such projects using Blender or Hexagon?
Or am I missing a step somewhere with the Millennium Dragon??
Thanks in advance,
Ryuu
Wrinkles via displacement and normal mapsSo, I have a need to take pieces of Daz Studio clothing and to add wrinkles to them. "Wrinkles" as in "this guy has been wearing this suit for the last month" type thing.
In theory, one could do this by editing the mesh to create an appropriate morph, but it's problematic to get small detail, plus if it's dForce clothing, running a simulation is likely to try to flatten them out anyway. So, displacement and normal maps seem like a much better approach - not affected by dForce, and able to simulate finer detail than the mesh would provide.
I found a tutorial that shows how ZBrush can create displacement and normal maps to do exactly what I want:
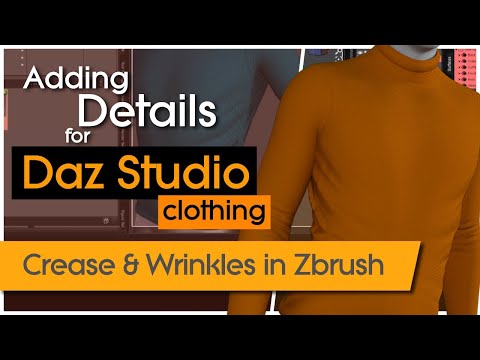
But I don't have ZBrush, nor am I really hankering to learn it/buy it because I don't do that much modeling work.
The essence of the technique seems to be that ZBrush can "memorize" the original position of the vertices and then, when you edit them, it can compare the edited version to the original version and automatically create the displacement and normal maps. Does anyone know of a similar ability/workflow for Hexagon or Blender?
I searched, in particular, for displacement maps in Blender, but most of the posts I found were about using them, or about creating displacement from a flat surface using a model. Nothing about how to create one from a suit jacket or the like.
Oh, sure, I could try to manually edit a bitmap to create the maps, but the odds that I can do that at any level of quality are < 0.0001%.
Any suggestions for similar workflows with other applications?
Off Topic Thread #2Well, it seems that the hunt is over.
ShareCG is officially closed.
There were still lots of items I would have downloaded, but I cannot complain too much. I got most Carrara related stuff and a ton of other things.
I hope there will be a huge content transfer to other sites, as they suggest in their final message.Beehive hair for g9 or g8 that is polygonalQuite the opposite, actually: export to OBJ is necessary, as FBX doesn't appear capable of exporting the curves that make up SBH. Set line tesselation to 0 to transfer the curves with no geometry, then convert them into your preferred 3D program's hair system.
Genesis 8.1 Character Skin Turns WhiteThank you for all your answers, I just found a mini tutorial that showed how to fix the issue!
: https://www.deviantart.com/ironclawroo/journal/Mini-Tutorial-Transfer-G8-Geoshells-to-G8-1-931797481Can you guys tell me if the 4.23 DazStudio version is that different from the 4.21 though? Like I mentioned earlier I avoided the update until now in fear this version would be too different and need me to re-learn how to use the studio. It took me 3 years to get where I am now so yeah... Let me know!
Some G8F Character Morphs do not work anymore...* SOLVED *Masterstroke said:
dainagon said:
None of my morphs are working, and nothing I do seems to fix it. Can anyone help?
in order to help, it needs more information.
How did you install the morph assets?
By hand (zip file)?
DIM?
Smart content?
Install path of DAZ studio and path of the content folder. Default or custom?Hi! I install everything manually. And my content folder is on my D drive. I have used DAZ for like 20 years and have NEVER had this problem so I have no clue what's wrong.
-Sarah
Accessories Distort when attached to characterebonartgallery said:
crosswind said:
n.aspros123 said:
crosswind said:
Distortion comes from the Auto Follow full body morph and partial body morphs from the figure... it's a commonly-seen issue. You can zero out the Auto Follow morph properties on the accessory (Show Hidden Property... firstly in Parameters pane...)
Thanks for replying. @crosswind.
I clicked where the arrow is and 4 lines. Preferences > Show Hidden Properties. I could not find Auto Follow morph...? See revs Equip 6 Param.
Select Currently Used, if the equipment is fitted on the figure - Jill, you should be able to see Auto Follow morphs.
Can you post an image of what that looks like. I'm trying the same thing and all I see is Fit To, and a bunch of unreadable dark-grey-on-black mess.
Okay. Attached ss 1 is a typical case with G8F (Victoria 8.1), Auto Follow morph with "FBM..." (full body morph) in the label of the hidden property on the wearable.
Ss 2 is a typical case with G9 (Victoria 9), Auto Follow morph with "...bs..." (blend shape) in the lable ~~
Accessories Distort when attached to charactercrosswind said:
n.aspros123 said:
crosswind said:
Distortion comes from the Auto Follow full body morph and partial body morphs from the figure... it's a commonly-seen issue. You can zero out the Auto Follow morph properties on the accessory (Show Hidden Property... firstly in Parameters pane...)
Thanks for replying. @crosswind.
I clicked where the arrow is and 4 lines. Preferences > Show Hidden Properties. I could not find Auto Follow morph...? See revs Equip 6 Param.
Select Currently Used, if the equipment is fitted on the figure - Jill, you should be able to see Auto Follow morphs.
Can you post an image of what that looks like. I'm trying the same thing and all I see is Fit To, and a bunch of unreadable dark-grey-on-black mess.
Eyes not closing as expectedIt's a commonly-seen issue on customized character as well as converted character. You need to make an MCM (Morph Corrective Morphs) on the eyelids for Eye Closed / Eye Blink.
How can I save model by himself without any morphs or figures neededcrosswind said:
How to 100% migrate everthing from old PC to new PC within 15 mins : https://www.daz3d.com/forums/discussion/comment/9128591/#Comment_9128591
@Leana thanks you both! I will try it out when I will buy my new PC! Hope it will be good transfer :) Thanksy!
Daz 3D is part of

Connect
DAZ Productions, Inc.
7533 S Center View Ct #4664
West Jordan, UT 84084Licensing Agreement | Terms of Service | Privacy Policy | EULA
© 2026 Daz Productions Inc. All Rights Reserved.