-
DAZ is losing me
GeoffreyHawkins said:
daveso said:
GeoffreyHawkins said:
When shopping new releases/bundles, I try to never spend more than $3-$5 per item (averaged out per each transaction) for items I like but have no immediate need for. I'll kick my max up to $10 for items that I have more pressing need for. I typically stay a year or so behind the curve and it works to my advantage in the long term, otherwise, it's just too frustrating to navigate DAZ's new release marketing strategies. Patience is definitely a virtue when navigating the DAZ store.
yes. but going over the same content over and over to try and find something to buy "cheaper" utilize sale criteria getting old too.
It appears you are focused on collecting content rather than buying what you need. If so, you will be forever frustrated by DAZ. Accept DAZ for what they are and exploit their crazy marketing when it is too your benefit. Walk away when it's not. Life's too short.
That is possible although I don;t feel that I'm a "collector" when I buy, but I do see a vision of where it can be used. Problem is there is so much that can be used somehow. I see kit bashing stuff for sure. ... but, it is a fact I have way too much ocntent, especially female, when it is enitrely possible to morph a billion characters without buying a single new one.
Daz to Blender Bridge - Meet the TeamDAZ_sam said:
endlessloving said:
HI there,
it's great to know that there is a bridge now. I tried it and after the "transfer" blender showed the hands of my G8M figure totally messed up, with fingers about a meter long.I used power pose to adjust the hands and fingers before I used the bridge and it seems that there is an issue with rigging.
Is there any way to make sure that the rigging works properly when using the bridge? I only need one pose and not an animation.
I don't actually need the rigging in blender, I just want to make sure that I can import an exactly posed figure into blender, including the materials from DAZ.Is there maybe a tutorial on how to use the bridge? I guess to make this work a figure needs to be prepared in a certain way or just in a default posture?
Right now there isn't a simple way of doing this in the bridge. But, it is a great idea for a tutorial. As the bridge team is small I will add to a list of many things we need to do. We will look into power pose though, and see why this is occurring thanks!
Thanks for considering to make a tutorial.
I have continued to try to get a pose from Daz to Blender but simply failed.
The Bridge does not really work for me at this point.
Skin textures are broken, cloths are overlapping and the pose is always just the default pose.
I also tried to use colada and obj and fbx and there is always something that goes really wrong.
I am wondering how other people get their figures from Daz into Blender or is it just not really a common thing?
DAZ and Blender on their own are really amazing and if there is a way to make them more compatible, that would be so aweome!
If I can support this project by testing particular things, please let me know.Sculpting over Daz characters and selling them?richardandtracy said:
I do sometimes wonder how clothing can be created while following the exact letter of the license agreement. But usually only when I'm feeling exceptionally pedantic.
This is the way I see it: The clothing has to be made so that it'll fit on the outside of G8F/M, so, there must be a void inside the clothing which can only be G8F/M mesh derived to prevent intersection with the figure - if it wasn't derived from the figure, then intersection wouldn't be prevented or the clothing would be so baggy as not to be applicable to G8F/M. This void, as it's derived from the G8F/M mesh, must also count as a mesh derivative too when following the exact and literal wording of the license. Furthermore, the clothing is rigged to work with G8F/M using rigging transfer from G8F/M. Which must also be derived from DAZ intellectual property.
It's at that point I throw up my hands & start doing something else. But I hope you can see my slight concern about clothing and rigid application of the license.
Regards,
Richard.
The clothing also has the joint centres and a projection of the weight of the base figure. Daz allows derivative add-ons which (mainly) require the base figure for use (of course you could just hang the clothes in a closet or drape them over the furniture, or convert them to another figure with an effort, but those are not the main uses of the content).
Sculpting over Daz characters and selling them?I do sometimes wonder how clothing can be created while following the exact letter of the license agreement. But usually only when I'm feeling exceptionally pedantic.
This is the way I see it: The clothing has to be made so that it'll fit on the outside of G8F/M, so, there must be a void inside the clothing which can only be G8F/M mesh derived to prevent intersection with the figure - if it wasn't derived from the figure, then intersection wouldn't be prevented or the clothing would be so baggy as not to be applicable to G8F/M. This void, as it's derived from the G8F/M mesh, must also count as a mesh derivative too when following the exact and literal wording of the license. Furthermore, the clothing is rigged to work with G8F/M using rigging transfer from G8F/M. Which must also be derived from DAZ intellectual property.
It's at that point I throw up my hands & start doing something else. But I hope you can see my slight concern about clothing and rigid application of the license.
Regards,
Richard.
Am I right to conclude that DS 4.15 is not compatible anymore?I don't think there would be much use for, say, Genesis 8 base models within DS 4.8.
Wrong guess
 I use g8 all the time. Not 100% perfect (e.g., with some you need tweak iray materials), but usable. Now, dForce similation and Genesis 8.1 are out of it's range completely, though.
Well, Bryce wasn't happy because I got multiple "Out of memory" errors, but even so... the result speaks for itself.
I presume you remember that recent DAZ characters not only have huge sizes of image maps in materials (up to 8192x8192, i think), but also contain much more types of those materials than oldie like Bryce could recognize (i think either David Brinnen or Rashad... was that Dan Whiteside..hm.. were exploring idea what use displacement maps for... might be misremembering). So it's best to remove any materials from daz character completely, send it to Bryce as pure mesh. Then, manually set textures in material editor, reducing their size before that. Otherwise, during transfer you end up with too many image mats that are not used at all, and they are big and eat much memory.
<raises hand>
Oh, i hoped that idea with "installations order" would fix it :(
Endlessly ongoing... playing cards/casino chips/coins/banknotes scatter... hiatus time (still)Next Step: Start On A 54 Boned Figure With Each Bone Effectively Independent
Abandoning the morphing prop idea (having to redo every single morph for each base mesh really is too much!) I'm going ahead with the alternative approach that I mentioned a few times.
Since I've already got a working Poser version of a 54 boned geometry swapping figure (with a deck of 54 cards as the basic mesh) it seems a good idea to start with that. But since it was only uploaded to another site* and linking to it doesn't appear to be allowed I'll re-upload it here - just for my reference.
For it to be useable in Studio I need to strip out the geometry-swapping stuff. So I started with the 'Instantiation Via Geometry Swapping Test.cr2' in the attached zip, and removed. all the geomChan and alternateGeom sections (which exist for each of the 54 bones), plus a few parmNodes and valueParms related to geometry variants (screenshots for my reference). I was very surprised that I managed to do that without any obvious error on my first attempt. 'Deck54 Geometry Swapping Removed .zip' Poser runtime attached if anybody wants to play. Since the 54 cards load up colocated I've also included a pose to spread them out a bit - I needed that to check that all 54 cards are present and correct. Note that the back of the cards hasn't got a proper texture and simply uses the full 54card texture
Here's a screenshot of the posed deck54 loaded up in DS4.12. From a quick check the behaviour seems to match Poser.
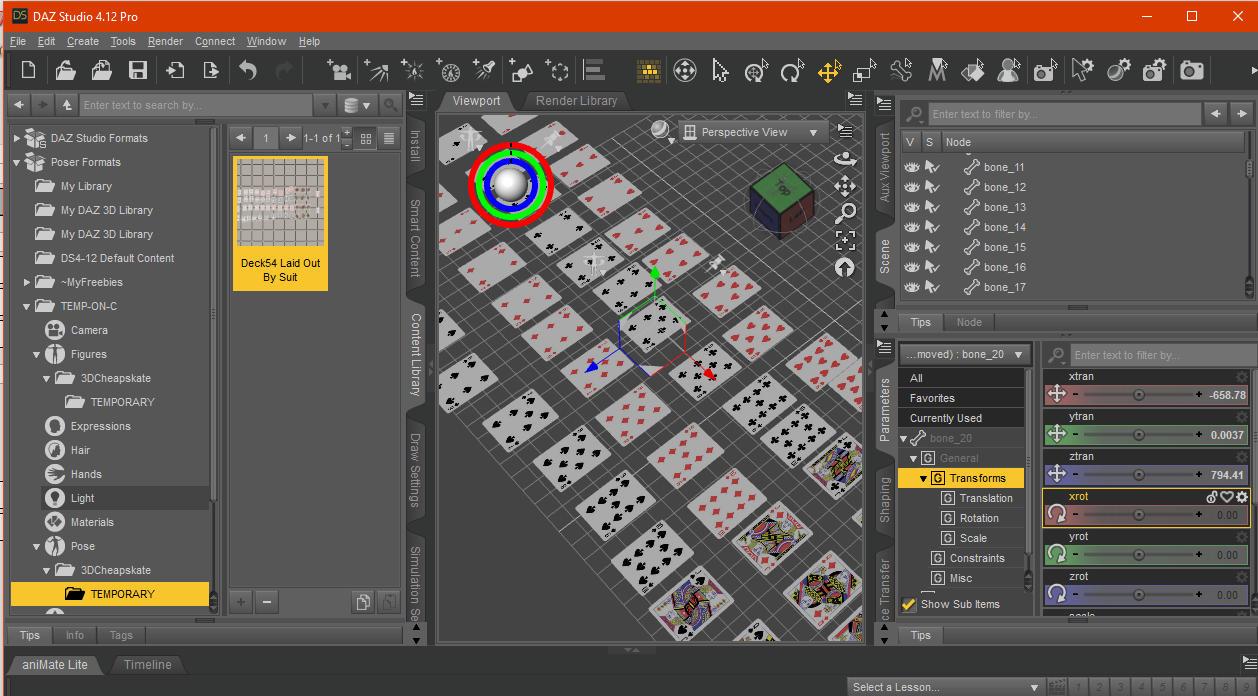
Next step - either create scatter poses A to D based on the offsets in that post, or create a 54 disk (casino chip, coin, etc) base mesh. Not sure which appeals most, they're both such delightful options !
Edit 22 Feb: I'd got as far as the offsets for bone 20 before I remembered that (a) all my offsets are positive integers from 0*** to 51 1 to 54 whereas what I want are offsets from -25.5 to +25.5 -26.5 to +26.5 to keep the spread centred around the figure origin, and (b) bone_1 etc aren't particularly good names and it may be better to change them first. And (c) I haven't got any random rotations. And (d) ...
I think I'd better stop for today - starting to make stupid mistakes.
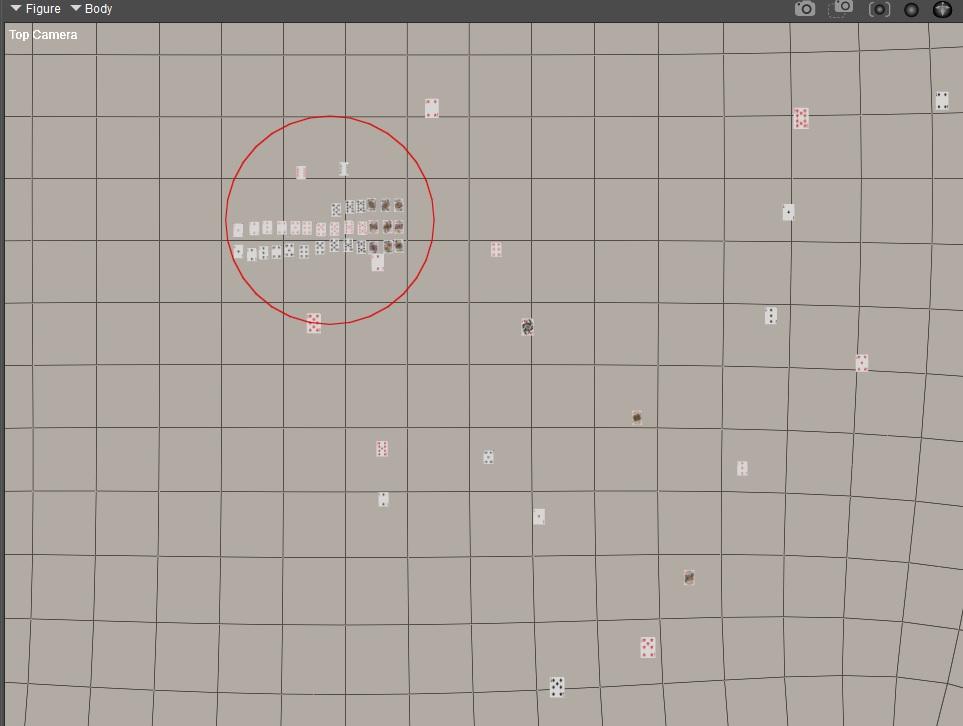
*it was originally attached to the first post of my "Instantiation Via (Poser) Geometry Swapping ?" thread at the site beginning with an H**, so if you want to read the background you'll need to search for it.
**and ending in an "ivewire3D".
***yes, I know
~ ~ ~ ~ ~ ~ ~ ~ ~ ~ ~ ~ ~ ~ ~ ~ ~ ~
Edit 23 Feb: I've finally worked out how to group the relevant faces with the appropriate bones from a donor CR2 in the Poser Setup room - without going near the group editor. When creating the model in Blender do the mesh for each bone as a separate object, and name each object to correspond to the internal bone name in the donor CR2. My test mesh was a casino chip duplicated three times, so four chips, each to be assigned to a separate bone. Then when exporting the OBJ select all the objects and tick 'Objects as OBJ Groups', not 'Objects as OBJ Objects'. Blender appends the mesh name to the object name to make the group name, so it's necessary to do a regular expression find and replace on the resulting OBJ file to correct that. Then simply import the OBJ into Poser with all options unticked, go to the Setup room, and load the donor CR2 from the library. Since I only used four objects/bones for my quick test I only selected to use the first 4 bones from the donor CR2 when prompted. Exit the Setup room (without bothering to even look at the group editor - that still confuses the heck out of me!) and test - I applied the pack of cards laid out in suits pose from the attached Deck54 Geometry Swapping Removed.zip.
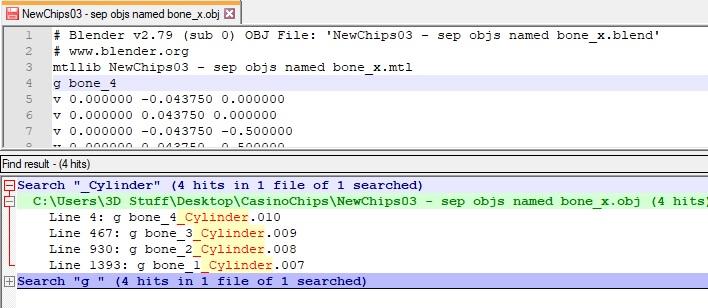
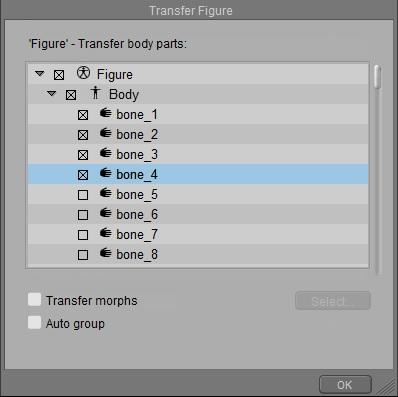
All seems good so it's probably time to create that 54 casino chip OBJ.
Regarding the base mesh to use for the chip, I'd originally said a 24 vertex cylinder (72 faces) for the 54 chip scatter, and a 32 vertex with 4 control edges (224 faces) for a single chip prop. A 32 vertex cylinder without control edges has 96 faces, and a 24 vertex cylinder with 4 control edges would have 168 faces. Multiplying those by 54 chips gives:24 vertex cylinder x 54 = 3888 faces
32 vertex cylinder x 54 = 5184 faces24 vertex cylinder + 4 control edges = 9072 faces
32 vertex cylinder + 4 control edges = 12096 facesSo adding control edges to the 24 vertex cylinder increases face-count by a factor of less than 2.5, and is only 1.75 as many faces as a plain 32 vertex cylinder. So I'm thinking maybe the 24 vertex cylinder + 4 control edges should be the base mesh, which would allow SubD (Studio/Poser) and smoothing (Poser) to work on it...
Edit2, later on 23 Feb: Rather than making a snap decision I created a single chip of each of the 4 varieties just mentioned, UV mapped them (Top camera > Project From View (Bounds), flipped the bottom face UVs left to right to prevent it being a mirror image, scaled the UV down to 99% because I did that before for some reason, imported into Poser, applied a texture, checked that all front/back faces look correct and line up correctly with the sides, rendered, added one level of subD and rendered again.


Well, we already know that subd messes up the non-control-edged disks so that's no surprise, but scaling the UVs down to 99% causes the little + on the top of the crown icon to bleed over onto the edge. I'll have to try again without scaling the UVs down
Edit3, even later that same day 23 Feb: Re-UV-mapped all 4 base meshes to 100% of the UV map and the problem with the crown + bleeding onto the edge under subd doesn't appear.


Neither does the similar thin line spotted a long time previously (not sure why it only appeared on some chips), which was the reason for scaling the UVs down to 99%. But that particular problem only shows up if if the textures at UV(0.5,0) and UV(0.5,1), or UV(0,0.5) and UV(1,0.5), are different colours - which they aren't for this set. So I quickly modified the $500 texture to make the top and bottom of the UV mapping different colours and had a look at it in Poser 11. I only see it now in the preview. Maybe it was a PP2014 thing ?
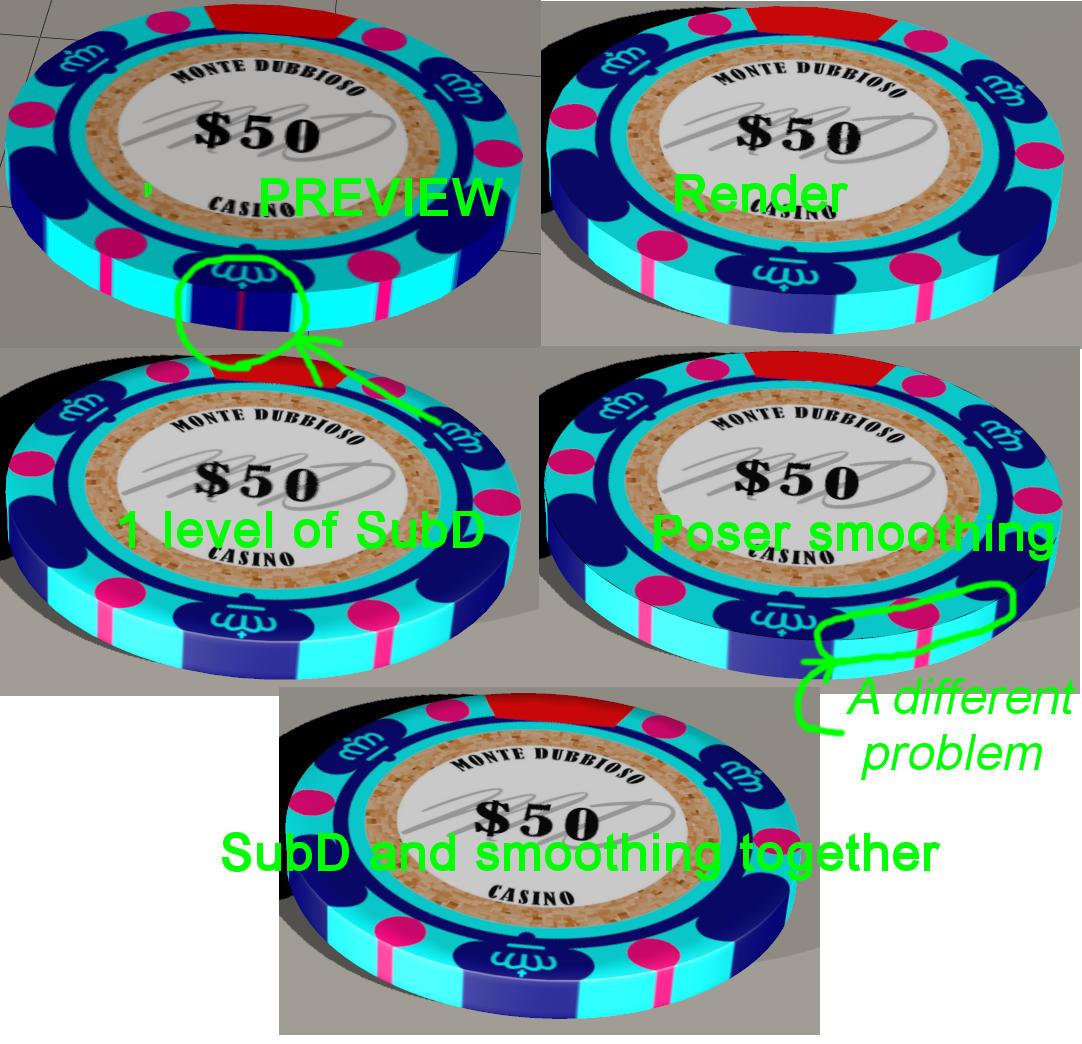
But now I've seen a different problem with Poser smoothing - maybe the control edges are too close (edit: Fortunately I'djust made a very stupid mistake in my render settings!) ? (I think this sort of thing is why it takes me a long time to do things - in trying to fix a minor problem I uncover even minor-er problems and try to fix them...)
Same test in Studio (4.12.1) both 3Delight and iray - seems you have to apply subd to get rid of it
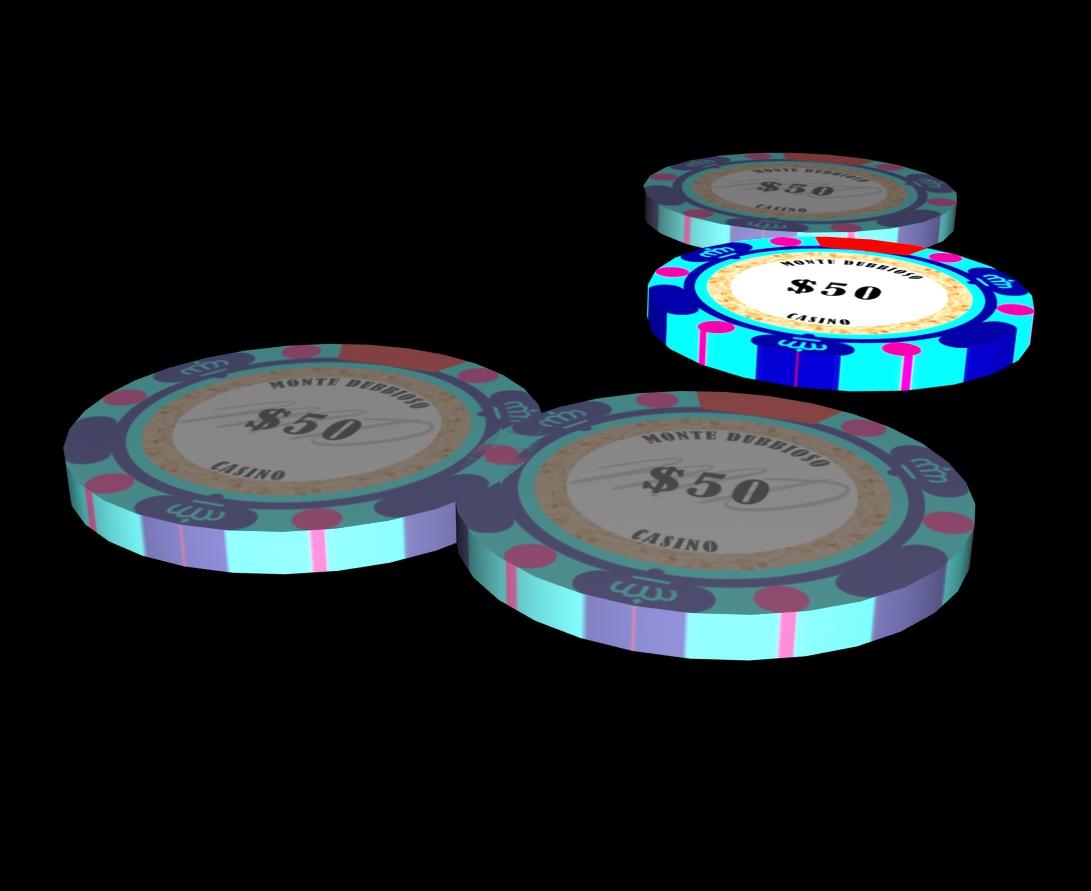
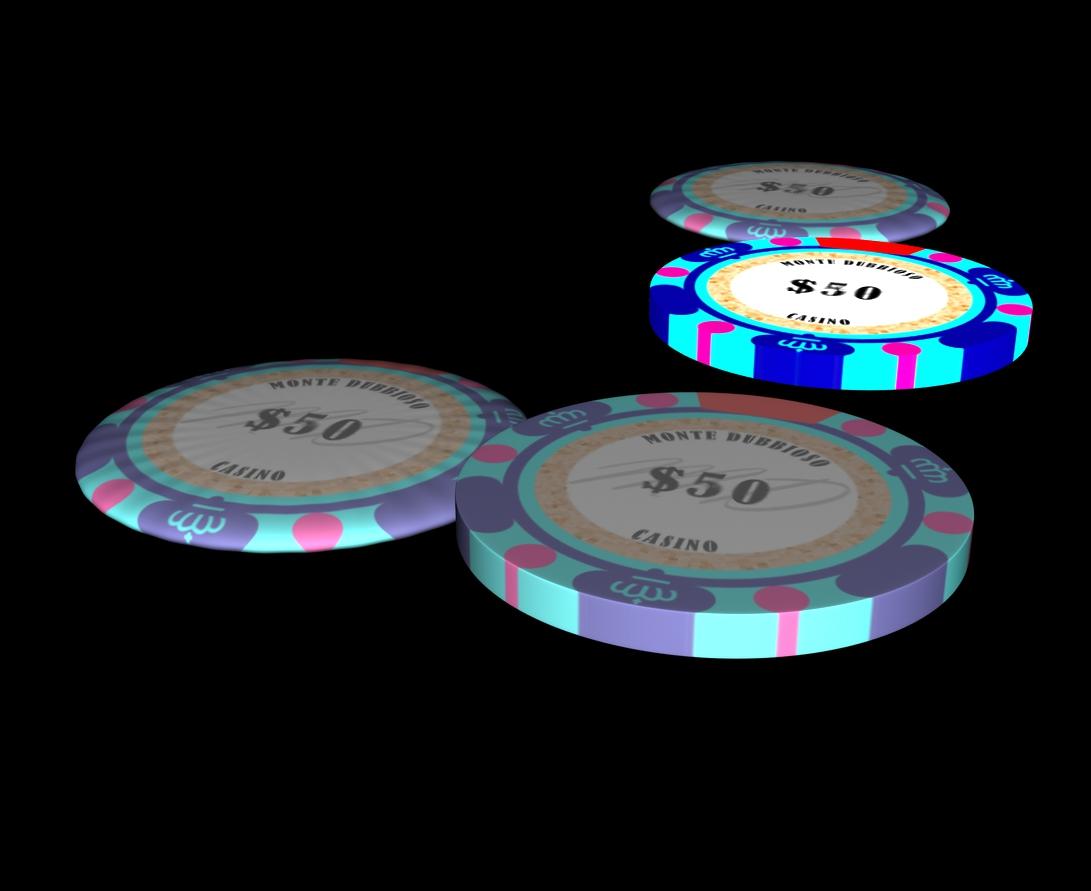
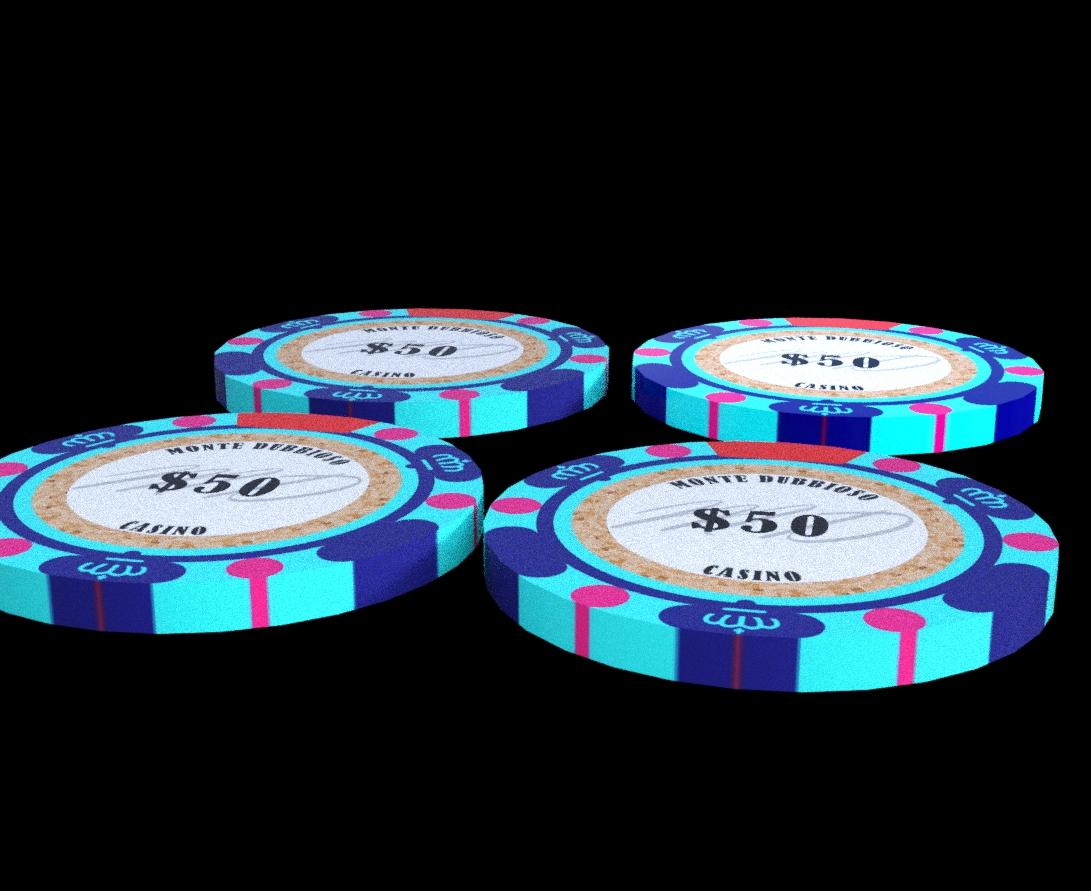

Since I've checked Studio 3Delight/iray maybe I should also check Poser cycles - or maybe there's a way to sidestep this - rotate the UV map a bit so that none of the vertices are right on the edge ? I wonder...
Edit4, later still on 23 Feb: Rotating the UVs by half a sector, i.e. 7.5° for the 24 vertex disks, seems to do the trick - that line doesn't appear any more. Neither in DS 4.12 (3delight/iray) nor in Poser11 (firefly/superfly) , with or without subd. and even though the little + above the crown icon is damn close to the edge it's not bleeding over.
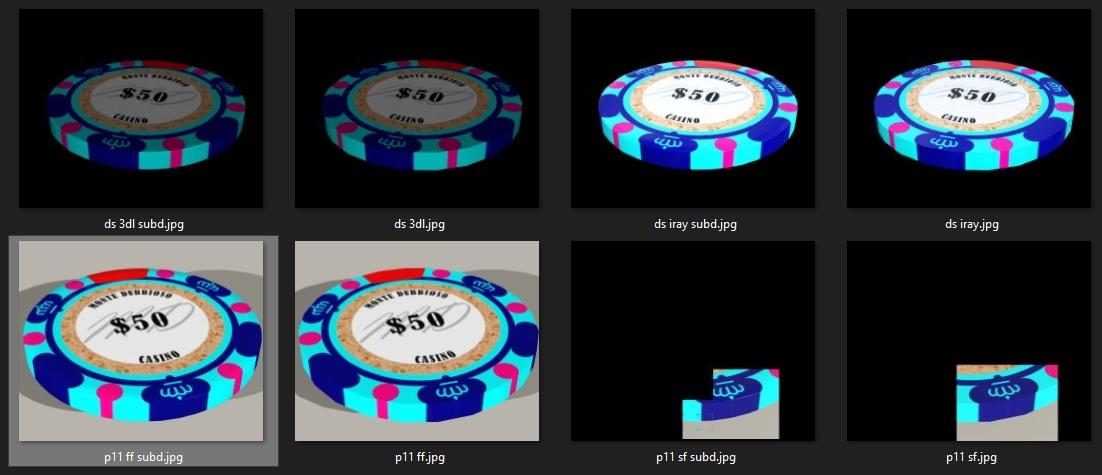
So I think rotating half a sector hits the sweet spot between the 100% UV problem and the 99% UV problem !
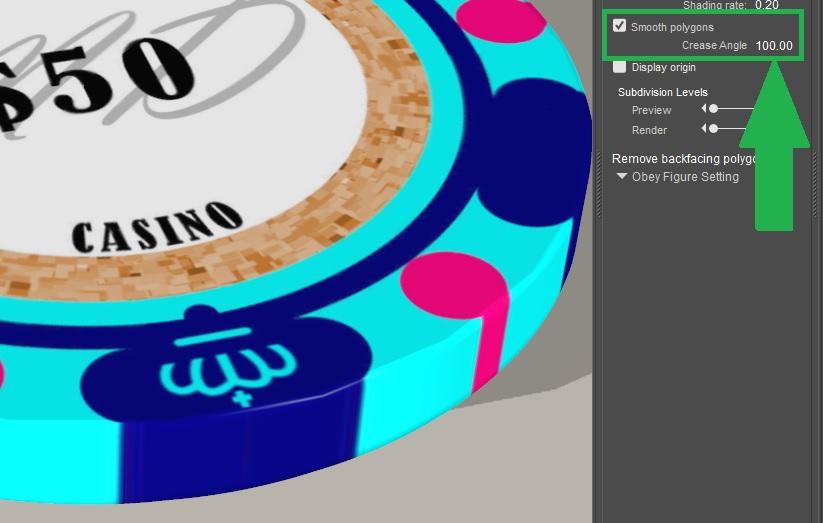
And I realized that the Poser Smoothing problem was me - I forgot to increase the crease angle from default 80 to something over 90. Doing that it works correctly
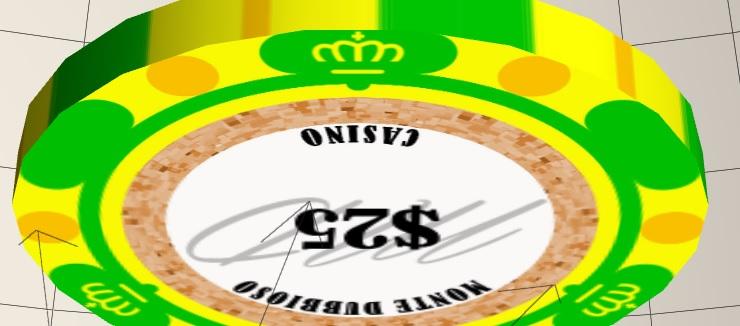
Final thing for this post, hopefully - when I rotated all the UVs 7.5° I didn't take into account that I'd flipped the bottom face, so that's been rotated 7.5° in the opposite direction and is now 15° out of sync with the top face. Easy to fix - just need to remember to do it.
Edit 24 Feb: Rather than start a new post and bump this thread with no real progress, I'll just post these confirmation pics here. Test renders in Studio 4.12 3Delight/Iray and Poser 11 Firefly/Superfly of the four basic chip meshes both with and without subd, and Poser 11 Firefly/Superfly renders of the four basic chip meshes with Smooth Polys. They all seem fine, without any extraneous thin vertical line on the edge (although because the texture images are 75% quality JPG I think that the JPG artefacts around the + of the crown icon are causing a barely visible vertical line when subd is applied - but I only think I noticed that because I was specifically looking for it, so I'm happy to let it go). Also a Poser 11 of the four basic chip meshes above a mirror plane to verify that I've correctly corrected the rotation of the lower face UVs - I have.
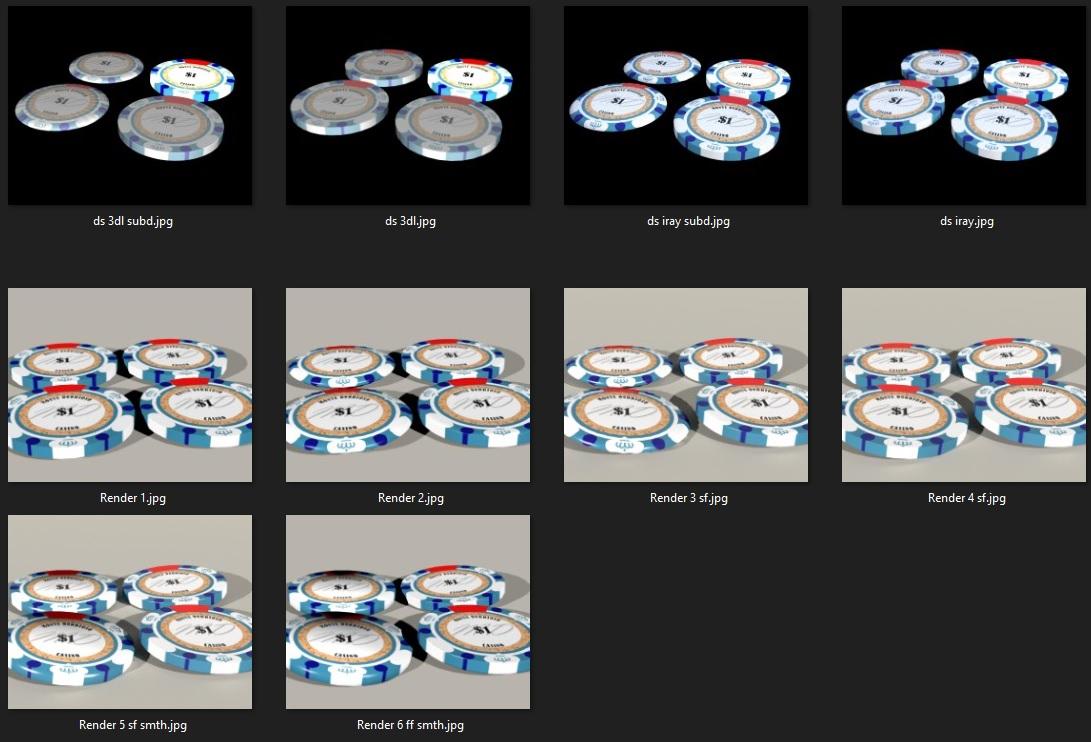
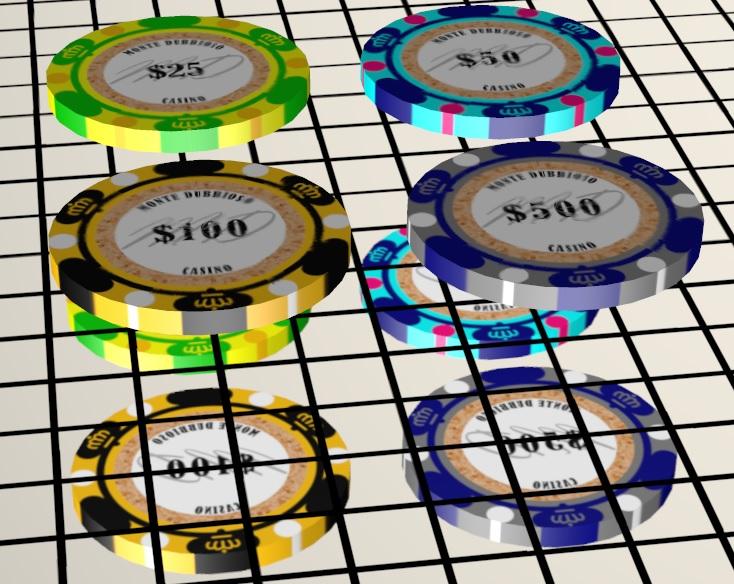
Edit 25 Feb: Just uploaded a zip of the latest (very simple) blend file 'NewChips04c rotated UVs +7.5.zip' including the exported OBJs (the MTLs are included too but they don't include anything useful). Next step is to replicate one of the disk objecks 53 more times making sure each object is named to match a Poser bone (I'm thinking 'Scatter_Disk_01' etc - 'disk' rather than 'chip' because the texture for any basic disk shaped can be used, e.g. coins, casino chips, tiddlywinks, etc).
Also thinking about having up to half a dozen materials (once again named in a non-disk-type-specific way, e.g. Disk 01-09 Material, etc) so you can mix different value casino chips, coins, or tiddlywinks.
Why just 'or', why not 'and/or' ? Say $1 and $5 casino chips, cents, 50p pieces (nope, they're not round!) 10p pieces, doubloons, and a green tiddlywink ? Different diameters, thicknesses and diameter:thickness ratios are the main problem with that, although I think some simple ERC controls (master 'Disk 01-09 Diameter', 'Disk 01-09 Ratio' etc dials) could handle that). And perhaps simple PZ2 pose / MAT pose pairs could be used for preset combinations ? (Note to self: remember to use targetGeom rather than valueParm if you want to save ERC dial settings in poses - I think ?)Why not simply use Studio instances you may well ask ? Well... Poser doesn't have those!
(and as I've said before, where's the fun in doing something the obvious, sensible way?)Edit 26 Feb: Just attached a backup of my test runtime ('Runtime (Dev pre cutting down to 8disk only).zip'). I've got the basics of the 54 chip scatter working now, although I'm only using 8 chips and 4 materials. I want to create a new post for this, but I don't want to include any extraneous stuff. But also I don't want to accidentally lose anything important when I start deleting stuff from my temporary runtime. And I don't trust my own on-computer or flashdisk backups any more - I've just had a backup flashdisk go tits-up on me!)
Facial Morphs AGAINRichard Haseltine said:
So you are taking limits off a morph, in the Parameter Settings dialogue?
I have taken off limits in the past and now I've reapplied them. In the most recent failure the limits were back on - but still - the facial morphs disappeared.
But as I say - somehow I fluked a couple that work using the exact same process.
Stuck with Figure SetupAnd this is the try where the Transfer utility got weird and when I try to put the bones back where they're supposed to be, the model I'm trying to attach just mucks about up there. It adds extra bones that aren't meant to be there like metatarsels and toes and a spare leg.
Plus the Hip and Pelvis are in the wrong order. I reparented and renamed them but the name refuses to stick in the Rename Node>Node Label, so they remain 'hip, Pelvis' and 'pelvis, Hip' respectively, which I think doesn't help with the transfer utility.
Hence I tried to rename the geometry as per my previous post, without using the same naming convention to see if the Transfer Utility will take the new bone placement as it IS rather than deciding for me as the image shows. But, the original post is the result. Won't let me do that to try that next experiment.
Also deleted the saved asset the from the first try as I thought it may be saving it somehow and blocking the new version, so can't even show the bones as I want them to be (until I muck about finding the best place for them to move nicely, that is).
I was following SickleYield's Geografting tutorial which is excellent.
Stuck with Figure SetupIt has groups. I've renamed them in the hopes that the transfer will stop superimposing the Genesis8 figure's bones over the new bones and adding extraneous ones. It worked the first try when I started this project, but nothing since.
SOLVED "Face Transfer" Plugin causes Daz To Crash When I Try to Save the FaceRichard Haseltine said:
Have you installed the updated Genesis 8 Starter Essentials with the Genesis 8.1 content added?
Crap, all my smart content just vanished. But at least 2 of the tests I conducted did have an option of Genesis 8.1 for the avatar, face transfer would only generate a Gen 8 character. I gotta run another system restore.
Need some help selecting tools from the storeThe DAZ morph packs for male and female a good start and very useful.
Genesis 8 Female Body Morphs | 3D Models and 3D Software by Daz 3D
Genesis 8 Female Head Morphs | 3D Models and 3D Software by Daz 3D
Genesis 8 Male Head Morphs | 3D Models and 3D Software by Daz 3D
Genesis 8 Male Body Morphs | 3D Models and 3D Software by Daz 3D
Another good one is the aging morphs bundle :Aging Morphs Bundle for Genesis 8 Female(s) and Male(s) | 3D Models and 3D Software by Daz 3D
And the 200 plus morphs pack for really detailing the head and face: 200 Plus Head and Face Morphs Bundle for Genesis 8 Female(s) and Male(s) | 3D Models and 3D Software by Daz 3D
Sculpting over Daz characters and selling them?If you use others' morphs, other than merchant resoruce sets in some situations, as the basis for your morph then when you bring the shape back into DS as a new morph you need to enable the Revrse Deformations option - that will separate your changes into a new custom morph which can then be applied on top of the other morphs to give the intended final shape, while still requiring the user to have the other morphs themselves
Daz Studio 4.15 32 Bit installHi Richard, I have Mojave 10.14.6, I have an old 2010 Mac Pro tower so I could upgrade with cherry picked hardware, it is 64 bit. Things I have deduced thus far.
32 bit does not like characters created in 64 bit, the cause of most of my crashes I think. So I created characters within 32 bit, applied lip sync, saved static characters and animation. Observation: 32 bit does not play back very well but progressed anyway. Also, applying further poses is slow to respond and does not hold the pose created after the frame it is applied to, but reverts to original, so left only the lip sync to transfer.
Opened 64 bit, static characters in their start poses and applied saved animation, opened no problem. Then added further poses to timeline. Observations: 64 bit plays back seamlessly and adding more poses much easier. Downside, the audio did not play so in this instance I'm going to render the animation and add the audio file in post on my editing software. Not sure why the audio did not save, something I will look into.
Leg Bump Issues - Genesis 8 FemaleThe logical conclusion would be that the clothing item has a morph which causes the bumps, remove (delete) the clothing item or find the morph dial linked to it.
Parented morphhello, sorry if I'm not clear, but I use a translator
I would like to know how to join several morphs controlled by a single slider ?
in advance thank you
The Official aweSurface Test TrackMustakettu85 said:
Sven Dullah said:
...and as a fact I've used dForce mostly for things it was not made to do, more like dStroy.
Hehe, the "polygon" dForce does lend itself to weird uses. I'm thinking about whether it might ultimately be useful to solve (or at least alleviate) rigging issues with old figures, like pre-V4, think those ugly shoulder bends etc. A smoothing modifier works okay in a lot of cases... but it doesn't seem to be mappable, unlike dForce, so it smoothes everything over, even parts you don't want to get smoothed.
disclaimer: yes V4 and her friends actually do have ugly bends by default as well, but there are fixes for those. not the case for older figures, especially non-DAZ.
Getting the GenX stuff was the best buy EVER:) I used to render M4 a lot but now I only load the Gen4 figures to transfer the morphs. And, in fact, have bought some very nice G3 morphs on sale lately, a bunch of dirt cheap characters, and just the other day I got the G3UV's to Genesis1 script, which works very well. So now I have to testconvert a number of G3 skins, some of which look very promising;)
Need some help selecting tools from the storeHi everyone, I'm new to Daz, and I want to be able to ajust body types, age, and nationality. Since I'm spending money on these tools, I don't want to just start buying things willy nilly. Can anyone recomend some good morph tools to give me a good "starter kit". I've been looking at a lot of tools from Zev0, but havn't pulled the trigger yet because I'm just not sure where to start. Thanks so much.
Released: ShapesInjector [Commercial]Totte said:
rhye_7b205b2b74 said:
Totte said:
rhye_7b205b2b74 said:
I load Gf3 then import a dress from Marv Designer and use Transfer Utility to get dress to fit and bend, then start the script and all I get is this - No morphs ???
what exactly does this script do??
Doubleclick the item line in the list, select the directory with all the saved CTRL morphs you have created for all the bodyshapes you want to support.
where exactly are these .obj files everything is .duf?
I don't know Marv Designer but you export them from there, or from the 3D modelling software you create the FMBs with
ok thanks
Released: ShapesInjector [Commercial]rhye_7b205b2b74 said:
Totte said:
rhye_7b205b2b74 said:
I load Gf3 then import a dress from Marv Designer and use Transfer Utility to get dress to fit and bend, then start the script and all I get is this - No morphs ???
what exactly does this script do??
Doubleclick the item line in the list, select the directory with all the saved CTRL morphs you have created for all the bodyshapes you want to support.
where exactly are these .obj files everything is .duf?
I don't know Marv Designer but you export them from there, or from the 3D modelling software you create the FMBs with
Released: ShapesInjector [Commercial]Totte said:
rhye_7b205b2b74 said:
I load Gf3 then import a dress from Marv Designer and use Transfer Utility to get dress to fit and bend, then start the script and all I get is this - No morphs ???
what exactly does this script do??
Doubleclick the item line in the list, select the directory with all the saved CTRL morphs you have created for all the bodyshapes you want to support.
where exactly are these .obj files everything is .duf?
Daz 3D is part of

Connect
DAZ Productions, Inc.
7533 S Center View Ct #4664
West Jordan, UT 84084Licensing Agreement | Terms of Service | Privacy Policy | EULA
© 2026 Daz Productions Inc. All Rights Reserved.