-
Switching the Viewport from Filament (PBR) back to Texture Shaded turns the background black.
Thanks, again, Richard.
Attached is a screen shot of the Viewport Draw Style menu "after" I click on Filament the first time.
What shader/render is used in new viewport windows?Hi gang!
Up until now I've always used 1 viewport window to set up my scenes and that was usually enough for me. This time however I noticed that while a posed figure looked decent enough on their own they still looked somewhat out of place within the entire scene. So I started using 2 viewport windows side by side; one using my intended camera view with the Filament render and the other the easier texture shaded setup.
However... I noticed that after I had added this new window it used a shader / texture setting which acted like a mixture between Filament & texture shaded, yet was obviously neither. To make matters more confusing this selection (a ball with a 'stripe' in the middle) is also no where to be found in the drop down menu with presets and once you changed the setting in one of the extra windows then this ball also never comes back again.
See my screenshot... on the left is Filament, the upper right corner uses the texture shaded setting and the bottom right... I really don't know. Trust me: it's nothing like the texture shaded setting, you can clearly see this when comparing the goblin in the upper and lower right viewports. But it's also nothing like Filament either; demonstrated by the missing backdrop (Iray sphere).
Does anyone know what this setting is and maybe better yet: how you can re-select it after you changed the setting to someting else? It seems like a really useful mixture between quick renders.
Thanks in advance for any feedback you can give me!
(edit: update)
In the mean time I also started looking at the "Aux viewport" pane which I plan to detach & place on my second monitor. I started going over the settings ("F3") when I noticed that in the 'Viewport DrawStyles" section the exact same icon (ball with white 'seperation' in the middle) is used to indicate the texture shaded draw style. However, as demonstrated in my screenshot, the texture shaded setting in the options menu has a completely different icon. Confusing for sure! :)
PS... (offtopic!)
If you ever need a good looking dragon in your renders and you don't fancy using pre-made poses then I can highly recommend "Blue dragon for Daz Dragon 3", this figure is amazing! It poses easily (I even have little issues setting up its wings!) and it looks... the blue/reddish combination and overall looks of this figure... Just look at the screenshot and know that I merely used a pre-made pose. But that majestic look... One of my favorites I'll tell you! Sorry, had to vent a little :)
Finally getting organized. Is it even possible??? LOLShelLuser said:
whispers65 said:
I can't say that I'm really a people person as much as a scene/location/object person. For instance, a boat on the ocean, a cyberpunk back alley, an Island, a car, a house, etc. Those things catch my eye more.
Awww, no Genesis eh? We're mortal enemies now :P (naah!)
Nah. I fired up a genesis figure last night.
I like to see how things work. I worked in IT for 34 years and did troubleshooting so figuring things out is kind of in my blood, although I'm a LOT older these days so it takes a while to catch it.
Hmm, since we're in 2020 (rounded up) right now and since you mentioned being older I'm assuming that I can safely subtract 10 - 15 years taking us back to 2005, then subtract 30 years from that and it puts you right in what I consider the golden age of IT: when it call began and when you actually had to know your stuff vs. knowing how to talk your way around a manager and then blaming 'Murphy' for your own shortcomings :P nice!
Also you calling it IT and not ICT gave this away a bit. Yah, I can relate here ;)
I'm soon to be 57. I've been around a little bit. We played board games before video games came out. Pong was our first video system. Incidentally, I've never even heard of the "ICT" lol.
Actually... not really. Items from a lower generation will usually always fit characters from a higher generation. But 'smart' doesn't really account for this feat. None of it. I have this very cool (IMO) troll loincloth, it's really crude which I think really does the character justice. So... I also applied this to some of my female characters from time to time which I think seriously adds up to my fantasy renders. Yah... it'll fit perfectly but you won't be able to set it up using "smart".
Simply put: unless you mess with the meta data yourself then you won't see items from a different generation in your smart contents pane (depending on what you have selected in your scene tab).
I'm not sure what you mean on the fit part. Hair seems to be the worst for me. If I try a hair from Genesis on genesis 3 then I won't get a "fit to" option. I can however cheat and put in on genesis 2 first and then fit to genesis 3 from there.
Odd, that shouldn't matter... If the hair is actually recognized by Daz Studio as hair you should always get a "Fit to..." option - as far as I know -. Could be related to the hair and your used figure perhaps? Either way, I attached a screenshot to showcase what this scenario would look like over here, I simply used "any" hair I found under Genesis, but ... if you can share any specific names then maybe somecan could figure out what's going on on your end....
I do have a "Fit to..." option, just not the correct figure. I don't have an example right off, but I'll be using Genesis 3 and go to put on something from Genesis or something. There won't be a "Genesis" option so I either go with unsupported or genesis 2 and see where my luck takes me.
I suck at renders. Lighting is the worst for me. But I've always taken what someone else has created. Now I want to create things myself more than ever. I took a stab at it a time or two and didn't get far. I'm ready to try again.
That's the spirit! Yah, that's my story right now when it comes to actually creating 3D props, but... As to renders... maybe something to consider: Iray (only usable with an NVidia videocard though) and / or Filament. You'd need a proper background of some sorts ("hdri") which can also apply for some lighting but depending on what you need the whole lighting becomes much less of an issue, let alone a hindrance.
I enjoy working on casual, often plain out silly, stuff and because I often don't intend the render to get too serious I usually then rely on Filament. It's a "viewport render engine" added to the later versions of Daz Studio which I think could help you get started with creating good looking stuff yet without the extra hassle of lighting. It's not perfect! But it might help get more detailed renders without too much issues.
If you do intend to look into this stuff: by default the engine tends to over-expose models, if you want to make full use of it you'll have to add a "Filament draw options node" (see 'create' menu) to help you tone things down (change parameters of this node in the 'Parameters' pane (after you selected it in the scene pane)). Food for thought perhaps?
I didn't know that Iray was only for nvidia, but I do have an nvidia card. It's an old one gtx970. It does what I want. Yeah, an upgrade would be great, but then again there's that whole money thing. The word "Filament" vaguely rings a bell. I'll have to research it. I've never noticed it before anyway. For viewport, I just have it only whatever the default textured mode or whatever. I've never changed it lol. I'll place characters etc and then do a render and then cancel and make adjustments. As you can see, even though I've been working with studio for a while I don't know a lot of stuff and I'm surely not anywhere close to doing things easy lol.
You wouldn't happen to be a zbrush sales person? No seriously, you have me sold on it. I would love to have it, but have no money. The lottery hasn't been kind. I'm still hoping though.
Nope, no hidden agendas on my end. Yah, I tend to get excited about the stuff I use and if you think this was convincing you should read my stories / blog posts about my audio stuff :P In all honesty though I am just as excited about Daz Studio itself, hence the long post :)
Also... Blender may be something to keep in mind as well. Although I personally don't enjoy working with it I'll also be the first to state that the project (and software) as a whole is very impressive. I don't keep taps on other stuff but I do skim YouTube and watch general "3D videos" (referring to the render part ;)) over there, which sometimes also covers Blender. Seriously: there are plenty of people out there who can get some serious results with all that.
Of course... tools don't make the artist, but even so... could be something to look into. My "tube across the figure" example which I mentioned referred to Hexagon, at least Blender also has sculpting options these days which can definitely help to get 'faster' results. And as mentioned: it's free.
My sister and I had a challenge at one point to make an animated movie in blender. of course, it went nowhere. I've never even animated a ball or a stick figure. I do have an idea in mind, but it's like everything else - in my mind.
I have a tshirt and a pair of shorts that I like for a character. The tshirt has 5 textures (3 of them plain colors) and the shorts have 2. I'm going to give this video a try and see if I can expand the options. For others, this would be simple. For me a challenge. We'll see how it goes.
Wishing you all the best!
And I mostly hope you're going to have as much fun with all this as I've had so far. It's always a bit special creating something visual of your own :)
(edit) : forgot my attachement, that's my cue to head to bed :-)
This kind of fell through last night. It's always take step forward and several backward. He used photoshop and then created a layer and then a mask layer for the layer. Paint.net doesn't have mask layers. So I'm still trying to "wrap" my ahead around texturing. I can see if you have a layer for the pattern or I guess UV is the term, and then have a layer for the actual texture as in the fabric or wood or something, and then another layer for color or a pattern of some sort. I sort of get that. What I was working on was a finished product. I was going to trying and add textures to it. The tshirt was a little easier. It was all black with a logo or something on it. I copied part of the tshirt with no logo and pasted over the logo and then I superimposed in another layer something else. It worked, but I'm not sure the "correct" workflow. The shorts were camo so I didn't get anywhere on it. I'll try again today. If I can get it in my head and do it a couple of times, then I can do hundreds if needed and practice.
Finally getting organized. Is it even possible??? LOLwhispers65 said:
I can't say that I'm really a people person as much as a scene/location/object person. For instance, a boat on the ocean, a cyberpunk back alley, an Island, a car, a house, etc. Those things catch my eye more.
Awww, no Genesis eh? We're mortal enemies now :P (naah!)
I like to see how things work. I worked in IT for 34 years and did troubleshooting so figuring things out is kind of in my blood, although I'm a LOT older these days so it takes a while to catch it.
Hmm, since we're in 2020 (rounded up) right now and since you mentioned being older I'm assuming that I can safely subtract 10 - 15 years taking us back to 2005, then subtract 30 years from that and it puts you right in what I consider the golden age of IT: when it call began and when you actually had to know your stuff vs. knowing how to talk your way around a manager and then blaming 'Murphy' for your own shortcomings :P nice!
Also you calling it IT and not ICT gave this away a bit. Yah, I can relate here ;)
I have no plans on moving files around. I don't understand the structure that well. As long as creating catetories doesn't do that. Everything can stay the way it is.
Good plan. There is actually some structure in effect though, which will become more clear if you buy or grab stuff from "other places" besides Daz3D's store, so basically when you have to install your stuff manually.
In short: People => (Figure / Generation) => (Item type) => (Artist name) => (Item name) => "Stuff".
Where 'People' could be exchanged for other things, like Hair or Poses. Of course that's the intended theory, in reality many artists don't seem to care about the library structure at all (not even those selling their stuff through the Daz3D store!) and it's usually quite a mess. Don't feel bad if some things don't make sense to you.... "$library => People => "retracted publisher name" => "retracted artist name" => "Awesome armor"" (which is then filled with both armor props + material presets) makes no sense to me either. And yet... this comes from an official Daz product.
Actually... not really. Items from a lower generation will usually always fit characters from a higher generation. But 'smart' doesn't really account for this feat. None of it. I have this very cool (IMO) troll loincloth, it's really crude which I think really does the character justice. So... I also applied this to some of my female characters from time to time which I think seriously adds up to my fantasy renders. Yah... it'll fit perfectly but you won't be able to set it up using "smart".
Simply put: unless you mess with the meta data yourself then you won't see items from a different generation in your smart contents pane (depending on what you have selected in your scene tab).
I'm not sure what you mean on the fit part. Hair seems to be the worst for me. If I try a hair from Genesis on genesis 3 then I won't get a "fit to" option. I can however cheat and put in on genesis 2 first and then fit to genesis 3 from there.
Odd, that shouldn't matter... If the hair is actually recognized by Daz Studio as hair you should always get a "Fit to..." option - as far as I know -. Could be related to the hair and your used figure perhaps? Either way, I attached a screenshot to showcase what this scenario would look like over here, I simply used "any" hair I found under Genesis, but ... if you can share any specific names then maybe somecan could figure out what's going on on your end....
Can't really comment on this but... I do wonder: why bother?
I tend toward scenes with several people in it and I have used different generations in the same scene. I don't know. I do like variety. I think some things fit better and look more realistic on genesis 3. But I like to experiment around and see what is possible. Character creation is fun. Do they have tails? Braces? Vamprie teeth? Are they transparent?
Ah yes, point taken. Thanks for elaborating! Different people / artists / fans, different approaches :) Yeah, sometimes I get a bit too carried away.
I suck at renders. Lighting is the worst for me. But I've always taken what someone else has created. Now I want to create things myself more than ever. I took a stab at it a time or two and didn't get far. I'm ready to try again.
That's the spirit! Yah, that's my story right now when it comes to actually creating 3D props, but... As to renders... maybe something to consider: Iray (only usable with an NVidia videocard though) and / or Filament. You'd need a proper background of some sorts ("hdri") which can also apply for some lighting but depending on what you need the whole lighting becomes much less of an issue, let alone a hindrance.
I enjoy working on casual, often plain out silly, stuff and because I often don't intend the render to get too serious I usually then rely on Filament. It's a "viewport render engine" added to the later versions of Daz Studio which I think could help you get started with creating good looking stuff yet without the extra hassle of lighting. It's not perfect! But it might help get more detailed renders without too much issues.
If you do intend to look into this stuff: by default the engine tends to over-expose models, if you want to make full use of it you'll have to add a "Filament draw options node" (see 'create' menu) to help you tone things down (change parameters of this node in the 'Parameters' pane (after you selected it in the scene pane)). Food for thought perhaps?
You wouldn't happen to be a zbrush sales person? No seriously, you have me sold on it. I would love to have it, but have no money. The lottery hasn't been kind. I'm still hoping though.
Nope, no hidden agendas on my end. Yah, I tend to get excited about the stuff I use and if you think this was convincing you should read my stories / blog posts about my audio stuff :P In all honesty though I am just as excited about Daz Studio itself, hence the long post :)
Also... Blender may be something to keep in mind as well. Although I personally don't enjoy working with it I'll also be the first to state that the project (and software) as a whole is very impressive. I don't keep taps on other stuff but I do skim YouTube and watch general "3D videos" (referring to the render part ;)) over there, which sometimes also covers Blender. Seriously: there are plenty of people out there who can get some serious results with all that.
Of course... tools don't make the artist, but even so... could be something to look into. My "tube across the figure" example which I mentioned referred to Hexagon, at least Blender also has sculpting options these days which can definitely help to get 'faster' results. And as mentioned: it's free.
It's funny. In the beginning, I wanted to start with tshirts, underwear, and socks. LOL. So we're the same on that. I felt it would be easier than to make a ballroom gown or tuxedo starting out.
If there's one thing I've learned about 3D renders and such over the years it's to start small, learn the basics (not necessarily the technique or steps to make a specific item) and depending on how you approach things: don't try to take on too big of a project to start off, because it could leave you demotivated (though that depends on ... you of course :)). It's one of the reason why I'm quite pleased with my own cellphone :)
He used photoshop. I don't have that anymore, but I'm going to try paint.net. It's free. I can probably do the same steps.
Maybe 2 other things to consider: Photoshop Elements. It's not free but it's a lot cheaper than getting a subscription and IMO it's quite good. Takes getting used to, definitely not perfect (Adobe are weird on some points) but ... I enjoy working with it. Also in combination with their 'Organizer' which can help you set up a database for your media and sort things out without actually physically moving your images (a "Smart Contents" pane in Photoshop, lol!).
Of course you only get what you pay for and sometimes... also true story: at one time I couldn't use this software (which I paid for!) for over 2 months without it crashing on me. Just "poof", and on a high end machine too! Turned out Adobe messed up and eventually fixed the whole thing.
So... there's also Gimp to consider, and that too is very impressive. Free of charge, been using that for years before I started using PSE (which one could argue I only started using because I'm lazy :P) but even so, Gimp most definitely rivals Photoshop when it comes to provided features, though it does have a bit of a learning curve. Still, plenty of documentation available, maybe something to consider?
I have a tshirt and a pair of shorts that I like for a character. The tshirt has 5 textures (3 of them plain colors) and the shorts have 2. I'm going to give this video a try and see if I can expand the options. For others, this would be simple. For me a challenge. We'll see how it goes.
Wishing you all the best!
And I mostly hope you're going to have as much fun with all this as I've had so far. It's always a bit special creating something visual of your own :)
(edit) : forgot my attachement, that's my cue to head to bed :-)
(edit2): Removed my attachement due to nudity, can't redo right now but... hair on G3 shouldn't be an issue perse.
Kiko 8.1 body render whiteukebeauty101 said:
thanks for the help I'll try the different rendering and comment back the results. I have been using the 3Delight default. I'm still figureing the program out lol
Ah, in that case welcome to the club! ;-)
Let me elaborate a bit here then, just to help you get started... You can refer to my attached screenshot ("Filament.jpg") for details about the things I'm listing here:
- First change the viewport render engine, I marked the option in the upper right corner of the viewport. This option is always placed next to the "view menu" (where you can switch between front, back, perspective or a specific camera view). You need to set this to "Filament", which you can recognize by the "roundish" icon.
- Add the 'Filament draw options node'; you can either use the create menu (as shown in my screenshot) but... maybe something to keep in mind for now: you can also change / customize your interface and simply add the option to one of the toolbars (if you look closely at the toolbars in my screenshot you'll notice the option there as well, I became somewhat "addicted" to Filament because it can often provide a good / decently looking render without the long waits).
- Now open the 'Parameters' tab and use the options I marked to lower the light settings. By default Filament is heavily over-exposed, and this is how you can fix that. Of course... I merely marked the options which I prefer to use, others can also have their uses.
After you've done that then you should have something comparable to my "demo" screenshot. If you want to use this as an actual render then you can change the "render settings" and switch the engine to "viewport", this will create a one on one copy of your current viewport. Not very useful when you're using the 'textured shaded' setting but with Filament it can result in a good looking render.
However... do keep in mind that while Filament can provide awesome results it's not perfect. As you can see in my "demo" screenshot her hair looks a bit bland even though I applied a specific color material. This is happening because Filament is not a perfect substitute for the Iray render engine.
Also, for the other random readers: the white legs is what you get to see when you render Kiko with the 3Delight engine. I simply used spot render to illustrate the effect, so... this has nothing to do with Filament (figured I'd showcase the problem).
Hope this can help! And good luck with your renders... like I said: Kiko is also one of my personal favorites, the model is very well designed so, yah, I think you're going to enjoy working with her.
Backface culling and Inverted Hull in 3Delight and IrayUpdate: the shaders in this thread were made with Daz Studio 4.15.0.30.
Update: I was able to modify the Iray face culling shader to get a proper Inverted Hull, see details in my next post.
Original post (with broken images fixed):
In the process of comparing various rendering techniques for my projects, I tried to use the classic Inverted Hull method to get an outline around my toon characters. It's pretty straightforward in 3Delight, but I couldn't quite get it to work properly in Iray.
In the future, I don't think I will be using Iray for NPR (Non-Photorealistic Rendering). Nonetheless, having benefited from others posting about their experiences, I decided to do the same and describe what I tried to do and why, and how it turned out.
The conclusion will be that it is possible to do backface culling in Iray, but there are limitations making the technique inconvenient for Inverted Hull.
A) Inverted Hull in 3Delight
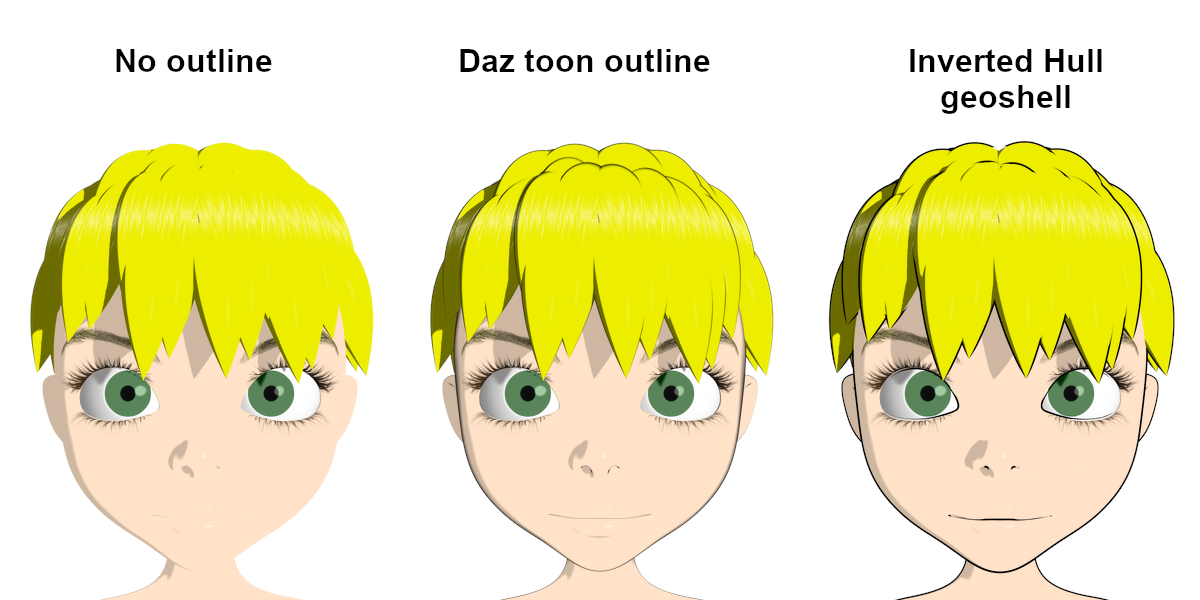
The idea is to add a geoshell to a model and make it so that the faces of the geoshell facing toward the camera are invisible, while the faces facing away are visible. Because most of this backward-facing geoshell is hidden by the model, the end result is a colored outline that fits the model.
The following picture is a comparison of various versions of a 3Delight render: no outline, Daz toon outline (RSL Toon Outline brick) and my implementation of Inverted Hull (geoshell with custom frontface culling shader).
Ideally, I would just flip the normals on the geoshell and rely on automatic backface culling, like it can be done in other tools like Blender.
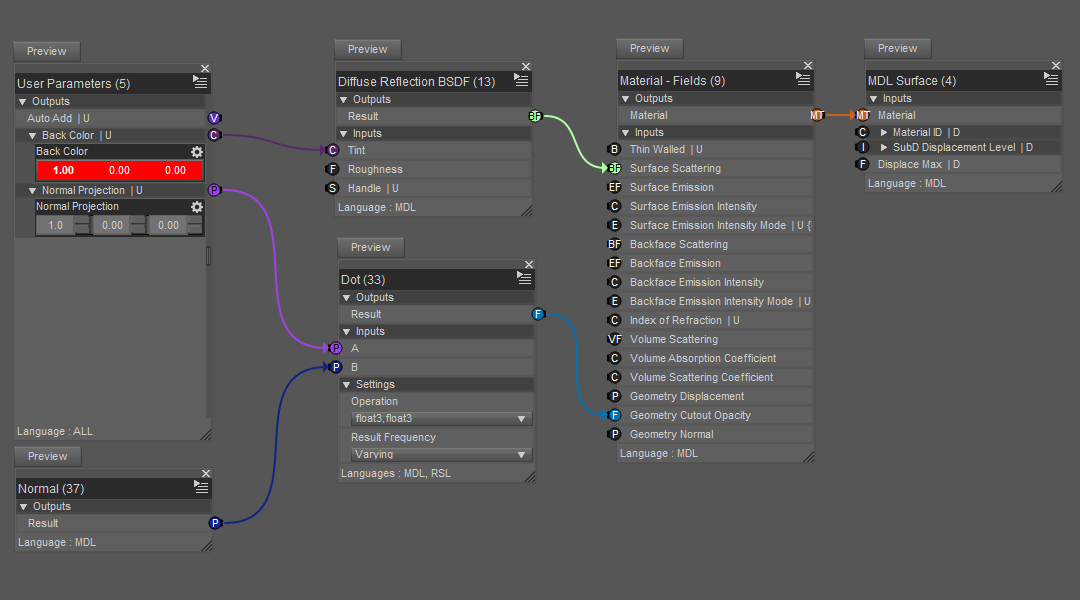
However, I couldn't find a simple way to do that in DS, so I decided to create a custom shader in which the dot product between the "I" vector variable and the normal is used to drive the opacity of the output.
The following picture shows the 3Delight shader used to generate the Inverted Hull effect above.

It works as expected in 3Delight, but can it be done in Iray?
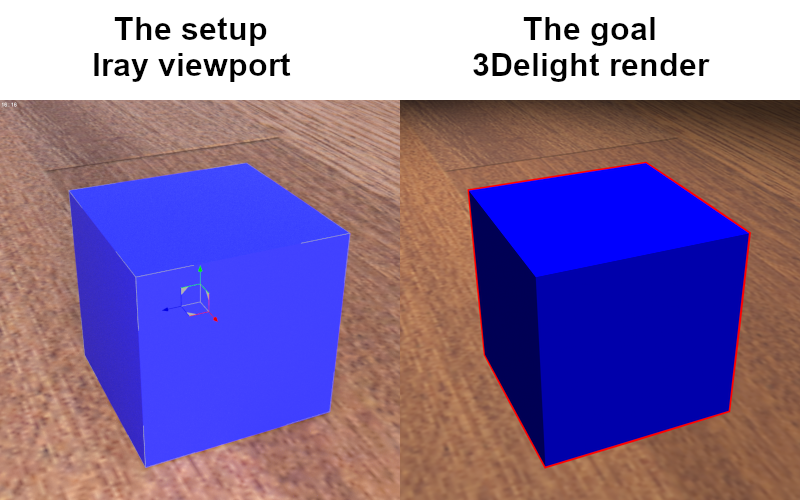
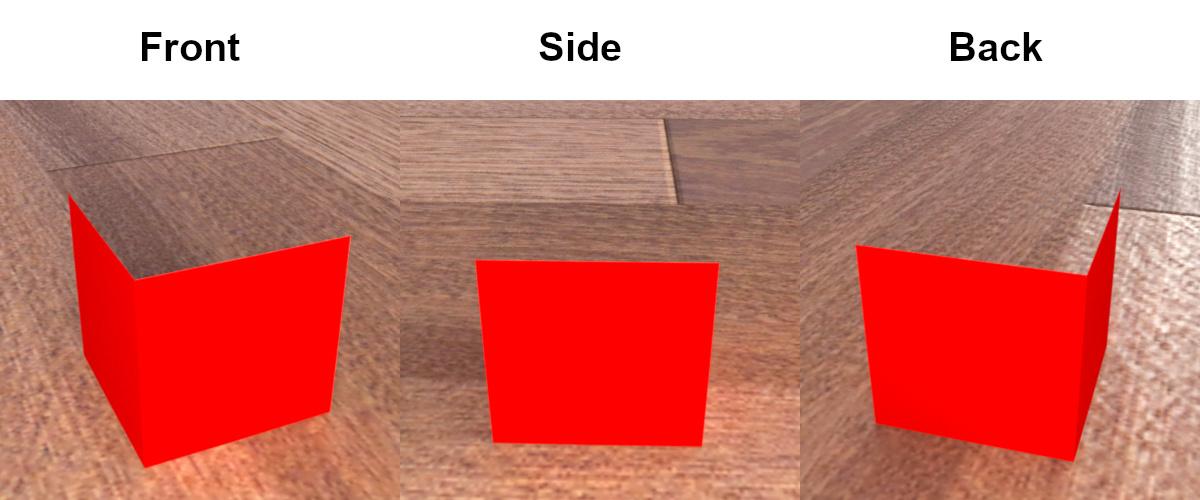
For the sake of clarity, I will be working with the following setup: textured plane + blue cube + red geoshell.
B) Inverted Hull in Iray
Initially, I couldn't find an equivalent to 3Delight's "I" vector variable, so I decided to manually input the position of the camera and subtract it from the pixel position to get the vector. It would have been inconvenient to manually copy the camera coordinates everytime, but if that is what it takes, so be it.
Thanks to a post on two-sided materials I was able to figure out a brick network that theoretically should have allowed me to do what I wanted:
1. Setup the foundation: User Parameters (Utility/User Parameters) → [Tint] Diffuse Reflection BSDF (MDL/Default Modules/df/Diffuse Reflection BSDF) → [Surface Scattering] Materials Fields (MDL/Materials/Material - Fields) → [Material] MDL Surface.
2. Compute the difference (Mathematical/Operators/Subtract) between the manually entered camera position input and the output of the Position brick (MDL/Default Modules/state/Position).
3. Normalize (Mathematical/Standard Functions/Normalize) and compute the dot product (Mathematical/Standard Functions/Dot) with the output of the Normal brick (MDL/Default Modules/state/Normal).
4. Compare to zero (Mathematical/Operators/Greater Than Or Equal) and connect to the [Geometry Cutout Opacity] pin of the Material Fields brick.However, the results were disappointing and very frustrating, because the rendering looked somewhat random: some parts were visible, some parts were not visible, and tweaking the values would sometimes make the whole thing go dark, and I couldn't figure out what was going on.
Some web searching gave me several results seeming to suggest that backface culling in Iray might not be doable at all.
At this point, I had pretty much given up on the idea, but I still wanted to understand exactly why what I was doing was not working.
After hours of trying to connect the bricks in various ways and getting more and more confused, I noticed something surprising with this network:
Here is what happens when orbiting around a cube with this shader (the cube is hidden, only the geoshell is shown):
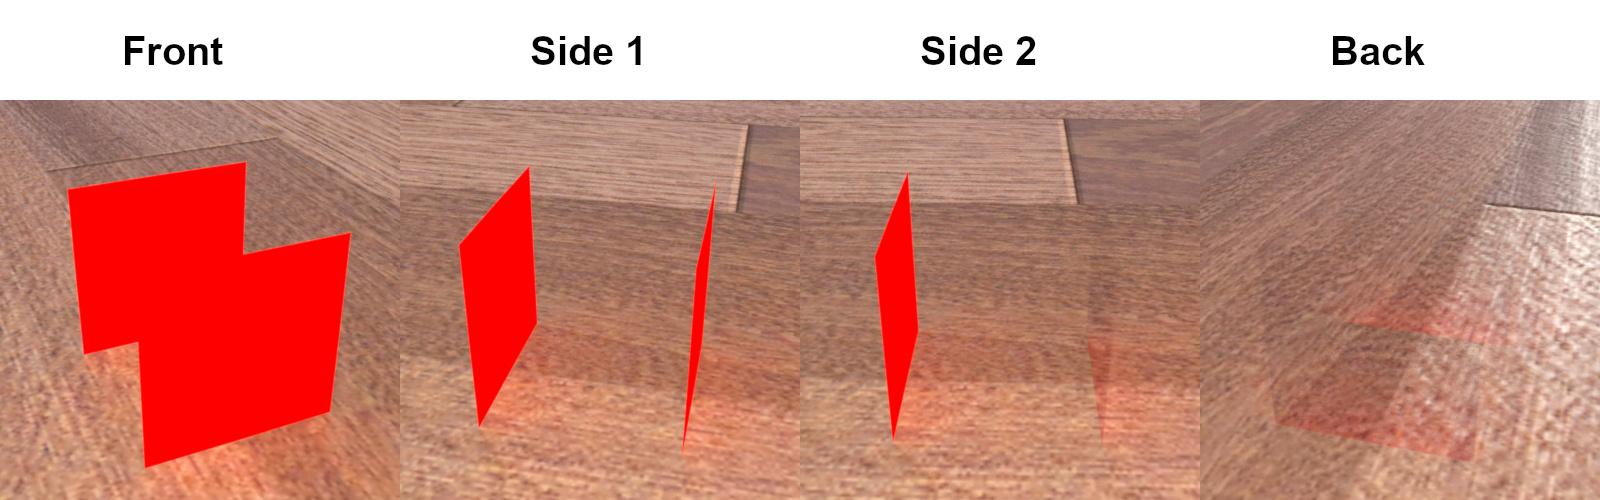
It looks like a combination of frontface and backface culling. So there might be a way after all!
But based on my understanding of the shader, it shouldn't be doing that at all. More specifically, there is no information related to the camera that is being explicitly used in this shader, so the faces should be always invisible, or always visible.
So, how could they appear and disappear so consistently based on the viewpoint?
I don't have a lot of experience with Iray, so to me this was not obvious at all, but after thinking about it for a while, I came up with what sounds like a plausible explanation: each face has two opposite normals, and the Normal brick always returns the one that is facing the camera (same with the Geometry Normal brick).
In the shader above, the dot product selects all the normals that are facing the positive X direction, namely:
- the outside normals of the +X face of the cube;
- the inside normals of the -X face of the cube.
The inside normals of the +X face and the outside normals of the -X face all face backward (-X direction), which is why the faces disappear when the viewpoint moves behind the cube.So now the question is: is there a way to determine which side (inside or outside) the camera is facing?
To find that out, I tried to think of ways that the orientation could affect the rendering. For example, would a positive displament become negative on the other side? Nope, displacements look the same on either side of a face.
What about textures, are the UVs changed on the other side? They aren't! So the texture coordinates contain information related to the orientation of the face.Now, is there a way to get this information? A look at the list of bricks in (MDL/Default Modules/state) reveals bricks named Texture Tangent U and Texture Tangent V. If those are vectors in 3D space, then there is a way:
1. Compute the cross product W=UxV. W should be a vector normal to the surface but pointing only on the outside.
2. Compute the dot product W·N. The signum of this dot product should tell whether the normal that we are looking at is facing inside (<0) or outside (>0).
3. Set the geometry cutout opacity appropriately.For testing purposes, I added a switch to toggle between frontface and backface culling. The shader looks more complicated than it actually is because I couldn't find a brick to compute a cross product, so I had to do it explicitly. Anyway, here it is:
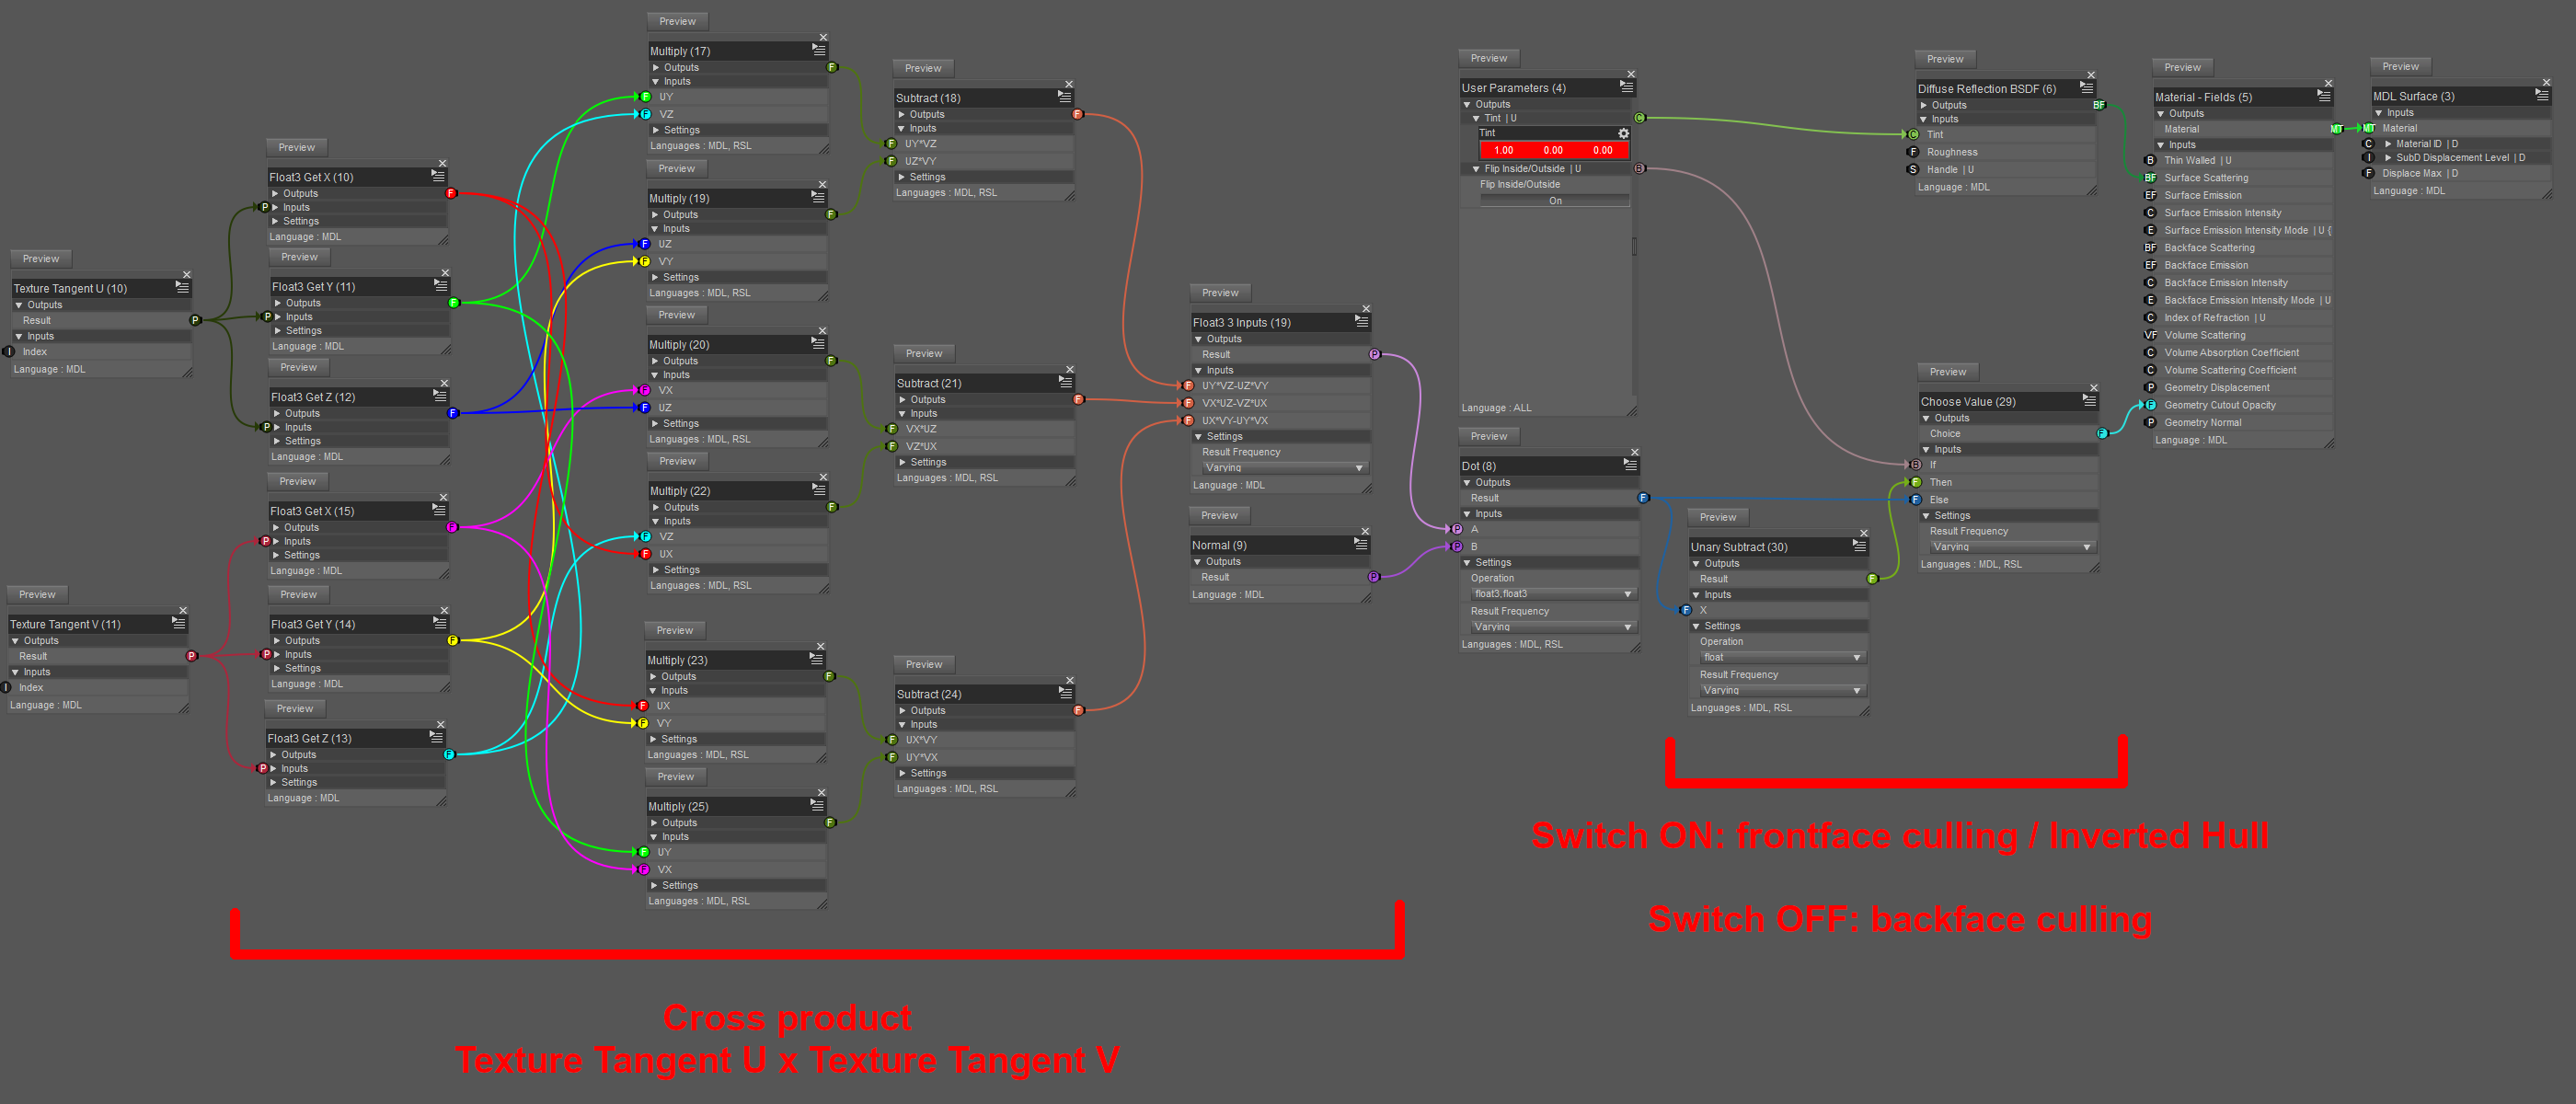
So I did all that, tested it, and... It works!...
Sort of.
The good news is that this shader does backface culling with the switch ON. Here is a visualization after removing the top part of the box with an Iray section plane, so we can see that the geoshell faces are invisible from the inside (again, the cube is hidden, only the geoshell is shown):
By the way, the shader can be applied to anything, it doesn't have to be a geoshell.
Now for the bad news. It seems that setting the cutout opacity dynamically in this way does not make the faces transparent to light rays.
In other words, even though we can see through them, as far as lighting is concerned, they are opaque. The following pictures show the results a couple of experiments, this time with the cube visible and the switch OFF.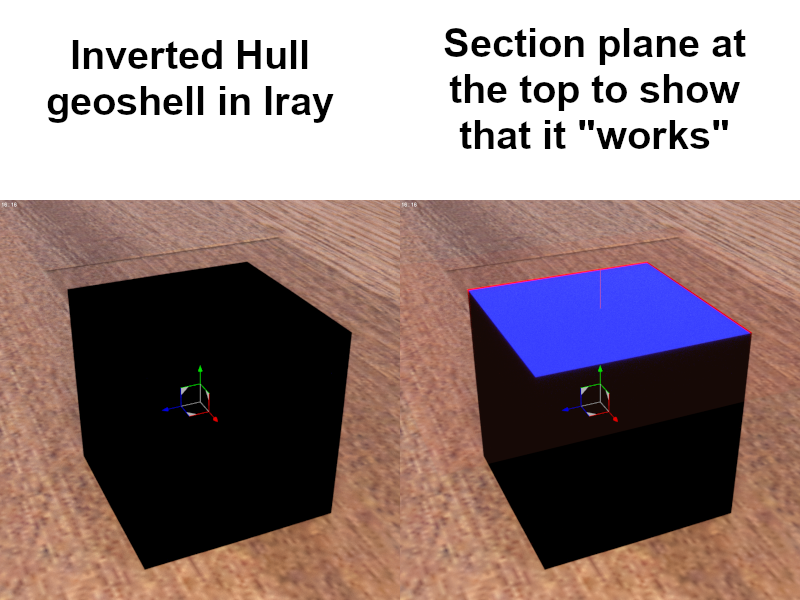

I also tried using a different method, with a two-sided material setup with transparent glass on one side, but as soon as transparency is turned on, it all goes black. My guess is that you can have different materials on each side of a face, but if light is allowed to go through, it has to do it the same way on both sides. So if one side is opaque, then both are. (This is speculation only, as I don't know the actual details.)
C) Filament?
Filament has some kind of face culling, but I can't get it to work properly.
Flipping the normals on the model just makes the geoshell disappear.
And trying to write a shader doesn't work because it looks like Daz's implementation of Filament uses some fixed PBR pipeline internally, and all that matters is the label name of the input. For example, a color input labeled "Base Color" named "Diffuse Color" will allow to color the object even if it is not connected to anything in the shader.
D) Conclusions
It is possible to do backface culling in Iray.
However, light doesn't go through faces that are dynamically culled with geometry cutout opacity, so Inverted Hull doesn't work properly with the technique I presented.
Finally, using the Shader Mixer is... not an enjoyable experience. At all.
Daz Studio 5 development updateBut Occlusion is already present in 4.12 and 4.15, why he's asking for it?
 I used it a lot in the past.
Way better ask for a better implementation of Filament and fix to its few (for now) bugs, it will be great see it in the list along with 3Delight and IRay.
Kiko 8.1 body render whiteShelLuser said:
In addition to the used version I think you should also mention what render engine you're using, without that piece of info this will become a wild goose chase.
Anyway, owning Kiko 8.1 myself (one of my favorite models!) I think I know what's up: you added the base model "as-is" and then tried to render her using the 3Delight engine, when I do that it gives me the exact same results. While there are different material settings available I can only get a normal render out of her using either Iray or the Filament viewport render engine (if you go this way then don't forget to add a filament node to tone down the lighting).
However... when looking at the storepage I noticed that it does mention "normal map on/off presets", even so I can't find that so quickly. Both provided material maps ("All maps HD" and "All maps") provide me with the same result: a white figure with 3Delight.
thanks for the help I'll try the different rendering and comment back the results. I have been using the 3Delight default. I'm still figureing the program out lol
Switching the Viewport from Filament (PBR) back to Texture Shaded turns the background black.Hi Richard,
It's hard to let go of this problem. Here are a couple of additional observations.
1. This problem is triggered if I select either the Filament (PBR) or NVIDIA iRay draw modes. In both cases the background turns black if I switch back to Texture Shaded mode.
2. Two screen shots are attached showing the style of Texture Shaded draw mode icon both before and after selecting either Filament or NVIDIA draw modes.
Kiko 8.1 body render whiteIn addition to the used version I think you should also mention what render engine you're using, without that piece of info this will become a wild goose chase.
Anyway, owning Kiko 8.1 myself (one of my favorite models!) I think I know what's up: you added the base model "as-is" and then tried to render her using the 3Delight engine, when I do that it gives me the exact same results. While there are different material settings available I can only get a normal render out of her using either Iray or the Filament viewport render engine (if you go this way then don't forget to add a filament node to tone down the lighting).
However... when looking at the storepage I noticed that it does mention "normal map on/off presets", even so I can't find that so quickly. Both provided material maps ("All maps HD" and "All maps") provide me with the same result: a white figure with 3Delight.
So in the last 2 installs of DS Pro 4.15 goes in application folder why...?No custom installer needed just drag and drop right now...Will find out if it works on the beast today later..I am wanting to know why DAZ CENTRAL puts the main daz folder in apllications...? I am going to try today get the plugin working then make some IRAY presets and see if it works in filament...just want to know why DC is putting main program in 3d applications....must be new...?
Switching the Viewport from Filament (PBR) back to Texture Shaded turns the background black.I've been troubleshooting for a couple of days now, and still can't figure out what's happening.
From observation, it appears that switching the Viewport draw mode to Filament changes the default lighting model for the entire DAZ session. Strange that simply re-loading a saved Workspace layout will fix the situation until Filament is re-selected. Everything renders properly in Texture Shaded mode, but the background being solid black is quite annoying.
I'd like to use Filament from time to time, but at this point, it's poison for my runtime environment.
Thanks for the effort, Richard.
AIUTO...CHI CONOSCE L’ITALIANO? PARTE TREDICICongratulazioni per l'uscita dell'item su Renderosity!!!
* * *
Che problema hai stavolta?
Sempre il solito: la povertà
 o almeno la sobrietà per le quali, maledette sciagure, non posso comprare allo stato una macchina decente... posso metterci tutte le pezze che voglio né pretendo un PC stellare munito di una RTX 3090 da 24 GB di Vram: ma una macchina per lavorare decentemente, quando lo desidero, con Iray ma anche per poter solo far muovere nella viewport i personaggi in tempo reale senza lag di decine di secondi, che carichi una figure decentemente vestita in un tempo ragionevole, che renderizzi - se voglio - a 8000 x 10.000 in tempi magari biblici ma senza mettersi a ridere, cioè a crashare immantinente alla richiesta, quello sì.
Per farvi capire: non ho porte USB 3.0 e le schede PCI Express non funzionano, perché tutti quelle che ho provato richiedono lo standard PCI-E 2.0, e quindi i dischi esterni sono connessi con lo standard USB 2.0!!!
Poi posso usare Filament, Arnold, (l'ottimo, mi pare) Octane e fors'anche - se funziona ancora - Luxrender via Reality ecc. Ma son sempre complicazioni.
Anyone know of any tricks to speed up active pose responsiveness with fibermesh / stand hair visibleI struggle with same issue. Take a look at your CPU usage.
Right now I have a scene "In Texture Mode" up when idle and desktop background it's using 17% of CPU, nothing happening in scene. 3 characters all with fibermesh hairs.
I switch to " Wire Bounding Box Mode" and it drops to 0%.
I switch to "Solid Bounding Box Mode" it's at like .2%
"Wireframe" 10.5%
"Lit Wireframe" 11%
"Wire Shaded" 12%
"Smooth Shaded" 15-17%
"Wire Texture Shaded" 12%
"Texture Shaded" 17%
"Cartoon Shaded" 17%-18%
"Filament" After it establishes about 20%
"Iray Mode" Breaks, so dunno.
--- next test
Daz open idle nothing in scene 0%
Daz with stock G8.1M 0%
G8.1M + CC Beard Boss for G8 0%
Mike 1954 Hair (heh) 0% I figured that was it, it's a resources hog but no.
So what I need to do is start just deleting everything in the scene one at a time till I find the culprit(s).
I've found using some g3 clothing and hair on g8 characters makes it nearly impossible to pose the character. Using the character clones for fitting actually seems to help with that.
AIUTO...CHI CONOSCE L’ITALIANO? PARTE TREDICIColgo l'occasione per informarvi che è uscito un mio primo prodotto (a pagamento) su Renderosity per Halloween:
https://www.renderosity.com/rr/mod/bcs/jack-lantern-for-g8m/151596
Purtroppo non me lo hanno voluto far mettere compatibile con IM perchè gli americani sono cretini e dunque non sanno come trovare le cartelle.. i file vanno estratti e copiati manualmente (e non sono catalogati, per cui non appaiono come prodotti in DAZ). Per i freebe non fanno problemi ma per i prodotti a pagamento invece si
In compenso è compatibile con Iray e anche con Filament per cui potete usarlo per farci render veloci.Il PC+ for a day è riservato a chi ha il PC+.
Se però aggiungi nel carrello qualsiasi cosa (basta sopra a 1 centesimo) puoi avere gratis i tre prodotti (lampade, fiori e l'anniversary pack 4)... basta che li metti nel carrello insieme
Che problema hai stavolta?
Switching the Viewport from Filament (PBR) back to Texture Shaded turns the background black.Thanks Richard.
I have a default scene that loads on startup with a stardome background. I always start DAZ Studio with the Viewport in Texture Shaded mode.
When I then switch to Filament mode, everything looks fine. If I switch back to Texture Shaded mode, the stardome goes black. Every other background or skydome/sphere/box from that point on also loads as black until I reload the Workspace layout.
I checked all of the settings you described both before and after switching to and from Filament mode and they stay the same.
Any other ideas? Could that have anything to due with some buried iRay setting affected by Filament?
Switching the Viewport from Filament (PBR) back to Texture Shaded turns the background black.I don't see this - does it happen if you start with an empty scene, create a new primitive, switch to Filament and then back to Texture Shaded?
There are two ways the background might go black - a solid background colour (Window>Panes(Tabs)>Environment, Type set to Backdrop) or a Viewport background colour (Window>Style>Customise Style, it's in the 6.Viewports section)
Switching the Viewport from Filament (PBR) back to Texture Shaded turns the background black.I've only started experimenting with the Filament (PBR) viewport setting.
When I switch back to Texture Shaded from Filament, the background turns black. Only by reloading the Workspace layout will the background image be restored.
Why?
No Viewport/Main WindowRichard Haseltine said:
At least that probably means it isn't the database corrupted and needing a reset. Can you recall which Viewport Drawstyle the General release was using when it was restarted?
Thanks for having a think ... I think the Beta started up in Filament, but I can't be sure. When I went to bed I am fairly sure I left it in texture shaded, and when I tried to use it this morning there was no main window, and hasn't been since.
I am retired, I use DAZ for hours in a day most days, my system is stable, I don't mod or mess with it, the last Win10 update was days ago, and I've had several years of trouble-free DAZ, so this came out of nowhere :-(
How do you get this hair to appear?https://www.daz3d.com/dforce-longflip-hair-for-genesis-8-females I bought this hair on September 19th, but it only seems to appear in the smooth or texture shader, not the Filament PBR or (importantly) the Iray shader. What should I do about this? Is there a way to fix it?Daz 3D is part of

Connect
DAZ Productions, Inc.
7533 S Center View Ct #4664
West Jordan, UT 84084Licensing Agreement | Terms of Service | Privacy Policy | EULA
© 2026 Daz Productions Inc. All Rights Reserved.